Long Shots
In the studio, a long shot takes in an area of around 3.5 meters wide by 2.5 meters high (12 by 9 feet) or more.
Using long shots
A long shot opens up a number of productional opportunities:
• It shows the audience where the action is taking place, and helps them to get their bearings. They can see the layout and character of the surroundings, and the relative positions of people, furniture, etc.
• They can see how one part or section of a setting connects with another.
• They can see a complete group (e.g. a choir or orchestra) and locate people within that group.
• Then can follow wide movements; e.g. in a dance team.
• They can discern an overall pattern of movement or a display.
• The long shot immediately conveys a particular ambience or mood for the action. They are influenced by broad atmospheric and environmental effects that may be lost in closer shots (i.e. lighting and scenic treatment).
Some directors make it a practice to include an introductory establishing shot as soon as possible in each new scene, to orientate the audience.
Operational problems in continuous production As you saw earlier, long shots can show too much!
• The wider view may overshoot the setting, which then has to be extended.
• Cameras and lights may have to be positioned further away from the action than normal, to avoid their coming into shot.
• Being further away, lighting may need to be more powerful.
• Cameras may get lens flares from back light.
• Cameras may have to use narrow lens angles for closer shots.
Cameras in shot
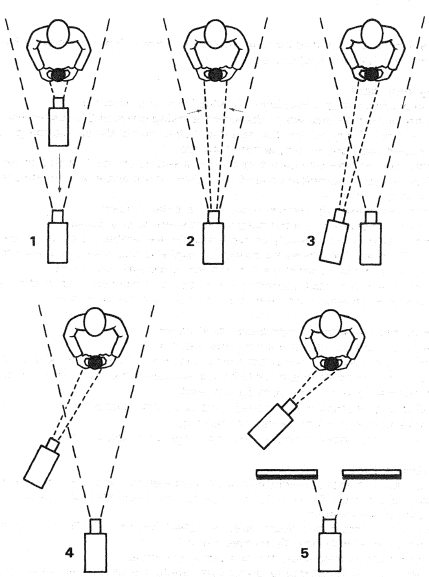
While the odd camera appearing in shot may be quite acceptable in some kinds of production, in others it would be a disaster! There are several regular ways of avoiding this happening:
• Dolly the camera back from close to distant viewpoints. (Time-consuming. The move may be artistically inappropriate.)
• Zoom out to a. long shot. (But perspective changes.)
• Cut from a ‘closeup camera’ on a narrow angle lens to another beside it using a wide angle lens. (Perspective changes.)
• Position the ‘closeup camera’ at an oblique angle; even hiding it behind scenery.
• Edit in separately recorded closeups or cutaways.
• Whenever a camera dollies back or zooms out, there is always the danger that it will reveal another. It may be necessary to pull back (clear) other cameras before cutting to the wide shot, to avoid this happening.
Transitions from close to distant viewpoints
To avoid another camera appearing in picture when changing from closeup to a: longer shot, various methods are used: 1. Trucking (tracking) the camera out.
2. Zooming out. 3. Cutting ietween nearly equidistant cameras (similar. viewpoints) with different lens angles. 4.Obliquely angled closeup camera (out of shot, but closer). 5. Hidden closeup camera.

