Demonstrations
A good demonstration doesn’t simply display. It arouses curiosity. It intrigues.
Organizing demonstrations
Here are some important practical points to look out for when arranging any demonstration:
• Above all, consider your audience. Who is the demonstration for? is it to be a general survey, or to discuss a particular, feature? Do you need to simplify, or can you rely on their having certain knowledge and experience already?
• Don’t try to cover too much in a single program. It is easy for information to become too superficial, or too congested.
• Remember the old maxim : ‘Outline the program topic – Tell them about it – Then give a summary of the main points’.
• Wherever possible, have one section lead on to the next. If there are several isolated topics, have visual bridges (graphics/titling) between them.
• When organizing items to be demonstrated, get full details about such factors as dimensions, weight supply requirements (power, water, compressed air), expendable materials needed, safety precautions necessary, process durations, transportation problems, insurance, etc.
• Always check apparatus on arrival, and before/after use. Make sure it is carefully collected and returned or stored.
• Try to arrange items in a consecutive sequence, rather than moving to and fro between them.
• In a bench demonstration, reduce visual clutter by removing (or keeping out of shot) anything you’ve finished with (e.g. dirty dishes, previous items).
• A demonstrator preoccupied with mechanics may not be able to follow a prompter. So words and durations can vary between. rehearsals and takes. When a program’s duration is critical, it may not be easy to cut items if it overruns, or ‘pad out’ if it underruns. To simplify editing, consider including extra ‘cushion’/‘buffer’ sequences that can be expanded, shortened or dropped to suit the scheduled duration.
• A long demonstration can become boring to watch. Rather than show it all, include examples of each step of the process, or make a start-to-finish recording, and show just its important stages (a particularly useful approach for unreliable processes!).
Demonstrations in closeup
To assist focusing and framing when taking very close shots:
• Begin with a longer shot before cutting to detail. (This shows relationships and scale.) When in doubt, go to a wider shot, and insert detailed closeups during editing.
• Don’t continually zoom in and out on details. It’s irritating to watch. Camerawork is unsteady when zoomed in to detail (focusing; shake).
• Don’t put things in and out of an empty shot.
• Keep the demonstrator’s hand movements slow and restricted in close shots. It may be better to use a pointer or a pen to indicate fine detail, than point with a finger.
• Check for distortion, shadowing, or light reflections.

The inset
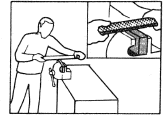
An inset enables us to show detail and overall effect simultaneously.

Working to the camera
Whenever possible, the demonstrator should work to the camera.

Camera viewpoint
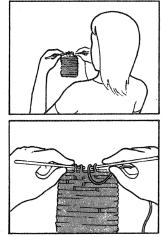
Sometimes the demonstrator cannot work to the camera. Aim to get the best viewpoint available in the circumstances.

Comparisons
To compare situations, a split screen can-show before and after conditions.
