
Data form validation is a very common use case in web development. The end user will know immediately if they've made a mistake when you create validation rules in your application.
In this recipe, we'll take a look at two examples on validation. In the first example, we'll use a component and check data based on a few simple validation rules. In the second example, we'll use a popular Ember add-on to make things easier.
- In a new application, create two components and install the validation add-on:
$ ember g component val-example
$ ember g component val-example2
$ ember install ember-cp-validations
The
val-examplecomponent will be the first example. Theval-example2component will be the second example using theember-cp-validationsadd-on. - Update the
val-example.hbscomponent template file:// app/templates/components/val-example.hbs Enter Age:<br> {{input value=num}} <button {{action 'check'}}>Check</button><br> {{error}}<br>This component asks for an age. If the button is clicked, the
'check'action will be triggered. A simpleinputhelper is used to capture the input. The{{error}}property displays the error text. - In the
val-example.jscomponent file, add acheckaction and simplevalidationmethod:// app/components/val-example.js import Ember from 'ember'; export default Ember.Component.extend({ num: null, actions:{ check(){ if(this.validation(this.get('num'))){ this.set('error',''); } else{ this.set('error','Error in box!'); } console.log(this.getProperties('num')); } }, validation(value){ return Number(parseInt(value))==value; } });The
checkaction calls thevalidationmethod. Thevalidationmethod's only purpose is to returntrueif the value is a number and returnfalseif the value is not. This result is used to set theerrorproperty that will be used in the template.This is a fairly simple example. It shows what you might need to validate the field. Another example might be creating a new computed property and have it depend on the
numproperty. Either way will work. - Add the component to the
application.hbstemplate file:// app/templates/application.hbs <h2 id="title">Welcome to Ember</h2> {{outlet}} {{val-example}}The
val-examplecomponent will render at{{val-example}}. - Run
ember serverand enter a non-numeric value in the textbox. The following window will be displayed: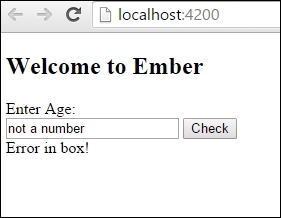
The Error in box! message is displayed because a number was not entered. This was triggered after the Check button was clicked.
For the next example, we'll use an Ember add-on instead.
- Update the
val-example2.hbstemplate file so that it can accept an e-mail and number:// app/templates/components/val-example2.hbs Enter Age:<br> {{input value=num}}<br> <div style='color: red'> {{message}}<br> </div> Enter Email:<br> {{input value=email}}<br> <div style='color: red'> {{emailMessage}}<br> </div> <button {{action 'check'}}>Check</button><br>This second component is a little more complicated than the first. We'll be validating two form fields, a number field and e-mail field. In addition, we'll be surrounding the message in a
divtag that will be used to help setcolorof the text. Both fields will be validated after pressing thecheckbutton. - Create a new
validations.jsfile in thecomponentsfolder:// app/components/validations.js import { validator, buildValidations } from 'ember-cp-validations'; export default buildValidations({ num: [ validator('number',{ allowString: true, integer: true, message: 'Error! This is not an integer!' }), validator('presence', true) ], email: [ validator('format', { type: 'email', message: 'This is not an email address!' }), ], });This file is needed for the
ember-cp-validationsadd-on. In this file, we define our validation rules. We begin by naming each property and defining the validations needed. We can validate many different types of inputs. A list of these validations can be found at http://offirgolan.github.io/ember-cp-validations/docs/index.html.The
validatoradd-on comes with several prebuilt messages. We can overwrite these messages by setting themessageproperty. In the preceding code, thenumandemailvalidators have custom messages. Thenumvalidator checks to see whether any value is in the field and whether it's a number. The e-mail field checks to see whether the value is in the format of an e-mail address. - Add a new
checkaction to the component:// app/components/val-example2.js Import Ember from 'ember'; import Validations from './validations'; export default Ember.Component.extend(Validations,{ num: null, email: null, message: '', emailMessage: '', actions: { check(){ this.set('message',''); this.set('emailMessage',''); this.validate().then(({model, validations})=>{ if(validations.get('isValid')){ this.set('message',''); this.set('emailMessage',''); } else{ if(model.get('validations.attrs.num.isInvalid')){ this.set('message',model.get('validations.attrs.num.messages')); } if(model.get('validations.attrs.email.isInvalid')){ this.set('emailMessage',model.get('validations.attrs.email.messages')); } } },(errors)=>{ console.log(errors); }); } } }); - After setting up the
validationsfile, you can add it to the component as a mixin. After adding thevalidationsmixin, you'll have access to thevalidate()method. This is a promise that returns after it validates the fields:… this.validate().then(({model, validations})=>{ if(validations.get('isValid')){ this.set('message',''); this.set('emailMessage',''); } …The
validationshave anisValidproperty. This will only returntrueif both properties,numandemail, passedvalidation. - We can check each individual validation as well:
…
 else{

    if(model.get('validations.attrs.num.isInvalid')){
      this.set('message',model.get('validations.attrs.num.messages'));
    }
    if(model.get('validations.attrs.email.isInvalid')){
      this.set('emailMessage',model.get('validations.attrs.email.messages'));
…
We can access the
modelproperties in the component. Thismodelwill have both thenumand emailproperties. We can usevalidations.attrs.num.isInvalidto check whether the validation failed. If it did, we can setmessagewe created earlier withvalidations.attrs.num.messages.In the preceding code, if the validation is not valid, then we set the error message that will be displayed in the template after the
checkaction is triggered.This add-on is very flexible. We can create our own custom validations if needed.
- Update the
application.hbsfile with the second component:// app/templates/application.hbs <h2 id="title">Welcome to Ember</h2> {{outlet}} {{val-example2}}This will display the second component example in our application template.
- Start the Ember server and enter invalid values for age and e-mail, and click on the Check button. The following image will be displayed:
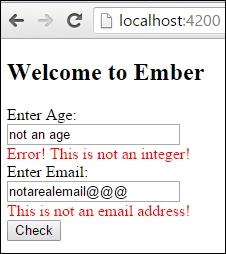
After clicking on the Check button, an action is triggered. The validators we created earlier check the text and return whether the text is valid or not. In this instance, the text is not valid so it displays an error message.
Data form validation is an extremely important feature of any web app. Any Ember application that has any type of user forms will need to validate data. Ember.js can retrieve data from templates and validate it. Other properties can be used to toggle or set error messages to be displayed.
The Ember CP validations add-on makes this process easier. You can create your own validations or use some of the built-in ones. This code uses computed properties and other methods to validate and report back issues to the user.
There are several other popular validation add-ons available on Ember. Check out this website for more information: http://emberobserver.com/categories/validations