Chapter 2. Preparation Phase
This chapter covers the following topics:
• Creating a Computer Security Incident Response Team (CSIRT)
• Building Strong Security Policies
While computer networks and sophisticated applications have allowed individuals to be more productive, the need to prepare for security threats has increased dramatically. Guarding against security threats includes preparing the infrastructure to protect not only against worms, viruses, and external denial of service (DoS) attacks, but also from internal threats such as theft of information and corporate espionage.
A six-step methodology on security incident handling has been adopted by many organizations, including service providers, enterprises, and government organizations. This methodology is composed of the following steps:
• Preparation
• Identification
• Classification
• Traceback
• Reaction
• Postmortem
This chapter covers the first and most crucial step in this methodology—the preparation phase.
Risk Analysis
Risk analysis is crucial. You need to know what you are protecting and how you are protecting it. What are your critical systems and assets? What constitutes your organization today? These are some initial questions you should ask yourself when starting any risk analysis process. You must know the difference between threats and vulnerabilities. Threats are occurrences that can affect a system or an organization as a whole. Examples of threats include fraud, theft of information, and physical theft. Vulnerabilities are flaws that make a system, an individual, or an organization exposed and susceptible to a threat or an attack.
On several occasions, when you ask security engineers, managers, architects, and executives to list or describe the critical systems of their organization their answers are contradictory. One of the main goals that members of an organization should have is to understand their environment and what they are trying to protect and what risks are most imminent.
Several methods of risk analysis have been published in books, websites, magazines, and blogs. Some take the quantitative approach; some take the qualitative approach; and others measure impact versus probability. This chapter does not favor one method over another but instead presents several best practices when analyzing security risks.
Threat Modeling
The primary goal of any threat modeling technique is to develop a formal process while identifying, documenting, and mitigating security threats. This process has a huge impact on any organization because it is basically a methodology used to understand how attacks can take place and how they will impact the network, systems, and users.
Organizations have adopted several threat modeling techniques. For example, Microsoft uses the DREAD model. The DREAD acronym defines five key areas:
• Damage potential
• Reproducibility
• Exploitability
• Affected users
• Discoverability
In the DREAD model, the first step is to quantify or estimate the damage potential of a specific threat. This estimate can include monetary and productivity costs followed by a probability study on the reproducibility and exploitability of the vulnerability at hand. In addition, the first step should identify which users and systems will be affected and how easily the threat can be discovered and identified.
Note
You can find more information about Microsoft threat modeling at http://msdn2.microsoft.com/en-us/security/aa570411.aspx.
Microsoft also has a threat modeling tool at http://msdn.microsoft.com/msdnmag/issues/03/11/resourcefile/default.aspx.
Another threat modeling technique is to create attack trees. Bruce Schneier, the chief technology officer of Counterpane Internet Security and the inventor of the Blowfish and Two-fish encryption algorithms, initially introduced this method. Attack trees represent attacks against a system or network in a hierarchical tree structure. The root node describes a goal, and the leaf nodes are various ways of reaching such a goal.
For example, the main goal of a specific attack may be to interrupt the services of an e-commerce web server farm. This goal will be the root of the tree. Each subsequent "tree branch or leaf" describes the methods used to take down that web server farm (that is, sending millions of spoofed TCP packets, compromising zombies on the Internet to launch DDoS attacks, and so on).
Note
A detailed white paper on attack tress by Bruce Schneier is posted at http://www.schneier.com/paper-attacktrees-ddj-ft.html.
Several other threat modeling techniques suggest the use and understanding of system and device roles. Identify what the network devices do and how they are used and placed within the infrastructure. Document and identify their functionality in the context of the organization as a whole; furthermore, configure them according to their role. For example, the same configuration of Internet-edge routers is not suitable for data center devices. Create easy-to-understand architecture diagrams that describe the composition and structure of your infrastructure and its devices. Elaborate the diagram by adding details about the trust boundaries, authentication, and authorization mechanisms.
Cisco has developed a methodology that goes beyond typical threat modeling techniques. This methodology or framework is called the Cisco Operational Process Model (COPM). COPM is a process model that was initially designed for service providers but has recently been adopted by many other organizations. This threat-mitigation practice goes beyond a single product or technology. The COPM framework helps you to prepare and anticipate the lack of operational security expertise by minimizing threats that cannot be completely controlled while controlling those that can be.
Note
Chapter 7, "Proactive Security Framework," describes COPM in detail.
COPM focuses on both business and technology groups throughout an organization, while also focusing on the availability and reliability of the infrastructure and its systems.
Total network visibility and complete control of elements is crucial to maintain services and business continuity. COPM is designed to introduce flexibility while improving security without relying on a single technology or product. Multiple technologies and features are used throughout the network to obtain visibility into network behavior and to maintain control during abnormal behavior.
How good is your network if you cannot manage it when an outbreak or attack is underway? Visibility is twofold. Network administrators should always have complete visibility of networking devices and the traffic within their infrastructure. At the same time, intruders must not have visibility to unnecessary services or vulnerable systems that can be exploited within an organization. The following section describes how you can perform periodic security penetration tests and audits to assess and evaluate the visibility of vulnerable systems within the organization. The "Infrastructure Protection" section later in this chapter describes several techniques that you can use to maintain the visibility of devices and systems within your infrastructure.
Penetration Testing
Penetration testing is often referred to as ethical hacking. Using this procedure, a trusted third party or a security engineer of an organization attempts to compromise or break into the network and its devices by scanning, simulating live attacks, and exploiting vulnerable machines to measure the overall security posture. Penetration testing techniques are of three common types:
• Black-box
• White-box
• Gray or Crystal-box
In the black-box technique, the tester has no prior knowledge of the network of the organization. Typically, the organization only gives the tester information about a specific system or domain for the "externally attempted" hack. In the white-box technique, the tester has been given more information (that is, network diagrams, list of devices, and so on) prior to starting the tests. The crystal-box test occurs when the tester is provided with an account on the internal network and standard access to the network.
Note
This section describes and lists several tools that you can use to assess the security posture of an organization. However, it is strongly recommended that you do not use any of these if you are unsure of the complications and side effects they may have in your organization. On many occasions, it is better to hire a third-party company to perform such tests.
Numerous security tools are designed to automate and ease the penetration testing process. These tools can be a combination of commercial vulnerability assessment tools and free open-source tools. Professional ethical hackers also develop their own tools to automate the test or to specifically test for new vulnerabilities. Commercial tools work by using sets of thousands of preset configurations or vulnerability tags (vuln-tags). Some of these commercial tools are focused on different areas (for example, web security, wireless security, and so on). Examples of commercial tools are Qualys Guard (http://www.qualys.com), and e-Eye Retina (http://www.eeye.com/html/index.html).
Hundreds of open-source tools exist, ranging from meticulously developed and supported tools to small scripts developed to perform a specific task. Table 2-1 lists some of the most commonly used open-source tools.
Table 2-1. Common Open-Source Security Tools

You can combine penetration testing with infrastructure device configuration audits to provide a comprehensive study of the security posture of an organization. For instance, on completion of the penetration test, you have an understanding of the current vulnerable systems within your organization. Even more, you have determined how visible these systems are to a potential attacker. You can combine this information with an analysis of the configuration of your infrastructure components, such as routers and firewalls.
Note
Some commercial tools are designed to perform device configuration and firewall rule analysis. Examples of these tools are the Cisco Configuration Assurance Solution (CCAS) (http://www.cisco.com/en/US/products/ps6364/prod_bulletin0900aecd802c8487.html), the AlgoSec Firewall Analyzer (http://www.algosec.com), and Security Risk Auditor from Redseal Systems (http://www.redseal.net).
CCAS automatically completes systematic audits of the production network configuration to detect device misconfigurations, policy violations, inefficiencies, and security gaps.
Cisco Advanced Services for Network Security group also provides comprehensive security posture assessment services, including detailed network security architectural reviews. For more information, go to http://www.cisco.com/en/US/products/svcs/ps2961/ps2952/serv_group_home.html.
The manual analysis of complex firewall policies is almost impossible because it is very time-consuming. As a result, it is difficult to detect many risks. The use of automated tools or professional services is a must.
Tip
Conduct penetration tests and network security architectural reviews periodically, because new threats and vulnerabilities are introduced on a daily basis. Doing so allows you to measure the effectiveness of the methods used to improve the overall security after the initial tests and architectural review.
You need to understand the confidentiality requirements and risks of these types of tests. To ensure unbiased results, executives often hire third-party security professionals to perform high-level audits within the network and infrastructure readiness tests without telling their own security engineers and managers. The results of such tests are often kept a secret until a contingency plan has been built. You also need to understand the ethics and laws governing these types of activities. If you are a security professional hired by an organization to perform these types of tests and reviews, going outside your contractual boundaries is not only unethical, but also illegal.
Note
The Cisco Press book titled Penetration Testing and Network Defense by Andrew Whitaker and Daniel P. Newman covers all the best practices of penetration testing in detail.
Social Engineering
Social engineering is one of the most dangerous risks that exist today. It goes beyond the most rigid and sophisticated security products and infrastructure components. How good is it to have the most expensive and elaborate authentication system in the world if your employee is going to give an outsider the password to access your network? The social engineering problem can only be solved with one of the most fundamental tools—education.
Some people say that social engineering comes in two types: technology based and human based. An example of technology-based social engineering is the use of technical tools to fool users into providing sensitive information. Human-based social engineering is the most dangerous of the two types. It can be accomplished through a simple phone call or by listening to a conversation in a break room within your organization. The attacker can use human psychology to obtain sensitive information. For example, someone can call one of your employees and try to obtain chunks of information that can be put together for further intrusion. An attacker can call one of your employees identifying himself as a security engineer who is performing a routine maintenance check on your system and ask for such sensitive information as IP addresses, gateways, and even passwords. Phishing is one of the most common types of social engineering today. The most common targets are financial institutions and online service companies. Phishing itself is not new, but its frequency has increased over the past few years. The typical phishing e-mail is the one claiming that your financial account information with a specific financial institution needs updating. The e-mail includes a link that sends you to a fake website where you are instructed to enter your password to update your information.
You need to be aware of another not-so-sophisticated social engineering technique. This one may include just a smile. Yes, a smile. Your organization may include the most colorful and elaborate badges for all employees, locked doors, and even security guards. However, employees tend to hold doors open for those who follow them into the building, especially if they are smiling and look confident. When they let others in, employees seldom check the photos of their IDs or whether they have an ID.
Education is one of the most fundamental safeguards and the most crucial in these types of scenarios and threats. Developing a good security awareness program is necessary for an organization of any size. You can use several techniques to educate your users (from flyers and periodic e-mails to web-based training and video-on-demand that your employees can view from anywhere anytime). This type of training should be mandatory.
Note
More information on end-user security awareness is covered in the section titled "Building Strong Security Policies" later in this chapter.
Security Intelligence
Always keep up-to-date by analyzing intelligence reports about current vulnerabilities and threats. In addition, try to educate yourself on advanced security topics to help you better protect your network and reduce organizational risks. You can obtain security intelligence reports and information about new threats from numerous sites, such as http://hackerwatch.org, http://www.cert.org, and http://first.org.
Cisco has a free website where you can obtain the latest information on security vulnerabilities, worms, viruses, and other threats. This website is called the Cisco Security Center, and you can access it at http://tools.cisco.com/security/center/home.x. The Cisco Security Center includes not only a comprehensive list of threats, but also information on how you can use your existing infrastructure to reduce exposure to such threats. In addition, it includes information about the latest intrusion detection system/intrusion prevention system (IDS/IPS) signatures to detect and protect your network from the threats.
Several educational institutions also collaborate with large corporations like Cisco on many research activities. An example is the Internet Motion Sensor (IMS) created by the University of Michigan. IMS is a large cluster of systems configured to monitor blocks of routable unused IP addresses. Its website is http://ims.eecs.umich.edu, and it contains detailed information on the measurement and identification of the latest security threats and anomalies. Examples of other research initiatives and organizations are as follows:
• CAIDA Network Telescope: http://www.caida.org/analysis/security
• The iSink: http://wail.cs.wisc.edu
• Common Vulnerability and Exposures: http://cve.mitre.org
• Team CYMRU Darknet Project: http://www.cymru.com/darknet
• The Honeynet Project: http://honeynet.org
When obtaining security intelligence information, you must determine the level of risk of these vulnerabilities and the impact they may have in your organization. A good way to calculate this risk is by using the emerging standard in vulnerability scoring called the Common Vulnerability Scoring System (CVSS).
Common Vulnerability Scoring System
The National Infrastructure Advisory Council (NIAC) commissioned the development of CVSS as a combined effort by many industry leaders including Cisco. The CVSS standard is now maintained by the Forum for Incident Response and Security Teams (FIRST).
Note
For more information about FIRST, go to http://www.first.org.
CVSS metrics are divided into three major components:
Cisco has an online tool where you can calculate your CVSS score at http://tools.cisco.com/security/center/cvssCalculator.x.
Base Metrics
Seven categories are used to calculate a "base score." These categories are the most elementary qualities of a specific vulnerability.
1. Access vector: Measures whether a vulnerability is exploitable locally, remotely, or both.
2. Access complexity: Appraises the complexity and level of effort required to exploit a specific vulnerability.
3. Authentication: Determines whether an attacker must be authenticated to exploit the vulnerability.
4. Confidentiality impact: Gauges the impact on confidentiality of a successful exploitation.
5. Integrity impact: Gauges the impact on confidentiality of a successful exploitation.
6. Availability impact: Describes the impact on availability of a successful exploitation of the vulnerability on the target system.
7. Impact bias: Allows you to prioritize one of the three impact metrics over the other two.
Temporal Metrics
CVSS has three different temporal metrics:
1. Exploitability: Describes the complexity required to exploit the vulnerability (unproven, proof-of-concept, functional, or highly exploitable).
2. Remediation level: Includes the level of an available workaround or solution. Describes whether there is an official fix, a temporary fix, a workaround, or no available solution.
3. Report confidence: Measures the credibility and confidence of the reported vulnerability (unconfirmed, uncorroborated, or confirmed).
Environmental Metrics
The environmental metrics are not scored in the Cisco Security Center website however, you can use them to represent the impact of a vulnerability based on your specific environment. Two metrics are used to calculate this impact:
1. Collateral damage potential: The likelihood for a loss of data, physical equipment, or property damage.
2. Target distribution: The relative size of the systems susceptible to such vulnerability.
–None: When no target systems exist
–Low: Typically when the vulnerability affects 1 to 15 percent of the systems within the organization
–Medium: Typically when the vulnerability affects 16 to 49 percent of the systems within the organization
–High: Typically when the vulnerability affects 50 percent or more of the systems within the organization
Note
Detailed information about the CVSS formulas is documented in a white paper published by NIAC at http://www.first.org/cvss/cvss-dhs-12-02-04.pdf.
Creating a Computer Security Incident Response Team (CSIRT)
It is unfortunate when large Fortune 500 companies do not have a Computer Security Incident Response Team (CSIRT). In some occasions, their CSIRT consists of one part-time employee. This is why it is extremely important to have management support when creating CSIRTs. It is difficult and problematic to create a CSIRT without management approval and support. Also, the support needed goes beyond budget and money. It includes executives, managers, and their staffs committing time to participate in the planning and improvement processes. Furthermore, it is equally crucial to get management commitment to award empowerment to the CSIRT. How good is a CSIRT if it does not have the authority to make an emergency change within the infrastructure if the organization is under attack or a victim of an outbreak?
Note
CSIRTs operate differently depending on the organization, its staff, their expertise, and budget resources. On the other hand, the best practices described in this chapter apply, generally, to any organization.
Who Should Be Part of the CSIRT?
Finding and retaining qualified security professionals is challenging. It can be also a struggle for organizations to justify additional headcount, especially for network security. Traditionally, information technology (IT) expenses are justified based on return on investment (ROI) and productivity metrics. On the other hand, security has been historically viewed as an additional cost. The opinion of many executives is changing, as organizations discover that better network security makes business transactions safer and reduces a big ticket item—liability.
In some cases, additional headcount is needed to create a formal CSIRT within an organization. However, on many occasions, the CSIRT can comprise staff from different departments within an organization. For example, an organization can have representatives from IT, Information Security (InfoSec), and engineering to be part of the CSIRT. The decision of whether to hire new staff or develop an in-house team depends on your organizational needs and budget. Clearly identify who needs to be involved at each level of the CSIRT planning, implementation, and operation. For instance, one of the most challenging tasks is the process of identifying the staff that will be performing security incident response functions.
In addition, identify which internal and external organizations will interface with the CSIRT. Evangelize and communicate the CSIRT responsibilities accordingly.
A question that many engineers, managers, and executives commonly ask is this: what skills should the CSIRT staff possess? The answer certainly goes beyond the in-depth technical expertise that the CSIRT contributor must have. Communication skills—both written and oral—are a plus. The CSIRT personnel must be able to communicate effectively to ensure that they obtain and supply the necessary and appropriate information. This leads to other critical qualities: the ability to respect confidentiality and integrity. This is obvious: integrity and confidentiality are crucial. Other key skills include:
• Handling stressful situations competently
• Managing time
• Problem solving/troubleshooting skills
• Working with teams effectively
• Handling situations diplomatically
Note
CERT has a section within its website dedicated to information about CSIRTs (http://www.cert.org/csirts).
Incident Response Collaborative Teams
Several virtual teams and collaborative efforts exist between large corporations and government organizations to exchange incident information and intelligence. The Cisco Critical Infrastructure Assurance Group (CIAG) has formed two groups that provide guidance and exchange ideas and information with many other large organizations. These groups are the Information Sharing and Analysis Centers (ISAC) and the Cisco Incident Response Communication Arena (CIRCA). CIRCA, specifically, exchanges information with several excellent sources, such as:
• Worldwide ISAC
• Telecom ISAC
• Information Technology ISAC
• Product Security Incident Response Team (PSIRT)
Note
You can obtain more information about these organizations at http://www.cisco.com/web/about/security/security_services/ciag/incident_response_support/index.html.
Tasks and Responsibilities of the CSIRT
You must develop and document roles and responsibilities for all CSIRT members and identify areas where authority may be ambiguous or overlapping. In addition, you may want to create a diagram or flowchart defining the CSIRT processes. You must develop policies and corresponding procedures. The following section details the importance of building strong security policies and procedures.
Building Strong Security Policies
What good does a firewall, IPS sensor, encryption device, and your favorite security product and tool do if you do not have guidelines, policies, and best practices on how to effectively configure and use them? Building strong security policies is crucial for any organization. These policies should be strong, yet realistically flexible to accommodate ever-changing requirements.
Policies communicate not only a standard but also an agreement on what should be the best practice for a specific situation (in this case, related to security). Policies must be detailed yet easy to understand and must also balance enforcement and productivity. A security policy is useless if it impedes productivity.
During the security policy design stages, you should define the reasons why such policy is needed. Also define the stakeholders, contacts, and their responsibilities. In addition, you should discuss how to handle violations to such a policy.
Depending on the size and goals of your organization, you may document the security policies in one large document or several small ones.
Tip
In most cases, smaller documents are easier to maintain and update. Occasionally, certain policies are appropriate for every site within your organization; others may be specific to specific environments.
An organization can have many different policies depending on its applications and systems. Some policies are implemented because of regulatory compliance to standards like Sarbanes-Oxley and the Health Insurance Portability and Accountability Act (HIPAA) of 1996. The following are some of the most common policies in every organization:
• Physical security policies
• Information protection
• Perimeter security
• Device security
• Acceptable use of specific applications and systems
• Remote access
• Wireless security policies
• Data center security policies
• Extranets and demilitarized zones (DMZ)
• Patch management
The following are examples of other elaborate policies:
• Lab security
• Acceptable encryption protocols
• Network admission control policies
• Identity management policies
Trust is the main subject in many policies. Many say that policies will not be written if you trust everyone to do the right thing. Ideally, you want to trust all resources, but that is unrealistic. Even defects in software and hardware are risks that you do not want to take by trusting everything that is not human. Different types of people (like your staff, guests, and contractors) should be trusted at different levels. Ensure that the level of access is commensurate with the level of trust.
Tip
SANS has several security policy templates that you can download at http://www.sans.org/resources/policies/#template.
Cisco has a Security Policy Builder tool at http://www.ciscowebtools.com/spb/.
Some people think of security policies as long documents that merely define what level of access systems and people have. However, policies include all of the previously mentioned items and topics, such as:
• Baseline router configuration parameters
• Guidelines for forwarding e-mails to external addresses
• Configuration management procedures and change control
Configuration management procedures and change control is a hot topic when planning incident response procedures. Security changes are defined as changes to network equipment that might impact the overall security of the network. Remember that these policies have to be flexible enough to accommodate the changes that staff members make to respond to security incidents and outbreaks. All security teams (such as InfoSec, CSIRTs, and so on) should review the list of business and technical requirements to identify specific network configuration or design issues to meet security needs.
Patch management is also a hot topic today. Always ensure that the current software revision levels of network equipment, desktop machines, and servers are up-to-date with security patches and hotfixes.
Update security policies regularly, or as needed. At a minimum, schedule an annual review to ensure that security policies do not become obsolete because of technology changes and demands. Also, include a provision for ad-hoc updates when higher-priority changes are needed.
It is recommended that you engage subject matter experts (SME) when reviewing existing policies because you should consider several factors in addition to those included during the initial development. SMEs can provide valuable input into changes in technology and best practices that may need to be incorporated in the specific policy. Security violations, deviations, and relevant audit information should also be reviewed when considering an existing policy.
You can use various techniques when planning, developing, and updating security policies. Always take the following basic idea into consideration: the policy must primarily reflect what is good for the security of the organization as a whole without limiting productivity.
Infrastructure Protection
A typical network infrastructure is built with routers, switches, and other equipment that provide indispensable services designed to increase the productivity of your organization. Each day results in new security threats, including DoS attacks and worm and virus outbreaks deliberately created to directly or indirectly disrupt the services that your network infrastructure attempts to provide. That is why it is critical to understand how to protect your organizational infrastructure by using security tools and best practices to protect each system in your network. You need to know not only how to protect the infrastructure, but also how infrastructure components can help you identify, classify, and protect against these security threats.
You need to understand the different router planes and their architecture to better protect your infrastructure devices.
RFC 3654 defines two planes:
• Control plane
• Forwarding plane
ITU X805 defines three planes:
• Control plane
• Management plane
• End-user plane
Finally, Cisco defines three planes:
• Control plane
• Management plane
• Data plane
Note
The techniques you will learn in this chapter apply to all the techniques and processes previously described. The Cisco definitions are used.
The control plane traffic includes routing protocol traffic—that is, Border Gateway Protocol (BGP), Open Shortest Path First (OSPF), and Enhanced Interior Gateway Routing Protocol (EIGRP) updates. The management plane traffic is basically all management communications, such as Secure Shell (SSH), Telnet, Simple Network Management Protocol (SNMP), RADIUS, and TACACS+. The data plane traffic (as derived from its name) includes all transit traffic not destined to the router. Figure 2-1 illustrates the difference between the three planes.
Figure 2-1. Router Planes

In the first (1) part of Figure 2-1, two workstations are sending traffic to each other, and the traffic is routed via an intermediary router. The data plane handles all this traffic. In the second (2) part of Figure 2-1, two routers are exchanging OSPF updates. The control plane handles this traffic. The third (3) and last part of Figure 2-1 illustrates a network administrator managing the router using the SSH protocol. The management plane handles this traffic.
The control and management plane traffic is always destined to the router. The processor in software platforms handles this traffic (traffic is Cisco Express Forwarding (CEF) switched in interrupt level.) In contrast, in high-end platforms such as the Catalyst 6500 or the Cisco 12000 series routers, control and management plane traffic is sent to hardware modules like the MFSC/SUP720 and then sent to the process level for processing. In some cases, data plane traffic may also reach the control plane. For instance, packets with IP options are process-switched (handled by the processor). Another example is when a router receives a packet that cannot be routed, the packet is sent to the control plane; subsequently, the router generates an Internet Control Message Protocol (ICMP) unreachable message.
From the many techniques you can use to better prepare and protect your infrastructure, these are the most crucial and frequently implemented:
• Strong device access control
• Securing of routing protocols
• Disabling of unnecessary services on network components
• Locking down of unused ports on network access devices
• Control of resource exhaustion
Strong Device Access Control
Strong device access control implies establishing the appropriate mechanisms to prevent unauthorized access to networking devices such as routers and switches. You can spend millions of dollars on the most sophisticated network devices, but these devices can be the worst investment you have ever made if they can be easily "owned" by the enemy (attackers). This is why it is critical to become familiar with what access mechanisms are available on each infrastructure device. You need to know how they work, which ones are "on by default," and how others can be "turned on." It is also useful to know how to secure/restrict these mechanisms as necessary so you can better protect the infrastructure as a whole.
Many access mechanisms are supported by different network access devices. Following are some examples:
• Console access
• Asynchronous connections
• Telnet
• rlogin
• SSH
• HTTP and HTTPs access via web-based GUIs
Note
Several of these access mechanisms are enabled by default in infrastructure devices. For example, console and modem access are enabled by default in Cisco routers, while other mechanisms need to be enabled manually.
Cisco and other organizations recommend several best practices to help secure access to network devices. The following sections include those most commonly recommended.
SSH Versus Telnet
SSH is a protocol that provides strong authentication and encryption. This is why it is recommended over insecure protocols like rlogin and Telnet. SSH comes in Version 1 and Version 2. The second version of SSH is recommended and should be used whenever it is supported, because it fixes a series of security issues found in the previous version. SSH supports the most common encryption ciphers:
• Advanced Encryption Standard (AES)
• Data Encryption Standard (DES)
• Triple DES (3DES)
• International Data Encryption Algorithm (IDEA)
• RC4-128
SSH can also tunnel TCP connections that allow file transfers with secure copy (SCP).
Four basic steps are required to enable SSH on a Cisco IOS Software device:
Step 1. Configure a hostname and domain name. The hostname "myrouter" and the domain name "cisco.com" are used in this example.
Router(config)# hostname myrouter
myrouter(config)# ip domain-name cisco.com
Step 2. Generate a Rivest, Shamir, and Adleman (RSA) protocol key pair. This automatically enables SSH.
myrouter(config)#crypto key generate rsa
The name for the keys will be: myrouter.cisco.com
Choose the size of the key modulus in the range of 360 to 2048 for your
General Purpose Keys. Choosing a key modulus greater than 512 may take
a few minutes.
How many bits in the modulus [512]: 2048
% Generating 1024 bit RSA keys, keys will be non-exportable...[OK]
myrouter(config)#
*Dec 14 02:40:23.093: %SSH-5-ENABLED: SSH 2.0 has been enabled
Step 3. (Optional) Configure time-out and number of authentication retries. These values depend on your environment; however, the 60-second timeout is appropriate in most cases.
myrouter(config)# ip ssh time-out 60
myrouter(config)# ip ssh authentication-retries 2
Step 4. Optionally, but highly recommended, configure VTYs to only accept SSH.
myrouter(config)# line vty 0 4
myrouter(config-line)# transport input ssh
The following steps demonstrate how to enable SSH on a PIX security appliance or a Cisco Adaptive Security Appliance (ASA):
Step 1. Configure the hostname and domain name in the security appliance.
ciscoasa(config)#hostname ciscoasa1
ciscoasa1(config)#domain-name cisco.com
Step 2. Configure a username and password, and use authentication, authorization, and accounting (AAA) authentication. In this example, local authentication is used. The username is user1, and the password is cisco123.
ciscoasa1(config)#username user1 password cisco123
ciscoasa1(config)#aaa authentication ssh console LOCAL
Step 3. Generate the RSA key pair for the security appliance (similarly to IOS). In this example, the modulus size is 2048.
ciscoasa1(config)#crypto key generate rsa modulus 2048
Step 4. Define the hosts/networks allowed to connect to the specific interfaces of the security appliance. In this example, only machines in the 10.10.10.0/24 network can connect via SSH on the inside interface.
ciscoasa1 (config)#ssh 10.10.10.0 255.255.255.0 inside
Step 5. Optionally, you can specify the version of SSH allowed on the PIX/ASA. By default, both SSH Version 1 and Version 2 are allowed. In this example, only clients that support SSH Version 2 are allowed to connect to the appliance.
ciscoasa1(config)# ssh version 2
Local Password Management
TACACS+ and RADIUS servers provide the best options for authentication of management access to networking devices. They provide numerous functions that ease the management of user accounts while providing higher security mechanisms. Local authentication is more susceptible to being broken than authentication using remote TACACS+ or RADIUS servers. That is why it is recommended to do the following:
• Encrypt any passwords shown in the configuration files. In IOS devices, you can encrypt the passwords in their configuration file by using the service password-encryption global command.
• Change default passwords.
• Limit the authentication failure rate. It is recommended, as a best practice, to configure a maximum threshold of three consecutive unsuccessful login attempts and to enable the generation of log messages when this limit is reached by using the security authentication failure rate 3 log command in IOS devices. This locks access to the router for a period of 15 seconds after three unsuccessful login attempts to protect against dictionary attacks. Dictionary attacks are an old trick. An attacker uses a script that tries thousands of words stored in a file using them as the password. A dictionary attack can be successful if a weak password is used or if you do not protect against it by limiting the authentication failure rate.
Configuring Authentication Banners
Sometimes people overestimate the benefits of configuring authentication banners. Banners with detailed warnings often make it easier to prosecute attackers who break into your systems. In some cases, you may be forbidden to monitor the activities of unauthorized users unless you have taken steps to notify them of your intent to do so.
Typically, authentication banners include the following information:
• A warning that the system you are trying to access should be used only by authorized personnel
• A detailed explanation that the unauthorized use of such a device is illegal, and individuals who attempt to break in are subject to prosecution
• A notice that the use of such a device may be monitored
• Specific notices required by certain local authorities
Interactive Access Control
You have already learned that you can access network devices via several interactive methods such as Telnet, rlogin, SSH, and local asynchronous, even modem connections for out-of-band access. On Cisco IOS devices, these interactive access methods have two basic types of lines (or sessions). The first type is the use of standard lines used by console and dialup modem connections. The first type of these connections are known as TTYs. TTY stands for "Text Telephone." The "Y" has a historical value referenced to the first text telephones. Now the term TTY refers to a serial connection to a computerized device. The second type of standard lines is the virtual TTYs (VTYs). VTYs are used by remote connections such as Telnet and SSH. This section shows the best way to protect interactive access.
One of the most common practices in Cisco IOS devices is to disable interactive logins on lines that will not need them. You can use the login and no password commands at the line configuration level. Another good practice is to restrict access to allow only the specific protocols (that is, SSH). In Cisco IOS devices, you can do this with the transport input command (for example, transport input ssh).
Always restrict the IP addresses or networks from which access will be granted to network access devices. In Cisco IOS, you can achieve this by using the access-class command in conjunction with an ACL. In the following example, an access list is configured to allow devices only on the 10.10.10.0/24 network to access the router via SSH.
Myrouter#configure terminal
myrouter(config)#access-list 10 permit 10.10.10.0 0.0.0.255
myrouter(config)#line vty 0 4
myrouter(config-line)#access-class 10 in
myrouter(config-line)#transport input ssh
On the Cisco ASA and PIX, you can restrict administrative access in a similar fashion by using the ssh, telnet, http, and asdm location commands. The ssh command restricts SSH connections to the security appliance. The telnet command restricts Telnet connections. The http and asdm location commands restrict HTTPS access via the Adaptive Security Device Manager (ASDM). In the following example, the only host allowed to access and manage the Cisco ASA via SSH and ASDM is 172.18.85.123.
ciscoasa# configure terminal
ciscoasa(config)# ssh 172.18.85.123 255.255.255.255 inside
ciscoasa(config)# http 172.18.85.123 255.255.255.255 inside
ciscoasa(config)# asdm location 172.18.85.123 255.255.255.255 inside
As with the Cisco ASA/PIX, in Cisco IOS, you can enable HTTP authentication with the ip http authentication command. The following example shows a configuration listing for HTTP authentication using RADIUS.
myrouter(config)#aaa new-model
myrouter(config)#aaa authentication login default group radius
myrouter(config)#aaa authorization exec default group radius
myrouter(config)#ip http server
myrouter(config)#ip http authentication aaa
myrouter(config)#tacacs-server host 172.18.85.181
myrouter(config)#tacacs-server key cisco123
You can also restrict who can administer the IOS device via HTTP by using the ip http access-class command. The following example shows how 10.10.10.123 is the only host allowed to connect via HTTP to the router.
mrouter(config)# access-list 9 permit host 10.10.10.123
mrouter(config)# ip http access-class 9
myrouter(config)# ip http max-connections 3
In this example, the router is configured to limit the maximum number of concurrent connections to three with the ip http max-connections command.
You can also configure timeouts to avoid idle sessions from consuming an administrative session indefinitely. In Cisco IOS, you can modify the idle timeout with the exec-timeout command, as shown in the following example. In this example, the exec-timeout is configured for 5 minutes.
myrouter(config)#line vty 0 4
myrouter(config-line)#exec-timeout 5
On the Cisco ASA, you can do the same by configuring the ssh timeout or telnet timeout commands as follows.
ciscoasa(config)# ssh timeout 5
ciscoasa(config)# telnet timeout 5
Another trick on Cisco IOS devices is to enable TCP keepalives on incoming sessions with the service tcp-keepalives-in command. The use of this command protects against malicious orphan connections.
Several IOS login enhancements have occurred since Cisco IOS Software Release 12.3(4)T. The login delay command was introduced to allow a delay between login attempts, making dictionary attacks harder to exploit.
Note
Dictionary attacks were defined earlier in this chapter.
The login block-for command allows you to limit the frequency of failed login attempts in Cisco IOS routers. The frequency is limited by defining a maximum number of failed attempts within a specified period. When this number is reached, the Cisco IOS router does not accept additional connections for a "quiet period." You can also create an ACL to include trusted systems and networks from which legitimate connections are expected. This is called an exception ACL, and it is configured in conjunction with the login quiet-mode access-class global command.
In the example that follows, the Cisco IOS router will enter a 60-second quiet period if 15 failed login attempts are exceeded within 60 seconds. The access list included next will make an exception for the authorized system with IP address 10.10.10.123. In addition, logging messages will be generated for every 10th failed login and every 15th successful login.
myrouter(config)# access-list 99 permit host 10.10.10.123
myrouter(config)# login block-for 60 attempts 15 within 60
myrouter(config)# login quiet-mode access-class 99
myrouter(config)# login on-failure log every 10
myrouter(config)# login on-success log every 15
Role-Based Command-Line Interface (CLI) Access in Cisco IOS
Role-based command-line interface (CLI) access is often referred to as CLI views. This is a feature introduced in Cisco IOS Software Release 12.3(7)T. The purpose of this feature is to explicitly control the commands that are accepted and the configuration information that is visible to different groups of users depending on their role. For instance, certain users from your network operations group could have limited access to EXEC and configuration commands and no access to security configuration commands. In contrast, you may want to allow the users in your security group to invoke security configuration commands such as crypto commands and others.
The three basic views or levels of access are as follows:
• Root view: The highest administrative view, this is equivalent to a user with level 15 privileges. To create new CLI views, you need to be in "root view" access.
• Superview: Do not include commands; in fact, you can only configure commands in CLI views. However, users logged into a superview account can access all the commands that are configured for any of the CLI views that are part of the superview.
• Lawful intercept view: This view is only available in Cisco IOS devices that support the lawful intercept subsystem. The purpose of this view is to restrict access to lawful intercept commands and configuration information.
Note
There is one root view, by default. You can define a total of 15 CLI views and superviews and only 1 lawful intercept view. For you to create a view, an "enable" password must exist. In addition, AAA must be enabled with the aaa new-model command, and the administrator must have level 15 privileges to access the root view. You must enable authorization with the aaa authorization command.
Follow these steps to create CLI views in Cisco IOS routers.
Step 1. Use the enable view command to access the root view, as shown in the following example:
myrouter# enable view
Password: (enter enable or enable secret password)
*Dec 25 00:03:28.123: %PARSER-6-VIEW_SWITCH: successfully set to view
'root'
Step 2. After entering in root view mode, you can create a new view with the parser view command. In the following example, a view called myADMIN is created with the password 1qaz@WSX.
myouter# configure terminal
myrouter(config)# parser view myADMIN
*Dec 25 01:08:51.123: %PARSER-6-VIEW_CREATED: view 'Admin123'
successfully created.
myrouter(config-view)# password 5 1qaz@WSX
Step 3. You can permit or exclude commands within the view with the commands sub-command, as follows:
myrouter(config-view)# commands exec include show interfaces
myrouter(config-view)# commands exec include all
myrouter(config-view)# commands configure include-exclusive crypto
Step 4. You can assign a user or a group to a CLI view in two ways. The first method is with the use of a AAA local user database. The second (and preferred method) is to use an external AAA server. You can associate local users to a CLI view with the username command, as shown here:
myrouter(config)# username operator1 view Operators password 1qaz@WSX
myrouter(config)# username sec_op1 view SecOps password xsw2ZAQ!
In this example, two users are created. The user operator1 is associated with a view called Operators. The second user, sec_op1, is associated with a view called SecOps.
Tip
When you use an external AAA server, you must use the attribute "cli-view-name" to assign a user to a specific CLI view.
Controlling SNMP Access
SNMP is a network management protocol that many organizations use. Administrators use SNMP not only to manage infrastructure devices but also to manage servers and other systems within their organization. SNMP is a powerful tool, because administrators can reach numerous devices within a large network, push and download configurations, and obtain system statistics. SNMP is considered a "double-edged sword" by many people, because an attacker can do the same thing when SNMP is not secured properly.
SNMP has three versions:
• Version 1
• Version 2 (commonly referred to as 2c)
• Version 3
Version 1 and Version 2c are weak in security functions and existing vulnerabilities. However, they are the most commonly deployed. In Version 1 and 2c, access to MIB objects is controlled by the use of community strings. However, these versions do not provide authentication or encryption mechanisms. Not having basic security capabilities such as authentication or encryption on a management protocol is like leaving your car unlocked and with the windows down in the worst neighborhood. SNMP Version 3 incorporates security features such as authentication, identity, and access control. Version 3 has multiple authentication options, including username, message digest algorithm 5 (MD5), and Secure Hash Algorithm (SHA) authentication. This version also provides privacy with DES encryption, and authorization and access controls based on views. Of course, the recommendation is for you to use SNMP Version 3 over the other two versions. On the other hand, this may not be possible because you may have devices (or SNMP applications) that do not support SNMP Version 3. In this case, you can improve security by doing the following:
• Changing any default or standard community strings such as "private" or "public"
• Defining nontrivial community strings
• Setting SNMP to send a trap on community-name authentication failures
• Defining access control rules on networking devices to only allow SNMP communication from trusted management hosts; of course, the management host should also be secured. You will learn how to secure management hosts and other systems in the "Endpoint Security" section.
Securing Routing Protocols
Routing protocols play a crucial role in the infrastructure of any organization. They use algorithms to select the best paths for datagrams within a network or set of networks. Understanding how to configure and use routing protocols is a must for any network administrator. On the same note, understanding how to secure these protocols is vital.
This book assumes that you are already familiar with routing protocols. However, here is a quick refresh. Routing protocols are divided into two major categories:
• Interior Gateway Protocols (IGP)
• Exterior Gateway Protocols (EGP)
IGPs handle routing within an autonomous system. In other words, typically IGPs route traffic between the routers within an enterprise. These protocols keep track of how to get from one destination to the other inside a network or set of networks that you administer. In most cases, all the networks you manage combined are just one autonomous system. Some large organizations use more complex techniques, including several autonomous systems. IGPs are also divided into two categories:
• Distance vector protocols: Use a distance calculation plus an outgoing network interface (a vector) to choose the best path to a destination network. Routing Information Protocol (RIP) and Interior Gateway Routing Protocol (IGRP) are examples of distance vector protocols.
• Link state protocols: These track the status and connection type of each link and produce a calculated metric based on these and other factors, including some set by the network administrator. Link state protocols know whether a link is up or down and how fast it is. Using this information, link state protocols calculate the "cost" of routing the datagrams within a network. For example, link state protocols may take a path that has more hops but uses a faster medium in preference to a path using a slower medium with fewer hops. Open Shortest Path First (OSPF) is the most widely used link state protocol.
EGPs control routing outside an autonomous system. Internet service providers (ISP) typically use EGPs to route traffic between separate organizations. The most common exterior gateway routing protocol is BGP.
You can use many different techniques to attack routing protocols. The most common are the injection of illegitimate routing updates and DoS attacks specifically against routing.
Several tools you can use are already built into BGP, Intermediate System-to-Intermediate System (IS-IS), OSPF, EIGRP, and RIPv2 that help secure your infrastructure routing. The most common tools/techniques are as followed:
• Configuring static routing peers
• Time-to-live (TTL) security checks
Configuring Static Routing Peers
Several routing protocols include different mechanisms that dynamically discover routing peers. Unfortunately, the same mechanisms can be easily used to insert bogus routers into the routing infrastructure. You can statically configure a list of trusted neighbors to avoid this problem. However, this technique causes controversy among administrators because, in large organizations, it can mean hundreds of configuration lines. For this reason, many prefer to use authentication mechanisms.
Authentication
Authentication is now available on most routing protocols. You can configure routing devices with a predefined shared secret key that is used to validate each routing update. Most routing protocols support two types of neighbor authentication: plaintext and MD5. With plaintext authentication, a secret key is included inside each routing update message. This does not provide much security because an attacker can easily read keys. MD5 authentication works by processing each routing update with an MD5 hash function and by including the resulting signature (digest) as part of the routing update message. When you are using MD5, the shared secret key is never sent over the network only the hashing information or digest.
Figure 2-2 illustrates a topology in which four Cisco IOS routers and a Cisco ASA are configured with OSPF and with MD5 authentication.
Figure 2-2. OSPF Authentication
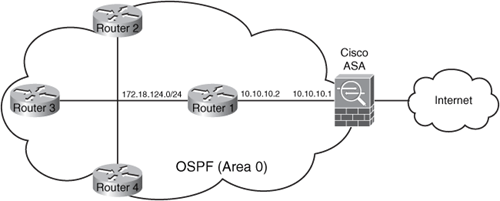
All routers and the Cisco ASA belong to the OSPF area 0. The following example shows the configuration of OSPF MD5 neighbor authentication on the router labeled Router 1.
router ospf 10
network 172.18.124.0 0.0.0.255 area 0
network 10.10.10.0 0.0.0.255 area 0
area 0 authentication message-digest
!
interface Ethernet1
ip address 10.10.10.2 255.255.255.0
ip ospf authentication message-digest
ip ospf message-digest-key 10 md5 1qaz@WSX
The first highlighted line shows how MD5 authentication is enabled for area 0. The second and third highlighted lines show how OSPF MD5 authentication is enabled on Ethernet 1. The shared key on this example is 1qaz@WSX.
The following example shows the configuration of the Cisco ASA. The commands are almost identical to the Cisco IOS router.
router ospf 5
network 10.10.10.0 0.0.0.255 area 0
area 0 authentication message-digest
!
interface GigabitEthernet0/1
ip address 10.10.10.1 255.255.255.0
ospf authentication message-digest
ospf message-digest-key 10 md5 1qaz@WSX
Notice that the Cisco ASA OSPF authentication configuration is similar to the Cisco IOS router. The actual code was ported from IOS. One of the differences is that OSPF interface subcommands are not preceded by the word "ip."
Note
For more information about neighbor authentication in Cisco IOS, refer to http://www.cisco.com/univercd/cc/td/doc/product/software/ios124/124cg/hsec_c/part25/schroutr.htm.
For more about routing authentication in Cisco ASA, refer to http://www.cisco.com/univercd/cc/td/doc/product/multisec/asa_sw/v_7_2/conf_gd/general/ip.htm.
Route Filtering
You can use route filtering to prevent specific routes from being propagated throughout the network. You can use route filtering as a security mechanism, because filters can help ensure that only legitimate networks are advertised and that networks that are not supposed to be propagated are never advertised. For example, you can filter RFC-1918 private addresses.
Note
For more information about routing security, see http://www.cisco.com/en/US/netsol/ns744/networking_solutions_program_home.html.
Time-to-Live (TTL) Security Check
TTL Security Check is a security feature implemented in BGP. It helps protect BGP peers from multihop attacks. This feature is based on the Generalized TTL Security Mechanism (GTSM) defined in RFC 3682 and applies only to external BGP (eBGP).
Note
Several organizations are working to implement this feature for other routing protocols, such as OSPF and EIGRP.
You can configure a minimum acceptable TTL value for the packets exchanged between two eBGP peers when you use the TTL Security Check feature in Cisco IOS. After you enable TTL Security Check, both BGP peers send all their updates with a TTL of 255. In addition, routers establish a peering session only if the other eBGP peer sends packets with a TTL equal to or greater than the TTL value configured for the peering session. By default, eBGP uses a TTL value of 1; the only exception is when eBGP multihop is used.
Note
If a router receives a packet with TTL values less than the calculated value, it silently discards it.
You can enable the TTL security check by using the neighbor <ip address> ttl-security command as shown in the following example:
Router(config)# router bgp 123
Router(config-router)# neighbor 209.165.200.226 ttl-security hops 3
In this example, TTL security check is enabled for the 209.165.200.226 eBGP neighbor which is three hops away. This router then accepts only BGP packets with a TTL value of 252 or greater.
Note
For more information about TTL security check, go to http://www.cisco.com/en/US/products/ps6350/products_configuration_guide_chapter09186a0080455621.html.
Disabling Unnecessary Services on Network Components
Infrastructure devices in some cases come with a list of services turned on by default that are considered appropriate for most network environments. However, it is always a good idea to disable unnecessary services because some services present a vulnerability that could be used maliciously to gain unauthorized access or disrupt service.
Note
Not all environments have the same requirements but, on many occasions, disabling these unnecessary services not only enhances security but also helps preserve system resources.
The following is the list of Cisco IOS services that Cisco recommends you disable because they have the possibility of being used for malicious purposes:
• Cisco Discovery Protocol (CDP)
• Finger
• Maintenance Operations Protocol (MOP)
• PAD
• IDENT
• TCP and User Datagram Protocol (UDP) small servers
• IPv6
Cisco Discovery Protocol (CDP)
CDP is a protocol that allows you to obtain information about other devices within the network. This information can include the platform, model, software version, and IP addresses of network devices adjacent to the Cisco IOS routers.
Note
CDP is a Cisco proprietary Layer 2 protocol that is enabled by default.
CDP is a useful tool in the hands of an administrator, but it is a tool to be feared in the hands of an attacker. You can disable CDP globally when the service is not used or per interface when CDP is still required. As a rule of thumb, you should disable CDP on interfaces facing nontrusted networks such as the Internet. To disable CDP globally, use the no cdp run command. If you want to disable CDP on a specific interface, you can use the no cdp enable interface subcommand. For example:
myrouter(config)# interface Ethernet1
myrouter(config-if)# no cdp enable
Tip
You should always check for features that depend on CDP before disabling it. Features that depend on CDP are On-Demand Routing (ODR) and Cisco IP Telephony solutions.
Finger
The Finger protocol is used to obtain information about users logged into systems within the network. If you are running Cisco IOS Software versions prior to 12.1(5) and 12.1(5)T, Finger is on by default. Attackers can use Finger in reconnaissance attacks because it does not reveal much sensitive information. However, attackers can use chunks of information to obtain a better understanding of your environment. Always disable Finger whenever possible. You can do this with the no service finger command. In Versions 12.1(5) or 12.1(5)T and later, the Finger service is disabled by default; however, if for some reason it was turned on, you can disable it with the no ip finger command.
Directed Broadcast
Cisco IOS software versions prior to 11.2 have IP Directed Broadcast enabled by default. You are probably not running a version of IOS this old. However, because directed broadcasts have been used for DoS attacks (that is, SMURF), it is always recommended that you keep IP Directed Broadcast disabled. If for some reason the IP Directed Broadcast feature was enabled, you can disable it with the no ip directed-broadcast interface subcommand, as shown in the following example:
myrouter(config)# interface Ethernet1
myrouter(config-if)# no ip directed-broadcast
Maintenance Operations Protocol (MOP)
MOP was designed for remote communications between hosts and servers. Cisco IOS routers can use MOP to gather configuration information when communicating with DECnet networks.
Note
By default, MOP is enabled on all Ethernet interfaces and disabled on all other type of interfaces.
It is recommended that you disable the MOP service whenever possible, because this service has several vulnerabilities. To disable MOP, use the no mop enabled interface subcommand, as shown in the following:
myrouter(config)# interface Ethernet1
myrouter(config-if)# no mop enabled
BOOTP Server
The Bootstrap protocol allows a system to configure itself at boot time by dynamically obtaining the following information:
• An IP address
• The IP address of the BOOTP server
• A configuration file
BOOTP is defined in RFC 951. Cisco IOS routers can act as BOOTP servers. This service is turned on by default and is used by features such as AutoInstall. If not needed, this service should be disabled with the no ip bootp server global configuration command.
ICMP Redirects
Cisco IOS routers send ICMP redirect messages when ICMP redirects a packet through the same interface on which it was received. Attackers can sniff these packets and use them to discover network topology information. Disable ICMP redirects whenever possible with the no ip redirects interface subcommand, as shown here:
myrouter(config)# interface Ethernet1
myrouter(config-if)# no ip redirects
IP Source Routing
IP source routing enables a device to control the route that the datagram will take toward its destination. This feature is rarely used because it is not practical in environments today. Attackers can take advantage of older IP implementations that do not process source-routed packets properly and may be able to crash machines running these implementations by sending altered packets with source routing options. It is recommended that you disable IP source routing whenever possible with the no ip source-route command.
Packet Assembler/Disassembler (PAD)
Packet Assembler/Disassembler (PAD) allows some devices such as character-mode terminals to connect to legacy X.25 networks. PAD is enabled on Cisco IOS routers. In some cases, PAD can be used to gain unauthorized access, because its security is weak. Disable PAD whenever possible with the no service pad global command.
Proxy Address Resolution Protocol (ARP)
Proxy Address Resolution Protocol (ARP) is used to reach devices on a remote subnet without configuring specific routes to a network device. When you are performing proxy ARP, a network device answers all ARP requests on the local subnet on behalf of systems some hops away. Attackers can also use proxy ARP to obtain information about hosts behind routers in attempting to figure out the topology of your network.
Note
Proxy ARP is defined in RFC 1027.
It is recommended that you disable Proxy ARP on interfaces that connect to untrusted networks. On Cisco IOS, you can disable Proxy ARP with the no ip proxy-arp interface subcommand, as shown in the following example:
myrouter(config)# interface Ethernet1
myrouter(config-if)# no ip proxy-arp
IDENT
The TCP Client Identity Protocol (IDENT) allows a system to query the identity of a user initiating a TCP connection or a host responding to a TCP connection. The IDENT protocol enables you to obtain identity information by connecting to a TCP port on a system and issuing a simple text string requesting information.
Note
IDENT is defined in RFC 1413.
Attackers can use IDENT as another reconnaissance tool. Always disable IDENT whenever possible with the no ip identd global configuration command.
TCP and User Datagram Protocol (UDP) Small Servers
TCP and UDP small servers are daemons that typically run on UNIX systems and that were designed for diagnostic purposes. Cisco IOS Software also provides an implementation of UDP and TCP small servers that enables echo, chargen, daytime, and discard services. Unless strictly necessary, these services should be disabled because a potential attacker can use them to gather information or even to redirect traffic.
TCP and UDP small services are disabled by default on Cisco IOS Software Versions 11.3 and later. However, if for some reason they have been enabled, you can disable them by using the no service tcp-small-servers and no service udp-small-servers global configuration commands.
IP Version 6 (IPv6)
Historically, Cisco IOS–affected systems running IPv6 have had a couple of vulnerabilities. The execution of these vulnerabilities could lead to a system crash or the execution of arbitrary code. Only devices that were explicitly configured to process IPv6 traffic have been affected. That is why it is recommended that you disable IPv6 when not required, subsequently eliminating the potential exposure to vulnerabilities like those previously mentioned.
You can disable IPv6 on a per-interface basis using the no ipv6 enable and no ipv6 address interface subcommands, as shown here:
myrouter(config)# interface Ethernet1
myrouter(config-if)# no ipv6 enable
myrouter(config-if)# no ipv6 address
Note
Chapter 11, "IPv6 Security," details how to secure IPv6 implementations.
Locking Down Unused Ports on Network Access Devices
This is a best practice that may be common sense for you but many network administrators overlook it. Several network devices have their ports and interfaces enabled by default. For instance, all Ethernet ports on Cisco Catalyst Switches running CatOS are enabled by default. Leaving unused ports enabled opens the chance for unauthorized access. It is always recommended that you keep all unused ports disabled. You can disable a port/interface on a Cisco Catalyst switch running CatOS with the set port disable command, as shown in the following example:
Console> (enable) set port disable 2/4
Port 2/4 disabled.
Console> (enable)
In this example, Ethernet port 2/4 is disabled on a Cisco Catalyst switch.
On devices running Cisco IOS, all interfaces are disabled by default; however, if an interface has been enabled and it is not in use, you should disable it with the shutdown interface subcommand as shown next:
myrouter(config)# interface Ethernet1
myrouter(config-if)# shutdown
Control Resource Exhaustion
Today, a growing number of DDoS attacks are being designed to specifically target key infrastructure devices. These types of attacks typically try to consume CPU resources, input queues, and memory. Worms and viruses that are generally designed to target end hosts generate large volumes of traffic that quite often exhaust most of the resources available in infrastructure equipment. You can implement several best practices by controlling the utilization of the limited resources in a device:
• Resource thresholding notification
• Receive access control lists (rACLs)
• Control Plane Policing (CoPP)
Resource Thresholding Notification
Always monitor the resource usage of infrastructure devices for unusual sustained high levels of CPU utilization, low free memory, and large volumes of dropped packets. These practices ease the detection and classification of attacks and outbreaks.
Note
Chapter 3, "Identifying and Classifying Security Threats," details numerous techniques to successfully identify and classify network attacks and outbreaks.
Several Cisco platforms provide automatic notification mechanisms that are generally based on SNMP or syslog. These mechanisms generate alarms when unusual levels of CPU or memory are detected. It is recommended that you use the Cisco IOS CPU thresholding notification and memory thresholding notification.
Note
The CPU thresholding notification was introduced in Cisco IOS Software Version 12.0(26)S.
You can configure two types of thresholds:
• Rising CPU threshold: Specifies the percentage of CPU utilization that will trigger a notification.
• Falling CPU threshold: Specifies the percentage of CPU resources that triggers a CPU threshold notification when CPU usage falls below this level for a configured period.
The following are the steps required to configure CPU threshold notification.
Step 1. Enable CPU threshold violation notification as traps and inform requests with the snmp-server enable traps cpu threshold command as follows:
myrouter(config)# snmp-server enable traps cpu threshold
Step 2. Configure the router to send CPU traps to a trusted SNMP server (10.10.10.123 in this example).
myrouter(config)# snmp-server host 10.10.10.123 traps
mycommunitystring cpu
Step 3. Configure the threshold notification parameters. In the following example, the CPU utilization threshold is set to 80 percent for a rising threshold notification and 20 percent for a falling threshold notification with a 5-second polling interval.
myrouter(config)# process cpu threshold type total rising 80 interval 5
falling 20 interval 5
You can also configure memory threshold notifications. You can configure the router to send notifications to a trusted SNMP server to indicate that free memory has fallen below a configured threshold. In addition, you can reserve memory to ensure that sufficient memory is available to issue critical notifications.
Note
Memory threshold notifications were introduced in Cisco IOS Software Version 12.2(18)S.
You can configure processor memory or input/output memory thresholds. To configure a processor memory threshold, use the memory free low-watermark processor threshold global command. You can specify input/output memory thresholds with the memory free low-watermark io threshold command.
In addition, you can mitigate low-memory conditions by reserving a region of memory for the router to use for the issuing of critical notifications. Reserving a block of memory for these functions is useful because when a router is overloaded by processes the amount of available memory might fall to levels insufficient for it to issue critical notifications. Use the memory reserve critical kilobytes command to accomplish this.
Note
You can obtain more information about Cisco IOS memory thresholding notification at http://www.cisco.com/en/US/products/sw/iosswrel/ps1838/products_feature_guide09186a00801b1bee.html.
CPU Protection
Attackers already know that targeting CPUs and network processors can affect more than just one server within an organization. Worms and DDoS can bring network infrastructure devices onto their knees costing thousands of dollars. Attackers typically follow two strategies when targeting a CPU. The first tactic that attackers employ is generating large volumes of traffic to the CPU or network processor because CPUs always have a finite capacity for processing packets. All processors have a limit regardless of the size or technology used. For this reason, some security experts say, It does not matter how much traffic a device can pass; what's important is how much traffic a device can drop.
The second tactic that attackers employ is making the network device generate large volumes of packets. They do this by sending traffic to the network device, to the location on the device where the CPU is expected to process and generate certain responses to specific requests. An example is sending malformed packets and making the network device send ICMP unreachable messages.
To counteract these two strategies be sure to take advantage of the following best practices:
• Filtering of traffic sent to the CPU: This is a key best practice. You should always make sure that only the expected protocols are used with the network device. When building these filters consider that, under normal circumstances, most traffic handled by infrastructure equipment is in transit over the forwarding path. Only a small portion of the traffic needs to be sent to the CPU for further analysis over the receive path. The traffic destined to the infrastructure equipment typically includes routing protocols, remote access protocols such as SSH and Telnet, or SNMP.
Note
Remember the rules you learned earlier in this chapter for protecting SNMP communications. Receive ACLs (or rACLs) are an example of a filtering technique.
• Rate limit traffic sent to the CPU: The filters discussed in the previous bullet should be combined with rate limiting techniques whenever possible. Another best practice is to implement a feature available on Cisco IOS routers called Control Plane Policing (CoPP). CoPP combines filtering with rate limiting to ensure that permitted traffic never reaches levels that could overwhelm the CPU. This feature is covered later on in this chapter (in the "Control Plane Policing (CoPP)" section).
• Traffic requiring CPU packet generation: Always control traffic that requires the CPU to generate packets. An example is using the ip icmp rate-limit command on Cisco IOS routers to prevent ICMP unreachable attacks.
• Processor versus interrupt time: Each time a Cisco router or switch (depending on the platform and feature implemented) receives a packet, it needs to interrupt other tasks to find out what to do with the packet. You can implement the scheduler allocate command or feature to tell the router to stop processing interrupts and to handle other tasks at regular intervals. This helps reduce the effects of fast packet floods.
Receive Access Control Lists (rACLs)
Receive access control lists (rACLs) are used to protect the Route Processor (RP) on high-end routers from malicious or unwanted traffic that could degrade performance.
Note
From the time this rACLs feature was originally introduced in 12.0 (22S for the Cisco 12000 series routers), numerous service providers have taken advantage of it. However, it is now available on other high-end routing platforms including the Cisco 7500 Series Routers and the Cisco 10000 Series Routers.
An rACL is just a standard or an extended ACL that controls the traffic sent by the various line cards to the RP. Because these high-end routers are designed in a distributed architecture, this type of ACL only affects the traffic destined to the RP and does not affect the transit traffic (traffic passing through the router).
rACLs comprise mainly permit statements that allow the protocols and specific sources that are expected to send traffic to the RP. These ACLs may also include deny statements to block specific unwanted traffic.
Note
All ACLs have an implicit deny statement at the end.
The following is an example of an rACL. The rACL number is 123. It can be any number, however, all the access control entries (ACE) must use the same number. In the following example, the router IP address is 209.165.200.225. Only BGP and OSPF are permitted from the 192.168.10.0/24 network; all other traffic is denied.
!The following ACEs allow BGP traffic to the RP (209.165.200.225)
access-list 123 permit tcp 192.168.10.0 0.0.0.255 host 209.165.200.225 eq bgp
access-list 123 permit tcp 192.168.10.0 0.0.0.255 eq bgp host 209.165.200.225
!
!The following ACEs allow OSPF traffic to the RP (notice that the OSPF multicast
address is
!used instead of 209.165.200.225)
access-list 123 permit ospf 192.168.10.0 0.0.0.255 host 224.0.0.5
Optionally, you can deny specific traffic to protocols like UDP, TCP, and ICMP for tracking purposes. To do so, you can add the following lines to the ACL.
access-list 123 deny udp any any
access-list 123 deny tcp any any
access-list 123 deny icmp any any
access-list 123 deny ip any any
ip receive access-list 123
Note
Do not forget to always apply the rACL with the ip receive access-list <num> command, as shown in the last line in the previous example. rACLs are created on the RP and then pushed to the line card processors. All received packets are first sent to the line card CPU; however, any packets requiring processing by the RP are then compared against the rACL before they are sent to the RP.
rACLs increase security by protecting the RP from direct attacks. However, because they are just filters, they do not provide rate limiting benefits that could control large volumes of traffic that may match the permitted sources and protocols. CoPP offers rate limiting techniques that replace the need for rACLs.
Tip
When deploying the rACLs, always remember to start slowly. In other words, gradually improve security over time because, if you start too aggressively, your chance of dropping legitimate traffic increases.
Control Plane Policing (CoPP)
You can configure Quality of Service (QoS) policies to rate limit the traffic sent to the RP that is protecting the control plane from reconnaissance and DDoS attacks. With the Modular QoS Command-line (MQC) policies, you can permit, block, or rate limit traffic to the RP. You can use MQC to define traffic into separate classes and to apply distinct QoS policies based on different criteria.
Note
CoPP was introduced initially in 12.2(18)S for Cisco 7200, Cisco 7300, and Cisco 7500 series routers, and it is now available on most IOS-based platforms.
The following example includes the definition of two classes: one for OSPF traffic, and one for SSH used for remote management.
!ACL classifying OSPF traffic sourced from 192.168.10.0/24
ip access-list extended ospf-traffic-acl
remark OSPF traffic class
permit ospf 192.168.10.0 0.0.0.255 host 244.0.0.4
!
!ACL classifying SSH traffic sourced from a management network (192.168.20.0/24)
ip access-list extended mgmt-traffic-acl
remark CoPP remote management traffic
permit tcp 192.168.20.0 0.0.0.255 host 209.165.200.225 eq 22
!
!Once the ACLs are configured, they are applied to each access class
class-map match-all ospf-class
match access-group name ospf-traffic-acl
!
class-map match-all ssh-class
match access-group name mgmt-traffic-acl
!
!Apply the specific class to the actual policy (policy-map)
policy-map copp-policy
class ospf-class
!SSH traffic is limited to a rate of 15,000 bps; if traffic
!exceeds that rate, it is dropped
class ssh-class
police 15000 1500 1500 conform-action transmit exceed-action drop
!
!Finally, apply the policy to the control plane
control-plane
service-policy input copp-policy
Note
You can obtain an informative white paper on how to deploy CoPP from http://www.cisco.com/en/US/products/sw/iosswrel/ps1838/products_white_paper0900aecd802b8f21.shtml.
Scheduler Allocate/Interval
You can use the scheduler interval command to control the CPU time spent on processes versus interrupts. This is helpful when you are under attack or during a worm outbreak. When the router is handling thousands of packets per second, the console or Telnet/SSH access may be slow and it may be almost impossible do anything.
In the following example, process-level tasks will be handled no less frequently than every 500 milliseconds.
myrouter(config)# scheduler interval 500
In newer platforms, the scheduler allocate command is used instead of scheduler interval. The scheduler allocate command is used to configure two intervals:
• Interval with interrupts enabled
• Interval with interrupts masked
The following example includes the scheduler allocate command with the values included in AutoSecure (a Cisco IOS feature explained later in this chapter in the "Cisco IOS AutoSecure" section).
myrouter(config)# scheduler allocate 4000 1000
Cisco recommends these values for most environments.
Note
The scheduler interval and scheduler allocate commands should not cause negative effects. It is recommended that these two commands be part of your standard router configuration, unless you have a specific reason to avoid using them.
Policy Enforcement
An entire book could be devoted to a discussion of policy enforcement. Also, you must design the enforcement of security policies according to your organization goals. Therefore, this section cannot fully cover policy enforcement or provide recommendations specific to your own business organization. It can, however, outline some common strategies that you can use when configuring network infrastructure devices to make sure that access to the areas of your network and its devices is granted only when needed by authorized sources.
The most common security policy enforcement mechanism is the use of packet filters at the various edges of the network. For example, you can configure firewalls or ACLs on routers to act as the first line of protection against external threats. Again, you should configure security policies based on the area in which your infrastructure components reside. For example, you will not configure the same policies for your Internet edge devices as the policies configured for your datacenter, core, and so on. Many engineers call this "configuration per device role." The roles of your device should develop your configuration templates. You can take several best practices into consideration when developing such configuration templates:
• Always make sure that external authorized sources can only communicate with internal devices via the expected protocols and ports.
• RFC 3330 describes the special use of IP addresses that may require filtering from sources of external devices. You should always filter packets with RFC 1918 private IP addresses that are not expected to be routed on the Internet.
• Follow the basic antispoofing services defined in RFC 2827.
The common technique used to accomplish these tasks is called Infrastructure Protection ACLs (iACLs). You can also configure Unicast Reverse Path Forwarding (Unicast RPF) for antispoofing.
Infrastructure Protection Access Control Lists (iACLs)
Using iACLs is a technique that was developed by ISPs, however, it is now a common practice by enterprises and other organizations. Employing iACLs involves the use of ACLs that prevent direct attacks to infrastructure devices. You configure these ACLs to specifically allow only authorized traffic to the infrastructure equipment while allowing transit traffic. Cisco recommends that you configure iACLs into four different sections or modules:
1. On the Internet edge, deny packets from illegal sources (RFC 1918 and RFC 3330 addresses). In addition, deny traffic with source addresses belonging within your address space entering from an external source. For example, if your address space is 209.165.201.0/24, you should configure an iACL to deny traffic from any external source by using an address from this space. The following example includes iACL entries (part of ACL number 123) used to deny RFC 3330 special-use addresses.
access-list 123 deny ip host 0.0.0.0 any
access-list 123 deny ip 127.0.0.0 0.255.255.255 any
access-list 123 deny ip 192.0.2.0 0.0.0.255 any
access-list 123 deny ip 224.0.0.0 31.255.255.255 any
The following entries deny RFC 1918 traffic.
access-list 123 deny ip 10.0.0.0 0.255.255.255 any
access-list 123 deny ip 172.16.0.0 0.15.255.255 any
access-list 123 deny ip 192.168.0.0 0.0.255.255 any
2. Configure iACL entries providing explicit permission for traffic from trusted external sources destined to your infrastructure address space.
3. Deny all other traffic from external sources destined to infrastructure components addresses as shown in the following example.
access-list 123 deny ip any 209.165.201.0 0.0.0.255
4. Unlike ISPs, enterprises are the destination for traffic. The last section of the iACL permits all other normal backbone traffic destined to noninfrastructure destinations for only specific protocols and ports. For example, you can allow HTTP for a web server bank with IP address space 209.165.200.0/24, as follows:
access-list 123 permit tcp any 209.165.200.0 0.0.0.255 eq http
ISPs allow all transit traffic at the end of the iACL using a permit ip any any ACL entry.
Unicast Reverse Path Forwarding (Unicast RPF)
Unicast Reverse Path Forwarding (Unicast RPF) is a feature that can replace the use of RFC 2827 ingress traffic filtering techniques. Unicast RPF is configured and enabled on a per-interface basis. The main purpose of Unicast RPF is to verify that all packets received from a specific interface have a source address that is reachable via that same interface. The router drops all packets that do not comply.
Note
You must turn on Cisco Express Forwarding (CEF) for Unicast RPF to work.
Two Unicast RPF modes are available:
• Strict mode: Requires that the source IP address of an incoming packet has a reverse path to the same interface from which it has arrived.
• Loose mode: Requires that the source IP address of an incoming packet has a reverse path to any interface on the device (except null0). In many cases, an enterprise may have dual connections to the Internet; therefore, Unicast RPF strict mode is not feasible. Only use Unicast RPF strict mode in deployments where the reverse path entries match the traffic paths, otherwise you risk discarding legitimate traffic.
The following example demonstrates how to enable Unicast RPF strict mode on an interface (FastEthernet 1/0 in this case).
Router(config)# interface FastEthernet 1/0
Router(config-if)# ip verify unicast source reachable-via rx
The following example demonstrates how to enable Unicast RPF loose mode on an interface (Serial2 in this case).
Router(config)# interface Serial2
Router(config-if)# ip verify unicast source reachable-via any
Automated Security Tools Within Cisco IOS
The feature within Cisco IOS called AutoSecure enables you to lock down your routers by enhancing the security of the management and the forwarding planes. Similarly, you can perform automatic audit and self-configuration options with Cisco Security Device Manager (SDM).
Cisco IOS AutoSecure
Cisco AutoSecure disables the unnecessary global services previously discussed in this chapter. It also enables certain services that help further secure global services that are often necessary. In addition, Cisco AutoSecure hardens administrative access by enabling appropriate security-related logging features. It is recommended in most environments because it implements a range of best practices that help secure any organization. It also reduces the time required to configure each item by hand.
Note
Cisco AutoSecure was introduced in Cisco IOS Software Version 12.3 and in subsequent 12.3T releases for the Cisco 800, 1700, 2600, 3600, 3700, 7200, and 7500 Series Routers.
Cisco AutoSecure has two modes of operation:
• Interactive: Users select their own options for services and other security-related features.
• Noninteractive: This mode automatically enables a set of Cisco recommended security features and disables unnecessary services.
Tip
The Interactive mode enables you to have more control over the router security features that you want to enable. However, if you need to quickly secure a router without much human intervention, the noninteractive mode is appropriate.
You can also specify what part of the AutoSecure suite of commands and features you would like to configure. The following example shows the options of the auto secure command.
myrouter#auto secure ?
firewall AutoSecure Firewall
forwarding Secure Forwarding Plane
full Interactive full session of AutoSecure
login AutoSecure Login
management Secure Management Plane
no-interact Non-interactive session of AutoSecure
ntp AutoSecure NTP
ssh AutoSecure SSH
tcp-intercept AutoSecure TCP Intercept
<cr>
In the next example, the auto secure command is invoked with no options; therefore, the complete suite of configuration options is presented to the user.
myrouter#auto secure
--- AutoSecure Configuration ---
*** AutoSecure configuration enhances the security of
the router, but it will not make it absolutely resistant
to all security attacks ***
AutoSecure will modify the configuration of your device.
All configuration changes will be shown. For a detailed
explanation of how the configuration changes enhance security
and any possible side effects, please refer to Cisco.com for
AutoSecure documentation.
At any prompt you may enter '?' for help.
Use ctrl-c to abort this session at any prompt.
Gathering information about the router for AutoSecure
Is this router connected to internet? [no]: yes
Enter the number of interfaces facing the internet [1]: 1
Interface IP-Address OK? Method Status Protocol
FastEthernet0/0 unassigned YES NVRAM administratively down down
FastEthernet0/1 unassigned YES NVRAM administratively down down
Enter the interface name that is facing the internet: FastEthernet0/0
Securing Management plane services...
Disabling service finger
Disabling service pad
Disabling udp & tcp small servers
Enabling service password encryption
Enabling service tcp-keepalives-in
Enabling service tcp-keepalives-out
Disabling the cdp protocol
Disabling the bootp server
Disabling the http server
Disabling the finger service
Disabling source routing
Disabling gratuitous arp
Here is a sample Security Banner to be shown
at every access to device. Modify it to suit your
enterprise requirements.
Authorized Access only
This system is the property of So-&-So-Enterprise.
UNAUTHORIZED ACCESS TO THIS DEVICE IS PROHIBITED.
You must have explicit permission to access this
device. All activities performed on this device
are logged. Any violations of access policy will result
in disciplinary action.
Enter the security banner {Put the banner between
k and k, where k is any character}:
~ UNAUTHORIZED ACCESS TO THIS DEVICE IS PROHIBITED.
You must have explicit permission to access this
device. All activities performed on this device
are logged. Any violations of access policy will result
in disciplinary action.
~
Enable secret is either not configured or
is the same as enable password
Enter the new enable secret:1qaz@WSX
Confirm the enable secret:1qaz@WSX
Enter the new enable password:2wsx!QAZ
Confirm the enable password:2wsx!QAZ
Configuration of local user database
Enter the username: admin
Enter the password:1qaz@WSX
Confirm the password:1qaz@WSX
Configuring AAA local authentication
Configuring Console, Aux and VTY lines for
local authentication, exec-timeout, and transport
Securing device against Login Attacks
Configure the following parameters
Blocking Period when Login Attack detected: 15
Maximum Login failures with the device: 3
Maximum time period for crossing the failed login attempts: 60
Configure SSH server? [yes]: yes
Enter the domain-name: cisco.com
Configuring interface specific AutoSecure services
Disabling the following ip services on all interfaces:
no ip redirects
no ip proxy-arp
no ip unreachables
no ip directed-broadcast
no ip mask-reply
Disabling mop on Ethernet interfaces
Securing Forwarding plane services...
Enabling CEF (This might impact the memory requirements for your platform)
Enabling unicast rpf on all interfaces connected
to internet
Configure CBAC Firewall feature? [yes/no]: yes
This is the configuration generated:
no service finger
no service pad
no service udp-small-servers
no service tcp-small-servers
service password-encryption
service tcp-keepalives-in
service tcp-keepalives-out
no cdp run
no ip bootp server
no ip http server
no ip finger
no ip source-route
no ip gratuitous-arps
no ip identd
banner motd ^C UNAUTHORIZED ACCESS TO THIS DEVICE IS PROHIBITED.
You must have explicit permission to access this
device. All activities performed on this device
are logged. Any violations of access policy will result
in disciplinary action.
^C
security passwords min-length 6
security authentication failure rate 10 log
enable secret 5 $1$gGZi$aoXeicM9JVVMfi0K6lFl50
enable password 7 14141B180F0B7B79777C66
username admin password 7 030752180500701E1D
aaa new-model
aaa authentication login local_auth local
line con 0
login authentication local_auth
exec-timeout 5 0
transport output telnet
line aux 0
login authentication local_auth
exec-timeout 10 0
transport output telnet
line vty 0 4
login authentication local_auth
transport input telnet
line tty 1
login authentication local_auth
exec-timeout 15 0
line tty 192
login authentication local_auth
exec-timeout 15 0
login block-for 15 attempts 3 within 60
ip domain-name cisco.com
crypto key generate rsa general-keys modulus 1024
ip ssh time-out 60
ip ssh authentication-retries 2
line vty 0 4
transport input ssh telnet
service timestamps debug datetime msec localtime show-timezone
service timestamps log datetime msec localtime show-timezone
logging facility local2
logging trap debugging
service sequence-numbers
logging console critical
logging buffered
interface FastEthernet0/0
no ip redirects
no ip proxy-arp
no ip unreachables
no ip directed-broadcast
no ip mask-reply
no mop enabled
interface FastEthernet0/1
no ip redirects
no ip proxy-arp
no ip unreachables
no ip directed-broadcast
no ip mask-reply
no mop enabled
ip cef
access-list 100 permit udp any any eq bootpc
interface FastEthernet0/0
ip verify unicast source reachable-via rx allow-default 100
ip inspect audit-trail
ip inspect dns-timeout 7
ip inspect tcp idle-time 14400
ip inspect udp idle-time 1800
ip inspect name autosec_inspect cuseeme timeout 3600
ip inspect name autosec_inspect ftp timeout 3600
ip inspect name autosec_inspect http timeout 3600
ip inspect name autosec_inspect rcmd timeout 3600
ip inspect name autosec_inspect realaudio timeout 3600
ip inspect name autosec_inspect smtp timeout 3600
ip inspect name autosec_inspect tftp timeout 30
ip inspect name autosec_inspect udp timeout 15
ip inspect name autosec_inspect tcp timeout 3600
ip access-list extended autosec_firewall_acl
permit udp any any eq bootpc
deny ip any any
interface FastEthernet0/0
ip inspect autosec_inspect out
ip access-group autosec_firewall_acl in
!
end
Apply this configuration to running-config? [yes]:yes
In the previous example, the router has the interface (FastEthernet0/0) that is connected to the Internet. The AutoSecure utility applies predefined commands based on best practices for Internet-edge routers. The router then guides the user on enabling other features, such as defining a banner, configuring passwords and administrative accounts, and enabling Cisco IOS Firewall set or Context-Based Access Control (CBAC).
Cisco Secure Device Manager (SDM)
SDM is an intuitive web-based tool designed for configuring LAN, WAN, and security features on a router. SDM includes a feature called Security Audit that is used to verify your existing router configuration and make sure that it includes the recommended security mechanisms suited for most environments. The SDM Security Audit is based on the Cisco IOS AutoSecure feature.
Note
SDM does not support all AutoSecure features. For a complete list of the functions that Security Audit checks for, and for a list of the few AutoSecure features unsupported by Security Audit, go to http://www.cisco.com/en/US/products/sw/secursw/ps5318/products_user_guide_chapter09186a0080656061.html#wp1061799.
Complete the following steps to have SDM perform a security audit, and then fix the configuration deficiencies it finds.
Step 1. Log in to SDM via HTTPS. For example, if your router IP address is 192.168.10.1, you can access SDM by typing https://192.168.10.1.
Step 2. After you have logged in, select Security Audit from the left frame or navigation panel.
Step 3. Click Perform Security Audit. The Welcome page of the Security Audit Wizard appears.
Step 4. Click Next. The Security Audit Interface Configuration screen is shown.
Step 5. You have to tell SDM which of your router interfaces connect to the Internet (or outside networks) and which connect to your protected (or inside) networks. Select either the Inside or Outside check box to indicate where each interface connects and click Next.
Step 6. SDM verifies your router configuration and identifies any security deficiencies. A window pops-up displays listing the configuration options being audited and whether the current router configuration passes such tests. Optionally, you can save the audit report to a file by clicking Save Report.
Step 7. Click Close.
Step 8. The list of possible security problems is displayed. Check the Fix it boxes next to any problems that you want SDM to fix. You can view a description of each problem and a list of the Cisco IOS commands that will be added to your configuration by clicking Problem Description.
Step 9. Click Next. SDM may display one or more screens requiring you to enter information to fix certain problems. Enter the information as required and click Next for each of those screens.
Step 10. A summary page listing all the configuration changes that SDM will make is displayed. To send those changes to the router, click Finish.
Note
You can also use the One-Step Lockdown feature in SDM to test your router configuration for any potential security problems and fix them automatically.
Telemetry
The automated measurement and transmission of data for analysis is what many people call telemetry. Cisco routers and switches have different mechanisms that offer a form of telemetry. An example is NetFlow. You can use NetFlow to obtain statistical information that can help you identify and classify attacks. This information can be collected from the CLI or can be exported to monitoring tools such as Cisco Secure Monitoring, Analysis, and Response System (CS-MARS) and Arbor Peakflow. The use of monitoring and event correlation tools is recommended because it can save you numerous hours of your busy schedule trying to digest information from logs, NetFlow, and other sources.
Note
Detailed information about how to identify and classify attacks is covered in Chapter 3. However, this section includes several telemetry best practices that help you better prepare and protect your infrastructure.
You must accurately synchronize the time and date with network telemetry. This is why it is crucial to enable Network Time Protocol (NTP) in network devices. Imagine trying to analyze and correlate network events if all your routers, switches, firewalls, and other network devices have different times and dates. For instance, if you were analyzing firewall logs and correlating them to NetFlow data, and the time was not synchronized, this task could be impossible.
Note
You can obtain information about NTP at http://www.ntp.org or at http://www.cisco.com/en/US/tech/tk648/tk362/tk461/tsd_technology_support_sub-protocol_home.html.
Another best practice is to send network telemetry information over out-of-band (OOB) mechanisms because this minimizes the chance for disruption of the information that provides network visibility, which is critical to successfully operating and defending the network. This is why it is always recommended that you have a management VLAN or section of the network where an interface of each network device can communicate with management stations and systems.
NetFlow data helps you identify DDoS attacks, network worms, and other forms of undesirable traffic. In addition, it is a key auditing and forensics tool. For instance, you can collect NetFlow data and map Network Address Translations (NAT) and ensure that your policy enforcement measures are working as expected.
Note
Chapter 3 includes several NetFlow configuration examples. It also shows how you can identify and classify security events using event correlation tools, such as CS-MARS.
Endpoint Security
This section includes several best practices and tips that you can use when implementing techniques and tools to increase the security of your endpoints (workstations, servers, and so on). You need to perform two major tasks when you are preparing your organization to enhance endpoint security. The first is patch management and keeping the endpoint systems (servers and workstations specifically) up-to-date. The second is using security software like the Cisco Security Agent (CSA) on servers and user desktop machines to protect them against known and unknown security threats.
Patch Management
A solid patch management strategy is crucial with the rise of widespread worms and malicious code that targets known vulnerabilities on unpatched systems. This is why the increasing governance and regulatory compliance enforcement by organizations like HIPAA and Sarbanes-Oxley has pressed organizations hard to gain better control and oversight of their information assets.
The main objective of a patch management program is to create a consistently configured environment that is secure against known vulnerabilities in operating system and application software. Patch management solutions vary in design and implementation. Regardless, several technology-neutral best practices are listed in this section and can be followed no matter what patch management software or solution you use.
A good practice is to designate a point person or a team that is responsible for keeping up-to-date on newly released patches and security threats that affect the systems and applications deployed within your organization. Have a complete and accurate asset inventory to determine whether all existing systems are accounted for when preparing and deploying patches and updates.
Also, prioritize and schedule the necessary application patches/updates. A patch update cycle must exist to facilitate the application of standard patch releases and updates. You can perform the cycle in a scheduled time fashion or based on events. You can implement the time-based scheduled cycle weekly, biweekly, or monthly, depending on the organization policies. In contrast, you can coordinate the scheduling cycle with critical security patches and updates. This plan should help you deal with the prioritization and scheduling of updates that must be deployed in a more immediate fashion.
Preferably, you should test patches and updates before deploying them to your systems. In critical situations when a security patch is needed because of a worm or a security outbreak, detailed testing may not be possible or feasible. The initial phases of production rollout can be considered an additional component of the testing process. Rollouts are often implemented in tiers with the initial tiers often involving less critical systems. Based on the performance of these stages of the patch deployment process, the entire environment will be updated, and the testing process can be considered finished with the completion of final acceptance testing.
Regular audits and assessment help gauge the success and extent of patch management efforts. You should always determine what systems you need to patch for any given vulnerability or a bug. In addition, you should always verify that the systems that are supposed to be updated have been patched.
Patch management software packages are available from many vendors. The following are some of the most popular ones:
• IBM Tivoli
• Unicenter
• Microsoft SMS
• PatchLink
• Altiris
The major requirement for any patch management system is the ability to accurately track deployed hardware and software throughout the enterprise, including remote users and office locations.
Cisco Security Agent (CSA)
CSA provides several more robust security features than a traditional antivirus or a personal firewall solution. The rich security features of CSA include:
• Host intrusion prevention
• Protection against spyware
• Protection against buffer overflow attacks
• Distributed host firewall features
• Malicious mobile code protection
• Operating system integrity assurance
• Application inventory
• Extensive audit and logging capabilities
• Protection against file modification or deletion
The CSA solution has two major components:
• Cisco Security Agent Management Center (CSA-MC): The management console where all groups, policies, and agent kits are configured
• Cisco Security Agent: The agent installed on end-user machines
The CSA-MC is the central management system that allows you to define and distribute policies, provide software updates, and maintain communications to the CSAs installed in end-user machines and servers. CSA-MC comes with a list of predefined groups you can use to meet initial needs. A group is the only element required to build an agent kit. The use of groups eases the management of large numbers of agents. When using groups, you can consistently apply the same policy to numerous hosts.
Agent kits are the configuration and installation packages of the agent software to be deployed to end-user machines. You must associate agent kits with configured groups. Agents installed on end-user hosts are automatically placed into their assigned group or groups when they register with CSA-MC. The agents enforce the associated policies of each group.
Note
Chapter 12, "Case Studies," includes a case study showing the deployment of CSA. You can get more information and documentation at http://www.cisco.com/en/US/products/sw/secursw/ps5057/index.html.
It is recommended that you place the CSAMC server on your management network (management VLAN). When doing this, you need to understand how the agents communicate with CSAMC and vice versa. The agents communicate with CSAMC over TCP port 5401, with a fallback to TCP port 443 (if TCP port 5401 communication is not possible). By default, CSA Profiler uses TCP port 5402 to communicate with CSAMC; however, this is configurable. Make sure that any firewalls or filtering devices allow this communication. CSAMC should be reached by all systems that are running the agent.
Another important factor is that the hardware running CSAMC must be sized appropriately. The current version of CSAMC is capable of managing up to 100,000 agents. However, it is recommended that you install and strategically deploy additional CSAMC servers depending on your network topology and geographical needs.
Note
For a list of hardware requirements, refer to the release notes on the Cisco website at http://www.cisco.com/en/US/products/sw/secursw/ps5057/index.html.
During the lab test and pilot phases, it is recommended that you start by using the default CSA policies (depending on the type of system where the agent is installed). The default CSA policies provide a good level of protection to the end hosts. Tuning of these is recommended; however, these default policies are known for stopping new and unknown threats.
Always select at least one host per each distinct application environment during the initial testing phase. During the pilot, the test hosts should be a mirror sample of the production systems. In addition, you may want to use a test machine per each server type to ensure no negative impact from CSA agent software installation. It is also recommended that you create a group for each type of application environment that needs to be protected.
Building and tuning of CSA policies is a continuous task; therefore, you must have the proper staff and procedures to minimize the administrative burden. The security staff is not only responsible for maintaining the CSAMC policies, but also for creating and organizing exception rules appropriately, and for monitoring user activity. You can organize the exception rules as follows:
• Create a global exception policy to allow legitimate traffic and application behavior that is required on all the systems within the organization. Subsequently, add these global exception rules to this exception policy.
• Create one exception policy for each group.
• Apply these policies to their respective groups, and collect all necessary data to complete any additional tuning.
When you start the deployment of the agent kits throughout the organization, always start by deploying the agents in test mode throughout your organization. It is a best practice to collect and analyze results and start policy tuning (as needed). After the initial tuning is done, enable protection mode.
Note
Make sure that your security, operations, and engineering staff members are trained to support your deployment.
Network Admission Control
In Chapter 1, "Overview of Network Security Technologies," you learned the concepts of Network Admission Control (NAC) and the differences between the appliance-based approach and the architecture-based framework solution. The architecture-based framework solution is intended to use a collection of both Cisco networking and security technologies, as well as existing deployments of security and management solutions from other vendors. This section includes several best practices when implementing NAC within your environment. These best practices can be followed when preparing, designing, or implementing any of the NAC solutions (Framework or Appliance).
Note
Chapter 12 includes a case study where NAC is deployed. The configuration of NAC appliance and NAC Framework components is also in that chapter.
Phased Approach
To achieve a successful enterprise-wide deployment of the Cisco NAC solutions, it is first necessary to have a solid background in the operational, management, and support functions required by such a deployment. Create a clear and detailed test and implementation plan to overcome challenges and follow a phased approached. For instance, it is always strongly recommended that you test any new technology or product in a lab environment first. Subsequently, you should complete and carefully evaluate a pilot within a limited production environment. If at all possible, this environment should include a sample of the systems available within the rest of the production network. This allows your network and security staff to quantify the effects of the new NAC solution on the organization without actually affecting the production network. This may not be easy to do in many smaller environments; however, it is still recommended. Your security and network staff members will gain valuable training and experience with the new technologies being deployed and understand their interaction with the existing infrastructure.
The following are the key points and phases when planning, designing, testing, and deploying NAC throughout your organization:
• Readiness assessment: Complete a readiness assessment of your current infrastructure. Assuming that the organization has a corporate security policy, complete a gap analysis determining what NAC policies to develop.
• Stakeholders: Identify who will be the stakeholders during the initial tests and the rest of the deployment.
• Initial lab testing: Build an initial lab environment.
• Test plans: Create a detailed test plan for lab and limited-production pilot.
• Initial tuning: Complete any initial tuning of policies, configurations, and procedures on the test network.
• Final deployment strategy: Start the deployment in the production environment in accordance with the deployment model devised from the pilot environment. Monitor the deployment stages and tune accordingly.
Testing and validation are critical best practices. Proper lab testing can significantly reduce production downtime, help your network and security support staff to become familiar with the NAC solution, and assist in streamlining the implementation processes. To be effective, however, the organization must allocate the necessary resources to build and maintain the appropriate lab environment, apply necessary resources to perform the correct tests, and use a recommended testing methodology that includes measurement collection. Without giving each of these areas detailed attention, the testing and validation process may not meet the expectations of an organization.
Many organizations do not take the time to build the recommended test lab environment. Consequently, they have deployed solutions incorrectly and have experienced network failures that could have been isolated in a lab environment. In some environments, this is acceptable because the cost of downtime does not offset the cost of a sophisticated lab environment. Many organizations, however, cannot tolerate downtime. These organizations are strongly urged to develop the recommended test labs, test types, and test methodologies to improve production network quality.
Identify a section of the network where you can successfully test the new NAC features and devices you may be implementing. This helps to minimize potential exposure and to more safely identify any production issues. For example, in the previous chapter, you learned how to successfully deploy Layer 2, Layer 3, wireless, and remote access VPN NAC features on different sites within an organization. During the pilot selection phase, you may identify an area or branch office where you can test the specific features to be deployed.
Pilot selection identifies where and how the pilot will be completed. The limited-production pilot may start with one device in a low-impact area and extend to multiple devices in a higher-impact area. You should perform a risk analysis to identify what areas and users can deal with some possible production impacts. You can also use the "monitor-mode" approach. In other words, you can configure the Cisco Secure ACS policies for Healthy, Quarantine, and Transition. You should, however, still allow users to access the network. This way you can quantify the impact of enforcing the configured policies and determine what and why machines are being quarantined or placed into any other state.
Base the duration of this pilot on the time it takes to sufficiently test and evaluate all the software, hardware, and third-party features and their dependencies. During the pilot phase, monitor and document results in a manner similar to that used in the initial lab testing. This can include user surveys, pilot data collection, and problem identification.
Administrative Tasks
You need to recognize the administrative tasks that are involved in maintaining all the NAC policies. Some of the most common administrative tasks include:
• Keeping the operating system (OS) policies up-to-date: Update your NAC policies in ACS every time a new OS critical patch comes out. If you fail to update, the host will be allowed to the network without having this update installed. This can be an administrative headache. That is why it is important that you have clear procedures and the correct staff in place to be able to support these tasks.
• Keeping your antivirus policies up-to-date: In the NAC Appliance solution, you can configure the Clean Access Manager (CAM) to automatically download information from Cisco about the latest antivirus patches. In contrast, in NAC framework solution, you have to configure Cisco Secure ACS to work in concert with antivirus vendor software (such as Trend Micro OfficeScan policy server) to validate endpoint antivirus credentials. In this case, you also have to keep up with the latest signatures in the antivirus server. Commonly, this is done by automatic mechanisms helping the administrative overhead of such tasks.
• Maintaining remediation servers and third-party software: Remediation servers need to be up-to-date so that you can successfully remediate machines that are put into quarantine for not having the latest version of the required software dictated in the configured NAC policies. What good is an expensive car if you do not have the fuel to run it? The same principle applies here. You can have the most elaborate remediation servers and mechanisms; however, if you do not keep them up-to-date, they might not be useful when you try to fix machines that have been put into quarantine because of the discovery of security deficiencies. You can obtain the most current list of third-party remediation partners from http://www.cisco.com/en/US/netsol/ns466/networking_solutions_package.html.
Staff and Support
Prepare your networking and security staff members to support the common administrative tasks discussed in the previous section. In addition, establish a clear technical support structure and a well-structured call routing process to provide end users the correct resources as quickly as possible. Most NAC-related support calls to your help desk will involve users who are not able to access the network (or are granted limited access) because their machines do not meet the standards that the security policy is enforcing. Consequently, these calls will most likely be high severity/priority calls. This is a worthy consideration when you are planning the deployment of the NAC solution and evaluating the impact on your support staff.
Educating users on setting the severity of the service request accurately, based on the impact to the organization, allows you to allocate the appropriate resources to resolve problems more efficiently. Using online resources and education material will also help alleviate the support process. The "life expectancy" of these calls will depend on why the user cannot access the network. For instance, a user may open a service request because his machine has been placed into quarantine and has failed to install an OS patch or antivirus signature update. In another instance, a user workstation may be infected and require more detailed work.
Have clearly defined escalation procedures. Having solid escalation procedures prevents service requests from being escalated prematurely. During the troubleshooting process, the engineer assigned to assist the user may determine that an onsite engineer is required to resolve the issue. Have a clear process in place for the engineer to contact a resource onsite.
Summary
This chapter is one of the most vital chapters of this book. It covered the fundamentals of how to better prepare yourself, your network, and your organization as a whole against security threats and vulnerabilities. It presented risk analysis and threat modeling techniques and discussed the process of creating strong security policies. This chapter also described how necessary CSIRTs are for your organization and provided the most common techniques when forming and managing a CSIRT.
Topics such as security intelligence and social engineering were covered in this chapter. Securing your infrastructure is one of the most challenging tasks. This chapter gave you detailed information on how to protect your infrastructure against many different vulnerabilities and threats.
You learned how to better secure end-user systems and servers (endpoint security) in this chapter. In addition, you read a summary of how identity management and Network Admission Control (NAC) can help you protect against viruses, worm outbreaks, and other vulnerabilities. The best practices outlined in this chapter are crucial for any organization.