
Chapter 4
Crafting Interactive Panoramas
Humans see more information than what is directly in front of their eyes. Your peripheral vision registers what’s around you, and when you turn your head, you build a mental picture of a space. Unlike still images, interactive panoramas stimulate this natural process and are therefore a compelling way to showcase your projects.
This chapter covers all of Photoshop’s native options for adding interactivity so you can create your own interactive panoramas. You will also explore several third-party solutions to craft interactive panoramas by using a variety of web technologies, including Java, Flash, and QuickTime VR.
Chapter Contents
- Shooting panoramic images
- Merging photos into panoramas
- Cleaning up panoramas
- Adding interactivity to panoramas
Tips for Shooting Panoramic Images
Photoshop can stitch together multiple photos into a seamless panoramic image. These, of course, can be printed, turned into a video, or exported to become an interactive web experience. Yet whatever you do with your panoramic product, it’s important to remember the many factors you need to consider before shooting the source images that make up any panorama. The following is a list to keep in mind.
How Panoramic Images Evolved in Photoshop
Photoshop has had the capability to merge multiple photos into seamless panoramas since CS2. In CS3, Photoshop became much better at aligning and blending the seams between images, and in CS5 options were introduced to remove geometric distortion and/or vignetting inherent in some wide-angle lenses. All of these features mean it’s easy to create beautiful panoramas of arbitrary resolution in Photoshop. The latest content-aware technology in CS5 enables you to also clean up any hairline seams or regions of missing pixels along the edges of the photos. This means it’s now easy to create larger panoramas without cropping, yet Photoshop still has limited options for building interactivity into these panoramas.
Overlapping Images Ideally, images should overlap by about 40 percent for Photoshop to properly merge them. However, photos with a minimum of about 20 percent overlap can still be merged, although the blending between adjacent photos might not be optimized.
Note: Be forewarned that Photoshop might not be able to merge images with more than 70 percent overlap.
Planning Shot Quantity Images are typically shot in rows, composing an entire 360-degree ring, or in multiple rings at different altitudes in order to capture more of the sky. The number of pictures required depends on the focal length of your camera lens.
Zooming In for Higher Resolution When creating a panorama, you would need to take only three images if using an 8 mm hemispherical fish-eye lens, because each image has close to a 180-degree field of view (the third image is required for overlap). On the other hand, hundreds of images would be required to capture a full 360-degree panorama if using a 300 mm telephoto lens. Zooming in and capturing more photos and subsequently stitching them together is the way to build incredible resolution that far exceeds any camera sensor’s ability to capture megapixels.
Note: Motorized robotic camera mounts are available for creating extremely large panoramas measured in gigapixels. See http://gigapansystems.com for more information.
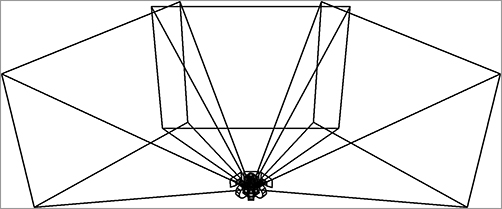
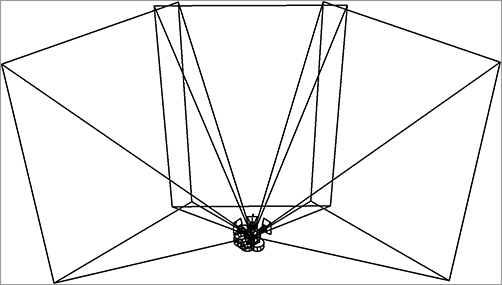
Understanding Focal Length vs. Field of View Camera focal length is more or less inversely proportional to field of view. Figure 4-1 shows a wide-angle lens having a large field of view.
Figure 4-1: This wide-angle lens has a large field of view.
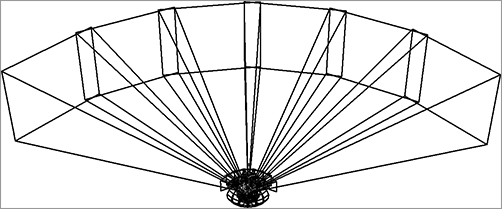
Fewer images are required to capture a panorama with a wide-angle lens as compared with a telephoto lens (see Figure 4-2).
Figure 4-2: A telephoto lens requires more pictures to cover the same space.
Holding the Camera vs. Using a Tripod Should you hold the camera or use a tripod? Photoshop is incredibly forgiving in the panorama-stitching process because the advanced Auto-Align and Auto-Blend algorithms it employs make stitching a mostly automatic process. However, if you are shooting a full 360-degree panorama by holding the camera, you are unlikely to overlap photos consistently and may even miss whole areas, making the panorama unusable.
The upside of using a telephoto lens is you can capture many more pixels in the same space as compared with a wide-angle lens. More pixels mean higher resolution, which translates into higher print quality, or a greater ability to zoom in and perceive detail in an interactive panorama. I recommend using a tripod if you have one, and holding the camera only for partial panoramas (fewer than 360 degrees). A degree ring is a welcome addition to any tripod because it helps you take pictures with consistent overlap (see Figure 4-3).
Figure 4-3: Use a tripod for the best results.
Photo courtesy of iStockphoto, © Narawon, Image #9297392
Using the LivePreview Mode The best way to figure out the number of degrees you need to rotate the camera between each shot is to activate the LivePreview mode on your camera (turning on its LCD) or to look through the viewfinder. Compare the position of a fixed object in adjacent shots. See how many degrees you can turn the camera while leaving about 40 percent overlap between shots.
Keeping Focal Length Consistent It’s critical not to change the focal length while you’re shooting panoramic photos, or Photoshop won’t be able to stitch the images together. If you are using a zoom lens with an adjustable focal length, I recommend resorting to one of the greatest of all human inventions: duct tape. That’s right, duct tape the zoom ring to the camera body, so the focal length doesn’t change during panorama capture.
Keeping the Camera Fixed in One Position Another rule is to keep the camera fixed in one position during panorama capture. If you are holding the camera, try to rotate the camera about an invisible axis running vertically through the camera body. If you’re using a tripod, make sure it has a firm footing before shooting, and try to get the vertical shaft plumb so that the tripod head is level. I’ve made the mistake of leveling the head without considering whether the shaft is plumb. The first few shots were fine, but the camera wasn’t level when the head was rotated more than 90 degrees.
Using a Bracket If you have a bracket that enables you to mount your camera in portrait orientation, consider shooting your panoramas this way (see Figure 4-4). You’ll capture a tall swath and may not have to shoot multiple rings to create a spherical panorama. On the other hand, you’ll have to take more photos going around the circle as compared with photos taken in landscape orientation.
Figure 4-4: Shooting in portrait orientation captures a taller swath.
Avoiding Automatic Camera Settings Photoshop will have problems blending images in a panorama if you let your camera automatically determine exposure values. Therefore, it’s essential to manually set white balance, aperture, ISO (light sensitivity) values, and shutter speed.
Choosing an Aperture Setting for the Size of the Iris When setting exposure manually, you’ll have to choose an aperture setting for the size of the iris (see Figure 4-5). If you leave the iris wide open, you’ll likely have problems with reduced depth of field. This can be used for dramatic effect in single photos so that only a narrow region is in sharp focus, but in panoramas you generally want everything to be in focus, so you might be tempted to go to the other extreme and tighten the aperture down all the way. However, the smallest aperture can introduce diffraction problems, causing everything to appear in soft focus. Therefore, I recommend selecting an aperture setting one or two stops from the smallest available on your lens. Note that the smallest aperture has the highest f-stop number.
Figure 4-5: Choosing an aperture setting for a panorama
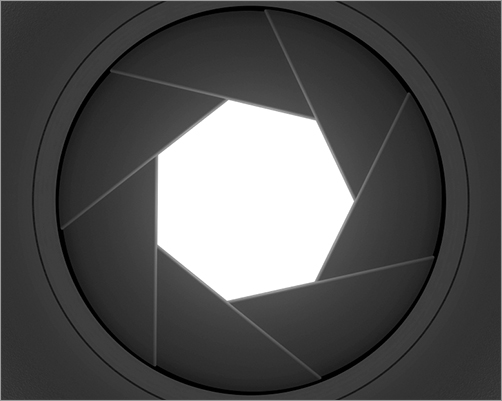
Photo courtesy of iStockphoto, © Geoffrey Holman, Image #5453933
Using a High ISO Value Select a high ISO value because modern digital single lens reflex (DSLR) cameras typically have very low noise and can handle a high value. Those of us who remember film photography are usually blown away by the high ISO values available in modern cameras. The higher the ISO, the faster shutter speed you can use. All things being equal, it’s preferable to use a faster shutter speed to minimize blur that can happen from vibration due to wind or cars driving past when working with a tripod, or due to camera shake when working handheld. These become even more of a problem when using a large focal length. Because of the potential for noise, I wouldn’t select the maximum ISO available, but a setting high in the camera’s range.
Selecting Shutter Speed Point the camera at the brightest region in your panorama (but not right at the sun, of course). Use this frame to select the shutter speed. You don’t want the highlights to be blown out, and you can recover detail from blacks later in Photoshop if necessary. Given your chosen aperture and ISO settings, select the shutter speed that properly exposes the image.
Balancing Autofocus with Manual The final consideration is focus. If you leave Autofocus on, the camera might refuse to shoot in areas of low contrast such as the sky. If you turn Autofocus off, and manually set focus at infinity, you might not capture detail in closer objects, especially while zoomed in. A hybrid approach is to shoot the first ring along the horizon with Autofocus on, and shoot the second elevated ring (capturing mostly the sky) with manual focus set at infinity.
In order to create a panoramic image from a series of stills, you must merge the individual shots into a composite whole. Photoshop’s Photomerge feature loads all merged shots as a series of layers in one document, and then repositions and distorts the layers so they align. Since Photoshop CS3, Photomerge also automatically blends the seams between the layers by creating layer masks to more accurately blend between adjacent shots. Before you begin, however, it’s important to understand the images you’ll be using in this section and how they were created.
Shooting Photos for Your Panoramic Image
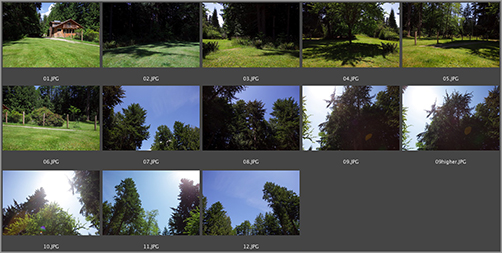
You can either shoot your own panorama photos or use the sample photos provided on the DVD. For the sample photos, I used a tripod with a degree ring and mounted the camera in landscape orientation. I determined by looking through the viewfinder that I needed to rotate the camera 60 degrees between shots while using a 24 mm lens. I shot a ring of six photos with the camera level and then tilted the camera up and shot another ring of six photos. After previewing the photos on the camera’s LCD screen, I noticed that one of the treetops was cropped, so I took another photo (09higher.JPG) to capture the missing pixels, bringing the shot count to thirteen. Figure 4-6 shows the results.
Figure 4-6: A collection of shots that will be used to create a panorama
The photos were stored in raw format on the camera SD card. Although Photoshop can merge raw files, it would take an inordinate amount of time because of their massive size. If you were creating a panorama for print, you might want to merge raw files for the highest resolution, but our goals in this chapter’s tutorials are to create interactive panoramas for the Web. With this goal in mind, I greatly reduced the amount of data that will be handed to Photomerge through the use of Image Processor.
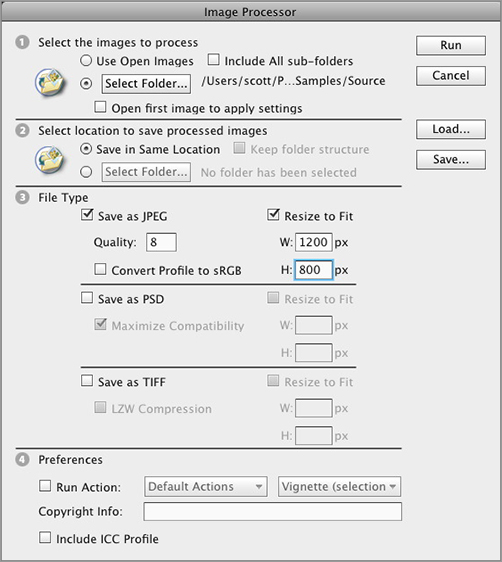
In other words, I chose File Scripts Image Processor, selected the folder of raw images, selected Save As JPEG and Resize To Fit, typed 1200 for width and 800 for height, and clicked Run (Figure 4-7). The samples provided on the DVD are these JPEGs.
Figure 4-7: Use Image Processor to convert raw files to JPEG
Note: You can optionally access Image Processor from Adobe Bridge by choosing Tools Photoshop Image Processor.
Photomerge is the name of the feature in Photoshop that stitches individual shots together into (mostly) seamless panoramas. Photomerge can do quite a lot of processing on source photos to blend them into a panorama. It can reposition, rotate, remove lens distortion and vignetting, load files into a stack, create layer masks to blend layers together, map the resulting image onto the inside of a cylinder or sphere, or alternately try to keep lines of perspective straight.
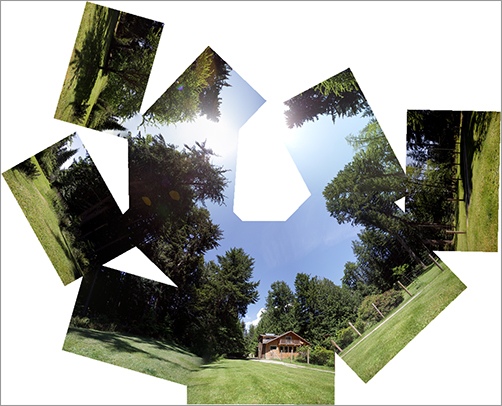
You don’t have to have Photomerge to perform all of the preceding tasks, however. For example, Figure 4-8 shows the result of the Collage option, which merely repositions and rotates the source images to align areas of similarity. Although this isn’t very practical, it does show you that Photomerge is doing a lot more than aligning pixels when creating a typical panorama. We’ll be creating two panoramas with the source files on the DVD: a cylindrical panorama using the photos from the first ring, and a spherical panorama using all 13 shots.
Figure 4-8: Photomerge Collage option
Note: Choose Auto layout if using a fish-eye lens, and Photomerge will correct for spherical distortion associated with such a lens. Choose Perspective layout only if you are doing a partial panorama centered on a building.
Cylindrical Panoramas
Cylindrical panoramas typically require fewer source images than spherical panoramas. Both geometries describe the inner surfaces of mathematical objects that images are mapped onto. Cylindrical panoramas enable the viewer to pan left and right as though they were turning a gigantic cylinder while standing in its center. Cylindrical panoramas are more appropriate in scenes that do not have a lot of detail in the vertical dimension, such as the distant view of a city’s skyline. The following steps show how to create a cylindrical panorama:
1. Choose File Automate Photomerge.
2. Select Files from the Use drop-down, click the Browse button, and navigate to the Source folder on the DVD.
3. Select the photos you plan to merge. Hold down the Shift button and then click each image in the selection, up to six images. If using the images I’ve provided, select 01.JPG through 06.JPG.
4. Select the Blend Images Together and Geometric Distortion Correction check boxes (Figure 4-9). Vignette Removal is not needed here because the aperture was stopped down sufficiently to avoid noticeable vignetting (darkening around the outer edges of the image due to optical issues associated with a large iris).
Figure 4-9: Photomerge dialog box
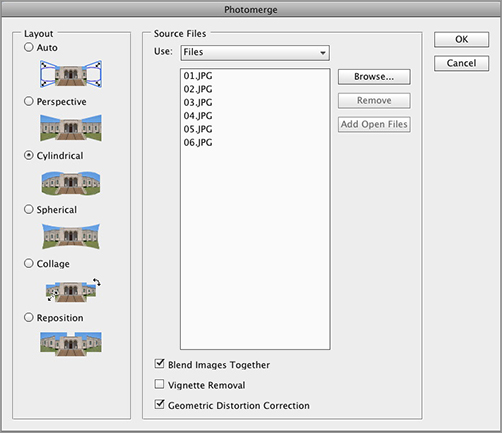
5. Under the Layout section of the dialog box, select Cylindrical and click OK. Photoshop will go to work creating the panorama, and you’ll see images flicker on the screen for a minute or two. Figure 4-10 shows the result.
Note: You can paint directly on the layer masks that were automatically generated to customize the blend between images if you feel that Photoshop didn’t get it right. Shift+click layer masks to toggle them off and on to see what they are doing.
Figure 4-10: Cylindrical panorama

6. Save the file as Cylindrical Panorama.psd.
Photoshop has done an excellent job blending the seams between individual images. However, this panorama still has some issues that require cleanup; we will get to them in due course.
Spherical Panoramas
The most immersive of all projection methods, spherical panoramas put the viewer in the center of a giant sphere with photographic imagery mapped onto its inner surface. Spherical panoramas allow up-and-down in addition to left-and-right rotation.
Spherical projection is most appropriate to exterior scenes that have tall objects nearby, such as the street-level view of an urban canyon filled with high-rise buildings, or the 200′ trees surrounding my house. Spherical panoramas are also appropriate in interior spaces where too much ceiling and floor would be cropped if using cylindrical projection. To create a spherical panorama, follow these steps:
1. Choose File Automate Photomerge.
2. Select Files from the Use drop-down, click the Browse button, and navigate to the Source folder on the DVD.
3. Select the images you plan to use. If using my images, select 01.JPG, hold down Shift, and click 12.JPG to select all 13 images.
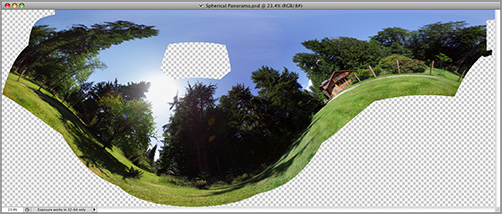
4. Select the Blend Images Together and Geometric Distortion Correction options. Choose Spherical layout and click OK. Figure 4-11 shows the result.
Figure 4-11: Spherical panorama
5. Save the file as Spherical Panorama.psd.
Don’t be alarmed at the way spherical projection looks in 2D. The wavy ground line seems unnatural but gets straightened out when the pixels are stretched to fill the inside surface of a sphere. There are holes at the top and bottom of the image where pixels were not captured. We will fill these holes in the next section.
You’ll notice that neither cylindrical nor spherical panoramas completely fill their document windows; there is a ragged transparent border around the pixels. The missing pixels typically occur at the zenith (straight up) and nadir (straight down). These transparent areas can either be cropped away or filled with pixels by using a variety of techniques. In the case of the spherical panorama, the hole in the sky must be filled or this flaw would unnecessarily distract from the immersive illusion we are trying to create. We’ll start by retouching the zenith and nadir, and then blend the seams that still exist between the extreme left and right edges of the panoramas.
Zenith and Nadir Retouching
If you’re using Photoshop CS5, the new content-aware features make zenith and nadir retouching much easier. If you’re using an older version, there are still plenty of retouching tools to get the job done. The following steps show how to fill the holes at the top and bottom of the cylindrical panorama:
1. Open Cylindrical Panorama.psd from the work you did before or use the sample file from the DVD.
2. Choose Layer Flatten Image, and transparent areas are filled with white.
3. Press Shift+W once or twice to select the Magic Wand tool. Set the options as shown in Figure 4-12, namely New Selection, zero Tolerance, Contiguous, and Sample All Layers. Click a white pixel along the ragged outer edge to select the whole region comprising both zenith and nadir areas.
Figure 4-12: Magic Wand options
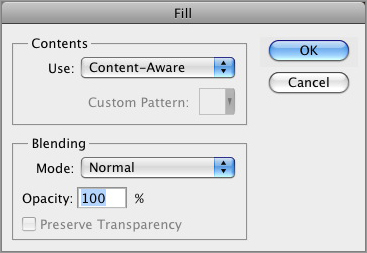
4. Choose Edit Fill and verify that Content-Aware is selected in the Use drop-down (Figure 4-13). Click OK, and after a short delay for processing, the trees and grass are filled in as if by magic.
Note: If you are using a version of Photoshop prior to CS5 or CS5 Extended, use the Clone Stamp tool to painstakingly brush similar pixels into white areas.
Figure 4-13: Content-aware fill
5. Press Cmd+D / Ctrl+D to deselect all pixels. Figure 4-14 shows the result. The upper and lower edges of the image look very good.
Figure 4-14: Zenith and nadir filled

6. Save the image as Cylindrical Panorama.jpg and select High as the quality level.
Making Seamless 360-Degree Panoramas
Photoshop generally does a good job of blending the seams between adjacent images. However, the seam between the extreme left and right edges is not blended at all. This becomes a problem if you want to add interactivity to a 360-degree panoramic image, because this final seam would be visible. Fortunately, there is a method to blend this last seam that I call the Switcheroo. However, before you get to that, you’ll have to cut up the panorama in order to blend the last remaining seam and then retouch both zenith and nadir.
Cutting Your Cylindrical Panorama and Blending the Seam
To cut the image into two equal parts and then place them in independent layers, follow these steps:
1. Open Cylindrical Panorama.jpg from the work you did before or use the sample file from the DVD.
2. Press Cmd+A / Ctrl+A to select all pixels.
3. Choose Select Transform Selection. Click the tiny middle-left anchor on the options bar to set the transform center along the left edge. Verify that width and height are unlinked (click the Link button if necessary), and then type 50.00% for width and click the Commit button (Figure 4-15). Now you have the left half of the image precisely selected.
Figure 4-15: Setting selection transformation options
4. Choose Layer New Layer Via Copy. The selection disappears, and the left half of the image is pasted on Layer 1.
5. Cmd+click / Ctrl+click Layer 1’s thumbnail to select all the pixels on this layer.
6. Press Shift+Cmd+I / Shift+Ctrl+I to invert the selection, thus selecting the right half of the image.
7. Target the Background layer and choose Layer New Layer Via Copy. The selection disappears, and the right half of the image is pasted on Layer 2.
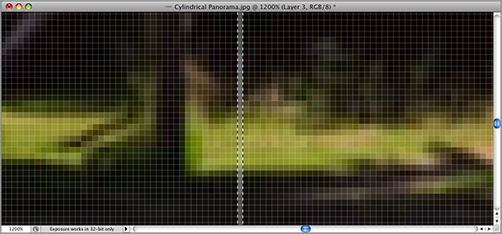
8. Toggle the Background layer off and notice the thin seam that appears in the middle of the document window. Zoom way in until you can see the individual pixels of the seam (Figure 4-16).
9. Choose the Single Column Marquee tool. Click and drag in the document window until the column is perfectly aligned with the seam.
10. Toggle the Background layer on, target the Background layer, and press Cmd+J / Ctrl+J to copy the selection to a new layer, called Layer 3. Rename Layer 3 to Seam 1.
Figure 4-16: Selecting the seam
11. Cmd+click / Ctrl+click Seam 1’s layer thumbnail to load its pixels as a selection.
12. Target Layer 2 and press the Delete key on the Mac or the Backspace key on a PC to remove the seam from this layer. Choose Select Deselect.
13. While holding Cmd/Ctrl, click both Layer 1 and Seam 1 and then press Cmd+E / Ctrl+E to merge them.
14. Double-click the Background layer to convert it into a regular layer and click OK. Now you can get rid of it by dragging the Background layer into the Trash at the bottom of the Layers panel.
You have successfully cut the image into two equal parts and placed them on independent layers. Now for the Switcheroo.
15. Press V to select the Move tool.
16. Hold down Shift and drag the Layer 2 image all the way to the left edge of the document window.
17. Target Layer 1, hold down Shift, and drag the image to the right edge of the document window. The layers will snap into position when you get close to the edge of the document window. Figure 4-17 shows the result.
Figure 4-17: Switching the left and right sides of the image

18. The seam between Layer 1 and Layer 2 is too noticeable. There is a fair bit of overlap but not close enough to 40 percent for Photoshop to align automatically. Zoom in and press V to move the layer closer to align it manually with Layer 2.
19. Turn the opacity of Layer 1 down to 50% so you can see partially through it.
20. Nudge Layer 1 to the left and up slightly by using the arrow keys when you get close. Use the light coming through the tree branches to help you align the layers. Restore the opacity of Layer 1 to 100%.
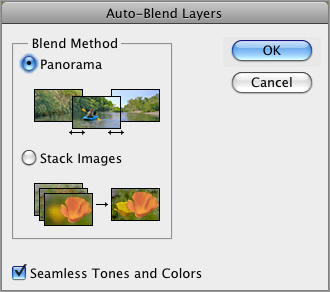
21. Shift+select Layer 1 and Layer 2 and choose Edit Auto-Blend Layers.
22. Select Panorama and select Seamless Tones And Colors in the Auto-Blend Layers dialog box (Figure 4-18).
23. Click OK, and masks are added to both layers, making the blend between the layers much better.
Figure 4-18: Auto-Blend Layers dialog box
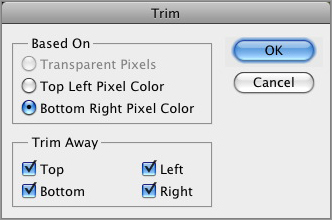
24. Choose Image Trim. Choose the Bottom Right Pixel Color radio button and click OK (Figure 4-19). The extra space left over after aligning the last seam is trimmed away.
Figure 4-19: Trim dialog box
25. Choose Layer Flatten Image. Press W to select the Magic Wand tool and then click within the thin strip of white that exists along the lower-right edge.
26. Press Shift+F5 and click OK to use the content-aware algorithm to fill in the missing pixels. Choose Select Deselect.
27. Save as Retouched Seamless Cylindrical Panorama.jpg with High quality (see Figure 4-20).
Figure 4-20: Seamless cylindrical panorama

Cutting Your Spherical Panorama and Blending the Seam
The spherical panorama’s final seam is blended in much the same way by dividing the image into two equal layers and then swapping their positions to expose the last seam. After we blend this seam, we’ll retouch the missing zenith and nadir areas:
1. Open Spherical Panorama.psd from the work you did before or use the sample file from the DVD.
2. Press Cmd+E / Ctrl+E to merge all the layers (which by default are selected) into a single layer. Rename this layer Base.
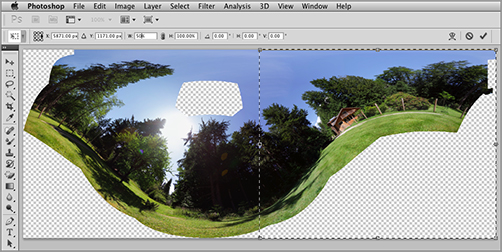
3. Press Cmd+A / Ctrl+A to select all. Choose Select Transform Selection. Click the tiny middle-left anchor on the options bar to set the transform center along the left edge, type 50.00% for width, and click the Commit button.
4. Press Cmd+J / Ctrl+J to copy the selection to Layer 1.
5. Target the Base layer. Press Cmd+A / Ctrl+A to select all. Choose Select Transform Selection. Click the tiny middle-right anchor on the options bar to set the transform center along the right edge, type 50% for width (Figure 4-21), and click the Commit button.
Figure 4-21: Transforming the selection by 50% in width
6. Press Cmd+J / Ctrl+J to copy the selection to Layer 2.
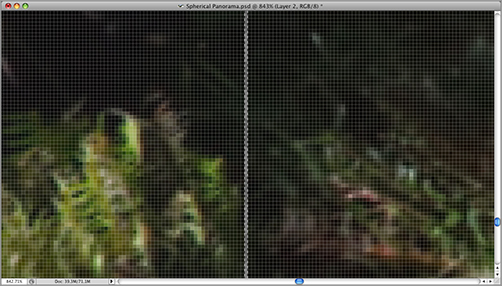
7. Toggle the Base layer off and notice the thin seam that appears in the middle of the document window. Zoom way in until you can see the individual pixels of the seam. Choose the Single Column Marquee tool. Click and drag in the document window until the column is perfectly aligned with the seam (Figure 4-22).
Figure 4-22: Selecting the single-pixel-wide seam
8. Toggle the Base layer on, target Base, and press Cmd+J / Ctrl+J to copy the selection to a new layer, called Layer 3. Rename Layer 3 to Seam. (There is no Seam 2, so Seam 1 should just be Seam).
9. While holding Cmd/Ctrl, click Seam’s layer thumbnail to load its pixels as a selection. Target Layer 2 and press the Delete key on the Mac or the Backspace key on the PC to remove the seam from this layer. Choose Select Deselect.
10. Drag the Base layer into the Trash at the bottom of the Layers panel.
You have again cut an image into two equal parts and placed them on independent layers—now for the Switcheroo.
11. Press V to select the Move tool. Shift+drag Layer 2 all the way to the left edge of the document window. Target Layer 1 and drag it to the right edge of the document window.
12. Use the left- and right-arrow keys to nudge Layer 1 pixel by pixel until it aligns with Layer 2 (Figure 4-23).
Figure 4-23: After the Switcheroo
13. Shift+click Layer 2 and choose Edit Auto Blend Layers. Click OK in the Auto Blend Layers dialog box.
14. Choose Image Trim, select the Transparent Pixels radio button, and click OK. The seam between Layer 1 and Layer 2 disappears.
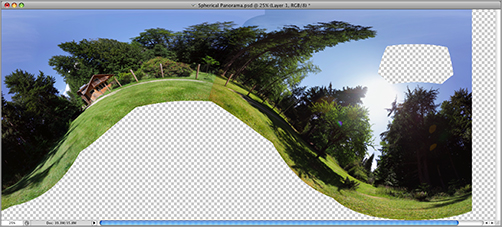
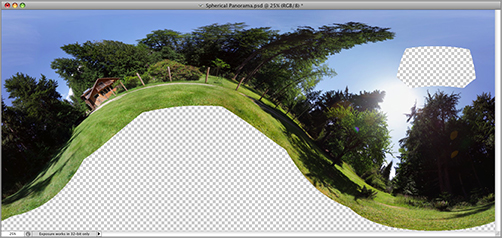
15. Save the image as Seamless Spherical Panorama.jpg with High quality (Figure 4-24).
Next on the agenda is to retouch the hole in the sky that is visible at the zenith of the spherical panorama and to clone in more grass at the nadir.
16. Choose Layer Flatten Image, press W to select the Magic Wand, and click a white pixel inside the hole in the sky.
Figure 4-24: Seamless spherical panorama needing zenith and nadir retouching
17. Press Shift+F5 and click OK in the Fill dialog box. The hole is filled with blue sky that matches the color and luminance values fairly well. Choose Select Deselect.
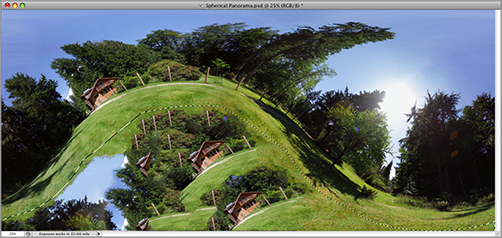
18. Click in the large white area, hold down Shift, and click in the smaller noncontiguous adjacent white area to select the entire nadir of the spherical panorama. Press Shift+F5 and click OK to use the content-aware algorithm to fill in the missing pixels. This time the result is flawed, almost comically so (Figure 4-25). The content-aware algorithm fails when the area to fill is too large.
Figure 4-25: Flawed content-aware fill in too large an area
19. Choose Select Deselect, press S to select the Clone Stamp tool, and press the square bracket keys to adjust the brush size if necessary.
20. Hold down the Option/Alt key and click a point within the grass that you’d like to clone.
21. Release the key and then paint to stamp these pixels in a new location. Continue reselecting new clone points as you paint to keep sampling areas of grass. Fill in the entire nadir with grass by using the Clone Stamp tool (see Figure 4-26).
Figure 4-26: Retouched seamless spherical panorama
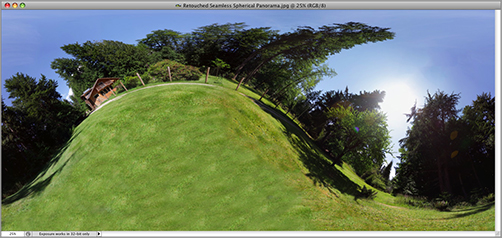
22. Save the image as Retouched Seamless Spherical Panorama.jpg and select High as the quality level.
3D Painting
If you’re using Photoshop CS4 Extended or CS5 Extended, you can preview the way the spherical panorama will look mapped to the inside of a sphere. In addition, you can optionally perform zenith and nadir retouching directly on the sphere with 3D painting tools. In the following steps, you’ll map the spherical panorama inside a sphere and paint on it in 3D:
1. Open Seamless Spherical Panorama.jpg from the work you did before or use the sample file from the DVD.
2. Choose 3D New Shape From Layer Spherical Panorama. After waiting a while for processing, you’ll see a zoomed-in detail of one part of the panorama. Notice in the Layers panel that you now have a vector 3D layer with a nested texture map containing the raster panorama image.
3. You can resize vector layers without loss of image quality. Choose Image Image Size. Select the Resample Image option, deselect Constrain Proportions, and type 800 for Width and 600 for Height (Figure 4-27). Click OK. Double-click the Zoom tool to quickly switch to 100% magnification.
4. Press N to select the 3D camera toolset. Choose the Zoom The Camera tool and drag upward in the document window to zoom out. Keep doing this until the Standard Field Of View is close to 11 mm on the options bar (Figure 4-28).
Figure 4-27: Adjusting the image size after 3D layer creation
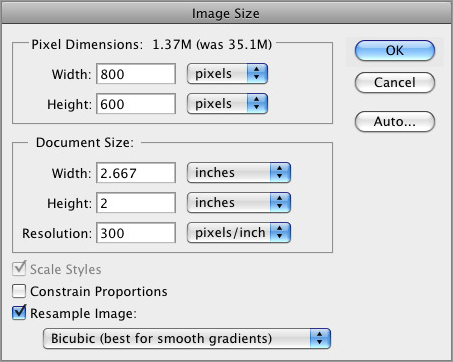
Figure 4-28: 3D Camera toolset
5. Using a combination of the Orbit and Roll The 3D Camera tools (on the options bar), reorient the camera so you are looking at the house. As you do this, you’ll get a sense of how the 3D panorama works interactively within Photoshop.
6. Navigate to the zenith and retouch the hole in the sky by using the Spot Healing Brush or Clone Stamp tool. Navigate to the nadir and clone stamp in the grass. The nice thing about painting in 3D is that what you see is what you get. The downside is that painting is slowed by the overhead of translating the 3D mapping coordinates to pixel locations in the 2D texture map.
Note: You can employ 2D retouching techniques on a texture mapped onto a 3D object by double-clicking the nested map in the Layers panel, and thus opening it in a separate document window.
7. Save the image as 3D Panorama.psd.
Adding Interactivity to Panoramas
This section offers several methods for adding interactivity to panoramas so that viewers of your imagery can gain a better understanding of the space in love which your design exists. In the previous section, you mapped a spherical panorama onto the inside of a 3D sphere and saw how you could rotate it in real time. In this section, you’ll record this interaction in a video. Then you’ll export the panorama to Zoomify, which gives a degree of user interaction, although it is not a true panorama technology. In addition, you’ll create truly interactive panoramas by using Java, QuickTime VR, and Flash.
Animating and Rendering 3D Panoramic Videos
By using the animation capabilities in Photoshop CS4 Extended or CS5 Extended, you can export a video that shows the virtual camera panning and zooming within the 3D sphere. Although this method isn’t really interactive (because the video follows a predetermined flight path), it gives viewers a spatial sense through camera motion. It’s also notable because we are creating video without using a video camera. These steps show how to export a video from a 3D panorama:
1. Open 3D Panorama.psd from the work you did before or use the sample file from the DVD.
2. Choose Window Animation.
3. Expand the Background layer track by clicking its disclosure triangle.
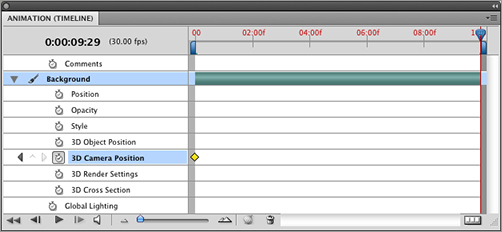
4. Click the time-vary stopwatch in the 3D Camera Position track to create an initial keyframe at time zero.
5. Drag the Current Time Indicator (CTI) to the extreme-right edge of the timeline (Figure 4-29).
Figure 4-29: Creating the initial keyframe in the Animation panel
6. Press N to select the 3D Camera tools. Using a combination of the Orbit and Roll tools (on the options bar), reorient the camera so you are looking at a different part of the panorama. Try to keep the horizon line level. Pressing the spacebar toggles playback onscreen.
Note: Adding intermediate keyframes helps control camera roll and orientation. To add a keyframe, simply move the CTI and then transform the camera by using the 3D toolset.
7. Choose File Export Render To Video. Specify an output path and codec options, and click Export.
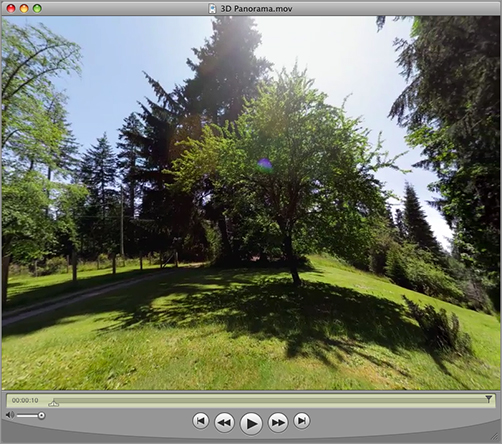
8. Play your rendered video or open the 3D Panorama.mov sample file provided on the DVD (Figure 4-30).
Figure 4-30: 3D Panorama movie
9. Save the file as Animated 3D Panorama.psd.
Exporting to Zoomify
Zoomify is an interesting technology that slices a large image into many smaller tiles and then reassembles the tiles in an interactive web control that loads tiles as needed. Zoomify is similar to Google Maps in how it works, and best of all there is a Zoomify exporter within Photoshop that you can use without “royalties, usage fees, traffic tracking requirements, or other strings.”
Note: Zoomify offers several commercial versions of its product with additional functionality at its website, www.Zoomify.com.
To use Zoomify, follow these steps:
1. Open Retouched Seamless Cylindrical Panorama.jpg from the work you did before or use the sample file from the DVD.
2. Choose File Export Zoomify.
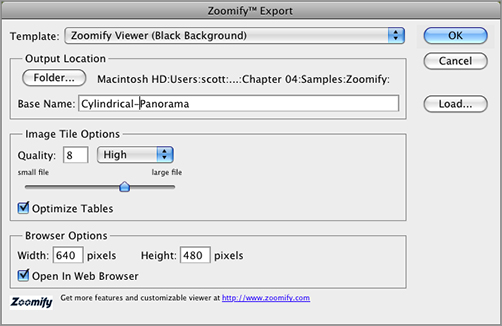
3. In the Zoomify Export dialog box, select Zoomify Viewer (Black Background) from the Template drop-down. Choose an output folder on your hard drive by clicking the Folder button. Type Cylindrical-Panorama as the base name, set Quality to High, and set Width and Height to 640 and 480 repectively.
4. Select the Open In Web Browser check box and click OK (Figure 4-31).
Figure 4-31: Zoomify Export options
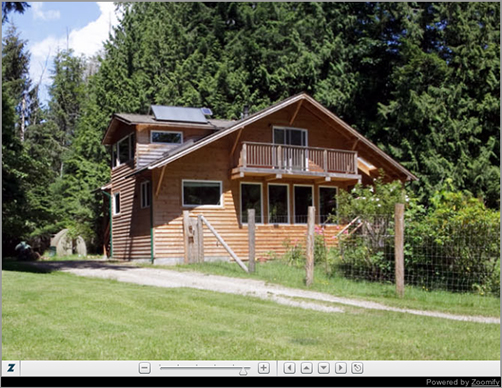
5. Use the navigation controls at the bottom of the Zoomify control to navigate the panoramic image. As you navigate, observe how the tiles appear blurry at first and then get sharper (Figure 4-32).
Figure 4-32: Using the Zoomify control in a browser
Creating Java Panoramas with PTViewer
PTViewer is a free Java applet (available at www.fsoft.it/panorama/ptviewer.htm) that displays panoramic images. Java was released in 1995 and developed by Sun Microsystems (now a subsidiary of Oracle Corporation). Java applets will run in any web browser that has a Java Virtual Machine (JVM) installed. According to a June 2010 survey (which you can see at www.adobe.com/products/player_census/flashplayer/), Java reaches 76 percent of Internet viewers.
To run the Java applet, you must first have a JVM. (You can get one at www.java.com). Then three files placed in the same folder are all that’s required to display the interactive panorama: the panorama image, the HTML file, and the Java archive file containing the applet code. You can play the applet locally or remotely on the Web. The following steps show how to create a Java panorama with PTViewer:
1. Open Retouched Seamless Cylindrical Panorama.jpg from the work you did before or use the sample file from the DVD.
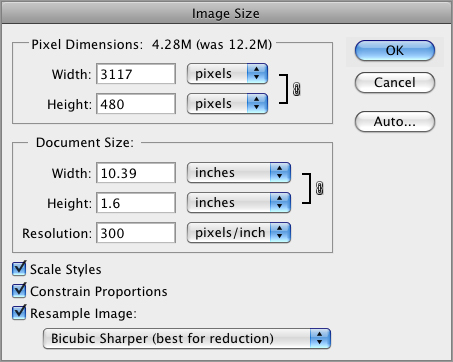
2. Choose Image Image Size. Select the Constrain Proportions check box and select Bicubic Sharper (Best For Reduction) as the resizing algorithm. Type 480 as the Height and click OK (Figure 4-33).
Figure 4-33: Downsampling a large panorama
3. Copy the PTViewer folder from the DVD to your hard drive. Choose File Save As, navigate to the PTViewer folder, and use the abbreviation RSCP.jpg rather than the full description Retouched Seamless Cylindrical Panorama, because spaces in the filename will not work on a web server.
4. Open java-pano.html in a simple text editor that does not apply formatting, such as Notepad on the PC or TextWrangler on the Mac. Edit the file value from panorama.jpg to RSCP.jpg and save java-pano.html (Figure 4-34).
Figure 4-34: Editing HTML code that controls the Java applet
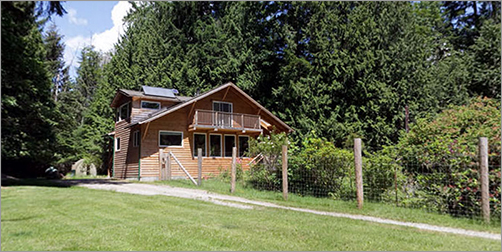
5. Double-click java-pano.html to load the page locally in your default web browser (Figure 4-35). Watch as the panorama starts to automatically rotate, with speed and initial location set by other parameters in the HTML file. Drag in the panorama to pan left and right. There is a limited ability to pan up and down, controlled by the relationship between the aspect ratio set for the applet (currently 800×400) and the aspect ratio of the panorama (3117×480).
Figure 4-35: The Java panorama in a browser
Generating QuickTime VR and Flash Panoramas with Pano2VR
There are several third-party solutions for generating QuickTime VR and Flash interactive panoramas. My favorite is Pano2VR by Garden Gnome Software (available at http://gardengnomesoftware.com/pano2vr.php), which works on Mac, PC, and Linux and generates both QuickTime VR and Flash interactive panoramas. You can use a free trial version to follow along with this tutorial. I’m using the Mac version here, but the other versions are similar.
According to the same June 2010 survey noted earlier, QuickTime reaches 58 percent of Internet viewers, and Flash reaches 99 percent. The figures are a little misleading because QuickTime reaches 100 percent of Mac users, and there are serious security issues surrounding Flash. You should consult your webmaster to select the appropriate web technology to deploy panoramas.
The following steps show how to generate QuickTime VR and Flash panoramas with Pano2VR:
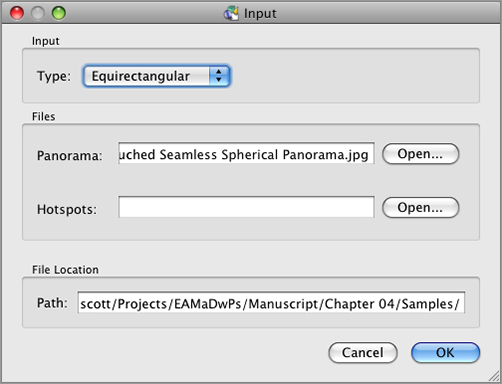
1. Launch Pano2VR and click the Select Input button. In the Input dialog box (Figure 4-36), select Equirectangular as the type and click the Open button for the panorama. Locate and select Retouched Seamless Spherical Panorama.jpg either from your own work or the DVD. Click OK to close the Input dialog box.
Figure 4-36: Input option in Pano2VR
2. In the main Pano2VR interface, select Transformation from the New Output Format drop-down and click the adjacent Add button.
3. In the Transformation/Thumbnail Output dialog box that appears, select Equirectangular from the Type drop-down and deselect the Use Default View check box in the Preview area.
4. Drag the Tilt and Roll sliders until the horizon flattens out in the preview image. I used 42.2 for Tilt and –33.7 for Roll (Figure 4-37). Type 5235 as the Width value (the original size of the input), select PNG as the output format, and click OK. Choose Yes when prompted whether you want to create the output file now.
5. Click the Select Input button again. In the Input dialog box, select Equirectangular as the type and click the Open button for the panorama. Locate and select the file you just transformed: Retouched Seamless Spherical Panorama_out.png. Click OK to close the Input dialog box.
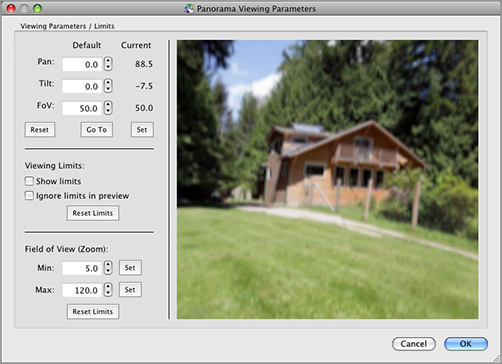
6. Click the Modify button in the Viewing Parameters area of the main dialog box to open Panorama Viewing Parameters dialog box. Set the FoV (field of view) to 50 degrees. Drag the preview in the Panorama Viewing Parameters dialog box toward the house to set the initial view (see Figure 4-38). Click OK and then Yes.
Figure 4-37: Transformation options
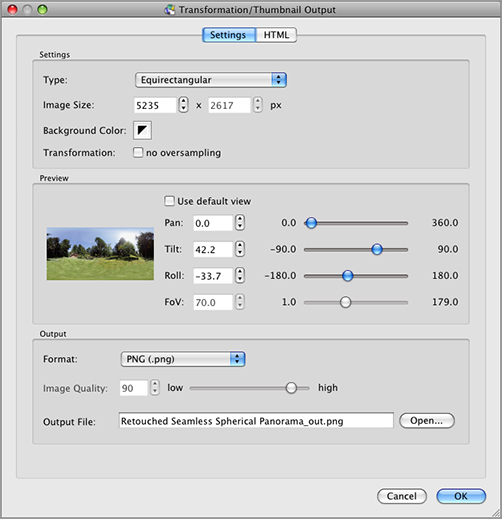
Figure 4-38: Panorama Viewing Parameters
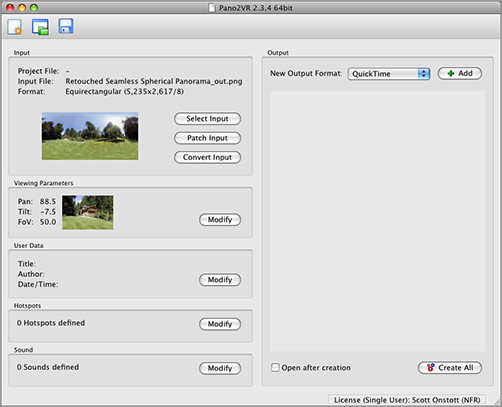
7. Click the red minus button for the Transformation output to remove it from the queue. Select QuickTime from the New Output Format drop-down and click the Add button (Figure 4-39).
Figure 4-39: The Pano2VR main interface
8. In the QuickTimeVR Output dialog box, set Cube Face Size to 1600 (above-optimal values are sharper), select Enable Auto Rotation, and set QTVR/Panorama.mov as the output filename and relative path (Figure 4-40).
9. Click the HTML tab at the top of the dialog box. Select the Enable HTML File check box and select normal.ggt from the Template drop-down. Use QTVR/Panorama.html as the output file (Figure 4-41). Click OK and Yes.
10. Double-click the Panorama.html file to view the embedded QuickTime VR panorama.
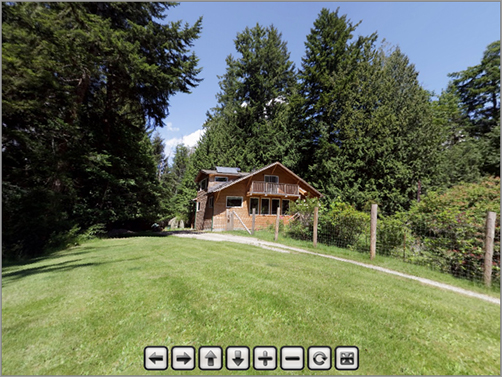
11. Flash panoramas are exported in the same way as QuickTime VR panoramas. I’ll leave it up to you to export a Flash panorama of this project on your own. Double-click Panorama.html inside the Flash folder on the DVD to view the final result (Figure 4-42).
Figure 4-40: QuickTime VR settings
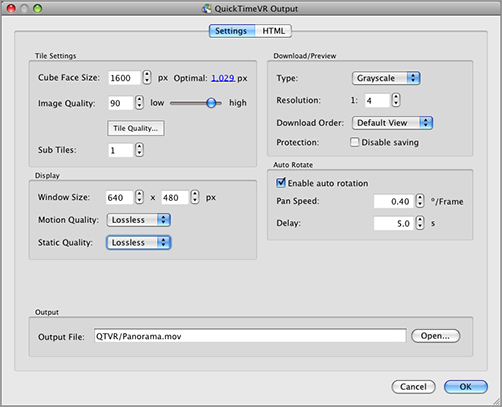
Figure 4-41: HTML settings
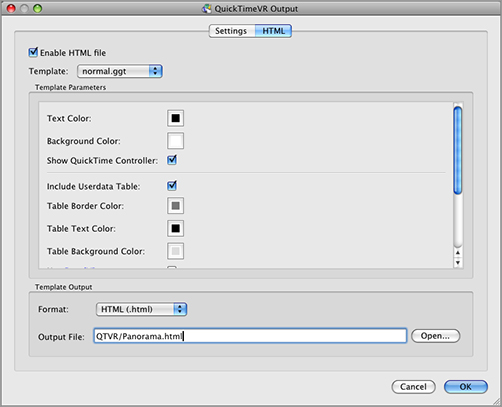
Figure 4-42: Flash panorama with skin (controls at bottom of screen)
In this chapter, you’ve learned everything you need to know to create interactive panoramas. From all the considerations required to shoot panoramic images, to merging photos into panoramas, to cleaning up and retouching zenith and nadir areas, to a wide variety of ways for adding interactivity, you have new skills to showcase your projects in compelling ways.