
Chapter 9
Illustrating 3D Models
Creating photo-realistic renderings from 3D models is an extremely complicated and time-consuming process that many architects outsource to experts in 3ds Max, Maya, or other high-end 3D packages. This chapter is about using the Extended version of Photoshop to go in the opposite direction: creating non–photo-realistic illustrations based on 3D models. The bonus is that non–photo-realistic illustration is a relatively fast process. Instead of trying to perfectly simulate reality, there is power in telling your visual story by using abstract and artistic methods.
Chapter Contents
- Illustrating with smart filters
- Illustrating with render settings
- Using painterly approaches to illustrating models
Illustrating with Smart Filters
Filters have been part of Photoshop for 20 years. You have probably used Gaussian Blur, Smart Sharpen, Lens Blur, Lens Correction, and even Vanishing Point occasionally. But have you ever wondered when you’d be able to use one of the literally 100 other filters? Illustrating a 3D model is the perfect opportunity to try some of these classic algorithms out. Here we go:
1. Open Denver Public Library.dae from the DVD.
2. Press K to select the 3D Object tools, and click the Rotate The 3D Object tool if it hasn’t already been selected. Type -90 in the X Orientation box and press Return/Enter (Figure 9-1) to match the coordinate system of the SketchUp model to Photoshop’s coordinate system.
Figure 9-1: Denver Public Library 3D model
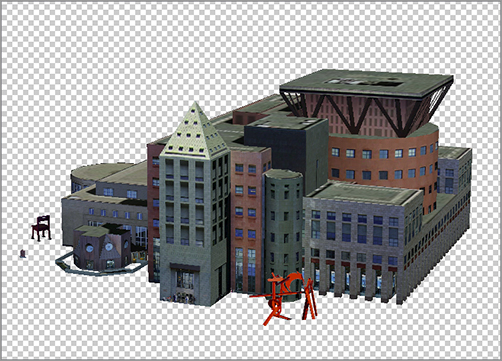
3D model by 3D Warehouse user Camelot (http://sketchup.google.com/3dwarehouse/details?mid=c49febea15033576ff5587f19e3bcdbb&prevstart=0). Design by Michael Graves.
3. The document window is square by default. Choose Image Image Size, select Resample Image, deselect Constrain Proportions, and change the Width unit drop-down to pixels. Type 1200 for Width and 900 for Height (Figure 9-2). Click OK to close the Image Size dialog box. Changing the image size does not adversely affect the quality of a 3D layer as it would a raster layer.
4. Press N to select the 3D Camera tools. Choose Front from the View drop-down on the options bar.
5. Select the Zoom The 3D Camera tool on the options bar, click the Perspective Camera button, change the Standard Field Of View drop-down to mm, and type 24 in the adjacent text box. The full camera choices are detailed in Figure 9-3.
Figure 9-2: Changing the image size
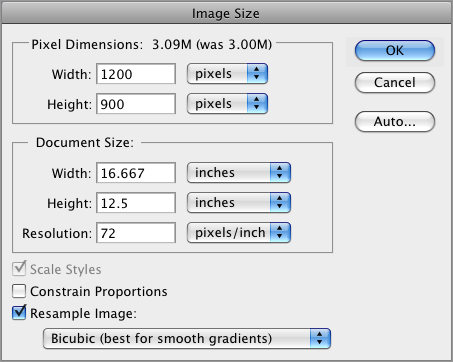
Figure 9-3: 3D Camera tool options
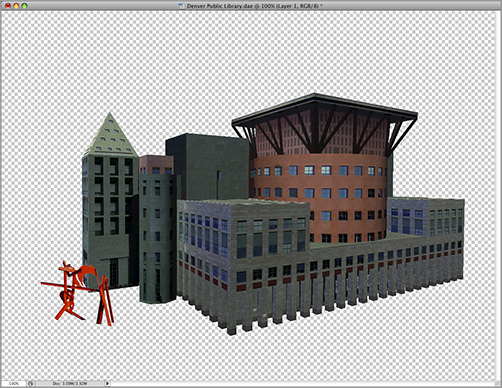
6. Select the Orbit The 3D Camera tool on the options bar and drag to the left to get an oblique view of the model. Select the Walk The 3D Camera tool and drag upward to move the camera closer and thus enlarge the size of the model in the document window (see Figure 9-4).
Figure 9-4: Composing a view of the model
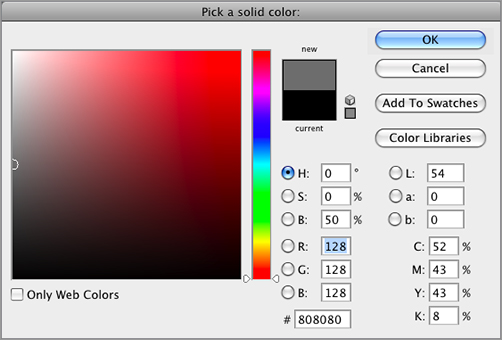
7. Click the Add A New Fill Or Adjustment Layer button at the bottom of the Layers panel and select Solid Color from the menu that appears. Select medium gray in the Color Picker by dragging along the left edge of the color ramp until 128 appears in R, G, and B (Figure 9-5). Click OK.
Figure 9-5: Selecting medium gray
8. Press Cmd+[ / Ctrl+[ to move the current layer below the 3D layer. Now you have a medium gray backdrop. Rename Color Fill 1 to Backdrop and Layer 1 to 3D Model. Drag Backdrop’s layer mask into the Trash at the bottom of the Layers panel to get rid of it.
9. Press Opt+[ / Alt+[ to select the 3D model layer. Press Cmd+Shift+N / Ctrl+Shift+N, type Rasterized in the New Layer dialog box, and click OK.
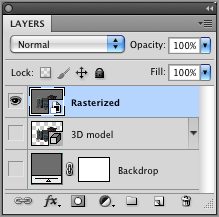
10. Press Cmd+Opt+Shift+E / Ctrl+Alt+Shift+E to stamp the visible layers to layer Rasterized. Toggle off layers Backdrop and 3D Model by clicking their eye icons in the Layers panel.
11. Right-click layer Rasterized and choose Convert To Smart Object from the contextual menu (Figure 9-6). By applying filters to a smart object, the changes remain nondestructive and re-editable.
Figure 9-6: Layers panel after creation of stamped Rasterized layer
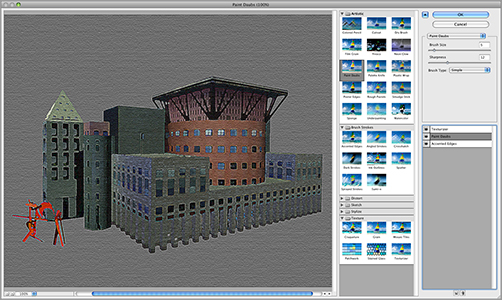
12. Choose Filter Filter Gallery. Click the disclosure triangle (Figure 9-7) to expand the categorized list of filters if it’s not already open. Open the Brush Strokes category and select Accented Edges. Set Edge Width to 1, Edge Brightness to 15, and Smoothness to 3.
Figure 9-7: Using the Filter Gallery to create an automatic illustration
13. Click the New Effect Layer button at the bottom right of the massive dialog box. Open the Sketch category and select Note Paper (the grayscale thumbnail shows this is a grayscale filter). Set Image Balance to 14, Graininess to 3, and Relief to 6 (Figure 9-7). Click OK to close the Filter Gallery.
14. Press Cmd+Shift+N / Ctrl+Shift+N, type Illustration 1 in the New Layer dialog box, and click OK.
15. Press Cmd+Opt+Shift+E / Ctrl+Alt+Shift+E to stamp the visible layers to the Illustration 1 layer. Now toggle this layer off.
16. Double-click the words Filter Gallery under the Rasterized layer to reopen the large dialog box. Click the Delete Effect Layer button.
17. Open the Artistic category and select Paint Daubs. Set Brush Size to 5, Sharpness to 12, and Brush Type to Simple.
18. Click the New Effect Layer button and click Accented Edges in the Brush Strokes category. Notice that the settings are the same as the last time you applied this effect, in step 12.
19. Click the New Layer Effect button, open the Texture category, and select Texturizer. Select Canvas from the Texture drop-down. Set Scaling to 100% and Relief to 4. Select Top from the Light drop-down, and leave Invert deselected.
20. Drag Paint Daubs above Accented Edges in the effect list. The illustration changes subtly (Figure 9-8). The order of effects can be significant—effects are evaluated in order from bottom to top. Click OK to close the Filter Gallery.
Figure 9-8: Creating an entirely different look with a different combination of filter effects
21. Press Cmd+Shift+N / Ctrl+Shift+N, type Illustration 2 in the New Layer dialog box, and click OK.
22. Press Cmd+Opt+Shift+E / Ctrl+Alt+Shift+E to stamp the visible layers to the Illustration 2 layer. Now toggle this layer off.
23. Save the image as Library Illustration.psd.
Create another illustration on your own. The Filter Gallery was designed for experimentation. There is seemingly an infinite number of permutations available by combining filter effects. When you’re satisfied, create a new layer and stamp the contents of the smart object onto it.
Illustrating with Render Settings
The appearance of 3D layers in the document window is controlled by render settings. By skillfully compositing shaded illustrations, line art, and wireframe views, you can create compelling abstract illustrations. Here’s how it’s done:
1. Open SF MOMA.dae from the DVD.
2. Press K to select the 3D Object tools and click the Rotate The 3D Object tool if it’s not already selected. Type -90 in the X Orientation box and press Tab twice. Type -45 in the Z box and press Return/Enter (Figure 9-9).
3. Choose Image Image Size, select Resample Image, deselect Constrain Proportions, and change the Width unit drop-down to pixels. Type 1200 in the Width box and 900 in the Height box.
4. Press N to select the 3D Camera tools. Choose Front from the View drop-down on the options bar.
Figure 9-9: San Francisco Museum of Modern Art 3D model
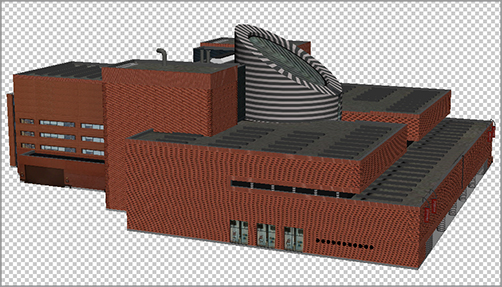
3D model by Google (http://sketchup.google.com/3dwarehouse/details?mid=a73dbc944067ca13ce65c15d9459044a&prevstart=0). Design by Mario Botta.
5. Select the Zoom The 3D Camera tool on the options bar and click the Perspective Camera button.
6. Choose the Orbit The 3D Camera tool and drag a short distance straight up to get an aerial view of the museum. Choose the Pan The 3D camera tool and drag down slightly to center the model in the document window (Figure 9-10).
Figure 9-10: Composing a view of the model
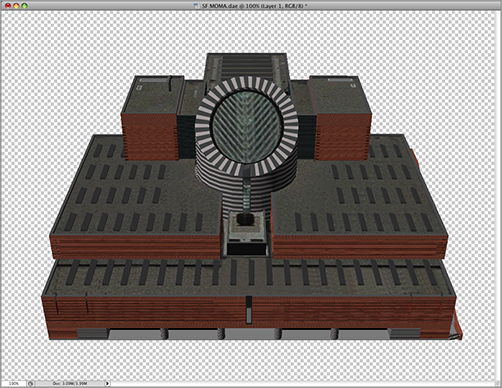
7. Choose Window 3D if the 3D panel isn’t already open. Click the Filter By: Whole Scene button at the top of the 3D panel and select the Shaded Illustration preset from the Render Settings drop-down (Figure 9-11).
Figure 9-11: Selecting a Render Settings preset
8. Rename Layer 1 to SF MOMA.
9. Press Cmd+Shift+N / Ctrl+Shift+N, type Shaded Illustration in the New Layer dialog box, and click OK.
10. Press Cmd+Opt+Shift+E / Ctrl+Alt+Shift+E to stamp what is currently visible onto the Shaded Illustration layer. Now toggle this layer off and target layer SF MOMA.
11. In the 3D panel, select the Wireframe preset from the Render Settings drop-down. The mesh triangulation (Figure 9-12) detracts from the pristine geometry of the design. You will fix this next.
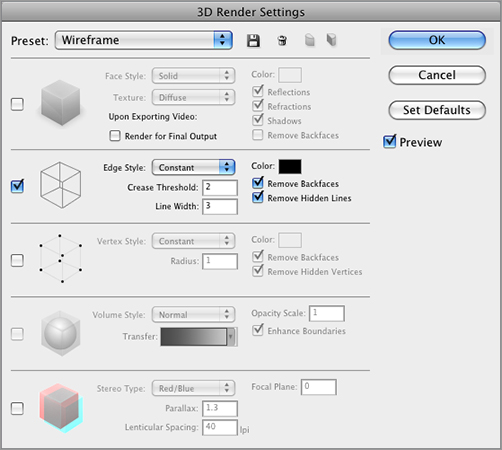
12. Click the Edit button adjacent to the Render Settings drop-down in the 3D panel. In the 3D Render Settings dialog box that appears, set Crease Threshold to 2 and set Line Width to 3 (Figure 9-13). Click OK. The triangulation is gone, and the wireframe is thicker.
13. Press Cmd+Shift+N / Ctrl+Shift+N, type Wireframe in the New Layer dialog box, and click OK.
14. Press Cmd+Opt+Shift+E / Ctrl+Alt+Shift+E to stamp what is currently visible onto the Wireframe layer. Now toggle this layer off and target layer SF MOMA once again.
15. In the 3D panel, select the Line Illustration preset from the Render Settings drop-down.
16. Press Cmd+Shift+N / Ctrl+Shift+N, type Line Illustration in the New Layer dialog box, and click OK.
Figure 9-12: The Wireframe preset suffers from mesh triangulation.
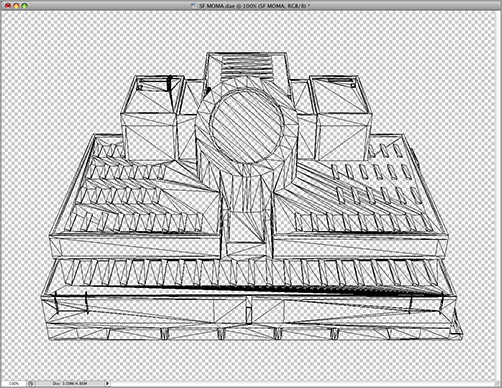
Figure 9-13: Customizing render settings
17. Press Cmd+Opt+Shift+E / Ctrl+Alt+Shift+E to stamp what is currently visible onto the Line Illustration layer.
18. Choose Layer New Fill Layer Gradient, type Backdrop in the New Layer dialog box that appears, and click OK.
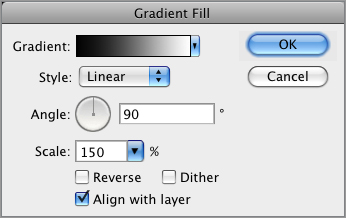
19. Select the Black, White gradient in the Gradient Fill dialog box and increase Scale to 150% to soften the transition from black to white (Figure 9-14). Click OK.
Figure 9-14: Customizing the backdrop gradient
20. Drag layer Backdrop to the bottom of the layer stack in the Layers panel. Drag Backdrop’s layer mask to the Trash icon in the lower-right corner of the Layers panel.
21. Toggle off layer SF MOMA. Toggle on layers Line Illustration and Wireframe. Target layer Wireframe.
22. The black wireframe on layer Wireframe blots out the white wireframe on Line Illustration. You can combine these effects with a layer mask. Click the Add Layer Mask button at the bottom of the Layers panel.
23. Select the Gradient tool from the main toolbox (press Shift+G to cycle between it and the Paint Bucket tool). Press D to select the default colors and then X to exchange foreground with background so that black is in the foreground.
24. On the options bar, open the Gradient Picker and select Foreground To Transparent. Select the Linear Gradient button and select Dither and Transparency (Figure 9-15).
Figure 9-15: Selecting gradient options
25. Hold down Shift and drag from the bottom of the building to the top (Figure 9-16). The wireframe gradually transitions from white to black.
Figure 9-16: Creating a gradient mask on layer Wireframe that gradually reveals the Line Illustration layer

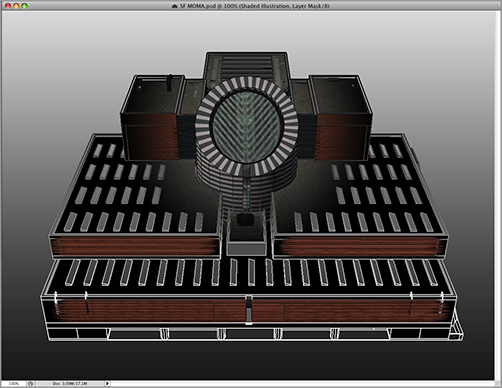
26. Toggle on layer Shaded Illustration and target this layer. Opt+click / Alt+click the Add Layer Mask button at the bottom of the Layers panel to add a black mask that completely obscures this layer. You will reveal the Shaded Illustration layer in stages.
27. Press G to select the Gradient tool. Click the Radial Gradient button on the options bar and press X so that White is the foreground color.
28. Hold down Shift and drag from the center of the glass atrium to the edge of the building, as shown in Figure 9-17. Perform this step twice more to progressively brighten the gradient and thus reveal more of the Shaded Illustration layer.
29. Press B to select the Paintbrush tool. Press the F5 key to open the Brushes panel. Select the Round Fan bristle brush (new in CS5 Extended), shown in Figure 9-18.
Figure 9-17: Creating a radial gradient mask that gradually reveals the Shaded Illustration layer
Figure 9-18: Selecting one of the new bristle brushes
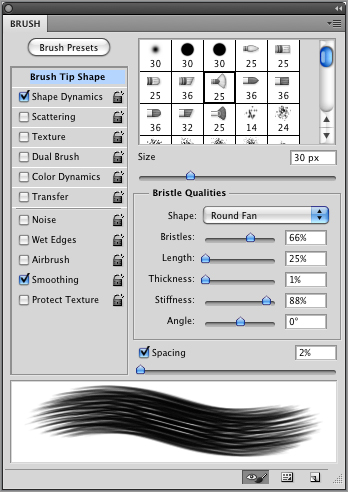
30. You’ll use the bristle brush to reveal some of the brick on the front of the building by painting in white on Shaded Illustration’s layer mask. The bristle brush is especially nice as brushstrokes are evident in the individual bristle tips. Paint across the façade as shown in Figure 9-19. Hold down Shift after you begin painting to ensure that the brush strokes are perfectly horizontal. The arrows in Figure 9-19 indicate the direction and extents of brushstrokes made to partially reveal the brick texture.
Figure 9-19: Selecting a bristle brush to paint on the layer mask and reveal selected parts of the shaded illustration
31. Save the image as SF MOMA.psd. Compare Figure 9-20 with Figure 9-10 to see how far you’ve come from the 3D model. The result has a unique abstract quality you don’t normally see in 3D models. Variations on this technique have great potential for generating attractive illustrations.
Figure 9-20: Composite of 3D render settings makes an attractive illustration
Using Painterly Approaches to Illustrating Models
Using brush tools to create an illustration can result in a handmade look typically associated with traditional media. However, I’m not suggesting you paint an illustration completely from scratch unless you happen to have an innate talent or desire to take up digital painting as a hobby. It is much faster and more efficient to start with a 3D model as the basis of your “painting.”
In this section, you’ll explore two painterly tools: the Art History Brush (introduced in Photoshop 5.5) and the Mixer Brush (new in Photoshop CS5 Extended). Both brushes help you simulate the look of traditional paintings by using markedly different methods. The Art History Brush uses gestural algorithms to simulate the way the hand typically moves a brush, whereas the Mixer Brush blends pixels by simulating physical bristles interacting with paint on the canvas.
Art History 101
What does art history have to do with Photoshop? The Art History Brush is related to the History Brush, and you don’t need to know anything about Renoir or Monet to use these tools. Both tools source their paint from a history state (marking a step you took in Photoshop). The Art History Brush differs from the History Brush by adding gesture to the brushstroke through a variety of algorithms. Let’s give it a try:
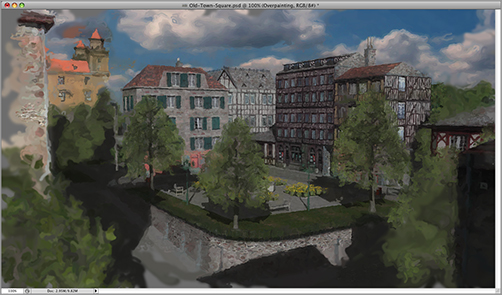
1. Open Old Town Square.jpg from the DVD (Figure 9-21). This image was exported from a SketchUp 3D model.
Figure 9-21: Old Town Square 3D model exported from SketchUp
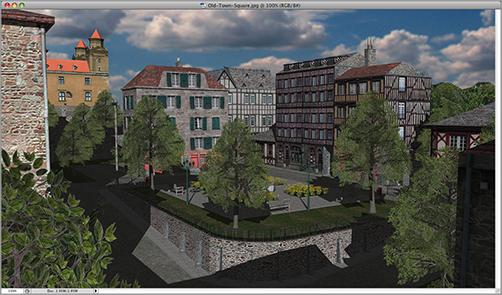
Model by 3D Warehouse user Dandis (http://sketchup.google.com/3dwarehouse/details?mid=343435e453a39621e5c675092f6a529b&prevstart=0)
2. Press Cmd+Shift+N / Ctrl+Shift+N, type Underpainting in the New Layer dialog box that appears, and click OK.
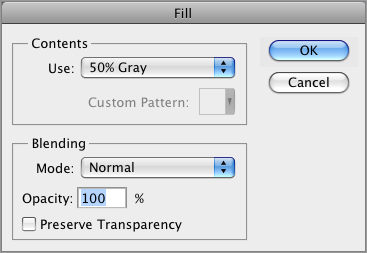
3. Press Shift+F5 to invoke the Fill dialog box. Select 50% Gray from the Use drop-down (Figure 9-22), and click OK. Think of this gray as your canvas.
Figure 9-22: Filling a blank layer with 50% gray
4. Press Shift+Y to cycle to the Art History Brush (it’s on a flyout with the History Brush). Select a 30-pixel soft round brush from the picker on the options bar. Select Tight Medium from the Style drop-down, type 50 px in the Area box, and click the Tablet Pressure Controls Size button if you are using a tablet (Figure 9-23). If you are using a mouse, you can adjust brush size with the [ and ] keys.
Figure 9-23: Setting Art History Brush options

Note: Although it is possible to paint with more-complex brushes including bristle tips while using the Art History Brush (for more-interesting facture), my MacBook Pro bogs down and the strokes appear only after a lag of several seconds. Perhaps in the future, computers will be able to keep up in real time and thus enable more-complex painterly effects. For now, I recommend sticking with the soft round brush, whose effects are calculated much faster.
5. Starting with a larger brush (pushing hard on the stylus on a pressure-sensitive tablet), paint a few brush strokes and observe the Art History Brush in action (Figure 9-24). Large strokes appear with dynamic tight medium curls.
Figure 9-24: Painting a few brushstrokes with the Art History Brush
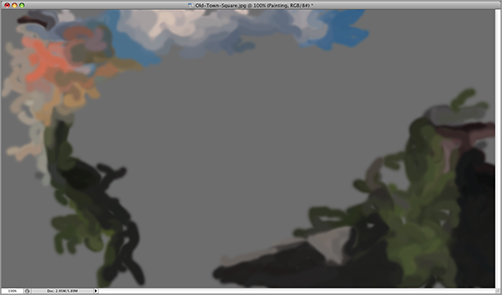
6. Using the same large brush, cover the entire canvas with brushstrokes (Figure 9-25).
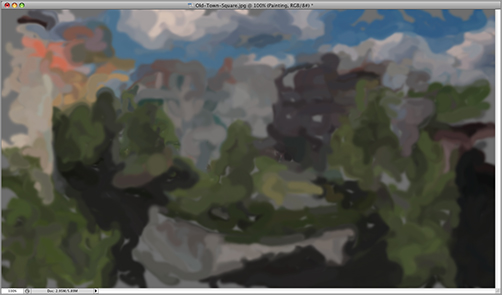
7. Press Cmd+Shift+N / Ctrl+Shift+N, type Overpainting in the New Layer dialog box that appears, and click OK.
8. Paint with a smaller brush and add finer detail (press lightly on the stylus or press the [ key to reduce brush diameter) to draw attention to the buildings surrounding the square and to the square itself.
Figure 9-25: Creating a multicolored underpainting
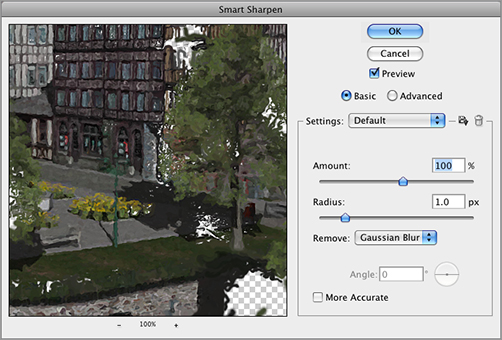
9. Choose Filter Sharpen Smart Sharpen. Set Amount at 100%, set Radius at 1.0 px, and choose Gaussian Blur from the Remove drop-down (Figure 9-26). Click OK.
Figure 9-26: Sharpening the overpainting increases clarity.
10. Decrease the opacity of the Overpainting layer and blend it with layer Underpainting. The opacity amount to select is entirely subjective (I chose 76%). Figure 9-27 shows my unique painting.
Figure 9-27: This illustration made with the Art History Brush has a traditional look.
Experiment with the styles on the options bar to develop a feel for the Art History Brush and find your own style. There is no “right way” to paint, and that is part of the beauty of this technique: Every artist’s painting is a unique original based on the same 3D model.
Painting with the Mixer Brush
The Mixer Brush differs from the Paintbrush tool in its capability to mix paint that’s already on the canvas with the foreground color in any percentage. You can even choose not to apply new paint at all but instead treat the paint that’s already on the canvas as wet. The Mixer Brush can spread this “wet paint” around just as you’d expect a real brush to behave on a physical canvas.
We will use the Mixer Brush to convert a 3D rendering to something that has hand-painted appeal. Whereas the Art History Brush uses an algorithm to style the brushstroke, the Mixer Brush offers full manual control. Those with real painting experience will likely get better results with the Mixer Brush because it was designed to be a physical analogue. Having a pressure-sensitive tablet to better simulate brush feel is a great boon as well. Regardless of your painting experience, give the Mixer Brush a try:
1. Open GeorgiaAquarium.tif from the DVD. This image was exported from a SketchUp 3D model (Figure 9-28).
2. The rendered image has transparency information (rather than an alpha channel) that you will use to reveal a sky gradient. Choose Layer New Fill Layer Gradient, type Sky in the New Layer dialog box, and click OK.
Figure 9-28: Georgia Aquarium model exported from SketchUp
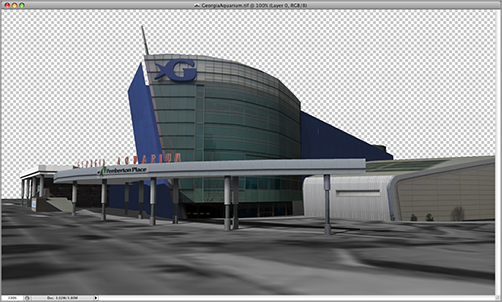
3D Warehouse model by Google (http://sketchup.google.com/3dwarehouse/details?mid=22b4b1889f701ac9be2e393d60145630&prevstart=0)
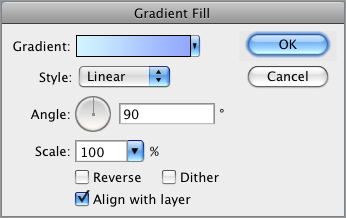
3. Choose the Sky gradient (created in Chapter 3, “Stretching the Photographic Truth”) in the Gradient Fill dialog box (Figure 9-29) and click OK.
Figure 9-29: Creating a Sky gradient
4. Press Cmd+[ / Ctrl+[ to move the Sky layer below Layer 0. Rename Layer 0 to 3D Rendering.
5. First you will set up the Mixer Brush for spreading wet paint without introducing new color. Choose the Mixer Brush from the brush flyout in the Tools panel. On the options bar, click the Load The Brush After Each Stroke button to turn off this mode. Set Wet to 100%, Load to 1%, Mix to 100%, and Flow to 100%. Deselect Sample All Layers, and if you are using a tablet, click the Tablet Pressure Controls Size button (Figure 9-30).
Figure 9-30: Selecting Mixer Brush options

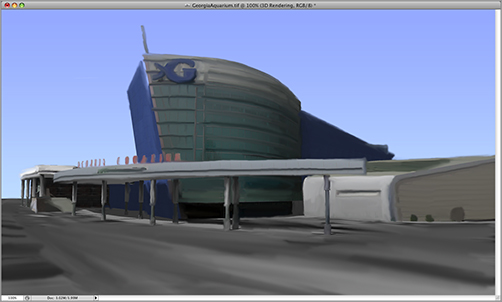
6. Select a 25 px soft round brush from the Brush Picker on the options bar. Keep your strokes parallel to framing, reveals, and any other linear elements. Trace over all edges to give them a hand-painted look. If you are using a mouse, adjust the brush size by using the [ and ] keys for more-subtle results. If you are using a tablet, press lightly for a smaller brush and press more firmly for a wider brush. Figure 9-31 shows my unique painting.
Figure 9-31: The Mixer Brush gives 3D rendering a hand-painted look.
7. Cmd+click / Ctrl+click the New Layer icon at the bottom of the Layers panel to add a new layer under the 3D Rendering layer. Rename Layer 1 to Clouds.
8. Press D to select the default colors and then press X to exchange foreground and background swatches so that white is in the foreground.
9. Press Shift+B to select the Paintbrush tool. Select the Round Fan bristle brush from the Brush Picker on the options bar. Paint in some clouds. Select a very light gray and paint over the cloud bottoms to give them depth. Figure 9-32 shows my unique clouds (and contrail).
10. Perform these last steps only if you have a tablet. Open the Swatches panel and select pure red by clicking the upper-left swatch. Target the 3D Rendering layer and press Cmd+Shift+N / Ctrl+Shift+N, type Cars in the New Layer dialog box, and click OK.
11. Select a small, soft, round brush on the options bar. Enable both Tablet Pressure Controls Opacity and Tablet Pressure Controls Size on the options bar (Figure 9-33).
Figure 9-32: Clouds add interest to an otherwise featureless sky.
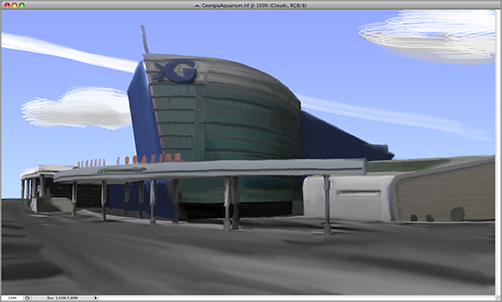
Figure 9-33: Selecting Paintbrush options

12. Drag from left to right with increasing pressure to paint in some time-lapse car taillights in the parking lot. These streaks help add interest to the large gray expanse at the bottom of the painting. Figure 9-34 shows my completed painting.
Figure 9-34: Red streaks representing cars help balance the composition.
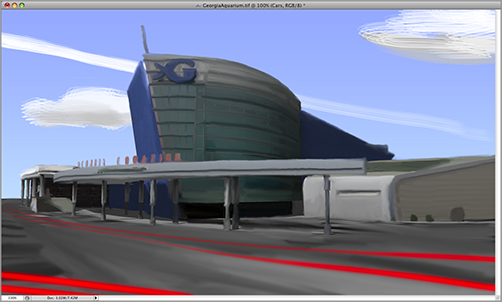
Compare Figure 9-28 with Figure 9-34 to appreciate how the painting leaves more to the imagination as compared with the 3D model. Consider the immortal words of Albert Einstein:
Imagination is more important than knowledge.
By simulating reality as closely as possible, photo-realistic 3D computer renderings made with programs such as 3ds Max leave little to the imagination, and sometimes visually conveying accurate project knowledge is precisely the intent. However, the non–photo-realistic techniques presented in this chapter offer the viewer a looser interpretation of reality that provides a space to stimulate the imagination. Consider employing non–photo-realistic techniques early in the design process and photo-realistic techniques later on as forms and details become increasingly carved in stone.