
If a picture is worth a thousand words, why go further?
Designers understand and harness the power of illusion all the time. Arranging elements just so and using visual effects to transform our perception of them can make even the improbable seem real.

Example exploration from my HoloScenes envisioning series
Filmed on Location
This rapid envisioning methodology was developed while working on a series of holographic design explorations I named HoloScenes. The key part of the technique is using photos of real-world empty spaces as a backdrop for fully integrated people and holograms to get the desired effect for your concept. Done well, it’s an inspirational experience. Don’t be self-conscious about the visual quality, just use it as a handy technique for depicting your ideas quickly.
Interestingly enough, this technique wasn’t intentional or well-thought out. It just evolved very naturally over time, almost unconsciously. As we talked about earlier, for whatever reason I am strongly drawn to photograph empty spaces I come across in my travels. There’s only ever a brief impression at the moment I snap the picture of what could be there in the future, but I’m sure something belongs there. That something almost always ends up being people interacting with holograms. I have no ideas why my mind works that way, but it’s the reason I ended up writing this book. Weird. I know.
Eventually, after collecting lots of photos of empty spaces in my Camera Roll, I had the idea of doing a series based on them. The thought of using smartphone photos from all over the world as the foundational element for the explorations felt good to me. Global locales seemed to help fuel ideas for very different experiences. So, that part became very intentional – purposely trying to depict very different experiences based on situation, location, and what time of day they occur. Diversity of experience became an early decision in my envisioning framework for this series.
As I sorted through dozens of photos I identified as potential locations, holograms started appearing out of thin air within each photo along with outlines of people. From there, it was relatively easy to mentally fill out the motion, sounds, and behaviors very quickly. That led naturally to me piloting an imaginary camera around the scene, looking for interesting angles.
That last interaction made me think about the cinematic aspect of composing these explorations – which is how I arrived at naming this technique Filmed on Location. There was always a running inside joke at the end of Pixar short films in the 1980’s that referred by them being filmed on location with RenderMan, a ground breaking 3D photorealistic renderer subsequently used in their animated motion pictures. I kind of felt like a Pixar film director during pre-production when thinking about my own compositions, so the idea stuck. Turned out to be fun and useful way to describe it.
The Technique
Working through the process of building out a scene using a photo as the foundational backdrop helped define much of what I now consider the best way to quickly envision.
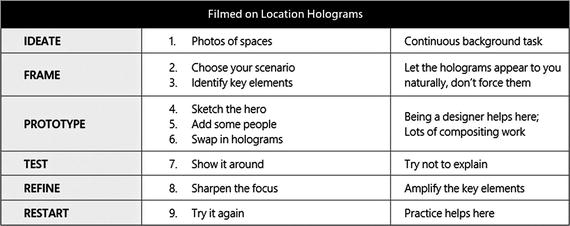
Table 14-1. A technique for envisioning that feels like it was filmed on location
Let’s dig into how this type of photo-based envisioning works step-by-step.
Step 1. IDEATE
There are two ways to approach ideation with this technique. The first is a casual journey where ideas come to you over time, and the other is a focused exploration of particular concepts. Both work well, it just depends on the situation you find yourself in.
Casual - Unlike some kinds of more involved envisioning, there really isn’t a discreet ideation phase in this case because I find it to be a bit more accidental. Once you learn to capture inspirational scenes in photos as you encounter them, this type of envisioning tends to just happen at its own pace. Think of taking location photos as a continuous background task. You may end up never using them, but you will have amassed a great collection to pick from.
Focused – If there’s a very particular concept you want to test out with people, the HoloScenes technique helps you put it into context. You’ll be on the lookout for a certain kind of scene to support your idea, so you could go on a very focused hunt for photos of it. Either way, let the concepts come to you naturally. If you try to force ideas into the scenes you find on your travels, it will show through.
Photograph empty spaces
Taking photos of interesting real-world scenes you come across is the best way I’ve found to jumpstart the holographic envisioning process. Think of taking such photos as a new habit for scouting film locations of your holographic experiences.
Be on the lookout for physical places and spaces that are calling out for something to be added holographically. Whenever you get that feeling, immediately stop what you’re doing, whip out your phone, and snap a picture. Move along.
Sometimes places will strike you as “empty but cool” for some reason. Remember to go back through your pictures when you have time to harvest any of those that move you. Quickly consider the possibilities when triaging the photos. Then share the promising ones with yourself or set them aside in a collection you’ll want to grow over time.
There’s nothing that makes one photo better than another for envisioning, but I have found it’s easier to work with places that have furniture or interesting features, but no people. Try for a mix of daylight and indoor shots. Pay attention to the colors in the scene – they are powerful cues.

Use your Camera Roll to collect photos of empty places for rapid envisioning
I can’t tell you how many photos I have of empty spaces. Hundreds, certainly. Photos full of things, but no people. And therein lies the most interesting paradox in envisioning holographic experiences — you cannot have a successful design without people being the design center. Yet, many of the most interesting ideas come to us when looking at empty space. Go figure. Having any people appear in these spaces could distract you from what it could be used for, so best to shoot empty spaces and let your imagination fill them in.
Tip
Using your own photos rather than pulling random images off the Web keeps you out of copyright infringement issues.
Step 2. FRAME
Making a few good decisions right up front will allow the rest of the envisioning process to flow. That’s what framing is all about.
Choose a scenario backdrop
There will be a time when you need to illustrate how using holograms in a particular situation would play out for some project that you are working on. Designers do this kind of storytelling all the time. While trying to help other people visualize how things would play out in certain scenarios, consider using some of the photos you’ve taken to establish the feel of the scene and get across some key aspects without too much effort.
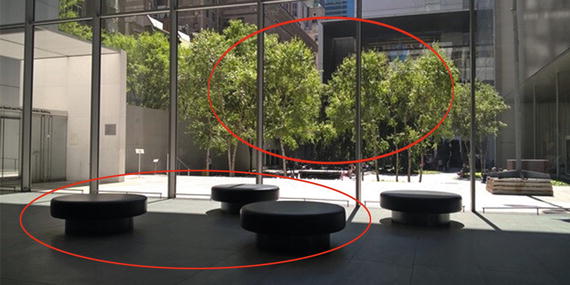
Go through your collection of potential backdrop photos with a completely open mind to see what jumps out at you. You may have no idea what you’re looking for exactly, which is fine. I tend to feel like the right photo will make itself known to you in some way. Just like scouting locations for a short film, the scene you ultimately choose will need to convey a particular feel and support the interactions of the people (and holograms) that inhabit it.

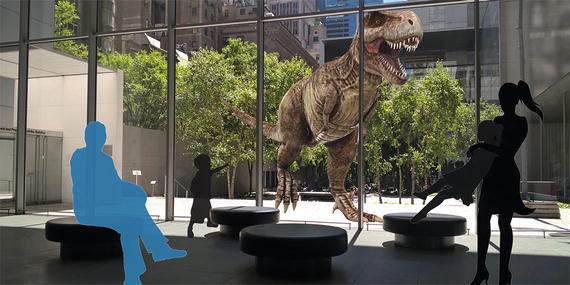
This lobby’s low seating screamed out as needing something on them
The photo you eventually choose will need to enable a scenario, or sequence of events that could plausibly happen. For example, looking at a photo of an empty conference room would certainly lend itself to a scenario where people are meeting to discuss something. Having a soccer match within that room isn’t a plausible scenario for that photo. Would feel off, right?
Identifying scenarios that feel like a natural fit for the photo is critical. Don’t try to force a photo into doing a job it’s not meant for — something about it will look odd or inauthentic. You’ll see how this works when you try this out. The photos actually speak to you if you let them. Go with the flow, and write down some notes on what could work if it helps. Set a copy of the photos you like most aside.
Tip
Use your strongest photos as the basis for an envisioned scene. No point in distracting the audience with low-quality, grainy, or blurry images in your work.
Identify key elements
What was that first thing that flashed into your mind when you looked at the photo you chose from your collection? Was it people interacting with something? A creature? Interface floating in the air? Game going on? Whatever it was is a huge hint to what the focus for this envisioning scenario should be. Why? Intuition and instinct are incredibly useful guides to us when envisioning. Your own imagination and subconscious saw something immediately that wasn’t there based on all of your experiences and knowledge. Dig in and evaluate whatever that was first. At the very least, try to pick something similar enough to your initial impression that feels unforced.
Who would be in the scene?
What would they be doing with holograms?
Where would this be taking place?
How would it play out?
When would this feel like something you’d want to do yourself?
You notice the active word in all those questions is would. It’s a forward-looking exercise, so our thinking is geared toward what’s possible, not what is. What would this scene tell us about the future of holographic computing if we let it?
Illustrating innovative technology
Showcasing new-to-world functionality
Imagining a breakthrough experience
Commenting on what could be, editorial fashion.
The space lent itself to particular vision for interaction and play
What came to mind immediately in that photo of the empty museum lobby is the tremendous amount of empty space that wants to be filled with people and holograms. Going with my first impression, I found myself thinking there was probably a family enjoying the space on a Sunday afternoon. The kids would be running around getting into trouble, poking at things they shouldn’t. The adults keeping watchful, but having their own conversations.
Another aspect of the photo that really jumped out at me was the large empty outdoor patio just behind the glass wall. What a great place for a huge holographic creature to be angrily pacing around waiting for unsuspecting museum guests to scare or eat. Or something.
It would be easy to say in hindsight I had a clear vision for all the interactions and technology that would eventually be injected into the scene, but that’s not true. I would realize as I worked with scene there were opportunities to editorially comment on telepresence and people’s manners in public spaces when interacting with holograms. It also allowed me to theorize about the future of play and toys. But, none of those elements that eventually found their way into the exploration were thought of initially. I just liked the space as a canvas for holographic adventures.
The photo lent itself to all kinds of interpretations, but the easiest one for me was this scene of a family enjoying the day out, but encountering something very unexpected. I could have locked in on that scenario and tried many different photos to depict it, but that photo spoke to me in that way, so I went with it.
Tip
Try using different photos for the same scenario exploration. Then try different scenarios with the same photo.
Step 3. PROTOTYPE
This is where we start creating the final form of the exploration. Each successive layer of information we add to the original photo brings another key element into focus.
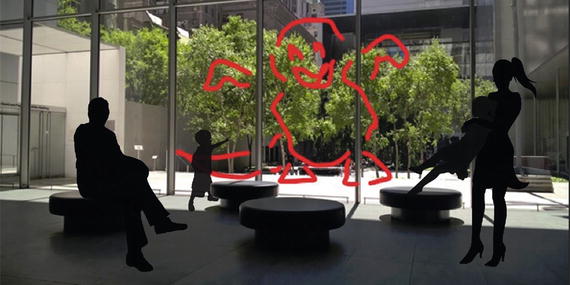
Sketch the hero
Every epic scene has a hero. Find yours. Heroes are most likely going to be some wickedly cool hologram you imagine, but they don’t have to be. It could be that a modest hologram enhances a real-world hero that’s already there. People make the best heroes.

Sketch your hero on top of the scene photo
Show the intent you hope to convey later through higher fidelity. For now, think through how the hero in this scene will play off of other elements. People, objects, time of day, motion, and lighting all affect how your hero is perceived.
Once you have an idea of how the hero will behave, use markup lines to illustrate movement or interaction even at this early phase of sketching. You’ll find this is what really sells the idea.
Tip
Try a few different approaches to depicting your hero, but keep it fast and fluid. Nothing to obsess over. Just get the general feel across.
Add some people
First a production note - after getting a basic scene sketched out, it’s time to turn the corner and make this real. That means choosing an app or medium that allows you to layer different elements in and manipulate them as needed. Think of the layering mechanism in Photoshop or Illustrator as a guide. Any app with layers can get the job done, so don’t obsess over not having the right tool. You could even draw them by hand in overlay fashion on paper or with cutouts.

Quickly add in some people to give you an idea of their relationship to the holograms
As we’re targeting a higher resolution comp for this exploration, it’s time to find some better people than our sketchy stand-ins. You can use any representation of a person that fits with your scenario and artistic style for this part. They don’t need to be real or even completely photorealistic to get the job done here. I often use the silhouette technique favored by architects and conceptual artists. I find that easiest from the production aspect to convey some design decisions I made, and it also complements the visual treatment I am going for.
For me, the translucent nature of the people in these renderings is appealing but not quite the right approach, so I settled on a different visual language we’ll see later where people who are present are drawn in black silhouette and holograms representing people who are not there are drawn in translucent blue.
Also, you don’t have to be an artist to get that great people effect in your project. Try a web search for ‘people silhouette’ and switch to the Image results. You’ll see lots of examples of the type of people you need to add, whether as full color photography or silhouettes (my preference). You’d be amazed how many different body types, sizes, poses, and actions are available.

Reasonably priced libraries of posed people are available online
Go ahead and find vector art (resolution independent) that is royalty free or buy some as an investment in your envisioning work.
Once you have the people picked out with the proper poses or at least the right attitude, drop them into the scene in a realistic size and perspective (so we don’t distract the audience with our gaffs). Remember, people are the anchors that make or break the believability of the envisioned experience. So, get in there and distort or twist the people into believable perspectives.
Drop in the posed people to bring the space to life
You’ll see in my example, I added a family with the mom and two little kids. I also thought this kind of scene would be perfect for grandpa to join the fun. Wonder what he thinks of the creature in the atrium. We’ll see.
Tip
You’ll be using many different people in your envisioning work, so best to start another collection of vector silhouettes, too.
Swap in holograms
Now that the scene has people and a stand-in hero, time to add the other holograms that support the activities and scenario. My suggestion here is to use the highest fidelity representations you can find (either as prebuilt 3D models or dimensional photographs), or create your own custom 3D models of holograms to make a high impact first impression with your audience.
The integration and compositing step of this technique is where you can spend a ton of time if you’re not careful. The goal is to rapidly depict what you’re after with fully lit and integrated content — but not at the expense of being done and moving onto other important explorations.

Find a hero hologram that will fit in. Punch it out of any background so it’s isolated.
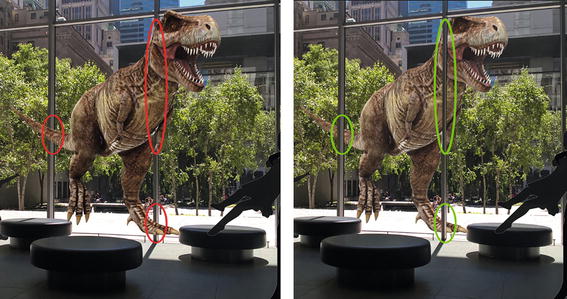
Note the parts that needed to be occluded for realism in placement
After going through all that, step back for a moment to see if your scene has already come to life by just adding the hero hologram and people.
If not, you’ve missed something important. Look critically at each part. Is the photo not the right angle? Are the people not the right size or looking disinterested? Does the hero not look like a real hologram? Whatever it is, isolate and fix it so we can move on.

Layers show the different scene elements and ordering in Photoshop
This is where the detail comes in. You’ll most likely be illustrating specific features.
Tip
It’s tempting to go overboard when adding all the detail of the supporting holograms. Go ahead :-)
Step 4. TEST
It’s tempting to keep futzing with the envisioned image until it’s close to perfect. Don’t.
Show it around
Once our envisioned scenario is even close to being convincing we need to show it someone else to get some feedback and test out the initial hypothesis about what the scene could depict. The intent here is to literally just show your comps to a few people to get a quick reaction.
Don’t setup a formal test. Print out the comp or take a laptop around showing the image. With no prompting by you whatsoever, did they say out loud what your intent was when you started the envisioning process? Be honest here. It’s ok if they didn’t get it. Just means you have more work to do.
Even if they did get it right away, I bet they made some suggestion or asked why something was a certain way. Remember those. Go back and fix the scene so it reflects that feedback if it makes sense. Buy that person a coffee and call it good.
Even in this super early phase of ideation and experiments, you have to be willing to listen carefully to people’s feedback. It’s human nature to not want to hear criticism after working so hard. But, maybe it is true that your holographic unicorn looks like a horse with a fake horn. That’s fine. We’ll get it next time around.
Tip
Seek contrarian opinions and nonbelievers. It strengthens your work to hear criticism of the ideas themselves. You’ll benefit from it.
Step 5. REFINE
Our final stage is tweaking the areas that just aren’t doing it, or conversely, we need to wholesale swap out elements to get closer to the vision.
Sharpen the focus
After getting some feedback on the earlier version, you probably will want to make a final pass to get all objects sized properly, adjust overall lighting, get rid of extraneous elements that don’t help tell your story.
Note the translucent blue treatment on the person who is not there in person
This phase allowed a bit more consideration of other interesting aspects that were not immediately apparent right off. Use this phase to punch up key features and fade back things that are not important to scenario and storytelling.
As an example of some polish you can apply at this point, don’t overlook the importance of sound, even in a static image. You wouldn’t want to go see an IMAX 3D movie with no surround sound, right? Same thing here. And easy enough to add if you have access to PowerPoint. Just embed a sound within a PowerPoint slide by assigning a sound file to that slide that auto plays when the slide is projected.
Tip
Punch up the parts that support your most important points to land. Make them the clear focus of the composition.
Step 6. RESTART
Now that we have a finished exploration in static or in semi-interactive state, it’s time to make the hard call. Do we keep going because it’s promising and we missed a few things, or just leave it as an artifact from our envisioning journey and move on?
Try it again
The bias in this type of technique is toward forward motion. We want to keep exploring, trying things out, failing, and trying again. So, given that our first thought is probably going to be move on, try it again in a different way or completely scrap what we’ve done.
There’s not right answer here. You will know by the reaction of other people whether you tapped into something important or undiscovered with your initial work. Careful to not let your ego or invested time color your thinking here (just as with any type of design work). There’s nothing wrong with completely starting over again with the same idea, knowing you didn’t quite nail it this time around. It’s difficult to get something you’re happy with right off. Take practice.
Regardless of whether you choose to move on or keep digging in, we’ve learned a valuable technique to leverage in the future. It gets us the impact and persuasion that can help move the idea to the next level.
Tip
There’s no shame in leaving a work alone and moving on. In fact, it’s really the desired behavior for this technique.
Summary
Leveraging photos of real places helps to ground any holographic ideas you want to test out. Always keep an eye out for places where you can holographically film on location.