
The spellbinding stories behind our artwork are too often lost to history.
Developers aren’t recognized as the true artists they actually are. Being both a coder and designer, I can tell you without question developers are some of the most creative people on the planet. The reason we don’t often think about that is the way they work and express themselves. Their impact is often seen in terms of the output, not the process. And therein lies the tragedy.
Behind-the-scenes stories of how art projects evolve are too rare
We are all missing out some incredibly entertaining tales and valuable lessons when these background stories are known only by their creators. The same is true of any artwork that’s not hanging in a museum with a placard explaining a bit about the artist and why the work exists. As a fellow artist, I am fascinated with the motivation and circumstances behind art pieces. Yet, I’ll never hear from the artist themselves about the creation process. Or will I?
Holographic computing has the power to change all that in a truly magical way.
Backstory
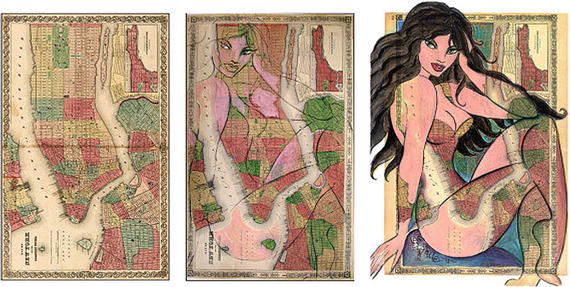
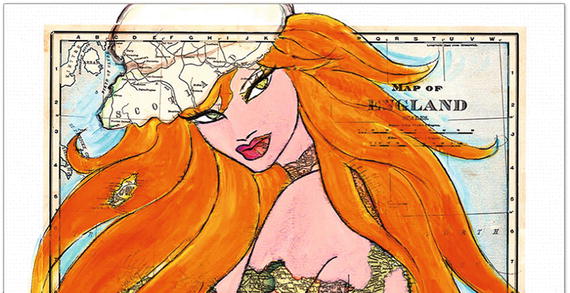
My sister Sharon Pell-Lie was an exceptional mixed-media artist living in New York City. She loved to create unique pieces that fused her favorite things, superhero-inspired women and their cute felines, on unusual backdrops. But, more interesting than that combo is how her artwork (on display at pellmell.com) illustrates a technique that we’ve been discussing for holograms.
Sharon Pell-Lie saw what was there but hidden, and found a way to uniquely capture it
Does this sound familiar? Of course, it does. It’s what we have been talking about this entire time – holograms are already waiting in your imagination to be set free for others to enjoy.
Sharon collected old maps and postcards the way I suggested you should continuously collect photos of empty spaces. In her travels around NYC, her beloved Paris, or Seattle, she’d spot these unassuming treasures and buy them on the spot. Which is my point exactly – whenever the opportunity arises to capture something that speaks to you, do it right then. You don’t have to know what you’ll use it for later. Just capture it and store it for the future.
Sharon was also quite prolific at creating her art. There are hundreds of pieces of different periods, styles, and subjects, that it’s hard to catalog them all. And so many interesting stories behind each one. Whenever I’d ask her about certain pieces that I liked personally, and she’d tell me a story that was completely unexpected about its motivation and timing. Those were priceless stories, now lost to the sands of time and fading memories.
Spellbinding Holograms
That got me thinking. In this era of video recording everything, free tools, and oodles of storage, why don’t we capture more about our creation process as its happening? Musicians often bring videographers into the studio to capture the recording process. Why not artists? Why not coders?
It’s with that thought I set out to capture what it would be like to talk with the artist or coder of something way after they had finished it. Through the use of mixed reality, I imagined we could bring that experience to life in a completely new way. Without having to visit the artist’s studio or coder’s lair, we could have a personal conversation with them about their work.
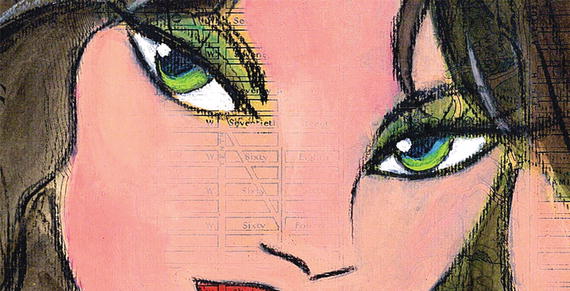
In my case, I thought back on how Sharon would tell me the stories of what inspired particular pieces (sometimes by real people, sometimes by her cats, sometimes just odd circumstances). The details were interesting, but to me the more memorable part was how she told those stories. “Spellbinding” is the word that came to mind, which is exactly what she named her art series of playful women and their favorite feline friends.
Close-up of “Capgirl” by Sharon Pell-Lie from the S*Pellbinders series
The challenge with this particular holographic exploration would not be artistic or informational though, it was clearly a technical one. How exactly would you bring the artist and any of their collaborators into the mixed reality space without resorting to hanging a two-dimensional video screen in the air (very unsatisfying, so why bother). Was it possible to create three-dimensional avatars of the real artist (living or dead) to inhabit the space and talk about their work? Seemed possible based on some technology demonstrations and any sci-fi movie ever made, but could I somehow do this myself as a working prototype to prove its viable? Of course :-)
And that same exact desire to create spellbinding holographic experiences will drive you to experiment with code and real hardware during your journey, too.
The Process
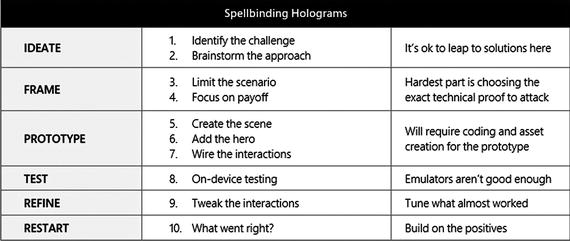
Table 16-1. A technique for doing technical proofs with holograms
Nothing to fear if you don’t code. Just find someone who does program, and owes you a big favor or works for cheap. This will take longer than you or they think.
Step 1. IDEATE
This is the time to brainstorm how you could potentially build out a working prototype of that signature moment in your holographic experience so people know it’s actually possible. Usually we try to stay away from jumping right to solutions in the brainstorming or ideation phase, but not here. We need ideas for how to get this real, quickly.
Identify the challenge
Try to focus in on the hardest part of the working prototype or the most critical aspect to get working to achieve your desired outcome (make an impact, show technical proof, set a vision). It’s important to get a handle on this early on so you know whether to keep going or bail on the idea of creating a working prototype at this point. No shame in discovering you can’t quite make this happen at the moment. The shame would be investing a ton of time with nothing to show at the end. In most cases, you’ll find there’s a middle ground where you can shoot for the stars and at least make to orbit.
In my example, the hardest part of the concept would be getting a convincing facsimile of the artist to exist along with their artwork, whether real or digital. The intent was to have them tell the viewer of their art the backstory or other interesting things about the work. People don’t record these types of explanations every time they create something. A bit much to expect. Is it too unrealistic? Is there even tech available that would allow us to create a holographic avatar without having an extraordinarily expensive setup?
Regardless of the answers, I had the technical challenge identified. What’s yours?
Brainstorm the approach
Now that we have the most difficult technical challenge identified, let’s figure out how we can get it working as a proof of concept (or at least well enough to prove it could be done with additional time, money, or resources). This is where having a friend or coworker who keeps up on all latest breakthroughs in various fields comes in handy. If that person isn’t readily available to brainstorm with you, use our Filmed on Location technique to illustrate what you’re after and post it for others to help you figure out how to get there. You’d be surprised how helpful the mixed reality community is in identifying existing tech or methods to help out.
The point of this exercise is not to start 3D modeling or coding it up right away (as tempting as that is). We want to figure out the approach we’ll take so we know what we’re in for. This does not mean we’re going to start scheduling sprints, setup a backlog, or any of that other agile non-sense. Just focus on how you can technically achieve that signature moment in the experience. Geek out. Draw weird diagrams on the whiteboard. Search for demos on the web. Identify some APIs or SDKs you could use. Then stop. Move on.
Putting a set of digital paintings in space – easy.
Augmenting an existing piece of real artwork with digital overlays – fairly easy.
See the artwork close-up without degradation or visual artifacts – a bit tricky.
Talking with an artist who’s not around – that’s ridiculously hard.

Incredibly slick software from Loom.ai quickly creates avatars from photos (source: Loom.ai)
By using an incredibly high tech combination of computer vision, machine learning, and motion picture special effects, companies like Loom.ai have figured out how to turn an ordinary selfie or photograph into an expressive 3D avatar. Delivered as both an API and SDK for developers to leverage in their own applications, this kind of advancement heralds the start of an entirely new era in being able to “exist” digitally and recognizably without high cost scanning procedures.
Great. That works for me. Problem solved. Let’s move on.
Step 2. FRAME
Since we’re coding this working prototype, we need to put a few well-chosen constraints in place to stop ourselves from heading directly into the ditch chasing some shiny target. Way too easy to waste time on the non-essentials when the goal is to get this up and working as fast as possible.
Limit the scenario
We can’t go fast and do everything at the same time. Let’s try to narrow the things we need hookup in this by reducing the surface area. By walking step-by-step through the intended scenario, we can look for the minimal set of objects, functionality, and behaviors we need to implement. The scenario doesn’t have to be super-detailed to serve its purpose. We can just list what you’d reasonably expect to happen (even though it rarely unfolds in that way) with this and try to focus our audience on that narrow “golden path” through the scenario.
In my case, the scenario sets up a potentially rich set of interactions if an artist suddenly appeared and started talking about their work. How could we limit the functionality and still have a compelling experience?
First, would the viewer even notice anything is different about the artwork?
How does the artist know when to engage the viewer?
Can the viewer stop that narrative and ask questions?
Would you allow rewind or fast forward? Is that rude to the holographic artist?
The purpose of asking these seemingly open-ended questions is to make sure you cover just enough of what’s reasonably expected by the participant to achieve your goal of testing this out.
Focus on payoff

Bringing those signature moments to life are the real payoff in your prototype
Roughly plot out the expected paths through the prototype, meaning what will the participant most likely do first, next, instead of, unexpectedly, unquestionably.
Identify the signature moment in this prototype so that you can get it hooked up properly.
Make sure the payoff is worth the effort. Be critical of the idea.
Once you have the answers, get going on building this out as fast as possible, testing whatever parts you can along the way to make sure it’s coming together as expected. Doesn’t have to be perfect to try out on someone.
Step 3. PROTOTYPE
This is the fun part. Kinda. Prototyping is incredibly rewarding when things are flowing and you’re the master of the universe. It’s frustratingly hard work when things aren’t quite coming together. And that condition seems to oscillate from one to the other on an hourly basis. So, to combat the bad parts, let’s start off with the straightforward part for an easy score.

AN ALL-PURPOSE WEAPON - If you don’t already have it, download a copy of the Unity development environment to easily construct the elements of our holographic experience. Unity is the leading tool for building the elements of just about any kind of mixed reality experience. In fact, I think you’d be hard pressed to find a developer in the industry who hasn’t at least tried it out for AR, VR, or Gaming projects. Unity is a one-stop shop for us since it enables scene composition, modeling, animation, lighting, special effects, and is extensible through add-ins. Trust me on this one, Unity is your new best friend when it comes to quickly prototyping mixed reality experiences.
Create the scene
Our holograms need somewhere to exist when they come to life, so let’s call that a “scene” for the moment. The scene we’re talking about now is essentially what you see when an experience first starts. It could feel like objects have been added to the space you’re in now, or you could feel like you’ve been transported to a completely different place.
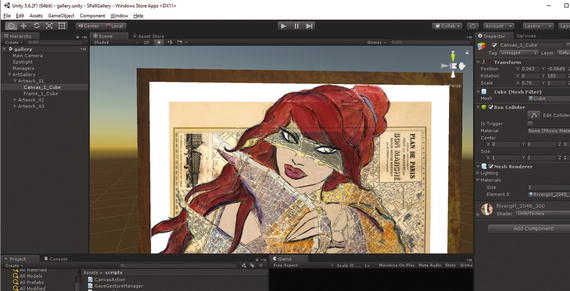
Here’s what my initial scene looked like in Unity before our hero makes her appearance
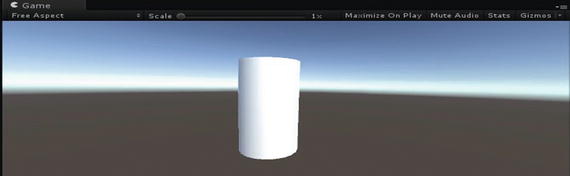
The skybox paradigm in Unity helps set up a scene using the horizon and sky
Conversely, in mixed reality, the notion of a scene is a bit trickier to define. Even calling it a scene in mixed reality is really a misnomer. It isn’t so much a traditional scene as a situation that has three possible setups – preset positioning, participant positioning, and dynamic. Yet, the term scene is widespread and easy to understand, so we’ll go with it.
Preset Positioning – During the layout phase in the tool, elements are arranged to relate to the viewer and each other in a predetermined way, and then placed that way in the scene. You could also do this by writing some code to position the key elements in particular places within the scene at runtime. For example, placing artwork on the nearest wall. Holographic platforms try to make that floor, wall, and tabletop surface placement easy to achieve via code APIs.
Participant Positioning – No one likes being told where they have to keep things. That holds true in mixed reality as well. When we inject holograms into your physical space, it can be very off-putting if they end up in awkward or unnatural places. Because the hardware we’re relying on needs to scan and figure out for itself where the floor and walls are (which can take a bit of time) it’s a common paradigm to ask the participant to place the holograms where they like. The elements are then rendered at that distance and position from the viewer.
Dynamic Positioning – Some of the best examples of mixed reality blending completely into the real world use a combination of auto-positioning and manual placement. These experiences typically need to position things on the floor, walls, or table tops to anchor them in places that make sense to the participant. Dynamic elements can later “find” the right place to appear based on room scans. An example would be a hologram appearing to sit down on your couch by itself.
You’ll have to figure out the best initial state for your scene based on what you hope the interaction model will be. My suggestion is to go back to any play testing you may have done to see which resonated with people the most. Set something up in Unity (or whatever app you’re using for scene composition) and try it out through a quick previewer or software emulator of any specialized hardware you’re targeting. You’ll get a rough idea of what the scene will feel like from that emulation, but there’s no substitute for trying it out in the target device. What a thrill the first time you see the scene draw in the room you are working in.
After settling on one of the positioning options you have essentially set the stage for the stars of the show to make their appearance – the holographic actors.
Add the hero
In our scenario, there’s always a center of attention that commands attention or entertains us during normal interaction. It doesn’t have to be immediately introduced or apparent. In fact, making the participant discover the hero as they explore is a great plan. Creating the memorable illusion for that hero is where we want to spend our prototyping time.

An early sketch for the developer of where the hero should appear near the artwork
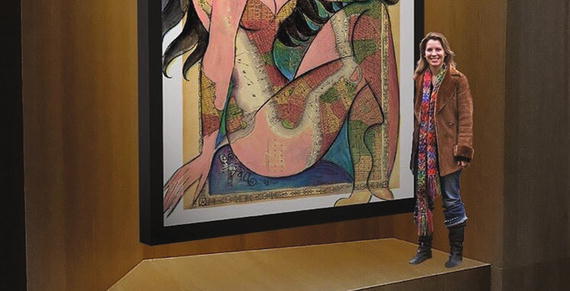
Our artist, Sharon Pell-Lie, appears and starts a conversation when you approach
The hero’s entrance is a surprise in this case, but it doesn’t have to be. Just engaging with the object in some other way could have easily been the trigger we needed to start the interaction.
Wire the interactions
It’s one thing to make a static scene show up on-device, and yet another to have the holographic heroes respond to your input, or act out their own behaviors. That’s incredibly important to hook up as soon as possible. Why? Blame the iPhone. We’ve all been programmed and conditioned to respond to anything that looks like it might have something more to it by tapping, swiping, or talking to it. There’s nothing worse than engaging something cool looking and have it just sit there and ignore you.

You’ll edit the code for your behaviors in a development environment like Visual Studio
If you are using Unity for this prototype, you can use its built-in code editor to help wire up the interactions with objects. Most people tend to use their full development environment to do the coding and debugging associated with object behaviors. In our case, Microsoft Visual Studio is the best development system to pair with Unity and Microsoft HoloLens. Other mixed reality systems have their own preferred development environments. The integration is good enough to allow for a productive workflow, and the Unity tool is constantly being updated with amazing new features to aid developers and designers.
In many cases, just a few lines of JavaScript or C# are enough to get the behavior we’re after. As I mentioned in the Introduction, this isn’t intended to be a step-by-step programming book, so I’ll leave the details of how to code up functionality for your holograms to the excellent tutorials found on the development sites for Microsoft, Unity, Apple, Magic Leap, and others. As a coder myself, I can tell you that it’s a massive amount of fun to learn how these platforms work. Try it out for yourself.
Once our basic behaviors are hooked up with code, it’s time to test it out using the hardware that’s required to see the holograms in our physical spaces.
Step 4. TEST
There’s no getting around the need to test our working prototypes of holographic experiences on the actual hardware. Emulators, previewers, or even video don’t do holograms justice. Seeing holograms in person evokes responses that aren’t replicated easily by anything other our own eyes and brains. We are seemingly hardwired to respond and connect deeply with holograms.
Let’s get this onto whatever device is going to help us see the holograms in our environment.
On-device testing

Seeing the artwork appear mid-air for the first time was indeed spellbinding
What we’re looking for once the prototype is on the device is the same as any other project – does it look right? Behave correctly? Exhibit any strange behavior? We’re going to follow the scenario outline we created earlier as we work our way through things. But, you’ll notice that you keep getting distracted by something. It’s almost unavoidable. Holograms are incredibly interesting to see in person. You get as close as possible to see and touch them. It’s addictive.
Another thing to remember is that once you have someone else try this out, there’s bound to be things that you didn’t account for – if for no other reason than they think differently than you do, press different things, try odd voice commands, or just don’t do anything you’d expect. People are so unpredictable, even for experts in designing breakthrough experiences.
Once you make it far enough along through your golden path of the scenario, see if the interactions and signature moment are anywhere close to what you expected. Didn’t think so. Back to the laboratory to tighten things up a bit.
Step 5. REFINE
You’ll have a ton of things to consider once you’ve tested the prototype out. The key is to not get overwhelmed and start over too fast, or conversely dig in too deeply to fix things. There’s a balance in moving things forward to learn more. We want to go fast so we fail fast. Or something like that. I’d rather think of it as learning from our experiments instead of failing. Either way.
One thing that you’ll probably notice about this example I’m using of Sharon’s artwork is that the early versions seem awfully stark. Just the pieces themselves and the artist explaining the backstory is cool, but even cool isn’t enough sometimes. We seem to need more supporting information about the work itself like I’d find in a museum placard. I’m also feeling like there’s some functionality that I am used to on my iPad and Surface that I’m missing. Why can’t I zoom? Share this with my friends? Look at other works by Sharon or related artists? Exactly. We’re not done, even in prototype form. We’ve created something so cool that people want more. A job well done is rewarded by a bigger job they say. Thanks.
Tweak the interactions
The first thing to refine is the easy stuff that we either missed or just got wrong. We do that as a best practice in case we have another opportunity to test out with someone else while we’re adjusting things. Always have a demo ready they say. In our case, that we can take care of the placard with the artwork information super fast and be ready for more testing or keep fixing things up.
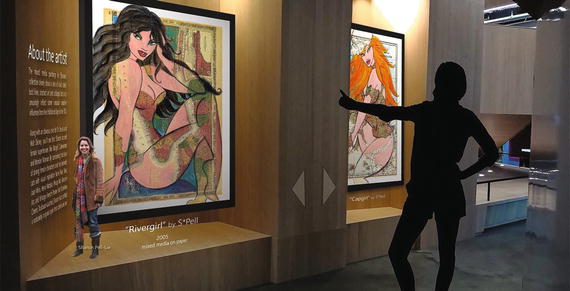
The refined experience features textual overlays, navigation, and more artwork
Once our list of high value fixes is complete, we’ll jump back into the real device to test things out and then look for new people to try it out on. It’s important during this tuning up phase to temper the desire to add new functionality with the goal of having just enough to meet our goal of making a big impact through a real code prototype, doing a technical proof of concept, or just getting a jump on the real implementation. Don’t over-invest in the prototype.
Step 6. RESTART
It’s always tempting to refactor the code for better efficiency or organization once you have a working prototype together. Don’t do it. Prototypes are meant to snapshots of ideas that were created to test a hypothesis or demonstrate a set of behaviors. Prototypes are meant to be disposable, not clung onto. Let it go. Move on. There are thousands more for you to build.
What went right?
Did we successfully hit our goal this time out?
Were people excited to try it out?
Are there reusable pieces of code or hardware we can leverage next time?
What did we learn about our process, talents, and team chemistry?
Be honest about these reflections. No shame in discovering that things really didn’t go to plan, even if you had a blast during the cycle.
There’s always something to take away from these kinds of hands-on experiments with code to create working prototypes. That something may be the way we dramatically flamed out and crashed in the eleventh hour, or how we were so close to having it working but just couldn’t get it together. No matter the final outcome, this type of prototyping to create spellbinding, breakthrough holographic experiences teaches us how to be better next time.
Summary
There’s nothing better than creating a working prototype that people can test out on their own without our intervention or instruction. In the world of envisioning, presenting people with holograms they can interact with right where they’re standing can’t be beat for a true measure of impact. This kind of envisioning is the best test of this promising new realm.