Chapter 3. Workload optimization
This chapter focuses on day-to-day administrative tasks and architecture, as seen from the SharePoint administrator’s perspective. Understanding these concepts provides insight into the current farm configuration, the flow of daily operations, and forecasting for the future state of the farm as a whole.
Skills in this chapter:
![]() Skill: Create and maintain site collections
Skill: Create and maintain site collections
![]() Skill: Plan SharePoint high availability and disaster recovery
Skill: Plan SharePoint high availability and disaster recovery
![]() Skill: Plan backup and restore
Skill: Plan backup and restore
![]() Skill: Plan and configure social workload
Skill: Plan and configure social workload
![]() Skill: Plan and configure a Web Content Management (WCM) workload
Skill: Plan and configure a Web Content Management (WCM) workload
![]() Skill: Plan and configure an Enterprise Content Management (ECM) workload
Skill: Plan and configure an Enterprise Content Management (ECM) workload
Skill: Create and maintain site collections
The creation and maintenance of site collections in a SharePoint farm is part of the daily activities associated with being a Farm Administrator. Some of the concepts in this section are familiar to SharePoint 2010 and 2013 administrators, but others have to do with new functionality introduced in both SharePoint Server 2016 and hybrid implementations with SharePoint Online. Having an understanding of these new concepts will speed the deployment of sites in your enterprise and reduce the data footprint and scale of your site collections.
This section covers how to:
![]() Configure Fast Site Collection Creation
Configure Fast Site Collection Creation
![]() Configure host header site collections
Configure host header site collections
![]() Configure self-service site creation
Configure self-service site creation
Configure Fast Site Collection Creation
SharePoint 2016 introduces the concept of Fast Site Collection Creation, allowing for a significant reduction in the time required to deploy new site collections from a SharePoint template. By using this functionality, a Site Master (or copy of the fully created site collection) can be created for each individual SharePoint template in your environment. This Site Master is then stored in a content database, and copies are made when the New-SPSite cmdlet is issued, immediately creating a complete site collection that has all features activated (no activation of features happens after the site is created, by default).
Creating the Site Master
Creating the Site Master is a two-step process. First, the SharePoint template must be enabled for use with a Site Master, and then the Site Master must be created from the template:
<# Enable the Template for use with a Site Master #>
Enable-SPWebTemplateForSiteMaster -Template <TEMPLATENAME> -CompatibilityLevel 15
<# Create the new Site Master from the enabled Template #>
New-SPSiteMaster -ContentDatabase <CONTENTDB> -Template <TEMPLATENAME>
Important
The Site Master and the created site collection can exist in different content databases; additionally, the Site Master can be used in multiple content databases, including those associated with a different web application (if required).
Need More Review?
For a complete listing of the PowerShell cmdlets associated with Fast Site Collection Creation (and some other useful cmdlets), review the TechNet article entitled “Use Windows PowerShell cmdlets to manage sites in SharePoint Server 2016” at https://technet.microsoft.com/library/ee890106(v=office.16).aspx.
Creating a new site collection using the Site Master
Creating a new site collection using a Site Master uses the same PowerShell cmdlet as creating one without the Site Master; the only difference is the use of the -CreateFromSiteMaster switch:
<# Create a new site collection using the Site Master #>
New-SPSite http://wingtiptoys/sites/<SITE> -Template <TEMPLATE> -ContentDatabase <CONTENTDB> -Compatibility Level 15 -CreateFromSiteMaster -OwnerAlias <OWNER>
Path-based site collections and host header site collections can both be created by using a Site Master. For the test, be familiar with the process required to create a new site collection from a Site Master and the supporting PowerShell cmdlets that allow this creation to take place (Enable-SPWebTemplateForSiteMaster, New-SPSiteMaster, and the -CreateFromSiteMaster switch of New-SPSite). Also be familiar with how to remove a Site Master and then disable a template for use with a Site Master.
Important
If you develop customizations that are feature-based for your on-premises SharePoint environment and require these features to reference the current site collection’s information, then you will need to mark your features to be activated postcopy for use with Fast Site Collection Creation; this step ensures that the additional features activate only after the site collection is created.
Configure host header site collections
Traditionally, there are three ways to host more than one website on a server:
![]() Issue a unique IP address to each website.
Issue a unique IP address to each website.
![]() Designate a nonstandard TCP port number (for instance, http://<website>:10800).
Designate a nonstandard TCP port number (for instance, http://<website>:10800).
![]() Create a host header.
Create a host header.
Host headers allow Internet Information Services (IIS) to assign more than one fully qualified domain name (FQDN) on a server to a single IP address. In DNS, each of these FQDNs might be configured as an A record; requests going to each different FQDN would all route to the same IP address on a web server, requiring that the web server itself be configured to know which site is being referenced by each host header.
Important
Documentation sources within both TechNet and MSDN refer to this functionality alternately as either host header site collections or host-named site collections. The current exam listing for 70-339 refers to host header site collections; thus, this is how they are referred to throughout this book.
SharePoint 2016 has no issue with this arrangement, allowing you to build a single web application from Central Administration and then specify a single host header (FQDN) used by IIS to route user requests. These requests could come to the top-level site collection itself (http://sitename.com) or could use a managed path to specify a site collection further within the URL (http://sitename.com/sites/siteone).
Site collections created and arranged in this manner are known as path-based site collections, due to the fact that either exclusive or wildcard managed paths (/sites in the preceding path) are required to group more than one site collection beneath a host header URL.
In such a configuration, an application pool and site is created in IIS. A binding is assigned to the site that specifies the host header and the TCP port, as shown in Figure 3-1.
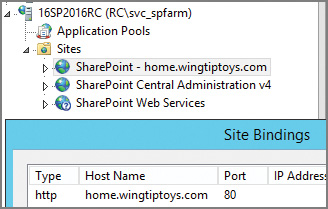
Comparing path-based and host header site collections
What’s not available in such a configuration is a mechanism for creating multiple site collections within the same web application, while assigning a unique FQDN for each. For instance, if you wanted to have a URL pattern that would allow you to specify business units (home.wingtiptoys.com, hr.wingtiptoys.com, accounting.wingtiptoys.com), you would need to create three web applications from Central Administration by using path-based site collections.
As it is recommended to minimize the number of web applications, both from a resourcing and administrative overhead standpoint, there has to be a better way, and there is. Within SharePoint, host header site collections can be created; this allows an administrator to build the application pool and site in IIS, but not specify the host header in the binding, choosing instead to allow this information to be stored within SharePoint itself (see Figure 3-2).
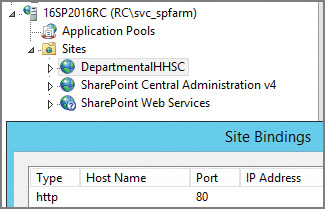
FIGURE 3-2 The newly created application pool and site (for host header site collections), no site bindings
Important
The web application containing multiple host header site collections should never have a host header or host name of its own in the site bindings.
Creating host header site collections
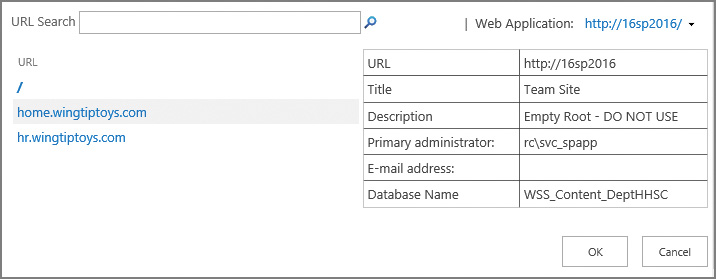
Once the decision has been made to move to host header site collections, all administrative efforts should as a necessity move to PowerShell. Limited administration potential exists from within Central Administration for host header site collections; they can be viewed from Application Management, View All Site Collections (see Figure 3-3).
Only a few steps are required to configure a web application and the associated host header site collections:
1. Create the Host Header web application by using the New-SPWebApplication cmdlet, ensuring that you do not use the -HostHeader switch.
2. Do an IISRESET /noforce on each server in the farm.
3. Create an empty path-based root site collection in the web application.
4. This site collection is used for crawling content and must be present; it should never be assigned for use by users.
5. Create new host header site collections by using the New-SPSite cmdlet and the -HostHeaderWebApplication switch.
 Exam Tip
For Search and other components to work effectively, there must be a root site collection in a host header web application. This site collection should be created and left unused.
Need More Review?
The creation and administration of host header site collections requires a bit of practice, as the administration of the site collections, managed paths, zones, and other specifics can all be administered from PowerShell. It is important to note that host header site collections don’t necessarily preclude the use of managed paths and path-based site collections; in fact, they work together just fine. For a better understanding of how to administer host header site collections, visit the TechNet article entitled “Host-named site collection architecture and deployment” at https://technet.microsoft.com/library/cc424952.aspx. For a more in-depth review of host header site collections and their applications, see the MSDN blog article “What Every SharePoint Admin Needs to Know About Host Named Site Collections” at https://blogs.msdn.microsoft.com/kaevans/2012/03/27/what-every-sharepoint-admin-needs-to-know-about-host-named-site-collections/.
Configure self-service site creation
One of the key collaborative functionalities present in SharePoint is the ability to quickly add new sites for use by individuals and teams. This flexibility can be further extended by allowing users themselves the option of creating a site on an ad hoc basis, a feature known as self-service site creation.
With this flexibility come questions surrounding the life cycle of a SharePoint site, from creation to eventual disposition. The ability to create new sites (and subsites, for that matter), often leads to rapid organic growth. Users, excited about the new tool set, create sites at will to match an expected structure; if the structure isn’t suitable, then these sites are just as quickly abandoned.
Important
Self-service site creation cannot currently be activated inside a host header site collection.
Site creation governance
In earlier versions of SharePoint, the lack of site governance often meant that this powerful feature was either (a) implemented and then retracted, or (b) never implemented at all. Without the ability to create new sites, users often would nest sites beneath other sites, sometimes several layers deep.
Fortunately, the options for self-service site creation governance in SharePoint 2016 are significant in scope. When enabled, these options can:
![]() Be created in a specific managed path within a web application.
Be created in a specific managed path within a web application.
![]() Have effective site quotas assigned, controlling growth metrics.
Have effective site quotas assigned, controlling growth metrics.
![]() Allow for the use of a custom form (perhaps to control intradepartmental billing for resources).
Allow for the use of a custom form (perhaps to control intradepartmental billing for resources).
![]() Specify the required or optional use of site classification settings.
Specify the required or optional use of site classification settings.
![]() Require a secondary contact for the newly created site.
Require a secondary contact for the newly created site.
Exam Tip
Although it is important to understand how to enable self-service site creation, it’s probably just as important to have a good grasp on the site quota and site classification features that make this functionality a reasonable option for many IT organizations.
Activating self-service site collections
Once governance and billing questions have been addressed, it’s possible to enable self-service site collections on a per-web application basis. Within Application Management, Site Collections, select Configure Self-Service Site Creation to begin the activation process (shown in Figure 3-4).
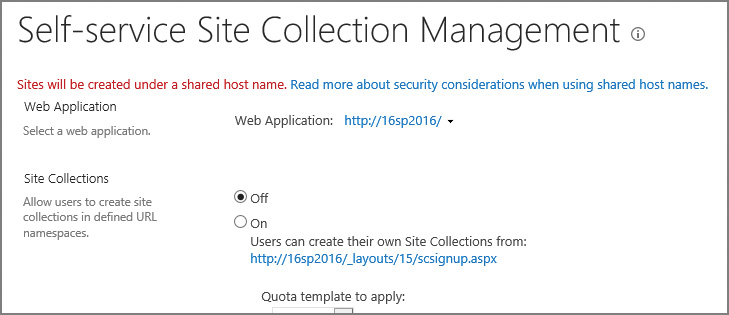
On the Self-Service Site Collection Management page, you can control five selections:
![]() Web Application Allows you to select the appropriate web application.
Web Application Allows you to select the appropriate web application.
![]() Site Collections Allows you to enable or disable self-service site collection creation and select a site quota.
Site Collections Allows you to enable or disable self-service site collection creation and select a site quota.
![]() Start a Site Allows you to configure the Start A Site link.
Start a Site Allows you to configure the Start A Site link.
![]() Hide the link from users.
Hide the link from users.
![]() Prompt the users to create a team site under a particular URL.
Prompt the users to create a team site under a particular URL.
![]() Prompt users to create a site collection under any managed path.
Prompt users to create a site collection under any managed path.
![]() Display a custom form (and provide a location for the form).
Display a custom form (and provide a location for the form).
![]() Site Classification Settings Choose whether to hide, make optional, or make required.
Site Classification Settings Choose whether to hide, make optional, or make required.
![]() Require secondary contact Choose whether or not to enable a secondary contact for the site collection.
Require secondary contact Choose whether or not to enable a secondary contact for the site collection.
Need More Review?
For a better understanding of what’s required for a successful self-service site creation implementation, visit the TechNet article entitled “Plan self-service site creation in SharePoint 2013” at https://technet.microsoft.com/library/cc263483.aspx.
Maintain site owners
Each site collection within SharePoint 2016 has the capability to specify multiple site collection administrators. These administrators are the de facto owners of the site collection and are responsible for the administration of their site collection from a resourcing and permissioning standpoint.
It is possible to add individuals to the administrators from within a site collection; additionally, you can designate someone as an owner of an individual site. However, neither of these people is responsible for receiving notifications about site status and resourcing; that role is only for the primary and secondary administrators of a site collection.
Viewing and changing the site collection administrators is done through the same interface in Application Management, as follows:
1. On the Application Management page in Central Administration, click the Change Site Collection Administrators link.
2. When the Site Collection Administrators page appears, ensure that you have the correct site collection selected and then assign the Primary Site Collection Administrator and Secondary Site Collection Administrator values (see Figure 3-5).
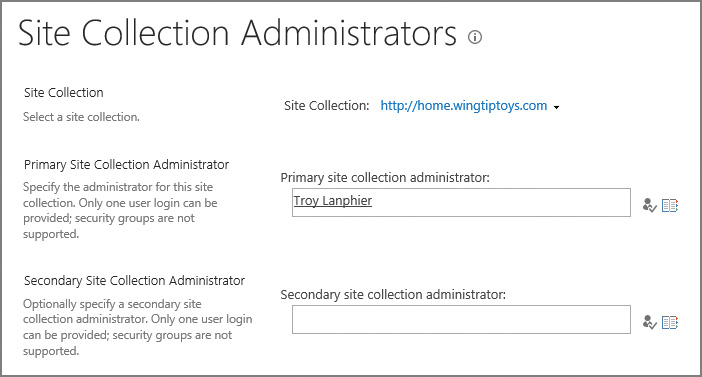
Important
If more than two site collection administrators are to be set for a particular site collection, this must be set up from Site Settings, Users And Permissions, Site Collection Administrators within the site collection itself.
Maintain site quotas
Site quotas (mentioned earlier in our discussion about self-service site creation) enable a SharePoint 2016 administrator to control the disk resource usage of site collections in a SharePoint farm. A site collection is allotted a particular amount of resources, and the administrator of that site is notified when the site has grown to consume a significant percentage of the overall resource allotment.
Users do not receive reminder emails if the SharePoint farm does not have outgoing email configured and functional. Ensure that this service is available before placing any quota restrictions within your farm.
There are only two resources measured within a site quota:
![]() The overall disk space consumed
The overall disk space consumed
![]() The number of points consumed by sandboxed solutions with code
The number of points consumed by sandboxed solutions with code
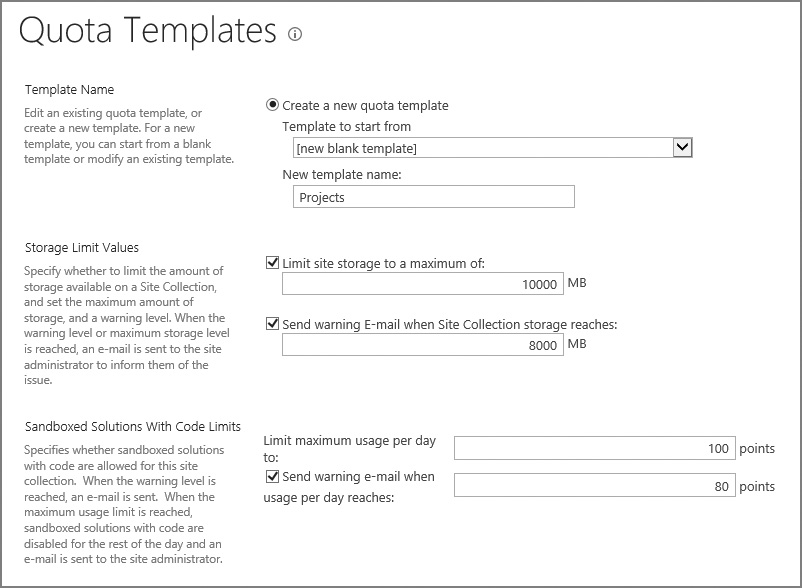
Site quota templates
Site quotas are assigned as new site collections are being created. Although it is technically possible to assign quotas on an individual basis to site collections in the farm, it is much easier to manage growth of a site by making multiple site quota templates available.
These templates would decide how much space is made available for a particular site collection, by default. For example, you might choose to have project sites with a maximum storage limit quota setting of 25 GB, whereas departmental portal sites might possess a maximum storage limit quota setting of 100 GB.
Site quotas are set from the Specify Quota Templates link within Application Management, Site Collections. On the Quota Templates page, you can control three items:
![]() Template Name Specify a new template name (and optionally, an existing template from which to start).
Template Name Specify a new template name (and optionally, an existing template from which to start).
![]() Storage Limit Values This setting allows you to limit the overall site storage maximum limit as well as allowing you to send a warning email when a certain size threshold is reached. Note that both of these values are set in MB, not GB.
Storage Limit Values This setting allows you to limit the overall site storage maximum limit as well as allowing you to send a warning email when a certain size threshold is reached. Note that both of these values are set in MB, not GB.
![]() Sandboxed Solutions With Code Limits As solutions are developed and deployed to the site collection, they consume sandbox resources, which are a number representing memory and processing cycles. You can limit the maximum usage (on a daily basis) to a certain number of points and then set the warning email to be sent out as you pass a certain resource value.
Sandboxed Solutions With Code Limits As solutions are developed and deployed to the site collection, they consume sandbox resources, which are a number representing memory and processing cycles. You can limit the maximum usage (on a daily basis) to a certain number of points and then set the warning email to be sent out as you pass a certain resource value.
Important
A good rule of thumb is that the warning emails should be sent when limits reach 80 percent of the total storage or points maximum values.
The completed quota template can now be assigned to site collections (Figure 3-6).
Need More Review?
For a better understanding of quota templates, including how to assign them via PowerShell, visit the TechNet article entitled “Create, edit, and delete quota templates in SharePoint 2013” at https://technet.microsoft.com/library/cc263223.aspx.
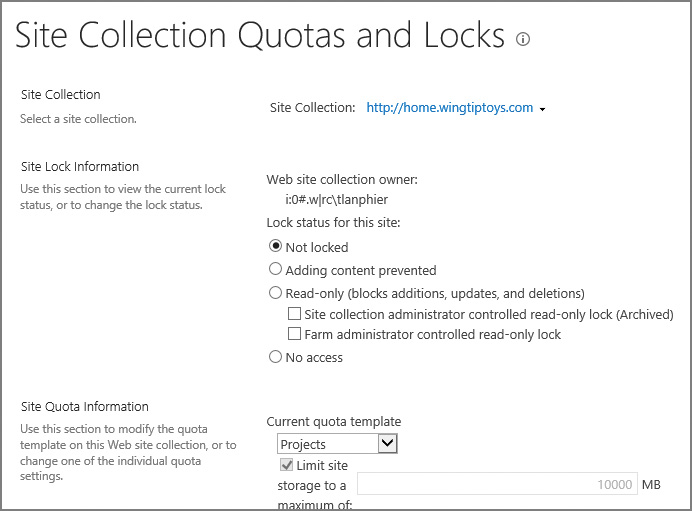
Assigning a quota to a site collection
After you have a series of quota templates built, assigning them to existing site collections is a straightforward process from Central Administration. To assign a site quota template to a site collection, follow these steps:
1. On the Application Management page, in the Site Collections section, click Configure Quotas And Locks.
2. Select the appropriate site collection.
3. Choose the lock status for the site.
![]() Not Locked Site collection is available for use.
Not Locked Site collection is available for use.
![]() Adding Content Prevented Site collection cannot have any new content uploaded.
Adding Content Prevented Site collection cannot have any new content uploaded.
![]() Read-Only Site collection cannot have any content changed or added; either the site collection administrator or the Farm Administrator can control this lock.
Read-Only Site collection cannot have any content changed or added; either the site collection administrator or the Farm Administrator can control this lock.
![]() No Access No one can access content in this site collection.
No Access No one can access content in this site collection.
4. Site Quota Information allows you to either select an existing quota template (also displays these values) or specify bespoke limits for this site collection.
Once these values are accepted, the site collection to which they are assigned now has some level of control for resources allotted (Figure 3-7).
Need More Review?
For a better understanding of quota locks, including how to assign them via PowerShell, visit the TechNet article entitled “Manage the lock status for site collections in SharePoint 2013” at https://technet.microsoft.com/library/cc263238.aspx.
Configure site policies
If you have been involved with SharePoint for any length of time, you might have run into sites within a particular site collection that have been abandoned. As mentioned previously, there are several reasons this can happen:
![]() The subsite was created along an organization structure that no longer applies.
The subsite was created along an organization structure that no longer applies.
![]() The subsite was created for a discontinued project and was abandoned along with the project.
The subsite was created for a discontinued project and was abandoned along with the project.
![]() The subsite was left in place, but now hosts information that is out of date and no longer of value.
The subsite was left in place, but now hosts information that is out of date and no longer of value.
Any way you cut it, a site that is not in use or is not useful as an archive should eventually be removed. This trimming effort is made possible by the use of site policies. These policies are set within the confines of a site collection.
Site closures and deletions
In early versions of SharePoint, the only disposition of a site from an automated standpoint was its eventual deletion. Although a site in SharePoint 2016 can still be automatically deleted, it can also be set to a closed state.
A closed site is marked for eventual deletion, but its users can still modify the site and its content. A site that is in closed status no longer appears in locations that aggregate sites such as Outlook. If a site is closed, but the owner wants it to remain in use, he or she can go into the site settings menu and reopen the site.
Creating a new site policy is done within the bounds of a site collection, specifically from within the Site Policies menu of Site Collection Administration. Once there, clicking the Create link allows the SCA to configure the settings of the policy:
![]() Name And Description Specify the name of the policy and describe its purpose.
Name And Description Specify the name of the policy and describe its purpose.
![]() Site Closure And Deletion Describes what happens to the site (and its subsites) as a result of this policy. The options available are as follows:
Site Closure And Deletion Describes what happens to the site (and its subsites) as a result of this policy. The options available are as follows:
![]() Do not close or delete site automatically.
Do not close or delete site automatically.
![]() Delete sites automatically, specifying the deletion event date.
Delete sites automatically, specifying the deletion event date.
![]() Close and delete sites automatically.
Close and delete sites automatically.
![]() Site Collection Closure In addition to the options available for deleting sites, applying this policy to the root site in the site collection sets the site collection to closed, making the root site and all subsites read only.
Site Collection Closure In addition to the options available for deleting sites, applying this policy to the root site in the site collection sets the site collection to closed, making the root site and all subsites read only.
Exam Tip
Closing a site is very different from deleting a site. A site owner or site collection administrator can reopen a closed site by going to the Site Closure And Deletion page under Site Administration.
Need More Review?
If you define site policies within a content type hub, they can be published across multiple site collections. For a more detailed understanding of site policies in SharePoint 2016, review the TechNet article entitled “Overview of site policies in SharePoint 2013” at https://technet.microsoft.com/library/jj219569.aspx.
Configure a team mailbox
A team mailbox (also known as a site mailbox) is a convenient feature that allows users in a SharePoint site to collaborate from a mail standpoint. This mailbox can be used to share important email messages, gather important team conversations, or share important documents by email.
From an IT perspective, this arrangement is optimal because the newly created mailbox resides in Exchange rather than being hosted inside SharePoint. SharePoint uses a site feature (appropriately named Site Mailbox) to provision the necessary components.
Configuring site mailboxes
Although SharePoint 2016 servers come with the Site Mailbox Site feature installed, this feature has a dependency on a Site Collection feature that is not available in an OOB SharePoint 2016 installation (also called Site Mailboxes). This is because a fair amount of configuration work is required to enable this particular functionality. Prerequisites include the following:
![]() User Profile Synchronization must be enabled in the farm.
User Profile Synchronization must be enabled in the farm.
![]() The App Management Service Application must be configured in the farm.
The App Management Service Application must be configured in the farm.
![]() SSL must be configured on the SharePoint servers hosting the default zone of web applications configured for server-to-server authentication and app authentication.
SSL must be configured on the SharePoint servers hosting the default zone of web applications configured for server-to-server authentication and app authentication.
![]() The administrator performing the configuration must be part of the SharePoint and Exchange Server administrator groups; additionally, the Exchange server must be configured and providing mailboxes for users.
The administrator performing the configuration must be part of the SharePoint and Exchange Server administrator groups; additionally, the Exchange server must be configured and providing mailboxes for users.
Once the prerequisites are in place, only a few more steps remain for the configuration to be complete:
![]() The Exchange Web Services API must be installed (SharePoint web-tier servers).
The Exchange Web Services API must be installed (SharePoint web-tier servers).
![]() IIS must be reset (SharePoint web-tier servers).
IIS must be reset (SharePoint web-tier servers).
![]() OAuth Trust and Service Permissions must be set (SharePoint Server farm).
OAuth Trust and Service Permissions must be set (SharePoint Server farm).
![]() OAuth Trust and Service Permissions must be set (Exchange Server farm).
OAuth Trust and Service Permissions must be set (Exchange Server farm).
Need More Review?
For more detail on this configuration, including PowerShell scripts required for each configuration, visit the TechNet article entitled “Configure site mailboxes in SharePoint Server 2013” at https://technet.microsoft.com/library/jj552524.aspx.
Creating the team mailbox
Initializing the site mailbox from within a team site is quite simple, requiring little technical ability. After a team site has been created, there is an extra tile in the Getting Started banner titled Keep Email In Context. Selecting this tile (see Figure 3-8) activates the Site Mailbox feature.

Plan Sites page pinning
Users browsing SharePoint sites in a hybrid SharePoint environment have the ability to follow a site by selecting Follow (Figure 3-9).

In a hybrid environment, this information is promoted to an individual’s SharePoint tile (also called the Sites tile in some tenancies). This page shows four groupings of sites (shown in Figure 3-10):
![]() Promoted Sites
Promoted Sites
![]() Followed Sites
Followed Sites
![]() Recent Sites
Recent Sites
![]() Recommended Sites
Recommended Sites

Once a user has followed a site, it appears in the Followed Sites area of the SharePoint/Sites page. If the user follows several different sites, then the list of sites might be a bit hard to navigate, especially when visiting followed sites that are regularly in use. These sites can be “pinned” to the top of the Followed Sites section by selecting a site’s ellipsis and then selecting Pin To Top (Figure 3-11).

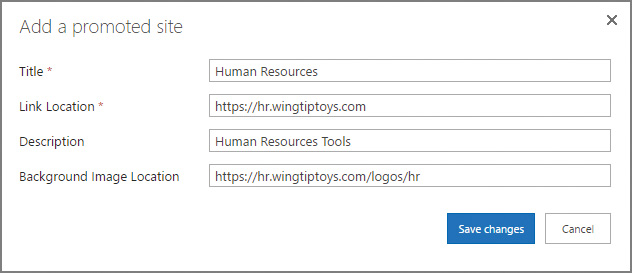
From an administrative standpoint, it is possible to alter the sites that are viewed by all in the organization within the Promoted Sites section of the SharePoint/Sites page. Selecting Manage in the Manage The Promoted Sites Below dialog box causes the tiles to change appearance, showing a new tile, Add A Promoted Site (Figure 3-12).
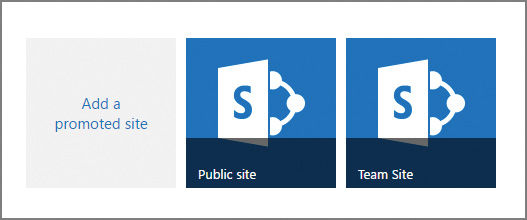
Selecting Add A Promoted Site allows you to specify the Title, Link Location, Description, and Background Image Location for the newly promoted site (Figure 3-13).
Skill: Plan SharePoint high availability and disaster recovery
High availability and disaster recovery concepts in SharePoint 2016 really are not that much different than they were in earlier versions. Some of these concepts have been deprecated by Microsoft (for example, SQL AlwaysOn Mirroring), but are provided by SharePoint for backward compatibility.
This section covers how to:
![]() Plan for service instance configuration
Plan for service instance configuration
![]() Plan for physical server distribution
Plan for physical server distribution
![]() Plan for server load balancing
Plan for server load balancing
![]() Plan for SQL Server clustering
Plan for SQL Server clustering
![]() Plan for SQL Server AlwaysOn Availability Groups
Plan for SQL Server AlwaysOn Availability Groups
![]() Plan for SQL Server Log Shipping
Plan for SQL Server Log Shipping
Plan for service distribution
In previous installations, you would often find that SharePoint follows a three-tier topology, with web servers, application servers, and database servers. This configuration is often referred to as a traditional topology.
Compare this topology to that found in a MinRole-compliant farm, and you will quickly see that the configuration becomes more distributed, with front-end, application (batch), distributed cache, and search servers replacing those found in a traditional topology. This configuration is built around the notion of minimizing network traffic between servers in the farm while maximizing the system resources of the individual server hardware and processing requests from the individual server. Such a configuration is called a streamlined topology.
Need More Review?
These two topology approaches are really nothing new, having been present in SharePoint 2013, but with the streamlined topology not having the extra MinRole health and governance technology to assist. For an understanding and comparison of how services are distributed between these two models, visit the TechNet article entitled “Plan service deployment in SharePoint 2013” at https://technet.microsoft.com/library/jj219591.aspx. Each of these models has a corresponding Services on Server Install Worksheet; the Streamlined Topology worksheet closely echoes the configuration of services in a MinRole-compliant 2016 farm.
Plan for service instance configuration
When discussing the concept of a highly available MinRole-compliant farm, it becomes obvious that quite a few servers will be involved. At the Front-end, Application, and Search tiers of the farm, at least two of each server are required, and three servers are required for Distributed cache to be highly available (Figure 3-14).
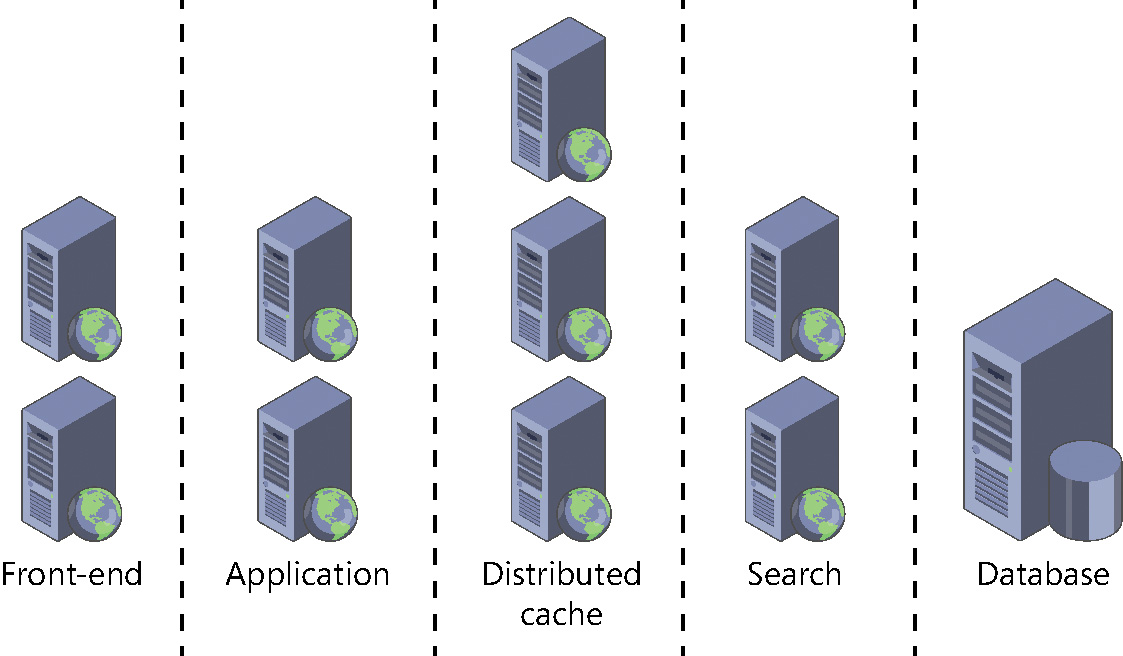
Add in the number of SQL servers required at the database level to provide high availability by using an AlwaysOn Cluster or AlwaysOn Availability Groups (2), and then the number of servers in the farm quickly escalates to a minimum of 15.
In smaller environments, you might find that the licensing, infrastructure, and maintenance costs for such an installation are prohibitive. If this indeed turns out to be the case, then a clearer understanding of what services each MinRole provides is in order.
Scaling services in a smaller, non-MinRole-compliant SharePoint farm
Creating a SharePoint 2016 farm with limited resources can be challenging. If you start with a single server, then it’s obvious that you will wind up creating a single-server farm that is MinRole compliant. But what happens when you are only able to add another one, two, or three servers to the SharePoint farm?
In general, you would choose the most logical MinRole and apply it first to the farm, specifying that the other servers in the farm become Custom role servers. For instance, if you had four servers total, you might choose to have two of the servers be Front-end MinRole compliant (to efficiently serve pages) and have the other two servers use the Custom role, hosting all other necessary services.
Important
In such a configuration, you might choose to have only one Distributed cache server because this topology requires that you must decide to have either one Distributed cache server or three Distributed cache servers.
In such a configuration, it becomes paramount that you closely monitor the performance of servers that are using the Custom role because they could become overcommitted depending on user load. Prior to configuring the Custom role servers in this farm, you should have a solid understanding of which services are required on these servers.
Need More Review?
Understanding which services are maintained on which MinRole servers isn’t much different than planning services on previous SharePoint 2013 farms. For a better understanding of how these services are assigned by MinRole, visit the TechNet article entitled “Description of MinRole and associated services in SharePoint Server 2016” at https://technet.microsoft.com/library/mt667910.aspx.
Scaling services in a smaller, fully MinRole-compliant SharePoint farm
If your farm is to remain fully MinRole compliant, then it’s required that no service applications be created until the farm has at least one server in each of the following roles:
![]() Front-end
Front-end
![]() Application
Application
![]() Distributed cache
Distributed cache
![]() Search (optional)
Search (optional)
Scaling services in a MinRole-compliant farm, then, just requires that you create the required MinRole servers at the appropriate level. For instance, if you require resiliency for the Front-end, Application, or Search components of your farm, you would just add a server with the appropriate MinRole at the appropriate level in the farm. If the Distributed cache role needed to be expanded, then you would add two additional servers to enable full resiliency.
Plan for physical server distribution
Servers in a SharePoint high availability and disaster recovery configuration have the ability to be installed in separate physical locations. This configuration is obviously not without its very own set of rules, which must be observed to keep the resulting SharePoint installation in a supported state. These rules are different, depending on the need: high availability only, disaster recovery only, or both.
Creating a stretched farm across two datacenters
As we discussed previously, each of the SharePoint MinRoles is capable of resiliency, requiring a minimum of two servers. By using DNS or a hardware load balancer, it is possible to split the installation down the middle for the purposes of high availability, installing hardware in two datacenters that are located near one another. This has the added benefit of allowing one center to fail without suffering a complete outage in the farm.
This configuration is described as a stretched farm implementation, and only has two requirements from a SharePoint standpoint to be fully supported:
![]() Connections within the SharePoint farm between servers (in particular, the Front-end and Database servers) must exhibit a latency of less than 1 ms, 99.9 percent of the time over a period of 10 minutes.
Connections within the SharePoint farm between servers (in particular, the Front-end and Database servers) must exhibit a latency of less than 1 ms, 99.9 percent of the time over a period of 10 minutes.
![]() The bandwidth connecting these two SharePoint installations must be maintained at a speed of at least 1 gigabit per second (Gbps).
The bandwidth connecting these two SharePoint installations must be maintained at a speed of at least 1 gigabit per second (Gbps).
Need More Review?
It’s important to understand that high availability and disaster recovery are often addressed together but are not the same thing. Understanding high availability configurations, particularly those that use multiple datacenters, is a fairly advanced topic, and requires an understanding of networking, servers, SharePoint, and SQL topics. For a detailed understanding of high availability in SharePoint 2016, review the TechNet article “Create a high availability architecture and strategy for SharePoint 2013” at https://technet.microsoft.com/library/cc748824.aspx.
Creating a SharePoint disaster recovery environment across two datacenters
A SharePoint disaster recovery environment really isn’t a single SharePoint environment, but rather two environments, one of which is in use (and sometimes configured for high availability use itself) and another that is built as a standby. Choosing which SharePoint disaster recovery configuration is used tends to be influenced by cost and implementation complexity, resulting in the need to choose one of three possible options:
![]() Cold Standby Recovery This environment type is the slowest to recover, and requires that backups of servers from the production datacenter be restored to physically different servers in the DR datacenter.
Cold Standby Recovery This environment type is the slowest to recover, and requires that backups of servers from the production datacenter be restored to physically different servers in the DR datacenter.
![]() Warm Standby Recovery This environment type is faster to recover, and involves regular restores of full and incremental backups from the production datacenter to physically different servers in the disaster recovery datacenter.
Warm Standby Recovery This environment type is faster to recover, and involves regular restores of full and incremental backups from the production datacenter to physically different servers in the disaster recovery datacenter.
![]() Hot Standby Recovery This environment type is by far the quickest to recover, often requiring seconds to minutes for the recovery to take place.
Hot Standby Recovery This environment type is by far the quickest to recover, often requiring seconds to minutes for the recovery to take place.
This last option, Hot Standby Recovery, requires further explanation. In such a configuration, a complete SharePoint farm is installed at the Primary (production) and Secondary (disaster recovery) locations. Each farm maintains its own separate Configuration database and Central Administration website content database.
Each of these farms must receive all customizations and updates in a synchronous fashion (deployment and maintenance scripts are recommended for consistency). Finally, from a back-end standpoint, content databases must be replicated from the primary to secondary farms on a regular basis by using one of three supported technologies:
![]() SQL Log Shipping A mechanism that allows for the automatic transmission of transaction log backups from a primary database instance to a secondary server instance.
SQL Log Shipping A mechanism that allows for the automatic transmission of transaction log backups from a primary database instance to a secondary server instance.
![]() Asynchronous AlwaysOn Mirroring A mechanism that replicates changes from a per-database standpoint from a primary database instance to a secondary server instance. This configuration is known as High-Performance Mode, and it implies that transactions do not have to synchronously commit on the primary and secondary instances.
Asynchronous AlwaysOn Mirroring A mechanism that replicates changes from a per-database standpoint from a primary database instance to a secondary server instance. This configuration is known as High-Performance Mode, and it implies that transactions do not have to synchronously commit on the primary and secondary instances.
![]() Asynchronous AlwaysOn Availability Groups A mechanism that replicates changes in a grouping of SQL content databases, from the primary instance to the secondary instance.
Asynchronous AlwaysOn Availability Groups A mechanism that replicates changes in a grouping of SQL content databases, from the primary instance to the secondary instance.
Exam Tip
Although AlwaysOn Mirroring is still supported for legacy SQL installations, it has also been deprecated and should not be used going forward.
Regardless of which of these replication strategies is used, it’s important to note that they can occur over hundreds or thousands of miles, without affecting the primary farm.
Need More Review?
Choosing a disaster recovery strategy requires quite a bit of coordination among the server infrastructure, SQL, networking, and SharePoint teams. It is unlikely that you, as the SharePoint administrator, will get to configure each of these options; that said, it’s important to understand the tools that are available to ensure continuous availability of your SharePoint farm. For more detailed information concerning DR strategies, review the TechNet article “Choose a disaster recovery strategy for SharePoint 2013” at https://technet.microsoft.com/library/ff628971.aspx.
Plan for network redundancy
Although discussions of network redundancy are technically outside the purview of the SharePoint administrator, it is important nonetheless to consider the availability of the networks to which your SharePoint farms connect. SharePoint farms are dependent on consistent network connectivity to provide intrafarm communication between servers in the SharePoint topology as well as communications to and from the respective users of the SharePoint farms.
Any SharePoint high availability design must be able to ensure that a network failure cannot single-handedly take down the farm. For instance, a connectivity break between cache hosts for the distributed cache service in the farm could result in a failure of the built-in cache cluster.
Network resiliency
Just as multiple servers in a SharePoint farm provide resiliency for services and roles, redundancy from a network standpoint can provide resiliency for farm connectivity. This resiliency might only be necessary for a single location (such as a high availability farm), or might also be necessary for disaster recovery site connections or connections to the cloud for hybrid implementations.
Factors that can affect network resiliency include the following:
![]() Power blackouts and brownouts Easily addressed via backup generators and multiple power distribution unit (PDU) connections.
Power blackouts and brownouts Easily addressed via backup generators and multiple power distribution unit (PDU) connections.
![]() NIC failures on member servers Most modern servers provide redundant network interface cards (NICs), which may each be connected to a separate virtual local area network (VLAN; an isolated or partitioned section of your local area network).
NIC failures on member servers Most modern servers provide redundant network interface cards (NICs), which may each be connected to a separate virtual local area network (VLAN; an isolated or partitioned section of your local area network).
![]() Router and switch failures Maintaining redundant VLANs is usually accomplished across multiple routers, preventing a network failure due to the loss of a single router in the datacenter.
Router and switch failures Maintaining redundant VLANs is usually accomplished across multiple routers, preventing a network failure due to the loss of a single router in the datacenter.
![]() Network services failures Most enterprises have multiple Domain Name System (DNS) and Dynamic Host Configuration Protocol (DHCP) servers, specifically created to provide resiliency.
Network services failures Most enterprises have multiple Domain Name System (DNS) and Dynamic Host Configuration Protocol (DHCP) servers, specifically created to provide resiliency.
![]() Upstream provider failures A disaster recovery environment is only as good as the network that connects it. Selecting redundant routes (or perhaps, redundant providers) allows you to ensure wide area network (WAN) connectivity to your disaster recovery environment.
Upstream provider failures A disaster recovery environment is only as good as the network that connects it. Selecting redundant routes (or perhaps, redundant providers) allows you to ensure wide area network (WAN) connectivity to your disaster recovery environment.
Plan for server load balancing
Load balancing at the Front-end level of a SharePoint farm allows the SharePoint administrator to scale the inbound load from a user standpoint. As the number of users in a SharePoint farm increases, more Front-end servers can be added to a pool of servers to better distribute the load.
There are two useful mechanisms for load balancing a SharePoint farm:
![]() Using the Network Load Balancing feature This feature in Windows Server allows for two or more servers to be assigned as a virtual cluster. If one server fails, inbound requests can automatically be directed to the remaining nodes.
Using the Network Load Balancing feature This feature in Windows Server allows for two or more servers to be assigned as a virtual cluster. If one server fails, inbound requests can automatically be directed to the remaining nodes.
![]() Using a hardware load balancer Dedicated load balancers are often quite sophisticated, and capable of not only performing basic load balancing, but also assessing the health of servers in a server pool. For instance, if a network card failed on a server pool, the load balancer would simply reassign requests to the remaining servers in the pool.
Using a hardware load balancer Dedicated load balancers are often quite sophisticated, and capable of not only performing basic load balancing, but also assessing the health of servers in a server pool. For instance, if a network card failed on a server pool, the load balancer would simply reassign requests to the remaining servers in the pool.
Network Load Balancing on Windows Server is fully described in the TechNet article entitled “Network Load Balancing Overview” at https://technet.microsoft.com/library/hh831698.aspx.
Plan for SQL Server aliases
When you configure a SharePoint server farm, you are asked to provide the name of the SQL server (and perhaps a server instance, if you are not using the default). The name of the SQL server becomes part of the farm’s configuration.
From both an operational and disaster recovery standpoint, this can be less than optimal. What happens if the SQL server fails or is irreparably damaged? How quickly would you be able to set up a replacement server and then restore SharePoint services?
SQL Server aliases are a mechanism that allows you to quickly disconnect one SQL back-end server instance and replace it with another. This is done by assigning an alias name by using a tool called the SQL Server Client Network Utility, or CLICONFG. CLICONFG (note the spelling; there is no second “i”) is found on every Windows server, and is fairly straightforward to configure.
Important
The CLICONFG utility is found on most Windows servers at C:WindowsSystem32cliconfg.exe.
Creating an SQL Alias
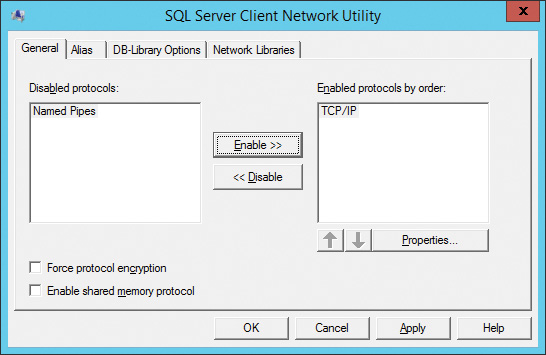
Configuring an SQL alias is done on every SharePoint server being configured in your farm and requires only a few steps. First, TCP/IP must be enabled (see Figure 3-15).
Next, click the Alias tab and click Add to configure the alias itself. Specify three things: the network library (TCP/IP), the server alias (Northwind, in this example), and the server name (16SQL, in this example). Optionally, you can choose to either dynamically determine the TCP port used by SQL, or select a particular port (the default is 1433). Figure 3-16 shows the alias being configured.
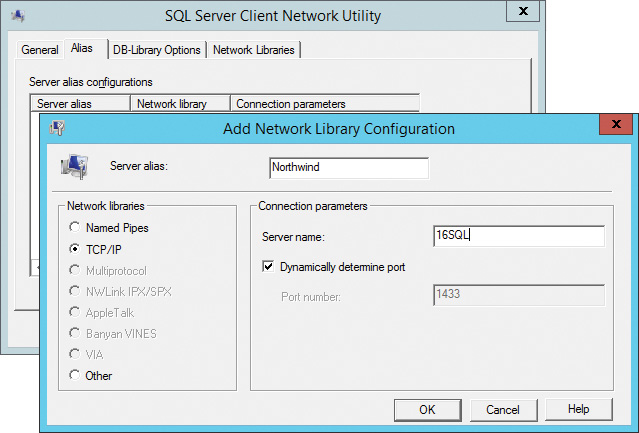
Click OK in the Add Network Library Configuration dialog box and then click OK in the SQL Server Client Network Utility dialog box to enable the newly created SQL alias.
Verify the SQL alias
Verifying the SQL alias is simple. Create a text file on your desktop (use ANSI coding), saving it with a .udl extension (this example uses SQLAlias.udl). Open the text file, and type the SQL alias name. Select Use Windows NT Integrated Security, and click the Select The Database On The Server drop-down list (shown in Figure 3-17). If everything is configured correctly in the SQL alias (and you have permissions to the SQL server), you should be able to see all the SQL databases associated with your farm. No changes need to be made, so click Cancel after you’ve verified connectivity (Figure 3-17).

Plan for SQL Server clustering
SQL Server clustering is part of the AlwaysOn family of high availability and disaster recovery technologies. Also known as AlwaysOn Failover Cluster Instances, this technology relies on the underlying Windows Server Failover Clustering (WSFC) functionality at the server level.
An SQL Server Failover Cluster Instance (FCI) is a single instance of SQL Server that is installed across multiple nodes. In more recent editions, this functionality has been expanded to allow the FCI to exist on nodes that occupy multiple subnets, allowing for network resiliency in the cluster.
Multiple nodes in the SQL FCI present themselves to the network as a single SQL instance. Failover between these nodes is transparent to the user, and generally takes seconds to accomplish.
Requirements for SQL Server clustering
SQL Server clustering has requirements at the server and storage levels specifically focused on maintaining the cluster itself. Hardware at these levels must be supported by the underlying Server Operating System level and must be certified for use with clustering, particularly in the case of storage based on storage area networks (SANs).
SQL Server clustering requires an understanding of both SQL-specific and operating system-specific tasks needed to establish a reliable and supported cluster installation. For a better understanding of these topics, visit the MSDN article “Always On Failover Cluster Instances (SQL Server)” at https://msdn.microsoft.com/library/ms189134.aspx.
Plan for SQL Server AlwaysOn Availability Groups
SQL Server AlwaysOn Availability Groups were introduced in SQL Server 2012, and use portions of the functionality found in SQL mirroring (deprecated), SQL clustering, and SQL log shipping. The result is the ability to group databases together (an Availability Group), and replicate it synchronously (high availability) and asynchronously (disaster recovery) to the respective environments.
Implementing SQL Server AlwaysOn Availability Groups is a process similar to the deployment of SQL Server clustering with one notable exception: SQL itself does not have to be clustered. Instead, individual SQL instances can be installed on cluster nodes and then configured to present what looks like a SQL instance to network clients.
This configuration is particularly useful in a full high availability and disaster recovery configuration. Multiple Windows servers can be configured with clustering at both the primary (production/high availability) and secondary (disaster recovery) environments. The servers clustered in each of these environments do not necessarily have to be part of the same cluster. You could have one high availability cluster in the primary environment and a single-server disaster recovery cluster in the secondary environment.
Even though these two environments are not related from a cluster standpoint, the primary environment can maintain an AlwaysOn synchronous-commit availability group configuration for the high availability production environment, replicating databases by using an AlwaysOn asynchronous-commit availability group for the disaster recovery environment. At this site, a separate SharePoint environment could be configured (different Configuration database, different Central Administration database, and other different configuration items) to use the replicated data in a read-only fashion.
Need More Review?
SQL AlwaysOn Availability Groups presents the most modern of the high availability and disaster recovery environments available for use by SharePoint. In such a configuration, it’s entirely possible to create a hot standby location that is current to within seconds (from an SQL Transaction view) of the actual production environment. For a better understanding of this topic, review the MSDN article entitled “Always On Availability Groups (SQL Server)” at https://msdn.microsoft.com/library/hh510230.aspx.
Plan for SQL Server Log Shipping
SQL Server Log Shipping is one of the oldest disaster recovery mechanisms in use today. This configuration is relatively straightforward to set up and requires no special hardware. As recovery technologies go, SQL Server Log Shipping can be used to create a warm standby location, copying Transaction Log backups from the primary to secondary locations. As is the case with SQL AlwaysOn, the SharePoint installation at the secondary site will be created separately and only share certain databases with the primary site.
From a functional point of view, SQL Server Log Shipping is a simple process:
1. The Transaction Log is backed up at the primary server instance.
2. The Transaction Log file is then copied (“shipped”) from the primary to the secondary server instance.
3. The Transaction Log file is restored at the secondary server instance.
Failover for such a configuration is always a manual proposition, and data copied from the source is usually current to within a matter of minutes (compared with seconds in an AlwaysOn Availability Groups configuration). This environment can optionally be created with a Monitor server, which looks at the Transaction Logs being shipped and can provide information about the process and generate alerts as required.
Need More Review?
More information regarding the configuration and maintenance of SQL Server Log Shipping can be found in the MSDN article “About Log Shipping (SQL Server)” at https://msdn.microsoft.com/library/ms187103.aspx.
Plan for storage redundancy
Thus far, we’ve worked through power, networking, and server redundancy. The storage layer of a high availability system has to be able to meet the same redundancy requirement as all the other components. This redundancy is available at two levels: the storage media itself and the communication channels within the storage array.
Storage media redundancy
At the disk level (whether rotational or solid-state media), the individual disk is not capable of any sort of redundancy. In rotational media, the interface, motor, and sometimes the chemical composition of the platters themselves can fail. In solid-state media, similar issues can present themselves at the interface and component levels.
The only way, then, to provide redundancy in the media itself is to increase the number of individual storage devices. Doing so statistically decreases the overall effect on the storage subsystem by way of RAID technology. Redundant array of inexpensive or independent disks (RAID) is a mechanism whereby a failure of one or more member storage devices can be covered by the remaining devices in the array.
RAID has several standard levels (0–6), with RAID 0 (Striping), RAID 1 (Mirroring), and RAID 5 (Block Level Striping with Distributed Parity) being the most common. On modern storage subsystems, nested or hybrid RAID solutions are generally in use, either RAID 0+1 (a mirror set composed of two striped sets) or RAID 1+0 (a stripe set composed of two mirrored sets).
Important
Media redundancy can be either software- or hardware-based in Windows Server systems. Windows Server can take a series of attached disks and make them into a set, relying on the operating system itself to handle the maintenance of parity and other items. Although this is functional, it nonetheless requires additional resources from a processor and memory standpoint. Hardware-based solutions, by comparison, are available from a number of vendors and have their own controllers in the array to handle the computational tasks required to maintain a RAID subsystem.
Need More Review?
For a better understanding of RAID levels as they pertain to Windows systems, review the TechNet article “Comparing Different Implementations of RAID Levels” at https://technet.microsoft.com/library/ms178048(v=sql.105).aspx.
Storage array redundancy
Moving beyond single and multiple groups of disk media, we come upon two types of enterprise storage, network-attached storage (NAS) and storage area network (SAN). Both of these storage types make use of arrays of media storage (RAID) for internal redundancy.
Network Attached Storage
Network-attached storage (NAS) is a term that describes a specialized computer presenting a series of drives for use over a network connection. These environments generally can be configured for hardware redundancy within the NAS itself, but are dependent on multiple external connections for redundancy in the same way servers require multiple connections.
Storage Area Network
SAN, or storage area network, is a term that describes a more advanced grouping of storage and hardware into an expandable environment from both an internal connectivity and storage standpoint. Interfaces to this environment sometimes require dedicated hardware on each server, tend to be faster than those presented by an NAS environment, and can be made available to servers by using a series of protocols including Fibre Channel, iSCSI, ATA over Ethernet, and others.
Plan for login replication
As you might imagine, the databases being copied between environments require a certain amount of configuration from a login standpoint. The logins themselves are not replicated with data in either an AlwaysOn Availability Groups or Log Shipping DR solution, leaving us to find a way to replicate or re-create them.
There are a couple of ways to handle this requirement:
![]() If you happen to know the user names and passwords for the accounts accessing SQL, then you can re-create the credentials within SQL at the secondary site (manual solution).
If you happen to know the user names and passwords for the accounts accessing SQL, then you can re-create the credentials within SQL at the secondary site (manual solution).
![]() You can create a script to replicate these credentials between environments by using a stored procedure (semiautomatic solution).
You can create a script to replicate these credentials between environments by using a stored procedure (semiautomatic solution).
![]() You can create an SQL Server Integration Services (SSIS) job that transfers logins between instances of SQL Server (fully automatic solution).
You can create an SQL Server Integration Services (SSIS) job that transfers logins between instances of SQL Server (fully automatic solution).
Need More Review?
Microsoft provides a T-SQL script for replicating credentials between environments in the Knowledge Base article entitled “How to transfer logins and passwords between instances of SQL Server” at https://support.microsoft.com/kb/918992. For information on how to set up fully automated login replication, visit the MSDN article “Transfer Logins Task” at https://msdn.microsoft.com/library/ms137870.aspx.
Skill: Plan backup and restore
Whereas the previous skill was about keeping the farm available for as much of the time as possible, this skill is primarily concerned with how to recover it in the event of a failure. These failures can exist at many possible levels: hardware, software, database, power, and others; the purpose of this skill is to assist you in planning how your environment will be recovered when (not if) something goes wrong.
This section covers how to:
![]() Establish a SharePoint backup schedule
Establish a SharePoint backup schedule
![]() Establish an SQL Server backup schedule
Establish an SQL Server backup schedule
![]() Plan a nonproduction environment content refresh
Plan a nonproduction environment content refresh
![]() Plan for farm configuration recovery
Plan for farm configuration recovery
![]() Plan for service application recovery
Plan for service application recovery
Establish a SharePoint backup schedule
SharePoint 2016 backup schedules are built by using the Backup and Restore section of Central Administration. Backups run from Central Administration actually create SQL Server backups of the SharePoint farm environment, and can be configured at several levels:
![]() Farm-level backups Can include both content and configuration data.
Farm-level backups Can include both content and configuration data.
![]() Web application Can back up an individual web application configuration (including IIS settings) and one or more content databases.
Web application Can back up an individual web application configuration (including IIS settings) and one or more content databases.
![]() Services and service applications (not shared) Can back up both the settings and any associated databases.
Services and service applications (not shared) Can back up both the settings and any associated databases.
![]() Proxies for service applications (not shared) Backed up separately from their associated service applications.
Proxies for service applications (not shared) Backed up separately from their associated service applications.
![]() Shared services Can back up both the service application and the service application proxy.
Shared services Can back up both the service application and the service application proxy.
Backups created in Central Administration require a location for the completed backups to be stored. This location must be a network share on a file server and shared with Full Control permissions to the SQL service account, Timer service account, and the Central Administration application pool identity account.
Important
SharePoint backups do not capture configuration changes made at the file level or changes made outside of SharePoint Central Administration or PowerShell. In particular, things like Web.config files, custom graphics installed at the file level (without a solution or feature), and other modifications will not be captured.
Search backups
The effective backup of the Search topology is a special case, particularly because the topology can be spread across multiple servers in the SharePoint farm. This backup is conducted in SQL Server and includes the Search administration, crawl, and property databases, as well as the index partition files.
Configuration-only backups
SharePoint Backup can create what’s known as configuration-only backups. These backups contain settings information, such as those affecting email, antivirus software, and Information Rights Management (IRM).
The ability to back up the configuration of a particular SharePoint farm has several applications:
![]() This configuration can be applied across multiple farms for the purposes of standardization.
This configuration can be applied across multiple farms for the purposes of standardization.
![]() Configurations can be replicated from production to a development or staging environment.
Configurations can be replicated from production to a development or staging environment.
Scheduling a SharePoint backup
Oddly, there is no provision in the Backup and Restore section of Central Administration for regular backups. If you want to use SharePoint backups on a scheduled basis (you can set up both full and differential backups), then you will need to build a backup script by using PowerShell and schedule the backups.
Need More Review?
SharePoint backups from Central Administration are discussed in the TechNet article “Overview of backup and recovery in SharePoint 2013” at https://technet.microsoft.com/library/ee663490.aspx. For more information on how backups are created from a PowerShell perspective, review the TechNet article entitled “Backup and recovery cmdlets in SharePoint 2013” at https://technet.microsoft.com/library/ee890109.aspx.
Establish an SQL Server backup schedule
For environments with a supporting SQL administration team, it’s often preferable to allow the SQL team to gather backups of SharePoint configuration and content databases directly from the SQL instance itself. These backups have the benefit of (usually) being part of an overarching enterprise-level backup system, and they can be scheduled and easily monitored; some of the SQL backups (content databases) can be used directly from SharePoint because database restores can be directly mounted and their content can be extracted to a site collection.
Determining an SQL backup schedule
Although it’s likely that the SQL team will have input into the overall backup schedule, you will likely need to determine how often you want the farm or its components backed up. This requirement will definitely be driven by both recovery point objectives (where we must restore to) and recovery time objectives (when the restore should be completed).
Need More Review?
Although SQL backup and restore operations aren’t part of day-to-day SharePoint administration, understanding how these operations are carried out could be an important skill. For more information, review the MSDN article “Back Up and Restore of SQL Server Databases” at https://msdn.microsoft.com/library/ms187048.aspx.
Plan a nonproduction environment content refresh
Now that you have an effective mechanism for capturing all or a portion of a production SharePoint farm, it’s time to put it to good use. Having a nonproduction environment that closely resembles the production environment from a configuration and limited content standpoint can be a valuable tool for testing configuration and operational changes such as:
![]() Testing updates you want to add to your production farm.
Testing updates you want to add to your production farm.
![]() Evaluating third-party tool sets, such as administration, backup, antivirus, and others.
Evaluating third-party tool sets, such as administration, backup, antivirus, and others.
![]() Performing backup and restoration tests.
Performing backup and restoration tests.
If desired, you can completely segregate these environments from production altogether, placing them in their own environment from an Active Directory, SQL, and Exchange standpoint. This is an effective way to virtualize development environments to fully test code interactions with external infrastructure systems.
Moving limited content
Occasionally, a select portion of content in an SQL database is all that’s required to test a piece of code. In such a case, it’s a simple matter to place a copy of the restored content database on the local SharePoint file system and temporarily mount it from within Central Administration. Once the database is mounted, site collection content can be selectively retrieved and restored to the nonproduction environment.
Plan for farm configuration recovery
Central Administration backups include the ability to back up and restore only the SharePoint farm configuration. Farm configurations are always done via a full backup, and can be restored from Central Administration or PowerShell, depending on need.
Restoring a farm configuration backup only overwrites from values present in the backup itself. If the destination farm has a configuration value defined (say, the name of an email server) and the backup being restored does not have the same value defined, it will leave the previous value unchanged.
If you need to recover a farm configuration from a backup and overwrite the existing farm configuration, this action should happen only during a system outage window because the farm will be unavailable until the configuration has been completely restored. Never stop, pause, or restart a farm configuration restore operation because this action will likely cause the farm to become damaged or unstable.
Need More Review?
For detailed information concerning the restoration of a farm configuration, refer to the TechNet article “Restore farm configurations in SharePoint 2013” at https://technet.microsoft.com/library/ee428326.aspx.
Plan for service application recovery
The restoration of service applications from either a full backup or a full and differential backup combination is a more granular version of the full farm recovery. A backup containing the service application configuration is selected and then restored. During this process, the service application is unavailable for use; thus, it is recommended that this restoration type also be performed during an outage window.
When recovering a service application, the service application type can affect the steps required for restoration from a backup. These restorations can be implemented via Central Administration, PowerShell, or partially (for databases only) by using SQL Server tools:
![]() Shared service application Only requires the restoration of a single service application.
Shared service application Only requires the restoration of a single service application.
![]() Nonshared service application Could include either the restoration of the service application or the restoration of both a service application proxy and the related service application.
Nonshared service application Could include either the restoration of the service application or the restoration of both a service application proxy and the related service application.
![]() User Profile service application Will restore the entire configuration, including the associated User Profile service databases.
User Profile service application Will restore the entire configuration, including the associated User Profile service databases.
![]() Search service application Might require the restoration of a separately backed up thesaurus file (not included in a farm backup). The restoration of the Search application itself restores the entire configuration, including the associated Search databases, but requires that the Search application be started after the restoration has completed because the service is restored in a “paused” state.
Search service application Might require the restoration of a separately backed up thesaurus file (not included in a farm backup). The restoration of the Search application itself restores the entire configuration, including the associated Search databases, but requires that the Search application be started after the restoration has completed because the service is restored in a “paused” state.
![]() Secure Store service Will restore the entire configuration. Once the restoration is complete, the passphrase will need to be refreshed by using the Update-SPSecureStoreApplicationKey cmdlet.
Secure Store service Will restore the entire configuration. Once the restoration is complete, the passphrase will need to be refreshed by using the Update-SPSecureStoreApplicationKey cmdlet.
Need More Review?
The backup and restoration of SharePoint farms is heavily dependent on whether or not a third-party utility is used. Instructions in this book and on TechNet are more concerned with backup and restore operations that can be used in Central Administration, PowerShell, or SQL Server tools. For an in-depth understanding of the restoration processes used throughout this chapter, review the TechNet articles under the “Restore (SharePoint 2013)” article at https://technet.microsoft.com/library/ee428303.aspx.
Plan for content recovery
Backed up content in a SharePoint configuration can take several forms, ranging from granular restorations on a per site collection basis to full farm restorations that restore configuration and content information. The type of recovery you wish to perform will in turn specify the type of backup that you will use for the restoration.
The good news here is that SharePoint content can be restored in a remarkably granular fashion in at least three different ways:
![]() Recovering a SharePoint content database.
Recovering a SharePoint content database.
![]() Recovering content from an unattached SharePoint content database.
Recovering content from an unattached SharePoint content database.
![]() Recovering content from an attached, read-only content database.
Recovering content from an attached, read-only content database.
Recovering a SharePoint content database
A SharePoint content database can be recovered by using either Windows PowerShell cmdlets, Central Administration, or SQL Server tools. The mechanism you choose will determine the appropriate steps for restoration.
In the case of a farm that has an existing content database that will be overwritten, access to the database will need to be released before the restoration can take place. Content databases being restored by using either the Restore-SPFarm cmdlet or Central Administration automatically causes SharePoint to free up access to the content database before the restoration takes place. Content databases being restored from SQL Server tools have to follow a different restoration path, with the following requirements:
![]() The account doing the restoration should have the sysadmin fixed server role.
The account doing the restoration should have the sysadmin fixed server role.
![]() The Windows SharePoint Services Timer service should be stopped on all SharePoint servers, allowing the running stored procedures to finish. This will take several minutes to complete.
The Windows SharePoint Services Timer service should be stopped on all SharePoint servers, allowing the running stored procedures to finish. This will take several minutes to complete.
![]() All full, differential, and transaction logs should be applied. As you are restoring the database, don’t forget to select the Overwrite The Existing Database option.
All full, differential, and transaction logs should be applied. As you are restoring the database, don’t forget to select the Overwrite The Existing Database option.
![]() Once the database backups and logs have been restored, the Windows SharePoint Services Timer service can be started on all SharePoint servers.
Once the database backups and logs have been restored, the Windows SharePoint Services Timer service can be started on all SharePoint servers.
Need More Review?
For detailed instructions concerning the restoration of content databases in SharePoint 2016, visit the TechNet article entitled “Restore content databases in SharePoint 2013” at https://technet.microsoft.com/library/ee748604.aspx.
Recovering content from an unattached SharePoint content database
In an enterprise setting, users will occasionally delete content (and sometimes, complete site collections). In earlier SharePoint versions, an entire content database would need to be restored to simply restore an individual site collection.
Fortunately, this situation has changed greatly. SharePoint site collections, sites, and even lists can be restored by using either PowerShell cmdlets or Central Administration. If the latter is used, you have the ability to browse content in the unattached content database, which can be selected for one of two partial actions:
![]() Back up a site collection.
Back up a site collection.
![]() Export site or list (don’t forget to select Export Full Security and select the correct version).
Export site or list (don’t forget to select Export Full Security and select the correct version).
Exam Tip
This recovery mechanism is by far the most regularly used in an enterprise setting. Be able to explain and perform recovery of content from an unattached content database.
For in-depth instructions concerning the restoration of content from an unattached SharePoint content database, visit the TechNet article entitled “Restore content from unattached content databases in SharePoint 2013” at https://technet.microsoft.com/library/hh269602.aspx.
Recovering content from an attached, read-only content database
This option is focused directly on environments that have one of two configurations: a dedicated, read-only disaster recovery environment, or a temporary, read-only updating environment that is used while the primary environment is being upgraded. This restoration can only be completed by using PowerShell cmdlets (this restoration cannot be done via Central Administration).
For this restoration to take place, the person executing the restoration should have:
![]() The Securityadmin fixed server role on the SQL Server instance
The Securityadmin fixed server role on the SQL Server instance
![]() The db_owner fixed database role on all databases that will be updated
The db_owner fixed database role on all databases that will be updated
![]() Membership in the Administrators group on the SharePoint server where the PowerShell cmdlets will be performed
Membership in the Administrators group on the SharePoint server where the PowerShell cmdlets will be performed
Important
Depending on your role in the organization, you might not have the appropriate shell admin credentials within the SharePoint farm. If this is the case, the farm Setup Administrator can assign shell access via the Add-SPShellAdmin PowerShell cmdlets. Once these permissions have been assigned, the database can be mounted via the Mount-SPContentDatabase cmdlet.
Need More Review?
For a better understanding of how to attach read-only content databases, review the TechNet article entitled “Attach and restore a read-only content database in SharePoint 2013” at https://technet.microsoft.com/library/ee748633.aspx.
Configure a recovery solution by using SQL Database running in Azure and other Azure backup solutions
Up to this point, we’ve discussed SharePoint recovery from a high availability standpoint (at the primary datacenter) and from a disaster recovery standpoint (at the secondary datacenter). One option has yet to be discussed: setting up a disaster recovery solution in Azure.
As is the case with standard disaster recovery sites, three recovery environments can be created by using Azure Infrastructure Services:
![]() Hot standby recovery A fully configured farm is provisioned, updating, and running in standby mode (read only).
Hot standby recovery A fully configured farm is provisioned, updating, and running in standby mode (read only).
![]() Warm standby recovery A farm has been created, but might require additional effort such as scaling and content database and service application configuration.
Warm standby recovery A farm has been created, but might require additional effort such as scaling and content database and service application configuration.
![]() Cold standby recovery A farm has been created, but all the relevant virtual machines are in a stopped state.
Cold standby recovery A farm has been created, but all the relevant virtual machines are in a stopped state.
The selected recovery configuration will meet two pertinent metrics: recovery objectives and operational costs. The environment that you select will have to meet both the recovery point and recovery time objectives as defined by the business; conversely, the environment selected will also need to meet operation cost forecasts.
Costs for recovery environments in Azure are based on memory, processor, and storage usage. As you move across the options from hot to cold standby recovery, the costs tend to reduce dramatically, but need to be weighed fairly against the costs of maintaining an offsite disaster recovery location.
Need More Review?
Specific considerations for each recovery type (hot, warm, and cold) are thoroughly covered in the TechNet article entitled “SharePoint Server 2013 Disaster Recovery in Microsoft Azure” at https://technet.microsoft.com/library/dn635313(v=office.15).aspx.
Skill: Plan and configure social workload
One of the key drivers in SharePoint 2013 was the introduction of large-scale social networking. SharePoint 2016 further advances the integration of enterprise social features in day-to-day collaboration. Users in SharePoint 2016 can now firmly take advantage of these features both on premises and in the cloud, thanks to effective hybrid integration design.
This section covers how to:
Plan communities
Communities are part of the social computing platform within SharePoint 2016, and coordinate collaboration between large groups of users in the enterprise. From a comparison standpoint, communities are to SharePoint hierarchies what folksonomies are to a taxonomy; that is to say, they allow people to collaborate outside of their traditional hierarchy and related navigational structure within a SharePoint 2016 installation.
Community types can vary based on the membership of the community and the desired visibility of the community within the enterprise:
![]() Private communities These communities are the least discoverable in a SharePoint farm and are purposely shared with only a limited number of members who contribute content.
Private communities These communities are the least discoverable in a SharePoint farm and are purposely shared with only a limited number of members who contribute content.
![]() Closed communities These communities are viewable to everyone in the SharePoint installation, but only approved members can contribute content. Visitors can request access, but not join the site automatically.
Closed communities These communities are viewable to everyone in the SharePoint installation, but only approved members can contribute content. Visitors can request access, but not join the site automatically.
![]() Open communities (with explicit membership) These communities are viewable to everyone in the SharePoint installation, and a visitor can automatically join as a member to contribute content.
Open communities (with explicit membership) These communities are viewable to everyone in the SharePoint installation, and a visitor can automatically join as a member to contribute content.
![]() Open communities These communities are viewable by everyone in the SharePoint installation, and all users can contribute by default.
Open communities These communities are viewable by everyone in the SharePoint installation, and all users can contribute by default.
Required services and service applications for communities
Three services and service applications should be configured for the use of communities within a SharePoint 2016 farm:
![]() User Profile service Integrates with community sites by updating mentioned users and hash tags in users’ activity feeds on their My Site.
User Profile service Integrates with community sites by updating mentioned users and hash tags in users’ activity feeds on their My Site.
![]() Managed metadata Allows users to include hash tags in their discussions and replies. Users can also create new tags and add them to the term store, helping to generate a corporate taxonomy.
Managed metadata Allows users to include hash tags in their discussions and replies. Users can also create new tags and add them to the term store, helping to generate a corporate taxonomy.
![]() Search service Allows users to search within discussions and community sites; it also populates the Community Portal page with links to community sites.
Search service Allows users to search within discussions and community sites; it also populates the Community Portal page with links to community sites.
Exam Tip
For the test, be familiar with which services and service applications are needed for the proper operation of community sites and portals; also be acquainted with the permission levels required for each different community implementation type.
Need More Review?
A complete discussion on the planning required for community implementations is available in the TechNet article “Plan for communities in SharePoint Server 2013” at https://technet.microsoft.com/library/jj219489.aspx.
Plan My Sites
My Sites in a SharePoint enterprise are individual, personal sites that are available for a single user. This is an alternate, on-premises arrangement to using the OneDrive functionality present in a hybrid arrangement with Office 365.
My Sites are the result of several distinct configuration efforts, and consist of the underlying web application hosting both the My Site host site collection (used to generate individual My Sites) and requiring the use of several SharePoint service applications such as Managed metadata, Search, and the User Profile service application.
Important
Although we still refer to this functionality as My Sites from an administration standpoint, it is important to note that users will see this functionality as OneDrive for Business in SharePoint 2016, even though this is an on-premises implementation.
Enabling individual sites for users in the enterprise can be a contentious discussion with management and with entities such as human resources and legal departments. At first glance, it seems that this is a waste of resources, and could potentially cause a governance headache; nothing could be further from the truth.
By default, My Sites have site quotas to control the overall size of the individual’s storage space. They also have a built-in workflow that defines the disposition of the individual’s site collection, should the individual leave the company.
Without My Sites, two major functions are completely lost:
![]() People search Enterprises continuously struggle with keeping contact information for individuals up to date, but My Sites allow for users to update their own information. The selection of fields to be updated is entirely under the control of the SharePoint administrator and any governance or regulation that applies to the enterprise. The resulting system allows for an easy mechanism to locate a user, see their free and busy schedule for meetings, send emails, and have conversations via phone or Skype for Business.
People search Enterprises continuously struggle with keeping contact information for individuals up to date, but My Sites allow for users to update their own information. The selection of fields to be updated is entirely under the control of the SharePoint administrator and any governance or regulation that applies to the enterprise. The resulting system allows for an easy mechanism to locate a user, see their free and busy schedule for meetings, send emails, and have conversations via phone or Skype for Business.
![]() Expertise search Enterprises also struggle with keeping an individual’s skills and certifications up to date. Having this information available in a searchable index allows the organization to easily and quickly locate people of a certain expertise level or skill set.
Expertise search Enterprises also struggle with keeping an individual’s skills and certifications up to date. Having this information available in a searchable index allows the organization to easily and quickly locate people of a certain expertise level or skill set.
Exam Tip
Understanding the particulars of how a My Site host is configured and how supporting services and service applications are configured will likely be on the exam.
Need More Review?
To gain an understanding of the planning and configuration required for My Sites, visit the TechNet article “Plan for My Sites in SharePoint Server 2016” at https://technet.microsoft.com/library/cc262500(v=office.16).aspx.
Plan OneDrive redirection
In SharePoint hybrid deployments, users can be redirected to use the OneDrive in Office 365 functionality. This redirection can be narrowed in scope, allowing some users to use hybrid OneDrive for Business while others still use the on-premises version of OneDrive for Business (My Sites).
Requirements for OneDrive redirection
To successfully redirect licensed users to OneDrive in Office 365, a handful of configuration changes will need to be made:
![]() Permissions As is the case for on-premises OneDrive for Business users, hybrid OneDrive for Business users requires two permissions to be enabled in the User Profile service application:
Permissions As is the case for on-premises OneDrive for Business users, hybrid OneDrive for Business users requires two permissions to be enabled in the User Profile service application:
![]() Create Personal Site, which is required for personal storage, newsfeeds, and followed content
Create Personal Site, which is required for personal storage, newsfeeds, and followed content
![]() Follow People and Edit Profile
Follow People and Edit Profile
![]() Audiencing (optional) You might want to phase in the availability of OneDrive for Business in a hybrid configuration. Adding a selection of users to an audience allows you to grant access to only those users while potentially allowing others to access OneDrive for Business on premises. This configuration is made in the Configure Hybrid OneDrive And Sites Features menu within Office 365 in Central Administration.
Audiencing (optional) You might want to phase in the availability of OneDrive for Business in a hybrid configuration. Adding a selection of users to an audience allows you to grant access to only those users while potentially allowing others to access OneDrive for Business on premises. This configuration is made in the Configure Hybrid OneDrive And Sites Features menu within Office 365 in Central Administration.
![]() Configuration of hybrid OneDrive and Sites features In Central Administration, you can specify a My Site URL present in your Office 365 tenancy, select an audience as required, and then choose to enable OneDrive only.
Configuration of hybrid OneDrive and Sites features In Central Administration, you can specify a My Site URL present in your Office 365 tenancy, select an audience as required, and then choose to enable OneDrive only.
Need More Review?
More information about the configuration of OneDrive for Business redirection can be found in the TechNet article entitled “How to redirect users to Office 365 for OneDrive for Business” at https://technet.microsoft.com/library/dn627525.aspx.
Plan social permissions
Whether speaking of My Sites on-premises or OneDrive for Business in the cloud, the permissions structure for individual users is the same.
Three types of social permissions exist in the User Profile service:
![]() Create Personal Site Enables users to create personal sites to store documents, newsfeeds, and followed content.
Create Personal Site Enables users to create personal sites to store documents, newsfeeds, and followed content.
![]() Follow People and Edit Profile Enables users to follow people from OneDrive for Business and edit their personal profile.
Follow People and Edit Profile Enables users to follow people from OneDrive for Business and edit their personal profile.
![]() Use Tags and Notes Enables users to use the Tags and Notes feature from earlier versions of SharePoint. This setting is enabled by default.
Use Tags and Notes Enables users to use the Tags and Notes feature from earlier versions of SharePoint. This setting is enabled by default.
It is recommended that existing permissions in the User Profile service not be altered because making changes can have unintended consequences.
Plan user profiles
At a core level, a user profile is a collection of metadata and properties that describes an individual user. From a SharePoint standpoint (and within Active Directory), a user is unique, and properties can be assigned to provide information about the user.
An example of this might be a user’s contact information within a company. Each user has an associated name, address, phone number, email, manager, job title, and other information within their distinct user profile. This user profile can be populated manually, but it’s often better to import these properties from an external system, such as Active Directory; this function is profile synchronization, and is controlled from Central Administration.
Extending a user profile
Although the information found in Active Directory is useful, it does not fully describe an individual. For instance, other information about a user can be manually added or populated by different systems (or the user themselves), such as:
![]() Customers
Customers
![]() Products
Products
![]() Sales leads
Sales leads
![]() Expertise
Expertise
![]() Certifications
Certifications
![]() Hobbies
Hobbies
Granted, some of this information might seem trivial (and perhaps unnecessary); after all, what does an individual’s interest in a particular hobby have to do with the business? Individual information often forms the basis of community, and this community comprises the workforce. As understanding improves between individuals, barriers fall, and users collaborate more freely.
Property policies
Laws concerning individual privacy vary by location. The ability to configure and control the properties associated with an individual user can be controlled from within Central Administration, and allow you to specify the following:
![]() Whether a property is included in user profiles
Whether a property is included in user profiles
![]() Whether the property is required
Whether the property is required
![]() Whether users can change the privacy setting on an individual property
Whether users can change the privacy setting on an individual property
![]() Who in the organization can view the property (role based)
Who in the organization can view the property (role based)
Be familiar with the process for importing users via a sync from Active Directory and the process for creating a connection to Microsoft Identity Manager (MIM) from the SharePoint farm because both could be represented on the exam.
Need More Review?
User profiles can be simple to configure, but require quite a bit of forethought regarding the privacy and use of information gathered about an individual. More information about how the properties can be implemented can be found in the TechNet article entitled “Plan user profiles in SharePoint Server 2013” at https://technet.microsoft.com/library/ee721054.aspx.
Plan activity feeds
Activity feeds are known in SharePoint as microblogging. This feature is wholly dependent on the availability of the distributed cache service, and allows users to have short, public conversations, very similar to those found on public social websites.
A microblog allows a user to post messages that can include text, URLs, pictures, and videos. A post is limited to a maximum of 512 characters; once posted, it is immediately seen in a feed. Hash tags (#Tag) and mentions (@Mention) are a way to capture the attention of users, who can then follow (and potentially “like”) the conversation.
If you’ve used the Yammer online functionality present in Office 365, it’s likely that this feature might seem redundant. The reason for this apparent redundancy is that activity feeds are available solely in an on-premises installation, replaced in a hybrid installation by Yammer.
Need More Review?
Although activity and newsfeeds are largely superseded by Yammer, some organizations are not willing to maintain their social interactions in a cloud-based forum. Understanding how to configure this on-premises feature is covered in two TechNet articles, “Overview of microblog features, feeds, and the Distributed Cache service in SharePoint Server 2013” at https://technet.microsoft.com/library/jj219700.aspx, and “Plan for feeds and the Distributed Cache service in SharePoint Server 2013” at https://technet.microsoft.com/library/jj219572.aspx.
Plan connections
As mentioned previously, user profiles in SharePoint provide metadata and properties about a user. This information is generally captured from two types of sources: Directory services and business systems.
Directory service integration
Users represented in profiles within SharePoint Server 2016 must have a profile in a supported directory service. These services include Active Directory, Sun Java System Directory Server, Novell eDirectory, and IBM Tivoli. A connection must be configured and an import sync done to retrieve users from one or more directory services.
SharePoint 2016 supports Active Directory Import without the need for any external functionality, but has limitations such as the inability to support more than one forest, import user photos, or export attributes back to Active Directory. If the required directory service integration cannot support these limitations, then an external MIM server can be configured.
By using MIM, connections to external, non-Active Directory systems can be configured to import data to user profiles. This technology also eclipses the OOB sync tool, allowing bidirectional flow of profile properties and attributes, the use of multiple Active Directory forests, and the automatic import of user profile photos.
Need More Review?
Guidance for selecting an import mechanism (Active Directory Import vs. MIM) is available in the TechNet article entitled “Install Microsoft Identity Manager for User Profiles in SharePoint Server 2016” at https://technet.microsoft.com/library/mt627723(v=office.16).aspx.
Business services integration
Business services connectivity requires the use of external content types that are backed by Business Connectivity Services (BCS). BCS established a one-way, read-only connection to the respective business service, then a field (or fields) in the external content type can be mapped to corresponding properties in a user profile.
Important
Connections to both of these types of external systems should be carefully evaluated and planned. Microsoft provides planning worksheets that include directory services and business services connectivity at https://www.microsoft.com/download/details.aspx?id=35404.
Configure Yammer settings
Yammer is an online-only social tool that is available in two versions: Yammer Basic and Yammer Enterprise. Yammer Basic is free, and intended for the consumer market, whereas Yammer Enterprise provides additional tools and resources to assist administrators in configuring a social environment within SharePoint 2016.
Connecting SharePoint on premises to Yammer
SharePoint 2016 on premises can use one of two mechanisms for connecting to Yammer:
![]() AAD Connect A mechanism for allowing users to use their Active Directory Domain Services (AD DS) credentials with Yammer by synchronizing their on-premises accounts to the cloud.
AAD Connect A mechanism for allowing users to use their Active Directory Domain Services (AD DS) credentials with Yammer by synchronizing their on-premises accounts to the cloud.
![]() Single-sign on A mechanism for allowing users to use their AD DS credentials with Yammer via a federated identity provider.
Single-sign on A mechanism for allowing users to use their AD DS credentials with Yammer via a federated identity provider.
These mechanisms should seem familiar by now because these are also the mechanisms for establishing a hybrid connection between SharePoint on premises and other Office 365 functionality (such as OneDrive and My Sites).
Once the connection mechanism is in place, connecting the SharePoint environment to Yammer is pretty straightforward, requiring only that you click a button in Central Administration, Office 365, Configure Yammer (Figure 3-18).

Exam Tip
Be familiar with the processes available for configuring the connection between SharePoint Server 2016 and Office 365, including those required for activating Yammer in the enterprise. More information about this activation process can be found in the TechNet article entitled “Integrate Yammer with on-premises SharePoint 2013 environments” at https://technet.microsoft.com/library/dn270535.aspx.
Displaying the Yammer feed inside SharePoint sites
Reviewing documentation, you might see a reference to a Yammer App, which was used to display Yammer information within a SharePoint site. This app has since been deprecated and replaced by Yammer Embed.
Yammer Embed allows you to display one of several feeds on your SharePoint site:
![]() My Feed Shows each user their personal feed with relevant items
My Feed Shows each user their personal feed with relevant items
![]() Group Feed Shows the latest conversations in a specific Yammer group
Group Feed Shows the latest conversations in a specific Yammer group
![]() Topic Feed Shows all posts having to do with a specific topic
Topic Feed Shows all posts having to do with a specific topic
![]() User Feed Shows all posts participated in by a particular user
User Feed Shows all posts participated in by a particular user
![]() Open Graph Feed Allows you to start a discussion about an object (for example, a webpage)
Open Graph Feed Allows you to start a discussion about an object (for example, a webpage)
These feeds are displayed by cutting and pasting an HTML script from Yammer into a SharePoint Script Editor Web Part.
Need More Review?
For more information about how to configure Yammer feeds in SharePoint 2016 sites, visit the Yammer Developer article entitled “Embed Feed” at https://developer.yammer.com/v1.0/docs/embed.
Skill: Plan and configure a Web Content Management workload
Web Content Management (WCM) is concerned with the creation and deployment of content from a publishing standpoint; that is to say, a few people generate content that is then consumed by a far greater number of users. This skill develops an understanding of the features in SharePoint 2016 that support this effort, extending content to desktop, tablet, and mobile clients alike.
This section covers how to:
![]() Plan and configure product catalog and topic pages
Plan and configure product catalog and topic pages
![]() Plan and configure Design Manager
Plan and configure Design Manager
![]() Plan and configure content deployment
Plan and configure content deployment
![]() Plan and configure display templates
Plan and configure display templates
Plan and configure channels
In the modern world, we expect websites to render content appropriate to the screen format of the device we are using. One approach to meeting this expectation is to brand SharePoint by using a responsive design. Although this solution works without issue, the amount of content being sent from the web server to the client (cascading style sheets [CSS], images, and other data) can be significant.
SharePoint 2016 (and previous versions) can be configured to change the response (and thus the amount of downloaded data) depending on the type of device requesting the web content; this functionality is called design channels.
Design channels tailor the response by using multiple sets of master pages and CSS, each designed specifically for the device making the request. One response type can be created for smartphones (with 4- to 5-inch screens) and another is created for tablets with larger screens (8 to 10 inches). A total of 10 device channels can be created in an on-premises installation of SharePoint 2016.
Exam Tip
Although it’s not likely that device channels will be on the exam, you should know two things. First, device channels are only available on publishing sites (or those with the Publishing feature enabled), and second, each type of device identifies itself by using an alias; testing the alias requires that you append ?DeviceChannel=alias to the URL.
The act of configuring a device channel is not terribly complex (although the generation of appropriate master pages and CSS definitely can be). To configure a device channel, you must specify the following settings:
![]() Name (required) The name used to identify the channel being created
Name (required) The name used to identify the channel being created
![]() Alias (required) A unique name that can be used in code to refer to the channel
Alias (required) A unique name that can be used in code to refer to the channel
![]() Description An optional description of the channel
Description An optional description of the channel
![]() Device Inclusion Rules (required) One or more user agent substrings (how SharePoint identifies a particular device type) that determine the devices that will use this channel
Device Inclusion Rules (required) One or more user agent substrings (how SharePoint identifies a particular device type) that determine the devices that will use this channel
![]() Active A check box that activates this channel for use
Active A check box that activates this channel for use
Need More Review?
Device channels require quite a bit of design work for each set of master page, CSS, and image combinations, and are described in the MSDN article entitled “SharePoint 2013 Design Manager device channels” at https://msdn.microsoft.com/library/office/jj862343.aspx.
Plan and configure product catalog and topic pages
SharePoint 2013 introduced a new type of publishing site called a product catalog. Despite the name, a product catalog site (Figure 3-19) can be used to surface lists and libraries (catalogs of information) via Search. Any series of lists and libraries can be surfaced in this template for use in cross-site publishing.

A newly created product catalog site guides you through the process and steps necessary to fully configure the site and its catalogs. These steps are broken down into five major activities, as shown in Figure 3-19:
![]() Create Site Columns Columns with descriptive metadata that can be reused and describe the products in a catalog.
Create Site Columns Columns with descriptive metadata that can be reused and describe the products in a catalog.
![]() Manage Site Content Types Adding the newly created site columns to a content type (such as Product).
Manage Site Content Types Adding the newly created site columns to a content type (such as Product).
![]() Manage Item Hierarchy In Term Store Adds individual terms to the product hierarchy term set, representing how items from the product catalog are categorized.
Manage Item Hierarchy In Term Store Adds individual terms to the product hierarchy term set, representing how items from the product catalog are categorized.
![]() Add Catalog Items Allows individual items to be added to the Products list.
Add Catalog Items Allows individual items to be added to the Products list.
![]() Modify Search Properties Used to modify managed properties settings so that cross-site publishing can query for and refine on properties in the catalog.
Modify Search Properties Used to modify managed properties settings so that cross-site publishing can query for and refine on properties in the catalog.
Exam Tip
Because the product catalog sites use both the Term Store and Search properties, they are heavily dependent on the Managed Metadata Service and Search service application, respectively.
Topic pages
Although these pages can be used with any publishing site consuming managed metadata, topic pages are nonetheless heavily associated with a SharePoint product catalog, and are effective ways of providing navigation based on a term set.
There are two distinct types of topic pages:
![]() Category pages A category page displays a single term that describes individual items.
Category pages A category page displays a single term that describes individual items.
![]() Catalog item pages A catalog item page displays individual terms beneath the category term.
Catalog item pages A catalog item page displays individual terms beneath the category term.
An example of these topic pages might be having a category called tools and catalog item pages for items such as screwdriver, saw, drill, and lathe.
Need More Review?
Topic pages are described in the TechNet article entitled “Assign a category page and a catalog item page to a term in SharePoint Server 2013” at https://technet.microsoft.com/library/jj884105.aspx.
Plan and configure Design Manager
Design Manager is a publishing feature that allows you to brand a SharePoint 2016 site without the need to develop solutions in a coding platform such as Microsoft Visual Studio. Branding a SharePoint implementation then draws closer to the toolsets and experiences required to brand standard websites. The resulting design can be copied to publishing sites and activated to instantly achieve a uniform branding experience.
Implementing a design by using Design Manager
Often, website design is carried out on a number of third-party tools. The resulting output of these tools (the design) can include:
![]() HTML files (which will be converted to SharePoint Master Pages)
HTML files (which will be converted to SharePoint Master Pages)
![]() CSS files
CSS files
![]() JavaScript files
JavaScript files
![]() Site images
Site images
Important
To use Design Manager, you must possess at least the Designer permission level on your site in SharePoint 2016.
After the HTML file is automatically converted to a Master Page, a relationship is established between the HTML file and Master Page. Further revisions should not be applied to the Master Page, but to the HTML file itself; SharePoint will automatically update the Master Page.
Snippets
When you are deciding how you wish the site to appear, you might decide that you need to add SharePoint-specific functionality; after all, it’s unlikely that the third-party design tool knows or cares that the resulting output will be used in SharePoint. Thus, the completed HTML page will need to add the SharePoint functionality via Snippets.
Step 4 of the overall Design Manager process calls for you to edit Master Pages; this is the point at which an HTML file will be converted to a Master Page. Selecting a Master Page (only its HTML, really) opens the Master Page in a separate browser window. At the top right corner of this window, you will see the Snippets link (Figure 3-20).
Clicking Snippets opens a series of menu items specific to SharePoint functionality. Selecting an item (such as Top Navigation) causes the HTML for that tag to be shown. This HTML can be applied at the correct location in your HTML file, and it will automatically be added to the resulting Master Page.
Need More Review?
For a better understanding of how you might use Design Manager in SharePoint 2016, review the MSDN site entitled “Overview of Design Manager in SharePoint 2013” at https://msdn.microsoft.com/library/office/jj822363.aspx.
Plan and configure content deployment
Within SharePoint 2016, it is possible to generate content in one site and deploy the content to another site. This functionality, often referred to as cross-site publishing, can be useful, particularly in regulatory, business, or legal situations that require that the content being generated be physically separated from the location to which it is published.
Important
In previous versions of SharePoint (2010 and before), content deployment could be carried out by using the Content Deployment Source feature, which only deploys content such as webpages, document libraries and lists, and other web design files, such as images and style sheets. This deployment mechanism is intended solely for backward compatibility. As a result, it is incompatible with a series of other SharePoint 2016 features, such as ratings, managed navigation, blog sites, slide libraries, social sites, and others.
If you are updating a content deployment solution based on the Content Deployment Source feature, then you have three options for content deployment:
![]() Author in place or use cross-site publishing by using the built-in security model.
Author in place or use cross-site publishing by using the built-in security model.
![]() Use a disaster recovery solution such as SQL Server Log Shipping or Availability Groups to replicate content between source and destination farms.
Use a disaster recovery solution such as SQL Server Log Shipping or Availability Groups to replicate content between source and destination farms.
![]() Make a backup copy of the site, restore it to a separate content database, and then work on the site. Once the site is ready for use, change the alternate access mappings URL to point at the new site.
Make a backup copy of the site, restore it to a separate content database, and then work on the site. Once the site is ready for use, change the alternate access mappings URL to point at the new site.
Plan and configure display templates
Probably one of the most useful components related to Search in SharePoint Server 2016, display templates are Web Parts that control which properties appear in a Web Part and how the properties appear in the Web Part.
Each display template is made up of two distinct components:
![]() An HTML version of the display template
An HTML version of the display template
![]() A .js file
A .js file
These files are combined in a Search Web Part to produce the expected functionality.
Configuring a display template
The process for creating a new display template really boils down to four major steps:
1. Map and open a connection to the Master Page gallery. This location can be found in Step 3 of Design Manager, Upload Design Files, and in general is the URL of the site collection you are working on, appended with /_catalogs/masterpages.
2. Open the Display Templates folder.
3. Copy the HTML file for an existing display template that is similar to the template you want to create.
4. Modify the HTML for your copy in an editor.
Important
There’s really no need to reinvent the wheel here: Copying an existing template as a basis for the change you want to make really is the fastest way to generate a new display template.
Exam Tip
Display templates are a key functionality in SharePoint 2016. Understand (at least at a high level) the differences in display template types, how each can be altered, and how new ones can be implemented. More information on display templates can be found in the MSDN article entitled “SharePoint 2013 Design Manager display templates” at https://msdn.microsoft.com/library/office/jj945138.aspx, and reference information about display templates can be found in the TechNet article “Display template reference in SharePoint Server 2013” at https://technet.microsoft.com/library/jj944947.aspx.
Plan and configure variations
Variations are a mechanism for presenting multiple versions of the same page that are based on different human languages (such as English, Russian, or Japanese). The individual’s browser settings are used to identify their native tongue, and the SharePoint server responds with the correct language variant of the content.
Variation labels
Each language that can be installed in SharePoint has an associated two-character variation label; for instance, EN for English, FR for French, and DE for German. This variation label is used to present the appropriate variation of the original site.
If you had a SharePoint site at https://home.wingtiptoys.com and wanted to enable these three variations, users visiting this site would be routed to the appropriate variation:
![]() https://home.wingtiptoys.com/EN for English
https://home.wingtiptoys.com/EN for English
![]() https://home.wingtiptoys.com/FR for French
https://home.wingtiptoys.com/FR for French
![]() https://home.wingtiptoys.com/DE for German
https://home.wingtiptoys.com/DE for German
As each of these variations is created, a navigation term set is created for its variation label. The term set for the source variation label is named Variations Navigation; this is further expanded when a variations label is created for the language, appending the variations label to the source variation label, such as Variations Navigation (en-us) for U.S. English.
Need More Review?
The proper configuration of languages and variations within SharePoint can be quite complex. When translation services are added (to allow for third-party translators to create the language-specific pages), the end result is a globally ready content management system. Variations are covered on TechNet in the article entitled “Variations overview in SharePoint Server 2013” at https://technet.microsoft.com/library/ff628966.aspx.
Skill: Plan and configure an Enterprise Content Management workload
Enterprise Content Management (ECM) is concerned with the sheer number of documents that are created in a collaborative setting by users across the enterprise. This content is subject to a series of business process and legal requirements that prevent personally identifiable information and other types of sensitive content from being deployed into publicly available SharePoint sites.
![]() Plan and configure document routing
Plan and configure document routing
![]() Plan and configure co-authoring
Plan and configure co-authoring
![]() Plan and configure durable links
Plan and configure durable links
![]() Plan and configure record disposition and retention
Plan and configure record disposition and retention
![]() Plan large document repositories
Plan large document repositories
![]() Plan and configure software boundaries
Plan and configure software boundaries
![]() Plan and configure data loss prevention
Plan and configure data loss prevention
![]() Plan and configure in-place holds and document deletion features
Plan and configure in-place holds and document deletion features
Plan and configure eDiscovery
Legal departments in many enterprise environments are feeling increasing pressure on two fronts:
![]() The ability to quickly locate and place holds on content
The ability to quickly locate and place holds on content
![]() The ability to create both scheduled and ad hoc searches for sensitive content in the enterprise
The ability to create both scheduled and ad hoc searches for sensitive content in the enterprise
This pressure results in a need for users in these departments to easily and reliably search for content across three distinct systems of record: SharePoint Server, Exchange Server, and Skype for Business Server. There are three major activities involved in connecting these systems of record: Connecting Skype for Business to Exchange, Configuring Skype for Business Server to use Exchange Server archiving, and Connecting Exchange to SharePoint.
Establishing connectivity between Skype for Business and Exchange
Connecting Skype for Business to Exchange involves the creation of a server-to-server (S2S) relationship between these two systems; this relationship requires that each environment be configured as a partner application to the other:
![]() Skype for Business to Exchange Requires that the appropriate server certificates be installed; then the use of the Configure-EnterprisePartnerApplication.ps1 PowerShell script will establish connectivity.
Skype for Business to Exchange Requires that the appropriate server certificates be installed; then the use of the Configure-EnterprisePartnerApplication.ps1 PowerShell script will establish connectivity.
![]() Exchange to Skype for Business Requires that the appropriate server certificates be installed; then the use of the New-CSPartnerApplication PowerShell cmdlet will establish connectivity.
Exchange to Skype for Business Requires that the appropriate server certificates be installed; then the use of the New-CSPartnerApplication PowerShell cmdlet will establish connectivity.
Need More Review?
Although neither Skype for Business nor Exchange Server are core elements of understanding needed for the exam, an understanding of how these two environments can be configured as partner applications will lead to a better understanding of the infrastructure required to enable eDiscovery. Detailed information about this configuration can be found in the TechNet article entitled “Configure partner applications in Skype for Business Server 2015 and Microsoft Exchange Server” at https://technet.microsoft.com/library/jj688151.aspx.
Configuring Skype for Business to use Exchange Server archiving
The action of archiving Skype for Business conversations to Exchange Server requires a maximum of three steps:
1. Enable Exchange archiving by modifying your Skype for Business Server archiving configuration settings (required for all deployments).
2. Enable archiving for internal communications, external communications, or both for your users (required for all deployments).
3. Configure the ExchangeArchivingPolicy property for each user (only required if Skype for Business Server and Exchange are located in different forests).
Connecting Exchange to SharePoint
If at all possible, SharePoint Server should be connected to Exchange for the purposes of eDiscovery. Once this connection has been established, SharePoint Search can be used to retrieve and place holds on information across both enterprise systems.
Exam Tip
Be very familiar with the process of establishing S2S connectivity between SharePoint and Exchange Server systems. This configuration is described in the TechNet article “Configure server-to-server authentication between SharePoint Server 2013 and Exchange Server 2013” at https://technet.microsoft.com/library/jj655399.aspx.
Dependency on Search
eDiscovery in SharePoint Server 2016 is heavily dependent on the correct configuration of the Search service application. As both ad hoc and scheduled eDiscovery queries rely on the Keyword Query Language (KQL), the Search index must be populated and in good working order.
Important
Although we’ve mentioned the Search service application, up to this point, we’ve not yet configured one. If you are configuring eDiscovery for use, you’ll need to do so, and this is covered in Chapter 5, “Search.”
Navigating the eDiscovery Site Collection
The final step in this effort is to create an eDiscovery Center site for use in building new eDiscovery cases (shown in Figure 3-21).
Once the eDiscovery site has been created (its creation is no different than that of any other site), you can create a site for your first case:
1. Click Create New Case.
2. Enter a Title and Description for your new site.
3. Enter a name for the new site in the Website Address section.
4. Under the Template Selection, select eDiscovery Case.
5. At this point, you can choose to Use The Same Permissions As The Parent Site or to create and Use Unique Permissions.
6. Finally, you can choose whether you want this site on the Quick Launch of the eDiscovery site, and whether you want the case site to use the Top Link bar from the eDiscovery site.
Plan and configure document routing
Document routing addresses a fundamental problem from a user administration standpoint; that is, a user uploading content to a folder on a file share can (most often) see documents created and uploaded by others. Although this usually isn’t an issue, some documents are more sensitive than others and should not be exposed to view.
It is possible in SharePoint to permission a document library so that the user can do a “blind drop” or “mail slot” document upload (where they cannot see the document they just uploaded); this is an improvement but still doesn’t allow the person receiving the content to make much use of it without establishing a workflow to route the document from library to library.
Using Content Organizer
SharePoint provides a feature known as Content Organizer for just this purpose. This feature can automatically perform a series of tasks:
![]() Route documents to different libraries or folders Content Organizer can route an uploaded document to a library or folder, based on a series of rules. This includes the ability to route documents to a different document library altogether.
Route documents to different libraries or folders Content Organizer can route an uploaded document to a library or folder, based on a series of rules. This includes the ability to route documents to a different document library altogether.
![]() Upload all documents to a Drop Off Library Content Organizer can be used to place all uploaded documents in a Drop Off Library, where metadata can be entered and a submission process completed.
Upload all documents to a Drop Off Library Content Organizer can be used to place all uploaded documents in a Drop Off Library, where metadata can be entered and a submission process completed.
![]() Manage folder size Content Organizer can be used to monitor the number of items in a folder and ensure that no folder contains more than a specified number of items (2,500 by default). When this number is exceeded, a new folder is created.
Manage folder size Content Organizer can be used to monitor the number of items in a folder and ensure that no folder contains more than a specified number of items (2,500 by default). When this number is exceeded, a new folder is created.
![]() Manage duplicate submissions When the same document is uploaded twice, Content Organizer can be used to either configure versioning or change the file name by adding unique characters.
Manage duplicate submissions When the same document is uploaded twice, Content Organizer can be used to either configure versioning or change the file name by adding unique characters.
![]() Maintain audit logs Content Organizer can maintain audit logs about a document stored with the document after it is routed.
Maintain audit logs Content Organizer can maintain audit logs about a document stored with the document after it is routed.
To enable the use of Content Organizer, just activate the Content Organizer site feature in the site you are using. Once this is complete, you will need to create new Content Organizer rules and then configure the appropriate Content Organizer settings. Both of these options are found within the Site Administration section of Site Settings.
Need More Review?
More information about Content Organizer, including how to set it up at a basic level, can be found in the support.office.com article “Create Content Organizer rules to route documents” at https://support.office.com/article/Create-Content-Organizer-rules-to-route-documents-1E4D37A3-635D-4764-B0FC-F7C5356C1900.
Plan and configure co-authoring
How is collaboration accomplished in your organization? Traditionally there are a couple of ways this is done, even after deploying SharePoint:
![]() A document is emailed to other users, asking for their input; the author then has to take this information and transfer it back from the altered copies to the original document.
A document is emailed to other users, asking for their input; the author then has to take this information and transfer it back from the altered copies to the original document.
![]() A document could be uploaded to SharePoint; then by using check-in and check-out, could be altered in an orderly fashion.
A document could be uploaded to SharePoint; then by using check-in and check-out, could be altered in an orderly fashion.
It’s fairly obvious that neither of these solutions is perfect for a document that is heavily edited by multiple users; the email solution is just not workable, and the SharePoint check-in and check-out solution works great until someone leaves the document checked out and goes on vacation.
Fortunately, there’s something better: co-authoring. This functionality within SharePoint allows for multiple users to simultaneously edit a document. Editing a document in this fashion requires a certain amount of training from a user standpoint, but is fairly straightforward to learn.
Planning considerations for co-authoring (documents)
Several factors should be considered before deploying co-authoring:
![]() Permissions Users participating in co-authoring should have Edit rights in the appropriate document library.
Permissions Users participating in co-authoring should have Edit rights in the appropriate document library.
![]() Versioning Either major or major and minor versioning can be used.
Versioning Either major or major and minor versioning can be used.
![]() Versions retained Retaining a large number of versions can become unwieldy over time, resulting in increased storage requirements. Consider restricting the number of major and minor versions in a library.
Versions retained Retaining a large number of versions can become unwieldy over time, resulting in increased storage requirements. Consider restricting the number of major and minor versions in a library.
![]() Versioning period This period is specifically for use with co-authoring and specifies how often a version of a document being co-authored should be captured.
Versioning period This period is specifically for use with co-authoring and specifies how often a version of a document being co-authored should be captured.
![]() Check out The Require Check Out feature should never be activated for libraries that host co-authored documents.
Check out The Require Check Out feature should never be activated for libraries that host co-authored documents.
Planning considerations for co-authoring in Microsoft OneNote
OneNote brings its own considerations to co-authoring, particularly related to the way it stores content in a SharePoint library:
![]() Minor versioning Absolutely, positively, do not enable minor versioning in a document library that hosts OneNote notebooks. Minor versioning will cause the OneNote notebook to stop allowing co-authoring and could result in corruption.
Minor versioning Absolutely, positively, do not enable minor versioning in a document library that hosts OneNote notebooks. Minor versioning will cause the OneNote notebook to stop allowing co-authoring and could result in corruption.
![]() Versions retained OneNote is a famously chatty application, regularly committing data to its notebooks. It is recommended that the number of versions retained be specified at a reasonable level, to ensure that the supporting document library does not become too large.
Versions retained OneNote is a famously chatty application, regularly committing data to its notebooks. It is recommended that the number of versions retained be specified at a reasonable level, to ensure that the supporting document library does not become too large.
Important
Consider creating new OneNote notebooks in their own, dedicated document library. This way, you will ensure that no one inadvertently makes configuration changes that are disagreeable or cause corruption in OneNote notebooks.
Need More Review?
For a clearer understanding of how co-authoring is configured and used in SharePoint 2016, visit the TechNet article entitled “Co-authoring administration in SharePoint 2013” at https://technet.microsoft.com/library/ff718235.aspx.
Plan and configure durable links
Durable links is a feature in SharePoint 2016 that allows a document to be moved within a site collection without changing its resource URL. This is particularly useful for documents that are commonly used (and thus bookmarked) by users. As this document is moved around (perhaps by a workflow), the user can always reference the document by its bookmark, even though the document itself has changed location.
Office Online Server requirement
The durable links feature is not available in a core, OOB SharePoint 2016 installation. SharePoint relies on Office Online Server to handle the assignment of a resource-based ID link for Web Application Open Platform Interface (WOPI) protocol documents. The resource ID assigned to individual documents is stored inside the content database, and is related to the source document.
When a user selects a document link, SharePoint Server 2016 looks up the file by Resource ID and then opens it in Office Online Server.
Document movement considerations
Although the document might move from location to location, its permissions do not. No provision is available for per-item permissioning of documents that use durable links. If a document is moved to a location where a user does not have permissions, the durable link will still be functional, but the user will not be able to access the document.
Exam Tip
From an exam point of view, the configuration of durable links is firmly intertwined with the configuration of Office Online Server (and its trust with SharePoint 2016). Review the TechNet article entitled “Configure Office Online Server for SharePoint Server 2016” at https://technet.microsoft.com/library/ff431687(v=office.16).aspx.
Plan and configure record disposition and retention
Compliance officers in a SharePoint Server environment work with SharePoint administrators to define the life cycle of documents in the enterprise. Not every document becomes a declared record in the enterprise, but the management of those that do becomes of paramount importance.
Records in an enterprise are often held for a period of several years based on the type of document they are. For instance, the priority and life span of a legal contract or other enterprise document might far exceed that of a budget workbook or memorandum (even if these documents were placed on hold for a legal case).
Disposition and retention of documents often has to do with a number of deciding questions:
![]() What is the legal responsibility of the enterprise to retain or destroy a document?
What is the legal responsibility of the enterprise to retain or destroy a document?
![]() What is the physical capacity of the system that stores the data?
What is the physical capacity of the system that stores the data?
![]() How capable is the Search subsystem of capturing large amounts of data and retaining them in an index? Would it make sense to maintain these long-lived records in a different index?
How capable is the Search subsystem of capturing large amounts of data and retaining them in an index? Would it make sense to maintain these long-lived records in a different index?
SharePoint 2016 has the ability to not only provide for the disposition of individual documents, but also to control the life span and eventual disposition of an entire site (and all its associated data and libraries).
Defining site policies
SharePoint 2016 allows for site policies to be created at the root of a site collection. This functionality can also be configured to apply to multiple site collections (including self-service site creation sites) by deploying the policies at a site collection that also happens to be a content type hub.
A site policy captures three sets of data (Figure 3-22):
![]() The Name And Description of the newly created site policy
The Name And Description of the newly created site policy
![]() What happens from a Site Closure and Deletion standpoint when the policy has been activated:
What happens from a Site Closure and Deletion standpoint when the policy has been activated:
![]() Do Not Close Or Delete Site Automatically.
Do Not Close Or Delete Site Automatically.
![]() Delete Sites Automatically.
Delete Sites Automatically.
![]() Close And Delete Sites Automatically.
Close And Delete Sites Automatically.
![]() What happens at a Site Collection Closure (whether or not the site collection will be set to read-only status)
What happens at a Site Collection Closure (whether or not the site collection will be set to read-only status)
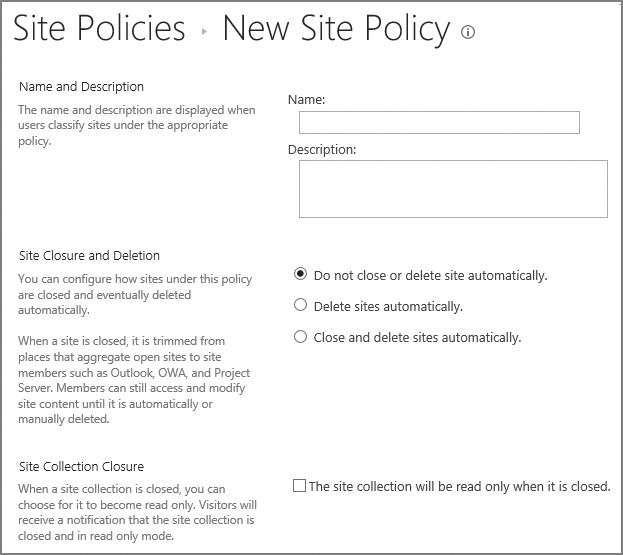
Plan large document repositories
SharePoint lists and libraries are quite capable of storing up to 30 million items in a list or library. That said, a great deal of configuration work is required to ensure that the environment storing these documents is capable of supporting this workload.
Guidance from Microsoft on TechNet (see https://technet.microsoft.com/library/hh395916(v=office.14).aspx) defines a set of tests to determine the proper configuration of your farm (particularly the SQL back end) for large document repositories:
![]() Document upload test
Document upload test
![]() Document upload and route test
Document upload and route test
![]() Document download
Document download
![]() Access document library
Access document library
![]() Access home page with Content Search Web Parts
Access home page with Content Search Web Parts
![]() Managed metadata fallback query (return more than 5,000 results)
Managed metadata fallback query (return more than 5,000 results)
![]() Managed metadata selective query (return fewer than 5,000 results)
Managed metadata selective query (return fewer than 5,000 results)
![]() Content type fallback query (return more than 5,000 results, filtering by content type)
Content type fallback query (return more than 5,000 results, filtering by content type)
Document repository definitions
To effectively service millions of documents to a user base from an archival standpoint, some boundaries must be placed around the configuration of which documents live in a library and how the files are accessed.
![]() Unstructured document library An unstructured library (hundreds of documents) has no document manager, and allows for high read transactions, with balanced adds and updates.
Unstructured document library An unstructured library (hundreds of documents) has no document manager, and allows for high read transactions, with balanced adds and updates.
![]() Collaborative large list or library A large list or library (thousands of documents) might have some subject owners, and allows for high read transactions with more updates than adds.
Collaborative large list or library A large list or library (thousands of documents) might have some subject owners, and allows for high read transactions with more updates than adds.
![]() Structured large repository A structured large repository (tens of thousands of documents) should have an assigned content steward, and allows for very high read transaction numbers with fewer adds and significantly fewer updates.
Structured large repository A structured large repository (tens of thousands of documents) should have an assigned content steward, and allows for very high read transaction numbers with fewer adds and significantly fewer updates.
![]() Large-scale archive A large-scale archive (millions of documents) should have an assigned team of content stewards, and allows for very high adds with very few reads and updates.
Large-scale archive A large-scale archive (millions of documents) should have an assigned team of content stewards, and allows for very high adds with very few reads and updates.
Need More Review?
It falls to the SharePoint administration team to work with the records management group to architect and implement a portion of the SharePoint environment that will be suitable for long-term records storage. Part of this conversation will have to do with server resources and design, as this type of document load needs to perform well. For a better understanding of these requirements, visit the TechNet article “Estimate capacity and performance for compliance and eDiscovery for SharePoint Server 2013” at https://technet.microsoft.com/library/dn169053.aspx.
Plan and configure software boundaries
In designing a SharePoint solution, the designers must address farm characteristics such as the number of servers, their memory and storage configuration, and how SharePoint itself should be architected from an internal standpoint.
To this end, Microsoft provides guidance based on performance testing that’s been done with SharePoint 2016. This guidance comes in the form of software boundaries and limits, including:
![]() Boundaries Static limits that cannot be exceeded by design.
Boundaries Static limits that cannot be exceeded by design.
![]() Thresholds Configurable limits that may be exceeded to accommodate specific requirements.
Thresholds Configurable limits that may be exceeded to accommodate specific requirements.
![]() Supported limits Configurable limits that have been set by default to a tested value.
Supported limits Configurable limits that have been set by default to a tested value.
Understanding software boundaries
These boundaries can be interpreted as operational limits for a system. Some limits are finite, with a maximum allowed value, whereas others exceed performance or recommended limitations. To better understand these boundaries, consider a new car. This car might have the following specifications:
![]() Four doors (a boundary)
Four doors (a boundary)
![]() A maximum weight recommendation (occupants and cargo) of 1,000 pounds (a threshold)
A maximum weight recommendation (occupants and cargo) of 1,000 pounds (a threshold)
![]() A maximum number of engine rotations per minute (RPM) limitation as given by the tachometer (a limit)
A maximum number of engine rotations per minute (RPM) limitation as given by the tachometer (a limit)
The number of doors that the car possesses is a value that cannot be changed without significantly altering the car’s design. Exceeding the weight recommendation probably won’t cause the car to stop functioning, but will significantly affect both its performance and economy. Finally, exceeding the maximum RPM limitation is entirely possible, but the engine could fail and would surely not be warranted by the manufacturer.
Two sets of limits exist for a SharePoint farm: hierarchy limits and feature limits.
Hierarchy limits
Hierarchy limits define boundaries, thresholds, and supported limits that affect the logical hierarchy of the farm, including limits on web applications, SharePoint servers, content databases, site collections, lists and libraries, columns, pages, and security.
Feature limits
Feature limits define boundaries, thresholds, and supported limits affecting individual SharePoint features, including limits on Search, User Profile services, content deployment, blogs, Business Connectivity Services, workflow, Managed Metadata Term Store (Database), Visio Services, PerformancePoint, Word Automation, Machine Translation Service, Office Online Service, Project Server, SharePoint apps, distributed cache service, and others.
Exam Tip
Although you’re not likely to be able to (or want to) memorize all the different boundaries and limits in SharePoint 2016, having a solid grasp on major limitations such as the maximum amount of RAM available to a distributed cache server host or perhaps the number of content databases per SharePoint farm might come up on the test. Spend some time reading through the article “Software boundaries and limits for SharePoint Server 2016” on TechNet at https://technet.microsoft.com/library/cc262787(v=office.16).aspx.
Plan and configure data loss prevention
As we covered in Chapter 1, data loss prevention (DLP) queries allow users managing sensitive content to locate content that might not belong in certain SharePoint sites, in accordance with corporate governance policies. This sensitive content is defined by a series of sensitive information types, available in both SharePoint 2016 and Exchange 2016.
Two different mechanisms exist for locating and managing content in a SharePoint farm: DLP queries from an eDiscovery Center and automated DLP policies, found in a Compliance Policy Center.
Data Loss Prevention Queries
One-off DLP queries can be run from the eDiscovery Center, referred to earlier in this chapter. Running a new DLP query presents you with a series of predefined sensitive information types, which can then be searched for in the enterprise (Figure 3-23).
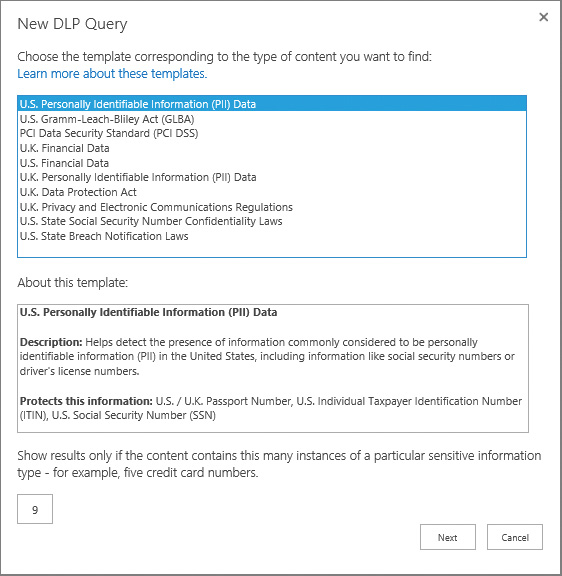
The query being run allows you to specify a name for the query, start and end dates for the query, who the author or sender might be (remember, this can search Exchange and Skype content as well), and possible sources. You can also use Export to create an Electronic Data Reference Model file, used in accordance with industry standards (visit www.edrm.net for details).
Compliance Policy Center
By creating a Compliance Policy Center, you can automate the life cycle of site collections in the enterprise. Additionally, you can run automated DLP queries and assign DLP policies to site collections, as shown in Figure 3-24.
Five options exist in the Compliance Policy Center:
![]() Deletion Policies Allow for creation of different deletion policies.
Deletion Policies Allow for creation of different deletion policies.
![]() Policy Assignments For Templates Allow for the assignment of deletion policies to different site templates.
Policy Assignments For Templates Allow for the assignment of deletion policies to different site templates.
![]() Policy Assignments For Site Collections Allow for the assignment of deletion policies to specific site collections. These assignments override any template assignment previously given.
Policy Assignments For Site Collections Allow for the assignment of deletion policies to specific site collections. These assignments override any template assignment previously given.
![]() DLP Policy Management Allows for the creation of DLP policies, sending incident reports to the compliance manager. Optionally, users can be notified with a policy tip warning them not to use sensitive information types. Content can also be blocked if desired.
DLP Policy Management Allows for the creation of DLP policies, sending incident reports to the compliance manager. Optionally, users can be notified with a policy tip warning them not to use sensitive information types. Content can also be blocked if desired.
![]() DLP Policy Assignments For Site Collections Allows for the assignment of DLP policies to different site collections in the enterprise.
DLP Policy Assignments For Site Collections Allows for the assignment of DLP policies to different site collections in the enterprise.
DLP integration in SharePoint is a key functionality, enabling SharePoint to abide by industry standard eDiscovery and compliance practices. An understanding of these technologies can be gained by visiting the support.office.com article entitled “Create a DLP query in SharePoint Server 2016” at https://support.office.com/article/Create-a-DLP-query-in-SharePoint-Server-2016-c0bed52d-d32b-4870-bcce-ed649c7371a3, and by visiting the TechNet article entitled “Sensitive Information Types in SharePoint Server 2016 IT Preview” at https://blogs.technet.microsoft.com/wbaer/2015/08/26/sensitive-information-types-in-sharepoint-server-2016-it-preview/.
In-place holds and document deletion features
Documents in SharePoint can be placed on hold for a period of time, to meet business regulation and compliance standards. The time period specified for a document can be assigned when the document is first created (relative to created date) or last modified (relative to last modified date).
Users of the document are not necessarily made aware of the hold, and can continue to interact with the document; this is done by creating a copy of the content, which is retained in the original location.
Two types of hold exist: eDiscovery in-place holds, and time-based in-place holds. eDiscovery in-place holds are generally used by the legal team to fulfill requests by the court for document evidence, whereas time-based in-place holds are crafted to meet with retention standards put in place by a content management team.
Holds can be created and managed from the In-Place Hold Policy Center. This site must be created (Figure 3-25), just as you already created the Compliance Policy Center and the eDiscovery center.

Once a document is no longer on hold, a timer job cleans up a hidden preservation hold library on the site, deleting the previously retained content.
Need More Review?
Documentation describing the hold process exists on support.office.com in the article entitled “Overview of in-place hold in SharePoint Server 2016” at https://support.office.com/article/Overview-of-in-place-hold-in-SharePoint-Server-2016-5e400d68-cd51-444a-8fe6-e4df1d20aa95.
Summary
![]() Fast Site Collection Creation involves the generation of a SharePoint Site Master template, which is then used to quickly deploy new site collections from within SQL Server itself.
Fast Site Collection Creation involves the generation of a SharePoint Site Master template, which is then used to quickly deploy new site collections from within SQL Server itself.
![]() Host header site collections allow for the creation of multiple, host-named site collections within a single web application, and do not require a host headentry from an IIS standpoint.
Host header site collections allow for the creation of multiple, host-named site collections within a single web application, and do not require a host headentry from an IIS standpoint.
![]() Site policies allow the SharePoint site owner or site collection administrator to generate policies that govern the instantiation and deletion of site collections and subsites; these policies can be made available for use across site collections by a content type hub.
Site policies allow the SharePoint site owner or site collection administrator to generate policies that govern the instantiation and deletion of site collections and subsites; these policies can be made available for use across site collections by a content type hub.
![]() Team mailboxes are a way of capturing emails and attached documents concerning a project without storing them in the SharePoint site; they are maintained within an Exchange mailbox tailored to the SharePoint site.
Team mailboxes are a way of capturing emails and attached documents concerning a project without storing them in the SharePoint site; they are maintained within an Exchange mailbox tailored to the SharePoint site.
![]() Service distribution in a SharePoint farm can follow either a traditional or a streamlined topology; SharePoint 2016 supports the latter via the use of MinRoles.
Service distribution in a SharePoint farm can follow either a traditional or a streamlined topology; SharePoint 2016 supports the latter via the use of MinRoles.
![]() SQL Server AlwaysOn Availability Groups can provide both high availability and disaster recovery services.
SQL Server AlwaysOn Availability Groups can provide both high availability and disaster recovery services.
![]() SQL Login Replication can be provided either manually, via T-SQL script, or via SSIS.
SQL Login Replication can be provided either manually, via T-SQL script, or via SSIS.
![]() Cold, warm, and hot standby recovery can be performed from SQL databases in Azure just as they can be by using standard colocation services.
Cold, warm, and hot standby recovery can be performed from SQL databases in Azure just as they can be by using standard colocation services.
![]() Communities provide collaboration between large groups of people in a SharePoint 2016 on-premises installation.
Communities provide collaboration between large groups of people in a SharePoint 2016 on-premises installation.
![]() Connections provided to User Profiles can come from both Directory Services and Business Services; full connectivity to a Directory Service (Microsoft or otherwise) is available with MIM.
Connections provided to User Profiles can come from both Directory Services and Business Services; full connectivity to a Directory Service (Microsoft or otherwise) is available with MIM.
![]() Display templates are used to format and present content from a Search standpoint.
Display templates are used to format and present content from a Search standpoint.
![]() Document routing by using Content Organizer is an effective way of performing routing by using a series of rules, versus having to generate workflows for the task.
Document routing by using Content Organizer is an effective way of performing routing by using a series of rules, versus having to generate workflows for the task.
![]() Durable links are a mechanism for retaining a resource URL to a document that changes location, and is dependent on Office Online Server to function.
Durable links are a mechanism for retaining a resource URL to a document that changes location, and is dependent on Office Online Server to function.
![]() Software boundaries support boundaries (limits that cannot be exceeded), thresholds (configurable limits that can be exceeded if necessary), and supported limits (set to a default by a tested value).
Software boundaries support boundaries (limits that cannot be exceeded), thresholds (configurable limits that can be exceeded if necessary), and supported limits (set to a default by a tested value).
![]() Data loss prevention allows users maintaining sensitive content to locate content that might not belong in certain SharePoint sites by using a DLP query.
Data loss prevention allows users maintaining sensitive content to locate content that might not belong in certain SharePoint sites by using a DLP query.
Thought experiment
In this thought experiment, demonstrate your skills and knowledge of the topics covered in this chapter. You can find the answer to this thought experiment in the next section.
You are designing a large-scale document management system in SharePoint 2016, particularly used by representatives of the legal and compliance teams.
1. What site templates might you find yourself using to meet the needs of DLP, compliance, and document and site management?
2. What guidance might you seek from Microsoft regarding the proper configuration of your SharePoint farm’s resources and limitations?
3. Rather than keep all documents in a single location, what might you propose as an alternative solution?
1. It’s likely that you will need at least three distinct sites for your legal and compliance teams: an eDiscovery Center (for ad hoc DLP searches and management of holds), a Compliance Policy Center (for generating formal DLP queries and enforcement), and an In-Place Hold Policy Center.
2. You might consider evaluating the boundaries, thresholds, and limits documentation available from Microsoft to vet your proposed solution from a supportability standpoint.
3. Depending on the scale and function of the solution, you might also consider document routing by using the built-in SharePoint Content Organizer feature.