Chapter 2. Authentication and security
Security within a SharePoint environment is a broad-spectrum topic, requiring a clear understanding of how users will authenticate and be authorized to access content. This chapter begins with a discussion of authentication types, and then examines how authorization is carried out at the farm, application, site collection, and site levels. Additionally, we discuss security-related functionality present at the services and service application levels of the SharePoint farm.
Skills in this chapter:
![]() Skill: Plan and configure authentication
Skill: Plan and configure authentication
![]() Skill: Plan and configure authorization
Skill: Plan and configure authorization
![]() Skill: Plan and configure platform and farm security
Skill: Plan and configure platform and farm security
![]() Skill: Create and configure a User Profile service application (UPA)
Skill: Create and configure a User Profile service application (UPA)
![]() Skill: Manage site and site collection security
Skill: Manage site and site collection security
![]() Skill: Provision and configure web applications
Skill: Provision and configure web applications
Skill: Plan and configure authentication
Authentication is a mechanism within a system that verifies the identity of the requestor as genuine against an authentication provider; this mechanism has nothing to do with the assignment of rights or permissions to a requestor. Once the requestor has been authenticated, authorization can then be granted to provide system resource access.
Important
A requestor is not necessarily a human being. A requestor can be a user, an app, or another server.
SharePoint Server 2016 requires authentication for three types of interactions:
![]() User authentication A user is trying to access SharePoint resources.
User authentication A user is trying to access SharePoint resources.
![]() App authentication An installed app is trying to access SharePoint resources.
App authentication An installed app is trying to access SharePoint resources.
![]() Site-to-site (S2S) authentication Two-way resource access between servers in the enterprise.
Site-to-site (S2S) authentication Two-way resource access between servers in the enterprise.
When new web applications are created via SharePoint 2016 Central Administration, the authentication options available are all claims-aware. These web applications can (by default) use one of the three available authentication types: Windows authentication, Forms-based authentication, or Secure Application Markup Language (SAML) token-based authentication.
 Exam Tip
A common misconception is that SharePoint itself performs authentication; in fact, it does not. Although SharePoint prompts for authentication, the captured requestor credentials are validated against a provider such as Active Directory Domain Services (AD DS).
Need More Review?
Understanding authentication in SharePoint is a key skill. Authentication mechanisms work the same in both SharePoint 2013 and SharePoint 2016, and are covered extensively in the TechNet article entitled “SharePoint 2013: Claims-based authentication” at http://aka.ms/spclm. Additionally, a video walk-through of each authentication type can be found in the TechNet article entitled “Plan for user authentication methods in SharePoint Server 2016” at https://technet.microsoft.com/library/cc262350(v=office.16).aspx.
This section covers how to:
![]() Plan and configure Windows authentication
Plan and configure Windows authentication
![]() Plan and configure anonymous authentication
Plan and configure anonymous authentication
![]() Plan and configure identity federation
Plan and configure identity federation
![]() Configure site-to-site (S2S) intraserver and OAuth authentication
Configure site-to-site (S2S) intraserver and OAuth authentication
![]() Configure connections to Access Control Service
Configure connections to Access Control Service
![]() Configure authentication for hybrid cloud deployments
Configure authentication for hybrid cloud deployments
Plan and configure Windows authentication
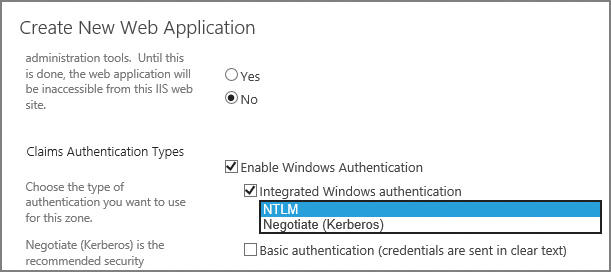
Windows authentication is the default claims authentication type used when creating a new web application. This authentication type can choose one or more of four possible Windows authentication types (Figure 2-1):
![]() NTLM A Windows integrated authentication type (one of two) requiring no additional configuration of authentication infrastructure
NTLM A Windows integrated authentication type (one of two) requiring no additional configuration of authentication infrastructure
![]() Negotiate (Kerberos) A Windows integrated authentication type (the second of two) that requires additional configuration of Service Principal Names (SPNs) in AD DS
Negotiate (Kerberos) A Windows integrated authentication type (the second of two) that requires additional configuration of Service Principal Names (SPNs) in AD DS
![]() Basic authentication An authentication type that sends the user credentials in plain text and requires additional configuration of the web application in Internet Information Services (IIS)
Basic authentication An authentication type that sends the user credentials in plain text and requires additional configuration of the web application in Internet Information Services (IIS)
![]() Digest authentication An authentication type that sends the user credentials in an MD5 message digest and requires additional configuration of the web application in IIS
Digest authentication An authentication type that sends the user credentials in an MD5 message digest and requires additional configuration of the web application in IIS
Note
Windows integrated authentication types allow clients to authenticate without requiring a prompt for credentials.
Integrated Windows authentication: NTLM
The NT LAN Manager (NTLM) authentication type is the simpler of the two integrated Windows authentication mechanisms to configure; no extra effort is required from a SharePoint standpoint to make NTLM function correctly.
NTLM’s benefits are mostly focused on ease of use, when compared with Negotiate (Kerberos):
![]() NTLM authentication can still function when the computer making the request is outside the network or is a stand-alone computer.
NTLM authentication can still function when the computer making the request is outside the network or is a stand-alone computer.
![]() NTLM is much easier to set up and configure than its Kerberos counterpart.
NTLM is much easier to set up and configure than its Kerberos counterpart.
There is, however, a price to be paid for NTLM’s simplicity:
![]() NTLM is an older authentication type, using a challenge/response mechanism for authentication that is less secure than Kerberos.
NTLM is an older authentication type, using a challenge/response mechanism for authentication that is less secure than Kerberos.
![]() NTLM has a negative effect on performance, making repeated round trips between IIS and causing an increased load on domain controllers.
NTLM has a negative effect on performance, making repeated round trips between IIS and causing an increased load on domain controllers.
![]() NTLM does not support delegation; if a user has authenticated into a SharePoint environment and then needs to access another system through SharePoint, the request will fail.
NTLM does not support delegation; if a user has authenticated into a SharePoint environment and then needs to access another system through SharePoint, the request will fail.
Integrated Windows authentication: Negotiate (Kerberos)
The Negotiate (Kerberos) authentication protocol is designed for both security and efficiency. A requestor authenticating via this protocol is issued and granted a ticket from a centralized Key Distribution Center (KDC) that is used to access resources.
Kerberos authentication provides several benefits:
![]() Kerberos is the most secure of the Windows integrated protocols, and is an open protocol supported by multiple non-Microsoft vendors and platforms.
Kerberos is the most secure of the Windows integrated protocols, and is an open protocol supported by multiple non-Microsoft vendors and platforms.
![]() Kerberos is quite efficient, minimizing the need for a client to repeatedly authenticate to a domain controller; this efficiency reduces both server and network traffic, often reducing page latency.
Kerberos is quite efficient, minimizing the need for a client to repeatedly authenticate to a domain controller; this efficiency reduces both server and network traffic, often reducing page latency.
![]() Kerberos supports delegation. A user authenticated into a SharePoint environment can “double hop,” directly accessing other Kerberos-configured systems through SharePoint.
Kerberos supports delegation. A user authenticated into a SharePoint environment can “double hop,” directly accessing other Kerberos-configured systems through SharePoint.
Kerberos might not always be the best option:
![]() The proper configuration of Kerberos authentication for SharePoint requires interaction and close coordination with the Active Directory and SQL support teams.
The proper configuration of Kerberos authentication for SharePoint requires interaction and close coordination with the Active Directory and SQL support teams.
![]() The security mechanisms employed by Kerberos include the ability for clients and servers to mutually authenticate one another, and clients and servers can use Advanced Encryption Standard (AES) encryption.
The security mechanisms employed by Kerberos include the ability for clients and servers to mutually authenticate one another, and clients and servers can use Advanced Encryption Standard (AES) encryption.
Exam Tip
Although not present within Central Administration, SharePoint also supports Windows classic mode for backward compatibility. Configuration of this authentication type is done entirely in Windows PowerShell; efforts should be made to move away from this type of authentication because it does not support some SharePoint 2016 functionality (such as the SharePoint App Store).
Basic authentication
Basic authentication is by far the least secure of the four Windows authentication types. This type of authentication is fairly simple to configure by using Central Administration and IIS, but is not often used, usually because credentials (user name and password) are passed insecurely over the wire in clear text.
Need More Review?
If you choose basic authentication, just ensure that you do so over an HTTPS session. Secure Sockets Layer (SSL) encryption provides a fairly good level of security, encrypting the user name and password that would otherwise be transmitted over the wire in clear text. The TechNet article entitled “Configure basic authentication for a claims-based web application in SharePoint 2013” provides details on the configuration of this authentication type at https://technet.microsoft.com//library/gg576953(v=office.16).aspx.
Digest authentication
Digest authentication is more secure than basic authentication, and is similar to NTLM in that it uses a challenge/response mechanism. A calculated checksum component is stored on a domain controller that must match an MD5 checksum (digest) of the user’s password at logon time. If the user decides to visit more than one web application, he or she must reauthenticate (furnish user name and password) again.
Need More Review?
Digest authentication configuration is similar to that of basic configuration, requiring configuration of IIS on a per-web application basis. The TechNet article entitled “Configure digest authentication for a claims-based web application in SharePoint 2013” provides details on the configuration of this authentication type at https://technet.microsoft.com/library/gg576966(v=office.16).aspx.
![]() Quick check
Quick check
![]() You have a requirement to provide secure pass-through authentication to your SharePoint environment. What are your options?
You have a requirement to provide secure pass-through authentication to your SharePoint environment. What are your options?
Quick check answer
![]() Integrated Windows authentication (NTLM) can be used in concert with SSL (HTTPS) connections to secure and encrypt your connections. Integrated Windows authentication (Kerberos) provides an even more secure connection than NTLM, but requires configuration efforts from your Active Directory infrastructure team.
Integrated Windows authentication (NTLM) can be used in concert with SSL (HTTPS) connections to secure and encrypt your connections. Integrated Windows authentication (Kerberos) provides an even more secure connection than NTLM, but requires configuration efforts from your Active Directory infrastructure team.
Plan and configure anonymous authentication
Anonymous authentication enables a user to access a SharePoint web application (such as an Internet-facing website) without being challenged for user name and password credentials. As with the other types of authentication, anonymous authentication can be applied to the zone of a given web application, with each zone maintaining its own list of which authentication types can be used.
Enabling a SharePoint site to allow anonymous authentication can be done via PowerShell or Central Administration, and can be enabled at the time the web app and zone are being created (Figure 2-2), or afterward by editing the completed web app.
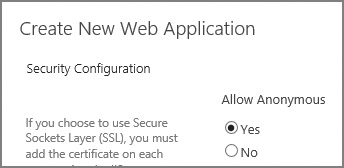
It’s important to remember that allowing anonymous access to a SharePoint web application is a SharePoint-specific setting. IIS websites created by SharePoint always have both anonymous authentication and Forms-based authentication methods enabled, even if the same settings in SharePoint are disabled. Never disable either of these methods directly from IIS on a SharePoint web application.
Plan connection encryption
Connection encryption is a mechanism for securing “in-flight” data as it is being transferred between SharePoint and other computers in your enterprise. In previous versions of SharePoint, either SSL 3.0 or Transport Layer Security (TLS) 1.0 cryptographic protocols could be used for secure communications; however, SSL 3.0 was later found to have vulnerabilities, making TLS 1.0 the remaining protocol available for use (SSL 3.0 could be disabled).
SharePoint 2016 now handles encryption by default by using the newer TLS 1.2 cryptographic protocol for secured connections.
Important
SSL and TLS protocols are both commonly referred to as SSL in documentation, sometimes even being grouped together as SSL/TLS. Remember that when we speak of implementing SSL in this book, we mean the TLS 1.2 protocol, not SSL 3.0.
Connection encryption in SharePoint 2016 is now supported in the following situations:
![]() When setting up SSL bindings for a SharePoint web application
When setting up SSL bindings for a SharePoint web application
![]() When connecting to other systems (such as crawling websites)
When connecting to other systems (such as crawling websites)
![]() When establishing an encrypted connection to a Simple Mail Transfer Protocol (SMTP) server
When establishing an encrypted connection to a Simple Mail Transfer Protocol (SMTP) server
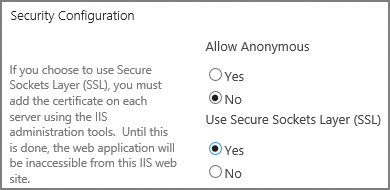
Setting up SSL bindings for a SharePoint web application
As TLS 1.2 is the default for SSL in SharePoint 2016, configuration of the protocol itself is not required (we don’t have to choose between SSL and TLS protocols as we did in the previous implementations of SharePoint). All that remains, then, is to add SSL to a web application, and there are two ways to do that: either on or after the creation of the web application.
The optimal mechanism for configuring SSL with a SharePoint web application is to specify that SSL is to be used while the web application is being created (Figure 2-3), and then add and bind the certificate to IIS. This ensures that, as your farm grows, the configuration database configures any newly added front-end servers with the same SSL-enabled web application configurations.
The provisioning and configuration of web applications is covered later in this chapter.
Connecting to other systems
SharePoint 2016 farms are capable of connecting to other systems such as Exchange 2016, Skype for Business 2016, Azure Workflow Service, other SharePoint farms, and SharePoint Server 2016 running in Office 365 via the use of S2S authentication. This connectivity is established by using the OAuth protocol, which is also used for app authentication in SharePoint 2016.
Establishing an S2S connection via OAuth requires the involvement of three parties: an authorization server and the two realms that need to connect to each other. In the case of Microsoft servers such as SharePoint, Exchange, and others, they can assume the role of the authorization server and one of the two realms to connect; the authorization server verifies the trusts between the two realms by issuing security tokens via the Security Token Service.
When a SharePoint 2016 user needs to access functionality present in another server farm, an S2S token requests access to the resource, acting on the part of the user.
Exam Tip
It should be noted that a logon token is not part of this process; the S2S token contains information about two things: the server requesting access and the user for whom the server is acting.
When the OAuth connection is established between realms, the implementer has a decision to make regarding encryption, specifically to encrypt or not to encrypt. By default, these connections are established via HTTPS, but the administrator has the option of overriding this behavior and allowing unencrypted HTTP connections in PowerShell.
Need More Information?
Separate processes exist for establishing relationships between SharePoint farms and other server farms, both on-premises and in the cloud. For a better understanding of the mechanisms involved, visit the TechNet article entitled “Plan for server-to-server authentication in SharePoint Server 2016” at https://technet.microsoft.com/library/jj219546(v=office.16).aspx.
Establishing SMTP encryption
Connection encryption is also available between a SharePoint 2016 farm and the server that it uses to provide SMTP functionality for outgoing email. Mail servers such as Exchange provide the ability to require encryption via the use of STARTTLS, a protocol command that is issued by the client (SharePoint) to request an upgrade of an insecure to a secure SMTP connection by using TLS or SSL cryptographic protocols.
Although STARTTLS itself is capable of supporting both TLS and SSL protocols, SharePoint 2016 does not allow the use of SSL 2.0 or 3.0 when negotiating connection encryption with an SMTP server; the only protocols supported are TLS versions 1.0, 1.1, and 1.2.
For SharePoint to securely connect to an SMTP server, the server must have STARTTLS enabled and have a valid server certificate installed, with a name that matches that provided to SharePoint during the configuration for outbound SMTP.
Important
If an encrypted connection is specified by SharePoint to the SMTP server, there is no fallback support for unencrypted connections.
Starting with Exchange 2013, STARTTLS (also known as Opportunistic TLS) is enabled automatically. Exchange 2013 and later versions also create a self-signed certificate that is used to secure the encrypted connection.
Configuring secure outgoing email in SharePoint can be set up on the Outgoing E-Mail Settings page under Central Administration, System Settings (Figure 2-4). Alternately, secure outgoing email can be set up via the Set-SPWebApplication PowerShell cmdlet and the -SMTPServer switch. You can optionally use the -DisableSMTPEncryption switch if the SMTP server doesn’t allow connection encryption.

Configuring outgoing email settings is a basic part of setting up any SharePoint farm installation. As such, there are two things to know: TLS connection encryption can be used (not SSL), and SharePoint can use any nonstandard TCP port specified by your mail administrator. For details on the configuration via Central Administration or PowerShell, visit the SMTP connection encryption section of the TechNet article entitled “New and improved features of SharePoint Server” at https://technet.microsoft.com/library/mt346121(v=office.16).aspx.
![]() Quick check
Quick check
![]() You are given a requirement from your infrastructure team to configure a secure connection from your SharePoint farm to the SMTP server. What options do you have available?
You are given a requirement from your infrastructure team to configure a secure connection from your SharePoint farm to the SMTP server. What options do you have available?
Quick check answer
![]() SMTP connection encryption is available, by using TLS 1.2 (not SSL 3.0). Additionally, you could work with your mail administrators to use a nondefault TCP port (instead of TCP port 25).
SMTP connection encryption is available, by using TLS 1.2 (not SSL 3.0). Additionally, you could work with your mail administrators to use a nondefault TCP port (instead of TCP port 25).
Plan and configure identity federation
As an organization’s business needs change, it often becomes necessary to extend the use of an application such as SharePoint 2016 to outside users or partners. Businesses often respond to this requirement by extending their internal authentication mechanism, issuing user names and passwords to partner organization personnel.
This sort of arrangement is not without its share of headaches:
![]() The organization’s IT staff are now responsible for maintaining both internal and external user accounts, often within two different authentication structures (Forms-based authentication, Active Directory).
The organization’s IT staff are now responsible for maintaining both internal and external user accounts, often within two different authentication structures (Forms-based authentication, Active Directory).
![]() Users from the external party must now keep track of one more set of credentials and authenticate more than once.
Users from the external party must now keep track of one more set of credentials and authenticate more than once.
![]() Special arrangements must be made to expose the authentication mechanism to the Internet, posing a security risk and requiring extra maintenance effort.
Special arrangements must be made to expose the authentication mechanism to the Internet, posing a security risk and requiring extra maintenance effort.
Discussions about claims-based authentication often quickly extend into user requirements for identity federation. Applications that were once exclusively held within a particular enterprise now can be extended to the cloud and into other partner enterprises.
This federation provides two major benefits for IT admins:
![]() Extra authentication mechanisms such as Forms-based authentication or separate Active Directory structures are no longer required to provide resources or applications to external business partners.
Extra authentication mechanisms such as Forms-based authentication or separate Active Directory structures are no longer required to provide resources or applications to external business partners.
![]() Users traveling or working outside the enterprise network are able to work with no special arrangements, acting in the cloud much as they would on premises.
Users traveling or working outside the enterprise network are able to work with no special arrangements, acting in the cloud much as they would on premises.
Users taking advantage of identity federation are required to maintain only one set of credentials, authenticating within their own environment to an Identity Provider Security Token Service (IP-STS), such as Active Directory Federation Services (AD FS) or Azure Access Control Service (ACS). Once users have authenticated, they receive an SAML token, which can then be used to access applications in their organization, in partner organizations, and in the cloud.
Need More Review?
In addition to AD FS and ACS, an alternative identity provider can also be used, but it must support the WS-Federation standard. For a better understanding of how AD FS and ACS work, see the articles entitled “Configure SAML-based claims authentication with AD FS in SharePoint 2013” at https://technet.microsoft.com/library/hh305235(v=office.16).aspx, “Federated Identity with Microsoft Azure Access Control Service” at https://msdn.microsoft.com/library/hh446535.aspx, and “Authenticate your SharePoint website users with Facebook” at http://blogs.technet.com/b/meacoex/archive/2013/12/25/authenticate-your-sharepoint-website-users-with-facebook.aspx.
In addition to acting as an identity provider (IdP), both ACS and AD FS can instead act as federation providers (FPs). By using this functionality, you can configure either to trust any number of IdPs such as Microsoft account (Windows Live ID), Facebook, Google, Twitter, and Active Directory itself, allowing external users to authenticate using these IdPs. Additionally, you should note that the use of more than one IdP is supported.
Exam Tip
Either of these technologies can be used in your organization to federate users from another organization, federate with an external authentication mechanism to nonpartner organization users, or both, if needed. Remember that users always authenticate to the IdP to receive an SAML token.
Configure claims providers
Connecting to either AD FS or ACS requires a brief discussion about application proxies. Regardless of which option you choose, you will need to deploy and configure the matching application proxy. This functionality acts as a reverse proxy for web applications, allowing users to authenticate to published web applications, and also as a proxy for authenticating users.
Application Proxy is a feature that is unavailable in the free edition of Azure Active Directory. If you want to use Application Proxy, upgrade to either the Basic or Premium edition of Azure Active Directory.
Choosing a provider
Either AD FS or Azure ACS can be used for on-premises deployments of SharePoint. If you already have an AD FS installation within your network, you are ready to configure external or federated claims access to your internal applications, including SharePoint.
If, on the other hand, you have not yet deployed AD FS but do have an Azure subscription, you can instead choose to deploy the Application Proxy functionality present in Azure AD. This proxy works by installing a new Windows service (called a Connector) inside your on-premises network, then registering the Connector with your Microsoft Azure AD tenant subscription.
Need More Review?
The configuration and deployment of AD FS or ACS must be customized to your organization’s specific needs. Because this configuration affects more than SharePoint, there might be some functionality available to you that requires coordination with your Active Directory infrastructure team, such as using ExpressRoute to connect your SharePoint 2016 environment directly to Azure.
For a better understanding of how AD FS and ACS (and their associated proxies) work, see the article entitled “Connect to Applications and Services from Anywhere with Web Application Proxy” at https://technet.microsoft.com/library/dn280942.aspx for AD FS and “Enabling Azure AD Application Proxy” at https://azure.microsoft.com/documentation/articles/active-directory-application-proxy-enable/ for ACS.
Configure S2S intraserver and OAuth authentication
SharePoint 2016 uses the Open Authorization 2.0 (OAuth) protocol to establish server-to-server or site-to-site (S2S) connections between a SharePoint farm and another SharePoint Server farm, an Exchange installation, a Skype for Business installation, or SharePoint Online. Users in SharePoint can then retrieve information from these other environments. This configuration is unchanged from SharePoint 2013 to SharePoint 2016.
Exam Tip
By default, S2S relationships are carried out over HTTPS, which is always a best practice. Establishing an S2S relationship over HTTP is technically possible (but not secure) and should be done only in a nonproduction environment.
Configuring S2S between two SharePoint 2016 farms
Server-to-server requests in SharePoint farms are configured so that one server farm may provide resources or functionality to another on behalf of a user. These configurations come in one of two types:
![]() A trust relationship to a farm that has web applications
A trust relationship to a farm that has web applications
![]() A trust relationship to a farm that has no web applications
A trust relationship to a farm that has no web applications
Configuration for each type happens from the perspective of the farm that will be receiving the S2S requests (aptly named the “receiving” farm). Although the S2S functionality is the same, configuration of the trusts differs greatly between the two types.
The configuration of S2S on a receiving farm (having web applications) requires that the New-SPTrustedSecurityTokenIssuer cmdlet be used to configure the trust, specifying the JavaScript Object Notation (JSON) metadata endpoint of the sending farm.
New-SPTrustedSecurityTokenIssuer –MetadataEndpoint "https://<HostName>/_layouts/15/
metadata/json/1" –Name "<FriendlyName>"
Configuring S2S on a receiving farm (with no web applications) obviously excludes the ability to use a JSON metadata endpoint; this configuration is a bit more involved, requiring the admin to accomplish several tasks:
1. Export the SharePoint Security Token Service certificate (.cer) without the private key from the receiving farm, then store it in an accessible location (usually a secured file share).
2. Retrieve the NameIdentifier field of the receiving farm.
3. On the trusting SharePoint farm, add the SharePoint STS of the receiving SharePoint farm as a trusted security token issued by using the following PowerShell cmdlet.
New-SPTrustedSecurityTokenIssuer -name <hostname> -Certificate "<CERLocation>"
-RegisteredIssuerName "00000003-0000-0ff1-ce00-000000000000@<NameID>"
-Description "<FriendlyName>" -IsTrustBroker:$false
Need More Review?
The configuration process for setting up S2S gets more complex based on the number of farms being interconnected and the way in which these connections are made. For more information about this process, see the TechNet article “Configure server-to-server authentication between SharePoint 2013 farms” at http://technet.microsoft.com/library/jj655400.aspx.
Configuring S2S between SharePoint Server 2016 and Exchange Server 2016
S2S authentication between these two environments requires coordination between the administrators of each because the configuration of each system must be modified for SharePoint and Exchange to share resources.
There are three major steps involved in completing this configuration:
![]() Configure the SharePoint server to trust the Microsoft Exchange server by using a JSON endpoint located on the Exchange server.
Configure the SharePoint server to trust the Microsoft Exchange server by using a JSON endpoint located on the Exchange server.
![]() Configure permissions on the SharePoint server for S2S.
Configure permissions on the SharePoint server for S2S.
![]() Configure the Exchange server to trust the SharePoint server by using the Configure-EnterprisePartnerApplication.ps1 PowerShell script.
Configure the Exchange server to trust the SharePoint server by using the Configure-EnterprisePartnerApplication.ps1 PowerShell script.
Exam Tip
Be familiar with the three distinct processes that go into establishing the relationship between these two environments. As usual, these configuration efforts take place in Windows PowerShell and require the use of SSL for communication between server environments.
Need More Review?
The trust that is shared between these two environments is not web-app-specific. Establishing the trust from Exchange 2013 to one of the SharePoint 2013 web apps establishes a trust with all the web apps in the entire farm. For a better understanding of this configuration, visit the TechNet article “Configure server-to-server authentication between SharePoint 2013 and Exchange Server 2013” at http://technet.microsoft.com/library/jj655399.aspx.
Configuring S2S between SharePoint 2016 and Skype for Business Server 2015
S2S authentication between these two environments requires coordination between the administrators of each because the configuration of each system must be modified for SharePoint and Skype to share resources.
There are only two steps involved in completing this configuration:
![]() Configure the SharePoint server to trust the Skype for Business server by using a JSON endpoint located on the Exchange server.
Configure the SharePoint server to trust the Skype for Business server by using a JSON endpoint located on the Exchange server.
![]() Configure the Skype for Business server to trust the SharePoint server as a new partner application.
Configure the Skype for Business server to trust the SharePoint server as a new partner application.
These configuration efforts take place in Windows PowerShell and require the use of SSL for communication between server environments.
Need More Review?
If you want to know more about the process of connecting these two environments, visit the TechNet site “Assign a server-to-server authentication certificate to Skype for Business Server 2015” at https://technet.microsoft.com/library/jj205253.aspx.
Configure connections to the Access Control Service
The Azure Access Control Service (ACS) is a mechanism that enables users to access an application while removing the authentication and authorization burden from the design of the application.
Important
There have been two versions of this service. The latest, ACS 2.0, is free for use and is the only supported version.
ACS enables applications such as SharePoint 2016 to integrate with both enterprise directories (such as Active Directory) and IdPs in the cloud such as Windows Live ID, Google, Yahoo!, and Facebook.
Using ACS for SharePoint authentication
Partner organizations that host both AD FS installations can set up trusts between their environments to allow users to access resources from either environment. A lot of configuration work and coordination between IT organizations is required to connect these environments.
Extending this concept, a growing organization could soon find itself needing to connect to multiple partner organizations. Requiring the IT organizations from each of these organizations to agree on how they will federate could become cumbersome.
ACS provides a way for organizations to connect their SharePoint farm (and other farms, including Exchange and Skype) to a cloud-based Active Directory tenant. From here, relationships can be established with other partner organizations, or IdPs such as Facebook, Live, Google, and others can be used to authenticate into an organization’s SharePoint infrastructure.
Another benefit of using ACS is the ability to extend an organization’s SharePoint installation into the cloud for any of the following reasons:
![]() Setting up development and test environments
Setting up development and test environments
![]() Providing disaster recovery SharePoint environments in Azure
Providing disaster recovery SharePoint environments in Azure
![]() Providing Internet-facing sites using SharePoint functionality not available in Office 365 and SharePoint Online
Providing Internet-facing sites using SharePoint functionality not available in Office 365 and SharePoint Online
![]() Creating app farms to support either on-premises or Office 365 SharePoint environments
Creating app farms to support either on-premises or Office 365 SharePoint environments
Need More Review?
Multiple Azure architecture types exist for SharePoint 2016 installations. Understanding which can be used to meet the needs of your organization is a critical component to any Microsoft-based cloud architecture. Detailed information on these architectures can be found in the TechNet article entitled “Microsoft Azure Architectures for SharePoint 2013” at https://technet.microsoft.com/library/dn635309(v=office.16).aspx.
Configure authentication for hybrid cloud deployments
The configuration story for hybrid cloud deployments in SharePoint 2013 could be quite complex and confusing to understand. Several options were available for use, each of which was configured individually:
![]() DirSync A tool that copies the local Active Directory, propagating to an Azure AD instance
DirSync A tool that copies the local Active Directory, propagating to an Azure AD instance
![]() FIM + Azure AD Connector Synchronized identity information from Forefront Identity Manager 2010 R2 to Azure AD
FIM + Azure AD Connector Synchronized identity information from Forefront Identity Manager 2010 R2 to Azure AD
![]() Azure AD Sync Replaced both DirSync and FIM + Azure AD Connector
Azure AD Sync Replaced both DirSync and FIM + Azure AD Connector
Hybrid implementations varied between these different tool offerings based on the authentication goals and when the project was carried out. Some organizations chose to just implement DirSync, and others chose to fully carry out a single sign-on (SSO) implementation by using one of the other options.
Exam Tip
Each of these three technologies has been deprecated (most recently the AADSync toolset). As you will see momentarily, Azure AD Connect has replaced each of these tools; however, there is a good chance that you will encounter one or more of these older implementations in existing hybrid environments. Be familiar with each of these types (particularly DirSync and AADSync) and how it was implemented in SharePoint 2013. For detailed information about these tools, review the MSDN article entitled “Directory Integration Tools” at https://msdn.microsoft.com/library/azure/dn757582.aspx.
Azure Active Directory Connect
Although the previous technologies are still supported to connect to Azure AD, the configuration path for implementing these technologies can be daunting. Microsoft recently introduced a tool called Azure AD Connect, which simplifies the implementation of hybrid cloud deployments.
As with any other deployment wizard, it is possible to run the tool and accept the express settings; however, the true value of this tool can be found in the custom settings, which allow you to accomplish tasks such as these:
![]() Deploy multiforest topologies.
Deploy multiforest topologies.
![]() Deploy a pilot environment, that uses just a few users in a group.
Deploy a pilot environment, that uses just a few users in a group.
![]() Configuration without deployment (also known as Staging mode).
Configuration without deployment (also known as Staging mode).
![]() Sign on by using federation.
Sign on by using federation.
![]() Enabling Azure AD premium features, such as the ability to write back passwords and devices from the cloud.
Enabling Azure AD premium features, such as the ability to write back passwords and devices from the cloud.
![]() Synchronizing custom Active Directory attributes from your on-premises implementation to your Azure AD tenancy.
Synchronizing custom Active Directory attributes from your on-premises implementation to your Azure AD tenancy.
Within Azure AD Connect, there are two configurations available: Password Sync and AD FS for SSO.
Password Sync
Password Sync resembles the earlier DirSync tool in functionality, and is the most commonly chosen option. In such an environment, SSO is not the main goal, although this configuration can be used as a backup for federation, allowing for a quick failover.
From a security standpoint, on-premises passwords are never transferred to Azure AD. The on-premises password hash is itself hashed before being transferred to the cloud, protecting passwords against “pass-the-hash” attacks; the lack of access to a local hash prevents unauthorized access to on-premises resources.
AD FS for Single Sign-On
The more advanced of the two configurations, federation with AD FS is used to implement a true SSO environment. Azure AD Connect can either use your existing AD FS or assist in the creation of an AD FS implementation.
With the inclusion of AD FS in this solution, advanced SSO options become available, such as these:
![]() The ability to deploy desktop SSO from domain-joined machines on the corporate network, including the use of multifactor authentication
The ability to deploy desktop SSO from domain-joined machines on the corporate network, including the use of multifactor authentication
![]() Soft account lockout or Active Directory password and work hours policy enforcement
Soft account lockout or Active Directory password and work hours policy enforcement
![]() Provisioning conditional access for resources, both on premises and in the cloud
Provisioning conditional access for resources, both on premises and in the cloud
Need More Review?
Azure AD Connect is a one-stop shop for setting up authentication in a hybrid implementation, combining both basic and advanced configurations in a single tool set. Information surrounding the setup, configuration, and maintenance of a hybrid authentication environment can be found in the article entitled “Integrating your on-premises identities with Azure Active Directory” at https://azure.microsoft.com/documentation/articles/active-directory-aadconnect/.
![]() Quick check
Quick check
![]() Your manager requests that you work with your infrastructure teams (Active Directory, Exchange, Skype) to come up with a way to connect to Azure AD, requiring the least amount of configuration effort. After you review multiple websites, the options that come up are DirSync, FIM + Azure AD Connector, Azure AD Sync, and Azure AD Connect.
Your manager requests that you work with your infrastructure teams (Active Directory, Exchange, Skype) to come up with a way to connect to Azure AD, requiring the least amount of configuration effort. After you review multiple websites, the options that come up are DirSync, FIM + Azure AD Connector, Azure AD Sync, and Azure AD Connect.
![]() DirSync, FIM + Azure AD Connector, and Azure AD Sync are all (technically) still supported, but also deprecated, and should not be used for new connectivity implementations (see https://azure.microsoft.com/documentation/articles/active-directory-aadconnect-dirsync-deprecated/?WT.mc_id=DirSyncDepACOM). Azure AD Connect allows you to create a hybrid configuration either in express or custom modes.
DirSync, FIM + Azure AD Connector, and Azure AD Sync are all (technically) still supported, but also deprecated, and should not be used for new connectivity implementations (see https://azure.microsoft.com/documentation/articles/active-directory-aadconnect-dirsync-deprecated/?WT.mc_id=DirSyncDepACOM). Azure AD Connect allows you to create a hybrid configuration either in express or custom modes.
Skill: Plan and configure authorization
After a user has been authenticated, he or she can then be validated attempting to interact with resources in a web application; this validation process is called authorization.
This section covers how to:
![]() Plan and configure SharePoint users and groups
Plan and configure SharePoint users and groups
![]() Plan and configure People Picker
Plan and configure People Picker
![]() Plan and configure permission inheritance
Plan and configure permission inheritance
![]() Plan and configure anonymous access
Plan and configure anonymous access
Plan and configure SharePoint users and groups
After users have been authenticated to a web application, they need to access the site collections contained within the web app. This access is granted via a series of permission levels that can be assigned to individual users or to SharePoint groups.
The optimal assignment of the permission structure goes something like this:
1. Individual permissions are assigned to a permission level.
2. One or more permission levels are assigned to a SharePoint group.
3. Users are assigned to the SharePoint group, receiving access based on the individual permissions.
Exam Tip
It is not uncommon to see a user added to more than one group within a SharePoint site collection. As an example, consider a user who belongs to both the Visitors (Reader permissions) and Members (Contributor permissions) SharePoint groups for a site. This person will receive the greater of the two permission sets, thus having the permissions that are assigned to the Contributor permission level.
Individual permissions
SharePoint 2016 has a total of 33 individual permissions that control how a user interacts with a SharePoint site. These permissions are broken into three distinct levels:
![]() List permissions (12) Apply only to lists and libraries
List permissions (12) Apply only to lists and libraries
![]() Site permissions (18) Apply to a particular site
Site permissions (18) Apply to a particular site
![]() Personal permissions (3) Apply to specialized objects such as personal views and personal Web Parts
Personal permissions (3) Apply to specialized objects such as personal views and personal Web Parts
Permission levels
As a SharePoint site is created, a series of permission levels are also created. The number and type of permission levels may vary, depending on the type of site created (for instance, there are a total of seven created for a Team Site, whereas there are 10 created for a Publishing Portal).
Need More Review?
For a complete list of permission levels and individual permissions, see the TechNet article “User permissions and permission levels in SharePoint 2013” at http://technet.microsoft.com/library/cc721640.aspx.
These permission levels are nothing more than an aggregation of the individual permissions available within the site collection. To view the permission levels on a site and the individual permissions assigned to each level, select the Permissions Levels icon from Site Permissions. When the Permission Levels screen appears, you see the individual permission levels available and their descriptions (see Figure 2-5).
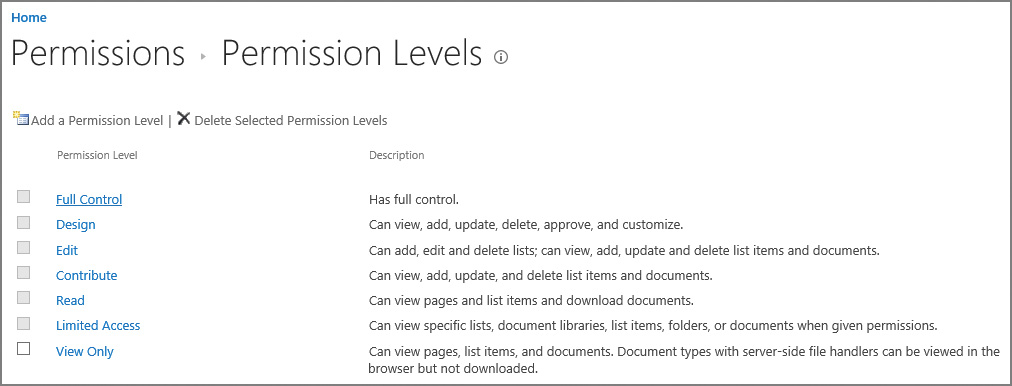
Selecting an individual permission level will allow you to see the list of permissions that make up that permission level. The creation and alteration of permissions levels is covered in the section “Manage site and site collection security” later in this chapter.
Although you can alter the permission levels that are defined when you create a site, it is not a good idea to do so. Copy the permissions level to a new permissions level and then alter the copy to have the distinct permissions you desire. If you don’t need a permission level or don’t like how it’s configured, you don’t have to delete it; just don’t use it.
SharePoint groups
When a site is created via the SharePoint web interface and configured to use its own permissions, three groups are automatically created:
![]() Visitors Assigned the Read permissions for the site (view pages and list items, download documents)
Visitors Assigned the Read permissions for the site (view pages and list items, download documents)
![]() Members Assigned the Contribute permissions for the site (view, add, update, and delete list items and documents)
Members Assigned the Contribute permissions for the site (view, add, update, and delete list items and documents)
![]() Owners Assigned the Full Control permission level for the site (full control)
Owners Assigned the Full Control permission level for the site (full control)
Important
When Windows PowerShell is used to create a new site collection (New-SPSite) or site (New-SPWeb), the resulting site has no SharePoint groups created. You can either create new groups by using the Windows PowerShell interface as part of your site creation script, or just use the mechanism that SharePoint uses to provision groups on a new site. Just append _layouts/15/permsetup.aspx to the end of the site’s URL (http://sitename), and the default group creation screen will appear.
Plan and configure People Picker
People Picker is a web control that is used to find and select users, groups, and claims to grant permission to items (lists, libraries, and sites) in SharePoint 2016. For web applications using claims authentication, this control uses claims providers to list, resolve, search, and determine the “friendly” display of users, groups, and claims.
The People Picker control can be tailored to the authentication mechanism used for each zone of a web application. As each zone is created, different authentication types (and People Picker properties) can be applied.
For instance, if you have users who were being authenticated over a Forms-based authentication interface, you might choose to exclude Active Directory accounts from appearing in the People Picker. Users authenticating via a different Active Directory authenticated zone would see these accounts in their People Picker.
Configuring People Picker properties
In previous versions of SharePoint, administration of the People Picker web control can be configured by using the STSADM command (along with getproperty to retrieve values and setproperty to apply new values). The preferred mechanism for administering People Picker is via PowerShell, however, as STSADM is deprecated.
If you were to execute the STSADM -help setproperty command, you would find a total of nine property names that can be used to administer the People Picker web control. These property names are listed beneath the SharePoint virtual server properties section, and all begin with the “peoplepicker” prefix. These property name and property value pairs map directly to PowerShell properties and values for a web application zone (Table 2-1).
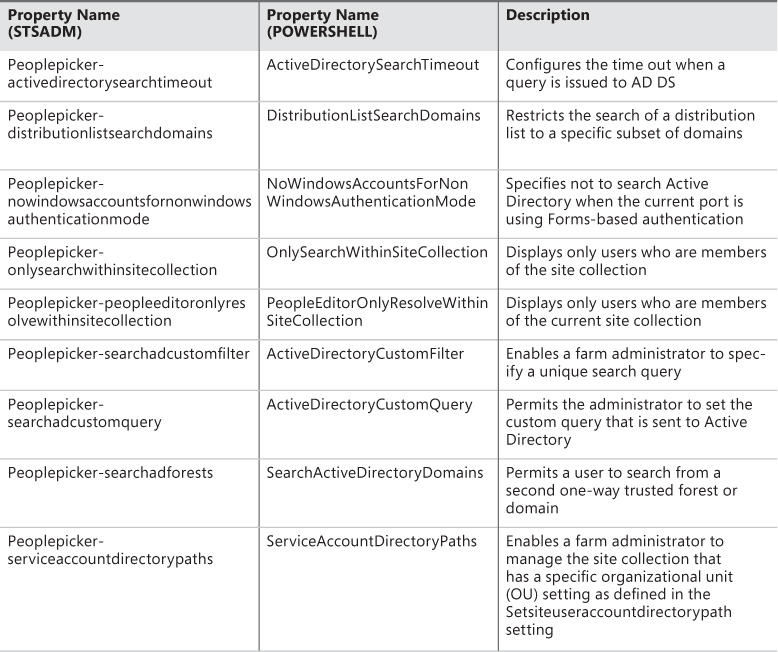
There are no specialized cmdlets for the configuration of People Picker available for use in SharePoint 2016. Be familiar with specifying People Picker properties and values via PowerShell for a web application zone.
Retrieving property values in PowerShell is only slightly more involved than it was in STSADM. For instance, to retrieve the current property value for the Active Directory Search Timeout, you would run PowerShell code looking something like this:
$webApp=Get-SPWebApplication http://www.contoso.com
$webApp.PeoplePickerSettings.ActiveDirectorySearchTimeout
Changing property values in PowerShell is a very similar process. Setting the Active Directory Search Timeout property value to 45 seconds instead of the default of 30 seconds might look like this:
$webApp.PeoplePickerSettings.ActiveDirectorySearchTimeout="00:00:45"
$webApp.Update()
Need More Review?
There are many different scenarios for configuring the People Picker, most having to do with either configuring it for a particular authentication type or restricting the number and type of results shown. In either event, the TechNet article “Configure People Picker in SharePoint 2013” details a lot of these options (and some LDAP magic). This article can be found at http://technet.microsoft.com/library/gg602075.aspx.
Plan and configure sharing
Site owners might not be familiar with every user who accesses the site. Perhaps the team member is in the next office, but it is just as likely that he or she could be located half a world away in a different regional office.
Users in remote offices often change roles without the site owner’s knowledge. Allowing users to request access for themselves or others allows the site owner to administer, not select, which users require access to a SharePoint site. Personnel in the remote office can now “share” content in SharePoint 2016, recommending that a person be able to access information by using one of the site’s permission groups (Visitor, Member, and so on). Users can also request access on their own.
When the request is made, the site owner is notified of the request and can then choose whether to approve or reject the permission request from Site Settings, Access Requests.
Prerequisite configuration
For the sharing functionality to work, outbound email must be properly configured in Central Administration so access requests can be routed and acknowledgments sent via email.
Outgoing email configuration was covered earlier in this chapter. For more information about the configuration of outgoing email in SharePoint, refer to the TechNet article entitled “Configure outgoing email for a SharePoint 2013 farm” at https://technet.microsoft.com/library/cc263462.aspx.
Sharing interface improvements
SharePoint 2016 improves on the default sharing behaviors found in SharePoint 2013, particularly Sharing hints, One-Click Sharing, and Create and Share.
Sharing hints
Menu items such as Share and Follow now have mouse-over hint behaviors, helping users better understand the function of each menu item (Figure 2-6).

One-Click
Users who cannot themselves share information from a site can request that the admin share content. The administrator can approve or deny this response by just clicking within the email itself.
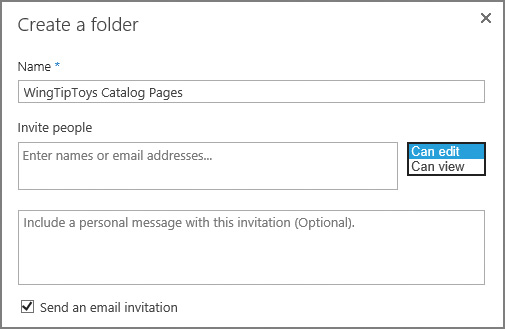
Create and Share
Users creating a new folder within a document library are presented with the option to invite people to access this site. Selecting this link changes the Create A Folder page, allowing the user to specify the people with whom they are sharing the content, indicate what permissions the users can have (can edit, can view), and send an email invitation, all in a single set of actions (see Figure 2-7).
Configuring a site for access requests
For sharing to take place within a site, it must be configured to enable access requests. On the Site Permissions page, a site owner can allow users to share the site, files, or folders, and also allow access requests (on the Access Requests Settings page, shown in Figure 2-8).

Exam Tip
If you have not yet configured outgoing email settings for your farm, the Access Requests Settings page will display a warning indicating that the server is not configured to send email and you should contact your server administrator for assistance. Once this configuration has been set, the Allow Access Requests check box will be enabled.
Once Sharing has been enabled, users can then share either the entire site or particular lists and libraries from the site.
Plan and configure permission inheritance
Permission inheritance is often a sensitive subject. On the one hand, you want to provide the best security for the objects within a site collection; on the other, you want to ease the administrative burden by making the permission structure as flexible as possible while still providing effective permissions.
Exam Tip
Breaking permission inheritance does not immediately change the effective permissions on the site, list, or library. A copy of the parent’s permissions is made and applied to the object before permissions are split.
Common permission inheritance
Consider the objects in Table 2-2 and their permission inheritance structure. Some of these sites and libraries are sensitive in nature, and should receive unique permissions.

Permissions in this series of objects are assigned to promote ease of maintenance:
![]() The NewsArticles and FieldGroup sites inherit permissions from the parent site (Intranet).
The NewsArticles and FieldGroup sites inherit permissions from the parent site (Intranet).
![]() The DailyUpdates and ShopNotes libraries also inherit this permissions structure.
The DailyUpdates and ShopNotes libraries also inherit this permissions structure.
![]() The EmployeeSurveys list inherits its permissions from the ManagementTeam site.
The EmployeeSurveys list inherits its permissions from the ManagementTeam site.
Several items, however, require unique permissions and are to be separated from the overall permissions structure:
![]() The ManagementTeam site and its lists and libraries
The ManagementTeam site and its lists and libraries
![]() The Clients list under FieldGroup
The Clients list under FieldGroup
Administration of this environment will be fairly straightforward because most levels inherit from their parent objects. No fine-grained permissions are required, easing administrative overhead.
Fine-grained permissions
Permissions in the series of objects shown in Table 2-3 are more complex because the document libraries in the FieldGroup and ManagementTeam sites now have documents that must be individually secured.

At first, this would not seem to be much of a problem. A new sensitive document (bonus structure or client document) could be individually secured, right? Absolutely; but the problem occurs when the document isn’t secured properly or permissions for that series of documents change.
Important
It is important to remember that Search in SharePoint 2016 is pervasive. Unless it has been configured to do otherwise, Search indexes all the documents in the farm; only the Search result is trimmed. When users search for a keyword, their permissions level is checked; if a sensitive document (say, an executive’s payroll and bonus structure) were unsecured and the user searches for the word ”performance,” Search would dutifully return this document in the query result, thus revealing sensitive information.
More in-depth details for implementing permission levels and inheritance are provided in the section “Manage site and site collection security” later in this chapter.
Plan and configure anonymous access
After a web application zone has been configured to enable anonymous authentication, the site owners within that application can then decide what level of authorization to grant to anonymous users.
Enabling anonymous access to a site
Enabling anonymous access to a site enables users to view the site without being challenged for a user name and password combination. All subsites, lists, and libraries that are configured to inherit permissions enable this level of access as well.
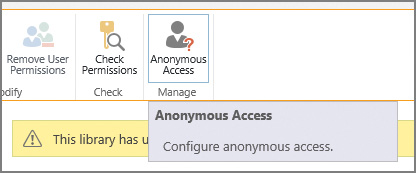
Anonymous site access is configured through the Site Permissions interface. Just click the Anonymous Access icon to begin the process (Figure 2-9).

Exam Tip
If the Anonymous Access icon does not appear in the Manage Permissions interface, anonymous access has not been enabled at the web application level.
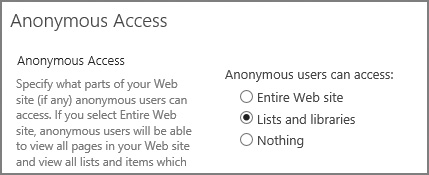
Control of which items can be accessed anonymously is shown on the next page. By default, nothing can be accessed; you can choose instead to provide access to only lists and libraries or to the entire website (Figure 2-10).
Altering this setting (in this example, allowing access to lists and libraries) results in the newly assigned anonymous access being listed on the Manage Permissions page (Figure 2-11).
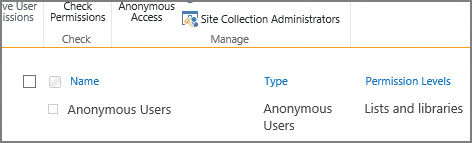
Enabling anonymous access to a list or library
Enabling anonymous access to a list or library enables users to view only the particular list or library within the site. This means that anonymous users have to know the explicit URL to directly access the list or library content (there is no navigation available).
Exam Tip
Authentication relies on the presence of a user name and password challenge. Credentials are never requested from anonymous users unless they attempt to access a location that is secured or choose to sign in to the SharePoint farm.
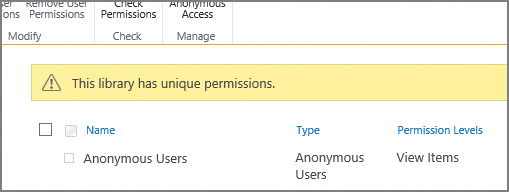
If a library is to be given anonymous access (but the site it is on does not allow anonymous access), then it will need to have its permissions inheritance broken from its parent site. With this change made (and anonymous access granted from a web application and site perspective), the library can be shared from its Permissions page (Figure 2-12).
Enabling anonymous access at the list or library level allows you to select the permission levels you wish to grant (Figure 2-13).

There are differences in anonymous access behavior for a list versus a library. A list enables an anonymous user to add, edit, delete, or view items; a library enables an anonymous user to only view items (this is a security measure).
Altering this setting (in the example, assigning View access to this library) results in the newly assigned anonymous access being listed on the Manage Permissions page (Figure 2-14).
Plan web application policies
Web application policies are a way to effectively control access for a web application from a global standpoint. This control can be used to assign or deny permissions to all content within the web application.
There are three web application policies that can be configured on a per-web application basis: user policy, anonymous policy, and permission policy (see Figure 2-15). These policies are configured in the Application Management (Manage Web Applications) section of Central Administration.

Exam Tip
Know what the effect will be of altering each of these policies within a SharePoint farm, particularly those that deny users access.
Permission policy
Permission policies are used to specify the permission options available in user policy. You can think of them as permission groups that are scoped at the web application level. Selecting the Permission Policy icon shows the permission policy levels that are created OOB, as shown in Figure 2-16.
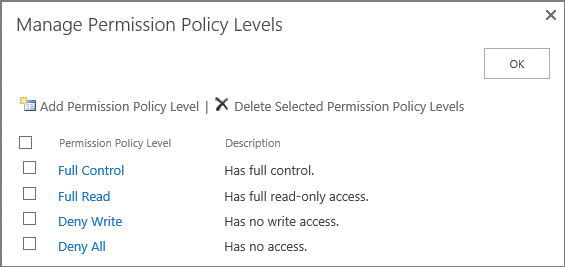
If you need a different policy level than what’s available OOB, you can click the Add Permission Policy Level link and create one that meets the needs of your organization.
Important
As with permission levels within a site collection, it’s not a good idea to alter these stock permission levels; consider creating a new one if required.
User Policy
Imagine that you have a legal requirement to enable an auditor access to review all content contained within a web application, regardless of the permissions assigned at the site collection or site levels. This sort of access can be provided within the user policy, granting Read permissions to the auditor at the user policy level for the web application (on a temporary basis, of course).
Within the user policy, you can choose to alter the access of one or more users at the web application level (see Figure 2-17). The users specified can be assigned permissions that you specify within the permission policy for the web application.
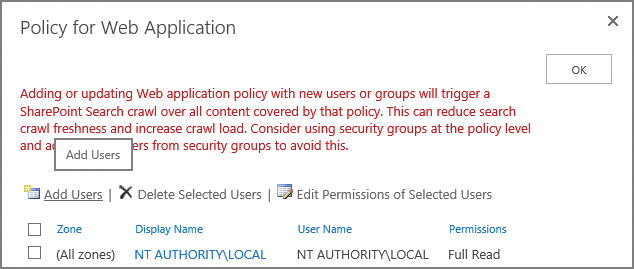
As indicated by the warning shown in Figure 2-17, changing the policy for a web application immediately kicks off a SharePoint search crawl, which could result in diminished performance for your users. Consider waiting until off-peak hours to alter a web application policy.
Important
By default, the Search crawling account has been granted Full Read access to the web application. This permission level is required for the account to crawl content in each SharePoint web application. It is not recommended to alter this access in any way, including granting the account Full Access, which would expose draft and unpublished documents, which should not appear within Search results.
Anonymous policy
As another example, consider an organization that has a governance policy that states that no unauthenticated users can be allowed to upload or change content within a site, but still has a requirement to provide anonymous access to content on a read-only basis.
In the previous section, you saw that enabling anonymous access allowed site owners to enable access to add, edit, and delete list items, which would be against policy. By using the anonymous policy, you can choose on a zone-by-zone basis whether anonymous users can be prevented from writing changes across a web application (Deny Write) or whether they have any access at all (Deny All). These options are shown in Figure 2-18.

Exam Tip
Anonymous access restrictions override any permissions previously granted at the site or list and library level.
Skill: Plan and configure platform and farm security
Securing a SharePoint environment requires a significant amount of coordination between the networking, data, and SharePoint teams at your organization. Configuration efforts vary in scope from altering core settings on your SharePoint web tier servers to altering SQL settings at the data tier, and enabling or disabling firewall configurations at the networking level. All these changes combine to form a more secure SharePoint implementation. Therefore, this skilll focuses on securing the farm from intrusion and data corruption from external sources. In addition, this skill focuses on how to secure the farm from the inside, assigning the appropriate administrative permissions and creating policies that help secure assets contained within the SharePoint infrastructure.
This section covers how to:
![]() Plan and configure security isolation
Plan and configure security isolation
![]() Plan and configure services lockdown
Plan and configure services lockdown
![]() Plan and configure antivirus settings
Plan and configure antivirus settings
![]() Plan and configure certificate management
Plan and configure certificate management
![]() Plan for Kerberos support for service applications
Plan for Kerberos support for service applications
![]() Plan and configure Information Rights Management
Plan and configure Information Rights Management
![]() Plan and configure delegated farm administration
Plan and configure delegated farm administration
![]() Plan and configure delegated service application administration
Plan and configure delegated service application administration
![]() Plan and configure managed accounts
Plan and configure managed accounts
![]() Plan and configure blocked file types
Plan and configure blocked file types
![]() Plan and configure Web Part security
Plan and configure Web Part security
Plan and configure security isolation
SharePoint is positioned in most organizations as the central nexus (or hub) for the presentation and aggregation of business knowledge. Content can be maintained within the SharePoint 2016 farm, or can just as easily be maintained in separate line-of-business (LOB) applications and then presented by SharePoint.
Regardless of the content’s original context, the fact that it can be presented in SharePoint has its pros and cons. On the one hand, information that was once stored in distinct, siloed systems is now readily available for use; on the other, information that might have been improperly secured in these disparate systems can be inadvertently exposed.
Exam Tip
One of the key balances to be struck in defining isolation is between security and utility. Know not only the benefits of each isolation type, but its drawbacks as well.
Security isolation requirements
This, then, is not so much a technical issue as a business process and legal issue. Dependencies such as how your business is organized, who the stakeholders are, and what your business purpose is can have far-ranging effects on the design outcome for your SharePoint farm.
For instance, if the SharePoint system being designed will be used to store medical information, knowledge management processes must be followed to comply with legal mandates. Failure to follow these mandates or to comply with auditing requirements could result in monetary and licensing penalties.
Even if your business does not have to comply with a heavy regulatory burden, you probably don’t have to go that far within your business to find reasons for considering security isolation. If you have employees, trade secrets, legal, or other boundaries, you might want to consider these design factors:
![]() Farm architecture Do you require more than one SharePoint farm to fully segregate the presentation of your data? Are there legal requirements for separating the data stores that support your SharePoint farm?
Farm architecture Do you require more than one SharePoint farm to fully segregate the presentation of your data? Are there legal requirements for separating the data stores that support your SharePoint farm?
![]() Web application layout Legal, auditing, and human resources departments might require the creation of separate application pools for the appropriate segmentation of data.
Web application layout Legal, auditing, and human resources departments might require the creation of separate application pools for the appropriate segmentation of data.
![]() Creating more than one search application Your business could be penalized for exposing information via search that is improperly secured. Recall from Chapter 1 that data loss prevention (DLP) searches are quite effective in reviewing your farm for content that is sensitive.
Creating more than one search application Your business could be penalized for exposing information via search that is improperly secured. Recall from Chapter 1 that data loss prevention (DLP) searches are quite effective in reviewing your farm for content that is sensitive.
Physical isolation
In highly secure environments, you might want to secure a particular SharePoint farm at a separate site. This SharePoint site would participate in business operations, but would probably maintain its own web, application, and data tier servers.
Due to the nature of the data being stored in this environment, disaster recovery to a remote location might be required, making this environment immediately available in the case of a business continuity event. These events range in scope from an extended network outage event (in which the data services provider experiences a large-scale outage) to a flat-earth event (in which the site no longer exists or is irreparably damaged for the foreseeable future).
From an Information Rights Management point of view (covered later in this chapter), this environment should be configured to restrict rebroadcast (email) and hard copy (printouts) for most users, requiring that auditing be fully enabled to track access to the data.
Users accessing this environment would likely be required to provide multiple layers of authentication, and this environment would be heavily secured from both physical and virtual (networking) points of view.
Service application isolation
SharePoint 2010 introduced the idea of service applications, which were the direct replacement for shared service providers. Each service application provides a connection (or proxy) that can be used by a web application to “subscribe” to the functionality provided by the particular service application.
A common example of this isolation is the separation of search information. Users who are privy to sensitive information, such as salaries and personal identification information, still require the use of Search. In fact, Search might be the key mechanism with which they can get work accomplished.
Creating a different search application for these folks enables them to use a particular search index in a web application without the exposure risk associated with sharing a search application with other users in the farm.
Application pool isolation
An application pool can be used to host one or more URLs within a SharePoint environment. Each application pool can be configured to run as a distinct service account, meaning that you can allow this application to participate in the farm and still be compliant with many regulatory requirements.
This type of isolation is particularly useful in environments in which the application pool retains credentials from and access to sensitive line of business (LOB) systems on premises and in the cloud.
Web application and zone isolation
A distinct web application starts with a single URL, presented in the default zone. It is possible to extend this web application up to four more times, each time assigning a new URL and zone.
With zones now defined, the authentication mechanism for each zone in the web application can be chosen. Additionally, web application policies can be specified that will allow for administrative control over user access in each zone.
Data isolation
If supporting multiple physical environments is not feasible (or possible) within your organization, you might have to support distinct data tiers. Separating these data tiers could enable distinct teams to support environments that are more sensitive or require a higher level of availability.
Data isolation is particularly applicable to environments in which service level agreements and recovery time objectives differ based on the type of data being accessed from within a single SharePoint farm.
Need More Review?
Security isolation is applicable at every level of a SharePoint design; both logical and physical considerations must be made to tailor the implementation to a particular need. In-depth coverage of logical architectures is provided in the TechNet article “Plan logical architectures for SharePoint 2013” at https://technet.microsoft.com/library/ff829836.aspx. Additionally, technical diagrams for logical architectures can be found in the TechNet article “Technical diagrams for SharePoint 2013” at https://technet.microsoft.com/library/cc263199(v=office.15).aspx#architecture.
Plan and configure services lockdown
As the SharePoint Server platform has matured, it has become better suited for use not only as an intranet and extranet platform, but also for Internet use. The array of publishing features, ease of use, and scalability present in the platform provide a versatile website experience.
SharePoint has become a bigger security target as a result of this exposure and popularity. With detailed documentation readily available describing all of SharePoint’s components and how they interact with one another, it falls to the administrator to secure Internet-facing SharePoint sites from external attacks.
Using the Limited-Access User Permission Lockdown Mode feature
When configuring a SharePoint Server site for access via the Internet, you will need a mechanism for effectively locking down the SharePoint site. In this case, locking down SharePoint just means that users in a “limited access” role will be unable to access application pages, thus minimizing the attack footprint on a SharePoint site.
Fortunately, there is a feature developed specifically for this task, called the Limited-Access User Permission Lockdown Mode, available in both SharePoint 2016 and in SharePoint Online. By using this feature, you can allow your authenticated users to log on to a SharePoint site while still securing application pages in your environment.
Exam Tip
If you decide to configure lists and libraries for anonymous access, you might run into a situation in which anonymous users cannot access lists and libraries, even though the correct permissions have been granted at the site or list and library level. This situation usually occurs when an administrator has activated the Limited-Access User Permission Lockdown Mode feature. This feature is a prerequisite for other features (such as the Publishing feature). If you need to share a site with this feature enabled, make sure to share individual files (not folders), or the entire site collection or subsite.
Be familiar with how to enable and disable this feature from the site collection and via PowerShell.
Plan and configure antivirus settings
Most organizations deploy antivirus software to their client workstations; some also apply server-specific antivirus software to their back-end systems as an extra protective measure. As one of these back-end systems, SharePoint 2016 provides for integration of third-party antivirus software and its configuration within the Central Administration website.
SharePoint presents an interesting challenge to the designers of antivirus software because documents uploaded to a SharePoint instance are not directly stored on a file system; instead, they are stored within SQL tables as a Binary Large Object (BLOB).
The direct manipulation of SharePoint databases from SQL is not supported; this prevents the direct scanning of SharePoint content databases. Instead, Microsoft provides a SharePoint Virus Scan (VS) API, which enables third-party software to interact with SharePoint content databases.
Standard antivirus software typically scans documents in two ways:
![]() As a document is being copied to the system, it is checked for evidence of any malicious code.
As a document is being copied to the system, it is checked for evidence of any malicious code.
![]() The file system is scanned on a periodic basis to ensure that all existing documents remain free of malicious code.
The file system is scanned on a periodic basis to ensure that all existing documents remain free of malicious code.
SharePoint allows for similar functionality via third-party antivirus solutions:
![]() As a document is being uploaded to or downloaded from SharePoint, it can be checked for evidence of any malicious code.
As a document is being uploaded to or downloaded from SharePoint, it can be checked for evidence of any malicious code.
![]() Existing files contained within SharePoint content databases can be scanned on a periodic basis to ensure that all existing documents remain free of malicious code.
Existing files contained within SharePoint content databases can be scanned on a periodic basis to ensure that all existing documents remain free of malicious code.
Implementing SharePoint antivirus solutions
Configuring virus scans for your SharePoint installation is a fairly straightforward process, unchanged from SharePoint 2013. Few options require configuration (shown in Figure 2-19), most of which have to do with controlling the performance impact of antivirus scans within your farm.

On the Antivirus page within Central Administration, Security, you can control three major settings:
![]() Antivirus Settings Control when documents are scanned (on upload or download), whether users can download infected documents, and whether or not the antivirus solution should attempt to clean infected documents.
Antivirus Settings Control when documents are scanned (on upload or download), whether users can download infected documents, and whether or not the antivirus solution should attempt to clean infected documents.
![]() Antivirus Time Out Control how long (in seconds) the virus scanner should run before timing out.
Antivirus Time Out Control how long (in seconds) the virus scanner should run before timing out.
![]() Antivirus Threads Control the number of execution threads on the server that the virus scanner can use.
Antivirus Threads Control the number of execution threads on the server that the virus scanner can use.
The Allow Users To Download Infected Documents check box is selected by default, and enables users to download infected documents; this setting is most often enabled to troubleshoot virus-infected documents already in SharePoint BLOBs within a content database. It is recommended that when you enable an antivirus solution (for upload, download, or both), you clear this check box until required.
The Attempt To Clean Infected Documents check box enables the third-party antivirus solution to clean infected documents automatically. Bear in mind that, if this sufficiently changes a file within a content database (particularly one that has been customized from its template), the file might need to be replaced from a backup with an uninfected copy, should the cleaning be ineffective.
When configuring the Antivirus Time Out Duration setting, you can specify the amount of time that can be spent before the virus scanner times out (the default setting is 300 seconds). Decreasing this setting can result in a performance increase in a slower SharePoint environment, as scanning documents can be resource intensive.
The Antivirus Threads section is somewhat related to the Antivirus Time Out Duration section, in that the number of threads (5 by default) indicates the number of processing resources that are spent on antivirus processing. As with the time out duration, decreasing this setting can also result in a performance increase in a slower SharePoint environment.
Exam Tip
SharePoint-aware virus scanning software should be installed on all front-end servers within the farm; failure to do so causes the antivirus settings within Central Administration to be ineffective.
Plan and configure certificate management
Up to this point, the use of certificates in a SharePoint farm has been largely optional. In many installations, SharePoint farms were intranet-facing, Central Administration was not configured by using SSL, connectivity between servers was not encrypted, and no external services were required (Azure, SharePoint Store).
This situation has changed dramatically. SSL certificates are being used for many different configurations, including:
![]() Internal and external client connectivity
Internal and external client connectivity
![]() Connections between environments (Exchange, SharePoint, Skype for Business) via OAuth
Connections between environments (Exchange, SharePoint, Skype for Business) via OAuth
![]() Connections between SharePoint and Office Online Server/Office Web Apps
Connections between SharePoint and Office Online Server/Office Web Apps
![]() Connections to Microsoft Azure Workflow Manager
Connections to Microsoft Azure Workflow Manager
In the case of external client connectivity, you will most likely purchase a certificate from a well-known SSL certificate provider; but in the other cases, you need to know the essentials for exporting, copying, and importing SSL certificates correctly.
Exam Tip
Know the different types of certificates that are required to secure interfarm communications and how to generate each type.
In the following example, you will interact with the certificates used by two SharePoint farms as the relationship between them is established. This example shows you how to export and import both root and security token service (STS) certificates in an interfarm setting.
Setting up for the trust creation
A trust relationship must be established between SharePoint farms that share service application functionality. In this relationship, one SharePoint farm (the publisher) publishes a service application that can then be consumed by a different SharePoint farm (the consumer).
This relationship is established in a secure fashion via the use of three distinct certificates:
![]() A root certificate, which is exported from the consuming farm.
A root certificate, which is exported from the consuming farm.
![]() An STS certificate, which is exported from the consuming farm.
An STS certificate, which is exported from the consuming farm.
![]() Another root certificate, which is exported from the publishing farm.
Another root certificate, which is exported from the publishing farm.
Exporting a root certificate (consuming farm)
Logging in to what will be the consuming farm, we begin the process of exporting the root certificate via PowerShell and the Get-SPCertificateAuthority cmdlet, exporting (in this case) to C:ConsumingFarmRoot.cer:
$rootCert = (Get-SPCertificateAuthority).RootCertificate
$rootCert.Export("Cert") | Set-Content "C:ConsumingFarmRoot.cer" -Encoding byte
Running the Get-SPCertificateAuthority cmdlet by itself will return the certificate details, including an expiration date that is set far in the future (Figure 2-20).

Exporting an STS certificate (consuming farm)
Next up is exporting the STS certificate, again from the consuming farm. As with the root certificate, this certificate can be exported by using Windows PowerShell 3.0, this time with the Get-SPSecurityTokenServiceConfig cmdlet; we’ll export it to C:ConsumingFarmSTS.cer:
$stsCert = (GetSPSecurityTokenServiceConfig).LocalLoginProvider.SigningCertificate
$stsCert.Export("Cert") | Set-Content "C:ConsumingFarmSTS.cer" -Encoding byte
Exporting a root certificate (publishing farm)
Finally, we’ll retrieve another root certificate, this time from the publishing farm. The process of exporting the root certificate on the publishing farm is identical to that on the consuming farm (with the exception of the file name, of course). We’ll export the certificate to C:PublishingFarmRoot.cer:
$rootCert = (Get-SPCertificateAuthority).RootCertificate
$rootCert.Export("Cert") | Set-Content "C:PublishingFarmRoot.cer" -Encoding byte
Preparing to establish the trust
To prepare for establishing the S2S farm trust:
![]() Copy the ConsumingFarmRoot.cer and ConsumingFarmSTS.cer files from the consuming farm to the publishing farm.
Copy the ConsumingFarmRoot.cer and ConsumingFarmSTS.cer files from the consuming farm to the publishing farm.
![]() Copy the PublishingFarmRoot.cer file from the publishing farm to the consuming farm.
Copy the PublishingFarmRoot.cer file from the publishing farm to the consuming farm.
Establishing the trust
Establishing the S2S farm trust is a three-part process. First, we’ll create a trusted root authority on the consuming farm, then we’ll establish the trust from the publishing farm, and finally, we’ll create a trusted service token issuer.
Creating a Trusted Root Authority (Consuming Farm)
Establishing the trust requires that we first create a new trusted root authority on the consuming farm, by using the publishing farm’s root certificate and the New-SPTrustedRootAuthority cmdlet. To create the new trusted root authority called “PublishingFarmRA”:
$trustCert = Get-PfxCertificate "C:PublishingFarmRoot.cer"
New-SPTrustedRootAuthority "PublishingFarmRA" -Certificate $trustCert
Confirm the creation of the trusted root authority by using the Get-SPTrustedRootAuthority command.
Creating a Trusted Root Authority (Publishing Farm)
Next, we’ll need to create a new trusted root authority, this time on the publishing farm; this requires that we use the consuming farm’s root certificate and the New-SPTrustedRootAuthority cmdlet. We’ll call the new trusted root authority “ConsumingFarmRA”:
$trustCert = Get-PfxCertificate "C:ConsumingFarmRoot.cer"
New-SPTrustedRootAuthority "ConsumingFarmRA" -Certificate $trustCert
Confirm the creation of the trusted root authority by using the Get-SPTrustedRootAuthority command.
Creating a Trusted Service Token Issuer on the Publishing Farm
The last step in this process is to create a trusted service token issuer (establishing the trust), importing the STS certificate from the consuming farm. We’ll call the token issuer “ConsumingFarmSTS”.
$stsCert = Get-PfxCertificate "c:ConsumingFarmSTS.cer"
New-SPTrustedServiceTokenIssuer "ConsumingFarmSTS" -Certificate $stsCert
![]() Quick check
Quick check
![]() What certificates do you need to establish a trust between consuming and publishing farms?
What certificates do you need to establish a trust between consuming and publishing farms?
Quick check answer
![]() Three certificates are required for this configuration: A root certificate from the consuming farm, an STS certificate from the consuming farm, and a root certificate from the publishing farm.
Three certificates are required for this configuration: A root certificate from the consuming farm, an STS certificate from the consuming farm, and a root certificate from the publishing farm.
Plan for Kerberos support for service applications
Kerberos is often used to secure client-facing web applications in SharePoint farms. Although the infrastructure configuration can be daunting, requiring collaboration with the Active Directory team in your environment, there are several benefits for running in this configuration:
![]() Kerberos is the strongest integrated Windows authentication protocol, capable of enterprise-grade encryption and mutual authentication between clients and servers.
Kerberos is the strongest integrated Windows authentication protocol, capable of enterprise-grade encryption and mutual authentication between clients and servers.
![]() Kerberos allows for the delegation of credentials, enabling clients to authenticate into an environment and then allow that environment to connect to other servers or services on their behalf.
Kerberos allows for the delegation of credentials, enabling clients to authenticate into an environment and then allow that environment to connect to other servers or services on their behalf.
![]() Kerberos heavily reduces the amount of network authentication traffic to AD DS domain controllers.
Kerberos heavily reduces the amount of network authentication traffic to AD DS domain controllers.
Need More Review?
Kerberos requires a certain amount of focus to properly configure; it is quite easy to misunderstand the relationship between clients, servers, services, delegation types, and other topics. Microsoft has produced several articles that discuss Kerberos, among them the TechNet blog article “Kerberos for the Busy Admin” at https://blogs.technet.microsoft.com/askds/2008/03/06/kerberos-for-the-busy-admin/, and the heavily detailed TechNet article “How the Kerberos Version 5 Authentication Protocol Works” at https://technet.microsoft.com/library/4a1daa3e-b45c-44ea-a0b6-fe8910f92f28.
In SharePoint 2016, we have the ability to use Kerberos in two ways:
![]() Basic Kerberos delegation Can cross domain boundaries within the same forest, but cannot cross a forest boundary
Basic Kerberos delegation Can cross domain boundaries within the same forest, but cannot cross a forest boundary
![]() Kerberos constrained delegation Cannot cross domain or forest boundaries, except when using Windows Server 2012 or greater domain controllers (DCs)
Kerberos constrained delegation Cannot cross domain or forest boundaries, except when using Windows Server 2012 or greater domain controllers (DCs)
Service applications often require Kerberos delegation to allow SharePoint users to access external, non-SharePoint resources. These service applications quickly divide into two groups, depending on the Kerberos delegation required.
Service applications that are less restrictive, supporting either basic or constrained Kerberos delegation, include the following:
![]() Business Data Connectivity Services
Business Data Connectivity Services
![]() Access Services
Access Services
![]() SQL Server Reporting Services
SQL Server Reporting Services
Other service applications require the translation of claims-based credentials to Windows credentials, and use Kerberos constrained delegation only. These include:
![]() PerformancePoint Services
PerformancePoint Services
![]() InfoPath Form Services
InfoPath Form Services
![]() Visio Services
Visio Services
For the exam, it’s likely that you will not need to know how each and every service application makes use of Kerberos. That said, you will likely need a basic understanding of delegation (and how to troubleshoot it), and a command of how to use the Set Service Principal Name (SetSPN) tool, which is used to view current SPNs, reset account default SPNs, and add and remove SPNs.
Plan and configure Information Rights Management
Active Directory Rights Management Services (AD RMS) protect the intellectual capital of an enterprise. Built on Active Directory, these services enable the author of a document to determine its intended use, and prevent any unauthorized distribution or reproduction of the document’s contents. This form of Information Rights Management (IRM) is supported by a server running the AD RMS role.
The RMS client is installed by default along with all the other SharePoint Server 2016 components, making the configuration and integration with RMS that much easier.
Exam Tip
Understand the capabilities of RMS and what types of document and email functionality it can secure. For a better understanding of these capabilities, refer to the TechNet article entitled “Active Directory Rights Management Services Overview” at https://technet.microsoft.com/library/hh831364.aspx.
When implementing IRM, you have three choices for specifying the location of Windows RMS, found on the Configure Information Rights Management menu beneath the Security section of Central Administration:
![]() Do Not Use IRM On This Server The default selection, this prevents the use of IRM on this server.
Do Not Use IRM On This Server The default selection, this prevents the use of IRM on this server.
![]() Use The Default RMS Server Specified In Active Directory Enable the use of RMS within this SharePoint implementation.
Use The Default RMS Server Specified In Active Directory Enable the use of RMS within this SharePoint implementation.
![]() Use A Particular RMS Server This allows you to select a particular RMS server for use with SharePoint Server 2016.
Use A Particular RMS Server This allows you to select a particular RMS server for use with SharePoint Server 2016.
There is an additional selection check box on this page, allowing tenants of this SharePoint farm (in a multitenancy configuration) to configure their own IRM settings (Figure 2-21).
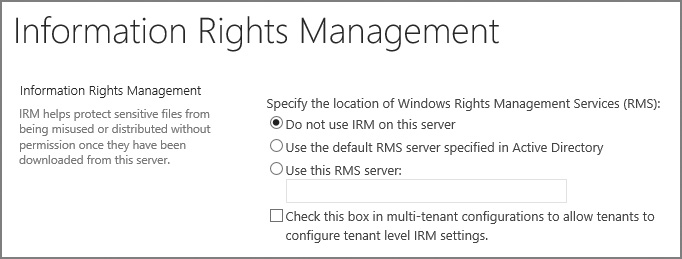
Selecting the Check This Box In Multi-tenant Configurations To Allow Tenants To Configure Tenant Level IRM Settings check box allows Windows PowerShell cmdlets to be used for enabling, disabling, and configuring IRM for each individual tenant, also allowing for the selection of a desired RMS server.
Important
Clicking OK at this point (to save your IRM selections), you might receive this error: The Required Active Directory Rights Management Service Client MSIPC.DLL Is Present But Could Not Be Configured Properly. If this is the case, the RMS server is probably not configured to enable the SharePoint web servers to access its ServerCertification.asmx page (found within the C:InetpubWwwrootADRMS\_WmcsCertification file path on the RMS server). Contact your RMS administration team and have them grant both (a) Read and Execute on this file for each web server in your SharePoint farm, and (b) Read and Execute for the AD RMS service group of the RMS server.
Alternately, Windows PowerShell administration for on-premises RMS deployments is carried out via a total of four cmdlets:
![]() Get-SPIRMSettings Returns the IRM settings
Get-SPIRMSettings Returns the IRM settings
![]() Get-SPSiteSubscriptionIRMConfig Returns the IRM settings for a specified tenant within the farm
Get-SPSiteSubscriptionIRMConfig Returns the IRM settings for a specified tenant within the farm
![]() Set-SPIRMSettings Sets the IRM settings
Set-SPIRMSettings Sets the IRM settings
![]() Set-SPSiteSubscriptionIRMConfig Sets the IRM settings for a specified tenant within the farm
Set-SPSiteSubscriptionIRMConfig Sets the IRM settings for a specified tenant within the farm
Need More Review?
Although the configuration of RMS within SharePoint 2016 provides no option for the SharePoint admin to control AD RMS integration with AD FS, this is nonetheless an option for larger organizations that regularly exchange sensitive information with partner companies. For more information about how this is configured, review the TechNet article entitled “Deploying Active Directory Rights Management Serviceswith Active Directory Federation Services” at https://technet.microsoft.com/library/Dn758110.aspx.
Plan and configure delegated farm administration
As your SharePoint implementation continues to grow in size, you might soon realize that having only one or two people responsible for farm administration becomes impractical. Rather than employ three shifts of coverage (24 hours) of Tier 3 support, enterprises often choose to delegate some of the core maintenance of SharePoint to the members of a support team, some of whom are available on a 24 hours a day, seven days a week basis.
Setting up delegated administration means two things:
![]() Less experienced admins become familiar with individual components and can have their responsibilities expanded as their skills mature.
Less experienced admins become familiar with individual components and can have their responsibilities expanded as their skills mature.
![]() More experienced admins do not have to be continuously on call to perform rudimentary maintenance tasks.
More experienced admins do not have to be continuously on call to perform rudimentary maintenance tasks.
Up to this point, it is likely that a small group of individuals have had access to the server farm account and they have been using it to accomplish administrative tasks. Although this might not have caused an issue (yet), allowing several people to have access to this credential set is just not a good idea and does not comply with any sort of auditing requirements. Simply put, if everyone logs in with the same account, then it’s impossible to determine who makes which changes in the farm.
The SharePoint farm account:
![]() Has full access to each of the databases in the SharePoint infrastructure (and the permission to create and delete more).
Has full access to each of the databases in the SharePoint infrastructure (and the permission to create and delete more).
![]() Serves as the application pool identity for the Central Administration website.
Serves as the application pool identity for the Central Administration website.
![]() Is the process account for the Windows SharePoint Services Timer Service.
Is the process account for the Windows SharePoint Services Timer Service.
Important
With this kind of administrative power, a compromised farm account could quickly result in the corruption or destruction of a SharePoint farm environment. Use of this secured account should be heavily restricted and audited because it has access to literally every component of a SharePoint farm, including securityadmin rights on the SQL instance supporting the farm.
To begin the process of delegating administration, you must first decide whether the user being delegated needs to be a Farm or a Shared Services Administrator.
Need More Review?
Knowing what privileges are assigned at which level of farm administration is a key skill in successfully deploying a SharePoint installation. Information about the administrative permission levels can be found in the TechNet article entitled “Choose administrators and owners for the administration hierarchy in SharePoint 2013” at https://technet.microsoft.com/library/cc263291.aspx.
Farm level administrators
Two groups exist that provide permissions to administer the SharePoint Farm:
![]() The Farm Administrators group
The Farm Administrators group
![]() The Windows Administrators group
The Windows Administrators group
Members of the Farm Administrators group have Full Control permissions to all servers in the farm and can be responsible for their general upkeep. Users in this group administer all the items they see in Central Administration: delegating service application permissions; administering managed accounts; and creating, deleting, and editing application pools, databases, and site collections. Backups and restores are possible, even to the extent of backing up content databases without having to interact directly with SQL Server through SQL Server Management Studio (SSMS).
Important
Members of the Farm Administrators group have no local logon privileges to servers in the SharePoint farm. The extent of their administrative privilege stops at the Central Administrative level, as they also cannot perform activities at the Windows PowerShell level (by default).
Members of the Windows Administrators group on the local server can act as farm administrators, because the BUILTINAdministrators group is added to the SharePoint Farm Administrators group (by default). These administrators can log on locally to the server, and have console-level access to install binaries to the farm, create new websites, and administer services. As is the case with the Farm Administrators, they have no default access to site content.
Shell Access
To approximate the permissions held by the original SharePoint farm account, Farm Administrators must also be added to the SharePoint_Shell_Access role via PowerShell. This Shell Admin role can allow the logged on admin to interact with the farm configuration database only, or a combination of the farm configuration, Central Administration content, and individual content databases.
Need More Review?
Shell Admins have Farm Administrative permissions plus the ability to interact directly with databases in the farm. By using the Add-SPShellAdmin cmdlet, these users can be selectively given administration over one or more content databases in the farm, making their permissions level roughly equivalent to those held by the SharePoint farm account. For more information, see the TechNet article “Add-SPShellAdmin” at http://technet.microsoft.com/library/ff607596.aspx.
By default, the local Windows Administrators group on a SharePoint server has administrative privileges to the SharePoint farm. In fact, they have more privileges than Farm Administrators because they can install and configure items from the command line (but are still subject to the Shell Admin limitations). Don’t remove this group, but be sure that you know who in your organization is assigned to this group from an access auditing standpoint.
Plan and configure delegated service application administration
As with the farm administration group, each service application can have users added to allow distributed management of functionality within the farm. These users will be assigned one of two roles: Service Application Administrator or Feature Administrator.
Service Application Administrators
Farm Administrators can designate new administrators (known as Service Application Administrators) for individual service applications within a farm. These users cannot create new service applications or perform actions within their service application that affects farm-level change.
For instance, although a Search service application administrator can freely make changes to the functionality present in the service application, he or she cannot make changes to the topology of Search, assigning or removing Search roles to a server in the farm.
Need More Review?
For a clearer understanding of how to assign administrators to a particular service application within a SharePoint farm, review the TechNet article entitled “Assign or remove administrators of service applications in SharePoint Server 2016” at https://technet.microsoft.com/library/ee704546(v=office.16).aspx.
Feature Administrators
Feature Administrators can be considered a subset of the Service Application Administrators. Essentially, these administrators can only administer a portion of a service application, as given by the Service Application Administrator.
Exam Tip
Become familiar with the different administrative levels in the more common service applications for delegation, such as the User Profile service application (UPA), Search service, and Managed Metadata Service (MMS).
Plan and configure managed accounts
In early versions of SharePoint (SharePoint 2007 and earlier), it was difficult to keep SharePoint-specific service accounts in compliance with enterprise password standards. Changing service account passwords on a regularly scheduled basis was an incredibly difficult task, often requiring farm outages (even brief ones) to accomplish.
SharePoint 2016 continues the concept of managed accounts first introduced in SharePoint 2010. A managed account is an Active Directory account (usually used as a service account) with a password that is maintained within the bounds of SharePoint itself. If configured to do so, this account is capable of automatically changing its password in accordance with your organization’s security governance strategy.
Important
Managed service accounts in Active Directory and managed accounts in SharePoint are not the same thing. If your organization uses the managed service account functionality found in Active Directory, it is imperative that SharePoint-specific managed accounts be excluded from this policy, as the account password must be maintained from within the SharePoint farm to function correctly.
A SharePoint managed service account enables you to change the account credentials from within Central Administration. These passwords can be changed either manually (by an administrator) or automatically (by SharePoint) on a timed interval.
If your infrastructure team enables a password change policy for your enterprise, SharePoint managed accounts can be configured to observe these changes, thus keeping your farm in compliance with the enterprise password policy.
Registering a new managed account
Registering a new managed account requires little effort, but a bit of forethought to answer questions like these:
![]() Should the service account be able to change its own password?
Should the service account be able to change its own password?
![]() Is there already a password policy in place, and how far in advance should my farm change the password?
Is there already a password policy in place, and how far in advance should my farm change the password?
![]() Should the Farm Administrators receive advance notice of this change, and when should they be notified?
Should the Farm Administrators receive advance notice of this change, and when should they be notified?
With the answers to these questions, you are now able to register a new managed account from Central Administration, Security, Register Managed Account. Initially, you will specify credentials (an initial user name and password) for the service account, and then configure the Automatic Password Change settings (Figure 2-22).
The interface for this functionality is a bit cluttered; the Weekly and Monthly options are not for email notifications, but for how often the password should change and what the window of opportunity is for changing the password, in accordance with your governance policies.
For a clearer understanding of what managed accounts are and how they are able to change their own passwords, see the TechNet article entitled “Configure automatic password change in SharePoint Server 2016” at https://technet.microsoft.com/library/ff724280(v=office.16).aspx.
Exam Tip
Because SharePoint service accounts are also Active Directory accounts, a distributed Active Directory team might not know to avoid automatically changing passwords on your SharePoint service accounts. If this happens, know how to take the new credentials and apply them by editing the managed accounts.
![]() Quick check
Quick check
![]() Your manager has just received a series of requirements for service password governance. She’s heard that you have the ability to configure managed accounts and requests that you work with your Active Directory team to allow them to create Active Directory managed accounts. Can you meet the requirements within your SharePoint farm, and should you use Active Directory managed accounts?
Your manager has just received a series of requirements for service password governance. She’s heard that you have the ability to configure managed accounts and requests that you work with your Active Directory team to allow them to create Active Directory managed accounts. Can you meet the requirements within your SharePoint farm, and should you use Active Directory managed accounts?
Quick check answer
![]() Active Directory managed accounts cannot be used with SharePoint 2016 farms. Managed accounts in SharePoint are controlled by SharePoint, but are capable of obeying Active Directory-issued password change requirements; as the password nears expiration, the account can be configured to automatically change its own password.
Active Directory managed accounts cannot be used with SharePoint 2016 farms. Managed accounts in SharePoint are controlled by SharePoint, but are capable of obeying Active Directory-issued password change requirements; as the password nears expiration, the account can be configured to automatically change its own password.
Plan and configure blocked file types
SharePoint 2016 enables an administrator to block certain file types from being uploaded into a SharePoint farm. In fact, there are several file extensions that are already disallowed on the Blocked File Types page of Central Administration.
Need More Review?
For the current list of file types blocked by default, review the TechNet article entitled “Manage blocked file types in SharePoint 2013” at https://technet.microsoft.com/library/cc262496(v=office.16).
There are several scenarios that might define a reason for a file type to be disallowed. For instance, if your organization has a media server that streams MP4 video files, you might want to prevent these files from being uploaded into SharePoint document libraries. Certain file types might also be disallowed just because they can contain malicious code (as an example, .exe files are disallowed by default).
Files are blocked by just examining the file extension to determine the type; if you were to change an extension from a forbidden to an acceptable type (from .mp3 to .txt, for instance), the file would be allowed to upload into SharePoint.
The configuration of blocked file types is done on a per-web app basis to accommodate design choices you make for representing data within your SharePoint farm. To add or remove a new blocked file type (Figure 2-23), go to the Security menu of Central Administration and then select Define Blocked File Types from within the General Security section.

On this page, you can do the following:
![]() Select an extension and delete its entry to unblock it.
Select an extension and delete its entry to unblock it.
![]() Add a new file extension in and it will be blocked. It is not required to add a new entry in alphabetical order, as it will be reordered automatically.
Add a new file extension in and it will be blocked. It is not required to add a new entry in alphabetical order, as it will be reordered automatically.
Exam Tip
Newly blocked file types will have no effect on existing files already stored within a SharePoint web application. For instance, if there are already .mp3 files present in a given web application, blocking this file type prevents only the addition of new .mp3 files to document libraries within the web application.
Plan and configure Web Part security
Although Web Part security is a topic that heavily affects SharePoint developers, SharePoint administrators should be familiar with the security protocols in place for Web Part development and implementation.
The SharePoint Web Part infrastructure is a direct extension of the ASP.NET Web Part infrastructure; therefore, security guidelines that apply to ASP.NET are applicable to SharePoint development as well, because SharePoint is built on top of ASP.NET.
Need More Review?
SharePoint Web Parts represent a significant portion of its functionality, enabling functional elements to be added to a SharePoint webpage by users without requiring any technical expertise. A development primer for learning SharePoint Web Part development can be found on the MSDN site at http://msdn.microsoft.com/library/ee231579.aspx.
Security for Web Part Pages is controlled from within Central Administration, Security, General Security. These settings directly control what abilities are given to users within that web application to configure, connect, and modify Web Parts (Figure 2-24).

Within the context of administration, SharePoint Web Part security can be configured in three ways:
![]() Connections between Web Parts can be allowed or disallowed.
Connections between Web Parts can be allowed or disallowed.
![]() Access to the Online Web Part Gallery can be allowed or disallowed.
Access to the Online Web Part Gallery can be allowed or disallowed.
![]() Web Parts that host JavaScript can be allowed or disallowed.
Web Parts that host JavaScript can be allowed or disallowed.
Exam Tip
Security for Web Part Pages is assigned on a per-web application basis. There are no exceptions to these settings in the affected web application, so work with your user base and consider carefully which are and are not needed before making any changes.
Web Part Connections
This selection just allows users (by default) to establish connections between Web Parts. Although this is an integral part of Web Parts, allowing users to do things like retrieve information in one Web Part and then use another Web Part to actively filter the content returned, this functionality might not be suitable for sites like a publishing portal, and so on. A page hosting significant numbers of these connections can have a diminishing effect on the performance of the site.
Online Web Part Gallery
This selection (allowed by default) is a legacy component carried over from earlier versions of SharePoint, and is provided for backward compatibility. The Online Web Part Gallery was a precursor to today’s SharePoint App Store; although primitive by comparison, it did have a series of useful Web Parts that were hosted by Microsoft.
Important
If you haven’t heard of a need for this gallery, or you aren’t upgrading a very old installation of SharePoint, you can safely disable this gallery. In fact, from a security and a performance standpoint, preventing access to this gallery is recommended.
Scriptable Web Parts
This selection (disabled by default) controls the ability of users to insert JavaScript into Web Parts. It is important to evaluate whether your users should be able to add JavaScript to a SharePoint site versus adopting a more formal development of those requirements. Altering this setting applies to all scriptable Web Parts in the pertinent web application.
Skill: Create and configure a User Profile service application (UPA)
The User Profile service application (UPA) is a collection of databases and functionality focused on individual users in a SharePoint 2016 installation. This functionality can be limited in scope to a single farm or made available to multiple SharePoint farms in the enterprise.
This service application is used to provide user profiles, profile synchronization with enterprise directory services, audiences, the My Site host and individual My Sites, and social notes and tagging.
This section covers how to:
![]() Plan and configure sync connections of MIM 2016 synchronization
Plan and configure sync connections of MIM 2016 synchronization
![]() Configure claims integration with UPA
Configure claims integration with UPA
Configure a UPA application
Configuring the UPA can be accomplished from either the Central Administration interface or Windows PowerShell cmdlets. Both configurations result in a series of three databases that are created along with the service application:
![]() Profile database Stores information about users, such as a profile picture, the organization the users belong to, and so on.
Profile database Stores information about users, such as a profile picture, the organization the users belong to, and so on.
![]() Social database Stores social tags and notes associated with individual users’ profile IDs.
Social database Stores social tags and notes associated with individual users’ profile IDs.
![]() Synchronization database Stores configuration and staging data for use when profile data is being synchronized with directory services such as Active Directory.
Synchronization database Stores configuration and staging data for use when profile data is being synchronized with directory services such as Active Directory.
Need More Review?
For a better understanding of the different databases used in SharePoint 2016, review the TechNet article entitled “Database types and descriptions in SharePoint Server 2016” at https://technet.microsoft.com/library/cc678868(v=office.16).aspx.
Configuring the UPA from Central Administration
Configuring the UPA from Central Administration will try to automatically associate the UPA with the default proxy group of the farm, and requires that you specify values for:
![]() Naming the UPA and specifying its Application Pool and Credentials.
Naming the UPA and specifying its Application Pool and Credentials.
![]() The Server, Name, Authentication Type, and Failover Server (mirroring only) for the Profile, Synchronization, and Social Tagging databases.
The Server, Name, Authentication Type, and Failover Server (mirroring only) for the Profile, Synchronization, and Social Tagging databases.
![]() The My Site Host URL and Managed Path.
The My Site Host URL and Managed Path.
![]() The Site Naming format, and whether or not to resolve naming conflict automatically.
The Site Naming format, and whether or not to resolve naming conflict automatically.
![]() The Default Proxy Group.
The Default Proxy Group.
![]() Yammer Integration (choosing whether to use Yammer or on-premises SharePoint social functionality for social collaboration).
Yammer Integration (choosing whether to use Yammer or on-premises SharePoint social functionality for social collaboration).
Configuring the UPA from Windows PowerShell
Configuring the UPA from Windows PowerShell requires the use of two Windows PowerShell cmdlets:
![]() New-SPProfileServiceApplication Enables you to specify the service application pool name and databases that you want to use for the new service application.
New-SPProfileServiceApplication Enables you to specify the service application pool name and databases that you want to use for the new service application.
![]() New-SPProfileServiceApplicationProxy Enables you to create a service application proxy or connection for use with the service application; this proxy is usually associated with the default proxy group.
New-SPProfileServiceApplicationProxy Enables you to create a service application proxy or connection for use with the service application; this proxy is usually associated with the default proxy group.
Exam Tip
Know how to specify a proxy group (including the default proxy group) in Windows PowerShell for a new service application.
Configure social permissions
As in previous versions, a fully configured installation of SharePoint 2016 automatically provides full use of the personal and social features to everyone in the organization. These features are broken into three major permissions sets that can be assigned to Active Directory groups:
![]() Create Personal Site (required for personal storage, newsfeed, and followed content)
Create Personal Site (required for personal storage, newsfeed, and followed content)
![]() Follow People and Edit Profile
Follow People and Edit Profile
![]() Use Tags and Notes
Use Tags and Notes
If you want to alter these permissions, you can do so by managing the UPA application itself from Services Applications in Central Administration (Figure 2-25).

Configure settings for hybrid OneDrive for Business
As your SharePoint 2016 environment moves into a hybrid configuration, one of the first things you might consider deploying to the cloud is OneDrive for Business. This technology can fully replace your on-premises My Site storage functionality, redirecting requests to your Office 365 tenant. If desired, you can also choose to only redirect a portion of your users to the cloud, by specifying an audience to which they will belong (Figure 2-26).
Configuration of these settings can be done either automatically or manually. Automatic configuration is done via the Hybrid Picker in SharePoint Online, and requires that the person running the picker be:
![]() A member of the Farm Administrators group
A member of the Farm Administrators group
![]() A Service Application Administrator (Full Control) for the UPA
A Service Application Administrator (Full Control) for the UPA
![]() Either an Office 365 Global Administrator or a SharePoint Online Administrator
Either an Office 365 Global Administrator or a SharePoint Online Administrator
![]() Logged in to both Office 365 and SharePoint Server from a server in the SharePoint farm
Logged in to both Office 365 and SharePoint Server from a server in the SharePoint farm
Important
It goes without saying that the automatic configuration requires that the SharePoint server have a direct connection to the Internet while this configuration is taking place. If this is not available, you will need to manually configure the hybrid OneDrive and Sites features.
Manual configuration of these features only requires that you be able to determine the URL of your My Sites URL in Office 365, determine if any audiencing is required, and select the appropriate hybrid features. To determine the appropriate My Sites URL, look for the site collection in your Office 365 configuration that looks like <domain>-mysharepoint.com.
Plan and configure sync connections of MIM 2016 synchronization
Two mechanisms exist for importing user profiles in SharePoint 2016: Active Directory Import and Microsoft Identity Manager (MIM) server integration. The configuration options for each vary in complexity, and provide different benefits based on your enterprise requirements for profile synchronization.
Active Directory Direct Import
Considered the lighter weight option for importing user profiles, the Active Directory Direct Import option (most often referred to simply as Active Directory Import) requires no configuration on the part of your Active Directory administrator. This operation is read-only and unidirectional in nature, pulling information from Active Directory and populating it in the SharePoint UPA application.
Active Directory Import, although not as complex or as powerful as MIM synchronization, does cause the import to be significantly faster, but at a cost:
![]() It imports with a single Active Directory forest only; multiforest configurations are not supported.
It imports with a single Active Directory forest only; multiforest configurations are not supported.
![]() It does not import user photos automatically.
It does not import user photos automatically.
![]() It supports nothing but Active Directory Lightweight Directory Access Protocol (LDAP).
It supports nothing but Active Directory Lightweight Directory Access Protocol (LDAP).
![]() The lack of bidirectional functionality precludes this option from being useful for adding metadata about users from SharePoint profiles to Active Directory (such as phone numbers, addresses, and so on).
The lack of bidirectional functionality precludes this option from being useful for adding metadata about users from SharePoint profiles to Active Directory (such as phone numbers, addresses, and so on).
Configuration Options
Active Directory Import is familiar to administrators who have configured and maintained profile imports in previous versions of SharePoint Server (except SharePoint Server 2010). An import can be configured from within the Synchronization, Configure Synchronization Connections menu of the User Profile service Application (Figure 2-27).

From this page, a new connection can be established with Active Directory, requiring the following information:
![]() Connection Name The friendly name for your Active Directory connection.
Connection Name The friendly name for your Active Directory connection.
![]() Type Active Directory Import (the only option for this configuration).
Type Active Directory Import (the only option for this configuration).
![]() Connection Settings Requires several different types of information, including:
Connection Settings Requires several different types of information, including:
![]() The Fully Qualified Domain Name (FQDN).
The Fully Qualified Domain Name (FQDN).
![]() Authentication Provider Type, either Windows Authentication, Forms Authentication, or Trusted Claims Provider Authentication.
Authentication Provider Type, either Windows Authentication, Forms Authentication, or Trusted Claims Provider Authentication.
![]() Authentication Provider Instance, used for Forms or Trusted Claims Provider Authentication only.
Authentication Provider Instance, used for Forms or Trusted Claims Provider Authentication only.
![]() The Account name and Password of the account that will retrieve the profile information.
The Account name and Password of the account that will retrieve the profile information.
![]() The TCP Port (defaults to 389, for LDAP).
The TCP Port (defaults to 389, for LDAP).
![]() Options including whether or not to use an SSL-secured connection, Filter out disabled users, and another option for Filtering in the LDAP syntax.
Options including whether or not to use an SSL-secured connection, Filter out disabled users, and another option for Filtering in the LDAP syntax.
![]() Containers Selecting Populate Containers allows the user to specify which container in Active Directory is to be synchronized in this connection.
Containers Selecting Populate Containers allows the user to specify which container in Active Directory is to be synchronized in this connection.
SharePoint Active Directory Import is heavily used in environments where writeback synchronization to Active Directory is not desired. Configuration efforts for this mechanism are fairly straightforward and are covered in the TechNet article “Configure profile synchronization by using SharePoint Active Directory Import in SharePoint Server 2013” at https://technet.microsoft.com/library/jj219646(v=office.16).aspx.
Microsoft Identity Manager
MIM 2016 replaces the functionality that had previously been offered by the SharePoint-integrated version of Forefront Identity Manager (FIM). This configuration requires the use of an external MIM server.
Two options exist for integrating MIM with SharePoint 2016: Convert from FIM or New MIM deployment:
Convert from FIM
Converting from a FIM installation in SharePoint 2013 as part of the upgrade to SharePoint Server 2016 requires two steps to implement: converting the Sync service XML files to a format usable by MIM, and importing the Sync service XML files by using the MIM Synchronization Service Manager. This process is full fidelity, allowing customizations to your sync configuration in FIM to work in MIM 2016, after the conversion has taken place.
To convert the Sync service XML files, use the following process:
![]() Export the server configuration from Miisclient.exe (your FIM management console in the SharePoint 2013 farm) and save this to a location that will be available to the MIM server.
Export the server configuration from Miisclient.exe (your FIM management console in the SharePoint 2013 farm) and save this to a location that will be available to the MIM server.
![]() Convert the exported file by using the ConvertTo-SharePointEcma2 PowerShell cmdlet on the MIM server.
Convert the exported file by using the ConvertTo-SharePointEcma2 PowerShell cmdlet on the MIM server.
![]() Open the Synchronization Service Manager by using the Start-SynchronizationServiceManager cmdlet on your MIM server.
Open the Synchronization Service Manager by using the Start-SynchronizationServiceManager cmdlet on your MIM server.
Importing the converted files
This is the easier of the two tasks. All that is required is to run the MIM Synchronization Service Manager (Miisclient.exe) and then click Import Server Configuration (Figure 2-28).

Connection information (usually just the password) will be required for each management agent used in the configuration of your MIM installation.
New MIM Deployment
As stated previously, MIM server is installed separately from your SharePoint Server 2016 farm, and can be used to support multiple SharePoint farm installations. Configuring a new deployment of MIM for your organization’s SharePoint infrastructure requires only two major steps: installing MIM itself, and installing the SharePoint Management Agent.
Need More Review?
Configuring MIM will likely be a joint effort among the SharePoint, SQL, and Active Directory Infrastructure teams. Multiple configuration options are available during the deployment process for MIM, meant for expanding this functionality beyond a single server. Detailed configuration for both upgrading and installing MIM server (specifically pertaining to SharePoint 2016) can be found in the UserProfile.MIMSync ReadMe file on GitHub at https://github.com/OfficeDev/PnP-Tools/tree/master/Solutions/UserProfile.MIMSync and in the TechNet article “Deploy a new Microsoft Identity Management (MIM) server for User Profile Sync in SharePoint 2016” at https://technet.microsoft.com/library/mt637055(v=office.16).aspx.
Configure profile properties
The UPA application functionality is highly extensible; everything from custom code to Business Connectivity Services (BCS) can be used to both input and output information from this component. As part of this extensibility, profile properties can be altered (and even added), providing much more detail about users in the enterprise.
Properties in a user profile
There are dozens of properties that describe each user in SharePoint 2016; information contained in these properties varies in scope from system-required fields (security identifier [SID], account, claims, and other pieces of information) to more user-friendly metadata about users, such as their names and phone numbers. A sample user profile is shown in Figure 2-29.
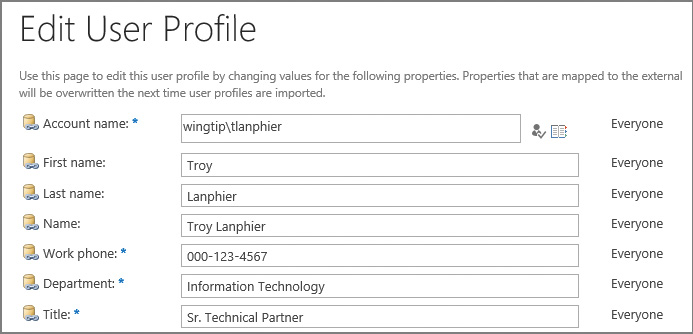
In this profile, you can see the following:
![]() Property fields (Name, Work Phone, Department, and so on)
Property fields (Name, Work Phone, Department, and so on)
![]() Active Directory mappings (indicated by the cylinder and link icon)
Active Directory mappings (indicated by the cylinder and link icon)
![]() Show To field (Everyone, for the fields shown)
Show To field (Everyone, for the fields shown)
This last field, Show To, chooses one of two social levels that can be allowed to view a field (Only Me, Everyone). The selection of a social level enables or disables the field to be shown to people in your organization, and also controls the feed events for that field (a setting of Only Me shuts it off, a setting of Everyone turns it on).
Configuring profile properties
By using the Edit User Profile Property menu item from within Manage User Properties, you can change several property settings for each profile item. Fortunately, because there are dozens of choices and dozens of profile properties, several of these values are already preconfigured OOB, or have been completed as a result of profile import (Figure 2-30).
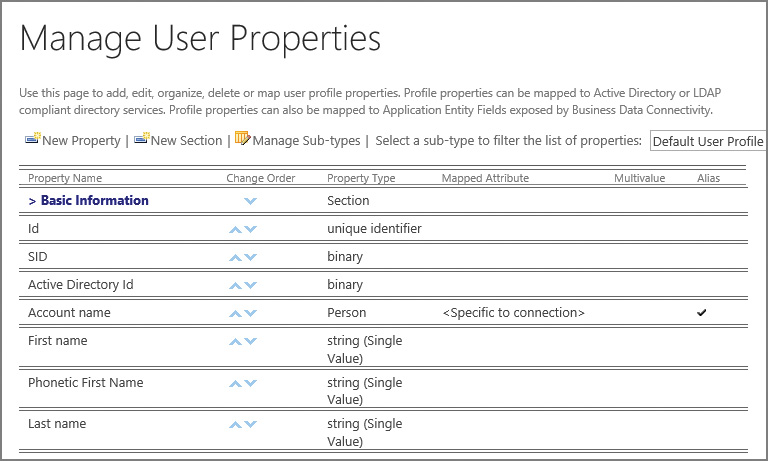
Profile properties are also able to be configured independently or for use with Active Directory. If there is a custom property in the Active Directory schema for your organization that makes sense to have in a user profile, then it’s fairly straightforward to include this as a custom property in SharePoint.
Profile properties are broken into sections:
![]() Basic Information (name, work phone, title)
Basic Information (name, work phone, title)
![]() Contact Information (work email, mobile phone, home phone)
Contact Information (work email, mobile phone, home phone)
![]() Details (past projects, skills, interests)
Details (past projects, skills, interests)
![]() Newsfeed Settings (email notifications, people I follow)
Newsfeed Settings (email notifications, people I follow)
![]() Language and Region (time zone, define your work week, and so on)
Language and Region (time zone, define your work week, and so on)
![]() Custom Properties (enables you to add new properties)
Custom Properties (enables you to add new properties)
To alter a profile property, just select Edit from its drop-down menu. Most often, the items you will interact with are the mapping to Active Directory and the Policy Setting, which determines whether a user can change the setting and what the default privacy setting is.
Important
All of these properties are (or can be) added to the index, and thus become searchable (and security trimmed) within SharePoint, enabling the enterprise to track specific information such as individual certifications, status, and so on about a staff member.
Configure claims integration with UPA
SharePoint farms are often implemented without any need for S2S authentication. Within a single farm, a user is claims authenticated, and these claims have no issues whatsoever being resolved to a specific SharePoint user.
When a SharePoint infrastructure extends beyond the scope of an initial farm, the question of user identity rehydration comes into play. S2S infrastructures allow two SharePoint farms to connect, whether on premises or in the cloud. With this in mind, we must consider how claims integration works in such an arrangement.
Let’s take two SharePoint farms as an example. A user is authenticated into the first farm but requires access to the other. The second SharePoint farm server has to accomplish two tasks to provide the resource:
![]() It has to be able to resolve the request to a specific SharePoint user.
It has to be able to resolve the request to a specific SharePoint user.
![]() It has to determine the set of role claims that are associated with the user (rehydrate the user’s identity).
It has to determine the set of role claims that are associated with the user (rehydrate the user’s identity).
SharePoint Server 2016 takes claims from the incoming security token and resolves this to a specific SharePoint user by using the UPA. To rehydrate the user’s identity, one of the following four key user attributes must be current in user profiles:
![]() The Windows Security Identifier (SID).
The Windows Security Identifier (SID).
![]() The Active Directory Domain Services (AD DS) user principal name (UPN).
The Active Directory Domain Services (AD DS) user principal name (UPN).
![]() The Simple Mail Transfer Protocol (SMTP) address.
The Simple Mail Transfer Protocol (SMTP) address.
![]() The Session Initiation Protocol (SIP) address.
The Session Initiation Protocol (SIP) address.
Important
SharePoint expects that only one matching entry will be found for a user in a query based on these attributes. If multiple results are returned, SharePoint will return an error stating that multiple user profiles were found.
Both user profile and relevant group memberships must be mapped for Windows Claims to work properly, as both are used to provide access to a resource.
Detailed information about claims authentication and user profiles can be found in the TechNet article entitled “Server-to-server authentication and user profiles in SharePoint 2016” at https://technet.microsoft.com/library/jj729797(v=office.16).aspx.
Skill: Manage site and site collection security
Securing a SharePoint installation can involve several different configuration levels. These levels vary in complexity from just granting or removing access to a single item to deciding what applications should be run on a web application or what content can be displayed within a site.
This section covers how to:
Manage site access requests
As new users are added to the business, site collection administrators are not always kept informed of who needs access to a site or site collection. Additionally, permissions are not always granted to the appropriate sites.
Most often, new users network with their peers to find out what components of the SharePoint environment are used for their work. When users visit a site to which they do not have permissions, they often see the message shown in Figure 2-31.

Although this message is concise and to the point, it is not of much value to the person who needs access to the site: no phone number, no IM, not even an email address to figure out just exactly who should be contacted to grant access to the site.
Fortunately, SharePoint administrators can make the user’s interaction with this site a bit more practical by enabling access requests for the site, resulting in the user being able to ask permission to access the site.
Enabling site access requests
The first thing that is required for site access requests to work is outgoing email; if this is not yet set up in your farm, you have to set it up before proceeding to configure site access requests.
After the outgoing email is configured, access requests can be configured in Site Settings, Site Permissions, Access Requests Settings (Figure 2-32).
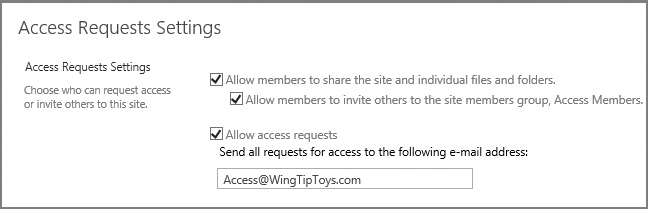
Exam Tip
Access requests are some of the few email interactions that are not sent directly to a site collection administrator (by default). These email messages are often sent to a group email box because you can choose only a single email address.
Managing site access requests
When a user visits the site now, the lack of permissions presents a different experience (see Figure 2-33).

An administrator visiting the permissions page for the site sees a pop-up warning (see Figure 2-34).

The admin can either click the link in the pop-up warning or select the Access Requests And Invitations link in Site Settings. The submitted access requests now show in the library and can be acted on (see Figure 2-35).

Manage app permissions
Apps from the SharePoint Store can be installed directly to your SharePoint farm. If you’ve ever installed an app to your phone or tablet device, you are familiar with this process:
1. Find an app that would be useful in your SharePoint environment.
2. Purchase (they are sometimes free), download, and install the app to your environment.
3. Note the permission levels the app is requesting; decide whether to trust the app to possess those permissions.
4. Use the app on your SharePoint site.
Exam Tip
Depending on the security considerations for your SharePoint farm, you might want to make the SharePoint Store available for users to view but review and approve any app before it is installed.
App permission requests
When an app is installed to your SharePoint farm, it requests one of four permission levels available in your farm (shown in Table 2-4).

App permission request scopes
An app permission request can be assigned at any of four possible scopes within your SharePoint farm:
![]() SPSite defines the app permission request scope as a SharePoint 2013 site collection (site).
SPSite defines the app permission request scope as a SharePoint 2013 site collection (site).
![]() SPWeb defines the app permission request scope as a SharePoint 2013 website (web).
SPWeb defines the app permission request scope as a SharePoint 2013 website (web).
![]() SPList defines the app permission request scope as a SharePoint 2013 list.
SPList defines the app permission request scope as a SharePoint 2013 list.
![]() Tenancy defines the app permission request scope as a tenancy.
Tenancy defines the app permission request scope as a tenancy.
These scopes are hierarchical in nature: If an app is assigned permissions at one level, all levels that inherit from the parent also provide the same permissions. For example, if an app is granted permission to the SPSite scope, it also has the same permissions at the SPWeb and SPList scopes.
Scope types are expressed as uniform resource identifiers (URIs); the first three URIs begin with the http://sharepoint/content string. This URI indicates that these permissions are assigned to a content database within a SharePoint farm.
Each scope appends its type to the end of the URI (except Tenancy):
![]() SPSite appends the /sitecollection/ string to the end of the URI (http://sharepoint/content/sitecollection/)
SPSite appends the /sitecollection/ string to the end of the URI (http://sharepoint/content/sitecollection/)
![]() SPWeb appends the /sitecollection/web string to the end of the URI (http://sharepoint/content/sitecollection/web)
SPWeb appends the /sitecollection/web string to the end of the URI (http://sharepoint/content/sitecollection/web)
![]() SPList appends the /sitecollection/web/list string to the end of the URI (http://sharepoint/content/sitecollection/web/list)
SPList appends the /sitecollection/web/list string to the end of the URI (http://sharepoint/content/sitecollection/web/list)
![]() Tenancy follows the URI structure (http://<sharepointserver>/<content>/<tenant>/)
Tenancy follows the URI structure (http://<sharepointserver>/<content>/<tenant>/)
App authorization policies
To use an app requires two distinct permission sets: user and app. Depending on the policy assigned to the app, a policy that designates one or both of these sets must be assigned to the app for it to access a content database.
There are three distinct authorization policies available:
![]() User and app policy requires that both the permissions of the user and app be evaluated before authorization is granted to the content database.
User and app policy requires that both the permissions of the user and app be evaluated before authorization is granted to the content database.
![]() App-only policy requires that only the permissions of the app be evaluated before authorization is granted to the content database. This setting is used when the app does not act on behalf of the user.
App-only policy requires that only the permissions of the app be evaluated before authorization is granted to the content database. This setting is used when the app does not act on behalf of the user.
![]() User-only policy requires that only the permissions of the user be evaluated before authorization is granted to the content database. This setting is used when users are accessing their own resources.
User-only policy requires that only the permissions of the user be evaluated before authorization is granted to the content database. This setting is used when users are accessing their own resources.
Manage anonymous access
Anonymous access is controlled at multiple levels within a SharePoint 2013 farm. As previously discussed, a web app must be configured in IIS to allow anonymous access before any site collections, sites, or content within the web application can be allowed to be accessed anonymously.
Enabling anonymous access at the web application level in SharePoint provides no access to any of the content within the web application; it merely allows users to pass through to the web app (anonymous isn’t truly authentication, per se, so it bypasses a prompt for user name and password). To actually access content contained within the web app, anonymous access needs to be added at the site collection, site, or list and library level.
Merely allowing anonymous access at the web application makes little difference to the content available within the web application. Be aware of how anonymous access is applied to each site or site collection and how to audit each web app. External search engines can be used for this task and quickly expose any security flaws you might have.
Manage permission inheritance
Permission inheritance is a means of simplifying the administration of permissions on a site collection, site, list, or individual item. Instead of having to designate permissions on each and every item, you can configure inheritance (enabled by default) within a site or site collection.
Breaking permissions inheritance
By default, sites inherit their permissions structure from the site collection in which they are contained, whereas lists and libraries inherit permissions from the site in which they are contained. More often than not, you will find yourself breaking permissions inheritance rather than enabling it.
1. To stop permissions inheritance, select Site Setting, Users And Permissions, and then click the Site Permissions link.
2. Before proceeding, have a look at the permissions—they do not change. When you stop inheriting permissions from the parent, a copy of the permissions is applied directly to the child site.
3. On the ribbon, note the Manage Parent icon, indicating that the permissions that apply to this child site are set at the parent level. Click the Stop Inheriting Permissions icon to break inheritance (see Figure 2-36).

4. A pop-up window appears, notifying you that you will soon be creating unique permissions for this site and its subsites. Click OK to proceed and set up groups.
5. The next page allows you to set up groups for this newly separated site, and offers you the chance to create new visitors (read privileges), members (change privileges), and owner (full privileges) groups for this site (Figure 2-37).
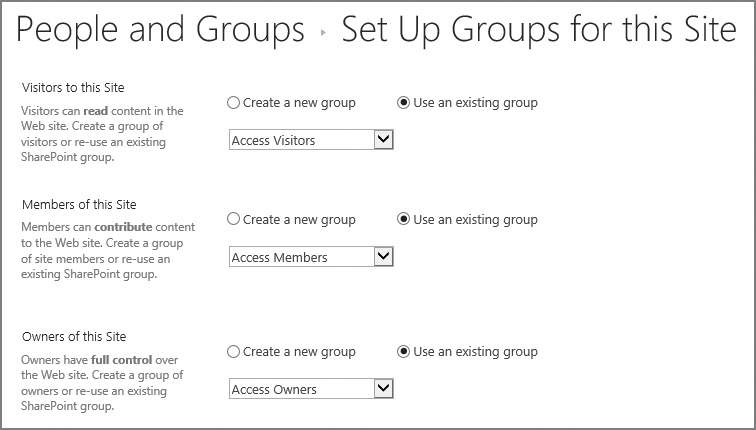
6. You can choose to either create a new group or use existing groups as provided within the site collection, but most often you will create new members and owners, leaving the parent’s visitors group (team site visitors) able to read the site.
Deleting unique permissions
At some point in the future, you might decide to reinherit permissions from the parent site. This is done by using the Delete Unique Permissions icon on the Permissions tab of the Site Permissions page.
Exam Tip
It is very important to note that the act of reinheriting permissions not only affects this site, but also affects all sites beneath this level that inherit permissions from this site. You might inadvertently expose content if you apply these changes incorrectly.
Permissions are reinherited from the Site Permissions link under Site Settings, Users And Permissions. Prior to reverting the permissions to the parent, it’s best to have a look at the permissions present (and potentially document them).
When you are ready to delete the unique permissions, select the Delete Unique Permissions icon (Figure 2-38).
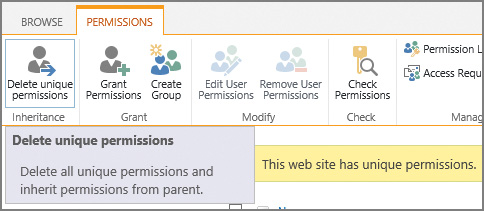
Important
If you created any specific groups as part of the “stop inheritance” process, these groups remain in the site collection until you delete them.
Configure permission levels
Earlier in this chapter, we discussed the inheritance of permissions and showed how these permissions related to groups within a SharePoint site (from a high level). This section takes the discussion step further, showing how each of these groups is assigned a permission level that, in turn, is assigned a group of more granular permissions.
Default permission levels within a SharePoint site aggregate a series of permissions within each site collection; these permission levels can then be assigned to an individual or group. There are several OOB permission levels, including those shown in Table 2-5.
Although these permission levels tend to cover most needs, SharePoint administrators are occasionally called on to alter existing permission levels or configure new permission levels within a site collection.
Although you can alter the OOB permission levels (with the exception of Full Control and Limited Access), doing so would not be wise until you understand the ramifications of such a change. For instance, you might decide that users holding the Contribute permission level should not be able to delete items (a fairly common request). Instead of altering the OOB Contribute permission level, consider building a similar permission level, perhaps called Contribute (No Delete), and assigning users to that permission level.
Adding a new permission level
It is a fairly common request to build a permission level similar, but not identical to, one of the OOB permission levels. In this example, we view and document the existing rights of the Contribute permission level, starting at the top of the site collection.
Begin by viewing the granular permissions present in the Contribute permission level:
1. In Site Settings, under Users And Permissions, click the Site Permissions link, then click the Permissions tab and click the Permission Levels icon and link (see Figure 2-39).

Important
If you do not see the Permission Levels icon, you are not at the top site in the site collection.
2. The Permission Levels page displays a series of permission levels. Click the Contribute link to view the individual permissions present.
3. The individual permissions that are present in each permission level are broken into three major groups:
![]() List Permissions Control a user’s interaction with lists and libraries on the site.
List Permissions Control a user’s interaction with lists and libraries on the site.
![]() Site Permissions Control a user’s interaction with the site.
Site Permissions Control a user’s interaction with the site.
![]() Personal Permissions Control a user’s personal view of lists and Web Part pages.
Personal Permissions Control a user’s personal view of lists and Web Part pages.
Obviously, it might take you a while to document each of these permissions by hand; fortunately, you won’t have to. Scrolling down to the bottom of the page and clicking Copy Permission Level allows you to copy this permission level.
In this example, we copy the Contribute permission, but remove the users’ ability to delete an item; appropriately enough, we call the new permission level Contribute (No Delete), as shown in Figure 2-40.

Removing the Delete capabilities present in the original permission level is now just a matter of clearing the Delete Items and Delete Versions permission check boxes (see Figure 2-41).
Scrolling to the bottom of the page and clicking Create will commit your changes. Your new permission level is now ready for use (see Figure 2-42).

Configure HTML field security
SharePoint 2016 enables you to embed inline frames (iframes) into SharePoint sites that represent external web content. Within Site Settings, as shown in Figure 2-43, you can choose one of three HTML field security levels:
![]() Do Not Permit Contributors To Insert Iframes From External Domains Into Pages On This Site (default)
Do Not Permit Contributors To Insert Iframes From External Domains Into Pages On This Site (default)
![]() Permit Contributors To Insert Iframes From Any External Domain Into Pages On This Site
Permit Contributors To Insert Iframes From Any External Domain Into Pages On This Site
![]() Permit Contributors To Insert Iframes From The Following List Of External Domains Into Pages On This Site (selected for this example)
Permit Contributors To Insert Iframes From The Following List Of External Domains Into Pages On This Site (selected for this example)
Exam Tip
It is possible (although not very likely) to cause a security breach by having an iframe represent content in a site that has been compromised. Choosing to limit your users to a particular subset of external domains is the best way to strike a balance between showing external content and showing none at all.
The last option enables you to determine the domains from which you allow iframes to be chosen. A sample listing of iframes is already chosen for you, including those from YouTube, Vimeo, and Microsoft. You can also add other domains of your choosing.
Skill: Provision and configure web applications
The web applications that support your SharePoint installation are the first component that your users encounter. An incorrectly configured web application can vary in experience from being entirely nonfunctional (misconfigured authentication mechanisms) to being functional but inconsistent (in the case of poorly configured alternate access mappings).
Configuring efforts at this level of the farm implementation form your first effort at maintaining effective security and governance mechanisms.
This section covers how to:
![]() Configure alternate access mappings
Configure alternate access mappings
![]() Configure SharePoint Designer settings
Configure SharePoint Designer settings
Create managed paths
As discussed in Chapter 1, managed paths are a mechanism that enables you to create a uniform navigational structure that relates multiple site collections together.
There are two distinct types of managed paths:
![]() Wildcard managed paths Enable one site collection to be the “implied” parent of several site collections by using a wildcard path value (for example, http://URL/path/Site1, http://URL/path/Site2).
Wildcard managed paths Enable one site collection to be the “implied” parent of several site collections by using a wildcard path value (for example, http://URL/path/Site1, http://URL/path/Site2).
![]() Explicit managed paths Enable one and only one site collection to be nested directly beneath another within a navigational structure (for example, http://URL/Site1).
Explicit managed paths Enable one and only one site collection to be nested directly beneath another within a navigational structure (for example, http://URL/Site1).
Exam Tip
There are a supported maximum number of managed paths per web application (20). Although it is possible to exceed this number, doing so places an extra processing load on the web-tier servers in your farm.
Managed path creation varies based on whether you will be using path-based site collections (PBSC) or host-header site collections (HHSC). Managed paths created for HHSC are defined at the farm level rather than at the web application level, and cannot be created or administered from Central Administration. They are also shared among all HHSCs in the farm; for example, adding /americas as a managed path on http://intranet.wingtiptoys.com/americas would also add it to http://backoffice.wingtiptoys.com/americas.
Creating a new managed path for a path-based site collection can be done via Central Administration; however, if you want to create a managed path within a host-header site collection, you will be doing so by using Windows PowerShell and the -HostHeader switch of the New-SPManagedPath cmdlet.
Creating managed paths (Central Administration)
Managed paths for path-based site collections (PBSCs) are defined on a per-web application basis and created from Central Administration in a few steps:
1. From the Application Management page, Manage Web Applications, select the web application for which you want to create a managed path. When the ribbon activates, click the Managed Paths icon.
2. The Defined Managed Paths page appears, showing all existing paths. In the Add A New Path section, specify the name of a new managed path (see Figure 2-44).

Important
Optionally, clicking the Check URL link allows you to ensure that there are no existing sites or site collections occupying the intended specified path. A new browser window appears; if the browser displays a Page Not Found error, the test is considered successful.
3. Finally, select whether the new link is to be a wildcard inclusion (selected in this example) or an explicit inclusion and then click Add Path.
Remove a PBSC managed path (Central Administration)
Removing a managed path from Central Administration is a fairly simple task, by using the same Define Managed Paths page on which managed paths are created.
Important
Before removing a managed path, ensure that the site collections nested within it or beneath it have either been moved to a new location or removed altogether.
1. From the Application Management page, Manage Web Applications, select the web application for which you want to create a managed path. When the ribbon activates, click the Managed Paths icon.
2. The Defined Managed Paths page appears, showing all existing paths. Select an existing managed path and click Delete Selected Paths (see Figure 2-45).
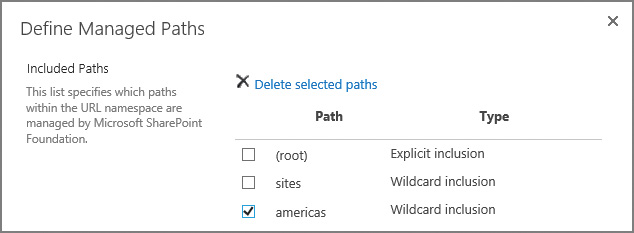
Important
When configuring managed paths via the interface, the Add Path button and the Delete Selected Paths link act in the same manner; that is to say, they have no confirmation action. After you have made your selection, that’s it: The change is made.
3. The Define Managed Paths page now shows the existing managed paths, with the americas managed path removed. Click OK to close the window.
Create a managed path (Windows PowerShell)
By using Windows PowerShell cmdlets, you can create new managed paths quickly. This Windows PowerShell path creation works for web applications that host both path-based and host-named site collections.
Creating the “americas” managed path in a PBSC web application only requires a couple of lines in PowerShell:
1. Start by assigning a variable for your web application by using the Get-SPWebApplication cmdlet:
$webApp = Get-SPWebApplication -identity http://intranet.wingtiptoys.com
2. Use the New-SPManagedPath cmdlet with the web application variable to build the managed path (note that if the -explicit switch is not specified, this cmdlet will build a wildcard inclusion):
New-SPManagedPath "americas" -WebApplication $webApp
Remembering that managed paths for an HHSC web application are defined at the farm level, we find that creating the “americas” managed path would be even easier, requiring only one line of PowerShell (no reference to a web application is required):
3. Use the New-SPManagedPath cmdlet without the web application variable, but with the -hostheader switch (note that if the -explicit switch is not specified, this cmdlet will build a wildcard inclusion).
New-SPManagedPath "americas" -HostHeader
Exam Tip
If the web application you are configuring creates PBSCs, don’t forget to specify the -WebApplication switch. If the web application you are configuring creates HHSCs, don’t forget to specify the -HostHeader switch.
Removing a managed path (Windows PowerShell)
By using Windows PowerShell cmdlets, you can also remove managed paths in two simple steps. This Windows PowerShell path removal works for web applications that host both path-based and host-header site collections.
To remove the “americas” managed path in a PBSC web application also requires a couple of lines in PowerShell:
1. Again, start by assigning a variable for your web application by using the Get-SPWebApplication cmdlet:
$webApp = Get-SPWebApplication -identity http://intranet.wingtiptoys.com
2. Use the Remove-SPManagedPath cmdlet with the web application variable to delete the managed path:
Remove-SPManagedPath -identity "americas" -WebApplication $webApp
Removal of the “americas” managed path on an HHSC web application requires only one line of PowerShell (no reference to a web application is required):
1. Use the Remove-SPManagedPath cmdlet without the web application variable, but with the -hostheader switch.
Remove-SPManagedPath "americas" -HostHeader
Managed path creation and removal is a fairly straightforward process, unchanged from SharePoint 2013. Refer to the TechNet articles “New-SPManagedPath” at https://technet.microsoft.com/library/ff607693.aspx and “Remove-SPManagedPath” at https://technet.microsoft.com/library/ff607707.aspx for information about the creation and deletion of managed paths in a SharePoint 2016 implementation.
![]() Quick check
Quick check
![]() You hire a new administrator and assign this admin a task to create a new managed path for a host header web application in your SharePoint farm environment. The admin does not have shell access to the farm. Can they complete the task?
You hire a new administrator and assign this admin a task to create a new managed path for a host header web application in your SharePoint farm environment. The admin does not have shell access to the farm. Can they complete the task?
Quick check answer
![]() Unfortunately, no. Admins must create managed paths for HHSCs via PowerShell; thus, the admin requires shell access to the farm before they can complete this task.
Unfortunately, no. Admins must create managed paths for HHSCs via PowerShell; thus, the admin requires shell access to the farm before they can complete this task.
Configure alternate access mappings
Alternate access mappings are deprecated in SharePoint 2016, as they are specifically geared toward path-based site collections (host-named site collections are recommended). Nonetheless, alternate access mappings are still present in SharePoint 2016 to provide backward compatibility, and they are also required to meet the needs of certain hardware-based load balancer and reverse proxy configurations.
Three major activities are involved in the configuration of alternate access mappings in SharePoint 2016:
![]() Editing public URLs
Editing public URLs
![]() Adding internal URLs
Adding internal URLs
![]() Mapping to external resources
Mapping to external resources
Internal and public URLs
Each alternate access mapping collection has an associated grouping of public URLs, which are associated with internal URLs. Internal URLs are the URL of the web request as it is received by SharePoint, which are then mapped to Public URLs. Public URLs are how SharePoint formats links corresponding to requests that match one of the internal URLs on that zone when returning a response. In other words, it’s the base URL that is used on the pages returned to a requesting user.
Although it is perfectly reasonable to point multiple URLs to the same website in IIS (and supported in SharePoint), it is important to remember that SharePoint has to figure out how to map URLs and so on to the incoming requests. If you receive error messages in Event Viewer and Unified Logging Service (ULS) logs about missing alternate access mapping references, note what the inbound URL is and correct the alternate access mapping settings.
External resource mappings
External resource mappings enable you to present non-SharePoint content utilizing the alternate access mapping functionality present in SharePoint 2016. This mapping is presented as an alternate access mapping collection at the same peer level as the other alternate access mapping collections within your SharePoint Server 2016 environment.
Need More Review?
Although alternate access mappings are deprecated, an understanding of how they function is often required to configure external load balancers. For a better understanding of alternate access mappings and SharePoint 2016, review the TechNet article entitled “Plan alternate access mappings for SharePoint 2013” at https://technet.microsoft.com/library/cc261814(v=office.16).aspx.
Configuring SharePoint Designer settings
SharePoint Designer 2013 is a client application that allows for the creation and modification of SharePoint sites, pages, and workflows within a SharePoint 2016 environment. This version of the tool will not be upgraded to a 2016 version, but is fully supported for use in SharePoint Online, SharePoint 2013, and SharePoint 2016 environments.
Exam Tip
Easily the most crucial configuration component for SharePoint Designer, the customization and unghosting of pages can account for performance losses over time. Be familiar with what it means to cause a page to revert to its template.
Administrative control of SharePoint Designer is controlled on a per-web application basis and enables four distinct configuration options:
![]() Allowing or preventing SharePoint Designer to be used in a given web application.
Allowing or preventing SharePoint Designer to be used in a given web application.
![]() Allowing or preventing Site Collection Administrators to detach or customize pages from the site template, which can result in performance loss.
Allowing or preventing Site Collection Administrators to detach or customize pages from the site template, which can result in performance loss.
![]() Allowing or preventing Site Collection Administrators to customize individual master and layout pages, a key requirement for customizing most SharePoint installations.
Allowing or preventing Site Collection Administrators to customize individual master and layout pages, a key requirement for customizing most SharePoint installations.
![]() Allowing or preventing Site Collection Administrators to inspect and modify the URL structure of their website.
Allowing or preventing Site Collection Administrators to inspect and modify the URL structure of their website.
Important
Each of these options is enabled by default in a newly created SharePoint web application.
Configuration changes for these four options are carried out by selecting Application Management, Manage Web Applications in Central Administration and then selecting the General Settings, SharePoint Designer menu item for an individual web application.
Summary
![]() Anonymous authentication isn’t technically authentication at all, but is an option for SharePoint web applications.
Anonymous authentication isn’t technically authentication at all, but is an option for SharePoint web applications.
![]() Connection encryption in SharePoint 2016 does not use SSL 3.0, instead preferring TLS 1.2.
Connection encryption in SharePoint 2016 does not use SSL 3.0, instead preferring TLS 1.2.
![]() Identity federation can use AD FS or Azure ACS.
Identity federation can use AD FS or Azure ACS.
![]() SharePoint 2016 uses the OAuth 2.0 protocol to establish server-to-server connections; this can happen over HTTPS (default) or HTTP.
SharePoint 2016 uses the OAuth 2.0 protocol to establish server-to-server connections; this can happen over HTTPS (default) or HTTP.
![]() Azure AD Connect has replaced DirSync, FIM+Azure AD Connector, and Azure AD Sync to implement hybrid cloud deployments.
Azure AD Connect has replaced DirSync, FIM+Azure AD Connector, and Azure AD Sync to implement hybrid cloud deployments.
![]() SMTP outgoing email has to be configured for access requests to work properly.
SMTP outgoing email has to be configured for access requests to work properly.
![]() Web application policies include user policy, anonymous policy, and permission policy.
Web application policies include user policy, anonymous policy, and permission policy.
![]() S2S trust relationships require a root certificate from the consuming farm, an STS certificate from the consuming farm, and a root certificate from the publishing farm.
S2S trust relationships require a root certificate from the consuming farm, an STS certificate from the consuming farm, and a root certificate from the publishing farm.
![]() Managed accounts can be configured to automatically follow a defined password policy, but are not the same as Active Directory managed accounts.
Managed accounts can be configured to automatically follow a defined password policy, but are not the same as Active Directory managed accounts.
![]() A User Profile service application has three databases: profile, social, and synchronization. It can be configured to do an Active Directory import only or be configured to integrate with MIM.
A User Profile service application has three databases: profile, social, and synchronization. It can be configured to do an Active Directory import only or be configured to integrate with MIM.
![]() Hybrid OneDrive for Business settings can be configured manually or via the use of the Hybrid Picker.
Hybrid OneDrive for Business settings can be configured manually or via the use of the Hybrid Picker.
![]() One of the following four attributes must be used for the user’s identity to rehydrate in a claims integration with UPA: the Windows Security Identifier (SID), the AD DS user principal name (UPN), the SMTP address, or the SIP address.
One of the following four attributes must be used for the user’s identity to rehydrate in a claims integration with UPA: the Windows Security Identifier (SID), the AD DS user principal name (UPN), the SMTP address, or the SIP address.
![]() App permissions levels include Read-Only, Write, Manage, and Full Control; app permission request scopes include SPSite, SPWeb, SPList, and Tenancy.
App permissions levels include Read-Only, Write, Manage, and Full Control; app permission request scopes include SPSite, SPWeb, SPList, and Tenancy.
![]() Managed paths for path-based site collections can be created via Central Administration or PowerShell, whereas managed paths for host-header site collections can only be created via PowerShell.
Managed paths for path-based site collections can be created via Central Administration or PowerShell, whereas managed paths for host-header site collections can only be created via PowerShell.
Thought experiment
In this thought experiment, demonstrate your skills and knowledge of the topics covered in this chapter. You can find answers to this thought experiment in the next section.
You are looking to extend your SharePoint farm installation to external users, and are evaluating the different authentication mechanisms for both partners and users who would authenticate by using Google and Windows Live.
Answer the following questions for your manager:
1. What sort of mechanisms could you use if you do not prefer any sort of cloud connection?
2. How might your organization federate with partner organizations?
3. What sort of changes might you need to make to allow trusted party authentication?
Thought experiment answer
1. Users could authenticate by using forms authentication, which would require you to configure an SQL database for the storage of credentials. You could also work with your Active Directory team to set up AD FS, giving external users the ability to log in to accounts that are maintained within your Active Directory infrastructure.
2. Your organization could use Azure AD to authenticate users, either by synchronizing accounts or by using SSO (AD FS). Partner organizations could establish federation through an AD FS trust or preferably could connect to the Azure AD with a trust.
3. Trusted party authentication would assume the use of Azure AD connected to a trusted authentication provider such as Google or Windows Live. You would likely need to add one or more fields to your Active Directory schema for claims authentication.