Chapter 5. Manage search capabilities
Search in SharePoint 2016 maintains its position as a key feature of a SharePoint deployment. The configuration of this feature varies in complexity and scale, and can be deployed on a single server, multiple servers, or even a separate search-centric farm.
Skills in this chapter:
![]() Skill: Create and configure enterprise search
Skill: Create and configure enterprise search
![]() Skill: Create and configure a managed metadata service application
Skill: Create and configure a managed metadata service application
![]() Skill: Plan and configure a search workload
Skill: Plan and configure a search workload
Skill: Create and configure enterprise search
At first glance, the setup and administration of enterprise search in SharePoint Server 2016 might seem quite familiar to those administrators upgrading from SharePoint Server 2013. PowerShell cmdlets used to configure the topology are the same (except those used for hybrid configuration), and there is no change from a database or component standpoint.
In this chapter, the changes present in the search feature of SharePoint 2016 will be discussed, and you will have a chance to become acquainted (or perhaps, reacquainted) with SharePoint Search from both a configuration and administrative standpoint.
This section covers how to:
![]() Plan and configure a Search topology
Plan and configure a Search topology
![]() Plan and configure content sources
Plan and configure content sources
![]() Plan and configure crawl schedules
Plan and configure crawl schedules
![]() Plan and configure crawl rules
Plan and configure crawl rules
![]() Plan and configure crawl performance
Plan and configure crawl performance
![]() Plan and configure security trimming
Plan and configure security trimming
![]() Choose and configure hybrid search
Choose and configure hybrid search
Plan and configure a Search topology
When planning a Search topology, one of the first items to be considered should be which topology was initially chosen for the SharePoint 2016 farm.
![]() Traditional topology A series of servers, generally distributed in three tiers: Web, App, and Data.
Traditional topology A series of servers, generally distributed in three tiers: Web, App, and Data.
![]() Streamlined topology A concept introduced with SharePoint 2013, this is specialized configuration for SharePoint servers, intended to optimize system resources and maximize performance to the end user.
Streamlined topology A concept introduced with SharePoint 2013, this is specialized configuration for SharePoint servers, intended to optimize system resources and maximize performance to the end user.
Understanding which of these two selections has been chosen for your SharePoint 2016 farm directly influences the topology actions that will be taken during the configuration process.
Search application components
The Search application components in SharePoint 2016 are identical to those found in SharePoint 2013. As was the case in SharePoint Server 2013, there are a total of six components present in a SharePoint Server 2016 Search application, the topology of which is created and administered via PowerShell:
![]() Crawl component This component performs crawls of the content sources you specify, retrieving both metadata and crawled properties. This information is then propagated to the content processing component.
Crawl component This component performs crawls of the content sources you specify, retrieving both metadata and crawled properties. This information is then propagated to the content processing component.
![]() Content processing component This component transforms the crawled items before sending them on to the index component. Crawled properties are mapped to managed properties by this component; other information is also provided to the analytics processing component.
Content processing component This component transforms the crawled items before sending them on to the index component. Crawled properties are mapped to managed properties by this component; other information is also provided to the analytics processing component.
![]() Analytics processing component This component has two major functions: analysis and reporting. It improves search relevance by analyzing the crawled items and how users interact with search results; it also creates search reports and recommendations.
Analytics processing component This component has two major functions: analysis and reporting. It improves search relevance by analyzing the crawled items and how users interact with search results; it also creates search reports and recommendations.
![]() Index component This component has two major functions. This component receives items from the content processing component before writing them to the search index; it also handles both incoming and outgoing queries from the query processing component, retrieving information and returning result sets, respectively, to and from the search index.
Index component This component has two major functions. This component receives items from the content processing component before writing them to the search index; it also handles both incoming and outgoing queries from the query processing component, retrieving information and returning result sets, respectively, to and from the search index.
![]() Query processing component This component analyzes queries before passing them to the index component for result set retrieval.
Query processing component This component analyzes queries before passing them to the index component for result set retrieval.
![]() Search administration component This component does not have an active role in handling incoming or outgoing search requests; it only runs system processes pertaining to Search and adds and initializes new search component instances.
Search administration component This component does not have an active role in handling incoming or outgoing search requests; it only runs system processes pertaining to Search and adds and initializes new search component instances.
Search application databases
From a database standpoint, SharePoint 2013 and SharePoint 2016 Search are also identical, requiring a total of four database types:
![]() Administration database This database stores all the Search service application settings; for example, the topology, rules, and mappings between crawled and managed properties.
Administration database This database stores all the Search service application settings; for example, the topology, rules, and mappings between crawled and managed properties.
![]() Crawl database This database stores tracking information and crawled items details, as well as crawl metrics (such as the last crawl time and ID).
Crawl database This database stores tracking information and crawled items details, as well as crawl metrics (such as the last crawl time and ID).
![]() Link database This database stores information about search clicks as well as information extracted by the content processing component; both types of information are analyzed by the analytics processing component.
Link database This database stores information about search clicks as well as information extracted by the content processing component; both types of information are analyzed by the analytics processing component.
![]() Analytics reporting database Reports are generated from the contents of this database, which include analysis statistics as well as the results of usage analysis.
Analytics reporting database Reports are generated from the contents of this database, which include analysis statistics as well as the results of usage analysis.
Search topology requirements gathering
SharePoint 2016 Search is capable of processing hundreds of millions of items within the context of a single SharePoint farm. It goes without saying that careful design of the initial topology is essential.
 Exam Tip
From a software boundaries and limits standpoint, the only real difference in search performance from SharePoint 2013 to SharePoint 2016 has to do with capacity. The maximum number of indexed items per partition has increased from 10 million in SharePoint 2013 to 20 million in SharePoint 2016. Both SharePoint versions allow 25 index partitions, thus the resulting maximum number of items available in search has also changed from 250 million in SharePoint 2013 to 500 million in SharePoint 2016. See https://technet.microsoft.com/library/cc262787(v=office.16).aspx for details.
Decision points for designing your SharePoint Search topology should include the following:
![]() Whether or not your SharePoint 2016 farm topology is to be MinRole compliant
Whether or not your SharePoint 2016 farm topology is to be MinRole compliant
![]() Resiliency requirements for your farm
Resiliency requirements for your farm
![]() Overall volume of content to be searched
Overall volume of content to be searched
![]() Client load on the farm, in terms of queries and page views per second
Client load on the farm, in terms of queries and page views per second
MinRole and Resiliency
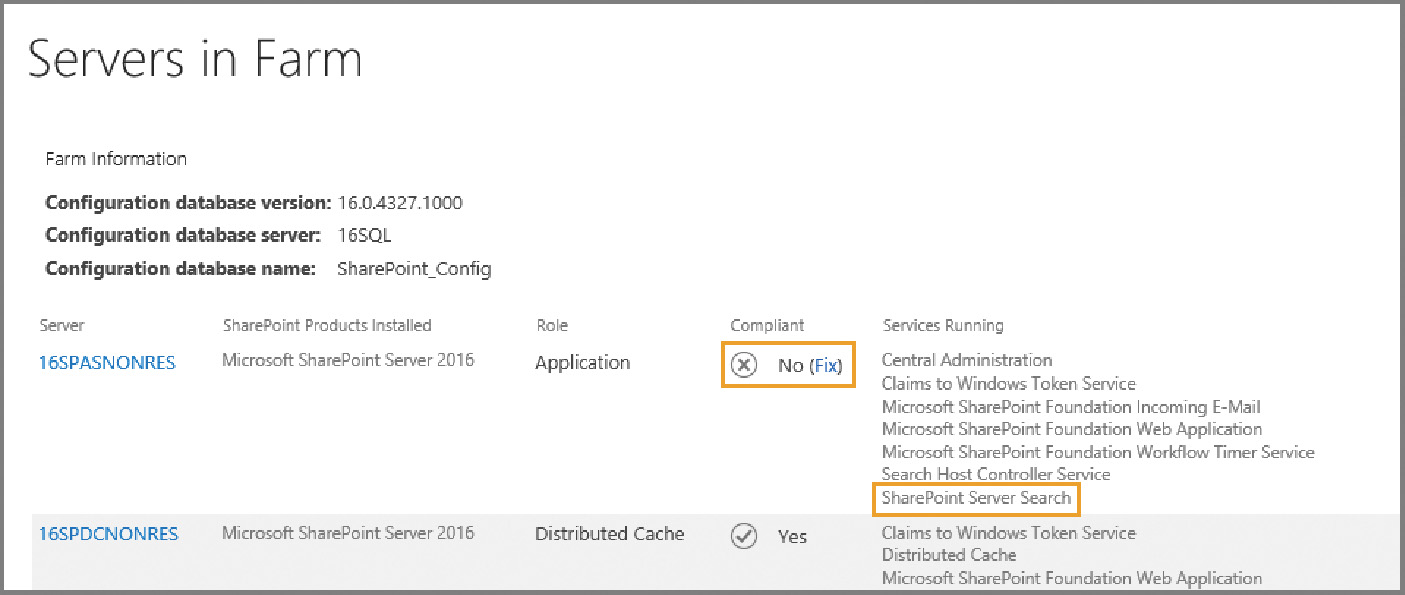
When discussing the business need for search resiliency within the farm, remember that a MinRole-compliant farm has no provision for allowing any Search component on the Application server, Distributed cache, or Front-end servers. Attempts to activate the Search service instance on one of these servers will result in MinRole noncompliance, as shown in Figure 5-1.
If the farm design will require search resiliency in a MinRole scenario, there are two available choices:
![]() Add additional servers in the Search role Having more than two servers hosting the Search role in a MinRole-compliant SharePoint farm meets the requirements for resiliency.
Add additional servers in the Search role Having more than two servers hosting the Search role in a MinRole-compliant SharePoint farm meets the requirements for resiliency.
![]() Provide search features via a dedicated Search farm In enterprise scenarios, the decision is often made to create a farm responsible solely for search requests. In such a configuration, all the servers in that farm host the Search role.
Provide search features via a dedicated Search farm In enterprise scenarios, the decision is often made to create a farm responsible solely for search requests. In such a configuration, all the servers in that farm host the Search role.
Exam Tip
From a MinRole standpoint, only the Front-end web, Application, and Distributed cache roles are required within a SharePoint farm. A Search role server is required only if the farm in question will be hosting Search.
Search corpus and client load
In a larger environment, you might choose to add servers to host the Search role, or instead build a dedicated Search farm. In either case, the way you design your Search topology might also depend on usage requirements for the farm. For instance, a farm that only faces the Internet might require that performance be focused on the query processing and index components as the content corpus (body of content) does not change drastically. An enterprise intranet site might have just the opposite requirement due to the turnover in content, requiring that performance be focused on the crawl and content processing components.
The sheer size of the content corpus (body of content) could be an issue: If you are in a larger environment with thousands of people generating information to be included in the search, you might need to consider the addition of a dedicated Search farm and alter the topology to make these servers focus the processing and delivery of search information.
Finally, client load (particularly on Internet-facing sites) could be an issue; if your SharePoint site hosts a large amount of content, you must deliver an outstanding search experience to provide your customers with the information they need. To do so, you might decide to break the index into multiple partitions and add servers that are specifically focused on providing query functionality.
Viewing the Search application topology
You can view the Search topology of a SharePoint Server 2016 Search application from Central Administration. This topology map shows not only the members of the farm that host Search, but also the search components that they host within the farm and which database servers and databases are used by Search.
Selecting the Search service application from within Central Administration and then choosing Manage allows you to review the Search topology (Figure 5-2).

The color and icon beneath each component indicates its status on each server in the farm:
![]() Green check A green check mark indicates that the search component is running correctly.
Green check A green check mark indicates that the search component is running correctly.
![]() Yellow triangle A yellow triangle indicates that the search component cannot perform all operations correctly.
Yellow triangle A yellow triangle indicates that the search component cannot perform all operations correctly.
![]() Red cross A red cross indicates that the search component is not running or that there are errors that prevent the component from running correctly.
Red cross A red cross indicates that the search component is not running or that there are errors that prevent the component from running correctly.
Exam Tip
If you need more detail on the status of Search in your farm, you should query the Search service application using the Get-SPEnterpriseSearchStatus cmdlet in Windows PowerShell.
Changing the Search topology
As was the case in SharePoint 2013, it is possible to review (but not alter) the Search topology of a SharePoint 2016 farm from within Central Administration. Changes in topology require the use of Windows PowerShell cmdlets for the Search service application.
If you have a single server hosting the Search role within your MinRole farm and choose to use the Farm Configuration Wizard (not the SharePoint 2016 Products Configuration Wizard), each search component will be deployed to only that server within the farm. This configuration is fine for an initial deployment, but does not address long-term growth or tuning needs.
Important
Unfortunately, initial deployments of more than one MinRole Search server in a farm provide no configuration advantage, if using the Farm Configuration Wizard to generate the Search topology. In such a case, the wizard will simply deploy all Search roles to a single Search server (probably not what you had in mind from a resiliency standpoint). If you need to expand the Search topology to more than a single server in the farm, you’ll have to use PowerShell and the search cmdlets.
At some point, you might encounter a requirement to change the Search topology in a SharePoint farm. Reasons for this change could include performance and scaling, or simply adding resiliency to the search layer of a MinRole farm.
There are two options for changing the Search topology of a farm:
![]() If you have a new farm or one that has an empty index, you can directly change the topology in Windows PowerShell.
If you have a new farm or one that has an empty index, you can directly change the topology in Windows PowerShell.
![]() If you have a farm with an existing index that you want to keep, you must do the following:
If you have a farm with an existing index that you want to keep, you must do the following:
![]() Clone the active Search topology.
Clone the active Search topology.
![]() Make changes to the cloned topology.
Make changes to the cloned topology.
![]() Make the clone the active Search topology for the farm.
Make the clone the active Search topology for the farm.
Exam Tip
Know the differences between changing an active Search topology (a topology with an index requires cloning) and a no-content Search topology (no cloning required).
Changing the search topology (empty index)
With a fresh installation, you have the opportunity to alter the topology without too much effort. To verify that your farm has an empty index, scroll up on the Search Administration page to the System Status section. Within this section, locate the Searchable Items section and verify that there are 0 searchable items (see Figure 5-3).

Need More Review?
Although you technically can choose to empty your index and then run these configuration steps, doing so will render Search unusable for your users until you have completed a full crawl of your content sources. To reset the index, simply click the Index Reset link on the Search Application page. For a better understanding of the items affected by an index reset (including the permanent loss of analytics information), review the TechNet article “Reset the search index in SharePoint Server 2013” at https://technet.microsoft.com/library/jj219652.aspx.
If you have a farm with an empty index, you can use the following steps to alter the topology of your farm.
1. Assign the host name of each server to a variable using the Get-SPEnterpriseSearchServiceInstance cmdlet (the example server name shown is wtsearch01):
$hostA = Get-SPEnterpriseSearchServiceInstance -Identity "wtsearch01"
Important
Note that this is not the fully qualified domain name (FQDN) of the server, but simply its NetBIOS (short) name.
2. If you are configuring your farm using a traditional topology (not MinRole-compliant), then you will need to start the search instance on each Search host server using the Start-SPEnterpriseSearchServiceInstance cmdlet. If not, skip to step 4:
Start-SPEnterpriseSearchServiceInstance -Identity $hostA
3. Verify the status of Search on each host using the Get-SPEnterpriseSearchServiceInstance cmdlet:
Get-SPEnterpriseSearchServiceInstance -Identity $hostA
You must wait until the Status line reads Online (not Provisioning) for each host before proceeding.
4. Create a new Search topology and set a reference using the Get-SPEnterpriseSearchServiceApplication and New-SPEnterpriseSearchTopology cmdlets, respectively:
$ssa = Get-SPEnterpriseSearchServiceApplication
$newTopology = New-SPEnterpriseSearchTopology -SearchApplication $ssa
Add the appropriate search components to the new topology using the appropriate cmdlets (you will be distributing them across multiple hosts, replacing $hostA with the appropriate server variable, as shown in Table 5-1).

Exam Tip
In a MinRole-compliant farm, the Search servers already have an activated Search service, thus there is no need to start the service or inspect it to ensure that it started. SharePoint 2016 will allow you to activate the Search service on a non-Search role server, but will indicate noncompliance in the Servers in Farm page of Central Administration.
Plan and configure content sources
A content source specifies settings that define what types of content to crawl, what start addresses are used, what priority the crawl has, and on what schedule the content is crawled.
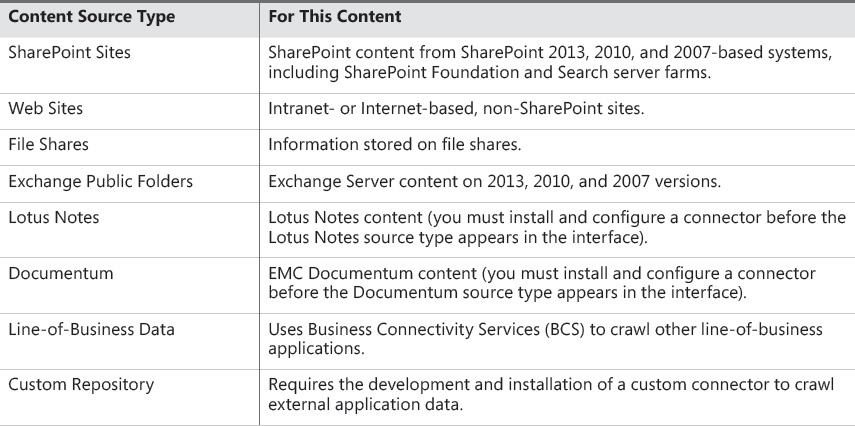
SharePoint 2016 enables content sources to be generated for any of eight possible content source types (see Table 5-2).
Exam Tip
Know which content sources are available for use in a default setting: SharePoint Sites, Web Sites, File Shares, Exchange Public Folders, and (conditionally) Line-of-Business Data. The Line-of-Business Data content source type requires that at least one Business Data Connectivity service application has been created.
Each content source type displayed in the Search service application uses an indexing connector when crawling content. The BCS Connector Framework handles connections to the Lotus Notes and Exchange Public Folder content source types; a standard series of protocol handlers handles connections to SharePoint Sites, Web Sites, and File Shares.
Need More Review?
The mechanism for creating custom connectors hasn’t changed since SharePoint 2010. For more information about creating a custom connector for use with SharePoint Server, see the MSDN article “Creating a Custom Indexing Connector” at https://msdn.microsoft.com/library/office/ff625806(v=office.16).aspx.
Plan and configure crawl schedules
Content sources are most often configured to be crawled by SharePoint Search on a frequent basis. The frequency with which they are crawled is set by the crawl schedule (see Figure 5-4).
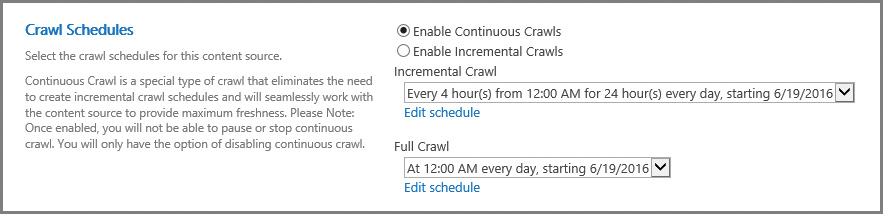
There are three types of crawls available in SharePoint Server 2016: full, incremental, and continuous.
Full crawl
In a full crawl, all the content within a particular content source is crawled and then processed into the index. Depending on the volume of content to be crawled, this crawl could take hours or days, so full crawls are almost always scheduled for nonbusiness hours or weekends.
A full crawl can be scheduled to run monthly, weekly, or daily at a given time of day. It is also possible (although not recommended) to run the full crawl multiple times within a given day. You can also stagger the schedule using the Run Every/On option to crawl every X number of days (Daily setting), by choosing the days of the week in which to run the crawl, or by selecting a particular day to run the crawl each month (Monthly setting).
There are several reasons for running a full crawl on a regular basis, including the following:
![]() Creating or re-creating the search index
Creating or re-creating the search index
![]() Correcting issues or corruption within the search index
Correcting issues or corruption within the search index
![]() Detecting security changes made on a file share
Detecting security changes made on a file share
![]() Capturing changes made by crawl rules (additions, deletions, modifications)
Capturing changes made by crawl rules (additions, deletions, modifications)
![]() Capturing new metadata mappings in Search
Capturing new metadata mappings in Search
![]() Capturing new server name mappings in Search
Capturing new server name mappings in Search
![]() Credential changes for the crawl account
Credential changes for the crawl account
![]() Software changes (hot fixes, cumulative updates, service packs) applied to the farm
Software changes (hot fixes, cumulative updates, service packs) applied to the farm
Exam Tip
If you ever need to reset the search index for your SharePoint farm, you have to do a full crawl of all content sources that should be included within the newly created index.
Incremental crawl
In an incremental crawl, changes made to the content within a particular content source are crawled and then processed into the index. An incremental crawl cannot be run alongside a full crawl; if a full crawl is taking an excessive amount of time to run, SharePoint waits to perform the next crawl until the first one completes.
An incremental crawl can be scheduled to run monthly, weekly, or daily at a given time of the day. Most often, an incremental crawl is scheduled a few times per day on every day of the week (again depending on the volume of content being crawled). The scheduling options for incremental crawls are identical to those of full crawls.
Important
As is the case with full crawls, no two incremental crawls can occur simultaneously. If a crawl is already running (whether full or incremental) and you schedule another to start before the first crawl completes, the new crawl is delayed.
Continuous crawl
First introduced in SharePoint 2013, continuous crawls provide a mechanism for quickly and regularly updating content in a SharePoint farm. In a continuous crawl scenario, the index is constantly updated with new content (on a timed basis) as the content is added to a SharePoint site.
Exam Tip
Continuous crawls are available for use only with content sources that are SharePoint sites.
Continuous crawls are unique among the crawl types, in that more than one can be running at a time. While a crawl of a content source is running (but in an incomplete state), the next scheduled crawl can begin on the same content source (thus the name continuous). By default, continuous crawls kick off every 15 minutes; there is no mechanism for scheduling these crawls in Central Administration.
PowerShell cmdlets exist that can be used to either shorten or lengthen the crawl interval. In the following example, the Local SharePoint Sites content source is set to crawl continuously, and then the crawl interval is reset to 1 minute:
$searchapp = Get-SPEnterpriseSearchServiceApplication "Search Service Application"
$contentsource = Get-SPEnterpriseSearchCrawlContentSource -SearchApplication $searchapp
-Identity "Local SharePoint Sites" $contentsource | Set-SPEnterpriseSearchCrawlContentSo
urce -EnableContinuousCrawls $true $searchapp.SetProperty("ContinuousCrawlInterval", 1)
Important
From a performance and scaling standpoint, continuous crawls can be demanding. Shortening the crawl interval allows more crawls to run at one time. Consider your service-level agreements with your business stakeholders prior to altering this value. Also, if you are in a MinRole farm and find that the Search role server is becoming overcommitted, consider adding another server in this role and then add it to the Search topology.
Plan and configure crawl rules
Crawl rules are used in conjunction with both content sources and search, but are applied to all content sources within the Search service application. These rules have three functions:
![]() Exclude content from being crawled.
Exclude content from being crawled.
![]() Crawl only a portion of content from a site that is otherwise excluded from crawls.
Crawl only a portion of content from a site that is otherwise excluded from crawls.
![]() Specify authentication credentials.
Specify authentication credentials.
Crawl rules are added on the Add Crawl Rule page within the Search service application (Figure 5-5).
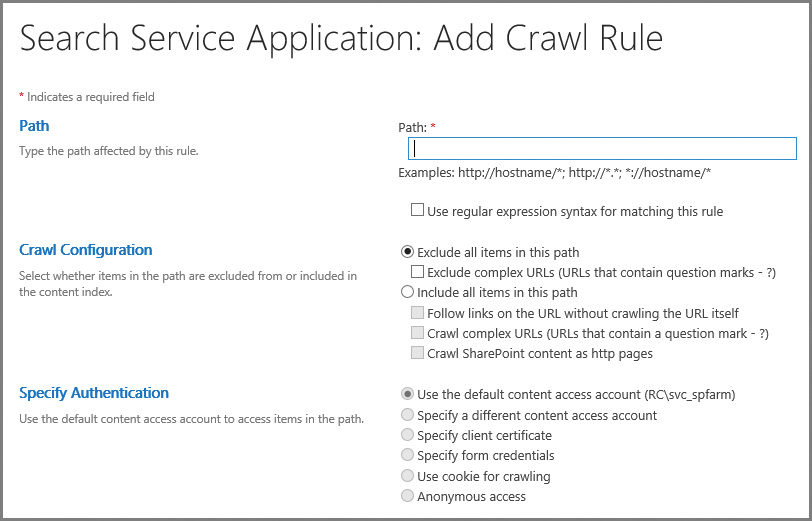
Each new crawl rule requires that three values be chosen: Path, Crawl Configuration, and Specify Authentication.
Path
This field captures the path that should be evaluated in this rule. The path should end with a final slash (front for a URL and back for a file share) and an asterisk (*), indicating a wildcard match.
The Use Regular Expression Syntax For Matching This Rule check box can be used to craft a regular expression that would omit potentially sensitive items such as credit card or Social Security numbers across an assortment of SharePoint sites.
Crawl configuration
While a crawl rule is being created, the author must choose whether it is intended to include or exclude content, using one of two possible selections:
![]() Exclude All Items In This Path If you choose to exclude a path, you can optionally choose to only exclude complex URLs.
Exclude All Items In This Path If you choose to exclude a path, you can optionally choose to only exclude complex URLs.
![]() Include All Items In This Path If you choose to include a path, you can optionally select the following check boxes:
Include All Items In This Path If you choose to include a path, you can optionally select the following check boxes:
![]() Crawl Complex URLs (URLs that contain a question mark - ?)
Crawl Complex URLs (URLs that contain a question mark - ?)
![]() Crawl SharePoint Content As HTTP Pages
Crawl SharePoint Content As HTTP Pages
Specify authentication
The authentication component of crawl rules is easily the most complex. There are six main options, each of which has a different configuration:
![]() Use The Default Content Access Account Choosing to use the default content access account requires no extra settings, and content will be crawled using the search crawl account specified in Central Administration.
Use The Default Content Access Account Choosing to use the default content access account requires no extra settings, and content will be crawled using the search crawl account specified in Central Administration.
![]() Specify A Different Content Access Account If you choose to specify a different content access account, you will be prompted for the account name and password. You can optionally choose to not allow basic authentication, which will prevent your password from being transmitted without encryption during the crawl.
Specify A Different Content Access Account If you choose to specify a different content access account, you will be prompted for the account name and password. You can optionally choose to not allow basic authentication, which will prevent your password from being transmitted without encryption during the crawl.
![]() Specify Client Certificate If you choose to specify a certificate, a drop-down list will appear with a list of available certificates.
Specify Client Certificate If you choose to specify a certificate, a drop-down list will appear with a list of available certificates.
![]() Specify Form Credentials If you choose to specify form credentials (Forms-based authentication on the site being crawled), you will need to specify the logon address and enter credentials (user name and password).
Specify Form Credentials If you choose to specify form credentials (Forms-based authentication on the site being crawled), you will need to specify the logon address and enter credentials (user name and password).
![]() Use Cookie For Crawling If you choose to use a cookie for crawling content, you can either obtain a cookie from a URL or specify one from your system.
Use Cookie For Crawling If you choose to use a cookie for crawling content, you can either obtain a cookie from a URL or specify one from your system.
![]() Anonymous Access If you choose to access the site anonymously, no extra settings are required. This rule crawls the content without attempting to authenticate.
Anonymous Access If you choose to access the site anonymously, no extra settings are required. This rule crawls the content without attempting to authenticate.
Rule evaluation order
Rules are evaluated on a per-URL basis; the first rule that a URL matches is the one that is evaluated—all others are ignored. This configuration simply means that care must be taken to order the rules optimally for the intended purpose.
Plan and configure crawl performance
At first glance, it would seem that optimizing crawls would have to do with enhancing the performance of Search within the SharePoint farm; although this is true, optimizing Search has just as much to do with the destination servers being crawled. Adjusting the timing, duration, and intensity of the crawl being performed allows for the optimal retrieval of content from any external source.
There are three configuration options for optimizing performance of the crawl component within SharePoint Server 2016:
![]() Determining how much crawl interaction the destination content sources can handle
Determining how much crawl interaction the destination content sources can handle
![]() Deciding how best to prepare and tune the servers that host the crawl component
Deciding how best to prepare and tune the servers that host the crawl component
![]() Understanding how to monitor the crawl component
Understanding how to monitor the crawl component
Content source performance and crawl impact rules
Crawl performance can be a sensitive subject, especially if the source being crawled itself is not within your control. Factors such as the location, domain membership, and the hardware and software resources available to the content source can affect the performance of a crawl.
Some of these sources might be located across a wide area network (WAN) segment; aggressively crawling these sources could cause diminished performance across the WAN segment, affecting the business.
Performance levels for content sources not located on the SharePoint farm can be negatively affected by a well-provisioned crawl component. If the SharePoint farm is crawling a content source so aggressively that it winds up diminishing performance on the content source, there is a very good chance that the crawl account will be temporarily (or perhaps permanently) disabled from accessing the content source.
Consider coordinating crawls with the administrator(s) of the “crawled” system for potential configuration changes like these:
![]() Time crawled What time of the day is considered “nonbusiness” but also does not interfere with regular processes such as backup jobs?
Time crawled What time of the day is considered “nonbusiness” but also does not interfere with regular processes such as backup jobs?
![]() Crawl duration How long will the crawl take?
Crawl duration How long will the crawl take?
![]() Items that are crawled Perhaps it is only important to crawl certain folders or sites, thus reducing the overall load on the content source and improving crawl metrics.
Items that are crawled Perhaps it is only important to crawl certain folders or sites, thus reducing the overall load on the content source and improving crawl metrics.
Adding a crawler impact rule
Included in Search Administration is a link called Crawler Impact Rule, which enables you to govern how many resources are requested from a site at any one time. Crawler impact rule fields include the following:
![]() Site The name of the site (not including the protocol).
Site The name of the site (not including the protocol).
![]() Request Frequency Indicates how the crawler will request documents from the site. From here you can choose to do either of the following:
Request Frequency Indicates how the crawler will request documents from the site. From here you can choose to do either of the following:
![]() Request up to the specified number of documents at a time and do not wait between requests (also specifying the number of simultaneous requests).
Request up to the specified number of documents at a time and do not wait between requests (also specifying the number of simultaneous requests).
![]() Request one document at a time and wait the specified time between requests (also specifying a time to wait in seconds).
Request one document at a time and wait the specified time between requests (also specifying a time to wait in seconds).
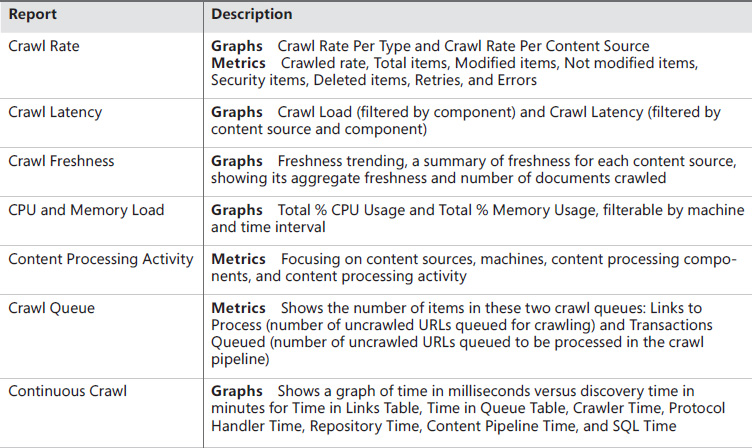
Monitoring crawl health reports
Crawl health reports are a series of graphical metrics that can be used to track the performance of the SharePoint Server 2016 crawl component at a granular level. These metrics are broken into seven report groupings, shown in Table 5-3.
Plan and configure security trimming
When viewed from a high level, Search in SharePoint 2016 follows a very basic process:
1. A content source is crawled (including the permissions applied) and then processed into an index.
2. A user issues a search query, which returns a result set.
3. The result set is security trimmed before being returned to the user.
If a user is granted permission to access an item, the item then appears in the result set. This does not mean that the information wasn’t there all along (the index certainly contained the data), but that it was simply “held back” from view at query time.
Content access accounts
SharePoint uses the notion of content access accounts when crawling content sources. These accounts are granted permission to access the appropriate content, which is then crawled, processed for content, and stored in the index.
Content access accounts should be ordinary Active Directory accounts; in fact, these accounts should specifically have no special privileges at all.
![]() They should not be the same account as that used for SharePoint setup or farm administration.
They should not be the same account as that used for SharePoint setup or farm administration.
![]() They should not be the same account as those that run any of the application pools or services.
They should not be the same account as those that run any of the application pools or services.
![]() They should not have local administrative access granted to any of the SharePoint or SQL member servers in the farm.
They should not have local administrative access granted to any of the SharePoint or SQL member servers in the farm.
The reason we should care about the status of these accounts is their effect on security trimming and the Publishing model. One of the most important components of SharePoint 2016, Publishing can be used for the life cycle of items contained within a SharePoint site:
1. An item is initially created and saved in draft mode.
2. After the document is deemed to be ready for publication by its creator, it is submitted.
3. If approvals are enabled, the item can be approved and then scheduled for publication.
4. After the item is approved, it can be published immediately or scheduled for publication at a later date.
Note
Items that are in draft mode, are not approved, or are not in a published state are unavailable in Search results.
Default content access account
Content is accessed via two types of content access accounts: default and specific. The default access account is used to access the content present in the SharePoint farm, whereas specific access accounts can be used to access content in a particular content source.
The default content access account is used to access most of the content in the SharePoint installation. If you want, this account can also be assigned Read permissions to other content sources; items crawled within these sources are also security trimmed as queries are issued by users. This account is shown (and can be assigned) in the System Status section of the Search Administration page.
Changing the default content access account is a very basic process:
1. Click the content access account name (in this case, RCsp_svcfarm).
2. Type a new user name and password (you have to type the password twice).
3. Click OK.
After this account is designated as being the default content access account, it is assigned Read permissions on all published content in a SharePoint farm on each web application in the farm.
Although the content access account has Full Read permissions to the web application, this permission level has no rights to any unpublished content in the farm.
Specific content access accounts
There could be several reasons a specific access account should be required for a content source. Content sources range from file shares, to web sites, and everything in between.
If these sources are not under your control, you can be issued credentials to access these sources for crawling. The content source denotes what type of content is to be crawled, but does not assign specific access account permissions.
Exam Tip
Specific content access accounts are assigned as part of crawl rules within the Specify Authentication section.
Choose and configure hybrid search
SharePoint 2013 and SharePoint 2016 both have the ability to configure cloud hybrid search between on-premises and Office 365 installations. In such a configuration, on-premises content is crawled and parsed on premises, then processed and indexed in Office 365. From a user standpoint, search results from both on premises and Office 365 are then presented in a single result set.
Important
In a SharePoint 2013 environment, cloud hybrid search directly replaces the older, federated search (August 2015 Public Update required). Cloud hybrid search is always used when configuring a search relationship between SharePoint 2016 and Office 365.
From a technical standpoint, cloud hybrid search removes technical obstacles present in the older federated search model, as neither a reverse proxy configuration nor a public Secure Sockets Layer (SSL) certificate is required for configuring cloud hybrid search. Cloud hybrid search also introduces a side benefit, namely the idea that the search index is no longer maintained on premises, but is instead stored in Office 365. Parsed content transferred from on premises to the cloud index is encrypted while in transit between the environments.
The configuration of a cloud Search service application involves a series of configuration actions. If you’ve already configured a hybrid relationship with your SharePoint farm, for OneDrive or Sites, you might have already completed some of these actions.
Preparing for cloud hybrid search
Before deploying cloud hybrid search, consideration should be given to preconfiguring the on-premises SharePoint environment, creating the necessary account information, downloading the necessary PowerShell scripts, and creating and reviewing a search architecture plan.
Reviewing the on-premises SharePoint Search environment
When an on-premises search is reconfigured as a hybrid Search service application, there is a fundamental change in both the Search server components and database server search databases.
![]() Search servers Normally, Search servers can host one of six possible search components: crawl, admin, query processing, index, analytics, and content processing. When the farm is configured for cloud hybrid search, the index, analytics, and content processing components still remain on the Search server but are inactive.
Search servers Normally, Search servers can host one of six possible search components: crawl, admin, query processing, index, analytics, and content processing. When the farm is configured for cloud hybrid search, the index, analytics, and content processing components still remain on the Search server but are inactive.
![]() Database servers Servers hosting the search databases usually have four databases in use: Search admin, Crawl, Link, and Analytics. In a cloud hybrid search configuration, the Link and Analytics databases are rendered inactive, although they must still exist on the database server.
Database servers Servers hosting the search databases usually have four databases in use: Search admin, Crawl, Link, and Analytics. In a cloud hybrid search configuration, the Link and Analytics databases are rendered inactive, although they must still exist on the database server.
Creating the necessary accounts
The accounts required for configuring cloud hybrid search are those used for all SharePoint hybrid configuration and testing. Specifically required are a search account for cloud hybrid search in SharePoint Server 2016, and a managed account for default content access in SharePoint Server.
![]() Global Administrator (Office 365 and Azure AD) Use an Office 365 work account that has been assigned to the Global Administrator role for Office 365 configuration tasks such as configuring SharePoint Online features, running Azure AD and SharePoint Online Windows PowerShell commands, and testing SharePoint Online.
Global Administrator (Office 365 and Azure AD) Use an Office 365 work account that has been assigned to the Global Administrator role for Office 365 configuration tasks such as configuring SharePoint Online features, running Azure AD and SharePoint Online Windows PowerShell commands, and testing SharePoint Online.
![]() Active Directory Domain Administrator (On-premises Active Directory) Use an Active Directory account in the Domain Admins group to configure and test Active Directory, Active Directory Federation Services (AD FS), Domain Name System (DNS), and certificates, and to do other tasks that require elevation.
Active Directory Domain Administrator (On-premises Active Directory) Use an Active Directory account in the Domain Admins group to configure and test Active Directory, Active Directory Federation Services (AD FS), Domain Name System (DNS), and certificates, and to do other tasks that require elevation.
![]() SharePoint Farm Administrator (On-premises Active Directory) Use an Active Directory account in the Farm Administrators SharePoint group for SharePoint Server configuration tasks.
SharePoint Farm Administrator (On-premises Active Directory) Use an Active Directory account in the Farm Administrators SharePoint group for SharePoint Server configuration tasks.
![]() Federated Users (On-premises Active Directory) Use Active Directory accounts that have been synchronized with Office 365 to test access to specific resources in both SharePoint Server and SharePoint Online.
Federated Users (On-premises Active Directory) Use Active Directory accounts that have been synchronized with Office 365 to test access to specific resources in both SharePoint Server and SharePoint Online.
Need More Review?
Accounts used with a hybrid configuration are detailed in the TechNet article “Accounts needed for hybrid configuration and testing” at https://technet.microsoft.com/library/dn607319(v=office.16).aspx.
Downloading the necessary PowerShell scripts
Microsoft makes the configuration of cloud hybrid search a bit easier by providing the CreateCloudSSA.ps1 and Onboard-CloudHybridSearch.ps1 PowerShell scripts, which should be downloaded in advance of deploying cloud hybrid search.
Although an in-depth understanding of these scripts is probably not required, it would be a good idea to be able to name the correct PowerShell scripts used when configuring cloud hybrid search. These scripts can be downloaded from the Microsoft Download Center at https://www.microsoft.com/download/details.aspx?id=51490.
Creating and reviewing a search architecture plan
Search architecture planning can be a fairly complex subject, as a search implementation might simply encompass a single server, might involve multiple servers, and might involve an entirely separate Search farm; cloud hybrid search can be added to any of these configurations.
Need More Review?
To gain an understanding of the depth and breadth of Search architecture planning, visit the Office article entitled “Plan cloud hybrid search for SharePoint” at https://support.office.com/article/33926857-302c-424f-ba78-03286cf5ac30#Plan_search_architecture.
Configuring cloud hybrid search
Now that the preliminary items have been reviewed and completed, the configuration work can begin. Configuration steps for cloud hybrid search might include some that have already been configured (if you’ve previously configured hybrid OneDrive for Business or Hybrid Sites). Steps for this configuration (including some optional ones) are shown here.
1. Configure Office 365 for SharePoint hybrid Configure your Office 365 tenant for a hybrid environment, including registering your domain, configuring User Principal Name (UPN) suffixes, and synchronizing your user accounts.
2. Create a cloud Search service application in SharePoint on premises Use the CreateCloudSSA.ps1 PowerShell script to create the cloud Search service application on the search farm that’s running SharePoint Server 2016.
3. (Optional) Alter the default Search architecture in SharePoint 2016 for cloud hybrid search If you planned a Search architecture that’s different from the default one, set up the planned Search architecture.
4. Connect your cloud Search service application to your Office 365 tenant Use the Onboard-CloudHybridSearch.ps1 PowerShell script to onboard your cloud Search service application and Office 365 tenant to cloud hybrid search. The script sets up the cloud Search service application to interact with the Office 365 tenant and also sets up server-to-server authentication.
5. Create a test content source to crawl for cloud hybrid search Add a small file share first for testing the crawl, as you can add more on-premises content later.
6. (Optional) Set up a separate Search Center to validate hybrid search results in Office 365 This recommended configuration allows you to validate and tune a new search experience in a separate Search Center, while keeping the original search experience entirely unchanged.
7. Start a full crawl of on-premises content for cloud hybrid search When the crawl completes, your on-premises content shows up in the search results in your validation Search Center in Office 365 and in Office Delve.
8. Verify that cloud hybrid search works Go to your Search Center in SharePoint Online in Office 365 and enter this query: IsExternalContent:true. The results you get should show content from the on-premises content source that you’ve crawled.
9. Tune cloud hybrid search Set up and tune the search experiences you’ve planned for your users.
10. Remove the validation Search Center and expose all users to hybrid search results Set your Search Center and any site search in Office 365 to use the default result source and set up the default result source with the search experiences that you’ve tuned. Your on-premises content shows up in the search results in your Search Center in Office 365, site search in Office 365, and in Office Delve.
Need More Review?
These steps are covered in great detail within the TechNet roadmap entitled “Configure cloud hybrid search - roadmap” at https://technet.microsoft.com/library/dn720906(v=office.16).aspx and the free Microsoft Press eBook entitled Configuring Microsoft SharePoint Hybrid Capabilities, which can be downloaded at https://blogs.msdn.microsoft.com/microsoft_press/2016/07/06/free-ebook-configuring-microsoft-sharepoint-hybrid-capabilities/. Having a solid understanding of this roadmap, along with those for hybrid OneDrive and Hybrid Sites, is essential for administering hybrid configurations in SharePoint 2016.
Skill: Create and configure a managed metadata service (MMS) application
The managed metadata service (MMS) within a SharePoint farm provides a way to define taxonomical structures that can be carried out through the entire farm. These structures include term sets, which can be used for assigning metadata to lists and documents and controlling navigation, and content type hubs, which can be used to centralize and standardize the deployment of specific content types within your enterprise.
This section covers how to:
![]() Configure proxy settings for managed service applications
Configure proxy settings for managed service applications
![]() Configure content type hub settings
Configure content type hub settings
![]() Plan and configure content type propagation schedules
Plan and configure content type propagation schedules
![]() Configure term store permissions
Configure term store permissions
Configure proxy settings for managed service applications
Most service applications present in a SharePoint 2016 farm are attached to a corresponding proxy. Using this proxy, a relationship can be established between a service application and a web application; this relationship is most often referred to as a service connection.
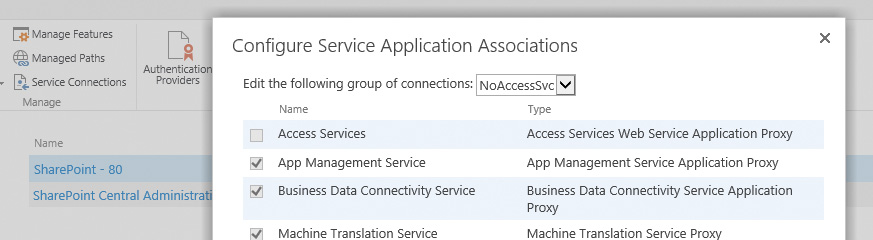
Consider a larger enterprise installation that wishes to prevent the availability of a particular service application (for example, Access Services) to a specific web application.
From a functional point of view, this effort requires three steps:
1. Create a new proxy group.
2. Associate all service application proxies to this group, except Access Services and Access Services 2010.
3. Associate the web application to the newly created proxy group.
Creating a new proxy group
A proxy group is a mechanism that defines the relationship between a web application and multiple service application proxies. These proxies enable the web applications associated with the proxy group to consume services (MMS, User Profile service application [UPA], and so on) from the associated service applications.
Exam Tip
There is no mechanism in Central Administration for creating a proxy group. Proxy groups are created using PowerShell via the New-SPServiceApplicationProxyGroup cmdlet.
To create a service application proxy group, you would then issue the following PowerShell commands, first creating and then verifying the existence of a new proxy group, as shown in Figure 5-6.

Associating proxies to a proxy group
Associating a service application proxy with a proxy group in Windows PowerShell requires only a few lines of code. Although it might seem like a lot of typing, it would be very easy to build several of these associations into a Windows PowerShell script.
Exam Tip
A service application proxy can be associated with multiple proxy groups using Windows PowerShell. Also, a proxy group is not required to host each and every available service application available within the farm.
Two PowerShell cmdlets are required to associate a proxy with a proxy group. First, the service application proxy is assigned to a variable representing the proxy group member using the Get-SPServiceApplicationProxy cmdlet, and then the variable is assigned to the proxy group via the use of the Add-SPServiceApplicationProxyGroupMember cmdlet, as shown in Figure 5-7.

Important
Removing a proxy from a proxy group is done using the same steps as when adding a proxy, except that Add-SPServiceApplicationProxyGroupMember is replaced by Remove-SPServiceApplicationProxyGroupMember. Removing a service application proxy from a proxy group immediately removes that service’s functionality from all associated web applications.
Assigning proxy groups to web applications
Once the proxy and proxy group have been created and assigned, assigning the proxy group to a web application can be done from within Central Administration by selecting a web application and then selecting Service Connections. Doing so grants the web application the functionality provided by the associated service applications, as shown in Figure 5-8.
Configure content type hub settings
A content type hub is a site collection that has been specified to provide content types, contained in a centralized or authoritative location, to other site collections. Content types must be configured for publication on an individual basis.
Exam Tip
When a content type is published from the hub to a site collection, the published copy of the content type is considered to be “sealed,” meaning that it cannot be modified. All modifications to this content type must occur within the context of the content type hub.
Publishing a newly created content type
The publication of content types stored in the hub is fully configurable from within the content type hub.
1. On the Content Type Hub page, select Site Settings (gear icon).
2. In the Web Designer Galleries section, select Site Content Types.
3. Select the link for your content type.
4. Select Manage Publishing For This Content Type.
5. The Content Type Publishing page opens (see Figure 5-9).

6. Choose from the following:
![]() Unpublish makes the content type unavailable; it also “unseals” each local copy of the content type.
Unpublish makes the content type unavailable; it also “unseals” each local copy of the content type.
![]() Republish publishes the newly updated changes to your content type.
Republish publishes the newly updated changes to your content type.
7. Click OK to close this dialog box.
Important
Proceed with caution when you choose to unpublish a content type altogether. The act of unsealing the content type causes the content type in each site collection to become its own freestanding entity. All changes made from that point on will be made within each distinct site collection.
Configure sharing term sets
A particular web application should have a default MMS application (known as the primary) that enables users to enter and use keywords; this connection also provides the content hub that is used for the web application.
Editing the Managed Metadata Service Connection
The sharing of term sets is configured from the Edit Managed Metadata Service Connection page, found within the Manage menu of the Managed Metadata Service Connection (see Figure 5-10).

The first two check boxes are the focus here; they determine the configuration of the MMS from a keyword or term set standpoint:
![]() Selecting the first check box (default keyword storage location) enables users to store new keywords into this term store.
Selecting the first check box (default keyword storage location) enables users to store new keywords into this term store.
![]() Selecting the second check box (default term set location) enables site admins to create new term sets.
Selecting the second check box (default term set location) enables site admins to create new term sets.
Web applications are often associated with more than one MMS application; they can be used to create separate content type hubs. If you elect to have multiple MMS connections provided to a web application, leave these first two check boxes cleared on all but the primary connection.
Exam Tip
Do not make more than one connection the default keyword storage location for any one web app. Also, do not make more than one connection the default term set location for any one web application.
Plan and configure content type propagation schedules
There are two types of timer jobs that control the flow and function of the content type hub:
![]() Content Type Hub This is a singular job that controls the content type log maintenance and manages unpublished content types.
Content Type Hub This is a singular job that controls the content type log maintenance and manages unpublished content types.
![]() Content Type Subscriber If there are several web applications that are connected or proxied to the MMS, each is assigned a Content Type Subscriber job. This job retrieves content type packages from the hub and applies them to a local content type gallery.
Content Type Subscriber If there are several web applications that are connected or proxied to the MMS, each is assigned a Content Type Subscriber job. This job retrieves content type packages from the hub and applies them to a local content type gallery.
Configuring the propagation schedule
The propagation of content types is controlled on a per-web application basis by the Content Type Subscriber timer job. To configure the propagation of a content type, follow these steps:
1. Open Central Administration and then select Monitoring.
2. On the Monitoring page, in the Timer Jobs section, select Review Job Definitions.
3. On the Job Definitions page, scroll down and select the Content Type Subscriber job for the intended web application.
4. Alter the Recurring Schedule settings for your job (see Figure 5-11).

Important
The randomness of the time window for timer jobs is by design and enables each SharePoint server in the farm to process the job within a certain window of time. This randomness is beneficial in that the farm can better balance the load caused by its timer jobs.
5. At the bottom of this page, you can choose one of the following options:
![]() Run Now starts the propagation cycle immediately.
Run Now starts the propagation cycle immediately.
![]() Disable disables the job (not recommended).
Disable disables the job (not recommended).
![]() OK accepts the changes you made to the propagation schedule.
OK accepts the changes you made to the propagation schedule.
![]() Cancel discards all the changes made to the propagation schedule.
Cancel discards all the changes made to the propagation schedule.
Configure custom properties
Custom properties can be added to an individual term or to a term set from within the Term Store Management Tool. These properties are useful for defining more advanced term attributes, which can then be used to develop custom code solutions for displaying and sorting terms and term sets within a SharePoint 2016 installation. These properties can also be used in conjunction with the Term Property Web Part.
There are two distinct property types: shared and local. Local properties are available only for a particular term in a term set, whereas shared properties are useful on all reused or pinned instances of the term anywhere within the term store.
Adding a new custom property
To add a new custom property to a term or term store, follow these steps:
1. Open the Term Store Management Tool for your MMS application.
2. Expand a Term Set Group.
4. Select the Custom Properties tab.
5. Add a new Shared Property Name and Value.
6. If you are adding a custom property for a term, you can instead choose to use a Local Property Name and Value.
7. Select Add to complete the addition and then click Save.
Configure term store permissions
Term store permissions operate in a hierarchical fashion and are assigned at the group level within a term store. These permission sets are mapped to one of three metadata roles:
![]() Term Store Administrators Members of this role can create new term set groups and assign users to the Group Manager or Term Store Manager roles.
Term Store Administrators Members of this role can create new term set groups and assign users to the Group Manager or Term Store Manager roles.
![]() Group Managers Members of this role have contributor access and also can add users to the Contributor role.
Group Managers Members of this role have contributor access and also can add users to the Contributor role.
![]() Contributors Members of this role have full permissions to edit terms and term set hierarchies within their term group.
Contributors Members of this role have full permissions to edit terms and term set hierarchies within their term group.
Exam Tip
Term store permissions for both Group Managers and Contributors are assigned at the term set group level. It is not possible to assign these permissions at the term set or individual term level.
Adding users to the Term Store Administrators role
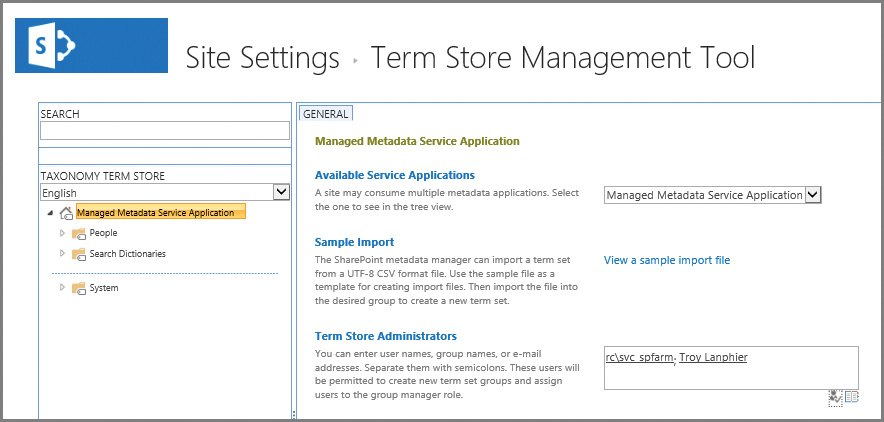
The addition of new Term Store Administrators is done at the Managed Metadata site level within the Term Store Management Tool.
1. Select Manage Service Applications, then the link of your intended MMS application.
2. The General tab will appear for your MMS application. Add the new user in the Term Store Administrators text box (see Figure 5-12).
Adding users to Group Manager or Contributor roles
The addition of new Group Managers or Contributors is done at the term set group level within the Term Store Management Tool.
1. Select Manage Service Applications, and then the link of your intended MMS application.
2. Choose the link for the term set group to which you want to assign people.
3. On the General Tab, you can now add Group Managers and Contributors (see Figure 5-13).

Configure MMS imports
Fortunately, it’s not required to manually enter each and every term in a term set. Instead, a sample import file (.csv) can be downloaded and altered to meet your needs:
1. From Site Settings, Site Administration, choose Term Store Management.
2. Select the MMS application you intend to alter.
3. On the General tab, choose View A Sample Import File to download the ImportTermSet.csv file, and alter it to suit (Figure 5-14).

4. Once you’ve completed your alterations to the import file, select the Import Term Set drop-down next to the group that will receive the uploaded terms.
5. Select the import file and then click OK to complete the upload.
Skill: Manage search
Although Search was a critical component of SharePoint 2013, it assumes an even larger role in SharePoint 2016 due to hybridization with the cloud. Search affects the content that can appear in navigation, filtering, search queries, and many other locations. Search is also capable of reaching across system boundaries, surfacing content present in other line-of-business systems.
This section covers how to:
![]() Manage Search Engine Optimization (SEO) settings
Manage Search Engine Optimization (SEO) settings
![]() Manage federated search, including integration with Delve and Office Graph
Manage federated search, including integration with Delve and Office Graph
![]() They are used to scope search results to a certain type of content or subset of search results.
They are used to scope search results to a certain type of content or subset of search results.
![]() They are also used to federate queries with the local SharePoint index, a remote SharePoint index, OpenSearch, or a Microsoft Exchange Server index.
They are also used to federate queries with the local SharePoint index, a remote SharePoint index, OpenSearch, or a Microsoft Exchange Server index.
If you created search scopes in prior versions of SharePoint, result sources will likely seem familiar. Search scopes have, in fact, been deprecated since SharePoint 2013, and have been replaced outright by result sources. If you upgraded from SharePoint 2010, you might find search scopes still exist and can be used in queries, but they will no longer be editable.
In SharePoint Server 2016, site collection administrators, site owners, and site designers can also create and configure result sources for use at the site collection and site levels. Search service administration privileges are required for creating farm-scoped result sources.
Need More Review?
Specific steps are required to build a result source at the Search service application, site collection, and site levels. These steps can be found in the TechNet article “Configure result sources for search in SharePoint Server 2013” at https://technet.microsoft.com/library/%20jj683115(v=office.16).aspx.
Creating a new result source in SharePoint 2016
Creating a new result source is done using the New Result Source link within the Result Sources section of the pertinent search application (Figure 5-15).
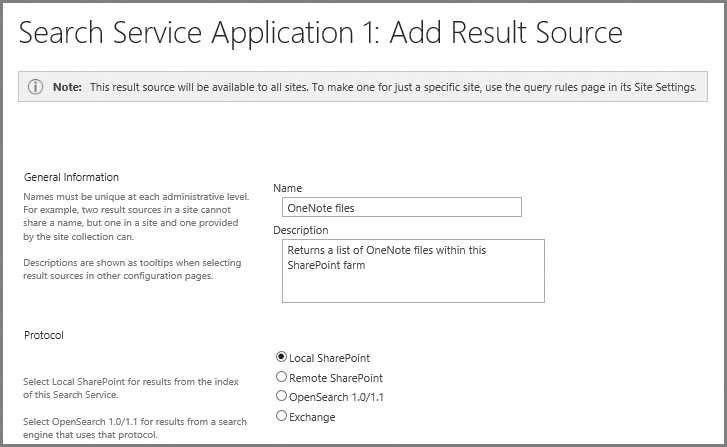
The creation of a new result source involves five major groupings of tasks: providing general information, specifying a protocol, selecting a search result type, developing a query transform, and specifying credential information.
![]() Providing general information Entering a Name and Description for the result source.
Providing general information Entering a Name and Description for the result source.
![]() Specifying a protocol Allows the selection of the search protocol to be used.
Specifying a protocol Allows the selection of the search protocol to be used.
![]() Local SharePoint provides results from the index of this Search service.
Local SharePoint provides results from the index of this Search service.
![]() Remote SharePoint provides results from the index of a Search service located in another farm.
Remote SharePoint provides results from the index of a Search service located in another farm.
![]() OpenSearch 1.0/1.1 provides results from a search engine using this protocol.
OpenSearch 1.0/1.1 provides results from a search engine using this protocol.
![]() Exchange provides results from an Exchange source.
Exchange provides results from an Exchange source.
![]() Selecting a search result type Depending on the protocol chosen, different options are presented.
Selecting a search result type Depending on the protocol chosen, different options are presented.
![]() For local SharePoint, either SharePoint or People search results can be searched.
For local SharePoint, either SharePoint or People search results can be searched.
![]() For remote SharePoint, the Remote Service URL must be entered for the remote farm, then SharePoint or People search results can be searched.
For remote SharePoint, the Remote Service URL must be entered for the remote farm, then SharePoint or People search results can be searched.
![]() No options are presented for OpenSearch 1.0/1.1.
No options are presented for OpenSearch 1.0/1.1.
![]() Exchange sources request that you specify the Source URL (or optionally, use AutoDiscover).
Exchange sources request that you specify the Source URL (or optionally, use AutoDiscover).
![]() Developing a query transform By using the query builder, transforms can be entered to focus on a particular type of content. For instance, a search for OneNote files might use a transform such as “{searchTerms} fileextension=one”.
Developing a query transform By using the query builder, transforms can be entered to focus on a particular type of content. For instance, a search for OneNote files might use a transform such as “{searchTerms} fileextension=one”.
![]() Specifying credential information Each protocol type requires a different set of credentials for authentication.
Specifying credential information Each protocol type requires a different set of credentials for authentication.
![]() Local SharePoint can select either Default Authentication (using their default SharePoint authentication credentials) or Basic Authentication (the same user name and password are provided regardless of user).
Local SharePoint can select either Default Authentication (using their default SharePoint authentication credentials) or Basic Authentication (the same user name and password are provided regardless of user).
![]() Remote SharePoint can select either Default Authentication or Single Sign-On ID credentials.
Remote SharePoint can select either Default Authentication or Single Sign-On ID credentials.
![]() OpenSearch can either select Anonymous (no authentication required) or choose from Basic, Digest, NTLM/App Pool Identity, NTLM/user name and password, Form Authentication, or Cookie Authentication.
OpenSearch can either select Anonymous (no authentication required) or choose from Basic, Digest, NTLM/App Pool Identity, NTLM/user name and password, Form Authentication, or Cookie Authentication.
Exam Tip
As a reminder, a total of four protocol types are available for use in result sources: Local SharePoint (this farm), Remote SharePoint (a different farm), OpenSearch 1.0/1.1 (used to crawl OpenSearch-compatible sources), and Exchange (used to crawl Exchange information).
Predefined result sources in SharePoint 2016
There are a total of 16 built-in result sources provided by SharePoint 2016 (see Table 5-4). Each of these result sources uses the Local SharePoint protocol and a query transform to retrieve the appropriate content.

Manage query rules
Query rules are used to promote certain search results, show blocks of additional results, or influence the ranking of search results. This functionality is made available not only to the Search application administrator but also to the site collection and site administrators within a SharePoint farm.
Query rules can be defined at one of three possible levels:
![]() Search service application Applies to all site collections in the web applications that consume the Search service application
Search service application Applies to all site collections in the web applications that consume the Search service application
![]() Site collection Applies to all sites within a particular site collection
Site collection Applies to all sites within a particular site collection
![]() Site Applies to a particular site
Site Applies to a particular site
Creating a new query rule
A query rule is composed of three possible components: the query conditions that cause the rule to fire, the actions that occur when the rule is fired, and (optionally) the ability to provide a time window for when the rule is available to fire.
Need More Review?
Specific steps are required to build a query rule at the Search service application, site collection, and site levels. These steps can be found in the TechNet article “Manage query rules in SharePoint Server 2013” at http://technet.microsoft.com/library/jj871676(v=office.16).aspx.
Creating a new query rule at the Search application level requires only a few steps. In this example, you will build a new query rule that acts much like a best bet would have in prior versions of SharePoint. This rule will fire when the user queries for the following words: 401K, Hiring, Interviewing, Retirement, or Termination.
To create this example query rule at the Search application level, follow these steps.
1. Select Manage Service Applications, then the link of your intended Search service application.
2. In the Queries And Results section of the Search Administration page, select Query Rules.
3. On the Manage Query Rules page, choose the For What Context Do You Want To Configure Rules drop-down list and select Local SharePoint Results (System). Next, select the New Query Rule link (see Figure 5-16).
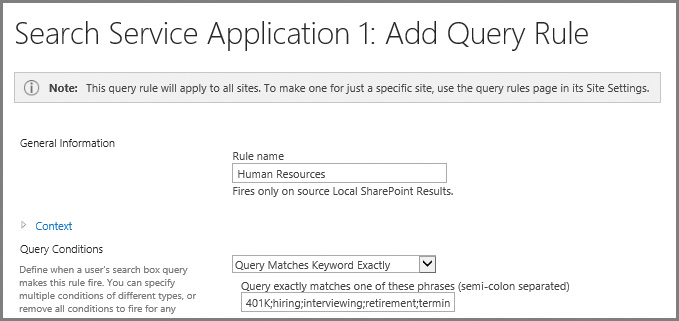
1. In the General Information Rule Name text box, type Human Resources.
2. In the Query Conditions section, choose the Query Matches Keyword Exactly drop-down value. In the text box beneath the drop-down list, enter the following string of terms in the field: 401K;hiring;interviewing;retirement;termination.
Exam Tip
Be familiar with each of the query conditions and the potential effect each one can have on the query rules.
3. In the Actions section, click the Add Promoted Result link, then enter the following values for Title and URL:
![]() Title: Human Resources
Title: Human Resources
![]() URL: http://hr.wingtiptoys.com
URL: http://hr.wingtiptoys.com
You can optionally choose to render the URL as a banner instead of a plain hyperlink.
Users who search for a term present in the Query Conditions (Retirement) now see the promoted site (Human Resources—hr.wingtiptoys.com).
Manage display templates
Search results in SharePoint 2016 are presented by a series of search-specific Web Parts. These Web Parts, in turn, rely on a series of display templates to control the formatting and presentation of search results.
Important
Display templates are available only for search-driven Web Parts.
There are two major groupings of display templates:
![]() Control templates These control the organization and layout of search results as well as the overall look of the Web Part.
Control templates These control the organization and layout of search results as well as the overall look of the Web Part.
![]() Item templates These provide the display characteristics of individual items displayed in search results within the Web Part.
Item templates These provide the display characteristics of individual items displayed in search results within the Web Part.
Display template configuration
As new search Web Parts are added to a page, each can be configured with specific control and item templates. These templates are changeable; new control and item templates can also be defined and stored within the Master Page Gallery to suit your needs.
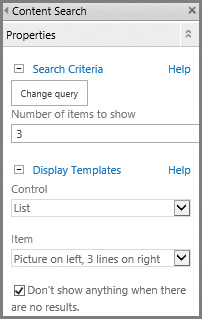
Editing a search Web Part (the Content Search Web Part is shown in Figure 5-17) enables you to configure its properties. Within the Display Templates section, you see the Control and Item selection drop-down boxes.
Creating new display templates
The first step of building a new display template is finding its location within the SharePoint file system and mapping a location from your client system.
Exam Tip
Be familiar with the four different display templates folders and which affect the result type functionality.
Display templates are housed within the Master Page Gallery of a given SharePoint site. Probably the easiest way to document this location is to use Design Manager to tell you the location.
1. On the Settings menu (click the gear icon) in your site collection, select Design Manager.
2. After the Design Manager page appears, select item 3, Upload Design Files. The URL shown (for example, http://intranet.wingtiptoys.com/_catalogs/masterpage/) is the location of the Master Page Gallery. Copy this URL to your clipboard.
Exam Tip
If you look at your Settings menu, but do not see the Design Manager link, there is a good chance that you do not have the Publishing features activated in this site collection. These features are a requirement for much of the ease-of-design functionality in SharePoint Server 2016.
1. Map a network drive from your client machine using the URL you previously captured.
2. In the newly mapped drive, open the Display Templates folder (Figure 5-18). Note that the Content Web Parts, Filters, Search, and System folders each maintain both control and item templates (not shown).
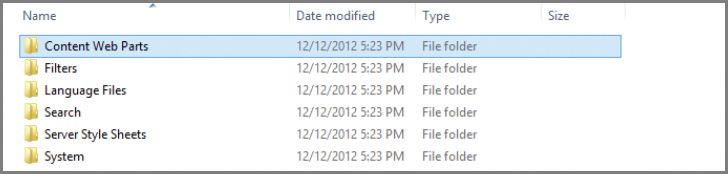
3. Open the Content Web Parts folder to display a series of control and item templates. Among them are the Control_List and the Item_Picture3Lines templates, which correspond to the List and Picture On Left, 3 Lines On Right item templates you saw in the Search Web Part.
Need More Review?
Creating display templates can be a fairly involved process. For more details on how to create a new display template, see the article “SharePoint 2013 Design Manager display templates” at http://msdn.microsoft.com/library/jj945138.aspx.
Manage Search Engine Optimization settings
Previous versions of SharePoint (prior to SharePoint 2013) did not provide any sort of built-in mechanism for controlling Search Engine Optimization (SEO). SharePoint Server 2016 now includes native, easy-to-configure SEO support for publishing sites that can be administered by site collection administrators and site owners.
There are three distinct levels of SEO configuration within SharePoint 2016: publishing pages, site collection, and XML site mapping.
Configuring SEO properties for publishing pages
Each publishing page on a SharePoint site can be configured with a series of SEO properties:
![]() Name A name for the page that could appear in the URL.
Name A name for the page that could appear in the URL.
![]() Title A phrase that can be used in search for keyword-based queries.
Title A phrase that can be used in search for keyword-based queries.
![]() Browser Title A friendly title for the page that can appear in the title bar of web browsers viewing the page (must be between 5 and 25 characters).
Browser Title A friendly title for the page that can appear in the title bar of web browsers viewing the page (must be between 5 and 25 characters).
![]() Meta Description A description for the page that would appear on a search results page.
Meta Description A description for the page that would appear on a search results page.
![]() Keywords Individual words that describe the intent of the page. These words will be used during keyword searches, influencing the ranking of the page in Search. This field allows between 25 and 1,024 characters.
Keywords Individual words that describe the intent of the page. These words will be used during keyword searches, influencing the ranking of the page in Search. This field allows between 25 and 1,024 characters.
![]() Exclude From Internet Search Engines This option enables you to include or exclude this page from the sitemap (if used) and search engines.
Exclude From Internet Search Engines This option enables you to include or exclude this page from the sitemap (if used) and search engines.
Most of these properties are stored as columns within the Pages library, although some are mapped a bit differently (for instance, Exclude From Internet Search Engines becomes Hide From Internet Search Engines in the page’s properties).
Additionally, you can use the last property, Exclude From Internet Search Engines, to both hide the page from an XML-generated sitemap and hide it from search engines.
To configure SEO properties for a publishing page, follow these steps.
1. Check the page out.
2. On the ribbon, select the Page tab and then select the Edit Properties drop-down list. Select the Edit SEO Properties menu item.
3. Change the values for the SEO Property fields and click OK to commit your changes. Note that changes made in this menu appear instantly on the site (such as changing the title of the page from Home to Intranet Home).
4. Check your page back in and publish it for the change to take effect.
Exam Tip
SEO properties are only available for Publishing pages (those contained within the /Pages library). The SEO properties icon in the ribbon is unavailable for any other page type (a standard team site page, for instance).
Configuring SEO settings for site collections
In addition to the SEO properties on Publishing pages, SharePoint 2016 enables you to configure the following settings on a per-site-collection basis:
![]() Verify Ownership Of This Site With Search Engines You can go to a search engine’s webmaster tools page and request the appropriate <meta> tag that is specific to your URL.
Verify Ownership Of This Site With Search Engines You can go to a search engine’s webmaster tools page and request the appropriate <meta> tag that is specific to your URL.
![]() Consolidate Link Popularity With Canonical URLs Allows you to specify filter link parameters that can help search engines combine the appropriate URLs on your site from a search metric point of view.
Consolidate Link Popularity With Canonical URLs Allows you to specify filter link parameters that can help search engines combine the appropriate URLs on your site from a search metric point of view.
To configure SEO properties for a site collection, follow these steps.
1. Navigate to the root site of your site collection.
2. On the Settings menu (gear icon), select Site Settings.
3. In the Site Collection Administration section, select Search Engine Optimization Settings.
4. On the Search Engine Optimization Settings page, select the appropriate values for the two optimization settings sections and then click OK.
Be familiar with the structure of a meta tag and the way it can be added for your Internet-facing SharePoint site.
Configuring SEO for the XML sitemap
If you have a site that enables anonymous access, you can also enable the Search Engine Sitemap site collection feature. This feature improves SEO of your site by automatically generating a sitemap on a regular basis that contains all the valid URLs in your website.
Enabling this feature adds two additional fields to the SEO Properties page, Sitemap Priority and Sitemap Change Frequency (Figure 5-19).
![]() Sitemap Priority This value indicates the weighting (between 0.0 and 1.0) of the importance of one page over another within your site collection; the higher the number, the more important your page.
Sitemap Priority This value indicates the weighting (between 0.0 and 1.0) of the importance of one page over another within your site collection; the higher the number, the more important your page.
![]() Sitemap Change Frequency This selection enables you to tell the search engine how regularly you expect the page to change to help improve search engine efficiency.
Sitemap Change Frequency This selection enables you to tell the search engine how regularly you expect the page to change to help improve search engine efficiency.

Manage result types
Result types evaluate a query based on a set of rules and then apply the appropriate display template. The display templates in use here are located in a different folder from the ones we used earlier in this section (located within the Content Web Parts folder).
When a query is made via Search (for instance, a series of Microsoft Word documents), the result set that is returned is evaluated for the way the returned information should be presented. The Result Type defines the fields for evaluating the result set in terms of conditions and actions.
![]() Conditions For the Microsoft Word result set, two conditions are evaluated:
Conditions For the Microsoft Word result set, two conditions are evaluated:
![]() Which result source should the item match? (All sources)
Which result source should the item match? (All sources)
![]() What types of content should match? (Microsoft Word)
What types of content should match? (Microsoft Word)
![]() Actions One action is applied, consisting of two parts:
Actions One action is applied, consisting of two parts:
![]() What should these results look like? (Word item)
What should these results look like? (Word item)
![]() What is the appropriate display template URL? (for example, ~sitecollection/_catalogs/masterpage/Display Templates/Search/Item_Word.js)
What is the appropriate display template URL? (for example, ~sitecollection/_catalogs/masterpage/Display Templates/Search/Item_Word.js)
Display templates associated with result types
The display templates that are associated with result types are located in the Search folder within the Master Page Gallery (see Figure 5-20).
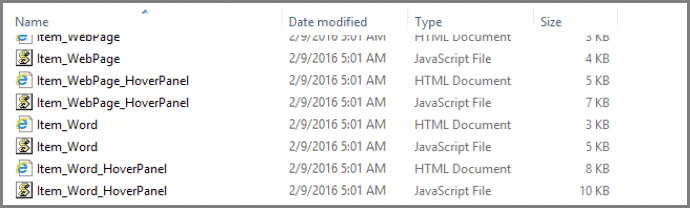
Manage a search schema
As a document is crawled, metadata is extracted as crawled properties. This metadata can include structured content (such as columnar metadata; for example, title, author) or unstructured content (such as keywords extracted from the body of the document).
For a user to be able to search on a piece of metadata, this crawled property must be mapped to a managed property. After this task is complete, queries can be performed against this metadata (such as looking up an item’s order number, stored in a list column).
To view the properties that have been crawled, select Search Schema from within the Queries And Results section of your Search service application. The resulting page shows a series of three links: Managed Properties, Crawled Properties, and Categories.
Managed Properties
The first page displayed is Managed Properties (Figure 5-21). On this page, you can selectively filter which managed property is shown and also see what managed properties are mapped to which crawled properties.
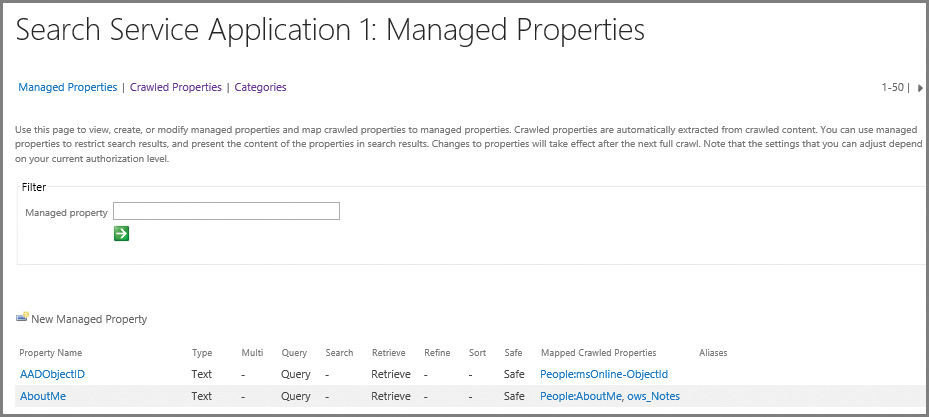
Crawled Properties
Selecting the Crawled Properties link inverts the view. Selecting a category (such as People) then enables you to see which crawled properties are mapped to a particular managed property (see Figure 5-22).
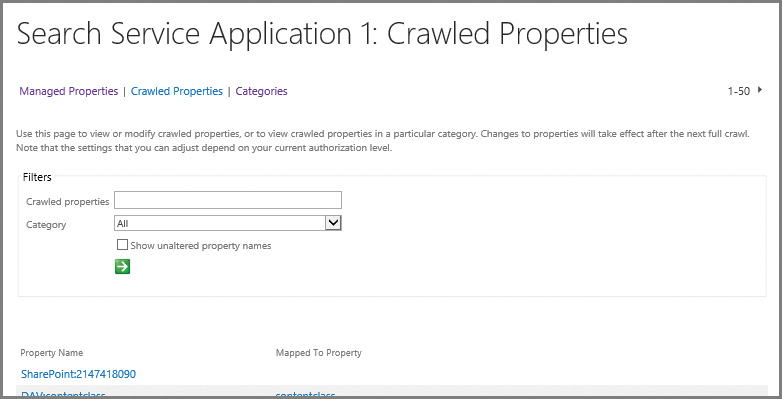
Categories
The Categories selection enables you to see a summary of all available categories and the properties each possesses (see Figure 5-23).

Exam Tip
Be familiar with the configuration and process of converting a crawled property to a managed property. This process is detailed in the TechNet article “Manage the search schema in SharePoint Server 2013” at https://technet.microsoft.com/library/jj219667.aspx.
Manage federated search, including integration with Delve and Office Graph
Delve is powered by Office Graph in Office 365, and shows users the most relevant content based on who they work with and what they are working on. This relevance is a direct result of the search capabilities present in Office 365. From a permissions standpoint, Delve respects the permission structure put in place, just as Search does.
Granting access to Delve
Access to Delve is granted within the SharePoint Online menu of the Office 365 Admin Center, and is located within the Office Graph section. Granular control of access to this feature is not available, leaving the administrator with two possible choices:
![]() Allow access to the Office Graph (default).
Allow access to the Office Graph (default).
![]() Don’t allow access to the Office Graph.
Don’t allow access to the Office Graph.
Removing access to Delve
Preventing user access to Delve primarily affects the user experience when visiting an individual user’s page:
![]() A person’s page in OneDrive for Business will only show user profile information.
A person’s page in OneDrive for Business will only show user profile information.
![]() Users can search for other people in the organization, but have no ability to search for documents or boards in a Delve-like fashion.
Users can search for other people in the organization, but have no ability to search for documents or boards in a Delve-like fashion.
Skill: Manage taxonomy
Term sets contained within MMS work together with SharePoint 2016 Search to provide functionality such as navigation and product catalogs. After the correct information has been located in Search, term sets continue to provide benefits, enabling you to both refine search results and filter content within a list.
Manage site collection term set access
In SharePoint 2016, it’s possible to have one site collection refer to another’s term set. Of course, you could also generate the term set within the MMS application, but perhaps this level of availability (having the term set available across the entire farm) is not required.
Exam Tip
Although the designated site collections do indeed have Read access to the original term set, they cannot change its contents.
You might have a team that generates and maintains its own term set in one site collection, and then wants to provide that term set to several other site collections. This cross-site collection term set access is Read-only, meaning that the sites allowed access are not themselves allowed to configure any new term sets or terms; however, the consuming site collections can bind and pin term sets from this group into their own term sets.
Configuring term set access in SharePoint 2016 can be done in a few steps.
1. Select Term Store Management.
2. Select the term set group for your site collection.
3. On the General tab for your term set group, scroll down to the Site Collection Access section.
4. Within the Site Collection Access section, enter the names of each site collection that should have access to this term set group (one per line, shown in Figure 5-24).

Manage term set navigation
Configuring a site collection to use managed navigation requires the use of a new term set to house the navigational structure. This term set can then be configured to be used for site navigation, faceted navigation, or both (see Figure 5-25).
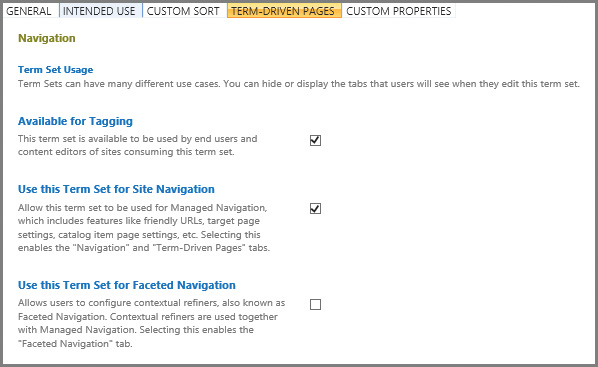
Choosing to have a term set be used for site navigation activates the Navigation and Term-Driven Pages tabs on individual navigation terms. After a term set is configured to be used as site navigation, its individual terms can function as navigation nodes.
Understand the differences between these two types of navigation. Faceted navigation has to do with refining content based on the context; site navigation enables you to use a term set for global and current navigation.
Term store management (Navigation tab)
On the Navigation tab, the Navigation Node Appearance section enables you to configure how the node will appear in the global and current navigation of the site (see Figure 5-26):
![]() Navigation Node Title You can choose to use the title as given by the term set or select the Customize check box and enter a more appealing name.
Navigation Node Title You can choose to use the title as given by the term set or select the Customize check box and enter a more appealing name.
![]() Navigation Hover Text Editing this text enables more helpful information to be displayed when the user moves a mouse over the link.
Navigation Hover Text Editing this text enables more helpful information to be displayed when the user moves a mouse over the link.
![]() Visibility In Menus This setting enables you to determine whether the link will be available to global navigation, current navigation, or both.
Visibility In Menus This setting enables you to determine whether the link will be available to global navigation, current navigation, or both.

Also located on the Navigation tab is the Navigation Node Type and the Associated Folder. The Navigation Node Type enables you to specify whether the node is simply a link or header, or whether the node sends users to a term-driven page. The Associated Folder allows you to specify a folder of pages that will be associated with this node (see Figure 5-27).
![]() If you choose the Simple Link Or Header option, you can either choose to enter the URL of a link or simply a header that can have links beneath it.
If you choose the Simple Link Or Header option, you can either choose to enter the URL of a link or simply a header that can have links beneath it.
![]() If you choose the Term-Driven Page With Friendly URL option, this node will be a friendly URL to a term-driven page (configured on the Term-Driven Pages tab).
If you choose the Term-Driven Page With Friendly URL option, this node will be a friendly URL to a term-driven page (configured on the Term-Driven Pages tab).
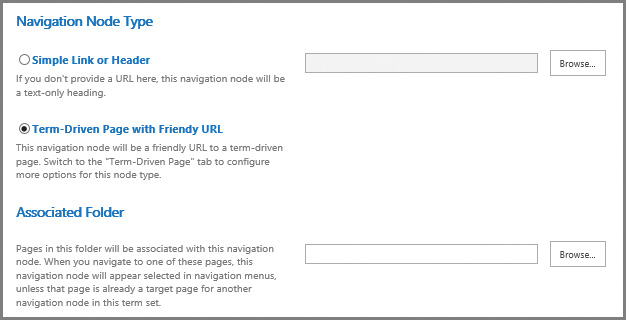
Term Store Management (Term-Driven Pages tab)
On the Term-Driven Pages tab (for a selected term), you can specify four different groups of settings (Figure 5-28):
![]() Configure Friendly URL For This Term Defaults to a friendly URL that matches the name of the individual term. Selecting the optional Customize check box allows you to change the friendly URL from its default.
Configure Friendly URL For This Term Defaults to a friendly URL that matches the name of the individual term. Selecting the optional Customize check box allows you to change the friendly URL from its default.
![]() Target Page Settings Enables you to choose both the target page for a term as well as specifying another target page for children of the term.
Target Page Settings Enables you to choose both the target page for a term as well as specifying another target page for children of the term.
![]() Category Image Allows you to specify a display image meant to represent this term in the Term Property Web Part.
Category Image Allows you to specify a display image meant to represent this term in the Term Property Web Part.
![]() Catalog Item Page Settings If you are using the term as a catalog category (covered in the next section), this setting enables you to choose both the Catalog Item Page for the category and another Catalog Item Page for children of the category.
Catalog Item Page Settings If you are using the term as a catalog category (covered in the next section), this setting enables you to choose both the Catalog Item Page for the category and another Catalog Item Page for children of the category.

Important
If the page you are viewing has neither a Friendly URL field nor a Category Image selection field on the Term-Driven Pages tab, you have selected a term set, not an individual term.
Manage topic catalog pages
Topic catalog pages are used to render items within the products list on a product catalog site. These pages are used to show structured content in a consistent fashion across a SharePoint site.
Most often, these pages are used within the confines of a site collection that has been enabled with the cross-site collection publishing feature. There are two distinct page types available:
![]() Category pages Used specifically to display a series of catalog items.
Category pages Used specifically to display a series of catalog items.
![]() Item pages (also called catalog item pages in some documentation) Used to display an item in detail.
Item pages (also called catalog item pages in some documentation) Used to display an item in detail.
Important
If you previously deployed the Product Catalog Site template, available in SharePoint 2013, it is no longer available in SharePoint 2016. This is not much of an issue however, because the Cross-Site Collection Publishing feature is still available and quite useful within a SharePoint farm.
Be familiar with the process of creating a product catalog, assigning terms in the term set, and then allowing another Publishing site to consume the result. Most important, remember to crawl the content source after enabling a list or library as a catalog.
Assigning master pages to the category and item pages
Because category and item pages are standard publishing fare within SharePoint 2016, it only stands to reason that they follow the same structure that all other Publishing pages do. When a Publishing site is initially configured to connect to a product catalog, the opportunity arises to specify a master page for both category and item pages.
To specify the catalog pages’ master page as part of the connect-to-catalog process (Figure 5-29), follow these steps.
1. Navigate to the root site of your Publishing site collection, and in Site Settings, Site Administration, choose Manage Catalog Connections.
2. On the Manage Catalog Connections page, select Connect To A Catalog.
3. On the Connect To Catalog page, click Connect for your product catalog.
4. In Catalog Source Settings, scroll to the bottom of the page.
5. The last section of the page enables you to choose from the two out-of-the-box (OOB) master page types (or use an existing one if you have it created; see Figure 5-29). Category and item pages can also be configured within this section.
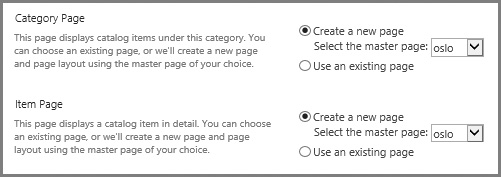
Important
When you initially make the connection between the product catalog site and the Publishing site that consumes its navigational hierarchy, you have the chance to choose the master page for both category and item pages. Selecting Catalog Source Settings after the fact does not give you the opportunity to make the choice again.
Options on the Term-Driven Pages tab
As discussed in the term set navigation section, there are options available on the Term-Driven Pages tab that enable you to specify catalog page settings; these choices are just that, optional. Catalog pages work just fine without making changes at this level.
The number of options available has to do with whether you are changing this setting at the term set or term level:
![]() If you are making this change at the term set level, your only option is to specify a custom page for the catalog item.
If you are making this change at the term set level, your only option is to specify a custom page for the catalog item.
![]() If you are making this change at the term level, you have two options: change the catalog item page for a category, and also change the catalog item for children of the category.
If you are making this change at the term level, you have two options: change the catalog item page for a category, and also change the catalog item for children of the category.
Configure custom properties
Within a term set, you can define properties that aren’t a necessary part of the term, term set, or group. Sometimes these properties are useful as part of a custom development effort; at other times, they might just be there to identify information that surrounds a term or term set.
Exam Tip
Custom properties are almost never used outside of custom development efforts.
These custom properties have two distinct scopes, shared and local, that define at which levels a custom property can be applied.
![]() Shared properties Properties that can be used on all reuses of pinned instances of the term anywhere in the term store.
Shared properties Properties that can be used on all reuses of pinned instances of the term anywhere in the term store.
![]() Local properties Properties that can be used only for a term contained within the term set being configured.
Local properties Properties that can be used only for a term contained within the term set being configured.
Important
Custom property configuration can differ based on the item. At the term set level, shared properties are the only configuration available; at the individual term level, both shared and local properties can be configured.
Configuration of a custom property is done within the Term Store Management Tool. To build a new custom property, follow these steps.
1. In the Site Administration section of your site collection, select Term Store Management.
2. Expand your term set until you get to the desired location for your custom property, then select the term or term set and click the Custom Properties tab (see Figure 5-30).
3. Click the Add link for either Shared Properties or Local Properties and then enter values for the property name and a matching value.

Configure search refinement
When you issue a search query in SharePoint 2016, you not only get the returned results of your query but also a series of categories that you can use to narrow your search (shown on the left side of Figure 5-31) that are known as search refiners.

Search refiners are represented within the Refiner Web Part, which is exposed by editing the search results page from within the Enterprise Search Center site.
Be familiar with which different refiners are available OOB and what each one can provide from a functionality standpoint (such as the modified date slider control). Within the Refiners section, you can select to either use the refinement configuration as defined in the managed navigation term set or you can define refiners within the Web Part.
Easily the more reusable of the two refinement options, using managed navigation for refinement enables you to set up refiners at the term or term set level. If you need more granular controls over refiners, you can configure each and every term; however, most refiners are applied at the term set level and then inherited by the individual terms.
1. In the Site Administration section of your site collection, select Term Store Management.
2. Expand your term set until you get to the desired location for your refiner to be applied and then select the term or term set.
3. Select the Faceted Navigation tab, shown in Figure 5-32. In this instance, the term selected already has custom refiners, but you can add refiners as well.

4. Clicking Customize Refiners causes refiner tags to be added to the Selected Refiners section, shown in Figure 5-33. Near the bottom of the screen, you can also see the sample values for the selected refiner. If you scroll down, you will see a Preview Refiners button; clicking this button enables you to see a preview of the Refinement Web Part output using this refiner.

5. Completed refiners for a term appear on the Faceted Navigation tab. Returning to the site where the Refinement Web Part was configured and selecting the Use The Refinement Configuration Defined In The Managed Navigation Term Set option completes the action (Figure 5-34).

Exam Tip
Be familiar with the steps required to configure a refiner both in the term set as well as a Web Part.
Configure list refinement
The ability to refine items doesn’t necessarily end with enterprise search; individual list and library items can also be refined because they are also part of the items indexed by Search. This functionality is similar to views, in that particular items can be filtered and selected from the overall list.
Enabling list refinement is done via the list’s Settings page, from the Metadata Navigation Settings link (Figure 5-35). Adding a Key Filter component enables you to refine the contents of the library based on Selected Key Filter Fields.

Important
Within the metadata navigation settings for a list, you can configure one of three things: the list’s navigation hierarchy, key filters for the list, and automatic column indexing. The last item, Indexing, is usually set to Automatically Manage Column Indices On This List, which results in improved query performance for the filtering and hierarchy used in a list.
Skill: Plan and configure a search workload
Setting up and configuring enterprise search is simply the beginning of a continuous process for improving search relevance. As users become more aware of Search from both an Internet and intranet standpoint, their expectations for Search become more and more detailed.
Configuring a search workload consists of the steps necessary to initially gauge the desired relevancy within a SharePoint 2016 farm as well as the balancing act between overall performance and keeping Search up to date. Taking the long view of optimization, search analytics reports can be used to track trends in customer Search usage, providing feedback on the optimization changes that have already taken place.
This section covers how to:
![]() Plan and configure search result relevancy
Plan and configure search result relevancy
![]() Plan and configure index freshness
Plan and configure index freshness
![]() Plan and configure result sources
Plan and configure result sources
![]() Plan and configure the end-user experience
Plan and configure the end-user experience
![]() Plan and configure a search schema
Plan and configure a search schema
![]() Analyze search analytics reports
Analyze search analytics reports
Plan and configure search result relevancy
Search relevancy (also known as relevance ranking) is a result of ranking models present within the SharePoint 2016 platform. These models fall into one of three categories:
![]() General purpose Compute the relevance rank for most types of search results.
General purpose Compute the relevance rank for most types of search results.
![]() People search People search ranking models compute the relevance rank for search results that are related to people. They calculate, among other things, how relevant search results are based on social distance and expertise.
People search People search ranking models compute the relevance rank for search results that are related to people. They calculate, among other things, how relevant search results are based on social distance and expertise.
![]() Special purpose Special purpose ranking models compute the relevance rank for search results related to various specific ranking scenarios. For example, there is a ranking model to calculate the ranking score for recommendations, and there are ranking models to calculate relevance ranks for cross-site Publishing sites that have an associated product catalog.
Special purpose Special purpose ranking models compute the relevance rank for search results related to various specific ranking scenarios. For example, there is a ranking model to calculate the ranking score for recommendations, and there are ranking models to calculate relevance ranks for cross-site Publishing sites that have an associated product catalog.
Need More Review?
SharePoint 2013 had a total of 16 ranking models, all of which have been carried over to SharePoint 2016, which has a total of 19, including three new models: the 2016 Highlights ranking model, the Graph Only model, and the Second Level Colleagues ranking model. For more information about ranking models, review the TechNet article “Overview of search result ranking in SharePoint Server 2013” at https://technet.microsoft.com/library/dn169065.aspx, and the MSDN article “Customizing ranking models to improve relevance in SharePoint 2013” at https://msdn.microsoft.com/library/c166ecdd-7f93-4bbb-b543-2687992dd2bc.aspx.
Rank evaluation
Rank evaluation is a two-stage process, combining the calculations from each to achieve an overall score for a search result. These models use five pieces of information, shown in Table 5-5.
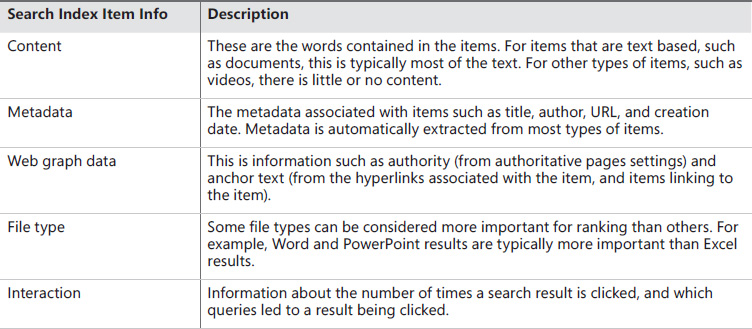
Influencing search result rank
There are three major ways to influence the ranking of search results in SharePoint 2016:
![]() Query rules Define which actions to take when a query matches a condition.
Query rules Define which actions to take when a query matches a condition.
![]() Use promoted results.
Use promoted results.
![]() Add a results block for promoted results.
Add a results block for promoted results.
![]() Change the query itself.
Change the query itself.
![]() Search schema Configure the context of a managed property.
Search schema Configure the context of a managed property.
![]() Change the context of a managed property in Advanced Searchable Settings.
Change the context of a managed property in Advanced Searchable Settings.
![]() Create custom ranking model As you have already seen, there are several ranking models already in use; before attempting to create a new one, use query rules with an existing one to try and meet your goals.
Create custom ranking model As you have already seen, there are several ranking models already in use; before attempting to create a new one, use query rules with an existing one to try and meet your goals.
Plan and configure index freshness
Index freshness is directly influenced by the type and frequency of search crawls configured for a SharePoint 2016 farm. These search crawls require resources and can affect resource allocation within a SharePoint farm, so there must be a balance struck between index freshness and overall farm performance.
There are three major factors in a SharePoint farm that can negatively affect index freshness:
![]() Crawl frequency Search indexes that are not updated frequently ultimately cannot be fresh. Although full and incremental crawls work together to index content, the minimum window of freshness can be no smaller than the incremental crawl time. Moving instead to a continuous crawl mechanism by default causes the index freshness to be a minimum of 15 minutes, although this interval can be altered in PowerShell.
Crawl frequency Search indexes that are not updated frequently ultimately cannot be fresh. Although full and incremental crawls work together to index content, the minimum window of freshness can be no smaller than the incremental crawl time. Moving instead to a continuous crawl mechanism by default causes the index freshness to be a minimum of 15 minutes, although this interval can be altered in PowerShell.
![]() Crawler impact rules for external servers Similarly, the rate and frequency with which external servers are crawled has a direct bearing on index freshness for those content sources. Where possible, configure the crawler impact rules to give the absolute best possible crawl performance without causing undue load to the external system.
Crawler impact rules for external servers Similarly, the rate and frequency with which external servers are crawled has a direct bearing on index freshness for those content sources. Where possible, configure the crawler impact rules to give the absolute best possible crawl performance without causing undue load to the external system.
![]() Permissions assignment Assigning users individual permissions on a site can negatively influence crawl performance. Where possible, combine these users into SharePoint groups and assign the permissions to the groups. For the absolute best crawl performance (and thus, index freshness), assign permissions via Active Directory group where reasonable and possible.
Permissions assignment Assigning users individual permissions on a site can negatively influence crawl performance. Where possible, combine these users into SharePoint groups and assign the permissions to the groups. For the absolute best crawl performance (and thus, index freshness), assign permissions via Active Directory group where reasonable and possible.
Plan and configure result sources
Result sources in SharePoint are used to gather content using three distinct items:
![]() Search provider or source URL Search results are retrieved from a location, such as the search index of the local SharePoint Search service.
Search provider or source URL Search results are retrieved from a location, such as the search index of the local SharePoint Search service.
![]() Protocol used for search results The search crawler can use many distinct protocols (shown earlier in this chapter: Local SharePoint, Remote SharePoint, OpenSearch, or Exchange) to parse content into an index.
Protocol used for search results The search crawler can use many distinct protocols (shown earlier in this chapter: Local SharePoint, Remote SharePoint, OpenSearch, or Exchange) to parse content into an index.
![]() Query transform This is used to narrow results to a specified subset of content.
Query transform This is used to narrow results to a specified subset of content.
Search experiences in the Enterprise Search Center each line up to a respective result source. Four result sources are configured in an OOB SharePoint 2016 implementation:
![]() Local SharePoint Results Provides the Everything Search experience, retrieving any and every type of matching content in the SharePoint farm.
Local SharePoint Results Provides the Everything Search experience, retrieving any and every type of matching content in the SharePoint farm.
![]() Local People Results Narrows the items queried to information concerning people in the organization.
Local People Results Narrows the items queried to information concerning people in the organization.
![]() Conversations Narrows the items queried to simply conversations in microblogs, newsfeed posts, and community sites.
Conversations Narrows the items queried to simply conversations in microblogs, newsfeed posts, and community sites.
![]() Videos Local videos in the SharePoint farm.
Videos Local videos in the SharePoint farm.
Need More Review?
There are more than a dozen preconfigured result sources that you can take advantage of, turning any or all into search experiences for your users. These result sources are listed in the TechNet article “Understanding result sources for search in SharePoint Server 2013” at https://technet.microsoft.com/library/dn186229.aspx.
Exam Tip
Understanding how to present result sources in the user interface is a fundamental skill, and could turn up on the certification exam.
Plan and configure the end-user experience
The end-user search experience in SharePoint 2016 combines some of the features already covered to streamline the end-user experience when interacting with Search.
Search interfaces
Users performing a search query do so from one of three possible locations:
![]() List level Within a list or document library, the option is given to Find A File, thus limiting a search query to the contents of the current list or library (Figure 5-36).
List level Within a list or document library, the option is given to Find A File, thus limiting a search query to the contents of the current list or library (Figure 5-36).

![]() Site level Site-level searches are performed from the standard Search box, near the upper right corner of a site. Search This Site is the default search experience in this box, although selecting the drop-down list allows the user to select from the Everything, People, Conversations, or This Site search experiences (Figure 5-37).
Site level Site-level searches are performed from the standard Search box, near the upper right corner of a site. Search This Site is the default search experience in this box, although selecting the drop-down list allows the user to select from the Everything, People, Conversations, or This Site search experiences (Figure 5-37).
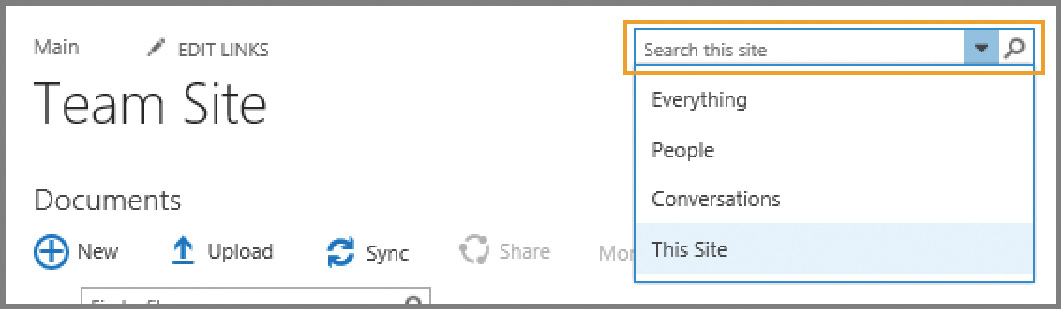
![]() Search Center An Enterprise Search Center expands on the abilities of Search, providing search experiences in combination with refiner information to further tune search results (Figure 5-38).
Search Center An Enterprise Search Center expands on the abilities of Search, providing search experiences in combination with refiner information to further tune search results (Figure 5-38).
Shaping the user search experience
The user search experience is a combination of these three Search interfaces with some of the technologies we’ve already covered.
![]() Query rules Used to promote specific search results, show blocks of additional results, or influence the ranking of search results.
Query rules Used to promote specific search results, show blocks of additional results, or influence the ranking of search results.
![]() Result types Use a combination of keywords and synonyms, managed properties, search experiences, and result sources to narrow the search result.
Result types Use a combination of keywords and synonyms, managed properties, search experiences, and result sources to narrow the search result.
![]() Display templates Used in search-specific Web Parts, these templates are based on a combination of HTML and JavaScript to control the appearance and formatting of the search results.
Display templates Used in search-specific Web Parts, these templates are based on a combination of HTML and JavaScript to control the appearance and formatting of the search results.
Plan and configure a search schema
Earlier in this chapter, we discussed the process of converting crawled properties into managed properties. This process formalizes the capture of metadata into something that can then be used to optimize search queries.
1. The Search service application must be created, and content sources must have an initial, full crawl run on them.
2. The results of a crawl are crawled properties; certain crawled properties can then be selected and then mapped to managed properties, which can be used to narrow search results.
3. Changing certain items within the search schema requires a reindex of the content, including crawled to managed property mapping, token normalization, complete matching, company name extraction, custom entity extraction, and enabling the queryable, retrievable, refinable, and sortable property settings.
Although we discussed most of these items earlier, possessing a solid understanding of the crawled to managed properties mapping process will allow you to better understand the search process as a whole. These items are captured in the TechNet article entitled “Manage the search schema in SharePoint Server 2013” at https://technet.microsoft.com/library/jj219667.aspx.
Analyze search analytics reports
SharePoint 2016 uses the same analytics architecture found in SharePoint 2013, consisting of three main parts:
![]() Analytics processing component This component runs the different analytics jobs used to extract information as it’s being crawled.
Analytics processing component This component runs the different analytics jobs used to extract information as it’s being crawled.
![]() Analytics Reporting database This database stores statistical information from the different analyses.
Analytics Reporting database This database stores statistical information from the different analyses.
![]() Link database This database stores extracted information from the analytics processing component along with information about clicks in search results.
Link database This database stores extracted information from the analytics processing component along with information about clicks in search results.
Exam Tip
Although it’s unlikely that you’ll be expected to answer questions about the minutia of the search analytics architecture, you should be able to recap the three different parts that comprise it.
Need More Review?
For a detailed understanding of each component required to build a search analytics report as well as the contents of each, review the TechNet article “Overview of analytics processing in SharePoint Server 2013” at https://technet.microsoft.com/library/jj219554.aspx.
Summary
![]() SharePoint 2016 Search is comprised of six components: crawl, content processing, analytics processing, index, query processing, and search administration.
SharePoint 2016 Search is comprised of six components: crawl, content processing, analytics processing, index, query processing, and search administration.
![]() SharePoint 2016 Search requires four application databases: Administration, Crawl, Link, and Analytics Reporting.
SharePoint 2016 Search requires four application databases: Administration, Crawl, Link, and Analytics Reporting.
![]() SharePoint 2016 allows 25 index partitions, each with 20 million indexed items per partition for a total of 500 million items.
SharePoint 2016 allows 25 index partitions, each with 20 million indexed items per partition for a total of 500 million items.
![]() In a MinRole-compliant farm, all search components exist on servers hosting the Search role.
In a MinRole-compliant farm, all search components exist on servers hosting the Search role.
![]() Changing a Search topology with an active index requires that you clone the existing topology, alter the clone, and then activate the cloned topology as the active topology.
Changing a Search topology with an active index requires that you clone the existing topology, alter the clone, and then activate the cloned topology as the active topology.
![]() Search content sources can include SharePoint sites, websites, file shares, Exchange public folders, Lotus Notes (connector install required), Documentum (connector install required), LOB data (using BCS), and custom repositories (requires custom development).
Search content sources can include SharePoint sites, websites, file shares, Exchange public folders, Lotus Notes (connector install required), Documentum (connector install required), LOB data (using BCS), and custom repositories (requires custom development).
![]() The three search crawl types are full, incremental, and continuous (which defaults to running at 15-minute intervals).
The three search crawl types are full, incremental, and continuous (which defaults to running at 15-minute intervals).
![]() Crawler impact rules can be used to minimize the effect of a SharePoint crawl on external systems.
Crawler impact rules can be used to minimize the effect of a SharePoint crawl on external systems.
![]() Search results are security trimmed by default.
Search results are security trimmed by default.
![]() A SharePoint 2016 hybrid search environment requires the same six components and four databases, though the index, analytics, and content processing components and Link and Analytics databases are all rendered inactive.
A SharePoint 2016 hybrid search environment requires the same six components and four databases, though the index, analytics, and content processing components and Link and Analytics databases are all rendered inactive.
![]() The managed metadata service provides a mechanism for defining taxonomical structures throughout your SharePoint 2016 farm.
The managed metadata service provides a mechanism for defining taxonomical structures throughout your SharePoint 2016 farm.
![]() Several service application proxies can be assigned to a single proxy group. Each service application proxy can also be assigned to multiple proxy groups.
Several service application proxies can be assigned to a single proxy group. Each service application proxy can also be assigned to multiple proxy groups.
![]() The content type hub relies on two timer jobs to function correctly: the Content Type Hub job and the Content Type Subscriber job.
The content type hub relies on two timer jobs to function correctly: the Content Type Hub job and the Content Type Subscriber job.
![]() Terms in a term set can be entered manually or added to an import file that can configure multiple terms at one time.
Terms in a term set can be entered manually or added to an import file that can configure multiple terms at one time.
![]() Result sources can use one of four possible protocols: Local SharePoint, Remote SharePoint, OpenSearch, and Exchange.
Result sources can use one of four possible protocols: Local SharePoint, Remote SharePoint, OpenSearch, and Exchange.
![]() Display templates control the formatting and presentation of search results.
Display templates control the formatting and presentation of search results.
![]() Crawled properties can be mapped to managed properties for use within Search.
Crawled properties can be mapped to managed properties for use within Search.
![]() Topic catalog pages include category pages and item pages.
Topic catalog pages include category pages and item pages.
![]() User search experience is shaped by query rules, result types, and display templates.
User search experience is shaped by query rules, result types, and display templates.
Thought experiment
In this thought experiment, demonstrate your skills and knowledge of the topics covered in this chapter. You can find the answer to this thought experiment in the next section.
You are designing a hybrid search configuration between SharePoint 2016 and Office 365. As Office 365 interacts with multiple technologies, you have been asked several questions, intended to help shape how SharePoint will interact in the Office 365 space.
1. What sort of PowerShell scripts must be run to connect your SharePoint 2016 cloud Search service application to the Office 365 tenant?
2. What components might you use that tie the on-premises environment of SharePoint to SharePoint Online?
3. As your organization has previously implemented SharePoint, management would like to know what benefits hybrid search offers.
Thought experiment answer
This section contains the solution to the thought experiment.
1. Two PowerShell scripts are required for this configuration, CreateCloudSSA.ps1 (used to create the cloud Search service application) and Onboard-CloudHybridSearch.ps1 (used to onboard your cloud Search service application).
2. Your organization could use OneDrive for Business, Hybrid Sites, and cloud hybrid search to unify the on-premises and cloud deployments of SharePoint.
3. Hybrid search offers the opportunity to provide a fully secure search index in Office 365. This index will be used for both on-premises and cloud search results, unifying the search experience for users. Search also provides the benefit of Delve and Office Graph, allowing users to find people both on their team and in others that work on similar projects within the organization.