CHAPTER 4
Configure networking
It is important to understand the fundamentals of networking in Windows 10 to pass the 70-697, Configuring Windows Devices exam. Network connectivity is an almost universal assumption in typical Windows 10 operation, so understanding how Windows networking works will help you in many areas of the exam. This chapter will cover the basics of main networking components of Windows 10, along with how to configure each of them.
Skills in this chapter:
![]() Skill 4.1: Configure IP settings
Skill 4.1: Configure IP settings
![]() Skill 4.2: Configure network settings
Skill 4.2: Configure network settings
![]() Skill 4.3: Configure and maintain network security
Skill 4.3: Configure and maintain network security
Skill 4.1: Configure IP settings
The IP address is the most widely used point of contact for a Windows 10 computer that is connected to the network. A computer’s IP address uniquely identifies it on the local network segment, and it serves as the functional component for most of the ways that computers communicate on a network, including name resolution and file transfer.
This section covers how to:
![]() Connect to a network
Connect to a network
![]() Configure name resolution
Configure name resolution
![]() Configure network locations
Configure network locations
Connect to a network
Networks are groups of computers and other resources. When connected, each resource that is connected (computer, network printer, server, or other host) must acquire, or have previously been assigned an exclusive address that will define it on that network. These addresses are unique, and you can’t have two hosts on the same network with the same address. This makes addressing a very important part of configuring and connecting to networks.
Understanding IP address requirements
Each host on a network must have a unique Internet Protocol (IP) address. This address, when it’s configured as an IPv4 address, is a 32-bit number that is styled as four sets of decimal numbers. For example: 192.168.4.20. Each host is also assigned a subnet mask, which determines which part of the IP address defines the network and which part defines the host. Together, the IP address and the subnet mask define the network within which a host can communicate. If the host requires communication outside of the local network segment, a gateway must be specified, which typically represents a network router that can provide network paths to other networks and the Internet. The IP address, subnet mask and default gateway together provide the full definition of IP connectivity for a network host. There are two ways to get an address to a resource: You can define it manually, or it can be assigned by a Dynamic Host Configuration Protocol (DHCP) server.
When an address can’t be assigned this way, Windows will assign its own IP address using a technology called Automatic Private IP Addressing (APIPA). APIPA addresses fall in the 169.254.x.x address range.
 EXAM TIP
Make sure to review the IP address ranges for Class A, B, and C to have an idea of how many networks and hosts each offers. Know their default subnet masks, too. Beyond that, know the private addresses available for local networks (192.x.x.x, 172.x.x.x, and 10.x.x.x for Class C, B, and A, respectively).
Understanding network terminology
Make sure that you are familiar with the following terms before continuing:
![]() APIPA This is a link-local (IP) address that is assigned by Windows when no other addressing mechanism can be found. This enables the host to function on the local network segment. Routers do not forward packets from these kinds of addresses.
APIPA This is a link-local (IP) address that is assigned by Windows when no other addressing mechanism can be found. This enables the host to function on the local network segment. Routers do not forward packets from these kinds of addresses.
![]() Default gateway This hardware or software device lets hosts connect to other networks. Often that network is the Internet, but it could also be another network segment in an enterprise domain.
Default gateway This hardware or software device lets hosts connect to other networks. Often that network is the Internet, but it could also be another network segment in an enterprise domain.
![]() DHCP This is a networking protocol that dynamically configures IP addresses for hosts on a network. A DHCP server assigns these addresses. These IP addresses are generally granted for a specified interval and must be renewed when the interval is up. If specific static addresses are required for clients, DHCP can be configured to allow reservations for those clients.
DHCP This is a networking protocol that dynamically configures IP addresses for hosts on a network. A DHCP server assigns these addresses. These IP addresses are generally granted for a specified interval and must be renewed when the interval is up. If specific static addresses are required for clients, DHCP can be configured to allow reservations for those clients.
![]() DHCP Scope A DHCP scope is a consecutive range of possible IP addresses that can be offered to hosts on a subnet (part of a network).
DHCP Scope A DHCP scope is a consecutive range of possible IP addresses that can be offered to hosts on a subnet (part of a network).
![]() DNS Domain Name Service (DNS) is a service that enables users to type the name of the host to which they want to connect to instead of its IP address. A DNS server resolves the name.
DNS Domain Name Service (DNS) is a service that enables users to type the name of the host to which they want to connect to instead of its IP address. A DNS server resolves the name.
![]() IPv4 This is an IP address that consists of 32 bits, notated by four 8-bit octets. It has two parts: the network ID and the host ID. The network ID describes the network, and the host ID defines the specific device on it. IPv4 addresses can be Unicast, Broadcast, or Multicast.
IPv4 This is an IP address that consists of 32 bits, notated by four 8-bit octets. It has two parts: the network ID and the host ID. The network ID describes the network, and the host ID defines the specific device on it. IPv4 addresses can be Unicast, Broadcast, or Multicast.
![]() Subnet mask This 32-bit number, notated by four 8-bit octets that consist of a set of 1s followed by a set of 0s, is used to define which part of the IPv4 address is the network ID and which part is the host ID. The 1s denote the network; the 0s denote the host. The default subnet masks are in the form 255.0.0.0 for Class A addresses, 255.255.0.0 for Class B addresses, and 255.255.255.0 for Class C addresses. Translated to binary, 255.0.0.0 looks like this: 11111111 00000000 00000000 00000000.
Subnet mask This 32-bit number, notated by four 8-bit octets that consist of a set of 1s followed by a set of 0s, is used to define which part of the IPv4 address is the network ID and which part is the host ID. The 1s denote the network; the 0s denote the host. The default subnet masks are in the form 255.0.0.0 for Class A addresses, 255.255.0.0 for Class B addresses, and 255.255.255.0 for Class C addresses. Translated to binary, 255.0.0.0 looks like this: 11111111 00000000 00000000 00000000.
![]() IPv6 The available IPv4 address combinations are dwindling, thus the need for a better option. IPv6 is that option. Instead of a 32-bit space, it’s a 128-bit space with 16-bit boundaries. This allows for many more addresses. An IPv6 address typically looks like this: 21DA:D3:0:2F3B:2AA:FF:FE28:9C5A.
IPv6 The available IPv4 address combinations are dwindling, thus the need for a better option. IPv6 is that option. Instead of a 32-bit space, it’s a 128-bit space with 16-bit boundaries. This allows for many more addresses. An IPv6 address typically looks like this: 21DA:D3:0:2F3B:2AA:FF:FE28:9C5A.
Configuring IP settings
You can configure IP settings on a Windows 10 computer by accessing the Properties page for the network adapter. To open the Properties page, perform the following steps:
From the desktop, right-click the Start button, and then click Network Connections.
In Settings, click Change Adapter Options.
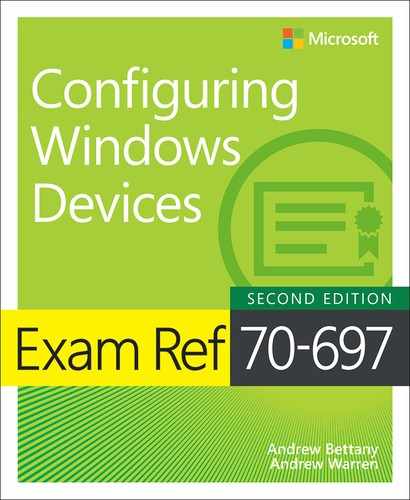
In the Network Connections window, shown in Figure 4-1, right-click the appropriate network adapter, and then click Properties.
In the Ethernet Properties dialog box shown in Figure 4-2, select Internet Protocol Version 4 (TCP/IP4), and then click Properties.
In the Internet Protocol Version 4 Properties dialog box shown in Figure 4-3, select the appropriate configuration options and specify addresses, if necessary. You can choose to either obtain the IP address and DNS server addresses automatically (from a DHCP server), or specify the addresses manually. You must, at a minimum, supply an IP address and a subnet mask.


EXAM TIP
You might be asked how to configure IPv4 or IPv6 addresses from the command line. The command to do this is Netsh. Make sure you understand the options associated with this command. You might be asked to select the proper command to apply a static address for a host, among other things. That command would look like this: netsh interface ipv4 set address ‘Ethernet’ static 192.168.5.12 255.255.255.0 192.168.1.10. If you want the address to come from a DHCP server, the command would look more like this: netsh interface ipv4 set address name=”Ethernet” source=dhcp.
Connecting to a network
The first time you connect to a local network, you are prompted to choose from one of these options:
![]() No, Don’t Turn On Sharing Or Connect To Devices This option is intended for public networks and hot spots (libraries, coffee shops). The user’s computer can’t be seen or accessed by others, and the user can’t see other computers also accessing the network.
No, Don’t Turn On Sharing Or Connect To Devices This option is intended for public networks and hot spots (libraries, coffee shops). The user’s computer can’t be seen or accessed by others, and the user can’t see other computers also accessing the network.
![]() Yes, Turn On Sharing And Connect To Devices This option is intended for private, trusted networks (home, work) and homegroups. Computers sit behind a trusted router and do not connect to the Internet directly.
Yes, Turn On Sharing And Connect To Devices This option is intended for private, trusted networks (home, work) and homegroups. Computers sit behind a trusted router and do not connect to the Internet directly.
These two options do not appear when you connect to an Active Directory Domain Services domain. However, when they do appear and when you choose an option, settings are configured automatically for network discovery, file and printer sharing, the state of the firewall, apps that can accept incoming connections, and so on. (Computers configured as Private or Domain have network discovery enabled; Public networks do not.)
Resolving connectivity issues
When a host can’t reach a network, that host has connectivity issues. The issue might be isolated to only that device; perhaps the computer’s Ethernet cable has come unplugged or the computer’s wireless features have been disabled. Maybe there is an IP address conflict on the network and the user’s IP address needs to be released and renewed. Often, using the troubleshooting tools in the Network And Sharing Center can expose the problem and offer a solution. If the issue isn’t isolated though, you have larger problems. A network server, gateway, or other necessary resource might be down, a network segment or physical backbone might be damaged, or there could be an issue that is caused by the Internet service provider (ISP), cloud services, or other technologies that are out of your control.
NETWORK AND SHARING CENTER
The Network And Sharing Center enables you to view the status of your active networks. If there’s a problem, you can click Troubleshoot Problems to see if the Network And Sharing Center can resolve it. It can be resolved by releasing and renewing the IP address, resetting adapter settings, or uncovering a simple problem such as a disconnected Ethernet cable (which you can then reconnect).
If a problem exists, but can’t be resolved automatically, you can choose from a list of troubleshooting options that include: solving problems connecting to websites, accessing shared folders, finding computers or files in a homegroup, finding and fixing problems with wireless adapters, and troubleshooting incoming connections. When you select any option and start the troubleshooter, it generally finds the problem and performs the repair or prompts you to authorize the repair. It might also require you to do something first, like insert an ethernet cable into the ethernet port on the computer.
COMMAND-LINE TOOLS
When the Network And Sharing Center and the Action Center can’t help resolve a connectivity problem, it’s likely a more complex issue. Perhaps a domain’s (or network segment’s) gateway is offline or a router failed. Perhaps the DNS server isn’t available or has been incorrectly configured on the host, or the unique, corporate, IP address of the computer has been changed to an APIPA address because of a currently unresolved network issue.
When these kinds of problems exist, you can use command-line tools to resolve them. Here are some of the tools you can use:
![]() Ping This tool verifies IP-level connectivity to another TCP/IP computer. To do this, it sends Internet Control Message Protocol (ICMP) Echo Request messages to the recipient. The receipt of these messages is displayed, along with round-trip times, if the connection is successful. Ping is the primary command used to troubleshoot connectivity, reachability, and name resolution.
Ping This tool verifies IP-level connectivity to another TCP/IP computer. To do this, it sends Internet Control Message Protocol (ICMP) Echo Request messages to the recipient. The receipt of these messages is displayed, along with round-trip times, if the connection is successful. Ping is the primary command used to troubleshoot connectivity, reachability, and name resolution.
![]() Ipconfig and Ipconfig /all This displays all current TCP/IP network configuration values. It can also refresh DHCP and DNS settings. Used without the /all parameter, Ipconfig displays IPv4 and IPv6 addresses, the subnet mask, and the default gateway for all adapters installed on the host. Common parameters are /release, /renew, and /flushdns.
Ipconfig and Ipconfig /all This displays all current TCP/IP network configuration values. It can also refresh DHCP and DNS settings. Used without the /all parameter, Ipconfig displays IPv4 and IPv6 addresses, the subnet mask, and the default gateway for all adapters installed on the host. Common parameters are /release, /renew, and /flushdns.
![]() Tracert This tool determines the path taken to a destination and shows information about each hop a packet takes to get to where it’s going. A hop is a pass through a router. You can use this information to see where the transmission fails.
Tracert This tool determines the path taken to a destination and shows information about each hop a packet takes to get to where it’s going. A hop is a pass through a router. You can use this information to see where the transmission fails.
![]() Netstat This displays a list of active TCP connections and the ports on which the computer is listening. It also displays Ethernet statistics, the IP routing table, and IPv4 and IPv6 statistics.
Netstat This displays a list of active TCP connections and the ports on which the computer is listening. It also displays Ethernet statistics, the IP routing table, and IPv4 and IPv6 statistics.
![]() Netsh This enables you to make changes to the network configuration of the current computer at the command line.
Netsh This enables you to make changes to the network configuration of the current computer at the command line.
![]() Nslookup This tool displays information that you can use to diagnose problems with DNS.
Nslookup This tool displays information that you can use to diagnose problems with DNS.
Configure name resolution
Computers are represented by their unique IP address, and you can communicate with them using that address if you like. One way to communicate with an IP address is to do so at a command line. For instance, you can type something like ping 192.168.4.5 to troubleshoot connectivity to another host on a local area network segment. Communicating this way however, is cumbersome.
DNS enables users to type names instead of numbers; this process is called name resolution. DNS servers store information about the names and addresses of Internet computers, and the lists they maintain are distributed among thousands of DNS servers available on the Internet, which are placed all over the world. The name resolution request is forwarded to one of these servers. If the name can’t be resolved server, it’s passed to another server and another, until it is resolved.
In many cases, your DHCP server will provide DNS server addresses for your client computers to use for name resolution. This occurs if Obtain DNS Server Address Automatically is selected. You can also manually configure a host to use a specific DNS server in the connection’s Properties dialog box (shown in Figure 4-3). On a domain with a unique DNS server that the host is required to use, this is necessary. It might also be necessary in a virtual private network (VPN) or in a virtual machine.
Depending on the configuration, Windows 10 resolves host names by performing the following actions:
Checking whether the host name is the same as the local host name.
Searching the DNS resolver cache, which is populated from the local Hosts file.
Sending a DNS request to its configured DNS servers.
Troubleshooting name resolution
The primary tools for troubleshooting host name resolution are IPConfig and NSLookup, and their Windows PowerShell equivalents Get-NetIPAddress, Get-NetIPv4Protocol, and Resolve-dnsname.
If you cannot connect to a remote host, and if you suspect a name resolution problem, you can troubleshoot name resolution by using the following procedure:
Open an elevated command prompt, and then clear the DNS resolver cache by typing the following command:
IPConfig /flushdns
Or, you can use the Windows PowerShell cmdlet Clear-DnsClientCache.
Attempt to verify connectivity to a remote host by using its IP address. This helps you identify whether the issue is due to name resolution. You can use the Ping command or the Test-Connection Windows PowerShell cmdlet. If the Ping command succeeds with the IP address, but fails by the host name, the problem is with name resolution.
Attempt to verify connectivity to the remote host by its host name by using the fully-qualified domain name (FQDN) followed by a period. For example, type the following command at a Windows PowerShell command prompt:
Test-connection LON-cl1.adatum.com
You can also use the ping command.
If the test is successful, the problem is likely unrelated to name resolution.
If the test is unsuccessful, edit the C:WindowsSystem32DriversEtchosts.txt text file, and then add the appropriate entry to the end of the file. For example, add this line and then save the file:
172.16.0.51 LON-cl1.adatum.com
Perform the test-by-host-name procedure again. The name resolution should now be successful.
Examine the DNS resolver cache to verify that the name resolved correctly. To examine the DNS resolver cache, type the following command at a command prompt:
IPConfig /displaydns
You can also use the Windows PowerShell cmdlet Get-DnsClientCache.
Remove the entry that you added to the hosts file, and then clear the resolver cache once more. At the command prompt, type the following command, and then examine the contents of the filename.txt file to identify the failed stage in name resolution:
NSLookup.exe –d2 LON-cl1.adatum.com > filename.txt
The Windows PowerShell equivalent command is:
Resolve-dnsname lon-cl1.adatum.com > filename.txt
Configure network locations
The first time that you connect a computer to a network, you must select whether you trust the network. This sets appropriate firewall and security settings automatically. When you connect to networks in different locations, you can ensure that your computer is set to an appropriate security level at all times by choosing a network location.
Windows 10 uses network location awareness to uniquely identify networks to which a computer is connected. Network location awareness collects information from networks, including IP address and media access control (MAC) address data from important network components, like routers and gateways, to identify a specific network.
There are three network location types:
![]() Domain networks These are workplace networks that attach to a domain. Use this option for any network that allows communication with a domain controller. Network discovery is on by default, and you cannot create or join a homegroup.
Domain networks These are workplace networks that attach to a domain. Use this option for any network that allows communication with a domain controller. Network discovery is on by default, and you cannot create or join a homegroup.
![]() Private networks These are networks at home or work where you know and trust the people and devices on the network. When you select home or work (private) networks, this turns on network discovery. Computers on a home network can belong to a homegroup.
Private networks These are networks at home or work where you know and trust the people and devices on the network. When you select home or work (private) networks, this turns on network discovery. Computers on a home network can belong to a homegroup.
![]() Guest or public networks These are networks in public places. This location keeps the computer from being visible to other computers. When you select the Public place network location, homegroup is not available and network discovery is turned off.
Guest or public networks These are networks in public places. This location keeps the computer from being visible to other computers. When you select the Public place network location, homegroup is not available and network discovery is turned off.
The Public networks location blocks certain programs and services from running, which protects a computer from unauthorized access. If you connect to a Public network and Windows Firewall is on, some programs or services might ask you to allow them to communicate through the firewall so that they can work properly.
To make changes to the network location, if that location is a homegroup, you can run the Homegroup Troubleshooter. This might never happen in a homegroup, but it’s worth noting that the Homegroup Troubleshooter is an option. If the location is a local network in a workgroup, you can make changes in the Settings app as follows:
In the Settings app, click Network & Internet.
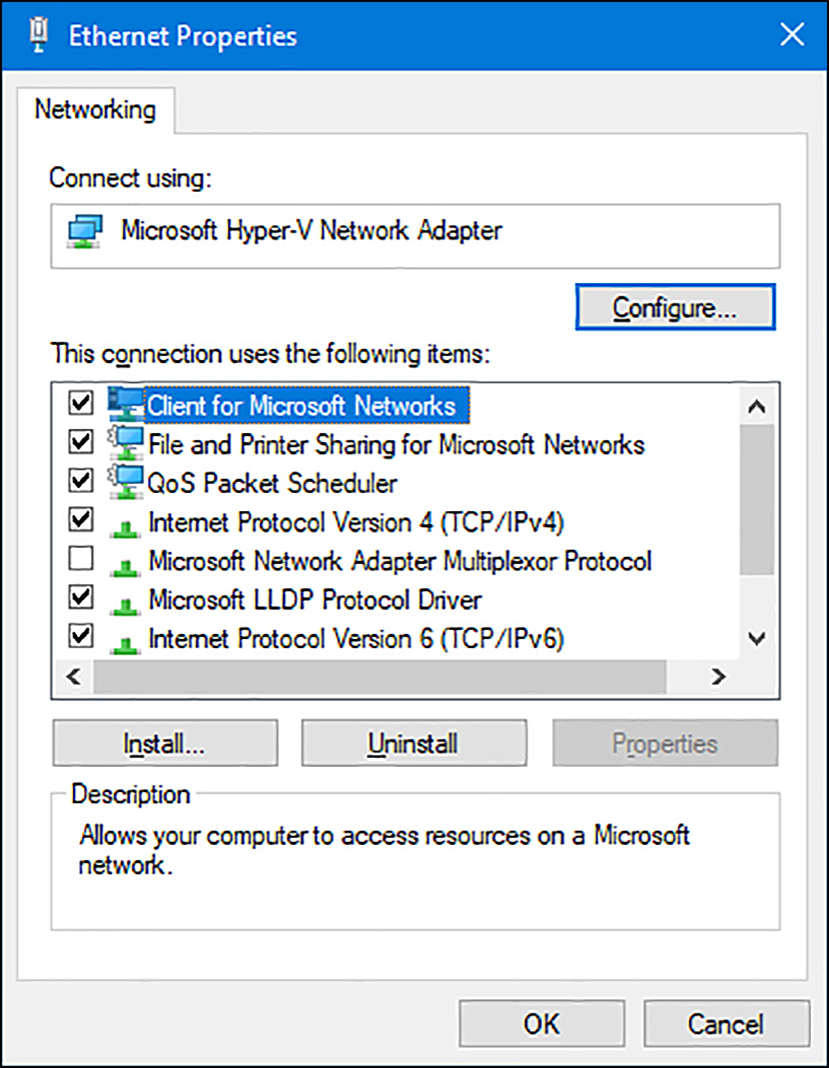
On the Network & Internet page shown in Figure 4-4, click Ethernet, and then click the adapter for which you’d like to configure the network location (Ethernet, in this case).
On the Network page, under Make this PC discoverable heading, shown in Figure 4-5, change the toggle switch to Off (do not find devices, which is recommended for a public network location) or On (find devices, which is recommended for a private network location). When you choose Off, the network location profile is Public, and when you choose On, the network location profile is changed to Private. You can verify this change by clicking Sharing options on the Status tab.

Skill 4.2: Configure network settings
There are many networking settings that you can configure. You can connect to wireless and broadband networks, and manage the list of wireless networks to which you’ve previously connected. You can configure location-aware printing to enable users to print to the desired local printer automatically. You can configure network adapters to reconfigure default settings and tweak performance.
This section covers how to:
![]() Connect to a wireless network
Connect to a wireless network
![]() Manage preferred wireless networks
Manage preferred wireless networks
![]() Configure network adapters
Configure network adapters
![]() Configure location-aware printing
Configure location-aware printing
Connect to a wireless network
An increasing number of devices use wireless connections as the primary method for accessing corporate intranets and the Internet. Additionally, many users have come to expect a wireless infrastructure in a corporate workplace. As a result, a good working knowledge of wireless connectivity is a requirement for today’s networking environment. In Windows 10, you can connect to a network from the network icon on the taskbar by following these steps:
From the Desktop, click the Network icon on the taskbar, as shown in Figure 4-6.
Click the appropriate wireless network name in the list.
Optionally, select the Connect automatically check box. This option will save the network security key so you do not have to enter it each time you connect to the network.
Click Connect. If the network is secure, you will be asked to enter the network security key.

Manage preferred wireless networks
Windows 10 keeps track of all networks to which you connect and prioritizes them automatically. When you have more than one connection option, Windows 10 determines which type it will connect to in this order: Ethernet, Wi-Fi, and then mobile broadband. For example, if a Windows 10 computer has all three network types available, Ethernet will be its chosen first; otherwise, Wi-Fi is chosen. If both become unavailable, then broadband will be chosen (and will be chosen automatically if you’ve configured it to). When choosing from wireless networks to which you’ve connected in the past, when more than one of those is available at a given time, Windows 10 connects to the last one you used.
If you’re connected to a network automatically, but want to choose another, click it from the list of networks. You can access this list by clicking the Network icon in the taskbar’s system tray.
In Windows 10, you can manage preferred networks in one of two ways. First, you can use the Wi-Fi page in the Network Setting section of the Settings app:
Open the Settings app.
Click Network & Internet, and then click Wi-Fi.
On the Wi-Fi page, click Manage Known Networks.
At the bottom of the page, beneath Manage Known Networks, click the network you want to manage.
To configure the network, click Properties. You can configure the following properties:
 Connect automatically when in range. Make this PC discoverable. Set as metered connection.
To remove the network, click Forget.
You can also manage wireless networks by using Netsh. To use Netsh to remove networks, perform the following steps:
From the command prompt, type the following:
Netsh wlan show profiles
Locate the profile you want to remove, and use it in the following command:
Netsh wlan delete profile name=<profile name>
Configure network adapters
When you right-click a network adapter in the Network Connections window, you can do any of the following:
![]() Enable or disable the adapter. (This can help you solve connection problems or keep wireless adapters from searching for networks when you don’t need them to.)
Enable or disable the adapter. (This can help you solve connection problems or keep wireless adapters from searching for networks when you don’t need them to.)
![]() Connect to or disconnect from the associated network.
Connect to or disconnect from the associated network.
![]() See the status of the adapter or connection. (You can use this to view the number of bytes sent and received, to diagnose connection problems, to view signal quality and speed, and to view the service set identifier (SSID).)
See the status of the adapter or connection. (You can use this to view the number of bytes sent and received, to diagnose connection problems, to view signal quality and speed, and to view the service set identifier (SSID).)
![]() Diagnose problems with the adapter or connection. (You can use this to run an automated tool that can assist in diagnosing connection problems.)
Diagnose problems with the adapter or connection. (You can use this to run an automated tool that can assist in diagnosing connection problems.)
![]() Bridge two or more connections. (You must select two connections that are LAN or High Speed Internet connections that are not being used by Internet Connection Sharing. A network bridge is a network device that connects to multiple network segments.)
Bridge two or more connections. (You must select two connections that are LAN or High Speed Internet connections that are not being used by Internet Connection Sharing. A network bridge is a network device that connects to multiple network segments.)
![]() Create a shortcut to the adapter for easier access.
Create a shortcut to the adapter for easier access.
![]() Delete the entry, if the option is available.
Delete the entry, if the option is available.
![]() Rename the adapter.
Rename the adapter.
![]() View the adapter’s properties. (You’ll see the Properties dialog box you learned about earlier in this chapter. From there, you can see the type of connection the adapter uses and install or uninstall protocols, Hyper-V Extensible Virtual Switch, Microsoft LLDP Protocol Driver, and more. When you select an option, you can view additional properties.)
View the adapter’s properties. (You’ll see the Properties dialog box you learned about earlier in this chapter. From there, you can see the type of connection the adapter uses and install or uninstall protocols, Hyper-V Extensible Virtual Switch, Microsoft LLDP Protocol Driver, and more. When you select an option, you can view additional properties.)
Explore the options available from the adapters on a computer you have access to. Make sure to click Configure in any Wi-Fi Properties dialog box to view the advanced options. You can configure the computer to turn off that device to conserve power or to allow the device to wake up the computer (on the Power Management tab). You can also view events (Events tab), see adapter and driver details (Details, Driver, and General tabs), and view advanced configuration options (Advanced tab).
Configure location-aware printing
Users are not always working at the same desk, day after day. Instead, many people move around and work at different desks, and often in different offices. This means that they’ll almost certainly need to access printers in various locations.
Printers can be available on any kind of network, including a network at home, at the office, or even at a company kiosk. Having to choose a printer every time they connect to a new network can annoy users, thus the need for location-aware printing. With location-aware printing, a default printer can be set for each location from which the user prints. This also keeps the user from accidentally printing to the wrong printer, which poses a potential security risk if the printed data is confidential.
EXAM TIP
Location-aware printing uses the Network Location Awareness service and the Network List service to determine the network location. The former collects and maintains network configuration information, and the latter identifies the network to which the computer is connected. If this feature doesn’t work, be aware that you need to check to make sure these services are running.
To configure location-aware printing, follow these steps:
In Settings, click Devices and then click Printers & scanners.
Scroll down the list of printers, and as shown in Figure 4-7, select the Let Windows manage my default printer check box.

Skill 4.3: Configure and maintain network security
A computer that is running Windows 10 is more likely to face threats that originate from the network than from anywhere else. This is because attacks from the network can target a large number of computers and malicious users perform them remotely, whereas other forms of attacks require physical access to the computer. In this Skill, you will learn about common network-related security threats and the steps that you can take to mitigate them.
This section covers how to:
![]() Configure Windows Firewall
Configure Windows Firewall
![]() Configure Windows Firewall with Advanced Security
Configure Windows Firewall with Advanced Security
![]() Configure connection security rules with IPsec
Configure connection security rules with IPsec
![]() Configure authentication exceptions
Configure authentication exceptions
![]() Configure network discovery
Configure network discovery
Windows Defender Security Center
Windows 10 1703 introduces the Windows Defender Security Center. This Microsoft Store app consolidates a number of network-related security components:
![]() Virus & threat protection
Virus & threat protection
![]() Device performance & health
Device performance & health
![]() Firewall & network protection
Firewall & network protection
![]() App & browser control
App & browser control
![]() Family options
Family options
To access Windows Firewall settings, open Windows Defender Security Center, and on the home tab, shown in Figure 4-8, click Firewall & network protection.

On the Firewall & network protection page, shown in Figure 4-9, you can view the current Windows Firewall status and access links to enable you to configure firewall behavior.

Configure Windows Firewall
Windows Firewall is a software solution that comes with Windows 10 that creates a virtual barrier between a computer and the network to which it is connected for the purpose of protecting the computer from unwanted incoming traffic and protecting the network from unwanted outgoing traffic. The firewall allows specific types of data to enter and exit the computer and blocks others; settings are configured by default (but they can be changed). This type of protection is called filtering. The filters are generally based on IP addresses, ports, and protocols.
![]() IP addresses are assigned to every computer and network resource connected directly to the network. The firewall can block or allow traffic based on an IP address of a resource (or a scope of addresses).
IP addresses are assigned to every computer and network resource connected directly to the network. The firewall can block or allow traffic based on an IP address of a resource (or a scope of addresses).
![]() Port numbers identify the application that is running on the computer. For example, port 21 is associated with the File Transfer Protocol (FTP), port 25 is associated with Simple Mail Transfer Protocol (SMTP), port 53 is associated with DNS, port 80 is associated with Hypertext Transfer Protocol (HTTP), and port 443 is associated with HTTPS (HTTP Secure).
Port numbers identify the application that is running on the computer. For example, port 21 is associated with the File Transfer Protocol (FTP), port 25 is associated with Simple Mail Transfer Protocol (SMTP), port 53 is associated with DNS, port 80 is associated with Hypertext Transfer Protocol (HTTP), and port 443 is associated with HTTPS (HTTP Secure).
![]() Protocol Protocols are used to define the type of packet being sent or received. Common protocols are TCP, Telnet, FTP, HTTP, Post Office Protocol 3 (POP3), Internet Message Access Protocol (IMAP), HTTPS, and User Datagram Protocol (UDP). (You should be familiar with the most common protocols before taking the exam.)
Protocol Protocols are used to define the type of packet being sent or received. Common protocols are TCP, Telnet, FTP, HTTP, Post Office Protocol 3 (POP3), Internet Message Access Protocol (IMAP), HTTPS, and User Datagram Protocol (UDP). (You should be familiar with the most common protocols before taking the exam.)
Although there are many rules already configured for the firewall, you can create your own inbound and outbound rules based on ports, protocols, programs, and more to configure the firewall to suit your exact needs. You’ll learn how later in this chapter.
Monitor the Windows Firewall
You can monitor the state of the Windows Firewall from Windows Defender Security Center. It’s easy to tell from here if the firewall is on or off, and which is the active network. However, for more information, including how you are notified when the firewall takes action, open Control Panel, click System and Security, and then click Windows Firewall, as shown in Figure 4-10.

To make basic changes to the state of the firewall, in the left pane click Turn Windows Firewall On Or Off. From there you can change settings for both private and public networks. There are two options for each:
![]() Turn On Windows Firewall (this is selected by default).
Turn On Windows Firewall (this is selected by default).
![]() Block All Incoming Connections, Including Those In The List Of Allowed Apps.
Block All Incoming Connections, Including Those In The List Of Allowed Apps.
![]() Notify Me When Windows Firewall Blocks A New App (This is selected by default).
Notify Me When Windows Firewall Blocks A New App (This is selected by default).
![]() Turn Off Windows Firewall (not recommended).
Turn Off Windows Firewall (not recommended).
What you’ll be most interested in as a network administrator, are the options available in the left pane. Specifically, you’ll use the Allow An App Or Feature Through Windows Firewall and Advanced Settings options. You’ll learn about the Advanced Settings in the next section, but here we discuss allowing an app through the firewall that is blocked by default.
Allow an app through the Windows Firewall
Some data generated with and by specific apps is already allowed to pass through the Windows Firewall. You can see which apps are allowed by clicking Allow An App Or Feature Through Windows Firewall in the left pane of the Windows Firewall window in Control Panel. As you scroll through the list, you’ll see many apps you recognize, including Bing Food & Drink, Games, Maps, Music, and Windows Media Player. See Figure 4-11. (Once you click Change Settings and give administrator approval, the Change Settings option will appear unavailable and the options in this list will be editable, as you see here.) You will also notice that some apps are not enabled by default, including Windows Media Player Network Sharing Service (Internet), Windows Remote Management, and Remote Shutdown.

To allow an app through the firewall or stop one from getting through, select the check box under the appropriate network profile for which it should be configured. As shown in Figure 4-11, there are two options for each: Private and Public. If you don’t see the app you want to allow or block, click Allow Another App. You can then select the desired app from the Add An App dialog box.
Configure Windows Firewall with Advanced Security
Although you can configure a few options in the main Windows Firewall window, most configuration tasks are performed within Windows Firewall With Advanced Security. You can open this window by clicking Advanced Settings in the Windows Firewall window as shown in Figure 4-12.

Once opened, there are several options and terms with which you need to be familiar.
![]() In the left pane, your selection determines which items appear in the middle and right panes.
In the left pane, your selection determines which items appear in the middle and right panes.
![]() Inbound Rules Lists all configured inbound rules and enables you to double-click any item in the list and reconfigure it as desired. Some app rules are predefined and can’t be modified, although they can be disabled. Explore the other nodes as time allows. You can also right-click Inbound Rules in the left pane and create your own custom rule. Rule types include Program, Port, Predefined, and Custom. They are detailed later in this section.
Inbound Rules Lists all configured inbound rules and enables you to double-click any item in the list and reconfigure it as desired. Some app rules are predefined and can’t be modified, although they can be disabled. Explore the other nodes as time allows. You can also right-click Inbound Rules in the left pane and create your own custom rule. Rule types include Program, Port, Predefined, and Custom. They are detailed later in this section.
![]() Outbound Rules Offers the same options as Inbound Rules, but these apply to outgoing data. You can also right-click Outbound Rules in the left pane and create your own custom rule.
Outbound Rules Offers the same options as Inbound Rules, but these apply to outgoing data. You can also right-click Outbound Rules in the left pane and create your own custom rule.
![]() Connection Security Rules Connection security rules establish how computers must authenticate before any data can be sent. IP Security (IPsec) standards define how data is secured while it is in transit over a TCP/IP network, and you can require a connection use this type of authentication before computers can send data. You’ll learn more about connection security rules in the next section.
Connection Security Rules Connection security rules establish how computers must authenticate before any data can be sent. IP Security (IPsec) standards define how data is secured while it is in transit over a TCP/IP network, and you can require a connection use this type of authentication before computers can send data. You’ll learn more about connection security rules in the next section.
![]() Monitoring Offers information about the active firewall status, state, and general settings for both the private and public profile types.
Monitoring Offers information about the active firewall status, state, and general settings for both the private and public profile types.
![]() In the right pane, you’ll see the options that correspond to your selection in the left pane.
In the right pane, you’ll see the options that correspond to your selection in the left pane.
![]() Import/Export/Restore/Diagnose/Repair Policies Enables you to manage the settings you’ve configured for your firewall. Polices use the WFW extension.
Import/Export/Restore/Diagnose/Repair Policies Enables you to manage the settings you’ve configured for your firewall. Polices use the WFW extension.
![]() New Rules Enables you to start the applicable Rule Wizard to create a new rule. You can also do this from the Action menu.
New Rules Enables you to start the applicable Rule Wizard to create a new rule. You can also do this from the Action menu.
![]() Filter By Enables you to filter rules by Domain Profile, Private Profile, or Public Profile. You can also filter by state: Enabled or Disabled. Use this to narrow the rules listed to only those you want to view.
Filter By Enables you to filter rules by Domain Profile, Private Profile, or Public Profile. You can also filter by state: Enabled or Disabled. Use this to narrow the rules listed to only those you want to view.
![]() View Enables you to customize how and what you view in the middle pane of the Windows Firewall With Advanced Security window.
View Enables you to customize how and what you view in the middle pane of the Windows Firewall With Advanced Security window.
When you opt to create your own inbound or outbound rule, you can choose from four rule types. A wizard walks you through the process, and the process changes depending on the type of rule you want to create. The rules are as follows:
![]() Program A program rule sets firewall behavior for a specific program you choose or for all programs that match the rule properties you set. You can’t control apps, but you can configure traditional EXE. Once you’ve selected the program for which to create the rule, you can allow the connection, allow only if the connection is secure and has been authenticated using IPsec, or block the connection. You can also choose the profiles to which the rule will be applied (domain, private, public) and name the rule.
Program A program rule sets firewall behavior for a specific program you choose or for all programs that match the rule properties you set. You can’t control apps, but you can configure traditional EXE. Once you’ve selected the program for which to create the rule, you can allow the connection, allow only if the connection is secure and has been authenticated using IPsec, or block the connection. You can also choose the profiles to which the rule will be applied (domain, private, public) and name the rule.
![]() Port A port rule sets firewall behavior for TCP and UDP port types and specifies which ports are allowed or blocked. You can apply the rule to all ports or only ports you specify. As with other rules, you can allow the connection, allow only if the connection is secured with IPsec, or block the connection. You can also choose the profiles to which the rule will be applied (domain, private, public) and name the rule.
Port A port rule sets firewall behavior for TCP and UDP port types and specifies which ports are allowed or blocked. You can apply the rule to all ports or only ports you specify. As with other rules, you can allow the connection, allow only if the connection is secured with IPsec, or block the connection. You can also choose the profiles to which the rule will be applied (domain, private, public) and name the rule.
![]() Predefined Sets firewall behavior for a program or service that you select from a list of rules that are already defined by Windows.
Predefined Sets firewall behavior for a program or service that you select from a list of rules that are already defined by Windows.
![]() Custom A rule you create from scratch, defining every aspect of the rule. Use this if the first three rule types don’t offer the kind of rule you need.
Custom A rule you create from scratch, defining every aspect of the rule. Use this if the first three rule types don’t offer the kind of rule you need.
EXAM TIP
You might encounter questions regarding how to create a rule on the exam. Therefore, you should spend a few minutes working through the wizard a few times, selecting different rule types each time to become familiar with the process.
With Windows Firewall With Advanced Security selected in the left pane and using the Overview section of the middle pane, click Windows Firewall Properties to see the dialog box shown in Figure 4-13. From there you can make changes to the firewall and the profiles, even if you aren’t connected to the type of network you want to configure.

In Figure 4-13, the Domain Profile tab is selected. If you want to, you can configure the firewall to be turned off when connected to a domain network. Additionally, you can strengthen the settings for the Public profile and customize settings for the Private profile. Finally, you can customize IPsec defaults, exemptions, and tunnel authorization on the IPsec Settings tab. Make sure to explore all areas of this dialog box and research any terms you are not familiar with.
Configure connection security rules with IPsec
You can use IPsec to ensure confidentiality, integrity, and authentication in data transport across channels that are not secure. Though its original purpose was to secure traffic across public networks, many organizations have chosen to implement IPsec to address perceived weaknesses in their own private networks that might be susceptible to exploitation.
If you implement IPsec properly, it provides a private channel for sending and exchanging potentially sensitive or vulnerable data, whether it is email, FTP traffic, news feeds, partner and supply-chain data, medical records, or any other type of TCP/IP-based data. IPsec provides the following functionality:
![]() Offers mutual authentication before and during communications.
Offers mutual authentication before and during communications.
![]() Forces both parties to identify themselves during the communication process.
Forces both parties to identify themselves during the communication process.
![]() Enables confidentiality through IP traffic encryption and digital-packet authentication.
Enables confidentiality through IP traffic encryption and digital-packet authentication.
Exploring connection security rules
A connection security rule forces authentication between two peer computers before they can establish a connection and transmit secure information. Windows Firewall with Advanced Security uses IPsec to enforce the following configurable rules:
![]() Isolation An isolation rule isolates computers by restricting connections based on credentials, such as domain membership or health status. Isolation rules allow you to implement an isolation strategy for servers or domains.
Isolation An isolation rule isolates computers by restricting connections based on credentials, such as domain membership or health status. Isolation rules allow you to implement an isolation strategy for servers or domains.
![]() Authentication exemption You can use an authentication exemption to designate connections that do not require authentication. You can designate computers by a specific IP address, an IP address range, a subnet, or a predefined group such as a gateway.
Authentication exemption You can use an authentication exemption to designate connections that do not require authentication. You can designate computers by a specific IP address, an IP address range, a subnet, or a predefined group such as a gateway.
![]() Server-to-server This type of rule usually protects connections between servers. When you create the rule, you specify the network endpoints between which communications are protected. You then designate requirements and the authentication that you want to use.
Server-to-server This type of rule usually protects connections between servers. When you create the rule, you specify the network endpoints between which communications are protected. You then designate requirements and the authentication that you want to use.
![]() Tunnel This rule allows you to protect connections between gateway computers. It is typically used when you are connecting across the Internet between two security gateways.
Tunnel This rule allows you to protect connections between gateway computers. It is typically used when you are connecting across the Internet between two security gateways.
![]() Custom There might be situations in which you cannot configure the authentication rules that you need by using the rules available in the New Connection Security Rule Wizard. However, you can use a custom rule to authenticate connections between two endpoints.
Custom There might be situations in which you cannot configure the authentication rules that you need by using the rules available in the New Connection Security Rule Wizard. However, you can use a custom rule to authenticate connections between two endpoints.
Firewall rules and connection security rules
Firewall rules allow traffic through a firewall, but do not secure that traffic. To secure traffic with IPsec, you can create connection security rules. However, when you create a connection security rule, this does not allow the traffic through the firewall. You must create a firewall rule to do this if the firewall’s default behavior does not allow traffic. Connection security rules do not apply to programs and services. They apply only between the computers that are the two endpoints.
EXAM TIP
Connection security rules specify how and when authentication occurs, but they do not allow those connections. To allow a connection, you must create an inbound or outbound rule. During the inbound or outbound rule creation, you choose the required conditions for the connection, including requiring that the connections have been authenticated by using IPsec. When you do, connections will be secured using the settings in the IPsec properties and rules in the Connection Security Rule node.
Configure authentication exceptions
When you configure a rule to allow traffic only when the connection between the communicating computers is secured using IPsec, you are creating an authenticated exception. You configure this option from the application Action page of the Rule Wizard when creating an inbound or outbound rule. When you choose the Allow The Connection If It Is Secure option on the Action page, you are configuring the rule to allow the connection using the settings in IPsec properties and rules in the Connection Security Rule node.
To create an inbound rule that applies to a single TCP port (Telnet, port 23) and create an authenticated exception for it, follow these steps:
In Windows Firewall With Advanced Security, select and then right-click Inbound Rules.
Click New Rule.
For the rule type, click Port, and then click Next.
On the Protocol And Ports page, leave TCP selected and in the Specific Local Ports box, type 23. Click Next.
For the action to take, select Allow The Connection If It Is Secure, and click Next.
To configure authorized users or authorized exceptions, select the applicable check box, click Add, and use the Select Users Or Groups dialog box to add the applicable entries.
Repeat step 6 for authorized computers and exceptions. Click Next.
Choose the profiles to which the rules should apply. Click Next. Name the rule. Click Finish.
Configure network discovery
By default, Network Discovery is enabled for private and domain networks and disabled for public ones. Network Discovery enables a computer to locate other computers on a network and allows computers on the network to see it as well. This is fine when the network is trusted, but it isn’t a good idea when the network is not. By having these settings and others already configured for the various network types, along with the applicable settings for ports and protocols, the network administrator does not have to configure every aspect of a connection manually. There is one caveat; even if Network Discovery is disabled, a Windows 10 computer can still access network resources if the user knows the names and locations of those resources (because they can’t be discovered by browsing).
It’s possible to make changes to how Network Discovery is configured. You do this from the Network And Sharing Center by following this procedure:
Open the Network And Sharing Center.
In the left pane, click Change Advanced Sharing Settings.
Click the down arrow, if applicable, beside the network type to change the settings: Private or Guest Or Public.
Make the desired change for Network Discovery Settings. Note the other options. See Figure 4-14.
Click Save Changes.

Thought experiments
In these thought experiments, demonstrate your skills and knowledge of the topics covered in this chapter. You can find the answers to these thought experiments in the next section.
Scenario 1
You are troubleshooting connectivity problems on a new laptop that has been added to a local, small business network that already includes eight other computers. Three of these eight are laptops that have always connected without issues. The new laptop can connect when plugged in directly to the router with an Ethernet cable, but it cannot connect wirelessly.
Answer the following questions related to how you would troubleshoot this issue:
What do suspect is causing this problem?
Do you think that the troubleshooter in the Network And Sharing Center can resolve this problem?
If the Internet Connection troubleshooter uncovers the issue but can’t resolve it, where would you turn next and why?
Scenario 2
You support multiple mobile users who connect to a dozen wireless networks a month and print to the printers on those networks regularly. Users complain that they have to choose their printers manually when using those networks and that sometimes they choose the wrong ones. Not only is this annoying, but because they print sensitive documents, it’s also a security issue for your company.
Beyond that, users have connected to wireless networks they’d rather have their laptops forget. The list of networks is quite long and they want you to remove entries for networks they’ll never use again (or networks that offered poor connectivity, such as one they have connected to in the past at a hotel or conference center). In the case of networks with poor connections, they’d rather default to broadband.
Regarding this scenario, answer the following questions:
What feature do you enable on the users’ Windows 10 laptops to enable the network connection to define the printer to which the users will print by default, and what two services does this feature rely on?
When a user is in a hotel where she’s stayed before, and that user has also connected to the hotel’s free Wi-Fi, what must you do to forget that network so that the user can default to broadband when she stays there next time?
Scenario 3
A client has a large library of media that contains thousands of music files. He wants to share that media in such a way as to be able to access it over the Internet from another computer he owns and keeps at his office. He’s enabled the appropriate options in Media Player on both computers. However, he can’t get sharing to work.
What do you need to do regarding the firewall so that this client can allow Media Player to share music files over the Internet?
Will you perform the required task in Windows Firewall or Windows Firewall with Advanced Security?
Will you need to be logged on as an Administrator to do this?
Thought experiment answers
This section provides the solutions for the tasks included in the thought experiment.
Scenario 1
There is probably something wrong with the wireless adapter. Maybe it isn’t enabled or needs an updated driver to work.
Probably. The Network And Sharing Center Internet Connection troubleshooter can discover that the Wi-Fi adapter is disabled, although it might not know why. If the adapter is functional, it can enable it with administrator approval.
You can try the Action Center to see if a new driver is available for the Wi-Fi adapter. If not, you can try to locate one using Device Manager. You can also refer to the manufacturer’s website to find out how to enable the Wi-Fi adapter, if that is the problem.
Scenario 2
Location-aware printing. This feature enables default printers to be configured based on the network the user is connected to. Location-aware printing uses the Network Location Awareness service and the Network List service to determine the network location.
Use the Netsh command to show the list of wireless profiles and then use this command to forget specific networks: Type netsh wlan delete profile name=<profile name>.
Scenario 3
You need to create an exception for the Media Player Network Sharing Server (Internet) in Windows Firewall.
You can perform this task in Windows Firewall. You will create an app exception.
Yes. You must be able to input Administrator credentials or be logged on as an Administrator to enable Change Settings in Windows Firewall.
Chapter summary
![]() After you connect to a network, your computer is given a unique IP address on that network segment. Every host connected to a network must have an IP address. You can use several troubleshooting tools to diagnose connection problems, if necessary.
After you connect to a network, your computer is given a unique IP address on that network segment. Every host connected to a network must have an IP address. You can use several troubleshooting tools to diagnose connection problems, if necessary.
![]() Name resolution enables network nodes to use friendly names to identify each other on the network rather than just an IP address.
Name resolution enables network nodes to use friendly names to identify each other on the network rather than just an IP address.
![]() A network location determines the different types of network traffic that are enabled for a network adapter.
A network location determines the different types of network traffic that are enabled for a network adapter.
![]() There are several ways to connect to a wireless network including using Control Panel and the Network icon in the desktop’s taskbar.
There are several ways to connect to a wireless network including using Control Panel and the Network icon in the desktop’s taskbar.
![]() There is a default priority for networks to which the user has previously connected: Ethernet, Wi-Fi, and mobile broadband. When there are two or more wireless connections available, Windows defaults to the last one used. You can manage networks by using the Settings app or the Netsh command.
There is a default priority for networks to which the user has previously connected: Ethernet, Wi-Fi, and mobile broadband. When there are two or more wireless connections available, Windows defaults to the last one used. You can manage networks by using the Settings app or the Netsh command.
![]() Each network adapter has options available for configuration. You can access these by right-clicking the network adapter in Network Connections and selecting an option from the shortcut menu.
Each network adapter has options available for configuration. You can access these by right-clicking the network adapter in Network Connections and selecting an option from the shortcut menu.
![]() Location-aware printing lets users configure a default printer for each network they connect to.
Location-aware printing lets users configure a default printer for each network they connect to.
![]() In Windows Firewall you can view the settings for private and public networks and make basic changes to the settings there. You can also disable the firewall there.
In Windows Firewall you can view the settings for private and public networks and make basic changes to the settings there. You can also disable the firewall there.
![]() In Windows Firewall, apps are either allowed through the firewall or not. You can create exceptions to configure specific apps to be able to get through the firewall.
In Windows Firewall, apps are either allowed through the firewall or not. You can create exceptions to configure specific apps to be able to get through the firewall.
![]() Windows Firewall with Advanced Security offers many more options for administrators, including configuring their own inbound, outbound, and connection security rules, configuring authenticated exceptions, and making changes to existing firewall settings.
Windows Firewall with Advanced Security offers many more options for administrators, including configuring their own inbound, outbound, and connection security rules, configuring authenticated exceptions, and making changes to existing firewall settings.
![]() You can make changes to how Network Discovery is configured for the available public and private profiles using the Advanced Sharing Settings in the Network And Sharing Center.
You can make changes to how Network Discovery is configured for the available public and private profiles using the Advanced Sharing Settings in the Network And Sharing Center.