CHAPTER 7
Manage remote access
The trend of more and more people working remotely is clearly on the rise. Convenience and cost reduction are just two reasons for this trend. Providing employees with permanent office space, including desks, PCs, telephones, and ancillary support is very expensive, especially when located in a city center. In 2016, the Department of Labor in the USA reported that 22% of the workforce work away from the office or are willing to work from home on a regular basis. These users typically only require a secure and reliable Internet connection to access company resources, which are often stored in the cloud.
Advances in technology, including mobile device management, VPN Reconnect, mobile tethering, and cloud technologies are helping to create and maintain ever more reliable and secure connections for remote workers. Improvements in speed and the availability of fast WiFi, urban and rural broadband, and increased cellular carrier speeds, such as Long Term Evolution (LTE) or 4G, are accelerating the rate at which users are able to adopt the ability to work anywhere, and businesses are able to enjoy the potential cost and environmental savings.
Increased mobility trends are demanding better device security, portability, and management. You have seen how Microsoft Intune helps manage remote devices and how BitLocker Drive Encryption and BitLocker To Go ensure data stored on devices can be secured using encryption. You’ll see in this chapter how using a Windows To Go workspace enables ultra-portability when working away from the office.
Skills in this chapter:
![]() Skill 7.1: Configure remote connections
Skill 7.1: Configure remote connections
![]() Skill 7.2: Configure mobility options
Skill 7.2: Configure mobility options
Skill 7.1: Configure remote connections
Windows 10 helps users to remain productive whether based in the office or at a remote location. In this section, you’ll learn how to configure VPN connections in Windows 10, and understand the various encapsulation, authentication, and data encryption options available.
The Remote Desktop Protocol that has been available since Windows XP is used to connect to other desktops, and this protocol continues to evolve, offering increased speed and functionality within Windows 10 both on the PC and mobile device. You need to understand how to configure remote access and enable users to connect to other computers from their devices for remote management or for the purpose of telecommuting.
In a world that is becoming more mobile and connected, you also need to understand how to tether a Windows 10 device to personal cellular or other metered broadband connections. You’ll need to also configure the devices so that data usage is controlled, both capabilities that are covered here.
This section covers the following topics:
![]() Configure remote authentication
Configure remote authentication
![]() Configure VPN connections and authentication
Configure VPN connections and authentication
![]() Configure Remote Desktop settings
Configure Remote Desktop settings
![]() Enable VPN Reconnect
Enable VPN Reconnect
![]() Configure broadband tethering
Configure broadband tethering
![]() Configure Remote Desktop client for Windows 10 Mobile, iOS, and Android
Configure Remote Desktop client for Windows 10 Mobile, iOS, and Android
![]() Protect remote desktop credentials with Remote Credential Guard
Protect remote desktop credentials with Remote Credential Guard
![]() Enable restricted admin mode for RDP in Windows 8.1 and Windows 2012 R2
Enable restricted admin mode for RDP in Windows 8.1 and Windows 2012 R2
Configure remote authentication
When we refer to using Windows 10 to connect to a remote end point, such as connecting to an enterprise network, we usually use either dial-up or virtual private networking (VPN). Despite the ubiquity of high-speed Internet access today, there are still some users who regularly use dial-up for legacy services, such as synchronizing electronic point of sale (EPOS) and daily bulletin boards.
When discussing remote authentication, it is easy to become rather confused by the terminology and differences between the various VPN connection protocols, authentication methods, and encapsulation methods that can be used. The best advice relevant to the exam is to draw a picture, list the parts of a VPN connection, and ensure you know which technology is the most recent innovation, such as VPN Reconnect (covered later).
Configure VPN connections and authentication
In Windows 10, creating a VPN enables data to be transferred through a virtual private network via a secured connection (tunnel) over a public network, such as the Internet, as shown in Figure 7-1.

Except in a few specialized scenarios, nearly all dial-up remote connections have been replaced by broadband-enabled VPN communications.
Windows 10 still supports Point-to-Point Protocol (PPP), which can be used with a dial-up connection. This is an old protocol, but because it creates a direct connection and maintains a dedicated link between the two points, it is used as the starting point for most dial-up and PPP connections.
For the exam, you will be required to understand the different types of VPN protocols that Windows 10 supports and when each protocol should be used.
VPN protocols
Windows 10 supports four commonly used VPN protocols. Each protocol offers different characteristics and age. Typically, the newest protocol will be the most secure.
![]() Point-to-Point Tunneling Protocol (PPTP) The oldest and what is considered one of the least secure of all supported VPN protocols. It can be used successfully, however, in low-security scenarios because it is very easy to set up, and still offers more protection than using PPP over the Internet.
Point-to-Point Tunneling Protocol (PPTP) The oldest and what is considered one of the least secure of all supported VPN protocols. It can be used successfully, however, in low-security scenarios because it is very easy to set up, and still offers more protection than using PPP over the Internet.
![]() PPTP creates the tunnel, and then can use several user-based authentication methods, including the Microsoft Challenge Handshake Authentication Protocol versions 1 and 2 (MS-CHAP v1 and MS-CHAP v2), Extensible Authentication Protocol (EAP), and Protected Extensible Authentication Protocol (PEAP). If EAP is used, certificates can be used with PPTP, otherwise they are not necessary.
PPTP creates the tunnel, and then can use several user-based authentication methods, including the Microsoft Challenge Handshake Authentication Protocol versions 1 and 2 (MS-CHAP v1 and MS-CHAP v2), Extensible Authentication Protocol (EAP), and Protected Extensible Authentication Protocol (PEAP). If EAP is used, certificates can be used with PPTP, otherwise they are not necessary.
![]() Layer 2 Tunneling Protocol (L2TP) This protocol uses the IP security extensions (IPsec) for encryption and encapsulation. L2TP encapsulates the messages with IPsec, and then encrypts the contents using the Data Encryption Standard (DES) or Triple DES (3DES) algorithm. The encryption keys are provided by IPsec using Internet Key Exchange (IKE). L2TP/IPsec can use pre-shared keys or certificates for authentication. Using a pre-shared key is useful during testing and evaluation, but should be replaced with a certificate in a production environment.
Layer 2 Tunneling Protocol (L2TP) This protocol uses the IP security extensions (IPsec) for encryption and encapsulation. L2TP encapsulates the messages with IPsec, and then encrypts the contents using the Data Encryption Standard (DES) or Triple DES (3DES) algorithm. The encryption keys are provided by IPsec using Internet Key Exchange (IKE). L2TP/IPsec can use pre-shared keys or certificates for authentication. Using a pre-shared key is useful during testing and evaluation, but should be replaced with a certificate in a production environment.
![]() L2TP/IPsec is widely supported on all versions of Windows since Windows XP
L2TP/IPsec is widely supported on all versions of Windows since Windows XP
![]() Secure Socket Tunneling Protocol (SSTP) This is a recent protocol introduced with Windows Server 2008 and supported on Vista SP1 or later. It encapsulates PPP traffic using the Secure Sockets Layer (SSL) protocol, which is widely supported on the Internet and because it passes through TCP port 443, which is the same as SSL, it will typically not be blocked by firewalls and can be used from almost any location. Using the Extensible Authentication Protocol-Transport Layer Security (EAP-TLS) authentication protocol together with certificates makes SSTP a very versatile and widely used protocol.
Secure Socket Tunneling Protocol (SSTP) This is a recent protocol introduced with Windows Server 2008 and supported on Vista SP1 or later. It encapsulates PPP traffic using the Secure Sockets Layer (SSL) protocol, which is widely supported on the Internet and because it passes through TCP port 443, which is the same as SSL, it will typically not be blocked by firewalls and can be used from almost any location. Using the Extensible Authentication Protocol-Transport Layer Security (EAP-TLS) authentication protocol together with certificates makes SSTP a very versatile and widely used protocol.
![]() Internet Key Exchange, Version 2 (IKEv2) IKEv2 is most useful for mobile users and is the default protocol for Windows 10 and Windows 8.1 when trying to connect to remote access servers. This protocol is partially supported on Windows 7 and later versions of Windows, and provides support for IPv6 traffic and the IKEv2 Mobility and Multi-homing (MOBIKE) protocol through the Windows VPN Reconnect feature, which allows automatic reconnection if a VPN connection is lost. Authentication is offered using EAP, PEAP, EAP-MSCHAPv2, and smart cards.
Internet Key Exchange, Version 2 (IKEv2) IKEv2 is most useful for mobile users and is the default protocol for Windows 10 and Windows 8.1 when trying to connect to remote access servers. This protocol is partially supported on Windows 7 and later versions of Windows, and provides support for IPv6 traffic and the IKEv2 Mobility and Multi-homing (MOBIKE) protocol through the Windows VPN Reconnect feature, which allows automatic reconnection if a VPN connection is lost. Authentication is offered using EAP, PEAP, EAP-MSCHAPv2, and smart cards.
![]() IKEv2 will not support older authentication methods, such as Password Authentication Protocol (PAP) and Challenge-Handshake Authentication Protocol (CHAP), which offer low protection.
IKEv2 will not support older authentication methods, such as Password Authentication Protocol (PAP) and Challenge-Handshake Authentication Protocol (CHAP), which offer low protection.
Windows 10 will seek to negotiate a common VPN type and, by default, the type is set to Automatic, with the option to select one of the four supported VPN types, as shown in Figure 7-2.

Authenticating remote users
Windows users authenticate using Kerberos when accessing the local network, but for remote authentication, this is not suitable, and a separate protocol, which protects against network intrusion, must be used. During the initial negotiation sequence (using PPP) when a client connects to the remote computer, each party must agree on a shared authentication protocol to use. By default, Windows 10 will use the strongest protocol that both parties have in common.
In the Add A VPN Connection Wizard, Windows 10 offers three sign-in options when configuring a VPN, such as:
![]() User name and password
User name and password
![]() Smart card
Smart card
![]() One-time password
One-time password
In addition to these options, you can also configure Windows 10 to use the common authentication protocols:
![]() EAP-MS-CHAPv2 This is a protocol that uses Extensible Authentication Protocol (EAP), which offers the default and most flexible authentication option for Windows 10 clients. It offers the strongest password-based mechanism for the client side, with certificates being used on the server side. Authentication can be negotiated based on certificates or smart cards, and EAP-MS-CHAPv2 is likely to be further extended and developed as technology advances. Windows 10 will aim to use this method for authentication connections where possible. IKEv2 connections must use EAP-MS-CHAPv2 or a certificate.
EAP-MS-CHAPv2 This is a protocol that uses Extensible Authentication Protocol (EAP), which offers the default and most flexible authentication option for Windows 10 clients. It offers the strongest password-based mechanism for the client side, with certificates being used on the server side. Authentication can be negotiated based on certificates or smart cards, and EAP-MS-CHAPv2 is likely to be further extended and developed as technology advances. Windows 10 will aim to use this method for authentication connections where possible. IKEv2 connections must use EAP-MS-CHAPv2 or a certificate.
![]() PAP This is the least secure protocol because it uses plaintext passwords. It is not considered secure and should only be used whenever other authentication methods cannot be negotiated.
PAP This is the least secure protocol because it uses plaintext passwords. It is not considered secure and should only be used whenever other authentication methods cannot be negotiated.
![]() CHAP Used for down-level client compatibility, and has been surpassed by MS-CHAP v2. This protocol uses a pre-shared key between the client and server to enable encryption to take place.
CHAP Used for down-level client compatibility, and has been surpassed by MS-CHAP v2. This protocol uses a pre-shared key between the client and server to enable encryption to take place.
![]() MS-CHAP v2 Stronger than the CHAP protocol, with significantly improved security when partnered with EAP to enable encryption of the password.
MS-CHAP v2 Stronger than the CHAP protocol, with significantly improved security when partnered with EAP to enable encryption of the password.
Creating a VPN connection
Windows 10 provides two methods of creating a VPN connection and configuring the VPN and authentication. The traditional method is found using the Set Up A New Connection Or Network Wizard within the Network And Sharing Center.
The modern method of creating a VPN is as follows:
Search for VPN, and click Change Virtual Private Networks (VPN).
In the Settings app, click Add A VPN Connection.
In the Add A VPN Connection dialog box, configure the options:
VPN provider, for example, Windows (Built-in)
Connection Name, for example, Work VPN
Server Name Or Address, for example, vpn3.adatum.com
VPN type, for example, Automatic
Type of sign-in information and choose User Name And Password
Type of sign-in info, for example, user name, and password
Click Save
On the VPN page in the Settings app, click Change Adapter Settings.
Select the Work VPN, and then click Change Settings Of This Connection.
Click the Security tab in the Work_VPN Properties dialog box, and in the Authentication section, click the radio button to Allow These Protocols.
Ensure the Microsoft CHAP Version 2 (MS-CHAP v2) is selected, as shown in Figure 7-3.
Click Advanced Settings.
In Advanced Properties dialog box, type the L2TP pre-shared key, and click OK twice.

Once you have created a VPN connection, you can launch the VPN by opening the Action Center, clicking the VPN tile, choosing the VPN connection in the Network And Internet dialog box, and then clicking Connect. You can also navigate to Network Connections via Network And Internet in the Control Panel, select the VPN icon, and then click Start This Connection.
Additional new VPN features introduced in Windows 10 include the following:
![]() Always On This feature enables Windows to automatically connect to a VPN. The Always On feature can be triggered by sign-in, when the desktop is unlocked, and on network changes. When the Always On profile is configured, VPN remains always connected unless the user disconnects manually or logs off the device. The profile is optimized for power and performance, and the profiles can be pushed and managed on devices using mobile device management (MDM) tools.
Always On This feature enables Windows to automatically connect to a VPN. The Always On feature can be triggered by sign-in, when the desktop is unlocked, and on network changes. When the Always On profile is configured, VPN remains always connected unless the user disconnects manually or logs off the device. The profile is optimized for power and performance, and the profiles can be pushed and managed on devices using mobile device management (MDM) tools.
![]() App-triggered VPN Previously known in Windows 8.1 as “On demand VPN,” this active VPN profile can be triggered by the user launching one of the applications that have been configuring a list of applications.
App-triggered VPN Previously known in Windows 8.1 as “On demand VPN,” this active VPN profile can be triggered by the user launching one of the applications that have been configuring a list of applications.
![]() Traffic Filters To protect the server from a remote attack, an administrator can configure policies on a Windows 10 device to inspect and, if necessary, filter VPN traffic before it is enabled to travel over the VPN. There are two types of Traffic Filter rules available:
Traffic Filters To protect the server from a remote attack, an administrator can configure policies on a Windows 10 device to inspect and, if necessary, filter VPN traffic before it is enabled to travel over the VPN. There are two types of Traffic Filter rules available:
![]() App-based rules An app-based rule will only enable VPN traffic originating from applications that have been marked as being allowed to traverse the VPN interface.
App-based rules An app-based rule will only enable VPN traffic originating from applications that have been marked as being allowed to traverse the VPN interface.
![]() Traffic-based rules Enterprise-level traffic-based rules enable fine-tuning of what type of traffic is allowed. By using the industry-standard rules covered by 5 tuple policies (protocol, source/destination IP address, source/destination port), administrators can be very specific on the type of network traffic that is allowed to travel over the VPN interface.
Traffic-based rules Enterprise-level traffic-based rules enable fine-tuning of what type of traffic is allowed. By using the industry-standard rules covered by 5 tuple policies (protocol, source/destination IP address, source/destination port), administrators can be very specific on the type of network traffic that is allowed to travel over the VPN interface.
An administrator can combine both app-based rules and traffic-based rules.
![]() LockDown VPN The LockDown VPN profile is used to enforce the use of the VPN interface. In this scenario, the device is secured to only allow network traffic over the VPN, which is automatically always on and can never be disconnected. If the VPN is unable to connect, then there will be no network traffic allowed. The LockDown profile overrides all other VPN profiles, and must be deleted before other profiles can be added, removed, or connected.
LockDown VPN The LockDown VPN profile is used to enforce the use of the VPN interface. In this scenario, the device is secured to only allow network traffic over the VPN, which is automatically always on and can never be disconnected. If the VPN is unable to connect, then there will be no network traffic allowed. The LockDown profile overrides all other VPN profiles, and must be deleted before other profiles can be added, removed, or connected.
Enable VPN Reconnect
VPN Reconnect has been available since Windows 7 and uses the IKEv2 protocol with the MOBIKE extension, to automatically re-establish a lost VPN connection without user intervention. For mobile users, the prevalence of dropped WiFi or LTE connections can be frequent, due to volatile signal strength. It is best to use and configure VPN Reconnect for your mobile users because this will reduce the frustration of having to manually reconnect, and it will also increase productivity.
The network outage time can be configured from five minutes up to an interruption of eight hours.
To enable VPN Reconnect, follow these steps:
Search for VPN, and click Change Virtual Private Networks (VPN).
In the Settings app, click Change Adapter Settings.
Select the Work_VPN, and then click Change Settings Of This Connection.
Click the Security tab in the Work_VPN Properties dialog box, and click Advanced Settings.
In the Advanced Properties dialog box, check the Mobility option on the IKEv2 tab.
Modify the Network Outage Time as necessary, as shown in Figure 7-4.
Click OK twice.

Configure broadband tethering
Windows 10 devices are becoming lighter and more mobile. Often users have multiple connected devices, including laptops, tablets, and cellular phones. Virtually ubiquitous Internet connectivity enables users to adopt an “always on” lifestyle. When users face situations where traditional connections, such as corporate WiFi or Ethernet, are not available, they will look for other forms of connectivity. This connectivity includes WiFi hotspots, or mobile devices used to connect to the Internet.
Broadband tethering introduced in Windows 8.1 enables users to share their own Internet connection with others by enabling the device to function as a wireless “hotspot.” Similarly, users can connect to other users’ shared personal “hotspots,” provided they have the necessary credentials.
To connect to a shared mobile hot-spot connection, follow these steps:
Click the WiFi icon in the notification area.
Select the shared hotspot.
Click Connect.
Enter the network security key, as shown in Figure 7-5.
Click Connect.
The network should now be connected.

WiFi services
When connecting to public or private WiFi hotspots, Windows 10 will find and connect your device to open WiFi hotspots that are nearby.
This feature uses crowdsourcing from your device and other Windows devices to source information about the local networks, such as whether the WiFi is open and high quality. If you are in range of the network, Windows 10 will automatically connect to it without being required to enter or know the WiFi password.
The feature is not available in all countries or regions and if WiFi Services is available, this feature is disabled by default.
To allow Windows 10 to automatically connect to open WiFi hotspots that it knows about through crowdsourcing, follow these steps:
Select the WiFi icon on the taskbar.
Select Network & Internet settings.
From the list on the left, select WiFi.
Under WiFi services, turn on Connect To Suggested Open Hotspots as shown in Figure 7-6.

At the top of the WiFi page is an option to manage all known networks that the device has connected to. Where a network is password-protected and this has been stored, there is an option to forget the connection that deletes the information and you will need to re-enter the password to reconnect.
Users who do not have unlimited broadband allowances need to be careful when enabling tethering because they incur excessive charges. They should take care to review the bandwidth used regularly, so that their usage does not exceed their allowed quota as defined by the service provider.
Hotspot 2.0 networks
For connecting to public WiFi networks, Windows 10 supports the Hotspot 2.0 wireless 802.11u WiFi standard. This should make connecting to hotspots in public places such as airports, or coffee shops, easier and more secure.
Your device will attempt to connect you to available public hotspots automatically, in a similar fashion to cellular-style roaming.
Although the standard is still new, there are several benefits to using Hotspot 2.0:
![]() Public Hotspots become easier and more secure–your device will detect which WiFi network is authentic and connect automatically.
Public Hotspots become easier and more secure–your device will detect which WiFi network is authentic and connect automatically.
![]() Network Providers can partner with other providers. This will allow great network coverage, and allow cellular-style roaming.
Network Providers can partner with other providers. This will allow great network coverage, and allow cellular-style roaming.
![]() Encryption is enforced and uses enterprise-grade WPA2 encryption.
Encryption is enforced and uses enterprise-grade WPA2 encryption.
When you attempt to join a Hotspot 2.0 network for the first time, Windows 10 presents an Online Sign-Up screen with a list of available network providers. After you have set an account with one of the providers, your device will be able to connect to other Hotspot 2.0 networks automatically in the future.
Configure Remote Desktop client for Windows 10 Mobile, iOS, and Android
An interactive user seldom manages servers locally. With the many tools available, including PowerShell, Remote Server Administration Tools (RSAT), and Remote Desktop, there is very little necessity (or even the possibility with cloud-based servers) to manage the server in person.
How to use Remote Desktop and how to configure the experience of the Remote Desktop Connection by configuring the available settings in the General, Display, Local Resources, Experience, and Advanced tabs, as shown in Figure 7-7, has been reviewed.

Any edition of Windows using Windows 7 or newer can initiate a Remote Desktop Connection, but the remote PC must be running one of the following editions of Windows:
![]() Windows 10
Windows 10
![]() Windows 8/8.1 Enterprise
Windows 8/8.1 Enterprise
![]() Windows 8/8.1 Professional
Windows 8/8.1 Professional
![]() Windows 7 Professional
Windows 7 Professional
![]() Windows 7 Enterprise
Windows 7 Enterprise
![]() Windows 7 Ultimate
Windows 7 Ultimate
![]() Windows Server 2008
Windows Server 2008
![]() Windows Server 2008 R2
Windows Server 2008 R2
![]() Windows Server 2012
Windows Server 2012
![]() Windows Server 2012 R2
Windows Server 2012 R2
![]() Windows Server 2016
Windows Server 2016
![]() Windows Multipoint Server 2011
Windows Multipoint Server 2011
![]() Windows Multipoint Server 2012
Windows Multipoint Server 2012
![]() Windows Small Business Server 2008
Windows Small Business Server 2008
![]() Windows Small Business Server 2011
Windows Small Business Server 2011
You cannot use the Remote Desktop client to connect to these Windows Versions and Editions:
![]() Windows 7 Starter
Windows 7 Starter
![]() Windows 7 Home
Windows 7 Home
![]() Windows 8 Home
Windows 8 Home
![]() Windows 8.1 Home
Windows 8.1 Home
![]() Windows 10 Home
Windows 10 Home
Remote Desktop is an established method of connecting to and controlling PCs and servers remotely. This can come from a remote device by using the Microsoft Remote Desktop client app (available for iOS, Android, Mac, and Windows). When you allow remote connections to your PC, you can use another device to connect to your PC and have access to all of your apps, files, and network resources as if you were sitting at your desk.
To set up the remote PC to allow remote connections follow these steps:
On the remote PC or server, open Settings, select System, and then About.
Under Related settings on the right hand side, select System Info.
Select Remote Settings.
On the Remote tab under Remote Desktop, select Allow Remote Connections To This Computer, and then select OK.
You should now be able to connect to the remote computer using the Remote Desktop Connection tool built-in to Windows, or by using one of the Remote Desktop apps discussed on the following pages.
If you prefer, you can automatically configure your PC for remote access, by downloading and running the Microsoft Remote Desktop assistant. This assistant updates your system settings to enable remote access, ensures your computer is available for connections, and checks that your firewall allows Remote Desktop connections.
Once the tool has configured your device, it will provide connection information that you can take to the remote machine to help establish the connection. Optionally, you can copy this info to your clipboard, save the connection information to a file, or scan the provided QR code using your mobile device app to add it as a connection on one of your devices.
Remote Desktop app on Windows 10
You can use the Remote Desktop app on any Windows 10 device by following these steps:
Download the Remote Desktop app from the Microsoft Store from this URL: https://www.microsoft.com/store/p/microsoft-remote-desktop/9wzdncrfj3ps?rtc=1.
Ensure you your PC or server is configured to accept remote connections.
Launch the app and connect to your PC or server using a PC, mobile device or HoloLens.
Use the Remote Desktop client to add a Remote Desktop connection to Remote Desktop on Android
You can use the Remote Desktop on an Android device by following these steps:
Download the Remote Desktop client from Google Play from this URL: https://play.google.com/store/apps/details?id=com.microsoft.rdc.android.
Ensure you your PC or server is configured to accept remote connections.
Use the Remote Desktop client to add a Remote Desktop connection to connect directly to the Windows PC or Server.
Remote Desktop on iOS and Mac
You can also use the Remote Desktop client for iOS and Mac to work with Windows 10 from your iOS device including iPhones and iPads and Macs by following these steps.
Download the Microsoft Remote Desktop client for iOS from iTunes at this URL: https://itunes.apple.com/us/app/microsoft-remote-desktop/id714464092?mt=8 or for the Mac at this URL: https://itunes.apple.com/us/app/microsoft-remote-desktop/id715768417?mt=12&ls=1.
Ensure your PC or server is configured to accept remote connections.
Use the Remote Desktop client to add a Remote Desktop connection to connect directly to the Windows PC or Server from your iPhone and iPad.
Add a Remote Desktop connection or a remote resource. You use a connection to connect to a directly to a Windows PC and a remote resource to use a RemoteApp program, session-based desktop, or a virtual desktop published on-premises using RemoteApp and Desktop Connections. This feature is typically available in corporate environments.
Configure Remote Desktop settings
In addition to using the Remote Desktop Connection found within Windows Accessories, you can use the command-line tool Mstsc.exe to launch the Remote Desktop Connection dialog box, as shown in Figure 7-7. The Mstsc.exe command also enables administrators to launch the tool, with several parameters configured.
The default firewall port that Remote Desktop uses is 3389, and this needs to allow RDP traffic through for Remote Desktop to work. If an administrator changes the firewall port for RDP traffic, the revised port number must be specified in the command-line tool Mstsc.exe when launching the application.
The syntax for mstsc is: mstsc [<connection file>] [/v:<server[:port]>] [/admin] [/f[ullscreen]] [/w:<width>] [/h:<height>] [/public] | [/span] [/multimon] [/edit “connection file”] [/restrictedAdmin] [/remoteGuard] [/prompt] [/shadow:sessionID> [/control] [/noConsentPrompt]] [/?], and the list of command-line parameters for Remote Desktop Connection are shown in Table 7-1.
TABLE 7-1 Command-line parameters for Remote Desktop Connection
Parameter |
Description |
<connection file> |
Specifies the name of a .rdp file for the connection |
/v:<Server[:<Port>] |
Specifies the remote computer you want to connect to |
/admin |
This parameter is used to connect you to a session for the administration of a Remote Desktop Session Host server (The RD Session Host role service must be installed on the remote server). |
/edit <”connection file”> |
Opens the specified .rdp file for editing |
/f |
Starts Remote Desktop Connection in full-screen mode |
/w:<Width> |
Specifies the width of the Remote Desktop window |
/h:<Height> |
Specifies the height of the Remote Desktop window |
/public |
Runs the Remote Desktop in public mode where passwords and bitmaps are not cached |
/span |
This enables the Remote Desktop width and height to be matched with the local virtual desktop, spanning across multiple monitors if necessary. |
/multimon |
Configures the Remote Desktop session monitor layout to render it identical to the client configuration |
/restrictedAdmin |
Connects to the remote PC or server in Restricted Administration mode which prevents login credentials being sent to the remote PC or server. Functionality and or compatibility may be impacted as the connection is made as local administrator. |
/remoteGuard |
Utilizes Remote Guard to protect the connection. No credentials are sent to the remote device, however full access is provided. |
/ shadow:sessionID |
Allows you to specify the SessionID you wish to connect to. |
/control |
Allows control of the remote session. |
/noConsentPrompt |
Allows the connection to continue without user consent |
/? |
Lists the available parameters |
Protect remote desktop credentials with Windows Defender Remote Credential Guard
Typically, Remote Desktop client software is used to make a connection to a server for remote administration. This can pose security concerns, since administrator credentials are highly privileged and must be protected.
Windows Defender Remote Credential Guard offers administrators the ability to protect credentials that are typically used over a Remote Desktop connection. This is achieved by redirecting the Kerberos sign on requests (and actively blocking NTLM) back to the device that’s requesting the connection. In this way the credentials and credential derivatives are not sent over the network, but instead the target device acquires a Kerberos service tickets on its own, which allows single sign-on experiences for Remote Desktop sessions.
 EXAM TIP
You must be running the Remote Desktop Classic Windows application to use Windows Defender Remote Credential Guard as the Remote Desktop UWP app doesn’t support the Windows Defender Remote Credential Guard.
Windows Defender Remote Credential Guard uses the users signed on credentials to connect to the remote computer. The only attack vector available to exploit, is on behalf of the user only when the session is ongoing, which prevents Pass-the-Hash attacks.
Since the credentials are not transmitted, this also prevents the use of credentials after disconnection.
In Windows 10 version 1703, you can configure Remote Credential Guard using Group Policy, as shown in Figure 7-8. To turn on Remote Credential Guard, on the client machine set the Restrict delegation of credentials to remote servers GPO setting found in: Computer Configuration>Administrative Templates>System>Credentials Delegation.

If you prefer to locally configure Windows Defender Remote Credential Guard on, you can use the following parameter to mstsc.exe:
mstsc.exe /remoteGuard
Enable restricted admin mode for RDP in Windows 8.1 and Windows 2012 R2
Alongside Windows Defender Remote Credential Guard is a more secure method of using Remote Desktop called Restricted Admin mode. This mode prevents users from passing credentials to the remote system and forces them to use local admin privileges on the remote server.
Only users whom possess administrative privileges already can use this feature and an attacker is unable to access any “domain user” credentials because these are not allowed when Restricted Admin mode is used.
Restricted Admin mode must be explicitly enabled on the destination systems which must be running Windows 7 or Windows Server 2008 R2 that have been patched with the Microsoft Security Advisory 2871997 Update which improves credentials protection and management. Supported editions of Windows 8.1, Windows Server 2012 R2, and Windows RT 8.1 and newer, already have the additional protection for the Local Security Authority (LSA) built-in.
To enable the Restricted Admin mode you should configure the remote computer using the following steps:
Open Registry Editor by running regedit from the Search box.
Accept the UAC if prompted.
In Registry Editor, create a new registry key as follows:
HKEY_LOCAL_MACHINESystemCurrentControlSetControlLsa
Name: DisableRestrictedAdmin
Type: REG_DWORD
Value: 0
Using a value of 0 will enable Restricted Admin mode. Once enabled, the destination system will accept incoming Restricted Admin-enabled connections.
Close the Registry Editor.
The setting takes effect immediately and no reboot is required.
To initiate a new connection using Remote Desktop in Restricted Admin mode, run the following command:
Mstsc.exe /RestrictedAdmin
In Windows 10 version 1703, you can configure Restricted Admin mode using the GPO shown in Figure 7-8. To turn on Restricted Admin mode on the client machine set the option to Require Restricted Admin.
EXAM TIP
You should ensure you are familiar with the new Remote Credential Guard and Restricted Admin mode as these offer enhanced protection for remote connections using the well-known and widely used Remote Desktop protocol.
Troubleshooting Remote Desktop Connections
Remote Desktop is a powerful tool for administrators, which enables them to manage PCs and servers within the enterprise. Some common problems encountered when trying to connect to a remote PC using Remote Desktop, and their resolution, are listed in Table 7-2.
TABLE 7-2 Troubleshooting Remote Desktop Connections
Problem |
Possible resolution |
The remote PC can’t be found |
|
There’s a problem with the network |
|
The Remote Desktop port might be blocked by a firewall |
|
Remote connections might not be set up on the remote PC |
|
The remote PC might only enable PCs that have Network Level Authentication set up to connect |
|
The remote PC might be turned off |
|
Remote Desktop Connection Zoom support
Many devices with very high dots per inch (DPI) resolutions are now available. When using a device, such as a Surface Pro, to connect to older versions of Windows, such as Windows 7 and Windows Server 2008, the display content might appear very small and hard to read. Windows 8.1 enabled support for host-side dynamic display scaling, but this is not available for older versions of Windows. In Windows 10, a new feature has been introduced to enable the user to zoom their session display on the client.
The new Zoom option can be found in the system menu in the Remote Desktop Connection session window, as shown in Figure 7-9.

With the session zoomed in, the screen text and icons become larger, and are more readable and usable for sessions with older versions of Windows.
Remote Desktop Connection pen support
The Remote Desktop Connection within Windows 10 supports pen remoting when connecting from a Windows 10 client to a host system that is running Windows 10 or Windows Server 2016. There was some limited pen support in a Remote Desktop session in Windows 8.1, but that has been enhanced to provide a near-local experience, without any configuration. If the local device supports pen and it is running Windows 10, the user can write or draw in the Remote Desktop session.
This feature is useful for administrators using touch-enabled devices, such as the Surface Book, to connect to a remote application server using their tablet.
Remote Desktop Connection Manager
Administrators who want to manage multiple remote desktop connections can download Remote Desktop Connection Manager (RDCMan). This tool is useful for managing server labs or large server farms, such as within a datacenter. It is similar to the Remote Desktops Microsoft management console (MMC) snap-in found on Windows Server, but more flexible. The current version enables many feature improvements, including virtual machine connect-to-console support, smart grouping of remote machines, support for credential encryption with certificates, and connectivity to virtual machines within Microsoft Azure.
Skill 7.2: Configure mobility options
Working from home, or away from the traditional office environment, is not suitable for all corporations or employees. Where feasible, mobile working is very popular, and as technology continues to improve, the trend is likely to grow. Windows 10 embraces mobility and offers several enhancements that increase productivity and collaboration, with Anywhere Access to business tools and information.
You need to understand the options available to enable and support mobility for users, so that they can be productive, working either at the office or away from the office.
This section covers how to:
![]() Configure offline file policies
Configure offline file policies
![]() Configure power policies
Configure power policies
![]() Configure Windows To Go
Configure Windows To Go
![]() Configure sync options
Configure sync options
![]() Configure WiFi Direct
Configure WiFi Direct
Configure offline file policies
When a user is travelling away from the office, there are often occasions when network availability is insufficient for them to be able to connect their device to the corporate network. Until they can re-establish a VPN connection, they are able to use a feature called Offline Files, which will enable them to continue to access corporate data, which is securely cached on their device, and enable this data to be automatically re-synced to the corporate network once they are able to reconnect.
You need to understand how to enable the feature and create policies to manage Offline Files in an enterprise.
Data that is made available over the network has the ability to be shared. A user might not be able to access the Offline Files feature in the following situations:
![]() An administrator has prevented offline copies on the folder or files.
An administrator has prevented offline copies on the folder or files.
![]() The user might not have NTFS permissions to access the files.
The user might not have NTFS permissions to access the files.
Users can choose which shared folders they want to make available offline. They could choose to make many folders available, but in practice, this is not recommended because the sync process will take longer if thousands of files and folders need to be synced each time the user leaves and rejoins the corporate network.
When a user is connected to the network, they can work with online files accessed directly from the network server. If they enable Offline Files, Windows 10 will cache a local copy of the files onto the local device. These files will be kept in sync with the network versions, and if the user must work offline, the Offline Files feature will automatically be used whenever the user needs to work with a networked file that they have previously made available offline.
Windows will also monitor the network for latency and disconnection, and will automatically switch to using the cached files, so that the user does not lose productivity.
Windows 10 will automatically switch to Offline Mode when one of the following situations occurs:
![]() The files are no longer available on the network, for example, the server is unavailable due to a server malfunction, or the server is turned off.
The files are no longer available on the network, for example, the server is unavailable due to a server malfunction, or the server is turned off.
![]() The files are no longer available on the network due to a network outage, or the user has disconnected his device from the network.
The files are no longer available on the network due to a network outage, or the user has disconnected his device from the network.
![]() The files are no longer available on the network due to a network outage, such as the WiFi or VPN connection being lost.
The files are no longer available on the network due to a network outage, such as the WiFi or VPN connection being lost.
![]() The network connection speed is slower than the minimum bandwidth specified in Group Policy.
The network connection speed is slower than the minimum bandwidth specified in Group Policy.
![]() Always Offline Mode has been configured in Group Policy.
Always Offline Mode has been configured in Group Policy.
Two of the recent policies settings relating to slow or metered networks are Enable Always Offline Mode and Enable File Synchronization On Costed Networks. Offline Files has been supported by Windows for many years, and for the exam, you need to review the most recent Offline Files Group Policy settings, including the following:
![]() Configure Slow-link Mode
Configure Slow-link Mode
![]() Configure Slow-link Speed
Configure Slow-link Speed
![]() Synchronize All Offline Files Before Logging Off
Synchronize All Offline Files Before Logging Off
![]() Synchronize All Offline Files When Logging On
Synchronize All Offline Files When Logging On
![]() Enable Transparent Caching
Enable Transparent Caching
![]() Enable File Synchronization On Costed Networks
Enable File Synchronization On Costed Networks
There are several new features available to enterprises using Windows Server 2012 and Windows 8 or later. By configuring Group Policy, administrators can enable additional features not found within the GUI, which support more efficient use of Offline Files, as follows:
![]() Always Offline Mode Provides faster access to cached files and uses less bandwidth by making users work offline even when they are connected through a high-speed network connection. By configuring Group Policy to enable the Configure Slow-Link Mode setting, the latency to 1 (millisecond) causes supported client devices to use the Always Offline Mode.
Always Offline Mode Provides faster access to cached files and uses less bandwidth by making users work offline even when they are connected through a high-speed network connection. By configuring Group Policy to enable the Configure Slow-Link Mode setting, the latency to 1 (millisecond) causes supported client devices to use the Always Offline Mode.
![]() Background file synchronization on costed networks Will enable Offline Files to be synchronized in the background, even over costed networks. You need to disable or not configure this setting, so that Windows will track roaming and bandwidth usage limits while the device is using a metered connection. When the client is near or over their usage allowance, Windows will disable background synchronization to prevent users from incurring excessive usage charges.
Background file synchronization on costed networks Will enable Offline Files to be synchronized in the background, even over costed networks. You need to disable or not configure this setting, so that Windows will track roaming and bandwidth usage limits while the device is using a metered connection. When the client is near or over their usage allowance, Windows will disable background synchronization to prevent users from incurring excessive usage charges.
To enable the Always Offline Mode, you should carry out the following steps:
Open Group Policy Management.
In the console tree, navigate to Computer ConfigurationPoliciesAdministrative TemplatesNetworkOffline Files.
Double-click Configure Slow-Link Mode.
Click Enabled.
In the Options box, next to UNC Paths, click Show.
In the Value Name box, specify the file share for which you want to enable Always Offline Mode, or to enable Always Offline Mode on all file shares, type *.
In the Value box, type Latency=1 to set the latency threshold to one millisecond, as shown in Figure 7-10.
Click OK twice.

To disable background file synchronization of Offline Files on metered networks, you should carry out the following steps:
Open Group Policy Management.
In the console tree, navigate to Computer ConfigurationPoliciesAdministrative Templates NetworkOffline Files.
Double-click Enable File Synchronization On Costed Networks.
Click Disabled.
Click OK.
You need to also review the following additional enterprise features that can be configured and deployed using Group Policy settings that relate to Offline Files, Folder Redirection, and Roaming User Profiles:
![]() Deploy Folder Redirection With Offline Files
Deploy Folder Redirection With Offline Files
![]() Deploy Roaming User Profiles
Deploy Roaming User Profiles
![]() Deploy Primary Computers For Folder Redirection And Roaming User Profiles
Deploy Primary Computers For Folder Redirection And Roaming User Profiles
Configure power policies
Windows 10 continues to enable users and administrators to fine-tune the power settings for individual elements on Windows devices. For mobile users, battery consumption and power conservation can be a critical issue when users are away from the office, without the device charger.
On a mobile device, the battery percentage remaining will be displayed in the notification area, as shown in Figure 7-11, with an option to modify the device Power & Sleep Settings, and options to change the screen brightness.

Clicking on the Power & Sleep Settings option will launch the Settings page, as shown in Figure 7-12, which shows the default settings applied to the device.

You define power settings in addition to the user-centric options. You can access Power Options by clicking the Additional Power Settings link on the Power & Sleep settings page, or by using the Power Options Control Panel.
Users can configure many options and choose, modify, or save a power plan, and make amendments to key power-related activities, including:
![]() Choose what the power button does.
Choose what the power button does.
![]() Choose what closing the lid does.
Choose what closing the lid does.
![]() Create a power plan.
Create a power plan.
![]() Change when the computer sleeps.
Change when the computer sleeps.
Administrators can configure additional advanced power-plan settings, and both types of users can restore plans back to their default settings.
On mobile devices, Windows 10 also includes a useful Windows Mobility Center, which can be used to review mobility settings, all in one location. Depending upon your system, some or all of the following settings might be available on your mobile device:
![]() Brightness Enables you to temporarily adjust the brightness of your display.
Brightness Enables you to temporarily adjust the brightness of your display.
![]() Volume Enables you to adjust the speaker volume of your device, or select the Mute check box.
Volume Enables you to adjust the speaker volume of your device, or select the Mute check box.
![]() Battery Status Lets you view how much charge is remaining on your battery.
Battery Status Lets you view how much charge is remaining on your battery.
![]() Screen Orientation Lets you change the orientation of your device screen from portrait to landscape, or vice versa.
Screen Orientation Lets you change the orientation of your device screen from portrait to landscape, or vice versa.
![]() External Display Enables connection to an additional monitor to your device.
External Display Enables connection to an additional monitor to your device.
![]() Sync Center Enables you to sync with external data sources, such as Offline Files.
Sync Center Enables you to sync with external data sources, such as Offline Files.
![]() Presentation Settings Lets you turn on presentation settings during a presentation, and temporarily disable the following:
Presentation Settings Lets you turn on presentation settings during a presentation, and temporarily disable the following:
![]() Disables popups and notifications area popups (such as from Outlook)
Disables popups and notifications area popups (such as from Outlook)
![]() Prevents Windows from going into sleep mode
Prevents Windows from going into sleep mode
![]() Prevents Windows from turning the screen off
Prevents Windows from turning the screen off
Mobility Center is only available on mobile devices, such as laptops and tablets.
Using Group Policy to configure power policies
In addition to the power options in the GUI interface, administrators can configure the same options by using Group Policy.
The Power Management GPOs are located in the following container:
Computer ConfigurationPoliciesAdministrative TemplatesSystemPower Management
There are seven nodes under Power Management: Button Settings, Energy Saver Settings, Hard Disk Settings, Notification Settings, Power Throttling Settings, Sleep Settings, and Video And Display Settings. Each has several GPOs that you need to explore to ensure that you appreciate the various aspects of the power options that can be configured using Group Policy. Although most of the settings are duplications of those found within the Control Panel, the following Sleep Settings are an example of power settings that are not available within the Control Panel:
![]() Specify The System Sleep Timeout (Plugged In)
Specify The System Sleep Timeout (Plugged In)
![]() Specify The System Sleep Timeout (On Battery)
Specify The System Sleep Timeout (On Battery)
![]() Require A Password When The Computer Wakes (Plugged In)
Require A Password When The Computer Wakes (Plugged In)
![]() Require A Password When The Computer Wakes (On Battery)
Require A Password When The Computer Wakes (On Battery)
![]() Allow Standby States (S1-S3) When Sleeping (Plugged In)
Allow Standby States (S1-S3) When Sleeping (Plugged In)
![]() Allow Standby States (S1-S3) When Sleeping (On Battery)
Allow Standby States (S1-S3) When Sleeping (On Battery)
Using powercfg.exe
If you have configured the power options for your device, you can save the entire power-management plan as a custom plan to a file. To do this, you need to use the Powercfg.exe command-line tool, which can export and import settings from one computer, which you can then deploy to other devices using the command line or using Group Policy.
Use the Powercfg.exe -list command in a command prompt to get a list of the power plans that are currently available on your device. On a Windows 10 PC, you should see the default plan(s) and any custom plans that you have created, as shown in Figure 7-13.

To export a power plan, make a note of the GUID value, which uniquely identifies the power plan. To export the policy, type powercfg.exe -export power.pow GUID (where the GUID value is the GUID that you noted previously). Figure 7-13 shows the completed listing, export, and verification that the .pow file has been created.
To import a custom power plan, type powercfg.exe /import c: emppower.pow, where c: emppower.pow represents the path and file name.
In Figure 7-14, the Power Management Group Policy settings are visible. In the right pane, you can see the highlighted options, which can be used to apply a custom power plan. These are Specify A Custom Active Power Plan and Select An Active Power Plan. You need to ensure that the power plan has been first deployed, using Powercfg.exe, to the device using powercfg.exe /import c:scheme.pow.

There are a number of specialist powercfg commands, which are more relevant to mobile devices and can be used to troubleshoot battery issues, such as abnormal battery drain, hibernation behavior, or to determine the expected life of the device battery. You need to review all of these commands for the exam, but if you have a battery-powered device, such as a Surface, it is worthwhile viewing the output of some of the commands shown in Table 7-3.
TABLE 7-3 Troubleshooting energy issues with powercfg.exe
Command |
Description |
powercfg /energy |
Generate an Energy Report |
powercfg /a |
Identify the available sleep and standby states that your device supports |
powercfg -devicequery wake armed |
Identify what last caused your device to wake from sleep or hibernation |
powercfg /batteryreport |
Generate a Battery Report |
powercfg.exe /hibernate on |
Make hibernation available |
powercfg.exe /hibernate off |
Makes hibernation unavailable |
powercfg /sleepstudy |
Generate a Connected Standby Sleep Study; by default, it will generate a report for the last 3 days, but this can be extended up to 28 days by using the /duration 28 argument. |
The powercfg /batteryreport is particularly useful for viewing the state of the battery, on a mobile device. The report shows power cycles and the battery performance and degradation over its lifetime.
Configure Windows To Go
Computing continues to evolve, and devices are getting smaller and smaller and more portable, while at the same time packing more features and more power.
Windows To Go offers users a paradigm shift in thinking about a PC. Instead of installing, configuring, and “owning” the PC that they use, the user of a Windows To Go workspace simply inserts a special USB drive into the host PC and boots directly to it. All Windows 10 operations are carried out natively on the USB drive, and essentially, the workspace acts like a parasite or guest using the hosts’ hardware except for the hard drive, which is disabled.
You need to regard Windows To Go as a specialist option to enable Windows 10 to be deployed in alternative workplace scenarios. Example scenarios could include travelling ultra-light without a laptop or tablet, or where there are a lot of employees, such as airline staff who use the same device, or staff on short contracts, which would make the provision of hardware uneconomical.
Windows To Go has the following features as well as differences when compared to a typical installation of Windows:
![]() Hardware requirements A Windows To Go workspace should only be used on PCs that meet the Windows 7 or later hardware requirements.
Hardware requirements A Windows To Go workspace should only be used on PCs that meet the Windows 7 or later hardware requirements.
![]() Licensing restrictions Windows To Go is only available in the Enterprise and Education editions of Windows 10.
Licensing restrictions Windows To Go is only available in the Enterprise and Education editions of Windows 10.
![]() Internal disks are offline Internal hard disks on the host computer are offline by default.
Internal disks are offline Internal hard disks on the host computer are offline by default.
![]() Trusted Platform Module (TPM) is not used If BitLocker Drive Encryption is used to encrypt a Windows To Go drive, it cannot use the TPM since the TPM is tied to a specific computer, and not to the Windows To Go drive.
Trusted Platform Module (TPM) is not used If BitLocker Drive Encryption is used to encrypt a Windows To Go drive, it cannot use the TPM since the TPM is tied to a specific computer, and not to the Windows To Go drive.
![]() Hibernate is disabled by default Hibernation is disabled by default to prevent possible corruption of the Windows To Go drive if it is moved to another device while using hibernation. Hibernation can be re-enabled in Group Policy. Windows To Go supports all other power states.
Hibernate is disabled by default Hibernation is disabled by default to prevent possible corruption of the Windows To Go drive if it is moved to another device while using hibernation. Hibernation can be re-enabled in Group Policy. Windows To Go supports all other power states.
![]() Windows Recovery Environment is not available To reduce size on the drive, the RE is not available.
Windows Recovery Environment is not available To reduce size on the drive, the RE is not available.
![]() Refreshing or resetting a Windows To Go workspace is not supported The feature is disabled; if necessary you should re-image it with a fresh image.
Refreshing or resetting a Windows To Go workspace is not supported The feature is disabled; if necessary you should re-image it with a fresh image.
![]() Upgrading a Windows To Go workspace is not supported Older Windows 8 or Windows 8.1 Windows To Go workspaces cannot be upgraded to Windows 10 workspaces.
Upgrading a Windows To Go workspace is not supported Older Windows 8 or Windows 8.1 Windows To Go workspaces cannot be upgraded to Windows 10 workspaces.
![]() Architecture and firmware The Windows To Go drive must be compatible with the processor architecture and firmware type. For example, 32-bit versions of Windows To Go will not work on 64-bit computers. Windows To Go is not supported on the ARM architecture, and Windows RT is not supported.
Architecture and firmware The Windows To Go drive must be compatible with the processor architecture and firmware type. For example, 32-bit versions of Windows To Go will not work on 64-bit computers. Windows To Go is not supported on the ARM architecture, and Windows RT is not supported.
Roaming with Windows To Go
Windows To Go drives can be booted on multiple computers. When a Windows To Go workspace is booted on a new host computer, it will detect all hardware on the computer and install any needed drivers. If the Windows To Go workspace returns to the same host computer again, it will load the correct set of drivers automatically.
Some applications do not support roaming as they bind to the computer hardware, which can cause difficulties if the workspace is being used on multiple host computers.
Hardware considerations for Windows To Go
Certified Windows To Go devices have been specially optimized to meet the necessary requirements for booting and running a full version of Windows 10 from a USB drive.
Windows To Go drives are optimized as follows:
![]() Built for high random read/write speeds
Built for high random read/write speeds
![]() Support the thousands of random access I/O operations per second
Support the thousands of random access I/O operations per second
![]() Tuned to ensure they boot and run on hardware certified for use with Windows 7 and later
Tuned to ensure they boot and run on hardware certified for use with Windows 7 and later
![]() Built to last under normal usage, despite the high performance requirements
Built to last under normal usage, despite the high performance requirements
Certified Windows To Go drives
The drives listed in Table 7-4 are currently certified Windows To Go drives.
TABLE 7-4 Certified Windows To Go drives
Windows To Go drive |
Vendor Website |
IronKey Workspace W500 |
http://www.ironkey.com/windows-to-go-drives/ironkey-workspace-w500.html |
IronKey Workspace W700 |
http://www.ironkey.com/windows-to-go-drives/ironkey-workspace-w700.html |
IronKey Workspace W300 |
http://www.ironkey.com/windows-to-go-drives/ironkey-workspace-w300.html |
Kingston DataTraveler Workspace for Windows To Go |
|
Spyrus Portable Workplace |
|
Spyrus Secure Portable Workplace |
|
Spyrus Worksafe |
|
Super Talent Express RC4 for Windows To Go |
|
Super Talent Express RC8 for Windows To Go |
|
Western Digital My Passport Enterprise |
Administrators can provision Windows To Go drives using the Windows To Go Workspace Wizard or PowerShell scripts to target several drives and scale out the deployment for a large number of Windows To Go drives. A USB duplicator can be used to rapidly duplicate Windows To Go drives after it has been provisioned. Do not enable BitLocker Drive Encryption on Windows To Go drives if you are planning to use a USB duplicator because drives protected with BitLocker will use the same encryption key if duplicated.
Creating a workspace with the Create A Windows To Go Workspace Wizard
To create a Windows To Go workspace on a certified USB drive, use the Windows To Go Workspace Wizard using these steps:
Launch the Windows To Go Workspace Wizard by typing Windows To Go in the Search bar.
Insert the certified Windows To Go 3.0 USB drive into an available USB 3.0 port.
You’ll be asked to Choose The Drive That You Want To Use. Select the certified Windows To Go workspace, and click Next.
Choose a Windows 10 image. Select the image, or select Add Search Location, and browse to a location that contains the required Windows 10 Enterprise .wim image file (such as install.wim).
Click Next.
Check the box next to Set A BitLocker Password (Optional), or click Skip.
The Create A Windows To Go Workspace Wizard will now apply the Windows image to the drive, as shown in Figure 7-15.

Once completed, the wizard will optionally configure the host PC to boot to the new Windows To Go workspace.
Creating a workspace with Windows PowerShell
PowerShell cmdlets can perform the same function as the Create A Windows To Go Workspace Wizard. Because there is no visual confirmation as in the wizard, you need to ensure that only the USB drive you want to provision as a Windows To Go Workspace is connected to the provisioning PC.
The PowerShell script should be run in an elevated Windows PowerShell prompt. The script required to configure the Windows To Go Workspace is quite long, and includes the following stages:
Partition a master boot record (MBR) disk with a FAT32 system partition and an NTFS-formatted operating system partition.
Apply the Windows 10 .wim file that contains a sysprepped generalized image using the Deployment Image Servicing and Management (DISM) command-line tool.
Use the Bcdboot.exe command-line tool to move the necessary boot parts to the system partition on the disk.
Apply the new SAN policy setting OFFLINE_INTERNAL - “4” to prevent Windows 10 from automatically bringing online any internally connected disk.
Create and deploy an answer file (unattend.xml) that disables the use of Windows Recovery Environment with Windows To Go.
There isn’t enough space in this book to include the scripts required, but you can view a sample PowerShell script at: https://docs.microsoft.com/windows/deployment/deploy-windows-to-go.
EXAM TIP
Windows To Go is only available as a feature in Windows 10 Enterprise and Windows 10 Education editions of Windows 10, and is licensed as part of the Microsoft Software Assurance program.
Configure sync options
The number of devices that users own has risen significantly over the last few years. It is typical for a user to have personal equipment at home, and also be provided with devices, such as a smartphone and a computer, by their employer. A few users have multiple tablets, laptops, and desktop PCs. With the rising trend of Bring Your Own Device (BYOD), whereby users bring their own devices to the workplace, users can find it difficult to manage their identity and consistency across multiple devices, and still remain productive on each.
Windows 10 builds on the sync settings that were introduced with Windows 8, and helps you with synchronization between your devices whether those are at home or at the workplace. You can sync settings, such as your desktop theme, browser settings, and passwords, so that they will appear on all your Windows 10 devices. This synchronization is not automatic; unless you sign in with a Microsoft account and turn on the syncing for each device.
Even if you sign in with a Microsoft account, you can disable syncing, or review each of the available options and enable or prevent them one by one.
In Windows 10, the sync settings are found in the Sync Your Settings section under the Accounts page in Settings. The default settings are that sync is turned on, as shown in Figure 7-16.

There are seven choices for the user to configure relating to syncing settings between your devices:
![]() Sync Settings If this is turned off, no changes are made to any of the settings on your other devices when you sign in with your Microsoft account.
Sync Settings If this is turned off, no changes are made to any of the settings on your other devices when you sign in with your Microsoft account.
![]() Theme This lets you sync your color and background choices. Turning this setting off enables each device to retain its own theme.
Theme This lets you sync your color and background choices. Turning this setting off enables each device to retain its own theme.
![]() Internet Explorer Settings This lets you sync Internet Explorer browser settings.
Internet Explorer Settings This lets you sync Internet Explorer browser settings.
![]() Passwords Any passwords saved on your Windows 10 device will be securely synced to the other devices that you sign in to with your Microsoft account.
Passwords Any passwords saved on your Windows 10 device will be securely synced to the other devices that you sign in to with your Microsoft account.
![]() Language Preferences This is useful if you require multilingual support.
Language Preferences This is useful if you require multilingual support.
![]() Ease Of Access Any accessibility options that are applied to one machine will sync to all your Windows 10 devices.
Ease Of Access Any accessibility options that are applied to one machine will sync to all your Windows 10 devices.
![]() Other Windows Settings Syncs other settings and preferences, such as taskbar settings and position, search preferences, mouse pointer speed, printer preference settings, File Explorer Quick Access settings, and many more.
Other Windows Settings Syncs other settings and preferences, such as taskbar settings and position, search preferences, mouse pointer speed, printer preference settings, File Explorer Quick Access settings, and many more.
Deleting your personal settings from the cloud
You have seen that when you use a Microsoft account to sign in to Windows 10, the settings and app data that you choose to sync are saved in your Microsoft account, or more specifically, they are stored in your secure OneDrive cloud.
If you stop synchronizing your settings between your devices, the data will not be removed from OneDrive; you need to delete the PC settings from OneDrive. To stop synchronizing your settings and delete the settings from OneDrive, carry out the following steps:
Sign in to your device with your Microsoft account.
Open Settings, click Accounts, and then click Sync Your Settings.
Set the Sync Settings toggle to Off.
Repeat this action on all devices that use the same Microsoft account.
If you have a Windows 8.1 phone, navigate to Settings, then tap Sync My Settings, and click Turn Off Synchronization For All Settings.
To delete your settings from OneDrive, you need to launch OneDrive.com.
Click the Settings/Options gear in the top right corner of the screen.
Select Device Backups.
For all devices, click Delete.
Sync Center and configuring sync options
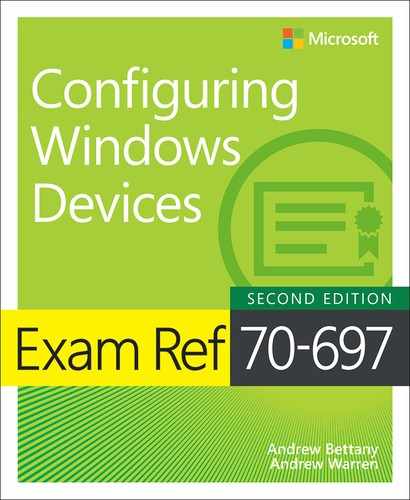
Previous versions of Windows included options to create a sync partnership between Windows and mobile phones, portable music players, or other mobile devices, but the most common use for Sync Center is to sync with Offline Files. If you have enabled Offline Files, as explored earlier in this chapter, Windows will display a sync partnership in Control Panel Sync Center, as shown in Figure 7-17.
When working with Offline Files, you can use Sync Center to perform tasks. For the exam, you need to review all options, and pay particular attention to the Manage Offline Files option, which opens a dialog box that enables you to configure settings, including:
![]() Disable Offline Files.
Disable Offline Files.
![]() Open Sync Center.
Open Sync Center.
![]() View Your Offline Files.
View Your Offline Files.
![]() Check Disk Usage For Your Offline Files.
Check Disk Usage For Your Offline Files.
![]() Change Disk Usage Limits For Your Offline Files.
Change Disk Usage Limits For Your Offline Files.
![]() Delete Temporary Files.
Delete Temporary Files.
![]() Encrypt Or Unencrypt Your Offline Files.
Encrypt Or Unencrypt Your Offline Files.
![]() Set The Threshold, in minutes, of how often Windows checks the speed of your network connection. By default, this is configured as five minutes.
Set The Threshold, in minutes, of how often Windows checks the speed of your network connection. By default, this is configured as five minutes.
If you right-click the Offline Files icon in the center of the Sync Center screen, as shown in Figure 7-17, you can select Schedule For Offline Files. This will launch the Offline Files Synchronization Schedule Wizard.
In the Offline Files Synchronization Schedule Wizard, you can modify the default schedule for when you want Windows to synchronize your offline files. If you choose synchronization at a scheduled time, you can set a start date, time, and whether the synchronization should repeat and at what frequency, such as hourly, weekly, or other.
You can choose the events or actions that will automatically synchronize Offline Files, such as when:
![]() You log on to your computer
You log on to your computer
![]() Your computer is idle
Your computer is idle
![]() You lock Windows
You lock Windows
![]() You unlock Windows
You unlock Windows
You can also choose additional scheduling options by clicking the More Options button, as shown in Figure 7-18.

When working with offline files, you need to take care that they are carefully managed in order to reduce the likelihood of sync conflicts. When Windows has two copies of the same file stored in separate places and a conflict occurs, the sync will not succeed unless you decide which of the files to keep. No conflict would normally occur when you are working away from the office and syncing the newer files from your device back to the network location.
Conflicts arise when multiple users are accessing the same files and folders. For example, if you had worked on a file remotely and so had another user, Windows will ask you how to address the conflict. If you accept the option to keep the latest version, you could potentially lose any amendments to your work, if this was not previously saved to the networked version.
Depending upon the number of conflicts that you encounter, it is preferable to use the Offline Files feature on files that are not shared with other users.
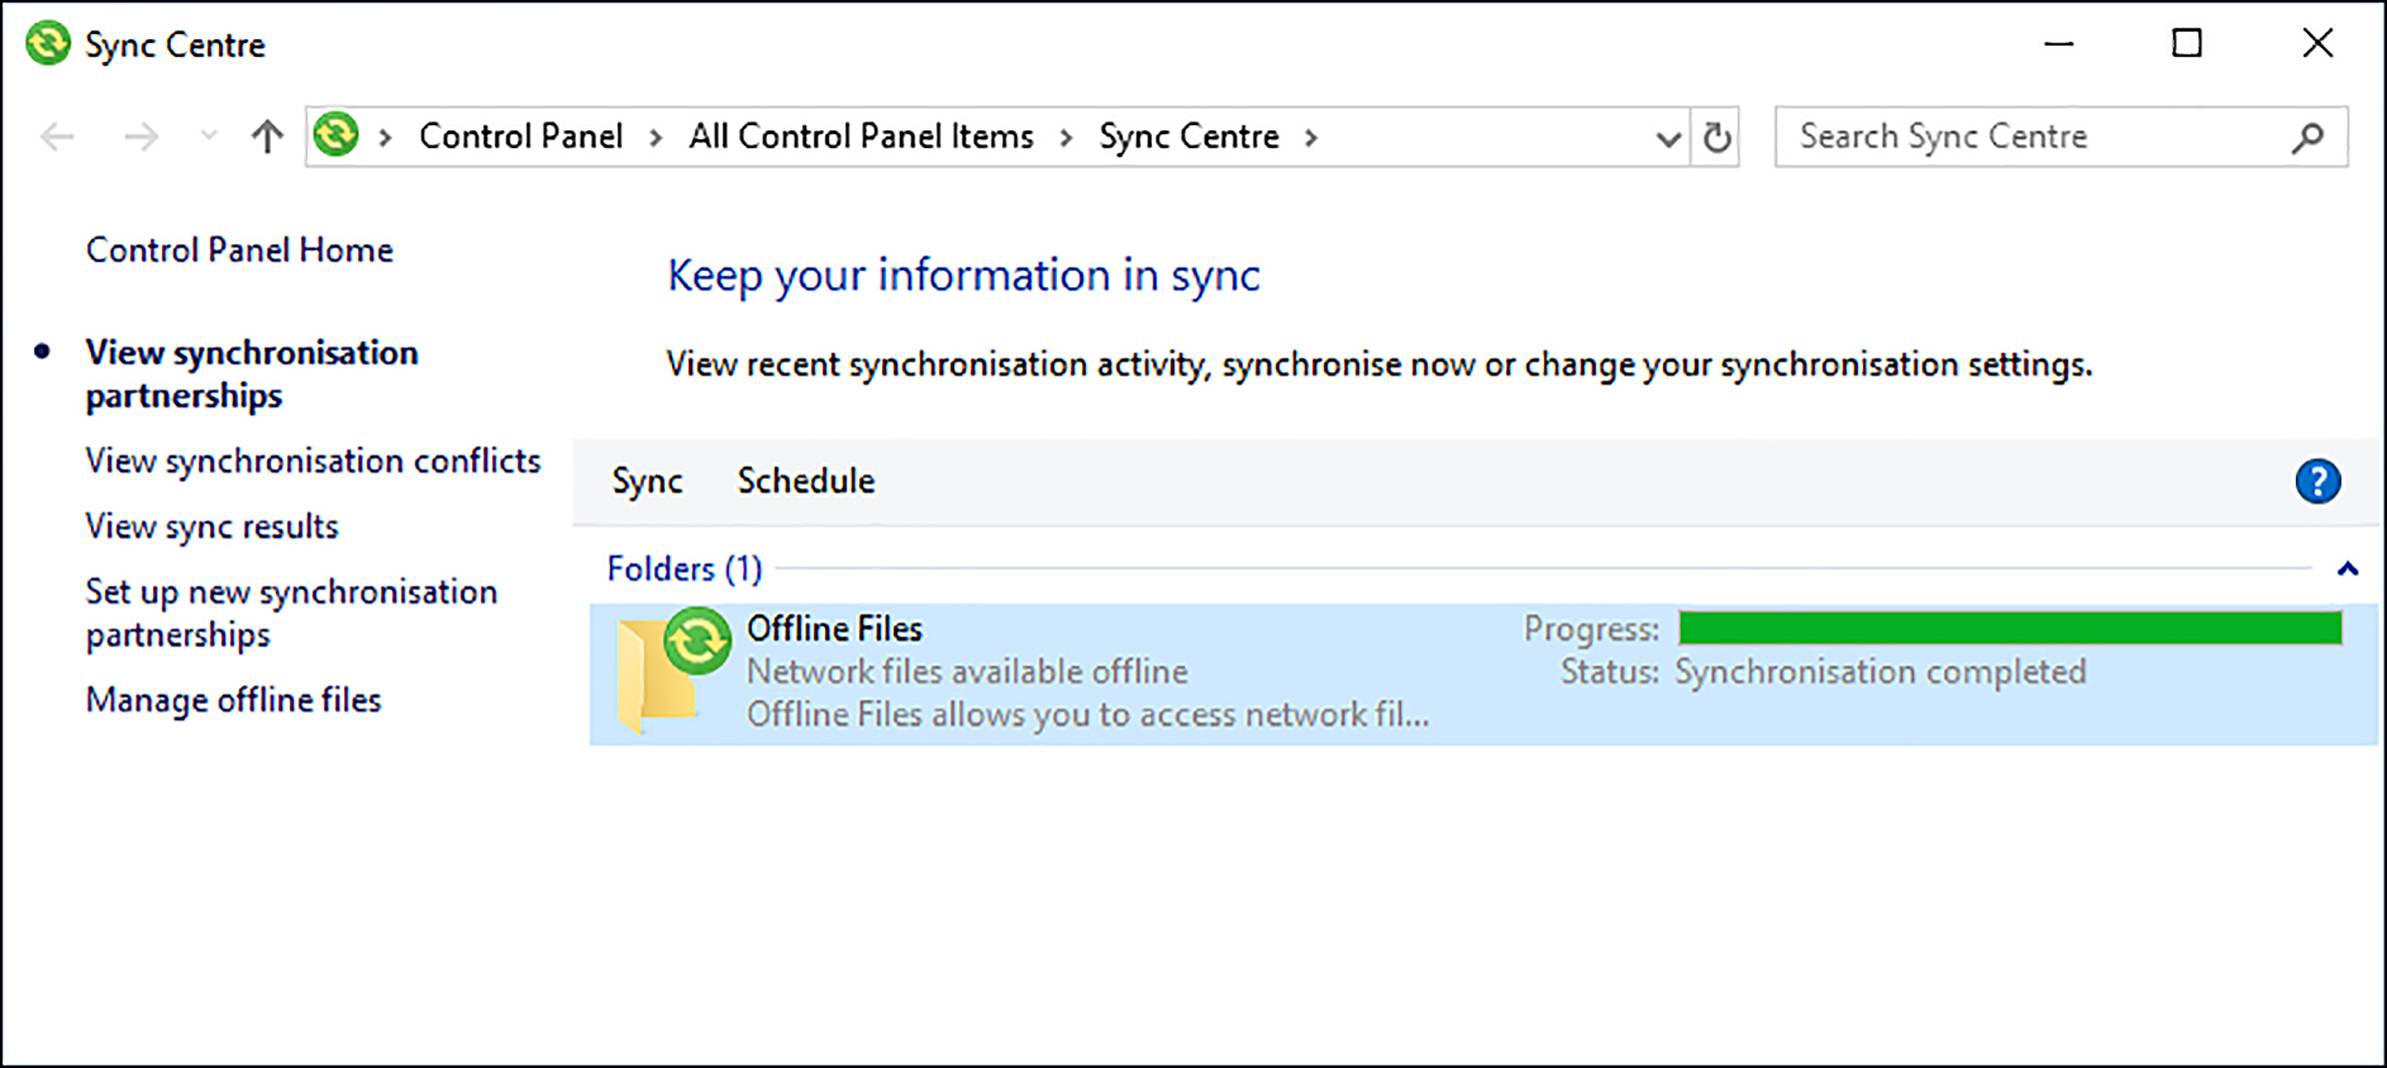
Use Work Folders
Work Folders is the enterprise feature which enables administrators to create a special folder called a sync share. It requires Windows Server 2012 R2 or Windows Server 2016, and is available to Windows 8.1 and Windows 10 users. Sync shares have characteristics similar to that of Offline Folders. Multiple devices can connect to the same sync share, but each user has their own single connection. Furthermore, sync shares can be accessed by non-domain joined computers that are owned or used by domain users, such as a home device or BYOD.
As this is an enterprise feature, you only need to understand how the basics of Work Folders are used and the functionality they provide.
Work Folders are available on Windows 7 and newer versions of Windows, and via an app on an Apple iPad or Android device. The functionality is as shown in Table 7-5.
TABLE 7-5 Work Folders functionality
Functionality |
Availability |
Description |
Work Folders integration with Windows |
Windows 10 Windows 8.1 Windows RT 8.1 Windows 7 (download required) |
Work Folders item in Control Panel Work Folders integrated into File Explorer to enable access to files stored in Work Folders Work Folders sync engine |
Work Folders app for devices |
Apple iPad (iOS 10.2 and later) Android 4.4 KitKat and later |
A Work Folders app that enables access to files in Work Folders |
Once the feature has been installed and configured on a Windows Server 2012 R2 or Windows Server 2016 domain computer, the user needs to launch Manage Work Folders within Control Panel and follow the Set Up Work Folders Wizard to connect to the corporate sync share.
There are three methods by which a device can be configured to use Work Folders:
![]() Auto Discovery Users only need to enter their corporate email address, and Work Folders will auto discover the correct path to the sync share using the DNS entry, which will look similar to workfolders.contoso.com.
Auto Discovery Users only need to enter their corporate email address, and Work Folders will auto discover the correct path to the sync share using the DNS entry, which will look similar to workfolders.contoso.com.
![]() Custom URL This is provided by an administrator. Work Folders will use the uniform resource identifier (URL), which will be similar to workfolders.contoso.com.
Custom URL This is provided by an administrator. Work Folders will use the uniform resource identifier (URL), which will be similar to workfolders.contoso.com.
![]() Group Policy This method can be deployed to devices that are part of the domain in which you want to use Work Folders. You can add Custom URL to the Specify Work Folders Group Policy Object (GPO), which is found at User ConfigurationPoliciesAdministrative TemplatesWindows ComponentsWork Folders. You need to provide a Work Folder URL, such as https://workfolders.contoso.com/sync/1.0, in the GPO, as shown in Figure 7-19. If the setting to force automatic setup is checked, users are not asked where they want to store the Work Folders data on the local device, instead this is stored in the %USERPROFILE%WorkFolders location.
Group Policy This method can be deployed to devices that are part of the domain in which you want to use Work Folders. You can add Custom URL to the Specify Work Folders Group Policy Object (GPO), which is found at User ConfigurationPoliciesAdministrative TemplatesWindows ComponentsWork Folders. You need to provide a Work Folder URL, such as https://workfolders.contoso.com/sync/1.0, in the GPO, as shown in Figure 7-19. If the setting to force automatic setup is checked, users are not asked where they want to store the Work Folders data on the local device, instead this is stored in the %USERPROFILE%WorkFolders location.
You need to know the following limitations and requirements about Work Folders, although you are not expected to have configured the infrastructure on Windows Server 2012 R2 or Windows Server 2016:
![]() Windows Server 2012 R2 or Windows Server 2016 are required to host sync shares.
Windows Server 2012 R2 or Windows Server 2016 are required to host sync shares.
![]() NTFS file system is required to store user files.
NTFS file system is required to store user files.
![]() Server certificates from a trusted certification authority (CA), such as a public CA, are required for each Work Folders file server host. A server needs to be accessible from the Internet, such as a network gateway.
Server certificates from a trusted certification authority (CA), such as a public CA, are required for each Work Folders file server host. A server needs to be accessible from the Internet, such as a network gateway.
![]() A registered domain name resolvable from users over the Internet.
A registered domain name resolvable from users over the Internet.
![]() Ability to create a public DNS Host(A) record called workfolders.
Ability to create a public DNS Host(A) record called workfolders.
![]() The max size for individual files is 10 GB.
The max size for individual files is 10 GB.
![]() Work Folders uses the: %USERPROFILE%Work Folders location by default.
Work Folders uses the: %USERPROFILE%Work Folders location by default.
![]() PCs and devices must be running one of the operating systems shown in Table 7-5.
PCs and devices must be running one of the operating systems shown in Table 7-5.
Configure WiFi Direct
WiFi Direct is a new standard developed with the WiFi Alliance, is fully supported by Windows 10, and enables WiFi Direct devices to connect seamlessly to one another. This can be achieved using Miracast over Infrastructure, which uses Ethernet if a network access point or secure ad-hoc WiFi network is available, or over a private ad-hoc wireless network as and when required.
WiFi Direct enables you to interact with other hardware, for example, print to a wireless printer or send your PowerPoint presentation to an external display.
Devices that are using WiFi Direct include mobile phones, cameras, printers, TVs, PCs, and gaming devices, such as Xbox One.
WiFi Direct is very similar to Bluetooth, but only 10x faster (WiFi Direct transfers data at up to 250 Mbps, whereas Bluetooth 4.0 transfers data at up to 25 Mbps).
As the technology continues to mature, Microsoft has upgraded and enhanced the application program interface (API) support with Windows 10 for developers to use when writing their software. Original equipment manufacturer (OEM) vendors are gradually incorporating WiFi Direct into their devices, such as printers using WiFi Direct. Unlike Bluetooth, only one device needs to support WiFi Direct, though they will still pair in much the same way as Bluetooth. For example, Miracast enables a Windows device to wirelessly display on to a projected screen, such as a TV or projector. Ideal for enabling screens that do not have built-in support for WiFi Direct, Miracast uses a High-Definition Multimedia Interface (HDMI) adapter, which plugs into the remote screen. Windows 10 can wirelessly connect to the Miracast adapter.
To use the WiFi Direct technology, a user will turn on or enable the WiFi Direct device, such as a Miracast adapter or printer, and Windows 10 will locate the device wirelessly and connect. Once connected, application files that are required for the user interface, such as display or printer dialog screens, are received directly from the WiFi Direct device.
Some characteristics of WiFi Direct are listed below:
![]() Distance between devices (ad hoc WiFi) Compared to Bluetooth, which creates a Personal Area Network of just a few feet, WiFi Alliance states that WiFi Direct devices can reach each other over a maximum distance of up to 656 feet.
Distance between devices (ad hoc WiFi) Compared to Bluetooth, which creates a Personal Area Network of just a few feet, WiFi Alliance states that WiFi Direct devices can reach each other over a maximum distance of up to 656 feet.
![]() Security WiFi Direct uses either WPA2-PSK or WPA2-Enterprise security, which uses AES 256-bit encryption with a key-based encryption and authentication method.
Security WiFi Direct uses either WPA2-PSK or WPA2-Enterprise security, which uses AES 256-bit encryption with a key-based encryption and authentication method.
![]() Speed WiFi Direct claims device-to-device transfer speeds of up to 250Mbps.
Speed WiFi Direct claims device-to-device transfer speeds of up to 250Mbps.
![]() Services WiFi Direct Send, WiFi Direct Print, WiFi Direct for DLNA, Miracast, and Miracast over Infrastructure are the five services that currently utilize the WiFi Direct standard.
Services WiFi Direct Send, WiFi Direct Print, WiFi Direct for DLNA, Miracast, and Miracast over Infrastructure are the five services that currently utilize the WiFi Direct standard.
The following steps provide an example of how to connect to a WiFi Direct TV screen:
Turn on the TV and select Screen Mirroring, Miracast, or other wireless input source on your TV.
On your Windows 10 device, open Settings and click Devices.
Select Bluetooth and other Devices.
Click Add Bluetooth or other Device, and you should see a list of the following types of devices that Windows 10 can search for:
Bluetooth
Wireless display or dock
Everything else
After selecting Wireless display or dock, Windows 10 should be able to locate your TV, as shown in Figure 7-20.
To project your screen, open the Action Center and click the Connect tile.
Select the WiFi Direct device from the list of wireless display and audio devices.
Windows will now establish the connection and your screen should now be mirrored.
Thought experiments
In these thought experiments, demonstrate your skills and knowledge of the topics covered in this chapter. You can find the answers to these thought experiments in the next section.
Scenario 1
Your CEO has asked you to research possible solutions for providing members of the sales team with access to company files, which can be synced to their devices over the Internet. The technology deployed should be available when you are at home or visiting clients. Your infrastructure includes Windows Server 2016.
Answer the following questions regarding your research:
What possible technologies can you use to provide access to company files over the Internet?
The Sales Manager uses an Apple iPad. Which solution would enable iPad to access and sync the files?
Your sales team needs to access and be able to present a PowerPoint slideshow. The slideshow is updated each day by the marketing team. Which solution would enable access to the updated file?
Scenario 2
You have been asked to help provide assistance to a helpdesk operator who is encountering some difficulties when connecting to devices using Remote Desktop Connection. You have several devices, including the following:
![]() Desktop PC running Windows Vista Business edition at your home office
Desktop PC running Windows Vista Business edition at your home office
![]() Windows 7 laptop running Home edition at your home office
Windows 7 laptop running Home edition at your home office
![]() Windows 10 Surface Book running Enterprise edition provided by your employer
Windows 10 Surface Book running Enterprise edition provided by your employer
![]() Twenty five Windows 2016 Servers located in a private data center
Twenty five Windows 2016 Servers located in a private data center
Answer the following questions about Remote Desktop Connection:
You try to connect to your home devices from your workplace using Remote Desktop. You can successfully connect to the desktop PC, but you’re unable to make a connection to your laptop. You need to access the laptop using Remote Desktop. What can you do?
When you connect to the desktop PC, using your Surface Book, the screen size is very small. What can you do?
You find it laborious to connect to the individual servers at the datacenter using the RDP client, one at a time. What can you suggest?
Thought experiment answers
This section provides the solutions for the tasks included in the thought experiments.
Scenario 1
Answers vary and possible solutions include Work Folders, OneDrive, OneDrive for Business and Offline Files. While Remote Desktop, , and VPNs can be used, they are not valid answers because they are not sync technologies.
Remote Desktop, Work Folders, OneDrive, and OneDrive for Business enable file access by an Apple iPad, but of these options, only Work Folders represents a solution that sync the files.
Work Folders is a sync technology, enabling access to the updated file.
Scenario 2
Answers vary, but because you’re having some success, it is likely that your home router is correctly configured to enable port forwarding to the internal network. Even if there are other issues found with the configuration, the home laptop is running an edition of Windows that does not support Remote Desktop connection. The laptop needs to be upgraded to either Windows 10 Pro or Windows 10 Enterprise version.
Because the Surface Book offers very high DPI resolutions, use the Scaling feature within the Remote Desktop Connection application.
You need to download and install the Remote Desktop Connection Manager in order to be able to quickly and seamlessly change from one server in the data center to another.
Chapter summary
![]() Windows 10 includes remote access capabilities that enable users to connect to a remote network using dial-up or VPN connections.
Windows 10 includes remote access capabilities that enable users to connect to a remote network using dial-up or VPN connections.
![]() Windows 10 supports four commonly used VPN protocols. These are Point-to-Point Tunneling Protocol (PPTP), Layer 2 Tunneling Protocol (L2TP), Secure Socket Tunneling Protocol (SSTP), and Internet Key Exchange, Version 2 (IKEv2).
Windows 10 supports four commonly used VPN protocols. These are Point-to-Point Tunneling Protocol (PPTP), Layer 2 Tunneling Protocol (L2TP), Secure Socket Tunneling Protocol (SSTP), and Internet Key Exchange, Version 2 (IKEv2).
![]() Windows 10 uses common authentication protocols including EAP-MS-CHAPv2, PAP, CHAP and MS-CHAP v2.
Windows 10 uses common authentication protocols including EAP-MS-CHAPv2, PAP, CHAP and MS-CHAP v2.
![]() VPN Reconnect is a feature supported when using IKEv2, which enables VPN connections to be automatically re-established if they are broken. VPN Reconnect uses the IKEv2 tunneling protocol with the MOBIKE extension.
VPN Reconnect is a feature supported when using IKEv2, which enables VPN connections to be automatically re-established if they are broken. VPN Reconnect uses the IKEv2 tunneling protocol with the MOBIKE extension.
![]() Always On, App-triggered VPN, and LockDown VPN profiles are new VPN features in Windows 10 that enable administrators to implement enterprise-grade VPN requirements.
Always On, App-triggered VPN, and LockDown VPN profiles are new VPN features in Windows 10 that enable administrators to implement enterprise-grade VPN requirements.
![]() Broadband tethering enables Windows 10 to connect devices to ad-hoc wireless networks.
Broadband tethering enables Windows 10 to connect devices to ad-hoc wireless networks.
![]() WiFi Services enables access to password-protected networks and hotspots shared through crowdsourcing.
WiFi Services enables access to password-protected networks and hotspots shared through crowdsourcing.
![]() Windows Defender Remote Credential Guard allows administrators to protect credentials that are typically used over a Remote Desktop connection.
Windows Defender Remote Credential Guard allows administrators to protect credentials that are typically used over a Remote Desktop connection.
![]() Remote Desktop improves the support for devices with pens, and also introduces a new feature that enables users to configure session zoom scaling, which can be used to compensate for screens with high DPI resolutions.
Remote Desktop improves the support for devices with pens, and also introduces a new feature that enables users to configure session zoom scaling, which can be used to compensate for screens with high DPI resolutions.
![]() Offline Files and Work Folders enable users to continue to work with shared files even when they are not connected to the network.
Offline Files and Work Folders enable users to continue to work with shared files even when they are not connected to the network.
![]() The Sync Center offers a centralized location to configure actions that will trigger the synchronization of sync partnerships.
The Sync Center offers a centralized location to configure actions that will trigger the synchronization of sync partnerships.
![]() Users can modify existing device power plans or create new ones to fine-tune their battery consumption and manage battery life. Administrators can use the Powercfg.exe command line tool and Group Policy to export, import, and apply power plans to devices.
Users can modify existing device power plans or create new ones to fine-tune their battery consumption and manage battery life. Administrators can use the Powercfg.exe command line tool and Group Policy to export, import, and apply power plans to devices.
![]() Windows Mobility Center offers users of mobile devices quick access to configuration settings that are often modified by mobile users.
Windows Mobility Center offers users of mobile devices quick access to configuration settings that are often modified by mobile users.
![]() Windows To Go workspaces enable users to travel without their own device, and use a Windows To Go certified USB drive to boot to Windows 10 on a host computer.
Windows To Go workspaces enable users to travel without their own device, and use a Windows To Go certified USB drive to boot to Windows 10 on a host computer.
![]() Work Folders enable users to access and sync company sync shares from external devices that include domain-joined and non-domain joined devices.
Work Folders enable users to access and sync company sync shares from external devices that include domain-joined and non-domain joined devices.
![]() WiFi Direct enables Windows 10 devices to interact with other hardware, such as printers, TVs, PCs, and gaming devices, such as Xbox One.
WiFi Direct enables Windows 10 devices to interact with other hardware, such as printers, TVs, PCs, and gaming devices, such as Xbox One.