
CHAPTER 9
Manage updates and recovery
To keep your personal and enterprise Windows 10 computers secure, you need Windows 10 patched from known threats such as malware, system vulnerabilities, and security risks. The process of using the Microsoft and Windows Updates mechanism ensures that Windows systems are protected. This process is recommended by Microsoft for the complete lifespan of Windows, especially since threats continue to increase in both complexity and frequency.
Microsoft has built up the stability of the new kernel originally developed for Windows Vista, continuously improving it to provide Windows 10 with a very stable and reliable platform for users. Windows 10 features improve reliability and reduce the likelihood of crashes occurring, such as the self-healing file system used for Storage Spaces, in place memory conservation, and improved anti-malware protection.
The drive toward using the Cloud more extensively has allowed Microsoft to develop and implement new solutions for recovering from operating system failures. In much the same way as the Previous Versions feature empowered end users to recover overwritten or damaged files, in Windows 10 end users can simply and efficiently recover a failed or unresponsive system without lengthy downtime. This releases administrators from recovering individual files from tape backups.
Skills in this chapter:
![]() Skill 9.1: Configure system recovery
Skill 9.1: Configure system recovery
![]() Skill 9.2: Configure file recovery
Skill 9.2: Configure file recovery
![]() Skill 9.3: Configure and manage updates
Skill 9.3: Configure and manage updates
Skill 9.1: Configure system recovery
It is rare that Windows 10 will suffer from a system crash in a corporate environment where each computer is managed by an administrator. System instability can arise from unstable device drivers, a failed internal module such as a system drive or memory failure, or poorly written third-party software.
Resolution from a system failure may be quick or slow, depending upon the nature of the failure and also any precautions in place at the time of the failure. If you install a faulty device driver you can remove it by simply performing a driver rollback, and troubleshoot a system that will not boot by allowing Windows to apply automatic repairs during startup. Some features from earlier versions of Windows are retained in Windows 10, but others such as Last Known Good Configuration have been deprecated.
Windows 10 helps users remain productive by safeguarding against system failure and incorporating tools that speed up the recovery process after a failure has occurred.
This section covers how to:
![]() Configure a recovery drive
Configure a recovery drive
![]() Configure system restore
Configure system restore
![]() Perform a refresh or recycle
Perform a refresh or recycle
![]() Perform a driver rollback
Perform a driver rollback
![]() Configure restore points
Configure restore points
Configure a recovery drive
Most Windows 10 PCs will have a recovery partition to contain a full image of the system. The contents of the recovery partition can also be copied to a removable storage device so that in the event that your recovery partition becomes inaccessible or corrupted you will still be able to recover your system.
Disk drive space on many small form factor devices and tablets is often smaller than that available on a laptop or PC, and this can limit the availability for an original equipment manufacturer (OEM) to include a recovery partition on devices shipped with Windows 10. If there is no recovery partition, you can still create a bootable Universal Serial Bus (USB) recovery drive that can boot into the Recovery Environment (RE). You will then need to access a system image that you have created or that is provided by the OEM.
To create a recovery drive, follow these steps:
Search for Recovery Drive and select Create A Recovery Drive.
Accept the User Account Control (UAC) prompt and provide the necessary credentials, if required.
Check the Backup System Files To The Recovery Drive option.
Click Next. Windows 10 will prepare the recovery image.
If you have not already connected a backup device to the system, on the Connect A USB Flash Drive page, connect a drive that has at least 8 GB capacity.
On the Select The USB Flash Drive page, select the drive for the recovery drive and click Next.
On the Create The Recovery Drive page, read the warning that the USB drive contents will be deleted and click Create. The Creating The Recovery Drive page appears with a progress bar, which will indicate the phase of the process that is being performed. The process can take up to 30 minutes depending on the performance of the PC and the media.
The tool performs the following actions:
Prepares the drive
Formats the drive
Copies Recovery Drive utilities
Backs up system files
On the last page, click Finish.
When the recovery drive has been provisioned on the removable media you will see the confirmation screen as shown in Figure 9-1. If your device has a recovery partition, you will see a link on the confirmation screen to delete the recovery partition from your PC. This relates to the Windows 10 device recovery partition and not the newly created recovery drive. If you want to free up the space on your device, you need to select this option. It is important to store the recovery drive in a safe place because you will not be able to recover your device if you have lost the recovery drive and you have deleted the recovery partition.

You should carefully label your Recovery Drive media after they have been created. A 64-bit (x64) recovery drive can only be used to reinstall a device with 64-bit architecture. The Windows 10 Recovery Drive cannot be used to repair down-level versions of Windows.
Configure system restore
You might have used System Restore in a previous version of Windows, such as Windows XP or Windows 7, to restore a computer that has become unstable. System Restore has been retained in Windows 10 and it offers a familiar and reliable method of recovering systems by restoring the operating system to a restore point created during a period of stability.
Once enabled, System Restore will automatically create restore points at the following opportunities:
![]() Whenever apps are installed If the installer is System Restore compliant.
Whenever apps are installed If the installer is System Restore compliant.
![]() With updates Whenever Windows 10 installs Windows updates.
With updates Whenever Windows 10 installs Windows updates.
![]() Based on a schedule Windows 10 includes scheduled tasks, which can trigger restore point creation.
Based on a schedule Windows 10 includes scheduled tasks, which can trigger restore point creation.
![]() Manually You can create a System Restore from the System Protection screen.
Manually You can create a System Restore from the System Protection screen.
![]() Automatically When you use System Restore to restore to a previous restore point, Windows 10 will create a new restore point before it restores the system using the selected restore point.
Automatically When you use System Restore to restore to a previous restore point, Windows 10 will create a new restore point before it restores the system using the selected restore point.
To turn on System Restore and manually create a System Restore point, follow these steps:
Search for System and click the System Control Panel item.
On System, select the System Protection link in the left pane. The System Properties dialog box appears with the System Protection tab open.
To turn on the System Restore feature, select the Local Disk (C:) (System) drive, and then click Configure.
On the System Protection For Local Disk (C:) dialog box, select Turn On System Protection.
Under Disk Space Usage, move the slider for the Max Usage to allow room on the restore points to be saved (five percent is a reasonable amount) as shown in Figure 9-2.
Click OK twice.

You can also use PowerShell to configure System Restore. Some of the available cmdlets that you should review include the following:
![]() Enable-ComputerRestore Enables the System Restore feature on the specified file system drive.
Enable-ComputerRestore Enables the System Restore feature on the specified file system drive.
![]() Disable-ComputerRestore Disables the System Restore feature on the specified file system drive.
Disable-ComputerRestore Disables the System Restore feature on the specified file system drive.
![]() Get-ComputerRestorePoint Gets the restore points on the local computer.
Get-ComputerRestorePoint Gets the restore points on the local computer.
![]() Checkpoint-Computer Creates a system restore point.
Checkpoint-Computer Creates a system restore point.
The following command enables System Restore on the C: drive of the local computer:
PS C:> enable-computerrestore -drive "C:"
If the amount of space allocated for the restore points becomes full, System Restore will automatically delete the oldest restore points. If you require more restore points to be available, you need to allocate a larger proportion of the hard disk to the feature.
Once the system has created restore points, you are protected and the system should be recoverable.
To recover your system, you can launch the System Restore Wizard from either:
![]() System Protection If your system will allow you to sign in to Windows, you can launch System Restore from the Windows 10 graphical user interface (GUI).
System Protection If your system will allow you to sign in to Windows, you can launch System Restore from the Windows 10 graphical user interface (GUI).
![]() Windows Recovery Environment (Windows RE) If the system will not allow you to sign in, you can boot to the Windows RE and launch the System Restore Wizard from the Advanced options.
Windows Recovery Environment (Windows RE) If the system will not allow you to sign in, you can boot to the Windows RE and launch the System Restore Wizard from the Advanced options.
Identify affected apps and files
When using System Restore to restore the computer to an earlier state, the wizard will allow you to scan the restore point and advise you which apps and files will be affected by performing the operation. To perform a System Restore on Windows 10, follow these steps:
Search for System and click the System Control Panel item.
On the System, select the System Protection link in the left pane. The System Properties dialog box appears with the System Protection tab open.
Click System Restore.
On the Restore System Files And Settings page, click Next.
On the Restore Your Computer To A State It Was In Before The Selected Event page, choose the restore point that you want to be restored as shown in Figure 9-3.
Optionally, click Scan For Affected Programs, or click Next.
On the Confirm Your Restore Point page, click Finish.
On the warning screen, click Yes.
The System Restore will now prepare your computer and restart. The System Restore process can take some time to complete.
When the process is complete, the system will restart and you can sign in to Windows.
You will be presented with a summary of the system restore status, and a confirmation that your documents have not been affected.
Click Close.

Modify the task schedule
After you have enabled the System Restore feature, you can modify the default task schedule for when you want automatic restore points to occur by modifying the SR scheduled task. Use the following steps to modify the System Restore task schedule:
Search for Task, and click the Task Scheduler item.
In the Task Scheduler Microsoft Management Console (MMC), expand the node on the left to locate Task Scheduler LibraryMicrosoftWindowsSystemRestore.
Double-click the SR task in the middle pane
On the SR Properties (Local Computer) dialog box, click the Triggers tab.
On the Triggers tab, click New.
In the New Trigger dialog box, configure the schedule that you require. For example, you can configure Windows to create a daily System Restore point at noon.
Ensure that the Enabled check box is selected, and click OK.
On the Triggers tab, click OK.
In the Task Scheduler MMC, the trigger is now displayed and enabled.
Close the Task Scheduler MMC.
Launch Windows Recovery Environment
To launch the Windows RE and use safe mode or other advanced troubleshooting tools, you can attempt to start Windows 10 in advanced troubleshooting mode by using one of the following options:
![]() If available, select Restart Now under Advanced Startup in the Recovery section of the Settings App.
If available, select Restart Now under Advanced Startup in the Recovery section of the Settings App.
![]() Recovery from the menu. Restart the device using the Recovery Drive.
Recovery from the menu. Restart the device using the Recovery Drive.
![]() Boot the device using Windows 10 installation media, and select the Repair Your Computer option.
Boot the device using Windows 10 installation media, and select the Repair Your Computer option.
![]() Press the Shift key and select the Restart option on the Start menu.
Press the Shift key and select the Restart option on the Start menu.
In addition to the methods above, Windows will automatically start in the WinRE after detecting the following issues:
![]() Two consecutive failed attempts to launch Windows.
Two consecutive failed attempts to launch Windows.
![]() Two consecutive unexpected shutdowns that occur within two minutes of boot completion.
Two consecutive unexpected shutdowns that occur within two minutes of boot completion.
![]() A Secure Boot error
A Secure Boot error
![]() A BitLocker error on touch-only devices.
A BitLocker error on touch-only devices.
Once Windows 10 boots to the advanced troubleshooting mode, you need to click Troubleshoot, then on the Advanced Options screen you can access some or all of the following options as shown in Figure 9-4.
![]() System Restore Use a System Restore point to restore Windows.
System Restore Use a System Restore point to restore Windows.
![]() System Image Recovery Recover Windows using a system image file.
System Image Recovery Recover Windows using a system image file.
![]() Startup Repair Fix problems that are preventing Windows from loading.
Startup Repair Fix problems that are preventing Windows from loading.
![]() Command Prompt Used for advanced troubleshooting.
Command Prompt Used for advanced troubleshooting.
![]() Startup Setting Change Windows startup behavior.
Startup Setting Change Windows startup behavior.
![]() Go back to the previous build Revert to a previous Windows build for Windows Insiders.
Go back to the previous build Revert to a previous Windows build for Windows Insiders.

If your system has a unified extensible firmware interface (UEFI) motherboard you will also be offered an additional option:
![]() UEFI Firmware Settings Used to modify UEFI settings.
UEFI Firmware Settings Used to modify UEFI settings.
The advanced troubleshooting mode shown in Figure 9-4 allows you to select the Startup Settings,. which restarts Windows in a special troubleshooting mode that might be familiar to users of other versions of the Windows operating system. The Startup Settings boot troubleshooting mode presents you with the following options:
![]() Enable debugging mode Start Windows 10 in troubleshooting mode, monitoring the behavior of device drivers to help determine if a specific device driver is causing Windows 10 to behave unexpectedly.
Enable debugging mode Start Windows 10 in troubleshooting mode, monitoring the behavior of device drivers to help determine if a specific device driver is causing Windows 10 to behave unexpectedly.
![]() Enable boot logging mode Windows 10 creates and writes to a file named Ntbtlog.txt to record the device drivers installed and loaded during startup.
Enable boot logging mode Windows 10 creates and writes to a file named Ntbtlog.txt to record the device drivers installed and loaded during startup.
![]() Enable low-resolution video mode Start Windows 10 in a low-resolution graphics mode.
Enable low-resolution video mode Start Windows 10 in a low-resolution graphics mode.
![]() Enable Safe Mode Windows 10 starts with a minimal set of drivers, services, and applications to allow you to troubleshoot the system using the GUI. Safe mode does not include network connectivity.
Enable Safe Mode Windows 10 starts with a minimal set of drivers, services, and applications to allow you to troubleshoot the system using the GUI. Safe mode does not include network connectivity.
![]() Enable Safe Mode with Networking Safe mode with networking enables network connectivity.
Enable Safe Mode with Networking Safe mode with networking enables network connectivity.
![]() Enable Safe Mode with command prompt Safe mode using a command prompt window rather than the Windows GUI.
Enable Safe Mode with command prompt Safe mode using a command prompt window rather than the Windows GUI.
![]() Disable driver signature enforcement Allows you to load device drivers that do not have a digital signature.
Disable driver signature enforcement Allows you to load device drivers that do not have a digital signature.
![]() Disable early-launch anti-malware protection Start Windows 10 without the early launch anti-malware functionality running. This mode is useful for identifying whether early launch anti-malware is affecting a driver or app from being loaded.
Disable early-launch anti-malware protection Start Windows 10 without the early launch anti-malware functionality running. This mode is useful for identifying whether early launch anti-malware is affecting a driver or app from being loaded.
![]() Disable automatic restart on system failure Stops Windows 10 from automatically restarting after a system failure occurs.
Disable automatic restart on system failure Stops Windows 10 from automatically restarting after a system failure occurs.
You can cancel and reboot your system normally by pressing Enter. To select an option that you require, you need to press the number key or function key F1-F9 that corresponds to the list of items as shown in Figure 9-5.

If you press F10, you are taken to another screen with the option to launch the recovery environment. This option reboots the system and returns you to the Advanced Options screen as shown in Figure 9-4.
Perform a reset
If other methods of recovering your system fail or your problems reoccur, you can revert your system to the state similar to how it was when you purchased it or when Windows 10 was first installed. Typical issues that prevent the use of other tools mentioned in this chapter could include a damaged hard drive or a malware attack that encrypts the drive.
Windows 8 first introduced the option to refresh or recycle your computer; Windows 10 has improved the performance and reliability of this feature. You will see the words recycle and reset used interchangeably by Microsoft to mean the same thing, although the Windows interface options typically use the term reset. The Reset This PC option consolidates the two options (Refresh Your PC and Reset Your PC) that were available in Windows 8 and Windows 8.1.
For enterprise users who suffer from an unstable or corrupted system, often the quickest remediation is to deploy a fresh system image from the deployment server to the device. Home users and small organizations can use a similar solution, but rather than use a deployment server on the network such as Windows Deployment Services (Windows DS), Windows 10 is able to re-image the device itself. Selecting the Reset This PC option effectively reinstalls the Windows 10 operating system and allows you to either keep your files or remove everything.
To start the recovery process, follow these steps:
Launch Settings.
Click Update & Security.
Select Recovery.
On the Reset This PC page, click Get Started.
The screen will be dimmed and you will be presented with the options shown in Figure 9-6 as follows:
 Keep My Files Removes apps and settings, but keeps your personal files. Remove Everything Removes all of your personal files, apps, and settings.
Select Keep My Files.
A warning appears informing you that your apps will be removed; it lists any apps that will need to be reinstalled.
Click Next.
On the Ready To Reset This PC page, you are reminded that resetting the PC will remove apps and reset all settings back to defaults.
Click Reset to restart the PC and allow the reset process to begin.

After the reset process has completed and you’ve signed in, you will have a list of removed apps on the desktop.
The second option asks you if you want to clean the drives also. This allows you to remove all settings, apps, and personal files and restore the operating system to the factory settings,, which is to the same state when you first installed or upgraded to Windows 10. If you plan on selling or disposing of the device, you can choose to remove the files and to clean the drive during the reset process and the hard disk will be fully erased and the disk will be overwritten prior to the automated reinstallation of Windows 10. This option is ideal if you are seeking to recycle your PC and want to make it difficult for someone to recover your removed files.
When the system reset is complete, you are offered the out-of-box experience (OOBE). You will need to configure the device, install any apps, and modify any settings that you would like.
Your device manufacturer may have included the ability to restore your Windows 10 device to the factory installed OEM image and settings. This action restores the operating system to the original factory settings and is also available if you upgraded from Windows 8.1 to Windows 10. Selecting this option provides an automated reinstallation of Windows 10 and presents the OOBE that is provided by the OEM.
After the reset process, if you sign in with the same Microsoft account you were using before, the Microsoft Store apps that you have purchased will be available to reinstall by using the following steps:
Open the Microsoft Store.
Select the three dots in the top right corner and then click My Library.
Select the apps you want to install, and select Install.
 EXAM TIP
In versions of Windows prior to Windows 10, you could use a utility called Recimg.exe to capture an image of your computer after you installed applications and made customizations. You could then export this image and use it as a recovery image, but this utility has been deprecated in Windows 10.
Perform a Fresh Start
With the Creators Update, Windows 10 provides a new way to reset the system called Fresh Start. This is included in both the Recovery section of the Settings app and within the Windows Defender Security Center. Fresh Start performs three actions:
![]() Reinstalls Windows 10 while retaining your data.
Reinstalls Windows 10 while retaining your data.
![]() Removes all installed apps and bloatware.
Removes all installed apps and bloatware.
![]() Installs the latest security updates.
Installs the latest security updates.
You can access the Fresh Start feature using the following steps:
Launch Settings, and click Update & Security.
Select Recovery.
Under More Recovery Options, click the Learn how To Start Fresh With A Clean Installation Of Windows.
On the pop up dialog, click Yes to Switch Apps.
Alternatively, launch Settings, and click Update & Security.
Select Windows Defender and click Open Windows Defender Security Center.
On the Windows Defender Security Center screen, select Device Performance and Health and then under Fresh Start click Additional Info.
On the Fresh Start page click Get Started and accept the UAC prompt.
The screen will be dimmed and you will be presented with the warning as shown in Figure 9-7.

On the Fresh Start page, to proceed, click Next.
Fresh Start will then display a list of apps that will be removed. Fresh Start saves a list of apps removed, called Removed Apps, which will be found on the desktop once the process is completed.
Click Next.
If you recently upgraded to Windows 10, click Next on the warning regarding the previous version of Windows.
On the Let’s Get Started page, click Start.
The PC is then reset which can take up to 20 minutes.
When the PC restarts after the Fresh Start has completed, you can log in with the same username and password and all your data will be retained. Any applications that you use will need to be reinstalled, but crucially any third-party apps or bloatware that came preinstalled on your system by the OEM will have been removed. If you need access to the list of removed apps, a file is created during the process and this is found on the desktop after you sign in to the device. Within the Fresh Start page in Windows Defender Security Center, you will see a history of when the Fresh Start feature has been used, and a link to the list of Removed Apps.
Perform a driver rollback
You know that device drivers allow Windows to control and communicate with the majority of hardware found in and attached to a device. Because a device driver allows the operating system to use the hardware, device drivers are a critical part of the operating system. You will have reduced device functionality if its driver is unavailable, corrupted, or not installed.
Device driver software is maintained by the hardware OEM and they often produce improved drivers that can be made available throughout the lifetime of the device. New device drivers often make improvements or remove errors from previous versions. So, it is recommended that you allow Windows to update device driver software whenever a new version is available. Thankfully in Windows 10, this process is automatic by default, although you can disable all updating of device drivers as shown later in this chapter.
You need to be aware that device drivers run at the kernel level and have access to all system resources within the operating system. To prevent malicious code from been granted access to your system, you need to ensure that only drivers that are signed with a digital signature from a trusted authority are allowed to be installed on your system. The 64-bit versions of Windows 10 enforces device driver signing, but the 32-bit versions of Windows 10 permit their use and will warn users about the danger of using unsigned drivers.
Drivers are often bundled as a set of files known as a driver package and can contain the following modules:
![]() Driver files A driver is a dynamic-link library (DLL) with the SYS file name extension.
Driver files A driver is a dynamic-link library (DLL) with the SYS file name extension.
![]() Installation files including INF A device setup information (.inf) file that is copied to the %SystemRoot%Inf directory during installation. Every device must have an INF file, which provides information that the system needs for device installation.
Installation files including INF A device setup information (.inf) file that is copied to the %SystemRoot%Inf directory during installation. Every device must have an INF file, which provides information that the system needs for device installation.
![]() Installation files including CAT files A driver catalog file (.cat) contains a cryptographic hash of each file in the driver package to verify that the driver package has not been altered after it was published.
Installation files including CAT files A driver catalog file (.cat) contains a cryptographic hash of each file in the driver package to verify that the driver package has not been altered after it was published.
![]() Other Files A driver package can also contain additional files, including device installation apps, device icon, device property pages and device stage metadata.
Other Files A driver package can also contain additional files, including device installation apps, device icon, device property pages and device stage metadata.
When a device driver is installed manually, Windows 10 updates the driver store with the driver, within the FileRepository folder, using a trusted location located at %SystemRoot%System32DriverStore.
Drivers can be copied to the Driver Store prior to device installation, for example, by using Group Policy or during initial system deployment. In this way, standard users can connect known hardware to their Windows 10 devices and the system will automatically install the driver software from the driver store without help from the IT helpdesk. To manually install driver packages to the driver store, use the command line tool Pnputil.exe, which has the following syntax: pnputil.exe -a pathdrivername.inf, as shown in Table 9-1.
TABLE 9-1 Pnputil.exe parameters
Parameter |
Description |
-a or /add-driver |
Adds the INF file specified |
-d or /delete-driver |
Delete the INF file specified |
-e or /enum-drivers |
Lists all third-party INF files |
-f or /force |
Force the deletion of the identified INF file. Cannot be used together with the -i parameter. |
-I or /install |
Installs the identified INF file. Cannot be used together with the -f parameter |
/? |
Displays help |
An example command to add the INF file specified by the DEVICE.INF is:
pnputil /add-driver C:\%SystemRoot%System32DriverStoreDevice.inf
In addition to the Pnputil.exe, you can use the following Windows PowerShell cmdlets:
![]() Enable-PnpDevice Enables a Plug and Play (PnP) device.
Enable-PnpDevice Enables a Plug and Play (PnP) device.
![]() Disable-PnpDevice Disables a PnP device.
Disable-PnpDevice Disables a PnP device.
![]() Get-PnpDevice Displays information about PnP devices.
Get-PnpDevice Displays information about PnP devices.
![]() Get-PnpDeviceProperty Displays detailed properties for a PnP device.
Get-PnpDeviceProperty Displays detailed properties for a PnP device.
An example PowerShell command to enable the device specified by the instance ID ‘NETVID_6986&;PID_4466&;MI_008&;&;0020’ is as follows:
PS C:> Enable-PnpDevice -InstanceId
'NETVID_6986&;PID_4466&;MI_008&;&;0020'
If a new device driver causes system instability or problems using some hardware, you can use the Driver Roll Back feature to revert a particular driver to the previous version of the device driver within Device Manager.
You can only use the Driver Roll Back feature if you have previously updated the default driver, that is, if you have not installed a newer driver, the option within Device Manager will be unavailable. Using Driver Roll Back will overwrite the current device driver. After using this feature, the previous device driver is no longer available unless you manually reinstall the driver.
To use Roll Back Driver, complete the following steps:
Open Device Manager.
Right-click the device to roll back, and then click Properties.
In the Device Properties dialog box, click the Drivers tab.
Click Roll Back Driver.
In the Driver Package Roll Back dialog box, provide feedback to Microsoft and then click Yes as shown in Figure 9-8.

Configure restore points
Included with Windows 10 is the Backup And Restore (Windows 7) tool, which allows you to create a system image of your computer. Although this feature was deprecated in Windows 8 and removed in Windows 8.1, it has returned in Windows 10. The reappearance of this feature is useful for users upgrading from Windows 7 directly to Windows 10. Any backups that were created on a Windows 7 machine can be accessed on your Windows 10 computer and you can also use it to back up your Windows 10 PC using the familiar tool.
The backup tool allows you to create backups of files contained in folders, libraries, and whole volumes. You can also create a system image and manually create a system repair disk. The backups can be saved onto external USB drives, network drives, or onto a local disk if it is different from the disk on which Windows 10 is installed.
The Backup And Restore (Windows 7) tool is found in the System And Security section of Control Panel, or you can search for “backup and restore” and select the Backup and Restore (Windows 7) item listed in Settings.
Create a backup and system image
To create a backup of your files and folders and a system image follow these steps:
Search for Backup And Restore, and select the Backup And Restore (Windows 7) item listed in Settings.
On Backup And Restore (Windows 7), click Set Up Backup.
On the Select Where You Want To Save Your Backup page, choose the location and click Next.
On the What Do You Want To Back Up page, click the Let Windows Choose (Recommended) option, and click Next.
On the Review Your Backup Settings page, click the Change Schedule Link.
On the How Often Do You Want To Back Up page, leave the Run Backup On A Schedule (Recommended) check box selected, and choose when you want the back up to be performed.
Click OK.
On the Review Your Backup Settings page, click Save Settings And Run Backup.
The backup will begin. The first backup will take the longest time because this is a full back up and subsequent backups are incremental backups.
You can allow Windows to choose what to back up, which will include all files and folders in your user profile (including libraries) and a system image. You can specify the frequency and time when Windows 10 will perform backups, or retain the default backup schedule of Sunday at 7 P.M. every week.
If you require more specific scheduling, you can modify the triggers within Task Scheduler after you have enabled scheduled backups. Available options to trigger a scheduled backup include:
![]() On a schedule
On a schedule
![]() At log on
At log on
![]() At startup
At startup
![]() On idle
On idle
![]() On an event
On an event
![]() At task creation/modification
At task creation/modification
![]() On connection/disconnect to a user session
On connection/disconnect to a user session
![]() On workstation lock/unlock
On workstation lock/unlock
Volume Shadow Copy Service (VSS) is used by Backup And Restore (Windows 7) to create the backups. The initial backup creates a block level backup of files to a backup file using the new virtual hard disk (.vhdx) file format. You can mount the VHDX file stored in the backup folder in File Explorer. VSS greatly enhances the performance of the backup operation because subsequent backups will copy only the data that has changed since the previous backup, which is often a smaller amount of data. Therefore, the incremental backup will be created much faster than the initial backup.
Each time you run a backup, the Backup And Restore (Windows 7) tool creates a new restore point that can be used by the Previous Versions feature in File Explorer, which we will cover later in this chapter. These restore points are not the same as the System Restore points created using System Protection.
Within an elevated command prompt you can use the Wbadmin.exe tool to back up and restore your system, volumes, files, folders, and applications. You need to be a member of the Backup Operators or the Administrators group to use this tool. To list the backups available on your system, run the following command in an elevated command prompt:
wbadmin get versions
The output will display the backup metadata, including the time, target location and what the backup can be used for, such as Volume, Files, Applications, Bare Metal Recovery and System State.
System Image Recovery
When you use the System Image Recovery process within Windows Recovery Environment, Windows 10 replaces your computer’s current operating system state with the system image that has been created by the Backup And Restore (Windows 7) tool.
You should only use System Image Recovery if other recovery methods are unsuccessful because it will overwrite data on your computer. During the restore process, you can’t choose individual items to restore. All of the apps, system settings, and files are replaced. Any data files stored locally on your computer that you have created or modified since the system image was created will not be available after you use the System Image Recovery unless you have saved them onto another location such as OneDrive.
To recover a device with a Restore Point, follow these steps:
Launch Settings, and click Update & Security.
Select Recovery.
Under Advanced Startup, click Restart Now
On the Choose An Option page, select Troubleshoot.
On the Troubleshoot page, select Advanced Options.
On the Advanced Options page, select System Image Recovery.
Allow the system to reboot and Windows will prepare for System Image Recovery.
On the System Image Recovery page, select your user account.
On the System Image Recovery page, enter your password and click Continue.
On the Re-image Your Computer page, verify the system image is correctly selected as shown in Figure 9-9, and click Next.
On the Choose Additional Restore Options page, click Next, and then click Finish to start the restoration process.
In the Re-image Your Computer dialog box, read the warning, and then click Yes. The Re-image Your Computer process will now proceed.
Once competed, Windows will need to restart. Click Restart Now, or you can wait and allow Windows to automatically restart. When Windows restarts, you will be presented with the sign in screen.

Create a system repair disk
You can create a system image and a system repair disk using the Backup And Restore (Windows 7) tool, which can be used with the advanced troubleshooting mode to recover Windows 10 in the event of a drive or other catastrophic failure.
A system image can be incorporated into any backup when using the Backup And Restore (Windows 7) tool, however to create a system repair disk requires that you manually create a repair disk as follows:
Search for Backup And Restore and select the Backup And Restore (Windows 7) item listed in Settings.
Insert a blank writable CD or DVD into your device.
On Backup And Restore (Windows 7), click the Create A System Repair Disc link.
On the Create A System Repair Disc page, click Create Disc.
Click Create disc, as shown in Figure 9-10.

The system repair disc is useful if Windows 10 will not automatically boot in the advanced startup options. In this scenario, insert the system repair disk and your computer will boot from the recovery media automatically. If it doesn’t, you might need to change the boot order.
Skill 9.2: Configure file recovery
Empowering users to quickly recover lost, corrupted, or accidently deleted files is built into Windows 10. Users are constantly protected from accidental data loss and they now have the ability to help themselves when recovering files, a task which was typically requested through an enterprise IT helpdesk.
Whether the data is stored on local computers, on networked drives, or in the cloud using OneDrive, the data can be monitored for changes or deletions that can then be reverted should the need arise.
Many users who have upgraded from Windows 7 might not have seen the Previous Versions feature or encountered File History, or the Recycle Bin feature within OneDrive.
This section covers how to:
![]() Configure File History
Configure File History
![]() Restore previous versions of files and folders
Restore previous versions of files and folders
![]() Recover files from OneDrive
Recover files from OneDrive
Configure File History
File History is file recovery method that provides users with a very easy and user friendly method of retrieving files after they have been accidently deleted or modified. Once enabled, File History will automatically create a backup of all user files that have been modified on an hourly schedule. So long as the backup destination location does not become full, the File History can continue to store changes indefinitely.
To turn on File History, follow these steps:
Launch Settings, click Update & Security, and select Backup.
Under Back up using File History, click the Plus (+) icon labeled Add A Drive.
File History will search for drives.
In the Select A Drive dialog box, select the external hard drive that you want to use for File History.
On the Back Up Using File History page, verify that the Automatically Back Up My Files toggle is On.
Once enabled, File History will save copies of your files for the first time. This will happen as a background operation and you can continue to work normally.
File History saves your files from your user profile and all the folders located in your libraries, including OneDrive, that are synced to your device if OneDrive is used. You can manually include or exclude folders on the Backup Options page. To manually include additional folders to be monitored by File History, you need to perform the following steps:
Open Settings, click Update & Security, and select Backup.
Click the More Options link.
On the Backup Options page, click Add A Folder.
Select the folder that you want to back up and click Choose This Folder as shown in Figure 9-11.
Ensure that the folder is listed in the list of folders under Back Up These Folders.
Close the Backup Options page.

There are two other methods for adding a folder to the File History list of folders:
![]() Add folders to one of the existing libraries already backed up by File History File History will protect these folders.
Add folders to one of the existing libraries already backed up by File History File History will protect these folders.
![]() In File Explorer Select the folder and click History in the Home ribbon, and then click the Include It In Future Backups link.
In File Explorer Select the folder and click History in the Home ribbon, and then click the Include It In Future Backups link.
You can configure many of the File History settings multiple ways and you need to be familiar with each of them:
![]() File History in Control Panel
File History in Control Panel
![]() Backup within the Settings app
Backup within the Settings app
![]() History item on the File Explorer ribbon
History item on the File Explorer ribbon
Within the advanced settings screen of File History, accessed from the See Advanced Settings link on the Backup Options page, you configure the following:
![]() Modify the frequency of the File History backup from every 10 minutes to daily.
Modify the frequency of the File History backup from every 10 minutes to daily.
![]() Share the backup drive to other HomeGroup members.
Share the backup drive to other HomeGroup members.
![]() Open File History event logs to view recent events or errors.
Open File History event logs to view recent events or errors.
![]() Define the length of time to keep saved versions of your files.
Define the length of time to keep saved versions of your files.
![]() Manually clean up older versions of files and folders contained in the backup to recover space on the backup drive. You could also use the command line tool FhManagew.exe to delete file versions based on their age stored on the File History target device.
Manually clean up older versions of files and folders contained in the backup to recover space on the backup drive. You could also use the command line tool FhManagew.exe to delete file versions based on their age stored on the File History target device.
File History file recovery
You can launch File History file recovery, as shown in Figure 9-12 in several ways:
![]() History icon Open File Explorer and navigate to the folder that contains a modified or deleted file, and then click History on the Home ribbon. The File History page will open and you can view the recoverable files.
History icon Open File Explorer and navigate to the folder that contains a modified or deleted file, and then click History on the Home ribbon. The File History page will open and you can view the recoverable files.
![]() Restore personal files Open File History in Control Panel and select the Restore Personal Files link on the left side.
Restore personal files Open File History in Control Panel and select the Restore Personal Files link on the left side.
![]() Restore files from a current backup The Restore Files From A Current Backup link is at the bottom of the page within the following location: SettingsUpdate & securityBackupMore optionsBackup Options.
Restore files from a current backup The Restore Files From A Current Backup link is at the bottom of the page within the following location: SettingsUpdate & securityBackupMore optionsBackup Options.

When the File History page is in view, you can navigate through each restore point by using the left and right arrow buttons. Each restore point has a date and time to help you decide which version of the file or files to restore. You can select one or more files to revert, and select which version of the file by navigating through the backups that have been made by File History. If you right-click the file or folder, you can preview the file to view the contents. If you want to proceed to recover the file, click the green button on the File History screen. The file or files selected will be restored and File Explorer will open with the restored files displayed.
File History support for encryption
Protecting files and folders using Encrypting File System (EFS) is supported on NTFS when using Windows 10 Pro and Windows 10 Enterprise versions. File History supports backing up files that are encrypted using the EFS so long as the drive selected for the backup is formatted as a NTFS volume. Without NTFS, data cannot be encrypted using EFS and therefore if the destination drive does not use NTFS, File History will not back up encrypted files.
If you use BitLocker Drive Encryption to protect your data on your PC and use File History to back up this data to a removable drive, the data will no longer be protected. You should consider enabling BitLocker To Go on the removable drive to protect the contents. The File History is designed to back up on a per-user basis and is performed using the local user account, which means only files and folders that you have access to will be backed up.
Restore previous versions of files and folders
Previous Versions has been reintroduced in Windows 10, and is a file and folder feature that enables users to view, revert or recover files that have been modified or deleted by mistake. Previous Versions uses the File History feature or restore points created during backups in Backup And Restore (Windows 7). One of these features must be configured to use the Previous Versions feature.
After you have enabled File History or created a Backup And Restore (Windows 7) backup, you need to browse in File Explorer to the location where the modified or deleted files are. If one of these methods has “protected” the file or folders being browsed, the Previous Versions tab shown in File Explorer will list the available restore points for your data. Until one of these tasks has been performed, the Previous Versions tab will be empty.
VSS is used by Previous Versions to monitor and preserve copies of modified files on an automatic schedule. You saw earlier in the chapter that the Backup And Restore (Windows 7) tool also creates a restore point each time you create a backup. After the initial File History restore point has been created, subsequent restore points may take only a few minutes to complete.
If you configure File History and also use the Backup And Restore (Windows 7) tool, multiple restore points will be available in the Previous Versions tab. The Previous Versions feature is available on all file systems if File History is used. The Backup And Restore (Windows 7) can only be used to back up data using New Technology File System (NTFS) volumes.
To revert files to a previous version, use the following steps:
Ensure that File History is turned on.
Create a folder on your computer, for example, “C:Travel PlansYork”, and then create or save a text file called “Things to do.txt” into the folder.
In File History, click Run Now.
Open Test.txt and modify the contents, save, and exit the file.
In File History, click Run Now.
Right-click Test.txt and select Restore Previous Versions.
On the Previous Versions tab, note that the Test.txt file has one previous version listed, which is the original file. Modify the file again. There will not be another Previous Version listed until the next Restore Point is created by File History.
To manually create a new Restore Point, return to File History and click Run Now. Return to the Test.txt file and notice that it now has two file versions listed, as shown in Figure 9-13.
Delete the Things to do.txt file.
To recover the last version of the file that was saved by File History, right-click the “C:Travel PlansYork”, folder and select Restore Previous Versions.
On the Previous Versions tab, select the Travel Plans folder, and drop down the Open menu item, and select Open in File History.
File History launches. Double-click the folder that contained the deleted file.
Select the deleted file, and choose the green restore button.
Verify that the Things to do.txt file has been restored to the This “C:Travel PlansYork” folder.

Recover files from OneDrive
OneDrive allows you to store your files online. You can sync files between your PC and OneDrive. You can access files from OneDrive.com from just about any device that is connected to the Internet. There are a couple of ways you can recover files from OneDrive that have gone missing.
If you accidentally delete a file stored in your OneDrive account, you can recover files by using the Recycle Bin, which is available with OneDrive.com.
The OneDrive Recycle Bin can retain deleted items for a minimum of three days and up to a maximum of 90 days. The actual retention period is dependent on the size of the Recycle Bin, which is set to 10 percent of the total storage limit by default. If the Recycle Bin is full, old items will be deleted to make room for new items as they are added to the Recycle Bin and this may have an impact on the 90-day retention period.
To recover deleted files from your OneDrive.com, follow these steps:
Browse to your OneDrive.com, or right-click the cloud icon in the notification area and click View Online.
On the left side of the page, select the Recycle Bin.
If the Recycle Bin is not visible, click the three horizontal lines in the top left corner of the screen and select Recycle Bin.
Select the items that you want to recover.
Click Restore on the menu.
OneDrive will restore the items and they will be removed from the Recycle Bin.
At present you are not able to modify the retention settings or increase the size of the Recycle Bin for OneDrive.com. If you are using the Recycle Bin often and you are concerned about whether your deleted files will be protected by the Recycle Bin, you could consider increasing the space provided to the Recycle Bin by upgrading to a paid OneDrive storage plan such as Office 365 Personal. If space is limited, you could also review the items currently in the Recycle Bin and selecting items for permanent deletion to free up space as shown in Figure 9-14.

When you delete files using the OneDrive.com interface or from your OneDrive folders within File Explorer, the deleted files will be automatically synchronized to the OneDrive.com Recycle bin and the File Explorer Recycle Bin (or Trash if you are using OneDrive on a Mac).
If you use the Restore All or Empty Recycle Bin options you need to be aware that these tasks are irreversible.
The Search feature within OneDrive.com is a powerful method of locating files stored in your OneDrive. Search results do not include items in the OneDrive Recycle bin or the File Explorer Recycle Bin.
OneDrive document version history
For Office documents, such as Microsoft Word and Microsoft Excel, OneDrive.com maintains previous versions of these documents where available. To view the available versions stored in OneDrive, navigate to the Office file right-click and choose Version History. OneDrive will open the file in a new browser tab. You can then see the list of available versions on the left pane, and review the contents of each file as shown in Figure 9-15.

The older versions are listed together with the date and time of when the file was last saved. If you select an older version of the document from the list of older versions in the left pane, OneDrive will open the older file into the tab and display the name of the modifier. You can choose to Download this older version from the links displayed in the left pane.
Skill 9.3: Configure and manage updates
Most IT professionals are vigilant against attacks, but most end users are not. Within an enterprise, end users’ machines are highly managed and they must rely on proper safeguards being in place. All employees should be encouraged to review appropriate training and education relating to updates, data security, malware threats, and social engineering attacks.
This section focuses on the understanding that it is essential that computers are not left unprotected and open to being compromised. Windows Updates offers enterprises and end users a reliable and proven method of reducing the ever present threat of malicious attack.
This section covers how to:
![]() Configure update settings
Configure update settings
![]() Configure Windows Update policies
Configure Windows Update policies
![]() Manage update history
Manage update history
![]() Roll back updates
Roll back updates
![]() Update Microsoft Store apps
Update Microsoft Store apps
Configure update settings
Keeping Windows fully updated and secure is the aim of the update mechanism built into Windows 10. On the second Tuesday of each month, known as “Patch Tuesday,” Microsoft typically releases a bundle of new updates, updated drivers, and other enhancements to their operating systems. More recently “Patch Tuesday” is referred to as Update Tuesday. In addition, non-security updates for Microsoft Office are released on the first Tuesday of each month and firmware updates for the Surface devices are released on the third Tuesday of every month.
If urgent threats occur during the intervening time, additional “Zero-Day” updates will also be released to counter exploits that cannot wait until the next regular update.
Unlike previous versions of Windows where the user had the ability to disable updates, Windows Update with Windows 10 will check for and install updates automatically. The user has several options available to modify this behavior as follows:
![]() Change Active Hours This setting allows the user to identify the period of time when they expect the device to be in use. Automatic restarts after an update will occur outside of the active hours.
Change Active Hours This setting allows the user to identify the period of time when they expect the device to be in use. Automatic restarts after an update will occur outside of the active hours.
![]() Restart Options Updates will automatically be installed on your system. Windows will ask you to schedule a restart of your device to complete the installation of updates. The installation can be completed at a particular time and day within the following seven days. Users can also see more reminder notifications to prompt them to restart their PCs.
Restart Options Updates will automatically be installed on your system. Windows will ask you to schedule a restart of your device to complete the installation of updates. The installation can be completed at a particular time and day within the following seven days. Users can also see more reminder notifications to prompt them to restart their PCs.
![]() Advanced Options There are three areas that can be configured within the advanced options as shown in Figure 9-16.
Advanced Options There are three areas that can be configured within the advanced options as shown in Figure 9-16.
![]() Choose How Updates are Installed Users can choose to include updates for other Microsoft products in addition to Windows, and use the users sign in info to automatically sign back into the device to complete the installation following an update.
Choose How Updates are Installed Users can choose to include updates for other Microsoft products in addition to Windows, and use the users sign in info to automatically sign back into the device to complete the installation following an update.
![]() Choose when updates are installed Updates are issues in servicing rings, or branches. Users can choose which servicing ring they want the device to adopt and also defer feature updates for up to 365 days, and quality updates which include security improvements for up to 30 days.
Choose when updates are installed Updates are issues in servicing rings, or branches. Users can choose which servicing ring they want the device to adopt and also defer feature updates for up to 365 days, and quality updates which include security improvements for up to 30 days.
![]() Pause Updates A user can temporally pause updates from being installed onto their device for up to 35 days. After the device is un-paused it will automatically receive and install updates and cannot be paused again until these complete.
Pause Updates A user can temporally pause updates from being installed onto their device for up to 35 days. After the device is un-paused it will automatically receive and install updates and cannot be paused again until these complete.

It is good practice to allow Windows to automatically download and install new driver software and updates for your devices as they become available; this setting is enabled by default. Although the option is not found easily within Devices And Settings in Control Panel, it can be found using search. While it isn’t recommended, you can disable automatic updates and choose to never install driver software from Microsoft Update by following these steps:
Search for Device Installation.
Click the Change Device Installation Settings to launch the Device Installation Settings in Control Panel.
Click the No as shown in Figure 9-17, and click Save Changes.
Accept the UAC.

Delivery Optimization for Windows 10 updates
In Windows 10 you have several options regarding how Windows updates and Microsoft Store apps are delivered to the computer. By default, Windows obtains updates from the Microsoft Update servers, computers on the local network, and on the Internet. Windows Update Delivery Optimization allows the application of updates more quickly than previous versions of Windows. Once one PC on your local network has installed an update, other devices on the network can obtain the same updates without downloading directly from Microsoft.
This process is similar to popular peer-to-peer file sharing apps. Only partial file fragments of the update files are downloaded from any source, which speeds up the delivery and increases the security of the process. If you allow delivery optimization to take place, you then can choose how your PC will obtain updates and apps from other PCs:
![]() PCs on your local network Windows will attempt to download from other PCs on your local network that have already downloaded the update or app.
PCs on your local network Windows will attempt to download from other PCs on your local network that have already downloaded the update or app.
![]() PCs on your local network and PCs on the Internet Windows will attempt to download from the PCs on your local network, and also looks for PCs on the Internet that are configured to share parts of updates and apps.
PCs on your local network and PCs on the Internet Windows will attempt to download from the PCs on your local network, and also looks for PCs on the Internet that are configured to share parts of updates and apps.
If Delivery Optimization is enabled, your computer can also send file parts of apps or updates that have been downloaded using Delivery Optimization to other PCs locally or on the Internet.
To configure the additional sources, complete the following steps:
Open Settings, click Update And Security, and then click Windows Update.
Click the Advanced Options link.
Click Choose How Updates Are Delivered and review the available options as shown in Figure 9-18.
Turn on update seeding, and chose the method:
PCs on my local network. PCs on my local network and PCs on the Internet.Close the Choose How Updates Are Delivered page.

The default options for Delivery Optimization are different depending on which edition of Windows 10 is used, as follows:
![]() Windows 10 Enterprise and Windows 10 Education Use the The PCs On Your Local Network option by default.
Windows 10 Enterprise and Windows 10 Education Use the The PCs On Your Local Network option by default.
![]() All other editions of Windows 10 Use the The PCs On Your Local Network And PCs On The Internet option by default.
All other editions of Windows 10 Use the The PCs On Your Local Network And PCs On The Internet option by default.
With the Creators Update of Windows 10, several new delivery optimization features are available, which allow you to modify the behavior. These are found in Group Policy under ConfigurationPoliciesAdministrative TemplatesWindows ComponentsDelivery Optimization and can be found in Table 9-2.
TABLE 9-2 Delivery Optimization options
GPO Setting |
Description |
Minimum RAM (inclusive) allowed to use Peer Caching |
Specifies the minimum RAM size in GB required to use Peer Caching, with the default value is 4 GB. |
Minimum disk size allowed to use Peer Caching |
Specifies the required minimum disk size for the device to use Peer Caching, with the default value is 32 GB. |
Minimum Peer Caching Content File Size |
Specifies the minimum content file size in MB enabled to use Peer Caching. |
Enable Peer Caching while the device connects via VPN |
Determines whether a device will be allowed to participate in Peer Caching while connected to VPN. |
Allow uploads while the device is on battery while under set Battery level |
Specifies the battery levels at which a device will be allowed to upload data whilst on battery. Devices can download from peers whilst on battery regardless of this policy. By default, devices will not upload while using battery power. |
You can also use two new PowerShell cmdlets to review the performance of Delivery Optimization, such as the real-time snapshot of all current Delivery Optimization jobs and obtain key performance data.
These are:
Get-DeliveryOptimizationStatus
Get-DeliveryOptimizationPerfSnap
Deferring upgrades
The Professional, Enterprise, and Education editions of Windows 10 have the ability for users to defer feature upgrades. With this setting enabled, you can defer upgrades, including new Windows features. This will not permanently disable the upgrade, but it defers the download and installation for up to a year. All security updates will continue to be downloaded and installed, although these can also be deferred, but only for up to 30 days.
Some users will prefer to delay upgrades to their system, so that they can be reassured that any issues present with the installation can be resolved before the deferred upgrade is triggered. Others may be working on a project, and they do not want updates being installed during a project.
Devices using Windows 10 Home will automatically download the latest upgrades and these will be installed at the next reboot. Users can schedule a reboot to install them within the next seven days, but users cannot disable or defer feature upgrades.
Windows Update for enterprise customers
Businesses face a tradeoff between application compatibility and keeping systems secure and protected. By allowing devices to be fully patched and updated they run the risk that key enterprise software, or bespoke apps may be incompatible with the latest Windows 10 feature or quality update. With new malware and security vulnerabilities detected daily, it is important to strike a balance between maintaining systems in an up to date and protected state which remains fully compatible with hardware and software configurations.
With Windows 10, Microsoft has introduced several different Windows 10 servicing “branches” for businesses to consider and decide which option is the most appropriate from the following options:
SEMI-ANNUAL CHANNEL
![]() All Windows 10 PCs are on this servicing option by default, and will receive feature upgrades and security updates automatically.
All Windows 10 PCs are on this servicing option by default, and will receive feature upgrades and security updates automatically.
![]() A new Windows version will be made available in March and September of each year, and the year/month will be used in the version name such as Windows 10 Enterprise, Version 1703.
A new Windows version will be made available in March and September of each year, and the year/month will be used in the version name such as Windows 10 Enterprise, Version 1703.
![]() Each release will be supported and updated by Microsoft for 18 months from the time of its release.
Each release will be supported and updated by Microsoft for 18 months from the time of its release.
![]() Business customers that use Professional, Enterprise, and Education versions of Windows 10 can delay feature updates for any time up to a maximum of 365 days. By allowing businesses the option to delay the adoption of the feature upgrades, they can perform extra testing to ensure that new features can be verified for quality and application compatibility and fit within their production environment.
Business customers that use Professional, Enterprise, and Education versions of Windows 10 can delay feature updates for any time up to a maximum of 365 days. By allowing businesses the option to delay the adoption of the feature upgrades, they can perform extra testing to ensure that new features can be verified for quality and application compatibility and fit within their production environment.
![]() At any time before the updates are installed, users can also pause the installation for up to 35 days. Windows 10 Home edition users are not able to delay feature updates.
At any time before the updates are installed, users can also pause the installation for up to 35 days. Windows 10 Home edition users are not able to delay feature updates.
LONG TERM SERVICING CHANNEL (LTSC)
![]() The long-term servicing option is available only in the Windows 10 Enterprise LTSC edition.
The long-term servicing option is available only in the Windows 10 Enterprise LTSC edition.
![]() During the installed life of LTSC, Windows 10 will not receive feature updates, but will be provided with security updates.
During the installed life of LTSC, Windows 10 will not receive feature updates, but will be provided with security updates.
![]() The 10 years of support includes five years for mainstream support and then five years of extended support.
The 10 years of support includes five years for mainstream support and then five years of extended support.
![]() Systems identified that would be suitable candidates for using LTSC rely on ultimate stability such as systems powering hospital emergency rooms, air traffic control centers, financial trading systems, and factory areas.
Systems identified that would be suitable candidates for using LTSC rely on ultimate stability such as systems powering hospital emergency rooms, air traffic control centers, financial trading systems, and factory areas.
![]() Microsoft will release a new LTSC version of Windows 10 every 2-3 years, and the year will designate the version, such as Windows 10 Enterprise 2016 LTSB.
Microsoft will release a new LTSC version of Windows 10 every 2-3 years, and the year will designate the version, such as Windows 10 Enterprise 2016 LTSB.
WINDOWS INSIDER
![]() During the build up to the release of Windows 10, Microsoft created a special beta program that allowed IT pros to access early release versions of Windows 10.
During the build up to the release of Windows 10, Microsoft created a special beta program that allowed IT pros to access early release versions of Windows 10.
![]() This program was hugely popular, with over 10 million subscribers.
This program was hugely popular, with over 10 million subscribers.
![]() The Windows Insider Program continues and members can install, and deploy pre-production code to their test machines, allowing them to test, evaluate and provide feedback the Microsoft product team on any issues they encounter.
The Windows Insider Program continues and members can install, and deploy pre-production code to their test machines, allowing them to test, evaluate and provide feedback the Microsoft product team on any issues they encounter.
From mid-2017, Windows 10 adopted new servicing naming terms that allow both Windows 10 and Office 365 ProPlus servicing to be aligned as shown in Table 9-3.
TABLE 9-3 Servicing process name changes
OLD NAME |
NEW NAME |
Current Branch |
Semi-Annual Channel* |
Current Branch for Business |
Semi-Annual Channel |
Long-Term Servicing Branch |
Long-Term Servicing Channel |
*The Semi-Annual Channel replaces the Current Branch and Current Branch for Business concepts. During the transition period, you may see the Current Branch referred to as the Semi-Annual Channel (Targeted).
Since some systems may have updates deferred, or delayed, you may notice that this change may not be reflected in all installed systems.
There are various update features built into Windows 10. Customers can also use established update methods. Administrators will have full control over the internal distribution of security updates and can use existing management solutions such as System Center Configuration Manager (SCCM), Windows Server Update Services (WSUS), or Windows Intune. Alternatively, administrators can leave the users to receive these updates automatically via Windows Update.
Configure Windows Update policies
Within Group Policy there are multiple settings that can be configured to modify the behavior of Windows Update. Using Group Policy Objects (GPOs) is the most efficient method of modifying the default settings of your computers within Active Directory Domain Services (AD DS) domain environment.
This section focuses on the three nodes that contain Windows Update GPO settings for Windows 10 devices as follows:
![]() Computer ConfigurationAdministrative TemplatesWindows ComponentsWindows Update as shown in Table 9-4.
Computer ConfigurationAdministrative TemplatesWindows ComponentsWindows Update as shown in Table 9-4.
TABLE 9-4 Windows 10 GPO settings in the Windows Update node
GPO Setting |
Description |
Turn off auto-restart for updates during active hours |
Allows you to specify the active hours during which the PC won’t restart. |
Specify active hours range for auto-restarts |
Allows you to specify the maximum number of hours that active hours can be set. Between 8 and 18 hours. |
Specify deadline before auto-restart for update installation |
Allows you to enforce a restart between 2-14 days after a restart is scheduled. |
Configure auto-restart reminder notification for updates |
Allows you to specify when auto-restart reminders are displayed. |
Turn off auto-restart notifications for update installations |
Allows you to turn off all auto restart notifications. |
Configure auto-restart required notifications for updates |
Allows you to specify how the restart notifications are dismissed. By default this is automatic after 25 seconds. |
Configure Automatic Updates |
Configure whether Windows Update to enable automatic updates on your computer. If this setting is enabled you must select one of the four options in the Group Policy setting (note there is no option 1): 2 = Notify for download and auto install 3 = Auto-download and notify for install 4 = Auto-download and schedule the install 5 = Allow local admin to choose setting If you select option 4 you can also modify a recurring schedule, otherwise all installations will be attempted every day at 03:00. |
Specify intranet Microsoft update service location |
Configure whether Windows Update will use a server on your network to function as an internal update service. |
Do not allow update deferral policies to cause scans against Windows Update |
Allows you to prevent update deferral policies to cause scans against Windows Update. |
Remove access to use all Windows Update features |
Enabling this policy removes user access to Windows Update scan, download and install features. |
Specify Engaged restart transition and notification schedule for updates |
Enabling this policy allows you to configure setting related to PC restart following a period of time when auto restart settings have being configured. |
Do not include drivers with Windows Updates |
If you enable this policy setting, Windows Update will not include drivers with Windows quality updates. |
Configure auto-restart warning notifications schedule for updates |
Controls when users receive notification reminders and warnings to restart their device following an update installation. |
Update Power Policy for Cart Restarts |
For educational devices that remain on charging carts overnight, so that they will receive update reboots during the scheduled install timeframe. |
Defer Windows UpdatesSelect when Feature Updates are received |
Controls the type of feature updates to receive and when based on branch readiness level. |
Defer Windows UpdatesSelect when Quality Updates are received |
Controls the type of quality updates to receive and when based on branch readiness level. |
![]() Computer ConfigurationAdministrative TemplatesWindows ComponentsData Collection And Preview Builds as shown in Table 9-5.
Computer ConfigurationAdministrative TemplatesWindows ComponentsData Collection And Preview Builds as shown in Table 9-5.
![]() Computer ConfigurationAdministrative TemplatesWindows ComponentsDelivery Optimization as shown in Table 9-6.
Computer ConfigurationAdministrative TemplatesWindows ComponentsDelivery Optimization as shown in Table 9-6.
To set a GPO to configure Windows Update, complete the following steps:
In the Search box, type gpedit.msc, and then click gpedit.msc.
In the Local Group Policy Editor, navigate to one of the three nodes, which relate to Windows Update.
In the right pane, select the GPO setting and configure the setting as required.
Click OK and close Local Group Policy Editor.
There are seven GPOs that relate to the Windows 10 Preview Builds as described in Table 9-5.
TABLE 9-5 GPO settings in the Data Collection And Preview Builds node
GPO Settings |
Description |
Toggle user control over Insider builds |
Whether users can access the Insider build controls in the Advanced Options for Windows Update. |
Allow Telemetry |
Determines the amount of diagnostic and usage data reported to Microsoft by Preview Build users as follows. 0= Security (Enterprise, educational, Server and IoT Operating Systems will send minimal telemetry data to Microsoft) 1= Basic (Limited amount of diagnostic and usage data) 2= Enhanced (Sends enhanced diagnostic and usage data). 3= Full (Sends enhanced diagnostic and usage data plus additional diagnostics data during a crash). |
Configure the Commercial ID |
Allows you to define the identifier used to uniquely associate the device for when telemetry data is being sent to Microsoft. |
Configure Authenticated Proxy usage for the Connected User Experience and Telemetry service |
Allows you to block or allow the Connected User Experience and Telemetry service from automatically using an authenticated proxy to send data back to Microsoft. |
Disable pre-release features or settings |
Determines the level to which Microsoft can experiment with the product to study user preferences or device behavior as follows: 1 = Allows Microsoft to configure device settings only. 2= Allows Microsoft to conduct full experimentations. |
Configure Connected User Experiences and Telemetry |
Forward Connected User Experience and Telemetry requests to a proxy server. |
Do not show feedback notifications |
Allows you to prevent devices from showing feedback questions from Microsoft. |
The final table of GPO settings allows you to modify the Delivery Optimization settings in Windows 10 so that you can fine tune, and regulate peer caching of updates.
TABLE 9-6 GPO settings in the Delivery Optimization node
GPO Settings |
Description |
Absolute Max Cache Size (in GB) |
Allows you to limit the maximum size in GB for the Delivery Optimization cache. The default size is 10 GB. |
Enable Peer Caching while the device connects via VPN |
Can allow the device to participate in Peer Caching while connected via VPN to the domain network to download from or upload to other domain network devices, whilst either on the VPN or via the corporate network. |
Download Mode |
Configure the use of Windows Update Delivery Optimization for downloads of Windows apps and updates as follows: 0= HTTP only: No peering 1= LAN: HTTP blended with peering behind the same NAT 2=Group: HTTP blended with peering across a private group. 3=Internet: HTTP blended with Internet Peering. 99=Simple: Download mode with no peering. 100=Bypass mode: Do not use Delivery Optimization and use BITS instead. |
Group ID |
Used to create a group ID to which that the device belongs to. Used to limit or group together devices. |
Max Cache Age (in seconds) |
Specifies the maximum time in seconds that each file is held in the Delivery Optimization cache after downloading successfully. Default setting is 3 days. |
Max Cache Size (percentage) |
Specifies the maximum cache size that Delivery Optimization uses as a percentage of available disk size. Default is 20%. |
Maximum Download Bandwidth (in KB/s) |
Specifies the maximum download bandwidth that the device can use across all concurrent download activities using Delivery Optimization. |
Max Upload Bandwidth (in KB/s) |
Defines the maximum upload bandwidth that a device will utilize for Delivery Optimization. |
Minimum Background QoS (in KB/s) |
Specifies the minimum download QoS (Quality of Service or speed) for background downloads. Default is 500KB/s |
Allow uploads while the device is on battery while under set Battery level (percentage) |
Specify the value between 1 and 100 to allow the device to upload data to LAN and Group peers while on battery power. The device can download from peers while on battery regardless of this policy. |
Minimum disk size allowed to use Peer Caching (in GB) |
Specifies the required minimum disk size for the device to use Peer Caching. Default is 32GB. |
Minimum Peer Caching Content File Size (in MB) |
Specifies the minimum content file size in MB enabled to use Peer Caching. Default value is 100 MB. |
Minimum RAM capacity (inclusive) required to enable use of Peer Caching (in GB) |
Specifies the minimum RAM size in GB required to use Peer Caching. Default value is 4 GB. |
Modify Cache Drive |
Specifies the drive Delivery Optimization will use for its cache. |
Monthly Upload Data Cap (in GB) |
Specifies the maximum total bytes in GB that Delivery Optimization is allowed to upload to Internet peers in each calendar month. Default value is 20 GB. |
Maximum Download Bandwidth (percentage) |
Specifies the maximum download bandwidth that Delivery Optimization uses. The default value is 0. |
Manage update history
Once an update has been downloaded and applied to a device, you can view your update history on the Windows Update page.
When you select the Update History option, you can see the updates that have been applied to your device. The updates are listed in date order. Each update is listed with the following information (see Figure 9-19):
![]() Update name
Update name
![]() Microsoft Knowledge Base (KB) reference number
Microsoft Knowledge Base (KB) reference number
![]() Status of the installation
Status of the installation
![]() Date of the installation
Date of the installation

You can select the link below an update to display a summary of the update. If you click More Info on the summary of the update page, you will be redirected to a webpage which provides the KB article related to the update.
Roll back updates
When viewing updates in the Update History page, you can click Uninstall Updates and the Installed Updates within Programs And Features in Control Panel will open. You can click an update within Installed Updates to uninstall the update and restart Windows.
When you view the list of updates, you might notice that some updates cannot be uninstalled. If you encounter an update that does not provide you with the uninstall option, you need to review the KB article that relates to the update for more information.
Resolving a problematic device driver or update
You have seen that the user has few choices when it comes to installing Windows updates. Sometimes a device driver or Windows update might cause your system to crash or exhibit instability. If Windows was behaving correctly prior to the update, you can uninstall the driver and prevent the driver or update from being installed again.
To uninstall an unwanted device driver:
Launch the Device Manager.
Select the device that has the problem driver.
Locate the device driver with the problem driver and choose Uninstall.
In the uninstall dialog box, select the check box to Delete The Driver Software For This Device.
Click OK and close Device Manager.
To uninstall an unwanted Windows Update:
Launch Settings, click Update & Security.
Select Windows Update and click Update History.
On the Update History page, click the Uninstall Updates link.
On the Uninstall an Update page, select the unwanted update from the list.
Right click the update and if available click Uninstall.
Click Yes to uninstall the update.
Once completed, you might need to restart your computer.
Until a new or updated fix is made available to replace the problem driver, you can temporarily prevent the driver or update from being reinstalled onto your machine. This is achieved by using the “Show or hide updates” troubleshooter, which you can download from Microsoft. The troubleshooter provides a user interface for either hiding or showing problem Windows Updates and drivers for Windows 10. You can download the Wushowhide.diagcab tool from the Microsoft Download Center.
Once installed, you need to run the troubleshooter and search for updates. You choose either Hide Updates or Show Hidden Updates. If you choose to hide updates, any updates that failed to install correctly on Windows 10 will be displayed. You can select which updates you do not want to be installed again as shown in Figure 9-20.

By marking the updates as hidden, Windows will not attempt to install them again until you enable them to be shown. In the wizard you are able to review detailed information relating to the updates. The troubleshooter will resolve the problem driver issues by updating the system to prevent the updates from being reapplied while they are hidden.
Clean up the Component Store
Some updates such as servicing stack updates are often marked as permanent in their manifest file (metadata) to prevent the update from being removed, which could cause stability issues.
Updates can occupy a large amount of storage space; this can be an issue for smaller devices and tablets. To identify the size of the WinSxS storage folder that contains all Windows updates, you need to open an elevated command window and type: Dism.exe /Online /Cleanup-Image /AnalyzeComponentStore.
The output, as shown in Figure 9-21, will advise whether the Component Store should be cleaned, which will allow Windows to reduce the size of the store and free-up some hard disk space.
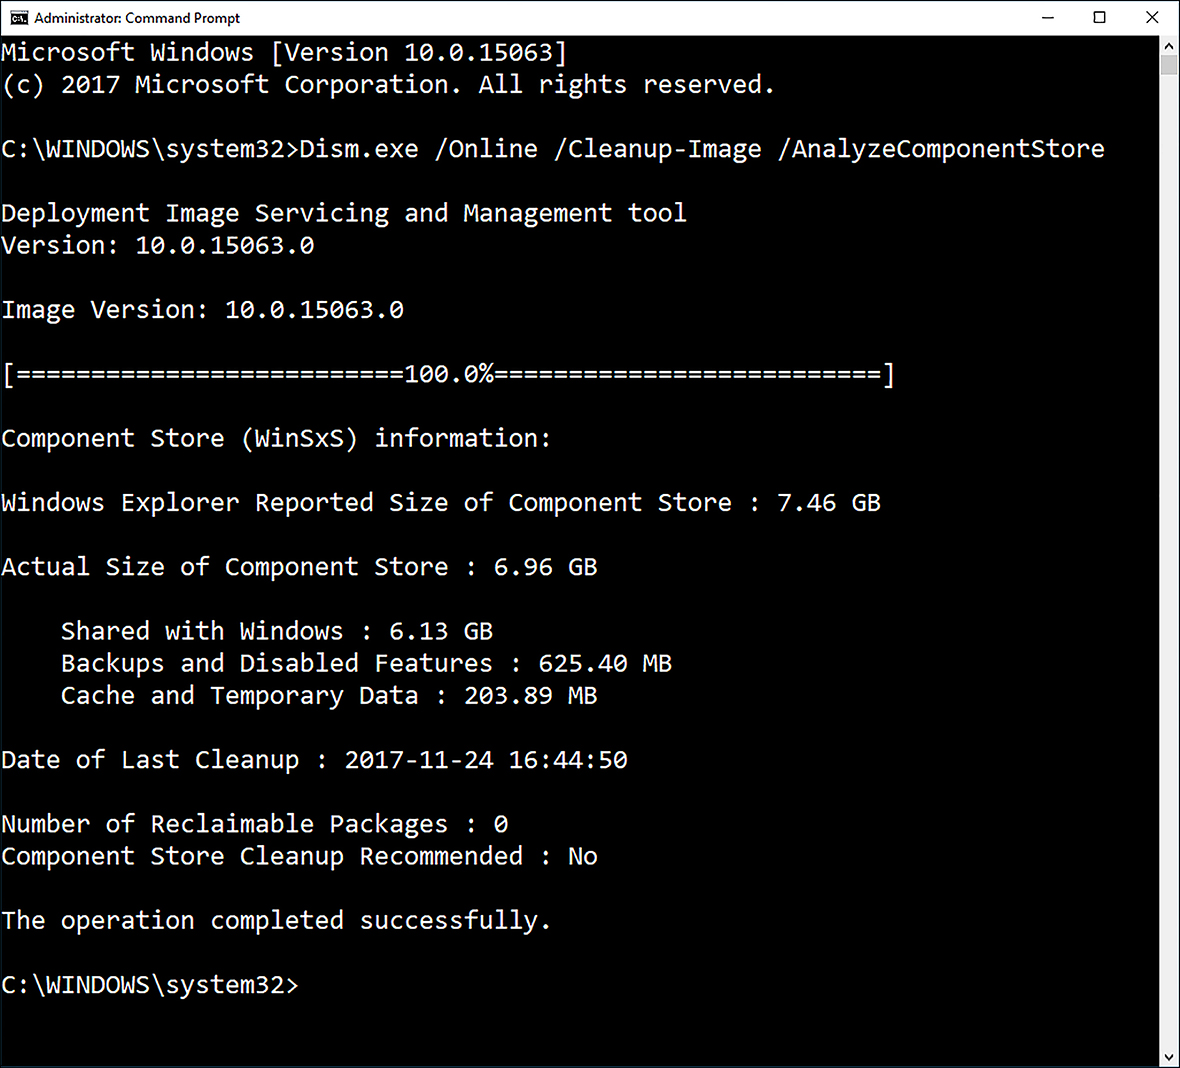
Windows will automatically clean up the WinSxS folder for you as a scheduled task in the background, but you can manually reduce the size of the folder by deleting installed package files within the WinSxS Component Store using one of the following methods:
![]() Task Scheduler The StartComponentCleanup task will clean up components automatically when the system is not in use. The task is set to run automatically 30 days after an updated component has been installed before uninstalling the previous versions of the component. To manually run the task, you need to open Task Scheduler and manually start the Task Scheduler LibraryMicrosoftWindowsServicingStartComponentCleanup task. Alternatively, you can invoke the task from the command line by typing:
Task Scheduler The StartComponentCleanup task will clean up components automatically when the system is not in use. The task is set to run automatically 30 days after an updated component has been installed before uninstalling the previous versions of the component. To manually run the task, you need to open Task Scheduler and manually start the Task Scheduler LibraryMicrosoftWindowsServicingStartComponentCleanup task. Alternatively, you can invoke the task from the command line by typing:
schtasks.exe /Run /TN "MicrosoftWindowsServicingStartComponentCleanup"
![]() Deployment Image Servicing and Management Deployment Image Servicing and Management (DISM) is an advanced command line tool that allows you to install, uninstall, configure, and update Windows features, packages, drivers, and international settings. To reduce the size of the WinSxS folder and immediately delete previous versions of updated components using DISM, open an elevated command prompt and type:
Deployment Image Servicing and Management Deployment Image Servicing and Management (DISM) is an advanced command line tool that allows you to install, uninstall, configure, and update Windows features, packages, drivers, and international settings. To reduce the size of the WinSxS folder and immediately delete previous versions of updated components using DISM, open an elevated command prompt and type:
Dism.exe /online /Cleanup-Image /StartComponentCleanup
![]() Disk Cleanup You can also use the GUI tool, Disk Cleanup to reduce space used by temporary files and system files, empty the Recycle Bin, and other files. There is an option to include system files, which includes drivers and updates.
Disk Cleanup You can also use the GUI tool, Disk Cleanup to reduce space used by temporary files and system files, empty the Recycle Bin, and other files. There is an option to include system files, which includes drivers and updates.
Rolling back Windows
Windows 10 is able to roll back the operating system to a previous version such as a Windows Insider preview build. If you installed a feature update, such as upgrading from Windows 10 (1609) to Windows 10 (1703), you can also go back to the previous version of Windows 10. If you upgraded to Windows 10 from an earlier version such as Windows 7, 8, or 8.1, you will also have an option to roll back the upgrade.
To preserve drive space Windows automatically performs a cleanup of all update files 10 days after updates have successfully been installed. You must therefore evaluate, and if necessary, remove the operating system update before the 10-day period expires and ensure that the manual cleanup process has not taken place during this period.
After 10 days, Windows 10 no longer offer the option to roll back operating system updates to a previous version because the original files will have been deleted to free up space on the hard drive. If you upgraded an earlier version of Windows to Windows 10, the old version is stored in a folder called C:Windows.old and can take up a lot of space–depending on the previous Windows version and age.
To roll back Windows 10 within 10 days of installation to an earlier version of Windows, use the Go Back To feature using following steps:
Open Settings and choose Update & Security.
Select the Recovery option.
Under the Go Back To Windows 7, select Get Started, as shown in Figure 9-22.
Follow the process to begin the rollback procedure, which will involve your system restarting.

Update Microsoft Store apps
Once a Microsoft Store app is installed, it will update itself automatically without any user interaction. You can change this default behavior within Settings and also modify policy using Group Policy. Due to the nature of the Microsoft Store and the extensive testing and validation of all apps prior to being made available in the Store, the updates are regarded as being safe for systems and you are advised to upgrade Store apps to benefit from any increased functionality and features.
On a daily basis, Windows 10 will attempt to check with the Microsoft Store for app updates. When an update for an installed app is available, it will be automatically downloaded and updated if you are online.
To see how many apps require updating, check for updates, pause updates, or manually update apps, you need to open the Microsoft Store. If you click the three dots to the right of your avatar and select Downloads And Updates, you can view all recent apps update activity. If you click the Get Updates button, any pending updates will be downloaded immediately, as shown in Figure 9-23.

If you have installed apps on another Windows 10 device, they may appear in your library, which is found in the Microsoft Store Settings. Unlike Windows 8.1, apps associated with your Microsoft account, these are not automatically installed on each of your Windows 10 devices; you must manually download and install them from within the My Library option once you have signed in to the Microsoft Store.
Disable automatic app updates in the Microsoft Store
Not everyone will want to take advantage of the updates, for example, a new update may deprecate a desired feature or incur large data consumption over costed networks. For all users except Windows 10 Home, you can opt out of the automatic app updating. To disable automatic Microsoft Store app updates, you can use these steps:
Sign into Windows with your Microsoft account user.
Open the Microsoft Store.
Click the three dots to the right of your avatar and click Settings.
In Settings, enable (default) or disable Update Apps Automatically as shown in Figure 9-24.
Click Home, the back arrow, or close the Microsoft Store.
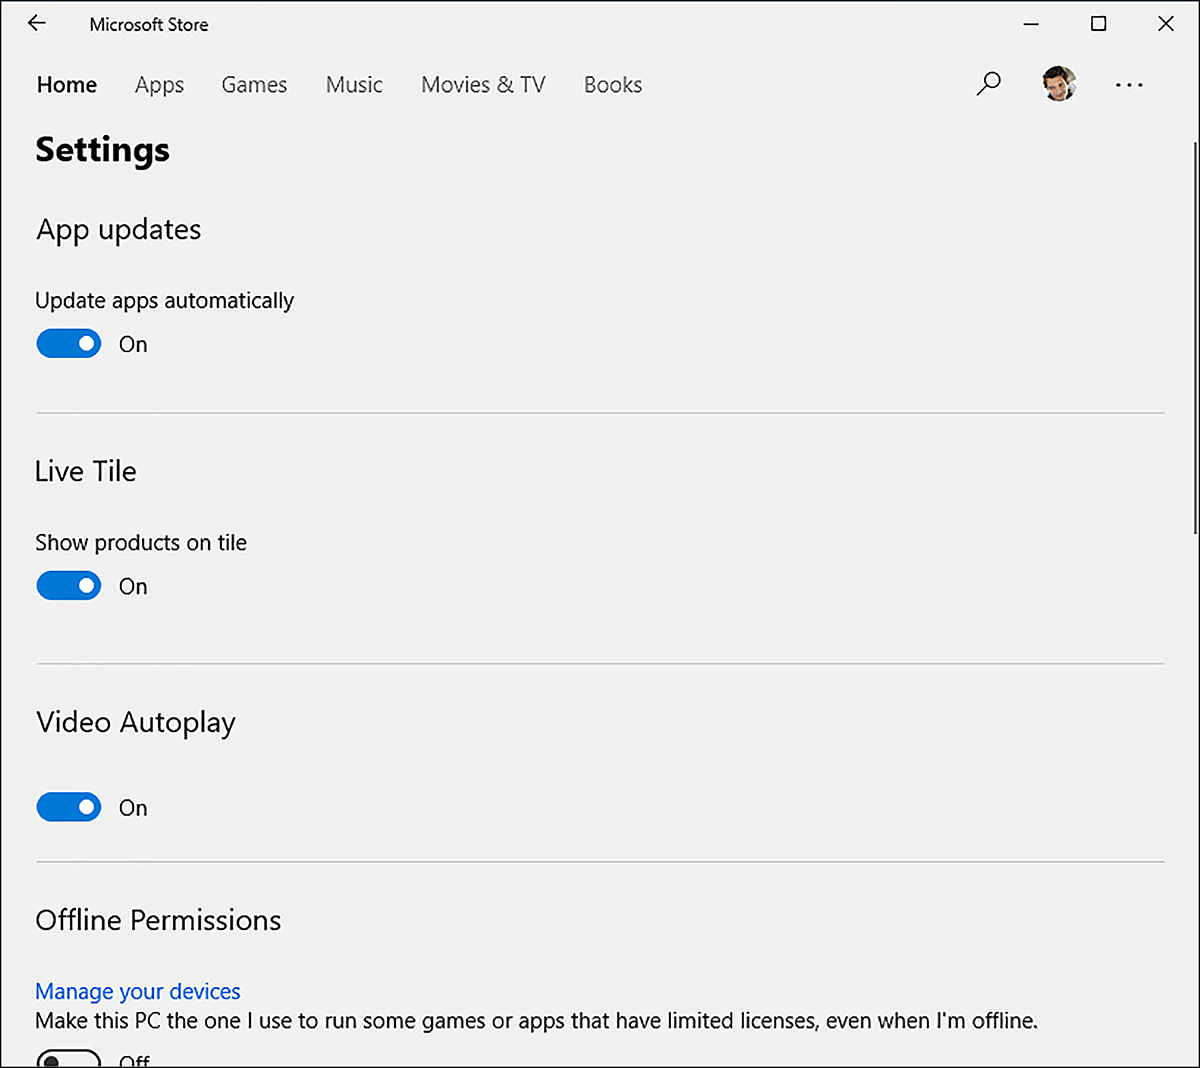
By disabling apps, you also conserve bandwidth, but your apps will not be updated. Whenever you have the Store app open, you can update your apps by selecting Downloads from the Settings menu and clicking Check For Updates.
Once you have installed the Group Policy administrative templates, configure the settings.
For enterprise administrators, Microsoft Store functionality can be configured using the following six GPOs found in the Computer ConfigurationAdministrative TemplatesWindows ComponentsStore folder:
![]() Turn off Automatic Download of Updates on Win8 machines.
Turn off Automatic Download of Updates on Win8 machines.
![]() Turn off Automatic Download and Install of updates.
Turn off Automatic Download and Install of updates.
![]() Turn off the offer to update to the latest version of Windows.
Turn off the offer to update to the latest version of Windows.
![]() Disable all apps from Windows Store.
Disable all apps from Windows Store.
![]() Turn off the Store application.
Turn off the Store application.
![]() Only display the private store within the Windows Store app.
Only display the private store within the Windows Store app.
If your enterprise has developed custom Microsoft Store apps and has installed them using the sideloading process, you should upgrade the app in a similar way, using the APPX installer file to replace the existing app, or you can use the command line tool Dism.exe or Windows PowerShell to manage and update sideloaded apps.
If your organization uses many sideloaded apps across the enterprise, you should consider using Microsoft System Center 2012 R2 Configuration Manager or the Microsoft Intune Self-Service Portal to deploy and manage Microsoft Store apps.
Thought experiments
In these thought experiments, demonstrate your skills and knowledge of the topics covered in this chapter. You can find the answers to these thought experiments in the next section.
Scenario 1
You want to use the Backup And Restore (Windows 7) tool to create a backup of your files contained on your computer to a removable USB hard drive or SDHC memory card. You want to create a custom schedule. Answer the following questions relating to the Backup And Restore (Windows 7) tool:
What is the default backup schedule for the Backup And Restore (Windows 7) tool?
How would you modify the schedule so that you can be more specific, for example, you want to backup the data every 30 minutes?
What triggers are available that could be used to begin the backup task?
You no longer want to use Backup And Restore (Windows 7) tool for your Windows 10 Pro tablet. What built-in backup tool could you use instead, and how could the data be safeguarded from theft?
Scenario 2
You have been asked to review the backup and restore options available within Windows 10 and OneDrive.com. Your manager is developing a backup strategy and wants to ensure that files are backed up and users can easily access the backed up files for at least six months. Backups will be stored offsite. Answer the following backup related questions.
How would relying on the OneDrive Recycle Bin feature affect the backup strategy?
You want to examine how the Previous Versions feature found in File Explorer works, but you cannot see any Previous Versions listed. How do you enable Previous Versions?
Could the Previous Versions feature found in File Explorer offer backup and recovery of files as part of the backup strategy?
Scenario 3
Your organization has 1,300 users distributed across the country in six branch office locations. Each location has high-speed Internet connectivity and there is a small team of IT staff at each office. You are upgrading the Windows 8.1 computers with Windows 10 and you need to research and create a plan for how Windows updates will be deployed across your organization.
Answer the following questions regarding your research:
Which edition of Windows 10 will you recommend for the majority of your users?
What new feature in Windows 10 could be used to expedite the roll out of Windows updates within the branch offices?
What enterprise ready tools could you include in your research for update management within the enterprise?
Thought experiment answers
This section provides the solutions for the tasks included in the thought experiments.
Scenario 1
The default backup schedule for the Backup And Restore (Windows 7) tool is every Sunday at 7 P.M.
You need to edit the AutomaticBackup task in the WindowsBackup node found in Task Scheduler and configure the task to repeat every 30 minutes by editing the trigger.
The triggers available for the task to begin include the following: On a schedule, At log on, At startup, On idle, On an event, At task creation/modification, On connection/ disconnect to a user session, On workstation lock/unlock.
You would suggest using File History. This feature allows the back up of files and folders to a removable drive such as a USB drive, or SDHC memory card which may be used with the device. The external storage may optionally be encrypted using BitLocker To Go or EFS.
Scenario 2
The OneDrive Recycle Bin is not a backup facility. It will only retain files that have been deleted for a maximum of 90 days. This is less than the six months required by the backup strategy.
You would need to turn on the schedule to create restore points using either File History or the Backup And Restore (Windows 7) tool. Once the Backup And Restore (Windows 7) tool creates a backup, or when File History runs, previous versions of files will be available on the Previous Versions tab.
Previous Versions could provide the longevity of access to the backed up files if the backup storage location does not become full. To ensure that the Previous Versions complied with the backup strategy, you would need File History or the Backup And Restore (Windows 7) tool to save the image to a remote storage location, such as a networked attached drive.
Scenario 3
Due to the size of the organization and also the potential benefits of having a licensing agreement using Software Assurance, you will recommend Windows 10 Enterprise.
The Windows Update Delivery Optimization feature in Windows 10 Windows to source security updates and app updates from other PCs that already have the updates.
Microsoft System Center 2012 R2 Configuration Manager, Windows Server Update Services and Microsoft Intune are three tools that can be used for update management within the enterprise.
Chapter summary
![]() A Windows 10 recovery drive can be used to recover your system in the event of failure.
A Windows 10 recovery drive can be used to recover your system in the event of failure.
![]() System Restore is part of the system protection, and useful to restore the operating system to a previous point in time if, for example, prior to when your computer became unstable.
System Restore is part of the system protection, and useful to restore the operating system to a previous point in time if, for example, prior to when your computer became unstable.
![]() Windows Recovery Environment allows you to access the advanced startup options to troubleshoot Windows 10 startup issues.
Windows Recovery Environment allows you to access the advanced startup options to troubleshoot Windows 10 startup issues.
![]() Windows 10 introduces the ability to reset your device. Reset can reinstall Windows 10 and allow you to keep your files.
Windows 10 introduces the ability to reset your device. Reset can reinstall Windows 10 and allow you to keep your files.
![]() A new feature called Fresh Start within the Windows Defender Security Center allows you to keep your personal files and some Windows settings but remove all apps, including third-party apps pre-installed on your device.
A new feature called Fresh Start within the Windows Defender Security Center allows you to keep your personal files and some Windows settings but remove all apps, including third-party apps pre-installed on your device.
![]() After 10 days following the upgrade to Windows 10, the previous operating system, stored in the Windows.old folder will be deleted. Prior to this happening, users can revert to the previous version of Windows.
After 10 days following the upgrade to Windows 10, the previous operating system, stored in the Windows.old folder will be deleted. Prior to this happening, users can revert to the previous version of Windows.
![]() Driver Rollback allows you to revert to a previous device driver after your system begins to suffer the effects of upgrading to a new device driver that is poorly performing.
Driver Rollback allows you to revert to a previous device driver after your system begins to suffer the effects of upgrading to a new device driver that is poorly performing.
![]() Restore points are created when the Backup and Restore (Windows 7) tool creates a backup image. You can use a system image to recover Windows 10 in the event that Windows 10 becomes unstable, such as a hard drive failure and other methods have failed to recover your system.
Restore points are created when the Backup and Restore (Windows 7) tool creates a backup image. You can use a system image to recover Windows 10 in the event that Windows 10 becomes unstable, such as a hard drive failure and other methods have failed to recover your system.
![]() Windows 10 File History is the preferred backup option that performs automatic backups of files every hour to a non-local storage.
Windows 10 File History is the preferred backup option that performs automatic backups of files every hour to a non-local storage.
![]() Previous Versions is a feature that allows you to recover deleted or modified versions of your files directly from File Explorer rather than via a backup or File History. Previous versions are generated whenever File History or the Backup and Restore (Windows 7) tool create restore points.
Previous Versions is a feature that allows you to recover deleted or modified versions of your files directly from File Explorer rather than via a backup or File History. Previous versions are generated whenever File History or the Backup and Restore (Windows 7) tool create restore points.
![]() OneDrive allows you to recover files you’ve deleted from OneDrive folders in the File Explorer Recycle Bin and the OneDrive Recycle Bin in the cloud interface. Recovering previously deleted files from either Recycle Bin will allow the files to be available again in OneDrive.
OneDrive allows you to recover files you’ve deleted from OneDrive folders in the File Explorer Recycle Bin and the OneDrive Recycle Bin in the cloud interface. Recovering previously deleted files from either Recycle Bin will allow the files to be available again in OneDrive.
![]() OneDrive can provide a history of older versions of Office documents that are stored within OneDrive so that you can access, restore, and download previous versions of your files.
OneDrive can provide a history of older versions of Office documents that are stored within OneDrive so that you can access, restore, and download previous versions of your files.
![]() The OneDrive Recycle Bin can retain deleted items for a minimum of three days and up to a maximum of 90 days, and the size of the Recycle Bin is 10 percent of your total storage.
The OneDrive Recycle Bin can retain deleted items for a minimum of three days and up to a maximum of 90 days, and the size of the Recycle Bin is 10 percent of your total storage.
![]() Windows 10 Home users have Windows Updates automatically downloaded and installed on their devices. Windows 10 Pro, education and Enterprise customers can defer feature updates for up to 365 days, and defer quality updates for up to 30 days.
Windows 10 Home users have Windows Updates automatically downloaded and installed on their devices. Windows 10 Pro, education and Enterprise customers can defer feature updates for up to 365 days, and defer quality updates for up to 30 days.
![]() Windows 10 Pro, education and Enterprise customers can pause updates for up to 35 days.
Windows 10 Pro, education and Enterprise customers can pause updates for up to 35 days.
![]() The Semi-Annual Channel brings a new version of Windows 10 twice a year that is supported for 18 months.
The Semi-Annual Channel brings a new version of Windows 10 twice a year that is supported for 18 months.
![]() The Long Term Servicing Channel is a special version of Windows 10, available to Enterprise customers only, is supported for up to 10 years and does not receive feature upgrades.
The Long Term Servicing Channel is a special version of Windows 10, available to Enterprise customers only, is supported for up to 10 years and does not receive feature upgrades.
![]() Windows Update Delivery Optimization is a method of peer-to-peer sharing of Windows update files. This feature significantly reduces the time that a Windows 10 device is vulnerable from zero-day malware attacks. Peer caching can occur between other users on the local network or optionally across the Internet.
Windows Update Delivery Optimization is a method of peer-to-peer sharing of Windows update files. This feature significantly reduces the time that a Windows 10 device is vulnerable from zero-day malware attacks. Peer caching can occur between other users on the local network or optionally across the Internet.
![]() Administrators can use Group Policy to centrally configure and manage Windows Update behavior, location of WSUS servers, and Windows Update Delivery Optimization settings.
Administrators can use Group Policy to centrally configure and manage Windows Update behavior, location of WSUS servers, and Windows Update Delivery Optimization settings.
![]() If a driver update causes system stability issues, you can uninstall the update and if necessary disable the automatic application of the update.
If a driver update causes system stability issues, you can uninstall the update and if necessary disable the automatic application of the update.
![]() Updating Microsoft Store apps is automatic and ensures that your system has the latest version of apps. Windows 10 Pro, education and Enterprise customers can modify this setting.
Updating Microsoft Store apps is automatic and ensures that your system has the latest version of apps. Windows 10 Pro, education and Enterprise customers can modify this setting.