
Chapter 3. Finding and Adding Friends
In real life, your social network consists not just of people who live in your town and work or study where you do, but also of people you’ve formed one-on-one relationships with: teachers, ex-sisters-in-law, bowling buddies, and so on. It’s the same with Facebook: You start with a network of school or work buddies (see Chapter 2), and then add friends one at a time. You can even use Facebook to look up old friends and find new ones.
Why would you want to enlarge your Facebook social circle? Well, having friends is really the whole point of joining Facebook. You get to swap life-in-progress tidbits (both serious and silly), share what you’re reading, play online games...the list is endless. But first you need to gather your pals. Read on to learn how.
How Facebook Friends Work
In the world of Facebook, a friend is any Facebook member who has agreed that you two have something in common. Maybe you play on the same softball team, volunteer at the local animal shelter together, or keep running into each other at parties thrown by the same ex-roommate. Maybe you dated, took a road trip together, or you’re second cousins twice removed. How you know a Facebook friend doesn’t matter; all that matters is that you both agree that you know each other.
Note
Facebook has no way of verifying the relationships between friends. But one of the major differences between Facebook and MySpace.com—the other big social networking site—is that Facebook strongly encourages truthfulness. So, while having a zillion “friends” is considered a status symbol on MySpace, it’s not on Facebook. On Facebook, the goal of friends is to put together a manageable list of people you actually know—and actually care about keeping up with.
Two people become Facebook friends when one person extends an invitation and the other person accepts, or confirms. When you become friends with someone in Facebook, three things happen:
You appear on your friend’sFriend List(Organizing Your Friends) and on her profile page (and vice versa). On Facebook, as in life, you’re known by the company you keep: Everyone with access to your friend’s profile (or yours) can see the relationship between the two of you. And with the click of a mouse, folks can hop from your friend’s profile to yours, or from your profile to your friend’s.
Note
One of the best, most addictive things about Facebook is its confessional nature. Facebook profiles encourage members to pontificate at length about subjects that don’t often come up in polite conversation. So, when you’re friends with someone in Facebook, you might be surprised at the juicy details you learn about them.
You can see your friend’s profile (and vice versa) even if he’s not in your network. This means you can see the events he’s planning to attend, the groups he’s joined, and all the other people he’s friends with, among other personal details.
You can sign up to receive automatic detail-packed updates, such as news feeds (Types of Updates), chronicling your friend’s Facebook activities (and vice versa).
Note
Chapter 5 shows you how to sign up for updates on your friends’ Facebook activities—including news feeds—and how to customize the updates your friends get about you.


Finding Friends
Before you can make someone your friend, you first have to find that person on Facebook. The site gives you three different ways to do this:
You can look up real-life friends and acquaintances who are already Facebook members.
You can invite real-life friends and acquaintances who aren’t on Facebook yet to join the site.
You can search for Facebook members you’ve never met but who share your interests (such as a background in server-side technology or a passion for container gardening).
Finding People Who Are Facebook Members
Some of your real-life friends and acquaintances might already be Facebook members. To find them, use one of the following search methods:
Search for Facebook members by name. In the Search field on the left side of any Facebook screen, type the name of the person you’re looking for and hit Return. Facebook displays all the matches (and near-matches) it finds in all networks. If you see a ton of matches, click the People tab so your list won’t be cluttered with groups or events that happen to match your search criteria. To narrow your search to a single network, choose a network from the “Show results from” drop-down list. To narrow it down by sex, age, or relationship status, click the blue Show More Filters link.
Tip
In Facebook, clickable links are blue. If one of the names you see in the search results (or on your friends list, or anywhere else in Facebook) is blue, then clicking it takes you straight to that person’s profile.
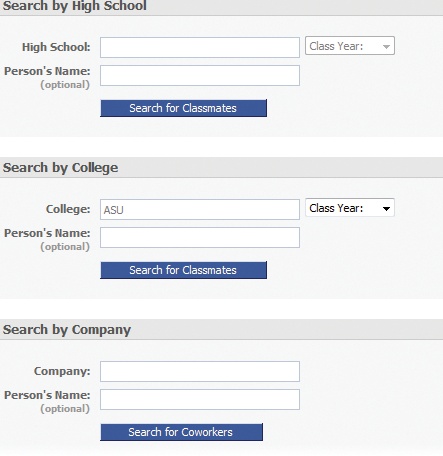
Search for Facebook members who are classmates, ex-classmates, or co-workers. On the left side of any Facebook screen, click the down arrow next to the word Search and choose Find Classmates or Find Coworkers. In the fields that appear, type in either the name of the school and graduating year of the class you’re looking for, or the name of a company. Then type in the name of the person you’re looking for and click “Search for”.
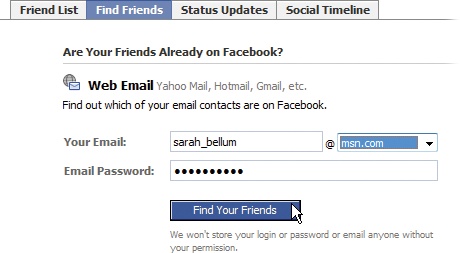
Search for people you regularly email from your Web-based email account. If you have a Web-based email address (such as [email protected] or [email protected]), you can give Facebook your email password and let it scan your email address book for matching Facebook members.
Here’s how: At the top of any Facebook screen, click the down arrow next to Friends, and then click Find Friends to display the Find Friends tab. If the email address Facebook suggests on the Find Friends tab is correct, type in your email password. If not, type in your email ID (the part of your email address before the @ symbol) and, from the drop-down list, choose your email provider—and then type in your email password. When you finish, click Find Your Friends. If Facebook finds members who match the email addresses in your Web-based email address book, it displays them; if it doesn’t find any matches, it pops up a message box asking if you’d like to try a different Web email account.
Note
You don’t have to have registered for Facebook with a Web email account to use this search method. For example, if you registered for Facebook with your work email address (like [email protected]), you can still search your Gmail address book.
Note
Keep in mind that when you enter your email account password you’re handing over some pretty sensitive info to Facebook. After all, that password’s the virtual key to your email, your address book, and probably a bunch of other personal goodies. While Facebook is a reputable outfit and pledges not to store your info, you might want to skip this step if this whole sharing business makes you queasy.
Search for people you regularly instant message. If you use AOL Instant Messenger (AIM), you can give Facebook your AIM screen name and password and let it scan your buddy list for matching Facebook members. To do so: On the Find Friends tab (at the top of any screen, click the down arrow next to Friends, and then choose Find Friends), click AIM Instant Messenger to display the Screen Name and AIM Password fields. Enter your screen name and password, and then click Find Friends. Facebook either displays matching Facebook members, or pops up a message box asking if you’d like to try your search again (you don’t; if Facebook didn’t find any matches the first time, it won’t find any matches the second).
Search for people you regularly email, using a list of contacts. Depending on the email program you use, you can export a list of email addresses from your email program and let Facebook scan the addresses for matching Facebook members. (If you use a Web-based email account, Finding People Who Are Facebook Members.) To do so: Create a contact file, a list of email addresses separated by tabs or commas. (If you need help doing this, on the Find Friends tab [at the top of any screen, click the down arrow next to Friends, and then choose Find Friends], click Email Application to display the Contact File field, and then click the “how to create a contact file here” link. Click the link for your particular email program and follow the instructions for creating a contact file.) Then give Facebook the name of the contact file you just created. Click Browse to select the contact file. After you do, Facebook either displays the Facebook members who match your email list, or shows you a link you can use to get technical help.


Finding People Who Aren’t Facebook Members
You can’t add people to your Friend List unless they’re Facebook members. But say you’ve got a few real-life pals you wish would sign up for the site so you could keep in touch more easily. Facebook gives you an easy way to invite these people to join:
At the top of any Facebook screen, click the down arrow next to Friends, and then click Invite Friends.
On the Invite Your Friends page that appears, type in your non-Facebook-pals’ email addresses, separated by commas; then type in a quick message and click Invite. Facebook sends invitations to all the addresses in the To field.
Tip
If you have more than a handful of email addresses to type in, consider having Facebook grab them from your Web email account (Finding People Who Aren’t Facebook Members) or from a file you export from your email program (Finding People Who Aren’t Facebook Members).

Finding New Friends
One of the reasons Facebook is so popular is that it lets you connect with kindred spirits. Want to meet other people who like your favorite TV shows, live in your town, or share your political views? Easy. And because Facebook wisely limits in-depth searching to fellow members of the networks you’ve joined, you already have something in common with the people you look up in Facebook: where you live, where you work, or where you go (or went) to school. Voilà—instant conversation opener!
To search for other Facebook members based on profile details:
On the left side of any Facebook screen, click the down arrow next to Search, and then click Advanced Search.
On the page that appears, use the drop-down lists and text fields to tell Facebook what kind of people you’re looking for; then scroll down to the bottom of the page and click Advanced Search. Facebook returns a clickable list of all the people in your network (and on your Friend List) that match the criteria you typed in, ordered by the number of criteria matched. (You see the criteria that matched highlighted in yellow.)
Note
Dating? Facebook’s browse feature (click the down arrow next to Search, and then click Browse) displays all the people in your primary network and then lets you either scroll through all the profile pictures, or search for potential sweeties based on a handful of criteria like age, sex, and the kind of relationship people are looking for.


Inviting People to Be Your Friend
You can’t just add people to your Friend List willy-nilly; they have to be Facebook members already, and they have to agree to be added.
Note
Finding People Who Aren’t Facebook Members shows you how to invite non-Facebook members to join the site.
To invite a Facebook member to be your friend:
Search for the person you want to befriend (see Finding New Friends).
Note
If you send a friend request to someone who can’t normally see your profile—they’re not in your network, for example—Facebook temporarily grants that person access to your profile so she can make an informed decision about whether or not to accept your invitation. If you don’t want folks to have this temporary access, you can remove or customize it: On the Facebook main menu, click “privacy”, and then click “Poke, Message and Friend Request” (see Chapter 13).
If your search returns the person you’re looking for, click the “Add [member] as a Friend link” you see just below the profile picture. If you don’t find the person you’re looking for, you can send her an invitation to join Facebook (Finding People Who Aren’t Facebook Members).
Fill out the confirmation box that appears and then click Add Friend. When you do, Facebook automatically sends an invitation to your would-be friend’s email address and posts a friend request to her Facebook profile (Creating Your Profile). If your friend agrees to the friendship and responds either to the email or the Facebook request (Responding to Friend Requests), Facebook adds your name to her list of friends, and her name to yours. Facebook also sends you a notification (see Customizing Your Mini-feed).
Note
If you don’t see the Add Friend link, it’s because the person you’re trying to befriend has adjusted her privacy settings to block friend requests. See Chapter 13 for details.
Note
In its quest to support polite social interactions, Facebook doesn’t give members a way to explicitly reject friend invitations, but they can ignore invitations. If you’ve sent an invitation and haven’t heard back after a few days, try sending the person a message or a poke (Poking). Still no answer? Sorry—you’ve been snubbed.


Responding to Friend Requests
When someone tries to add you to her Friend List, two things happen: Facebook sends you an email invitation, and it posts a little notice on your profile telling you that you have a friend request.
At that point, you’ve got two choices: You can confirm the request or ignore it, either in Facebook or right from your email program.
Confirming Email Requests
If you’re the type of person who checks her email every hour (or every five minutes) but only logs onto Facebook every couple of days, you’ll want to handle friend requests from inside your email program. Here’s how:

Confirming Requests in Facebook
Some people log in to Facebook whenever they’re in front of a computer. If you’re one of them, it’s easier to respond to friend requests from your Facebook home page than to fire up your email program and wade through your inbox looking for invitations. To confirm a friend request from inside Facebook:
Surf to your Facebook home page (click the “home” link in the upper-right part of your screen) and click the “friend request” link. Friend requests appear on the upper-right side of your home page under Requests. (If you don’t have any friend requests, you won’t see any listed under Requests.)
Make sure you want to accept the request, and then click Confirm. If you’ve never heard of the person, the message he sent doesn’t make sense, and the two of you have no friends in common, then you probably want to click the person’s name and check out his profile to make sure the request is on the up-and-up.
Note
Turn on the “[Name] can only see my limited profile” checkbox to pare down the personal details your new friend will be able to see (Chapter 13). You might want to do this if you’ve got a few social circles going on Facebook and don’t want them to collide. For example, if the friend request is from your boss, then you don’t want her browsing through your political rants or stag-party photos.
In the confirmation box that appears, turn on the checkbox next to the description that best fits your relationship—if you want. Depending on which box you check, Facebook may display extra (optional) fields you can use to describe your relationship in more detail. Check Worked Together, for example, and Facebook displays fields you can use to indicate that you’ve worked together for five years and are still working for Acme Foods.
Note
If you don’t want the world to know how you know this person (you “hooked up” with him but have too much class to advertise that fact, say), click Skip This Step instead of following steps 3–4. You still become friends with him, but Facebook doesn’t list how you know him.
Note
The details you supply in this box are what make up your (and your friend’s) social timelines (Viewing Your Connections to Friends).
Click Skip This Step. Just like that, you’re Facebook friends.
Note
If you want your friend to confirm the details of your relationship, click Request Confirmation instead of Skip This Step. (Confirmed relationship details appear on both Friend Lists in black, unconfirmed in gray.)
Tip
To see what friends you and your new friend have in common, simply click “View her profile,” and then, on your new friend’s profile, hunt for the Mutual Friends section (it’s below her profile picture).


Ignoring a Friend Request
In Facebook as in life, there will be times when someone extends the hand of friendship and you just don’t want to shake it. After all, confirming a friend request doesn’t just give your new pal access to a big chunk of your personal life; it also lets the world know that you think enough of the guy to declare yourself his friend. If you receive a friend request from someone you’ve never heard of, say, or whose profile paints a picture so creepy you want to lock your virtual door, all you have to do is quietly remove all traces of the request and get on with your life.
To do so:
Sign in to Facebook (Controlling Access to Your Account) if you’re not already there.Don’t follow the link inside the friend request email you received, or you’ll confirm the friendship.
In the notifications section of your Facebook home page, click the “friend request” link.
In the box that appears, click Ignore. That’s all you have to do: Facebook immediately removes the friend request link from your home page.
Note
The guy who sent the invitation won’t be notified that you’ve officially ignored him; he just won’t receive a confirmation.
In your email program, delete the friend request email.
Viewing Your Friends
Facebook automatically displays six randomly selected friends from your primary network (Chapter 2) in the Friends section of your profile.

To see more than these six friends listed on your profile—or to see more details about each of your friends—you’ve got a few options. You can:
See all of your friends at one fell swoop. To do so, head to the Friends section of your profile and click the See All link. When you do, Facebook displays your All Friends list. (If you know you have more friends than Facebook displays, make sure the Everyone tab is selected.) Another way to see your All Friends list is to head to the top of any Facebook screen, click the down arrow next to Friends, and then click All Friends.
See friends who’ve changed their profiles lately. From your All Friends list, click the Recently Updated tab. (Alternatively, head to the top of any Facebook page and click Friends.)
See friends who’ve updated their statuses recently. From your All Friends list, click the Status Updates tab to see your friends’ late-breaking statuses.
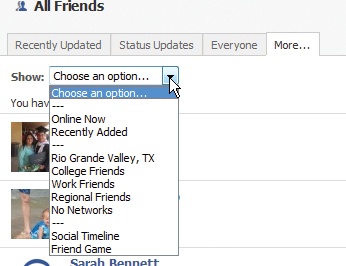
See friends who are online right this minute. From your All Friends list, click the “More...” tab. Then, from the Show drop-down list, choose Online Now.
See your friends broken out by the network they belong to, or whether they’re college friends, work friends, or friends who live close to you. From your All Friends list, click the “More...” tab. Then, from the Show drop-down list, choose a specific network (to see friends who belong to that network), College Friends (to see friends who belong to college networks), Work Friends (to see friends who belong to work-related networks), of Regional Friends (to see friends who belong to geographical networks).
Note
When you choose College Friends, Work Friends, or Regional Friends, Facebook displays an additional field you can use to show only those pals who belong to a specific college, work, or regional network.

Organizing Your Friends
The options Facebook gives you for viewing your friends (Viewing Your Friends) are great if you have only a handful of pals. But if you’re a hardcore social butterfly with dozens or even hundreds of friends, you’ll want to organize your friends into separate lists that reflect how you categorize them in your mind.
For example, imagine that in addition to your workplace network, you’re involved in a book club, a softball league, and a 12-step program. Creating four separate lists lets you keep track of your different social circles at a glance. And because Facebook lets you send the same message to all the friends on a single list all at once (see Sending Messages) and even invite everyone on the list to join the same group (Chapter 6) or event (119), creating separate Friend Lists helps you communicate with folks quicker while reducing the risk of having your worlds collide.
Creating a New Friend List
Facebook lets you create up to 100 different Friend Lists, each of which can contain up to 1,500 names. (Of course, unless you’re a politician, you probably won’t need anywhere near that many.) Here’s how to create a new Friend List:
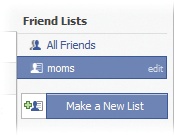
Head to the top of any Facebook page and click Friends. Head to the right side of the page that appears and click “Make a New List” (Viewing Your Friends).
Note
Because lists were designed to help you manage a bunch of friends, you don’t see the “Make a New List” link unless you have 11 or more Facebook friends.
In the field that appears, type in a name for your list and hit Return. In the example on the next page, the list’s name is moms.
Add the names of some friends to your list. The easiest way is to click the Select Multiple Friends link and then, from the list of thumbnails that appears, click the friends you want to add to your list. (Clicking a thumbnail once turns it blue to let you know you’ve selected it; clicking again de-selects it.) When you finish, click Save List. Your newly created list appears on the All Friends page beneath the Friend Lists heading.
Note
Alternatively, you can click in the Add to List field and type in names one at a time.
Note
You can add the same friend to multiple Friend Lists.


Viewing a Friend List
Friend Lists are for your eyes only—your friends never see which lists, if any, you’ve added them to. To see all the friends on a particular Friend List:
Go to the top of any Facebook page and click Friends.
Head to the right side of the page that appears and click the name of the list you want to see. Facebook displays the names of the friends you’ve added to that list.
Editing a Friend List
Online or off, social circles and friendships change over time. After you’ve created a Friend List (Creating a New Friend List), you can change its name, add friends to it, or delete friends from it.
To change the name of a list:
Go to the top of any Facebook page and click Friends.
Head to the right side of the page that appears and click the “edit” link next to the name of the list you want to change.
In the field that appears, type the new name. When you finish, hit Enter.
You add friends to an existing list the same way you add them to a new list (see Viewing a Friend List).
To delete friends from a list:
First, view the list (Viewing a Friend List).
Scroll down to the friend you want to remove from the list and click the X Facebook displays to the right of the friend’s name. Then, in the confirmation box that appears, click “Remove from List”.

Deleting a Friend List
Maybe you created a Friend List and find you never use it. Or maybe the number of friends on one of your Friend Lists dwindled to nothing. For whatever reason, deleting a Friend List is easy:
View the list you want to delete (Viewing a Friend List).
Scroll down to the bottom of the list and click the “Delete this list” link. Then, in the confirmation box that appears, click Delete List.
Viewing Your Connections to Friends
If you have a lot of Facebook friends (or a bad memory), you might be interested in viewing your social timeline. A social timeline is simply a list of your Facebook friends arranged chronologically by when you met—based on the relationship details you’ve given Facebook (Confirming Requests in Facebook)—accompanied by how-we-met details. Viewing your social timeline is easy and kind of fun. At the top of any Facebook screen, click the down arrow next to Friends, and then choose All Friends. Then click the “More...” tab and, from the Show drop-down list, select Social Timeline.
From Facebook’s point of view, understanding how people connect is incredibly useful (all the better to sell you stuff, my dear—in Chapter 11). From your point of view, looking at your social timeline is like looking through shoeboxes of old pictures. You’re not going to want to do it every day, but every once in a blue moon you may find it interesting to browse through your timeline and settle a bet over which of two friends you met first, or realize that you tend to connect with people based only on one or two shared interests.
Note
Looking at your social timeline will be about as interesting as watching paint dry unless you have a lot of Facebook friends and you (or your friends) have been diligent about providing Facebook with relationship details (Confirming Requests in Facebook).
Adding Relationship Details
Because your social timeline is basically a list of relationship details, you have to cough up some details before you can see your timeline. If you or your friends didn’t enter relationship details during the befriending process (Confirming Requests in Facebook), no sweat—you can add them any time. Here’s how:
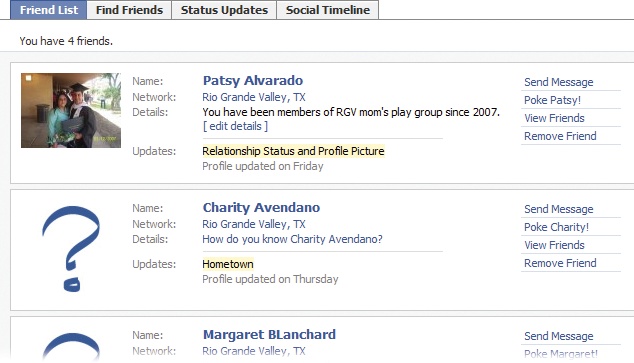
At the top of any Facebook screen, click the down arrow next to Friends, and then click All Friends to display your Friend List.
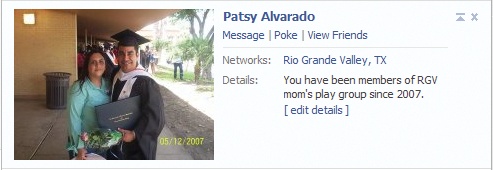
For each friend in your Friend List, click the square “expand” icon on the right side of the listing, and then click the Details link, which either reads “[ edit details ]” or “How do you know [Name]?”
In the box that appears, turn on as many checkboxes as you like, and then click Request Confirmation. Facebook shoots your friend a quick email (as well as a Facebook notification) she can use to confirm what you’ve written.
Note
The details you add show up on your Friend List and profile as well as on your friend’s Friend List and profile, even if your friend doesn’t confirm them. The difference? Details appear in gray until they’re confirmed; after that, they appear in black.


Breaking Up: Unfriending Friends
Breaking up is never easy, but sometimes it has to be done. Say one of your Facebook friends stabs you in the electronic back by posting inappropriate stuff on your wall (Writing on Walls) or spamming all your other friends, and you really have no choice but to cut him loose. To remove someone from your Friend List:
From your Friend List (Viewing a Friend List), click the name or photo of the person you want to “unfriend.” Facebook pops up the person’s profile.
Scroll down to the bottom of the profile and click the “Remove from Friends” link. (You don’t see this link on profiles of non-friends.) You’re friends no more.
Note
Unlike quietly ignoring a friend request, removing someone from your Friend List sends a clear message. Because Facebook friendship is reciprocal, removing a friend means you disappear from your former friend’s Friend List—an unmistakable rebuff.