
Chapter 11. Advertising on Facebook
In Facebook’s early days, “advertising” meant college students looking to sell their old textbooks or find new roommates. But now that Facebook is open to the public and has several million members, things have changed. Facebook’s ability to comb through millions of personal details at a practically unheard-of level of granularity (“Show me all the conservative male college students who live in Portland, have mobile phones, and enjoy watching vintage Bugs Bunny reruns”) and tap directly into each member’s circle of friends is an advertiser’s dream come true.
These days, big companies with big ad budgets are placing ads on Facebook. As the site has grown, marketing strategies have changed, too, from simple network-targeted banner ads to social ads, which mine members’ personal details and Friend Lists to hawk products. This chapter explores your options for advertising on Facebook, which range from free to affordable to don’t even think about it.
Taking Polls
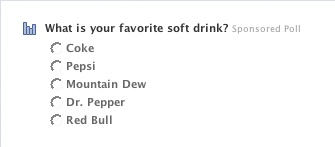
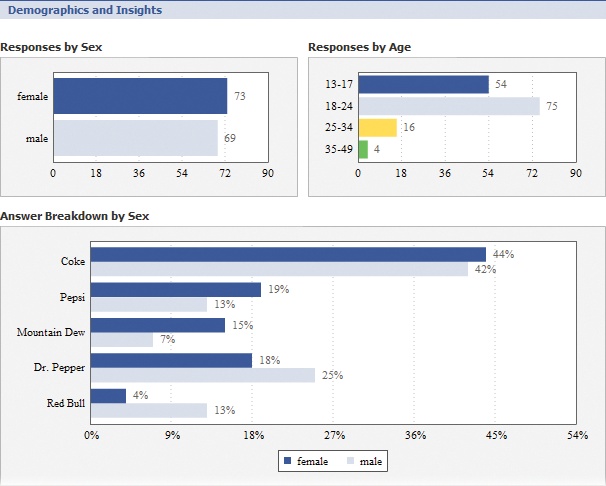
A Facebook poll is a lot like its real-world counterpart: It’s a question you can pay to display in certain Facebook members’ news feeds. Because Facebook gives you detailed feedback—not just the answers people picked, but other useful information, too, such as what percentage of males took your poll—polls are a relatively inexpensive way to “feel out” a group of members, which you probably want to do if you’re considering dropping a wad of cash on social ads (Social Ads (Targeted Announcements)) or a sponsored group (Sponsored Groups). Think of polls as quick-and-dirty consumer surveys.
Here’s an overview of how polls work:
Tell Facebook what kind of people you want to answer your question. You can target members based on gender, age, location, or personal interests. So, for example, you can tell Facebook to display your poll only in the news feeds of 25- to 34-year-olds, or only in the news feeds of people who list The Grapes of Wrath as one of their favorite books.
Note
If you want to use more than one characteristic to describe your poll’s audience, check out social ads (Social Ads (Targeted Announcements)), which let you combine characteristics to come up with pinpointed target audiences such as all 18- to 24-year-old males who like The Grapes of Wrath.
Decide what question you want to ask. It’s a good idea to keep your question short and sweet—people are more likely to read and respond to a one-sentence poll than a big ol’ paragraph—and you’re limited to text only: no graphics allowed.
Include up to five possible answers. Answers have to be in the form of one-choice-only clickable radio buttons; you can’t throw in true/false or write-in options.
Pay for your poll. The amount you have to pony up varies based on how many responses you want, as well as how quickly you want complete poll results. Polls start at $26.
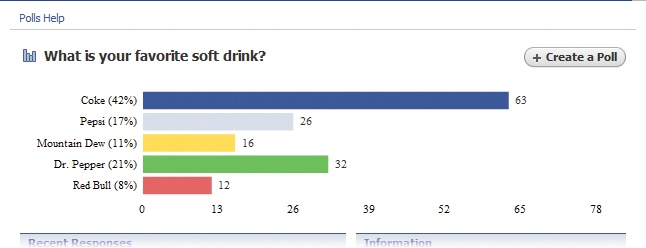
Check out the results. Facebook returns poll results in real time, so you get instant gratification as you watch the results stream in. Polls stay up for 24 hours max, but yours might close sooner depending on the number of results you paid for (Setting Up a Poll). Happily, Facebook displays results in an easy-to-read visual format rather than just dumping raw data on you.
Note
Facebook doesn’t store poll results indefinitely, so make sure you print them out (or save them in some other form) after your poll closes.
Setting Up a Poll
If you’ve got your credit card handy, you’re halfway to creating a Facebook poll; they’re that easy to set up. Here’s what you do:
Scroll to the bottom of any Facebook screen and click the Businesses link. Then, on the right side of the Business Solutions page that appears, click the Facebook Polls link.
On the Polls tab, click the “Create a Facebook Poll” button.
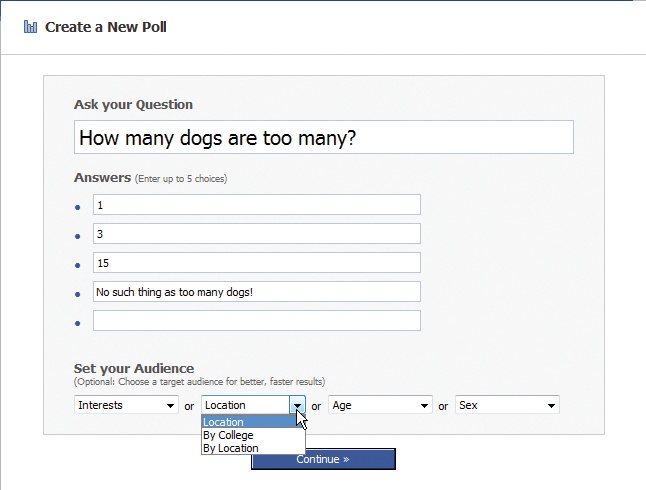
In the form that appears, type in your poll. Start with your question, and then type between two and five possible answers. (As soon as you start typing in the Answers field, Facebook displays another Answers field.) Then, from one of the “Set your Audience” drop-down lists, choose which Facebook members you want to see your poll: only males (Sex), only business majors or people into hip-hop (Interests), only people who live in Seattle (Location), and so forth. (You only get to pick one criterion; as soon as you choose one, Facebook grays out the other three drop-down lists.) When you finish, click Continue.
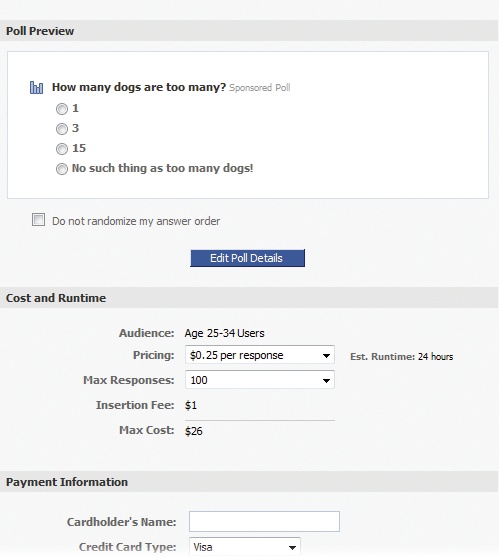
In the Polls form that appears, double-check your poll to make sure you haven’t misspelled anything; then pay up. If you spot a goof in your question, answers, or the audience you selected, click the Edit Poll Details button to fix it. If you want to keep your answer choices in the order you entered them (instead of letting Facebook put them in any order it feels like), turn on the “Do not randomize my answer order” checkbox. Then set the Pricing and Max Responses options you want (the higher the Pricing option you choose, the quicker you get complete results).
Note
Though you get to see real-time results as they stream in, it ain’t over ‘til it’s over—meaning you’re probably more interested in the complete results, which you don’t see until the poll’s over. The time it takes for your poll to finish can vary from minutes to days depending on a bunch of variables, including how quickly people respond to your poll and how quickly they get a chance to respond (which depends on how much money you give Facebook).
Finally, head to the Payment Information section of the page, and enter your credit card info. When you finish, click Place Order. Facebook shoots your question out to as many Facebook members as it’ll take to return the number of responses you paid for.
Note
Facebook gets to decide if it wants to give you price-per-response or number-of-response options, and what these options should be. If you click the Pricing or Max Reponses drop-down lists and see only one choice (or don’t see the choices you want), contact Facebook directly (Contacting Facebook).
After you place your order, Facebook begins displaying poll results as they come in. Poll results appear as soon as you click Place Order. If you surf off to do something else on Facebook, you can get back to your poll results by heading to www.facebook.com/polls.php.
Facebook Pages: Profiles for Bands, Brands, and More
The unfortunately named Pages (could the Facebook design team have possibly come up with a more generic name?) are basically Facebook profiles for things other than people, like bands and companies. Relatively new to Facebook (they’ve been around only since fall 2007), Pages combine the detailed information of a personal profile with interactive features and a pretty amazing marketing scheme. And best of all, they’re free.

Geared toward freelancers, business owners, musicians, politicians, nonprofits, and other small- to large-sized organizations, Pages:
Are tailored to meet your needs. For example, say you set up a band Page (Creating a Page shows you how). Your Page automatically comes with the standard discussion board, wall, and photo album features. But wait, there’s more: It also includes sections for posting video clips and listing upcoming events, and a built-in music player so people can check out your music.
Aren’t subject to the 1,000-member limit Facebook places ongroups. Pages can have an unlimited number of fans.
Give your organization respectability and visibility. You don’t have to tiptoe around Facebook’s advertising ban with Pages like you do with groups, because Pages were designed specifically for advertising. And because people searching Facebook can browse through Pages by clicking the Pages tab in their search results, they’re more likely to find your Page than if it was grouped in with a million personal profiles.
Don’t cost you anything. If you want to shoot social ads (Social Ads (Targeted Announcements)) to all your Page’s fans, you’ll need to get out your credit card; but for now, creating a Page is completely free.

How Pages Work
Word of mouth is an effective marketing scheme offline, and it works online, too. When a Facebook member surfs to a Page—by searching, browsing, or following a link he finds on another Facebook member’s profile—and likes what he sees, he signs up as a fan of the Page (see Becoming a Fan), and then all kinds of interesting things happen:
Facebook lists the Page on his profile. Everyone who visits this guy’s Page will now see that he’s coo coo for Cocoa Puffs (or likes the band, brand, or nonprofit organization he declared himself a fan of).
News of the guy’s new fan status appears both in his mini-feed (Mini-feeds: What You’re Doing) and in his friends’ news feeds (Types of Updates).
The person or company who created the Page gets to see who’s viewing it and how often via Insights (Social Ads (Targeted Announcements)). The Page’s creator also gets the option of sending news blasts calledupdates (Becoming a Fan) to the fan. For a fee, the Page’s creator can also send targeted social ads (Social Ads (Targeted Announcements)) to the fan and to everyone on the fan’s Friend List (Organizing Your Friends).

Creating a Page
Here’s how to create a free Facebook Page for your business, band, or nonprofit:
Scroll to the bottom of any Facebook screen and click the Businesses link. Then, on the right side of the Business Solutions page that appears, click the Facebook Pages link. On the Facebook Pages screen, click the “Create a Facebook Page” button.
On the Create New Facebook Page form, choose a category and Page name. The Local drop-down list includes business options like restaurant, park, and religious center. In other words, Local is where you indicate what kind of business you are. Turn on the “Brand or Product” radio button if you’re selling products such as pharmaceuticals or food, or if you’re in a business with a national reach such as travel or communications. Turning on the “Artist, Band, or Public Figure” radio button gives you freelance options such as writer, politician, and athlete. After you’ve picked the appropriate category and given your Page a name, click Create Page.
Flesh out your Page. The first thing you want to do is click the “Upload a picture” link to replace the giant question mark with a picture of your band, your product, or whatever. Then click “Add information to this page” to build a profile similar to the personal profile you created when you joined Facebook (see Creating Your Profile), by filling in Basic Info as well as Detailed Info. When you finish building your Page’s profile, click the Edit Page link to see a list of all the different applications you can upload tidbits to (such as album info, concert dates, and music clips if you’re in a band) and settings you can adjust (such as requiring your fans to be over 18).
Publish your Page. When you’ve packed your Page with as much info, photos, media clips, and other goodies as you can think of, click View Page. If it looks good, click the “publish this page” link (if not, click the “Back to Pages” link to make changes). That’s it: Your Page is online.
Note
Now that you’ve got a Page up, you might want to spend some money to make sure it gets noticed. Surprise! Facebook makes spending money easy. From the Applications menu, choose Page Manager (an application that Facebook installs automatically when you create a Page); then click the green “Create an ad” button. Make sure you also check out Social Ads (Targeted Announcements) to learn how to add social actions to your Page.


Becoming a Fan
Similar to wearing name-brand clothes and rooting for your favorite sports team, becoming a fan of a Page tells people in your social circle what you like and what’s important to you.
Note
After you create your own Page, people can become your fan using the steps below.
Declaring your fan status is easy. Just follow these steps:
Find the Page you’re interested in (type the name in the search box, and then click the Pages tab on the results page), and then click the “Become a fan” link. This link appears on the Page itself and on the Page’s listing in your search results.
In the confirmation box that appears, affirm your fan status. Turn off the “Allow [this Page] to send Updates to the Updates tab of my Facebook Inbox” checkbox if you don’t want to hear from the Page, and then click Add. Facebook lists the Page in the “I am a Fan of...” section on your profile. News of your newfound fandom also appears in your mini-feed, and in your friends’ news feeds.
Note
This isn’t your only chance to turn a Page’s updates on or off. If you become a fan of a Page and later decide you don’t want to get updates from it after all, head to the top of any Facebook screen and click the down arrow next to Inbox, and then select Updates from the drop-down menu. On the Updates tab that appears (which is where you see any Updates you receive), click Edit Updates Settings. Then simply turn off the checkboxes next to any Pages you don’t want to hear from and click Save Changes.
Note
You can’t hide the “I am a Fan of...” section of your profile, and you can’t prevent Facebook from displaying a Page in that section, but you can un-fan yourself. To do so, simply surf to the Page you want to disassociate yourself from (an easy way is to head to the “I am a Fan of...” section of your profile and click the name of the page), and then, on the Page itself, click the “You Are a Fan (undo)” link that’s replaced the “Become a fan” link.


Social Ads (Targeted Announcements)
A social ad is an announcement you can broadcast to specific groups of Facebook members, such as men in their 20s, women with college degrees, or married people who work at Wal-Mart and like Beanie Babies. Every social ad consists of a graphic and a little text, and each appears either in Facebook’s ad space (the lower-left part of each screen), or in people’s news feeds (Types of Updates), or both, depending on how much you pay.

Tip
Facebook’s social actions feature and Beacon program let you track people who interact with your Facebook Page or application—or with your company’s Web site—and then shoot your ad out to all their friends. The result? An ad that’s a little more personal and relevant—and, hopefully, more effective—than the average ad. See below for the scoop on social actions, and High-dollar Options for more on Beacon.
Here’s how social ads work:
Create your ad and tell Facebook when to run it and which members to target. You can get pretty darned specific when it comes to who sees your ad. For example, you can have Facebook show the ad only to single people aged 31 to 36 who have conservative political views and a degree in biology.
Pay for the ad. The amount you pay depends on how long you want your ad to run and how many people you want to see it.
Optionally, you can tie your social ad tosocial actions, which are the things people do on your Facebook Page or on your company’s Web site. If you’ve already created a Facebook Page (Creating a Page) or already have a Web site, you can combine your ad with the “news” headline that someone’s friend just became a fan, bought your product, or otherwise interacted with your Page or site.
Facebook runs your ad. Depending on such factors as how much money you coughed up and how many other ads Facebook has in the hopper, your ad appears either in peoples’ news feeds or in the space Facebook reserves for ads (the lower-left side of each screen).
Get feedback that helps you assess your ad’s effectiveness. Facebook’s Insights program generates charts that show you the kind of response your ad is getting (Creating and Running a Social Ad shows an example). If you know how to analyze them (they’re pretty straightforward), these charts can help you figure out whether your ad’s working or whether you need to tweak it. You get to use Insights for free when you purchase a social ad.
Note
You also get to use Insights if you create a free Facebook Page (Creating a Page).

Creating and Running a Social Ad
If you’ve got a graphic and a couple lines of copy, creating a social ad is nearly as easy as creating a Marketplace ad (Cost: Free, Risk: Yours). Expect to spend somewhere between $5 and $50 per day, depending on who you want to reach and how long you want your ad to run.
Note
Before you even think about creating a social ad, check out Facebook’s Advertising Guidelines (www.facebook.com/ad_guidelines.php), which lay out rules for the kind of content your ad can contain, the kind of Web site you’re allowed to drive traffic to, and more. (You get a chance to review Facebook’s Advertising Guidelines and its Advertising Terms and Conditions when you place an ad; Creating and Running a Social Ad.)
Here’s how to create and run a social ad:
Scroll to the bottom of any Facebook screen and click the Advertisers link. Then, on the Facebook Ads page that appears, click the Create Social Ad button.
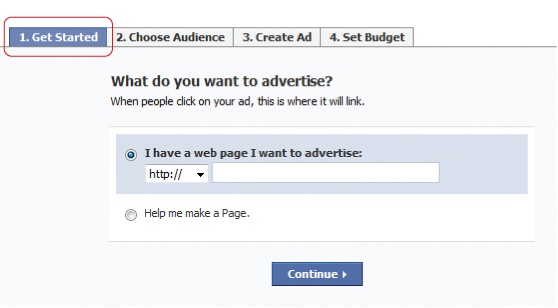
Tell Facebook whether you want to drive traffic to a Web site or a Facebook Page. In the Get Started tab, click either the text field and type in the URL of your company Web site, or turn on the “Help me make a Page” radio button and create the Facebook Page (see Facebook Pages: Profiles for Bands, Brands, and More) you want people to see when they click your ad. When you’re done, click Continue.
Tell Facebook who you want to target. As you select options on the Choose Audience tab, Facebook updates the number at the top-right of the screen to give you a rough idea of how many members are in the demographic you’ve chosen. (Turn on the Male checkbox, for example, and Facebook cuts the figure in half, since about half its members are female.) When you’re done, click Continue.
Tip
Clicking your browser’s Back button (it probably looks like a left-facing arrow) erases all your hard work and forces you to start your ad from scratch. So, if you change your mind about one of the options you’ve set on a previous page while you’re creating an ad, click either the tab you want to head back to (like the “2. Choose Audience” tab) or the Back button you see at the bottom of your screen.
Note
If you create a social ad after you’ve created a Facebook Page (Facebook Pages: Profiles for Bands, Brands, and More) or application (Facebook Applications: An Overview), the Create Ad tab displays the “Add Social Actions to my ad” checkbox right below the Photo fields. Turn on the checkbox if you want to advertise directly to the friends of people who check out your Page or application. (The friends all see a personalized version of your ad that mentions someone they know and an action that person just took, which is virtually guaranteed to be more effective than the regular, generic version of your ad.)
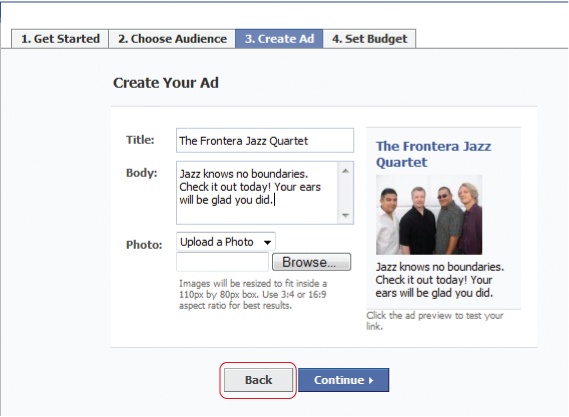
Type in your text and upload your graphic (if you have one). On the Create Ad tab, type in your ad’s title (25 characters or less) and body text (up to 135 characters). From the Photo field, choose Upload a Photo, and then click Browse to search your computer for the picture file you want to go with your ad. After you’ve done all that, click Continue.
Note
If your picture file is bigger than 4K or happens to be an animated image file, Facebook won’t let you upload it. If your image is larger than 110 × 80 pixels, Facebook will upload it, but it’ll shrink it to 110 × 80 pixels, so your image will be squished and people won’t be able to make out any details. (See the Tip in Sharing Pictures to learn how to check an image’s file format; the info box that appears also shows you file size and pixel measurements.)
Decide whether you want to pay Facebook based on how many people it drives to your site or Page (pay for clicks), or based on how many people see your ad but don’t necessarily click on it (pay for views). If you select the Pay for Views tab, Facebook lets you decide where you want your ad to appear: in people’s news feeds (Types of Updates) or in Facebook’s ad space (the lower-left part of any screen). If you select Pay for Clicks, Facebook decides where to display your ad.
In either case, you type in how much you want to pay—per click if you chose the Pay for Clicks route, or per 1,000 impressions if you chose the Pay for Views route. The higher the amount you type in the Bid field, the more often your ad appears (in relation to whatever other ads Facebook needs to run the day yours runs; in other words, the highest bidder gets her ads run more often). Because site traffic and the total number of ads Facebook sells on any given day fluctuate, you also need to type the total amount of money you want to pay Facebook in any 24-hour period in the Budget field. After you tell Facebook which days you want your ad to run, click Continue to preview your ad.
Check your ad for errors, and then enter your credit card information. If you spot a mistake, click Change Ad to go back and fix the error. You should check out Facebook’s Terms and Conditions, too. Basically, by running your ad, you certify that you’re not lying to people or trying to sell something objectionable or illegal, like drugs or porn or copyright-protected music. Then head to the bottom of the Review Ad page and click the Place Order button.
Check on your ad. You can see daily statistics as well as in-depth demographics (through Facebook’s much-ballyhooed Insights program—Social Ads (Targeted Announcements)) in as little as a few hours after Facebook starts running your ad. To do so: From the Applications menu, click either Ads, Page Manager, or “Ads and Pages” (the link you see depends on whether you’ve created an ad, a Page, or both.) Then click the Ad Campaigns tab. To see stats including impressions and clicks broken down by day, click the Daily Stats tab. To see the info in easy-to-interpret graph form, click the Insights tab.


Here’s a quickie rundown of the stats you see:
Bid ($) is the amount you bid for this ad (Creating and Running a Social Ad).
CPC reminds you that you chose to pay on a cost-per-click basis (Creating and Running a Social Ad).
Clicks refers to the number of people who’ve actually clicked your ad so far.
CTR (%) means “click-through rate”; this is the percentage of the people who’ve seen your ad who’ve actually clicked it.
Avg. CPC ($) and Avg. CPM ($) show you the amount of money you’re spending, on average, per click and per thousand impressions, respectively.
Spent ($) keeps track of how much you’ve spent on the ad so far based on the amount you bid, the number of clicks or impressions your ad gets, and how many days your ad runs. (If you bought a long-running ad, you can see day-by-day stats by clicking Daily Status.)
To dispense with the columns of numbers and see a chart of how your ad’s performing, click Insights.

High-dollar Options
Facebook’s free-to-inexpensive polls, Pages, and social ads are great for small businesses and freelancers. But companies with a little more dough to throw around can choose from even more advertising options. The following sections explain ‘em all.
Beacon
Facebook’s Beacon is a brand-spanking-new, still-being-hammered-out program that does for regular Web sites what social actions (Social Ads (Targeted Announcements)) do for Facebook Pages. Beacon lets you:
Track what people do on your own Web site. You can track actions like signing up for a service, adding a product to a wish list, and buying something.
Create Facebook stories (Customizing Your News Feed) about those actions. “Ralph just added 101 Dalmatians to his Christmas wish list on CD Zone” is an example of a Facebook story.
Combine those stories with an ad and send the whole shebang to all your customers’ Facebook friends. Like the social ads you create all by themselves (Social Ads (Targeted Announcements)) or in conjunction with a Facebook Page (Facebook Pages: Profiles for Bands, Brands, and More), these customized ads appear both in peoples’ news feeds and in the ad space that Facebook reserves on the lower-left side of every screen.
Say you run an online bookstore, and somebody logs in to your site and buys a copy of Upton Sinclair’s The Jungle. Using Beacon, you can tell whether that somebody is a Facebook member, and if she is, you can send a personalized ad (see the example Creating and Running a Social Ad) to everyone on her Facebook Friend List. You win in two ways:
People are more likely to read your ad if it’s coupled with news about someone they know. It’s human nature: We want to know what our friends are up to because we want to learn more about them.
Because friends often share tastes and interests, ads you send via Beacon are likely to reach an interested audience. If someone already visited your site or even bought something from you, the chances that her close friends will follow suit are much higher than if your ad goes out to random people.
Note
Beacon gives Facebook members a way to opt out of the advertising process. For example, if someone buys a book from you but doesn’t want his friends to know about it (because the book he bought is naughty, or he’s afraid his friends will view your ad as spam, or any other reason) he can check No on the box that appears after he completes his purchase on your Web site. He can also tweak his privacy settings to block future ads from your site (see Controlling Who Learns What You’re Up To).
Adding Beacon to your Web site involves adding customized code to your site, and it’s not cheap. To talk to somebody at Facebook who can walk you through the process: Scroll to the bottom of any Facebook screen and click Businesses; then click Facebook Beacon. On the page that appears, click the Sign Up button; after that, you just wait to hear from somebody on Facebook’s sales team.
Note
Beacon has stirred up a lot of controversy in the online community, both because it tracks the activities of Facebook members outside of Facebook (which many people view as an invasion of privacy), and because early versions of the program reportedly sought to hide tracking details from the members involved. Facebook’s been getting a lot of, ahem, feedback about Beacon, and the site is usually responsive to community pressure, so expect Beacon to undergo some changes during the coming months.
Sponsored Marketplace Listings
Chapter 8 showed you how to place free classifieds for products and services in the Facebook Marketplace (Cost: Free, Risk: Yours). But in addition to free ads, you can pay to have your ad show up on the right side of the Marketplace Home page, complete with a thumbnail picture.

To place a sponsored listing: Scoll to the bottom of any Facebook screen and click Advertisers. Then scroll to the bottom of the page that appears and click the “Contact our sales team” link.
Sponsored Stories
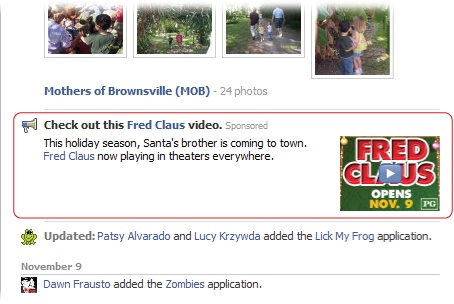
Sponsored stories are the big-business version of social ads (Social Ads (Targeted Announcements)). Here’s how they work: On the left side of every Facebook member’s home page is a News Feed section (Types of Updates). Because most of the gossipy tidbits (a.k.a. “stories”—Customizing Your News Feed) that appear in a member’s news feed involve that member’s close friends, she’s likely to actually browse through and read them. So when she comes across a sponsored story sandwiched between news of what her pals are doing, there’s a good chance she’ll see and even respond to the ad. (By Facebook’s estimates, the click-through rate for sponsored stories is 20 times higher than for regular banner ads.) Best of all, a sponsored story can contain lots of text and up to four images or an instantly-playable video clip.
Note
Members can’t hide their news feeds the way they can hide other sections of their home page—meaning, if they’re using Facebook, the only way they can escape seeing a sponsored story is to close their eyes. If you’re a marketing type, this is sweet news indeed.
Not surprisingly, it costs big bucks to place a sponsored story: They start at $50,000, at the time of this writing. If you’re interested, you need to talk to someone at Facebook to set up the deal (Contacting Facebook).
Tip
To make your message even more meaningful to your audience, consider sponsored social stories. A sponsored social story is a regular sponsored story coupled with the news that someone’s friend just bought the product (or watched the movie, or became a fan of the Page, or whatever). You create sponsored social stories by adding Beacon (High-dollar Options) to your Web site.
Sponsored Groups
Sponsored groups combine the interactivity of regular groups (Chapter 6) with unlimited membership, customized features, and tons of ads. The goal is to make a well-known brand appear as helpful and accessible as the group admin of your Facebook Scrabble group.
Note
With the advent of Pages (Facebook Pages: Profiles for Bands, Brands, and More), Facebook plans to phase out sponsored groups over the coming months.
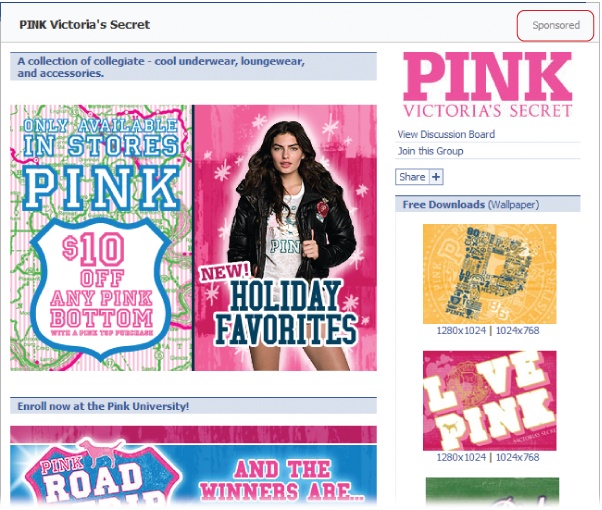
At a starting price of around $300,000, sponsored groups are only for the heaviest of hitters. So it shouldn’t come as a surprise that you don’t create a sponsored group by filling in a couple of online forms, the way you do a regular group. Instead, you contact Facebook directly (Contacting Facebook) so your marketing people can work with Facebook to develop a comprehensive marketing strategy.