FileMaker’s networking abilities make it easy for PCs and Macs to share the same FileMaker database file. Inevitably, layouts will not look exactly the same on each platform. And since the Windows and Mac operating systems use different default fonts—and render them at 96 dpi on Windows and 72 dpi on Macs—text may also appear a bit differently. In some cases, this will force you to add a bit more space to tight Mac-generated layouts used on Windows machines. But, overall, the FileMaker match across platforms is pretty close. Since FileMaker 6 sticks with the .fp5 format used in FileMaker 5 and 5.5, anyone on the network using version 5 or newer can access the same files.
To host a file simply means being the first user to open a shared FileMaker file. Anyone opening the file after the host is considered a guest. The host can set access rights and make file changes that guests cannot. For details, see Table 16.1, Network Rights: Hosts vs. Guests. FileMaker’s network access privileges, by the way, are not the same as the access rights set by your computer’s operating system. For information on setting Web access to FileMaker, see Publishing on the Web on page 255.
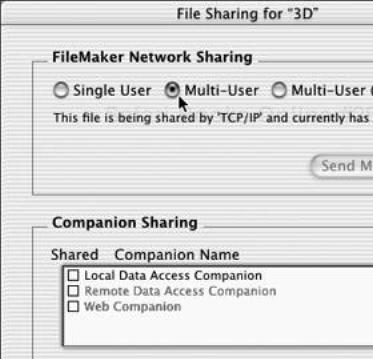
File sharing is set file by file. When a file needs to be shared, it must be set to Multi-User. By default, all FileMaker databases begin as Single User files. When a host needs to make substantial changes to a file, the file must be set back to Single User (see Table 16.1, Network Rights: Hosts vs. Guests) and guest users temporarily denied access to the file. Once the host finishes the modifications, the file can again be set to Multi-User.
Table 16.1. Network Rights: Hosts vs. Guests
PARTY | HAS RIGHT TO | |
|---|---|---|
Host Only | ||
(File must be set to Single User. Guests must close file.) | Change file to single-user status or close shared file Define, delete, change access rights or groups Define fields or change field definitions Save file copies (with Save a Copy command) Reorder layouts | |
Any User | ||
(One at a time) | Edit record or layout Define, change value lists Define, change own passwords Define, change relationships Open ScriptMaker dialog box | |
Any User | ||
(Any time) | Find, sort, browse records Export, import records Choose a page setup and print Switch layout view or mode Check spelling | |
Open the file you want to share:
 in Windows,
 on the Mac.
Choose File > Sharing (Figure 16.1). When the File Sharing dialog box appears (Figure 16.2), choose Multi-User, then click OK.
If you’re hosting the file, close it:
 in Windows,
  on the Mac.
A dialog box will appear listing other users of the file. Click Ask and they will be alerted to close the file as well. If they don’t respond, FileMaker automatically closes the file in 30 seconds.
Choose File > Sharing (Figure 16.1). When the File Sharing dialog box appears, choose Single User, then click OK (Figure 16.3). The file will remain set to Single User until you turn file sharing back on, so it’s best to make any changes promptly and return the file to its original Multi-User setting.
After making sure no one else has the file open, choose File > Open or use your keyboard:
in Windows, on the Mac.When the Open dialog box appears, choose a file and click Open.
Choose File > Sharing (Figure 16.1). Within the File Sharing dialog box, make sure Multi-User is selected (Figure 16.2). If the button is dimmed, a message will appear in the middle of your screen explaining why. Or choose Multi-User (Hidden) to host a file that’s somehow linked to a file guests will need to see. For more information, see the Tip below.
Click OK.
 Tip
Tip
The Multi-User (Hidden) choice in the File Sharing dialog box (Figure 16.2) is designed to grant guests access to a file they need to see while hiding related files that you don’t necessarily want them to see. For example, a file may include value list- or relational-links to another file. By opening the related file and choosing Multi-User (Hidden), the host can enable the first file to fetch all the data it needs without giving guests direct access to the related files.
Choose File > Open Remote or use your keyboard:

 in Windows, on the Mac (Figure 16.4).
When the Hosts dialog box appears (Figure 16.5), its appearance and your choices will vary depending on your network setup:

Figure 16.5. If you’re using AppleTalk with several server zones, pick a zone from the lower list and a file on that server in the upper list, and then click Open.
If you’re using IPX/SPX (Windows) or AppleTalk with no server zones (Mac), select a file in the top list and click Open.
If you’re using AppleTalk with several server zones, pick a zone in the box’s lower-left list, then select a file from those that appear in the top list and click Open (Figure 16.5).
If you’re using TCP/IP and want to pick a host outside your local area network, click Specify Host in the lower-left list (Figure 16.6). When the Specify Host dialog box appears, enter a host name or IP address (Figure 16.7). Click OK and when the Host dialog box reappears, choose a database in the top list. When you’re done, click OK to close the Hosts dialog box.
If you’re using TCP/IP on a local area network, click Local Hosts in the box’s lower-left list (Figure 16.6), then select a file from those that appear in the top list and click Open.
If you’re using a TCP/IP connection with a Windows machine or a Mac running OS X and need a host outside your local area network, you also can click Directory Service in the lower-left list (Figure 16.6). When the Directory Service dialog box appears (Figure 16.8), enter the necessary configuration information (your network administrator can help with the specifics). Click OK and when the Hosts dialog box reappears, choose a database in the top list. When you’re done, click OK to close the Hosts dialog box.
By giving you the options to set a mix of passwords and group definitions, FileMaker lets you precisely control who can access files on your network. Be careful to not overdo security, however. The first time users can’t get to something they need because of a password restriction, you’ll hear about it and they won’t be happy. Obviously you may need to control access to sensitive records, such as personnel and cost data. But in general, it’s better to add passwords as you need them than to set up a security maze from the start. If you’re the only one using a database or you’re working in a very small group, you may not even need to set passwords.
Passwords should be relatively easy to remember but not so obvious that people outside the group can easily figure them out. The most secure passwords are a random mix of letters and numbers, but these passwords can be very hard to remember. Ultimately, security vs. ease of use requires a balancing act determined by your group’s particular needs.
Group and password definitions are so inter-related it can get confusing as to which controls what. Remember: Groups control access or what users can see; passwords control actions or what users can do. In practical terms that means only the members of a group can see a particular layout or field, while passwords determine what they can do with the data once they reach it.
The first step in creating passwords is defining what FileMaker calls a master password, which grants access to everything in the database. Only then can you begin creating passwords for individual users. Aside from the master password, passwords are set based on the level of access needed. Password access privileges can run the gamut. For details, see Table 16.2, Password Access Privileges.
The first step in creating groups is defining them. Only then do you set a group’s access privileges. Once passwords have been set and groups linked to them, FileMaker controls all users’ access and their layout and field views of the database.
Table 16.2. Password Access Privileges
CHECK | TO LET USERS |
|---|---|
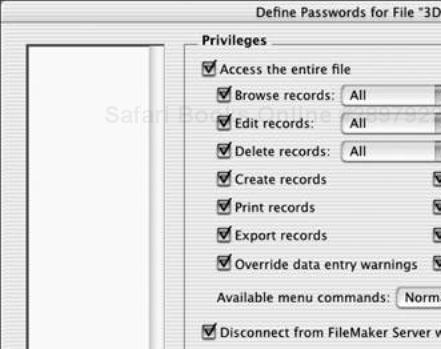
Access the entire file | Do any task via a master password. Only choice that grants right to define, change, or delete passwords. Also grants right to change field or group definitions, and document preferences. |
Browse records | View record data |
Print records | Print any records |
Export records | Export any records, copy a found set, enable Web Companion sharing |
Override data entry warnings | Enter data even if it doesn’t match preset entry options |
Design layouts | Create and change layouts |
Edit scripts | Create and change scripts |
Define value lists | Create and change value lists |
Create records | Create new records and enter data |
Edit records | Change data in records |
Delete records | Delete any records |
Open the file for which you want to set a password (
in Windows, on the Mac).Turn off File Sharing (see page 255).
Choose File > Access Privileges > Passwords (Figure 16.9).
When the Define Passwords dialog box appears, type a password into the Password text box (Figure 16.10). It can include up to 31 characters and can include spaces. Capitalization within passwords is ignored.
Check Access the entire file at the top of the Privileges panel.
Click Create, then click Done.
When the Confirm dialog box appears, type in the master password and click OK (Figure 16.11). Remember to turn File Sharing back on.
Only users who know the master password can define a password other than their own.
Open the file for which you want to set a password (
in Windows, on the Mac).Turn off File Sharing (see page 255).
Choose File > Access Privileges > Passwords (Figure 16.9).
When the Define Passwords dialog box appears (Figure 16.10), type a password into the Password text box.
Check the appropriate access boxes within the Privileges panel. (See Table 16.2, Password Access Privileges.)
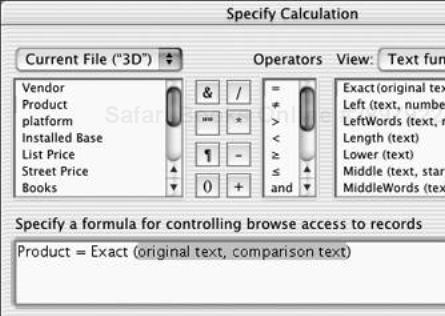
If you want to further limit the password user’s ability to browse, edit, or delete only certain records within the file, click any of the three drop-down menus and choose Limited (Figure 16.12). When the Specify Calculation dialog box appears, use the list of field names, operators, and functions to fine-tune which records can be accessed (Figure 16.13). (For more information on using formulas, see Understanding Formulas on page 126.) When you’re done, click OK to close the dialog box.
To grant access to all the FileMaker menu commands associated with the privilege boxes you’ve checked in steps 5–6, leave the Available menu commands pop-up menu set to Normal (Figure 16.14). If you want to enable only commands associated with simple data entry, choose Editing Only. To block use of any menu commands, choose None.
Click Create.
Repeat the process for as many passwords as you need to define. To associate passwords with existing groups, see To define groups on page 266.
Click Done.
When the Confirm dialog box appears, type in the master password and click OK (Figure 16.11).
For users who only need limited access and can’t be bothered with remembering a password, follow steps 1–3 of To define user passwords (see page 262).
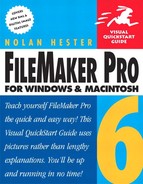
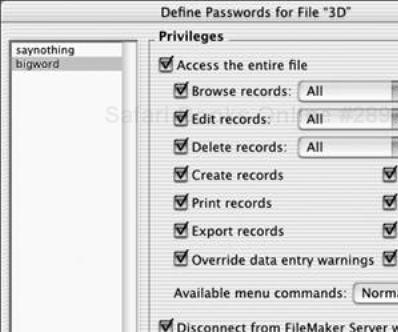
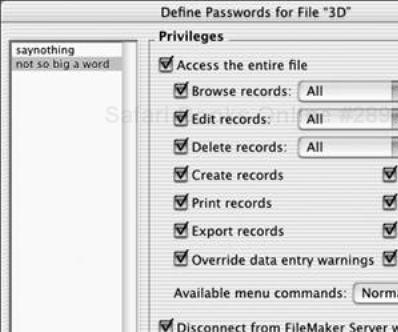
When the Define Passwords dialog box appears, leave the Password text box entirely blank, but go ahead and define a limited set of access options within the Privileges panel (top, Figure 16.15). Click Create.
A [no password] password now appears within the left-side list (bottom, Figure 16.15). Click Done.
![Top: Create a blank password by leaving the Password text box empty and giving it limited access privileges. Bottom: Once created, a blank password appears in the list as [no password].](http://imgdetail.ebookreading.net/data/2/0321167821/0321167821__filemaker-pro-6__0321167821__graphics__16fig15.gif)
Only users who know the master password can change or delete passwords other than their own.
Choose File > Access Privileges > Passwords (Figure 16.9).
When the Define Passwords dialog box appears (Figure 16.10), select the password within the left-side list.
Type a new password in the Password text box and make any changes in Privileges. Click Change. The new password is now active.
To delete the password, click Delete.
Click Done.
When the Confirm dialog box appears, type in the master password and click OK. Be sure to alert other users affected by the password changes.
Even if you don’t know the master password, you can change your individual password (if you have one).
Choose File > Access Privileges > Passwords (Figure 16.9).
When the Define Passwords dialog box appears, select your old password in the left-side list, type your new password into the Password text box, and click Change (Figure 16.16).
Once your password is updated in the left-side list, click Done (Figure 16.17).
Open the file for which you want to set group access (
in Windows, on the Mac). If you’ve already created passwords for the file, FileMaker will ask you to enter the master password.Turn off File Sharing (see page 255).
Choose File > Access Privileges > Groups (Figure 16.18).
When the Define Groups dialog box appears, type in the new group name and click Create (Figure 16.19).
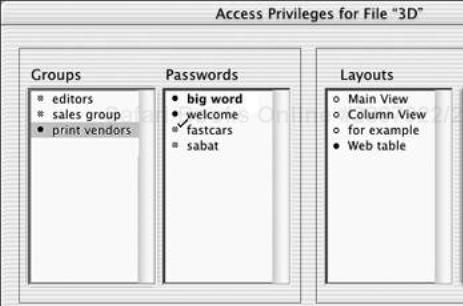
Make sure the new group name remains highlighted in the left-side list, then click Access (Figure 16.20). The Access Privileges dialog box appears, showing the groups, passwords, layouts, and fields for the file you’re working in.
Select the group in the far-left column by clicking on it. In Figure 16.21, print vendors is associated with three passwords, all marked by solid bullets: welcome, fastcars, and bigword. (As the master password, the bold-face bigword is linked to every group; the bullet for the password sabot is dimmed because it is not linked to the print vendors group.) For the access level signified by different bullets, see Table 16.3, Access Symbols.
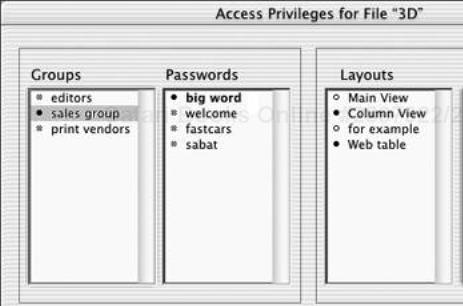
To change passwords linked to a group, keep the group selected in the far-left column and click the bullet next to a password you no longer want linked to the group (Figure 16.22). In the example, the bullet next to fastcars has changed to gray. To relink a password, click the bullet again.
The print vendors group in Figure 16.22 can see the Web table layout and 12 fields within it. Of those fields, group members can edit just three: Product, platform, and Books. To change the group’s layout and field access, just click on the adjacent bullets.
Click Save. If you want to make other changes, repeat the process, clicking Save after each round. If you change your mind mid-way through a round of changes, click Revert to go back to the version last saved. When you’re satisfied, click Done twice.

To change group definitions, you must host the file, know the master password, and first turn off file sharing.
Choose File > Access Privileges > Overview (Figure 16.23).
Within the Access Privileges dialog box, select a group in the left column and click the bullets in the other three columns (Passwords, Layouts, and Fields) to change the group’s definition (Figure 16.24).
Click Save, and then click Done.
To delete any group definitions, you must host the file, know the master password, and first turn off file sharing.
Choose File > Access Privileges > Groups.
When the Define Groups dialog box appears, select a group name in the left-side list and click Delete (Figure 16.25).
When the warning dialog appears, click Delete again (Figure 16.26). Click Done.