Unlike most of the book, this appendix has separate sections for Windows and Macintosh machines.
![]() For installing FileMaker on computers running Windows, turn to the next page.
For installing FileMaker on computers running Windows, turn to the next page.
![]() For installing FileMaker on computers running the Macintosh operating system, turn to page 319.
For installing FileMaker on computers running the Macintosh operating system, turn to page 319.
Once you’ve installed FileMaker, go ahead and configure its major preferences before you start using the program. See Setting FileMaker’s Preferences on page 323.
FileMaker runs on a variety of Windows operating systems: Windows 95, Windows 98, Windows Me, and Windows NT 4.0 (Service Pack 3), Windows 2000, and Windows XP. To use the Web Companion and ODBC features, however, you need to be using Windows 98 or later.
A PC with an Intel-compatible chip equivalent to at least the 486/33 with at least 32 MB of RAM (memory). If you’re running Windows 2000, you’ll need 64 MB; XP needs at least 128 MB.
A CD or DVD drive for using FileMaker’s installation CD.
A hard drive with at least 20 MB of free space for the Typical installation. A complete installation requires 120 MB.
The installation code for FileMaker. Look for the peel-off label on the sleeve containing the FileMaker CD.
Exit any other programs you may be running.
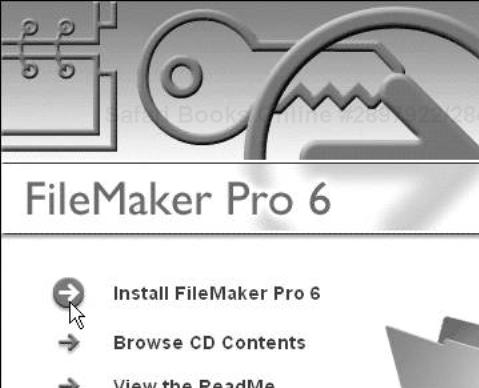
Put the FileMaker disc into your CD-ROM drive. Once the CD launches, you’ll be presented with several choices (Figure A.1). Choose Browse CD Contents if you want to look around. The View the ReadMe choice includes information on potential conflicts with other programs. To get started, click Install FileMaker Pro 6.
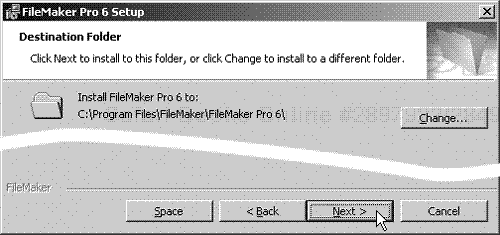
When the InstallShield Wizard appears, click Next and a series of setup dialog boxes will appear. In the first, the Licensing Agreement dialog box, select the I accept option button and click Next. In the Customer Information dialog box enter your name, organization, and choose whether FileMaker will be used for all users of the computer or just yourself. Click Next and when the Destination Folder dialog box appears, click Next to have FileMaker installed in its own folder (Figure A.2). If you want to install FileMaker elsewhere, click Change to navigate to that folder and click Next.
The Setup Type dialog box offers two configuration choices: Complete and Custom (Figure A.3).

Figure A.3.
 Unless you’re hard pressed for space, click Complete for the full FileMaker installation, and then click Next.
If the Complete choice suits your purposes—and in most cases it will—simply click the Next button and skip ahead to step 6. You should choose Complete unless you’re short on hard drive space, in which case choose Custom.
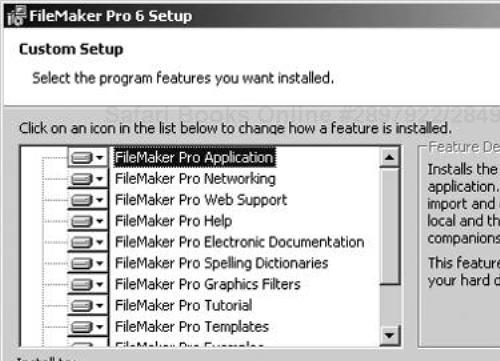
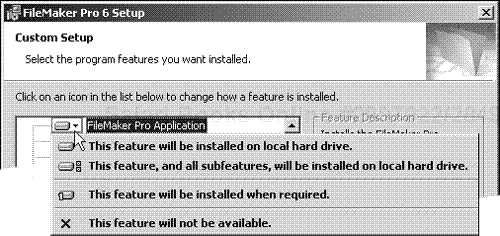
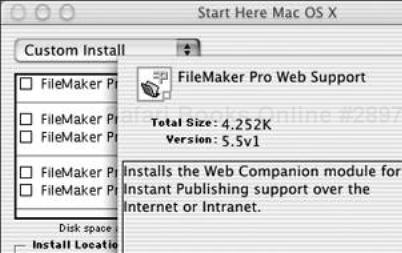
To install only certain FileMaker files, click Custom and the Custom Setup dialog box will appear (Figure A.4). Click any item listed in the dialog box’s main window and a brief description of its purpose and the size of the file will appear in the right-side panel. Click the drop-down menu of any item to select your installation option for that item (Figure A.5). Once you’ve made your choices, click Next.
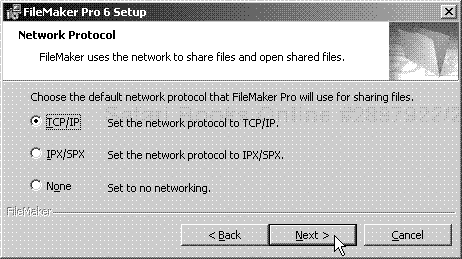
Once you select your installation type, FileMaker will ask you what networking protocol you prefer (Figure A.6). The default setting is TCP/IP, which will cover most situations, so click Next and move on. For more information on networking, see page 253.
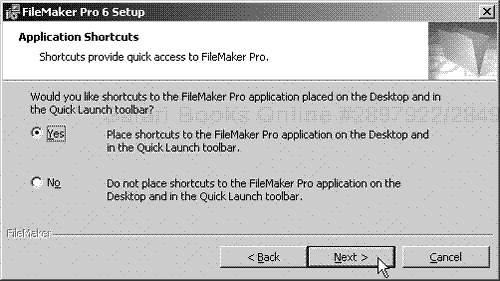
When the Application Shortcuts dialog box appears, Yes will be selected by default (Figure A.7). Click Next to enable installation of a FileMaker icon on your desktop and in the Windows Quick Launch toolbar.
When the Installation Code dialog box appears, enter your 17-digit code (Figure A.8), (You’ll find the code on the sleeve of your FileMaker CD.) Click Next and a dialog box will ask you to confirm your registration information. Click Yes. The installation will begin, with a bar graph marking its progress (Figure A.9).
Once the installation is completed, another dialog box will appear (Figure A.10). Click Finish and one final dialog box will appear. Choose Yes, I want to restart my computer now and click Finish.
Once your machine restarts, launch FileMaker by double-clicking the FileMaker icon on your desktop (Figure A.11). Or choose Start > Programs > FileMaker Pro.
FileMaker’s registration process will start (Figure A.12). Enter the necessary information in the series of dialog boxes that appear until you’re done and click Finish. You’re almost ready to get to work, but first see page 323 to set your FileMaker preferences.


Unlike so many software programs, FileMaker doesn’t demand the very latest operating system software to work. If using OS X, you should run at least v10.1 and, frankly, you’ll be much happier with v10.2 (Jaguar). It also will work with OS 7.6.1–9.1. To use the Web Companion and ODBC features, however, you need to be using at least OS 8.6.
A Macintosh or Mac OS-compatible computer running System 7.6.1–9.1 with at least 32 MB of RAM. If you’re running OS X, you’ll need at least 128 MB of RAM.
A hard drive with at least 35 MB of free space for the OS X Easy Install. If using pre-OS X, it will need 128 MB—yet another reason to move to OS X if your Mac can handle it. If you simply can’t free up the space for the regular installation, see the Tips on page 322 for help on creating a minimum installation.
A CD or DVD drive for using the FileMaker installation CD.
The installation code for FileMaker. Look for the peel-off label on the sleeve containing the FileMaker CD.
Turn off any anti-virus program you may have running in the background. Such programs sometimes cause problems for FileMaker’s installer program.
If it’s running, turn off File Sharing. (Remember to turn File Sharing back on once you’re done with the installation.)
Put the FileMaker disc into your CD-ROM drive.
Once the CD launches, depending on which system you’re running double-click either the Start Here Mac OS X or the Start Here Mac OS Classic icon (Figure A.13), which will present the software license agreement. Click Accept to move to the next step.
FileMaker’s Start Here dialog box will appear with Easy Install as the default setting, which will install all the FileMaker files (Figure A.14).

Figure A.14.
 If you choose Easy Install, be sure to note the default destination drive in the lower left and change it if necessary. The disk space needed appears above the Quit button.
Use the Installation Location pop-up menu to select a hard drive on which you want to install FileMaker. By default, your startup hard drive is chosen. Note that the approximate disk space needed to install FileMaker appears on the right just above the Quit button. If you don’t have enough disk space for the full installation, switch to another hard drive or see the first Tip on page 322 on making a custom installation. Once you’ve chosen a hard drive, click Install.
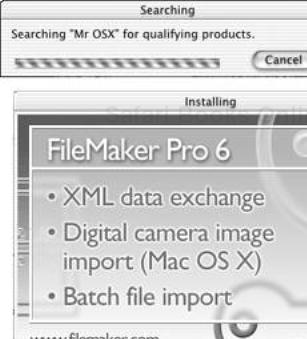
If you are upgrading from an earlier version of FileMaker, the installation program will search for it on your hard drive (top, Figure A.15) before beginning the installation (bottom, Figure A.15).
After installing the necessary files, FileMaker automatically launches the registration process (Figure A.16).
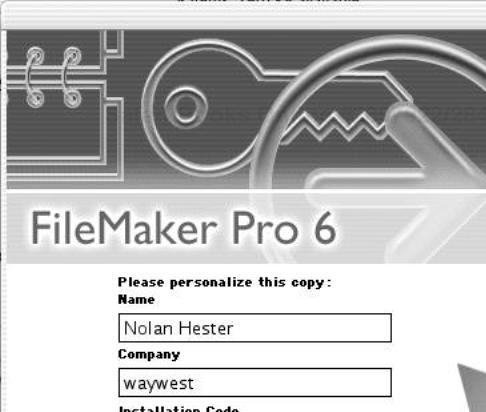
Fill out the registration dialog box when it appears (Figure A.17). You’ll find the 17-digit Installation Code on the sleeve of your FileMaker CD. Click OK and the installation will begin, with a bar graph marking its progress.
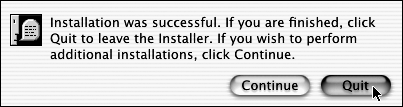
One final dialog box will appear, announcing that the installation is finished (Figure A.18). Click Quit and you’re done installing the program.
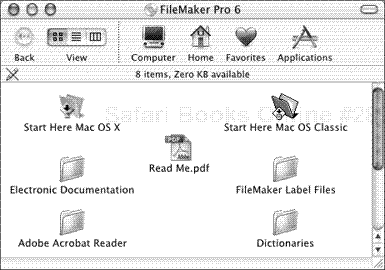
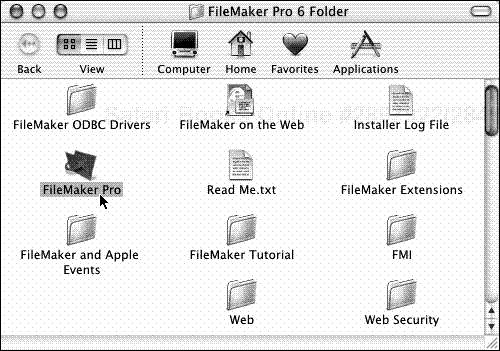
The new FileMaker Pro 6 folder will automatically open on your desktop (Figure A.19). Launch the program by double-clicking the FileMaker Pro icon. You’re almost ready to get to work, but first see the next page to set your FileMaker preferences.

 Tips
Tips
If you do not have enough hard drive space to install all the FileMaker files in step 5, click the Easy Install button in the upper left of the installation window and choose Custom Install (Figure A.20). You can then select only the files you need. The Approximate disk space needed figure in the lower right will change as you check or uncheck items, helping you decide how many FileMaker items to install.
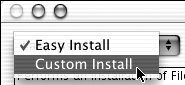
Figure A.20.
To perform a custom installation of FileMaker, use your cursor to toggle the install button in the upper left of Figure A.14.The Custom Install requires much less space than the Easy Install but also restricts what you can do with FileMaker. Consider tidying up your hard drive to make room for the Easy Install.
In making a Custom Install, if you’re not sure which items you truly need, click on the
 to the right of any item for more information on its purpose (Figure A.21).
FileMaker gives you control over three kinds of preferences: application, document, and Web. Application-level preferences affect every document used by FileMaker. Document-level preferences apply only to the open database, which if you like, lets you create a different set of preferences for a particular database. The Web preferences are covered separately in Setting Up and Configuring the Web Companion on page 292.
Before you start setting your preferences, here’s a quick rundown of the choices for each tab of the Application Preferences dialog box:
General: Most items in this tab are fairly self explanatory (Figure A.22). While you chose a Network Protocol when installing FileMaker, you can use this drop-down menu if you ever need to change the protocol. The Templates in New Database dialog option is great if you’ll regularly use templates as layout starting points; otherwise it adds an extra step to the file-opening process.
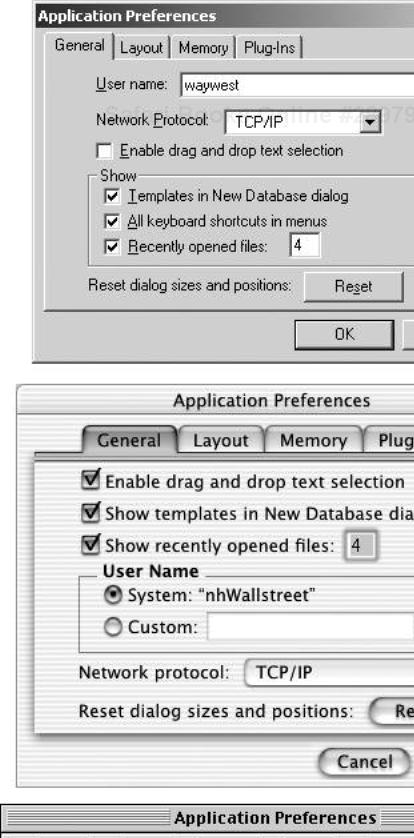
Figure A.22. The settings in the Application Preferences dialog box affect every FileMaker database. From top, the dialog box’s appearance in Windows, Mac OS X, and pre-OS X Macs.
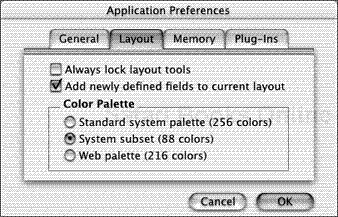
Layout: Most items in this tab are fairly self explanatory (Figure A.23). The Always lock layout tools option helps keep you from accidentally deselecting a tool, though you can also lock any tool by double-clicking it as you work within a particular file. The Web palette choice ensures that the colors used in layouts published on the Web will appear consistently across platforms and browsers. Unless you absolutely need to use a color outside the 216-color Web palette, go ahead and turn on this choice.
Memory: Unlike many programs, FileMaker has no Save command and instead saves automatically. Here’s where you control how often it saves—an interval based on your own comfort zone—or whether it saves only when the computer’s idle, which is the default (Figure A.24).
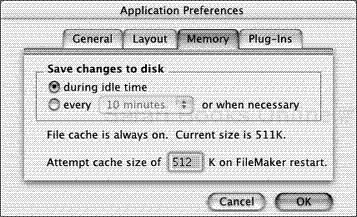
Figure A.24. Use the Memory preferences tab to set how often FileMaker automatically saves your database.
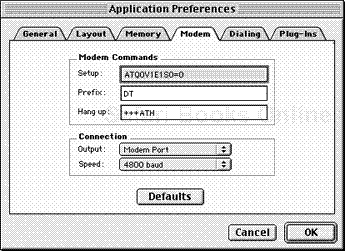
![]() Modem: Most of the items in this tab, which appears only in pre-OS X Macs, are fairly self explanatory (Figure A.25). Unless you know your AT modem control commands cold or have specific settings recommended by your modem manufacturer, leave the Modem Commands settings alone. As for the lower Connection panel’s settings, check the Speed—it’s easy to forget to bump it up as you upgrade modems or switch to a full-time connection.
Modem: Most of the items in this tab, which appears only in pre-OS X Macs, are fairly self explanatory (Figure A.25). Unless you know your AT modem control commands cold or have specific settings recommended by your modem manufacturer, leave the Modem Commands settings alone. As for the lower Connection panel’s settings, check the Speed—it’s easy to forget to bump it up as you upgrade modems or switch to a full-time connection.
![]() Dialing: FileMaker uses this tab, which appears only in pre-OS X Macs, to set part of the Dial Phone script to call numbers in a database. The entry boxes let you account for the varying dialing needs of phone systems in handling outside, long-distance, and local extension calls (Figure A.26).
Dialing: FileMaker uses this tab, which appears only in pre-OS X Macs, to set part of the Dial Phone script to call numbers in a database. The entry boxes let you account for the varying dialing needs of phone systems in handling outside, long-distance, and local extension calls (Figure A.26).
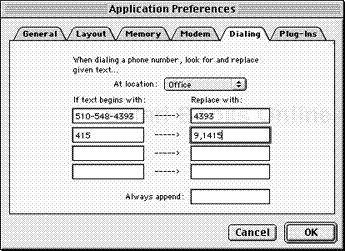
Figure A.26. ![]() This tab, which appears only in pre-OS X Macs, lets you control outside, long-distance, and extension settings.
This tab, which appears only in pre-OS X Macs, lets you control outside, long-distance, and extension settings.
Plug-Ins: This tab is used to enable your Data Access and Web connection plug-ins (Figure A.27). It also includes Auto Update, which works with FileMaker Server to automatically update the FileMaker plug-ins. For details, see To turn on the Data Access Companions on page 281 and Setting Up and Configuring the Web Companion on page 292.

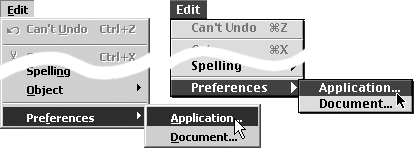
If you are using a Windows machine or a pre-OS X Mac, open a FileMaker database (
 in Windows,
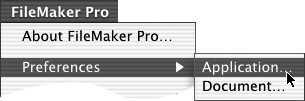
 on the Mac), then choose Edit > Preferences > Application (Figure A.28). If you are running OS X, choose FileMaker Pro > Preferences > Application (Figure A.29).
When the Application Preferences dialog box appears, choose a category with the tabs.
Make your choices based on the information described in the preceding section. Click OK.
If a document is shared, only users who know the master password can change its preferences. (For more on passwords, see Controlling File Access on page 259.) Before you start setting a document’s preferences, here’s a quick rundown of the choices:
General: The options in this tab give you a fair amount of control over individual databases (Figure A.30).

Figure A.30. The document-level General preferences tab affects only the currently open database. The Mac version (bottom) includes a provision for automatically importing digital camera photos.
Check Use smart quotes to automatically substitute the more typographically polished curly quotes for straight quotes.
Check Store compatible graphics to automatically store database objects in cross-platform formats such as JPEG, GIF, or PICT.
- By default, FileMaker will Automatically initiate photo import when a digital camera is connected to the Mac. Uncheck this box only if you want another program, e.g. iPhoto, to handle that task.
Check Try default password and type in a password if you want FileMaker to automatically enter that password when you open the database.
Check Switch to layout and enter a specific layout name if you want FileMaker to automatically change to that layout whenever this document is open. This can be particularly handy if you’re spending multiple sessions designing a complicated database.
Check either of the two Perform script boxes and enter a script’s name if you want a particular set of actions performed at that time (one to run upon opening a file, the other upon closing it). As host of a database, you may want guests to see it in a particular view.
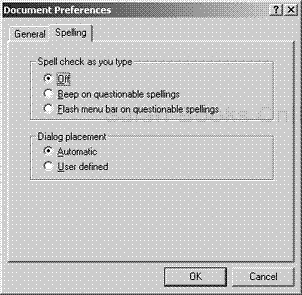
Spelling: Most items in this tab are fairly self explanatory (Figure A.31). Some users love Spell check as you type; others can’t stand it. Selecting User defined under Dialog placement, lets you move the Spelling dialog box when it appears the first time to a set spot on your screen. Unless you move it again for this database, it will appear in that same spot every time, making it quick to find.
If you are using a Windows machine or a pre-OS X Mac, open a FileMaker database (
in Windows, on the Mac), then choose Edit > Preferences > Document (Figure A.32). If you are running OS X, choose FileMaker Pro > Preferences > Document (Figure A.33).When the Document Preferences dialog box appears, choose a tab (General or Spelling).
Make your choices based on the information in the preceding section and click OK.

