5
Making Videos FUN – Effects, Elements, Transitions, and Titles
This is where the real fun begins – welcome to Chapter 5: Making Videos FUN! In this chapter, we will learn all about capturing your screen, adding titles, filters, and transitions to our clips to make them more amusing and entertaining, and taking a close look at elements and how to use them to add cool visual effects to our videos!
We will also look at why we should use it and how to avoid overloading our video with these new features. Most importantly, though, we will make sure to have fun going through the screen recording and editing parts, where you should feel free to add your own spin to the tutorials.
In this chapter, you will learn the following:
- How to record a screen
- How to add titles
- Effects and how to use them correctly
- Adding transitions to make our clips fit together
- Adding visual effects by using elements
Recording our screen
In this section of the chapter, we will start a new project as usual and go back to our recording menu, but this time, we will select Record Screen. Once we do that, the Wondershare Screen Recorder window will pop up, which looks as follows:

Figure 5.1: Wondershare Filmora 11 – the Screen Recorder window
On the left of this window, we can find the dropdown for what area of the screen we want to record. The options are as follows:
- Full Screen: Just as the name suggests, this option will record the entire screen
- Custom: With this option, we can choose a specific area of the screen to record
- Target Window: With this option, we can choose a specific window or program to record
Next to the drop-down list, we can find our speaker properties, and next to that our microphone properties. This is where we can choose which speaker and microphone to record the sounds from. We are also able to mute either one by clicking on its icon.
Lastly, we can click on the red circle to start recording.
Below that, we can find the settings that grant us extra properties that we can change as required:

Figure 5.2: The Screen Recorder window options
The properties we can change are as follows:
- Save to
- Frame Rate
- Quality
- Countdown
- Record Timer
- Mouse
- Pause/Resume Hotkey
- Start/Stop Hotkey
- Camera
And now that we have learned how to record our screen, we can continue to learn about the filters we can add to our timeline for extra effects in our videos.
Effects – adding makeup to our video
Welcome to a really exciting section of this chapter, where we will learn to overlay effects on top of our clips in order to add extra character to them.
To access these effects, we have to click on the Effects library that we mentioned all the way back in Chapter 1: Introduction to Video Editing and Filmora, which is at the top left of the Filmora 11 window, as shown here:

Figure 5.3: The Effects library
Now, you should already have the video that you recorded, but if you don’t, don’t worry – you can always record a new one now, upload another video, or add some video clips from the media library. Once you’ve done that, we can now continue by adding a new video track, as we saw before, by clicking on the Manage tracks button on the top left of your timeline and selecting the Add Video Track option, which will add a new video track on top of the one you already have, like this:

Figure 5.4: The second video track
After adding this new video track, we can now place our effect on top of any part of our video to see it in action, like this:

Figure 5.5: The second video track with an effect added
For this example, I used the Mirror effect, and now you can preview your video and add as many more effects as you like to fit the style of your video. I’d recommend checking out some of my own personal favorites, including Canvas, Jigsaw D, Bad TV Signal, and Classic.
Now that we’ve learned about and used some effects, we can now continue to the next section about transitions!
Transitions – changing clips seamlessly
Transitions in Filmora 11, and in general, are mainly used to make the flow and transition of different video clips smoother. The reason it makes the flow smoother is that it adds an animation that subconsciously shows a certain kind of continuation, rather than a sudden cut from one clip to another. To access these transitions, we have to press the Transitions button at the top of the Media panel, just like before:

Figure 5.6: The Transitions library
It is important to pick the correct transitions based on the content of the video clips in order to make them more believable and better received by the viewer. For example, if there is a romantic scene, you may want to use something like the Heart transition. This doesn’t always have to be the case, but it’s always something that your viewers will appreciate, even if it is subconsciously.
Unlike other assets, we do not place transitions on a new video track but instead place them on top of our video clips, as shown in the following screenshot. It is a good practice to place our transitions in between two of our video clips instead of directly on top of one, as this is what makes the transition smooth:

Figure 5.7: Adding transitions to our video clips
Place any transition you’d like on your video clips and return to this part of the chapter once you are finished. As for my choice for my project, I will choose to use the Bar transition, as it’s a decent transition that will fit most purposes.
And thus, we have completed yet another section of this chapter and have added transitions to our tool bag! We will now continue by learning how to add text on top of our video with the use of titles.
Titles – words are powerful
If there is one thing that is always present in a video except for the video clips and sound, it is text appearing in it. From advertisements to movies and cartoons, they all include text, if only for the end credits. So, let’s get started with using titles:
- To access our titles, we have to, as always, check the top of our Media panel, and then click the Titles library button, which will then show us all the available titles we can use:

Figure 5.8: Title presets and animation
Titles are extremely easy to use, just like any other type of media we’ve learned. We start by selecting one and dragging it onto our timeline. Make sure when adding it to your timeline that you add it on a new video track above the rest.
- Now, once added to our timeline, the title will say Lorem Ipsum; obviously, that’s not ideal, so to change it, we first have to click on the Edit button that we’ve been using this entire book. We will be shown this window once done:

Figure 5.9: The title properties window – part one
Before we continue, I’d like to mention that we will first go over all the different properties we can change, and after that, I’ll show you what I’ll be doing with my project, and you can either follow what I do or customize it to your own liking.
- So, let’s get started with the right side of the Titles tab:
- Font: In the top section where it says Font, we can change the font family, font size, vertical alignment, and font style settings to Bold or Italic, the horizontal alignment, and what the text will say.
- Settings: In the second section right below Font, we have our Settings section, where we can find where we can change our Text Color, Text Space, Line Space, Alignment, and Text Layer settings. I’m pretty sure you will know what these mean, as the majority of word processing/editing programs you most likely have used before offer these choices, but I’ll quickly summarize them just in case:
- Text Color is the color of the text (I know – shocking!).
- Text Space is the space between each letter.
- Line Space is the space in between each line.
- Alignment is where the text will be aligned on the viewport (the location).
- Text Layer is a little bit more complicated, but some titles offer multiple texts within the actual title, and with this button, you can change between them. This might be a little bit confusing written down, and if you do feel confused, you can try adding the Title 28 layer to your timeline and trying this property out. I’m 100% confident that once you use it, you will fully understand what it does.
- Transform: Moving on to the third section, we encounter Transform. This section has everything to do with the Rotation, Position, and Scale settings of our title.
- Compositing: The Compositing section right underneath has the Blending Mode option, which defines how the title is blended in regard to the media underneath it, and the Opacity option, which is how visible or invisible the text is.

Figure 5.10: Wondershare Filmora 11 – the title properties window – part two
- Now, let’s have a look at the left side of the Titles panel, where we have two more categories that we can use to further customize the text, the Preset and Animation categories:
- Preset: Starting with the Preset category, this is where we can choose a predefined style for our text. It is simply a collection of text styles with different effects that you can use:

Figure 5.11: Wondershare Filmora 11 – the Preset category
- Animation: Next, we have the Animation category, where we can add an animation to our text. This is an extremely important tool that you should always use if possible, as it makes the text easier to digest and always looks better than just plain old text:

Figure 5.12: Wondershare Filmora 11 – the Animation category
To choose either Preset or Animation, we simply just need to click on it once and it will be set.
- Now, let’s continue. In my project, I will use Title 33, and since I have a countdown at the start of my video, I will place it straight after the countdown and change the text to say something like Adventure, as that is related to all the video clips I’ve added so far in this book.
- Next, add Text style 6 from the Preset category and Cinema style from the Animation category:

Figure 5.13: Wondershare Filmora 11 – a title timeline example
This is what it will look like once done:

Figure 5.14: Wondershare Filmora 11 – a Preview panel example
To summarize everything we’ve done in this section of the chapter, we learned everything there is to know about titles and how to adjust their properties and looks. Next, we will continue by learning how to add Elements next.
Elements – visual effects to make our videos “pop”
I hope you’re enjoying this book as much as I did creating it because we’re about to exceed that level of enjoyment by adding elements to our project. Elements are basically visual effects or animated graphics that we can place over videos. They are similar to overlays, which we learned about earlier in this chapter, in the sense that we place them on top of our media on the timeline.
So, as always, to access any form of media, we need to go to the correct library; in this case, it is the Elements library, as shown here:

Figure 5.15: Wondershare Filmora 11 – the Elements library
There’s not much else to say about these, as they have the same properties as effects, so let’s jump straight into adding them to our project!
For my project, I’ve added an element called Yellow Energy above my title to give it an extra effect. This is what the timeline looks like:
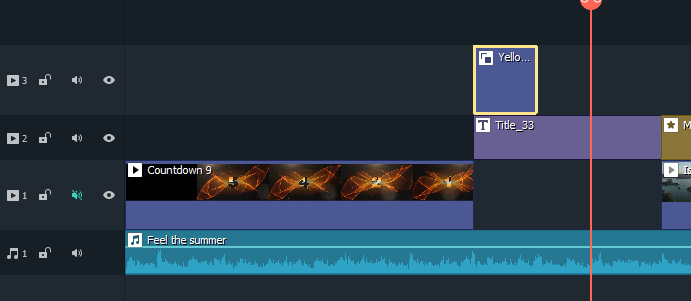
Figure 5.16: Wondershare Filmora 11 – an elements timeline example
Note that I’ve added a new video track and placed it on top of it to make sure it appears above everything else we’ve added so far. (This element does have animation, but alas, I can only post a screenshot of what it looks like mid animation.) The Preview panel now looks like this:

Figure 5.17: Wondershare Filmora 11 – an elements Preview panel example
And this concludes this very short section about elements. As mentioned before, it is very similar to effects and overlays and shares the same properties with them! Nonetheless, it is a very useful tool to engage viewers and keep their attention.
Summary
To summarize once again, in this chapter, we have learned about a lot of tools to help us create more fun and engaging videos, with the use of titles, effects, transitions, and elements. We learned to do that by using our screen recording functionality, thinking about the appearance of our titles, placing effects at the correct parts of the video, and adding transitions that fit the purpose of our video.
I’d like to congratulate you for making it this far in the book, and I hope you’re excited for the next chapter, where we will look at split screens, chroma key, motion tracking, and so much more. See you there!