
We’ve talked about how to surf the Web safely and covered the basics of digital communications. Now we need to cover a few other related topics that have to do with your online behavior in general. We’ll cover online banking and shopping, social media, cloud storage services, and just commonsense tips for living in the digital age.
Banking and Shopping Online
As we discussed in previous sections of this book, the security standards used by almost all banking and shopping web sites are sufficient for protecting your credit card information, at least during the transaction. As long as you see the little lock icon to the left side of the web address box, your communications with the far end are encrypted and secure. The real concern is saving your credit card information for future use. While most large online retailers do a good job guarding this data, there have definitely been situations where hackers have managed to steal users’ credit card information from these sites. But, as I said earlier in this book, fraudulent credit card charges are not a huge issue for the credit card owner—the credit card companies will not hold you liable for these charges, and you will never actually be out any money (assuming you report the charges in a timely manner, of course). This is not the case with debit cards, however. Debit cards provide immediate access to the funds in your bank account. If those funds are taken, they’re gone until you can convince your bank to reimburse you. This is why it’s always best to do your online shopping with a credit card instead of a debit card, if at all possible.
But the issue we’re discussing here is whether you should store your credit card information on a given web site to make future purchases easier. You should feel safe doing this with any major, reputable retailer, if you plan to do a lot of shopping there. But know that you can also put your credit card information in a password manager like LastPass and rapidly fill in all the relevant info on any online shopping site. So, instead of trusting the retailer with this info, you can just trust it to your password manager. Since the risks are fairly low, it’s really a matter of personal preference. I tend to save my credit card info on sites where I do a lot of shopping and use LastPass to fill in my credit card info on other sites.
Online banking is another practice that makes some people very nervous. Because banks are doing everything possible to reduce the need to hire human beings, it’s actually becoming expensive to avoid online banking. Banks are now charging their customers for mailing paper statements and in-branch transactions that require a live person. Like it or not, online banking is here to stay, and it’s the only way to avoid the growing list of banking fees. Like online shopping, interacting with your bank online is perfectly secure and safe. You should feel at ease checking balances, making transfers, and paying bills using your computer or smartphone. I know it seems scary, but financial institutions have been sending trillions of dollars in financial transactions over computer networks for decades, and they have a vested interest in doing it securely.
However, what you may want to do is to set some reasonable limits on what someone can do with your accounts. I say “someone” because we’re talking about the case where someone other than yourself has gained access to one or more of your accounts. This is true whether you use online banking or not, actually. For example, overdraft protection can be helpful for you if you accidentally write a check that your primary account can’t cover, but if you allow unlimited overdraft protection, this could also allow someone who manages to steal your checkbook or debit card to drain multiple accounts! So, you should talk to your local bank representative about putting commonsense limits on your bank accounts and be careful about how your various accounts are linked together. This is similar to creating a regular, nonadmin computer account. You’re guarding against the case where someone gets access to your account and limiting the amount of damage they can do.
It pays to be vigilant, as well. You should check in on all your online financial accounts from time to time, looking for suspicious activity and verifying the account balances. Many online banking sites offer automatic notifications for all sorts of specific activities on your account like transfers, withdrawals, and purchases over a certain amount. You can also be notified of things like password and account changes, overdrafts, large deposits, and so on. This is a great way to keep tabs on your account activity.
Credit Bureaus and Identity Theft
Identify theft is one of the nastiest problems you can deal with because it can negatively affect you for years, even if you do everything right. If someone manages to open a line of credit in your name and runs up a huge bill and these bills go to collection agencies, they could hound you for a long time.
Much of this hinges on some shadowy but powerful organizations called credit bureaus . The “Big Three” credit bureaus—Equifax, Experian, and TransUnion—know all about you. And yet you are not their customers; you’re their product. You can’t take your business elsewhere if you don’t like their service. You indirectly agreed to give these companies your information by agreeing to terms of service with your banks, credit card companies, utility companies, and loan agencies. The bureaus track all of your spending and debt and then generate a single score that supposedly determines your creditworthiness. The precise algorithm for calculating your credit score is a closely guarded secret, and even your access to your own credit history is strictly limited (one copy of your report for free, per year, per bureau).
In 2017, Equifax suffered a massive security breach, and the records of almost 150 million customers (nearly half the U.S. population) were stolen. Equifax’s response was slow and insufficient, and yet to date there have been no real consequences for the company, or even the industry as a whole.
While many financially savvy people are aware of the Big Thee credit bureaus, many are less aware of the Work Number and the National Consumer Telecommunications and Utilities Exchange (NCTUE). The Work Number is a service provided by Equifax that collects wage information from employers on about one-third of the working U.S. population. This information is being used to do things like verify your employment history for prospective employers and validate your income for loans and social services.
The NCTUE is a sort of specialized credit bureau that is focused on cellular services but is also being used by utilities companies. While this company appears to be a consortium of agencies, most of them appear to ultimately be owned by (wait for it) Equifax.
To be fair, these agencies do provide a valuable service that many consumers and lenders rely on. The problems are that they are not responsive to consumers and their security mechanisms have proven to be abysmal.
You can’t currently opt out of these credit services entirely, meaning that they will still collect and sell your data, and it will therefore remain at risk of being stolen or abused. However, you can at least protect yourself from someone opening new credit in your name (i.e., identity theft) by implementing a credit freeze . The process is painful (and we’ll go over this in the checklist), but at least now it’s free everywhere thanks to some legislation passed in 2018. Freezing your credit means that your credit score and credit history will not be available to anyone for any reason. This means you can’t get a new credit card or a new loan without first “thawing” your account. But realize that your credit history is also often checked for other reasons: signing up for utility services, getting a new cell phone, applying for a job, and so on. When this happens and you need to grant access to your credit report, you’ll have to find out which credit bureau they use and temporarily thaw your account.
Cloud Storage Services
Everything today is moving to “the cloud.” That is, more and more of our services and data are going online. As we discussed in Chapter 5, Apple and Microsoft have made it nearly mandatory to sign up for their cloud accounts to use their products. However, in this chapter I’m focusing on cloud storage services. These services give you a virtual hard drive somewhere out on the Internet where you can store just about any type of computer file.
There are dozens of cloud storage providers these days, all claiming to protect your data with “military-grade” or “unbreakable” encryption. As we discussed with online backup, you need to understand who holds the keys to your encrypted data. In most cases the answer is “them,” unless you explicitly take steps to change that behavior.
The simplest analogy for this is renting space in a physical storage facility, like U-Store-It or PODS. You buy a certain size container (the larger it is, the more it costs to rent), and then you put your excess stuff in the box. When you’re ready to leave, you lock it. But who keeps the key? Would you be comfortable leaving the only key with the owner of the rental facility? That would mean anyone who could convince the owner to open that container would have full access to whatever is stored there. Most places allow you to keep the key (or perhaps there are two locks on the door and you each keep one key). This isn’t only for your protection; it also neatly absolves the rental facility from responsibility for protecting access to the key and deciding who should be allowed to check out that key. The owner knows that if necessary, they could break your lock and gain access, too—for instance, if you die or lose the key or if a law enforcement officer comes knocking with a warrant.
However, the default key arrangement for cloud storage is usually the exact opposite—the storage provider keeps the key, not you. Again, this means anyone who can convince (or coerce) the owner into coughing up the key can gain full access to all your digital stuff. It also means the owner (or any of employees) has complete access, as well. However, some of these cloud storage providers will give you the option to provide and manage your own key. You have a password manager, so you can use it to safely store these keys. There are also applications you can use that will manage this encryption for you, in the case where the storage provider doesn’t offer the option for you to keep the keys. They will encrypt all your data before it’s stored and decrypt it when you need it. You can think of it as a second lock or a container within a container.
Sometimes, though, this is just too much hassle. Encrypting your data in the cloud means that it’s harder to share with other people, and it may break some nice features (like searching by file name or content). The thing to keep in mind if you’re not going to hold the encryption keys yourself is that whatever you put in the cloud could potentially be seen by someone else. As long as you don’t care about that, then you can forget about pre-encrypting the data. It’s important to realize, however, that just because you’ve deleted a file from this cloud service, they may still have a copy. For example, when you delete a file from Dropbox, you can actually log into your Dropbox account on a web browser and undelete it! That means it was never really deleted in the first place. These services may keep multiple copies, as well—so that if you change a file, they may retain a copy of what it looked like beforehand. They do this not to be sneaky (probably) but to help you recover something if you accidentally alter or delete it.
Social Media
Now we finally come to the web services that we lovingly refer to as social media. This includes things like Facebook, Twitter, Instagram, LinkedIn, and Pinterest.1 The stated purpose of these services is to allow people to find, connect, and share things with other people. However, I’m here to tell you that the actual purpose of these sites is to compile massive dossiers on as many people as possible and sell that data for money. The profit model for all of these “free” services is to provide companies with highly targeted advertising on the principle that catering to an individual’s tastes, income, education, religion, and so on, will make them much more likely to buy. Social media services are the most colossally effective trojan horses ever created by humans. People willingly provide hordes and gobs of extremely personally information on these sites. Even if you try to restrict access to your closest friends and family, you’ve already given the service provider permission to share this information with third parties (this is buried somewhere in your “terms of service”).
This was brought to light most recently by the Cambridge Analytica scandal. It’s a long story, but basically a political research and marketing company wanted to learn about as many U.S. voters are possible. Working with a psychology researcher named Aleksandr Kogan, Cambridge Analytica (CA) created a fun little Facebook survey called “This Is Your Digital Life” that attracted 270,000 people to respond. When you take these surveys, you’re granting the third-party survey maker access your Facebook data. However, Facebook also allow third parties to gain access to all of your Facebook friends’ information, too. This allowed Cambridge Analytica to amass a database of highly personal information on nearly 90 million Facebook users. Using this data for marketing purposes was against Facebook’s policy, but CA lied and said it was using it for academic research.
But the real problem isn’t policy, enforcement, or even security. The problem is that this data is being collected in the first place. The mere existence of so much highly personal information begs for it to be stolen and/or abused. On a personal level, people will invariably use this data to stalk love interests, check up on spouses or ex-lovers, dig into the lives of celebrities and politicians, and so on. It’s just human nature. At the corporate and government level, the potential for abuse is almost limitless. The only way to prevent this is to not collect the data in the first place. Since we can’t prevent these companies from collecting the data, the next best option is to just never use these services.
Yeah, yeah, I know. That ship sailed a long time ago for most of you. You can argue that it won’t really do you much good to quit at this point, and frankly most people just can’t give it up. These social media services are wildly popular because people truly enjoy using them to share all sorts of information with friends and family. So, let’s just acknowledge that and move forward. In the checklist for this chapter, I will give you some specific advice on how to lock down access to your social media accounts and how to avoid giving out the wrong types of information. But if you’re ready to make the break, I’ll also tell you how to delete your accounts. (You can do it! I did. In the wake of the Cambridge Analytica debacle, I deleted both my Facebook accounts.)
Summary
Online banking and shopping are actually very safe, in most cases. As long as you deal with a reputable retailer, make sure your connection is secured, and use a credit card from a major bank, you should be fine.
Identity theft is one of the most difficult attacks to recover from. To prevent someone from opening new credit in your name and sticking you with the bill, your best option (and it’s not an easy option) is to freeze your credit.
Cloud services provide extremely convenient ways to access and share your files, pictures, and other data, but you need to understand who holds the keys to that online storage and know that your storage provider may save copies of your files long after you “delete” them.
Social media services like Facebook and Twitter collect unprecedented amounts of information on their customers, and they make money by selling that information to advertisers. You need to be mindful of what information you give them and what you share with others.
Checklist
The checklist for this chapter sort of covers the “rest of the Internet”—things like online banking and shopping, social media, and online behavior in general. The items here are a bit of a hodge-podge of online safety guidelines, tips, and tricks.
Tip 9-1. Lock Down Your Apple/Microsoft Accounts
It’s almost impossible to avoid setting up Apple and Microsoft accounts. These cloud services are deeply embedded into most recent versions of Mac OS, iOS (iPhone and iPad), and Windows. But you can still tweak the settings on these accounts to better protect your privacy.
As a general rule, when signing up for these accounts, give them as little information as possible. Also, feel free to give them incomplete or even incorrect data. Instead of signing up with John Doe, try just using John D. Instead of giving your correct birthday, just give them something close enough. For child accounts, which often enable parental controls and age-based content, you can give a date that’s closer to the actual birth date. Don’t give them your full address. Often a ZIP code is sufficient.
However, if they ask for a mobile phone number or other e-mail address, you need to give them a real one. These are often used to verify your identity or to help you unlock your account if you forget your password.
In this section, we lock down the settings on your computer. (In Chapter 11, we show you how to lock down your iOS and Android cloud settings.) There’s no way to sugarcoat this... there are a ton of settings here. I’m not going to go through every single one of them, just the key ones. Regardless, I suggest you poke around and at least familiarize yourself with what’s there. The other hard truth is that these settings change often. The settings for Windows 10 changed while I was writing this book. And when new settings show up, they’re often “on” by default (i.e., set to the least private option). This is the world we live in now.
Find your Privacy Dashboard and take the time to poke around in all of these settings. Realize that all of the talk about “personalization” and “interests” and “history” is really about building up a profile on you that may be shared with others (on purpose or via hacking). Just say no wherever you can.
Tip 9-1a. Microsoft Windows 7/8.1
There aren’t a lot of settings for privacy on Windows 7 and Windows 8.1. The following screenshots are from Windows 7, but the Windows 8.1 screenshots are nearly identical.
- 1.Open your Windows Control Panel. Search for Action Center and click it (Figure 9-1).
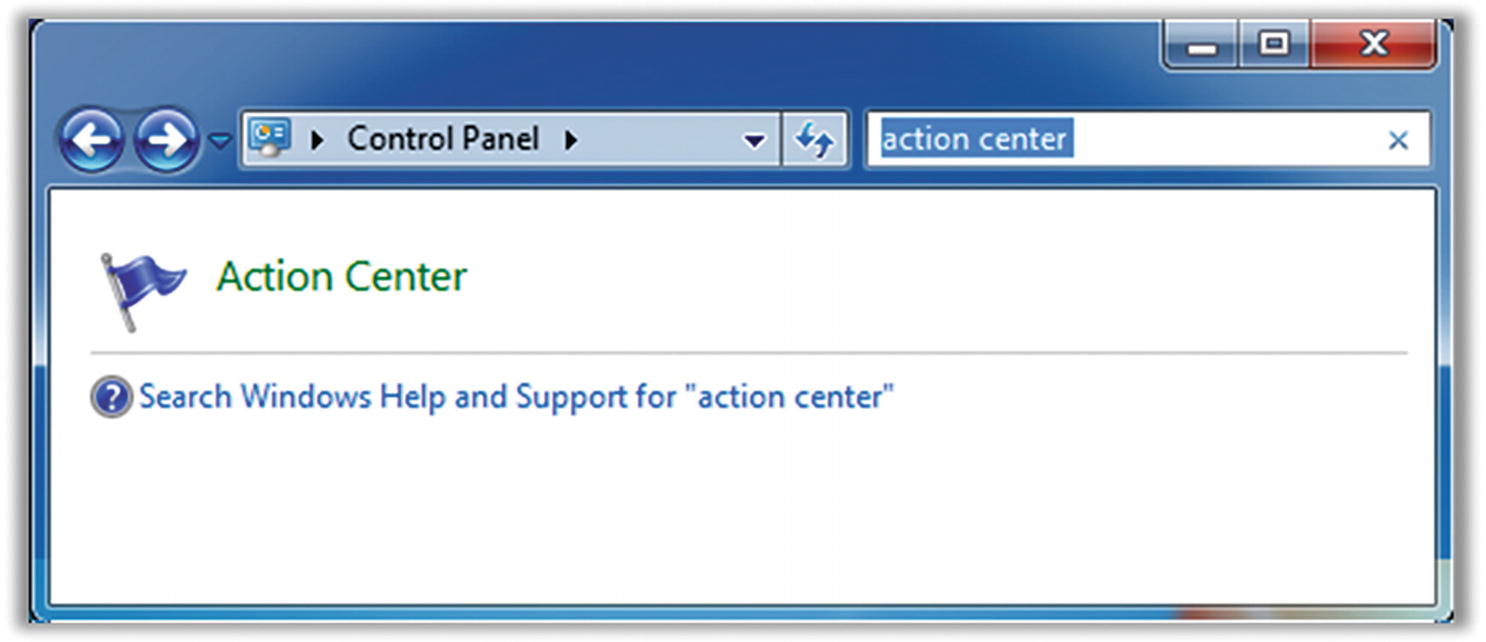 Figure 9-1
Windows 7 Action Center settings
- 2.
Click the link “Change Action Center settings” at the left.
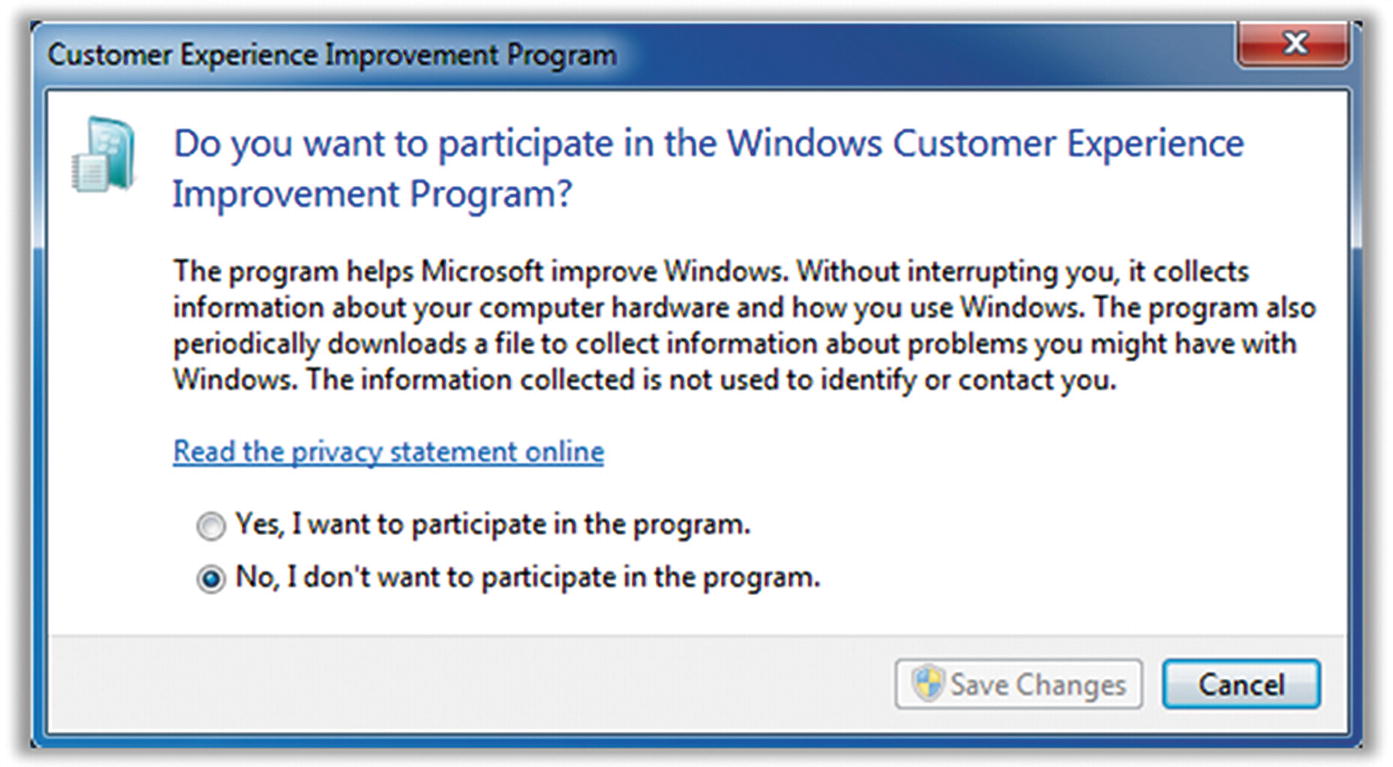
- 3.At the bottom, click “Customer Experience Improvement Program settings” (Figure 9-2).
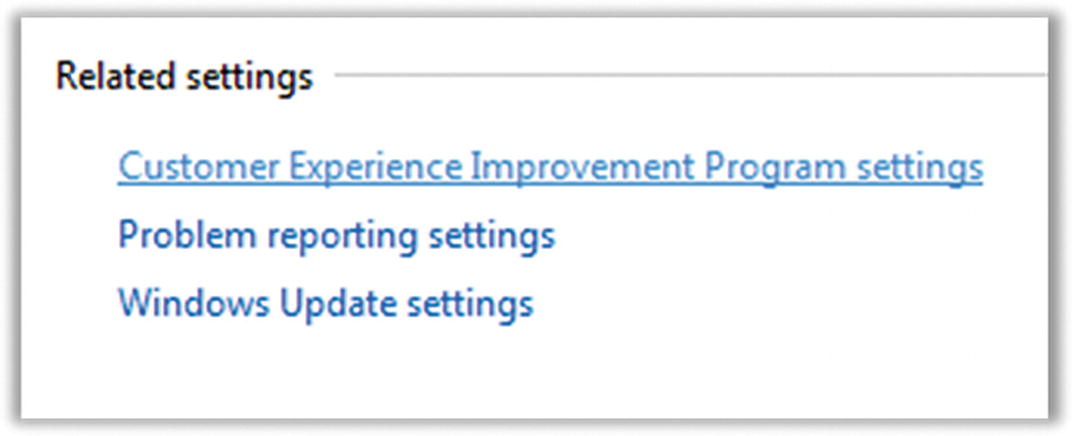 Figure 9-2
Windows 7–related settings
- 4.
Tip 9-1b. Microsoft Windows 10
- 1.
On your computer, open Settings. Open Privacy.
- 2.Start with the Windows Permissions section.
Under General, I would uncheck everything, but in particular, uncheck the first option (“let apps use advertising ID”).
Under Speech, Inking and Typing, I would turn off everything, unless you really plan to use it.
For “Diagnostics and feedback,” you may not have an option to send nothing. You may only be allowed to choose “basic” or “full.” I would choose “basic.”
Below this are other settings, including “Tailored experiences.” Doesn’t that sound so desirable? Again... these are euphemisms for “allow us to track you.” Disable this.
Now go to Activity History. Turn this off. While you’re there, you might want to also click “Clear activity history.”
- 3.
Under “App permissions,” there are a gazillion settings, but they basically fall into the same pattern. You can enable or disable a particular feature for all people and all applications, or you can enable/disable a feature on a per-application level. Unfortunately, the descriptions are not always clear—but again, you can change your mind later. Disable things where you can, and when you find that you need them, you can turn them back on.
Tip 9-1c. Mac OS
- 1.Go to System Preferences and find your iCloud settings (Figure 9-4).
 Figure 9-4
Mac OS iCloud settings
- 2.Once you open this preference, you’ll be shown several options for services to sync or back up in iCloud. You’ll want to make your own choices for each of these, but here are some specific things to consider:
iCloud Drive is Apple’s built-in cloud storage service, like Dropbox but with more Apple-centric features. Apple pushes you to use this constantly, which is annoying. I avoid it. For one thing, it’s expensive—if you use it at all, you’ll use up the free 5GB of storage in a hurry and need to buy more. If you enable this, all of your documents will automatically be stored in the cloud. (If Apple ever lets you use your own private encryption key, this might be a more attractive service.)
Turn off Photo cloud backup. You should already have one if not two different backup solutions for your computer, and those solutions have a lot more privacy control. Click the Options... button next to Photos and deselect iCloud Photo Library at a minimum. You may also want to disable the other options, though iCloud Photo Sharing can be handy if you have a friend or family member that you often share photos with.
Disable Keychain backup to iCloud. You have LastPass for managing your passwords. While this can be convenient because it’s built into all of Apple’s products, it’s currently not as secure as LastPass. (This may change with time. Apple is becoming very serious about its security and privacy.)
If you have a laptop (MacBook), I strongly encourage you to enable Find My Mac. It’s less useful for desktop computers that never leave the confines of your home, but if you’re at all worried about your computer being stolen, you should enable this feature that can help you find it.
You need to decide how much information you want to put into iCloud. Look at the other settings here and disable anything you don’t need to synchronize with other Apple devices.
- 3.Next open Security & Privacy settings under System Preferences (Figure 9-5).
 Figure 9-5
Mac OS Security & Privacy settings
- 4.If necessary, unlock the settings by clicking the padlock at the lower left (Figure 9-6). There are several settings here. The basic idea is that you want to limit access to potentially private things like location, contacts, calendar, and photos to only those applications that truly need it. When it doubt, turn it off—you can always turn it back on.
Be wary of apps that want access to Accessibility controls, unless you truly need it. These abilities can often give rogue apps a way to hack your system.
When it comes to Analytics, I usually turn those off. Yes, it helps developers to improve their products, but until we come up with real regulations on what data can be collected and how it can be used, I err on the side of caution.
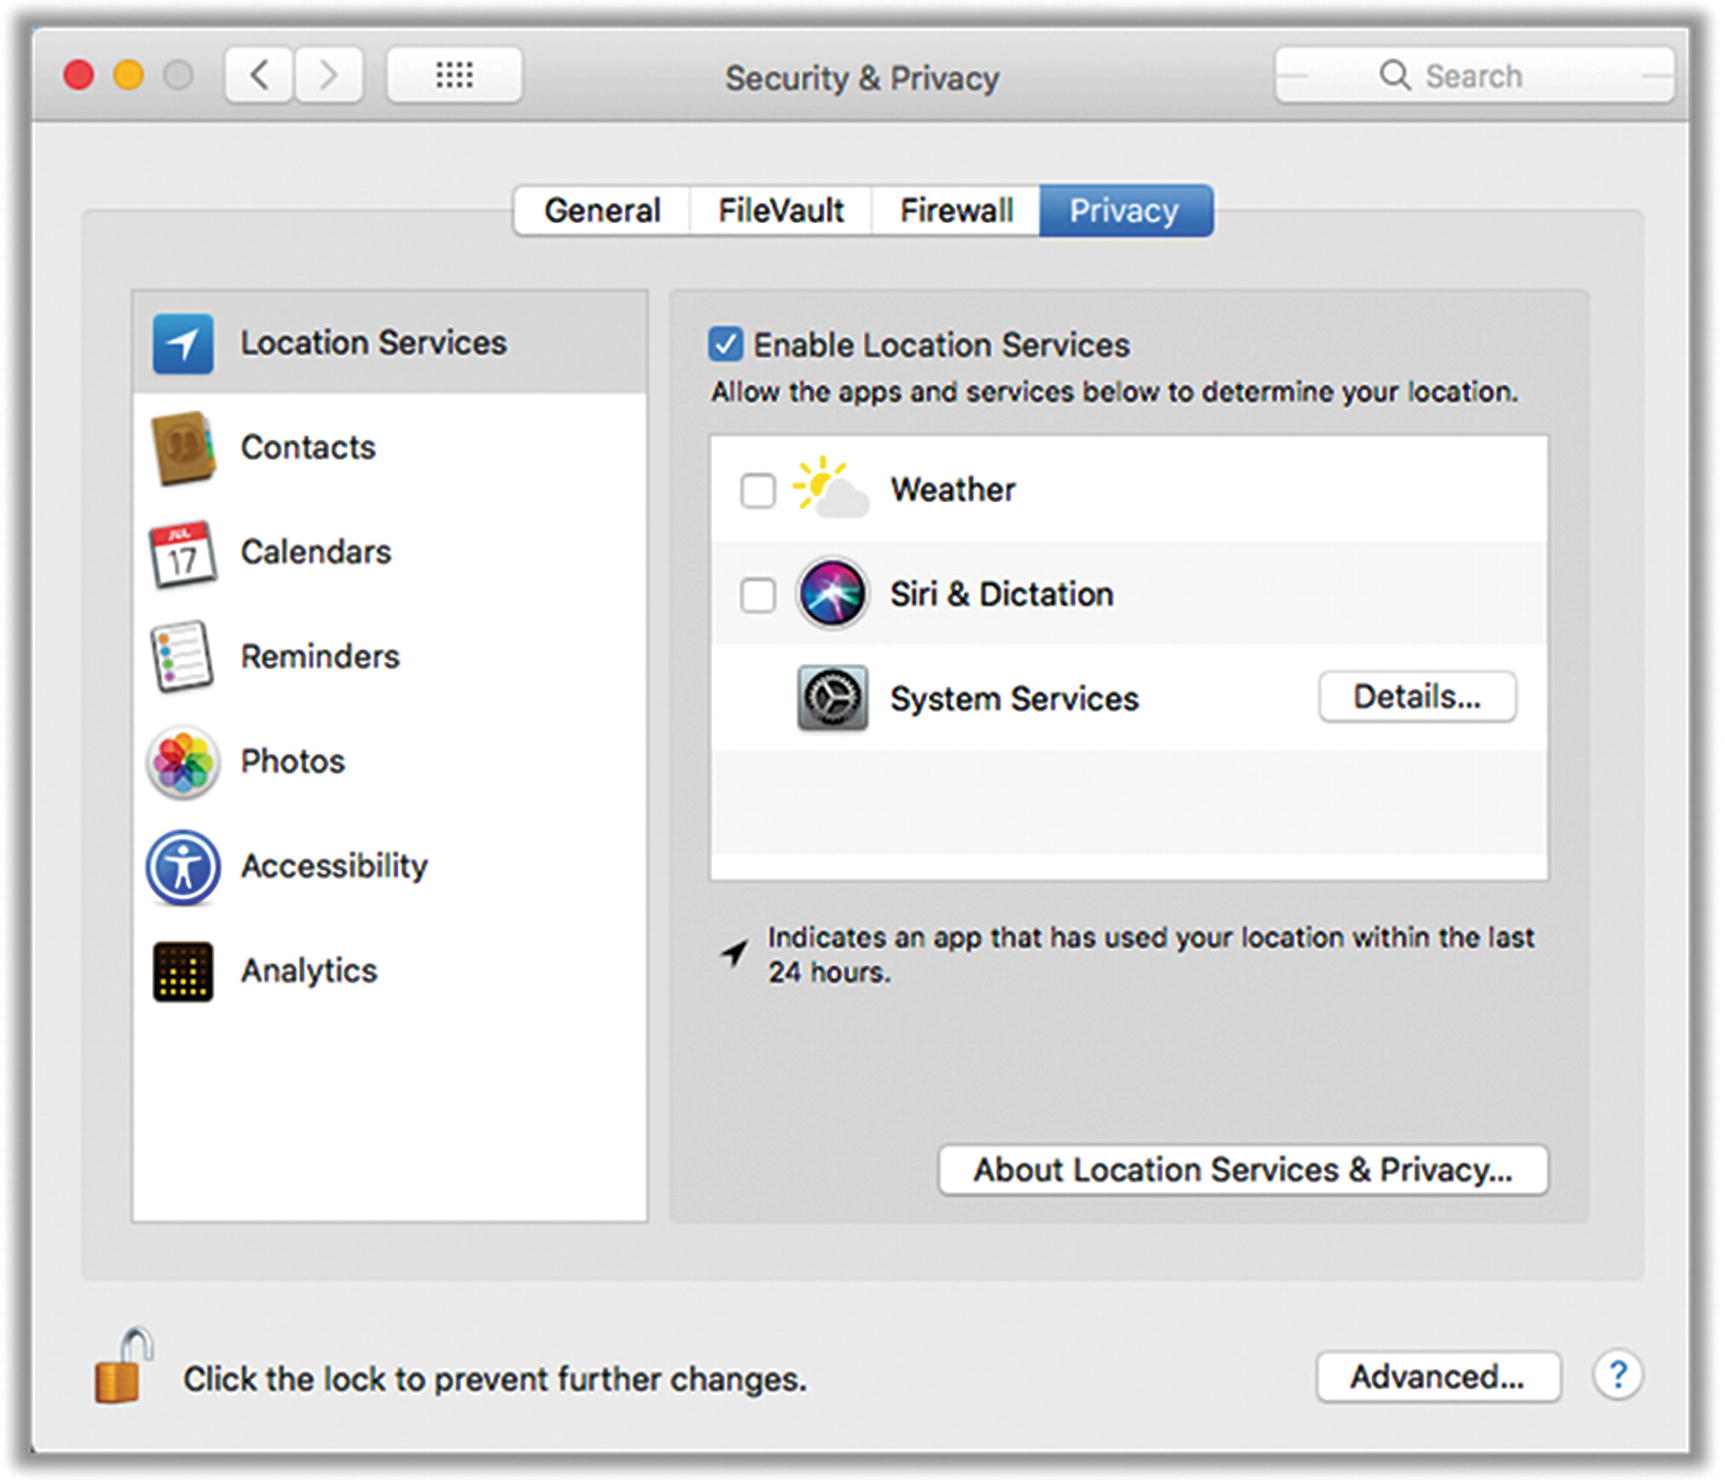 Figure 9-6
Mac OS Privacy settings
Tip 9-2. Use Throwaway E-mail Accounts
- Shared logins . The following sites will give you some pre-existing accounts that people have shared so that you may not have to create an account for yourself.
- Disposable e-mail accounts. When you go to these sites, they provide you with a throwaway e-mail account. You can check your e-mail for a short period of time and then abandon it.
mailinator.com (warning: e-mails are viewable by anyone)
- E-mail aliases . Some e-mail services offer you the ability to create e-mail aliases. These are e-mail addresses that will forward directly to your normal e-mail inbox, but you can cancel them at any time, effectively blocking that person from being able to ever reach you again—without abandoning your real account.
Gmail : Simply add any set of characters after a plus sign to your e-mail address. For example, if your real address is [email protected], you can give out [email protected] and the e-mail will go to the original address.
Fastmail : https://www.fastmail.com/help/receive/aliases.html
Tip 9-3. Use Credit Cards Online (Not Debit Cards)
Quite simply, if someone charges something to your credit card without your permission, you’re not actually out any money—the credit card company is. As long as you report the fraudulent charge in a timely manner, you won’t be responsible for the charge. With debit cards, that money is actually gone from your bank account, and you then have to fight to get it back.
Tip 9-4. Use Virtual Credit Card Numbers
Some credit cards offer a one-time-use “virtual” credit card number. This is a great option for buying something online from a store that you will probably never do business with again. This is usually done online, through your credit card account web site, but it can be hard to find—call the number on the back of your card and ask about this service. This service will generate a throwaway 16-digit credit card number that will work only one time. It comes with its own expiration date, security code, and everything. The charge will show up on your regular bill. Just be sure to save that temporary card info until you’ve received the merchandise, in case you need to return it or something.
The Capital One service, Eno, allows you to create cards that act as aliases for your real credit card. Unlike single-use virtual numbers, you assign these cards to a particular merchant. This has at least two benefits. First, if that company is hacked, the card info will be useless to the hacker—it works only for that vendor. Second, if your real card is ever lost or stolen, these alias cards will not be affected. They will still be tied to your account and will be associated with your new credit card number.
Tip 9-5. Give Your Credit Card Company a Heads-Up
Because credit card companies are ultimately the ones on the hook for illicit purchases, they have implemented all sorts of automatic antifraud protections. Their computers are well aware of where you live and what sorts of things you typically buy. If you suddenly buy something in a foreign country or make a large purchase from an online store, they may turn off the card until they can talk to you and verify that the charges were legit. To avoid this, you can give them a call ahead of time to let them know you’ll be traveling abroad or will be buying something expensive from a place you don’t normally shop.
Tip 9-6. Set Up Restrictions on Your Financial Accounts
Services such as overdraft protection, funds transfers, and linked accounts can be convenient. However, you need to think about what someone else could do if they were to somehow gain access to your checkbook, ATM card, or debit card. Anything you can do with it, they can also do. Don’t link two accounts unless you really need to (like with overdraft protection). If possible, put limits on daily withdrawal and transfer amounts. If you need to, you should always be able to go into your bank branch if you need to exceed these limits—but at least in that case you will deal with a human that can verify your identity.
Tip 9-7. Turn On Account Alerts
Many online banks, credit card companies, and financial firms have ways to create alerts on various types of account activity including being able to set trigger levels. For example, you can be alerted whenever someone withdraws more than $200 from an ATM or charges more than $300 on your credit card in one day. These are great ways to keep tabs on your accounts.
Tip 9-8. Freeze Your Credit
The most potent way to prevent an identity thief from opening a new line of credit in your name and sticking you with the bill is to freeze your credit at the Big Three credit agencies: Equifax, Experian, and TransUnion. When you freeze your credit, you prevent banks, lenders, credit card companies, employers, and really anyone from obtaining your credit record. This effectively prevents anyone from getting a new credit card or loan or bank account in your name (including yourself). If you need to do any of these things, you will need to find out which credit bureau is needed and temporarily “thaw” your account. Thanks to recent legislation, this process is now completely free (as it should be). For a freeze, you will have to individually contact all three agencies.
If you know you will be needing to access your credit report, you might instead set a fraud alert on your account. It will require that they contact you before opening any new credit lines in your name. This is also free but will expire after a year. You only need to contact one of the Big Three agencies for this—that agency will contact the other two for you.
Tip 9-9. Use Secure Cloud Services
Cloud storage providers may encrypt your data, but if they also hold the key, then it’s possible for that data to be viewed by employees, hackers, or legal authorities. And you should assume that your data will be saved forever (even if you delete it). This also applies to anything you post on social media sites.
Tip 9-10. Don’t Broadcast Your Travel Plans
While it’s good to give your credit card company a heads-up on travel, you shouldn’t be broadcasting this information on Facebook or Twitter. Criminals actually monitor social media sites looking for people who will be away from home for extended periods of time. You should also refrain from posting vacation pictures during your vacation to a public location, as well. Post them to a private service or just post them when you get home.
Similarly, you should never post pictures of your airline tickets or boarding passes online. You should also be careful how you dispose of your boarding pass and presumably your airline-printed luggage tags, even after your flight. These codes can contain things like your name, frequent flier number, record locator number, and other personally identifiable information. This information could be used to alter or even cancel your next flight or be used to gain access to your frequent flier account, among other things.
Tip 9-11. Don’t Sign In Using Facebook, Google, Etc.
You’ll see many sites now offering to let you sign in using your Google, Facebook, or Microsoft credentials instead of setting up a dedicated account for that site. Sure, this is convenient (and should actually be secure), but it means that you’re allowing Google or Facebook to track you on these sites. Since you have a kick-butt password manager, it’s no big deal to set up a dedicated account on each of these sites with unique passwords. Or try using throwaway accounts for one-time access (covered earlier).
Tip 9-12. Don’t Divulge Too Much Personal Info Online
This is a tough one. For whatever reason, people love to over-share on sites like Facebook, Twitter, and Instagram. But just remember that this information lasts forever and could be seen by anyone, despite any restrictions you try to put on your account or whatever privacy policy the social media site claims to follow. When you forget your password, how do you recover it? Most sites will ask you to answer three questions that supposedly only you would know the answer to. Where did you go to college? What’s your mother’s maiden name? What’s the name of your first pet or car? This is precisely the sort of information people post on social media. This information can also be used to impersonate you on the phone, as well.
Tip 9-13. Be Wary of Using DNA Services
There are services available today like 23andMe and Ancestry.com that allow you to use your own DNA to track your heritage and perhaps find long-lost relatives. Some services even claim to help you identify possible future health risks. While there is obvious value to these services, you need to realize that there are many scary ways this data can be abused, as well. Law enforcement and intelligence agencies are using these DNA databases to find people—or, importantly, their relatives. Because you share a significant percentage of your DNA with your parents, your siblings, and your children, you are actually also submitting their DNA when you submit your own. While we can hope that your DNA will be stored securely and access will only ever be granted to law enforcement when presented with a valid, court-reviewed warrant, I wouldn’t count on either. Databases can be hacked. Companies can be coerced. People do things they’re not supposed to.
Tip 9-14. Account Recovery Questions: Lie
Since password and account recovery is usually accomplished by providing the answer to a few simple questions, why not protect your accounts by simply providing the wrong answers? Nothing says you have to answer these questions truthfully. You just need to be able to faithfully provide the same answers when asked again later. Whoever is trying to hack your account will be trying to give the right answer, and they can’t possibly succeed if you lied.
One method would be to alter the real answers in some predictable way. Most of these questions have one-word answers, so just find some method for modifying the answer that only you know. Maybe prefix each answer word with not or some other prefix. Or repeat the word twice, or even just the first letter. For example, let’s say the question is “What was your mother’s maiden name?” If the real answer is Brown, try NOTBrown or nworB or BrownBrown or BBrown.
If you really want to kick it up a notch, use LastPass to generate totally random answers to these questions—use the password generator. (You may need to disable special characters.) Just be sure to save these answers in LastPass. I would probably save them in the “Notes” section of the web site’s vault entry or, if necessary, create a new secure note just for these answers.
Tip 9-15. Limit Who Can See Your Stuff
Most social media services provide ways for you to reduce who can see what you post, who can view your profile, and who can find or contact you. Take advantage of these settings by dialing them down as low as you can stand. Put your “friends” into groups, granting full access only to the handful of people who really deserve it.
Tip 9-16. Don’t Give Out Your E-mail Credentials
Many social media sites offer to help you find friends by looking at your e-mail contact lists. To do that, they just need your e-mail ID and password. Don’t worry, we won’t use it for anything else, really! Don’t do it. Just don’t. You would not only be giving them access to all of your e-mail contacts but all your e-mails, as well…forever (or until you change your password). On Google, it’s even worse—your e-mail account password is also the password for Google Docs, Google Calendar, and dozens of other Google services.
Tip 9-17. Enable Two-Factor Auth Wherever You Can
Note that if you have the option of using an authenticator app like Google Authenticator or using a test message (SMS), you should use the authenticator app. Text messaging isn’t as secure as it should be. It’s better than nothing, however, so if that’s your only option, take it.
Tip 9-18. Read the Terms of Service (or Not)
How many times have you actually read the entire terms of service or the end-user license agreement (EULA) before signing up for some online service or installing an application on your phone or computer? No one does. We just check the box that said we read it and click Accept. Sadly, even if you did read it, you probably wouldn’t learn much. The use of legalese and pleasant-sounding euphemisms make it really hard to truly understand what you’re agreeing to. I encourage you to try it, though—go read Facebook’s or Google’s or LinkedIn’s privacy policy, from top to bottom. See if you can figure out what data they collect and who they share it with.
Tip 9-19. Know What They Know
Many of the big online services have a way for you to download all of your information in one fell swoop. Every e-mail, every post, every picture, every “like,” every friend, every contact…you get the idea. I recommend you try this, if for no other reason than to understand the sheer quantity of information these companies have on you. Pay special attention to any marketing information—the ads they’ve picked for you, the demographics they’ve guessed for you, and so on.
Instagram: https://help.instagram.com/181231772500920
Twitter: https://help.twitter.com/en/managing-your-account/how-to-download-your-twitter-archive
LinkedIn: https://www.linkedin.com/help/linkedin/answer/50191/accessing-your-account-data
Pinterest: https://help.pinterest.com/en/articles/change-your-privacy-settings
Tip 9-20. Lock Down Your Social Media Accounts
Instagram: https://help.instagram.com/116024195217477/
Twitter: https://support.twitter.com/articles/14016-about-public-and-protected-tweets#
LinkedIn: https://help.linkedin.com/app/answers/detail/a_id/66/ft/eng
Pinterest : https://help.pinterest.com/en/articles/change-your-privacy-settings
Tip 9-21. Close Accounts You Don’t Use
Instagram: https://help.instagram.com/448136995230186/
Twitter: https://support.twitter.com/articles/15358-deactivating-your-account#
LinkedIn: https://www.linkedin.com/help/linkedin/answer/63?lang=en
Pinterest: https://help.pinterest.com/en/articles/deactivate-or-reactivate-account#Web