
Chapter 3: Flower Photography
Fun or Serious?
Why are you photographing flowers? It seems like such a silly question. The obvious answer is for their natural beauty: a tapestry of colors, textures, and forms. Because flowers will never appear the same on any two occasions, the camera provides us with a means of immortalizing their fleeting beauty. In fact, flowers constitute the second most popular topic to photograph, after people. Yet the question remains: Why are you photographing flowers? Let me put it another way: What do you intend to do with your floral images?
There are several options for floral photography:
1. To enlarge as posters, prints, greeting cards, or calendars
2. For documenting purposes
3. To write an article about certain flowers, garden, or floral event
4. For stock images to be distributed and used professionally

I wanted to make sure that this Iris Hybridia was the center of attention—both literally and figuratively.
I watch my father sweat and toil to make his garden a place of bountiful wonder, but nature has a cruel and uncanny way of often ruining his hard work. To me, gardening appears as a masochistic and expensive obsession, yet if it weren’t for people like my dad, I would be deprived of the dazzling brilliance, the multitude of colors, and the opulence of floral variety. A garden is a place of discovery, and the natural elements have an infinite effect in my exploration: the time of year, time of day, the sun, the clouds, the rain, the fog, and the wind all influence the plants and flowers, which themselves are ever-changing.
People assume, quite erroneously, that flowers are easy to photograph. First, although fixed to a spot, flowers are constantly battling the wind, so getting a shot without blur is a battle. Second, flowers are ephemeral, and timing is critical in getting that spectacular shot. Third, it is important to keep your shots as uncluttered as possible—use the simple adage: less is more. Concentrate on observing simple lines, shapes, and colors. A constant problem that I have seen is when a photographer tries to show too much in a picture. Just show what is most important without the distractions. If you don’t follow this rule, your viewer doesn’t know what to focus on; therefore, the image has failed to capture the right emotion from your audience.
Photography Is All About Observing
Here are two shots of the same Electon shrub roses. Why is the first photograph considered poorly composed? First of all, the ground isn’t very interesting, nor does it complement the subject matter. Second, I haven’t given the flowers enough individual strength. And third, there are too many irrelevant distractions around the main focus. Try getting down at eye level or shoot upward from ground level as in the second photograph. Notice how the color resonates with the blue sky as the backdrop instead of the ground. It is also a more pleasing image because you can actually feel the rose’s dominance.
A photograph of a flower is meant to heighten our awareness of its grace, characteristics, and intimate beauty. Think in forms of color, line, shape, and texture. There is an important distinction between what is beautiful and what is photogenic. The reverse is also true. A dying leaf or a dewdrop may not seem compelling, yet the same leaf can offer a distinctly evocative image. Many flower pictures are mundane mainly because of two factors: poor exposure and unfortunate choice of composition.
Composition is the unifying aspect behind all visual art. If someone told you to photograph a flower differently, what would you do? Think of it this way. You have an opportunity to photograph the portrait of the film director of Avatar and Titanic, James Cameron. How would you photograph him? Personally, I wouldn’t want to just take a mug shot of him, but rather I’d incorporate something about either his profession or his personality.
For example, shoot a ground-up shot of him in a dry dock underneath a massive ship or a direct shot of him emerging from a steamy jungle. The same principle should apply to every shot you take. The same principal can apply to flowers. Bring out the flower’s personality, its persona by using correct composition. You may have something important to say, and photography is a wonderful medium to express it. It is how you express it that can change the viewer’s opinion on the subject.
Try this as an experiment. Buy a flower, and take it home. Now photograph it as the “James Cameron” flower. With the same flower, now photograph it as the “Tim Burton” flower. Finally, photograph it as the “George Lucas” flower.

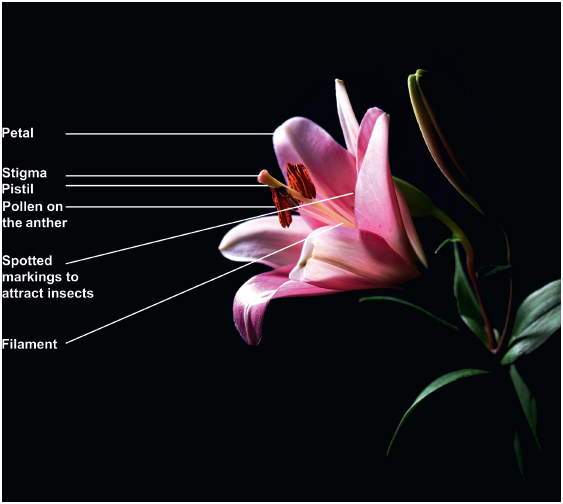
The Anatomy of a Flower

Focus on What You Want to Shoot
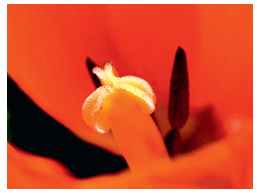
When you shoot with macro, focus is vital, and this is where problems reign. Your plane of focus is very shallow, just a fraction of an inch. So you have to make another decision: Exactly what part of the flower do you want to be in sharp detail? The pistil? The stamen? The stigma? Fine-haired cilia? Or spiraling petals? A small aperture improves sharpness, but there are inherent problems: either a very slow shutter speed must be used (not a practical solution outdoors where even the slightest movement of a flower would ruin the shot), or very bright sunlight or supplementary light must be available.
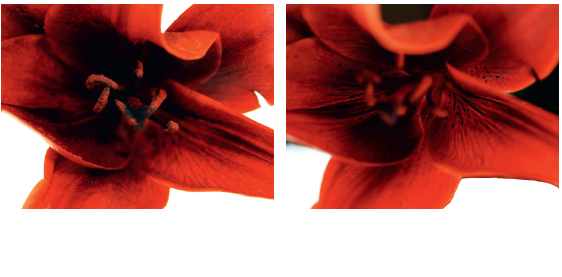
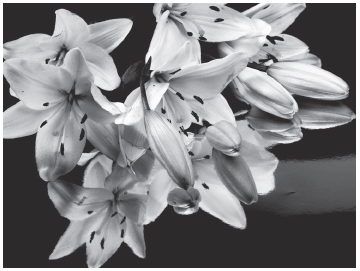
Be careful as to what you are focusing on. The images shown here illustrate a common error. In the photographs opposite, in the first photograph, the focus is on the pistils of this lily. In the second photograph, the focus is on the petals. If you are having difficulty trying to capture the whole flower, dial your camera to Aperture mode and focus using that format. The camera will set the exposure while you worry about a sharp focus. This shot would have been better had the whole flower been in focus.


If I’m Shooting Close- Ups, Why Is the Background So Important?
Backgrounds are virtually as important as the subjects themselves in making a picture work, but they are often the most overlooked aspect of photography. If the background isn’t a key component to the subject matter, blur it out by using a wider aperture or stronger lens. What you don’t want is the background to vie for the viewer’s attention; rather, it should complement the main focus as an integral part of it.
Using a flower that is the same color as the backdrop sounds like a contradiction, but the muted hue actually softens the whole picture while it enhances the foreground.
Try to find a strong solid background that will aid in the highlighting of the foreground, preferably dark hues for light-colored flowers and the opposite for dark flowers.
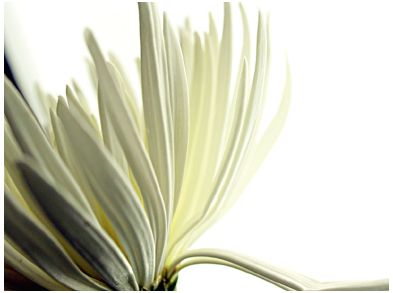
For white on white, make sure the background is overexposed; otherwise the flower will simply bleed into the background. For indoor shots, light the background separately from the flower.
An alternative is to use a backlit angle. Highlight your focused subject to give it a certain independence yet retain a feeling of solidarity. It is particularly eyecatching if the foreground and background are blurred out.
Eliminating Distractions
By using a white board outdoors, you can achieve two goals:
• To reduce any wind.
• To eradicate background distractions.
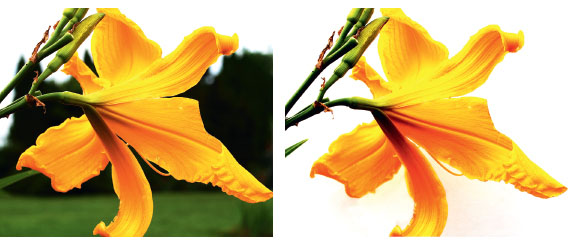
You can create more aesthetically pleasing images with the assistance of a white or black board. The only difficulty is holding the board behind your subject while looking through the viewfinder, focusing, and pressing the shutter release simultaneously, but it can be done. You may need a stand to hold the board in place. You may think, I can get rid of the background through postproduction on your computer, but it is so much easier and less time consuming to just use a white or black board.
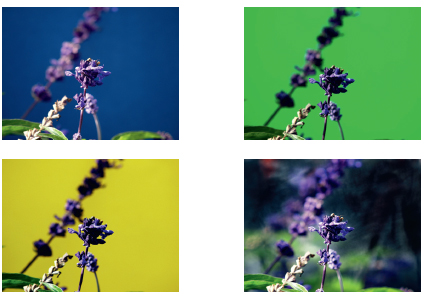
The figure in the left was taken under normal circumstances with an emphasis on the flower in its environment. I then placed a white board behind the flowers for a shot that concentrated on the delicacy of the flowers without any distractions, seen in the figure on the right. An alternative to a white or black board is to try various colored boards as demonstrated by the figures overleaf, including a reflective silver board (last figure), although I must admit, it’s a bit distracting.
Positive and Negative Space
Negative space, by definition, is the empty space around the subject. When composing a shot, observe how you frame your subject in relation to the positive space and the negative space. The frame is the binding size of the picture, the positive space is the subject, and the negative space is the empty space around the subject. It all has to do with balance and the flow of the eye. If the image is too cluttered, the eye has nowhere to focus.
Negative space acts as a foil or the support to your subject. It is this negative space that is the most crucial aspect in nearly all compositions—having too much or too little negative space can completely ruin a potentially good photograph. Your key decision will be whether you want to preserve the flower in context or focus on the flower in isolation. Green leaves can make a distinct and harmonious background to many flowers, but they need to be sufficiently blurred so as not to detract from the flower itself.
1. The color of the negative space should complement the primary subject. If the subject is light in color, the negative space should be dark and the reverse if the subject matter is dark. A single color is safer for negative space than an assortment of tones that can become too distracting. The exception is soft pastels that blur seamlessly into the background.
2. The negative space’s light should be equally intense with the positive space or high in contrast.
3. Unless the background is crucial, try to bleed it out so that the emphasis is on the main subject (i.e., the positive space).

Using Negative Space
Tonal Contrast
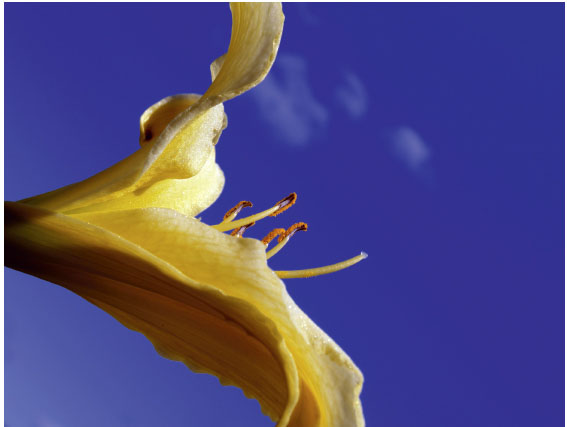
The challenge occurs when similar flowers are massed together, offering no contrast. For example, a white flower will stand out better against dark green foliage or a yellow flower against a blue, cloudless sky. You will have to look for ways to get around this in your composition, such as by using a ground-up shot instead of a head-on shot. If this isn’t possible, use a longer lens (less depth of field) to bleed out the background.
Sharpness
There are several approaches to sharpness:
• Have your subject stand out as the central focal point. This is a poetic way of representing your subject, by having it in stark vividness while the background is softly blurred. This method is especially effective if the background flowers are the same as your subject flower. Use the widest aperture or f/stop on your lens (i.e., choose something like f/2.8, f/4, or f/5.6, which will give you a very high shutter speed).
• Remember that depth of field is very limited when you are up close. Sometimes you have to shoot at f/16 or so in order to get any depth of field.
Horizontal versus Vertical
The majority of photographs taken with SLR cameras are in landscape format. People look at the world in a horizontal, 180-degree angle; therefore, landscape format is simpler and almost automatic. It is also time consuming to adjust your camera vertically, especially on a tripod. Nevertheless, try looking at a subject from both a horizontal and a vertical perspective. To use an example, the images of peonies below illustrate two completely different appearances simply by using a horizontal and vertical format. Choose the angle that gives the image the most impact, both aesthetically and descriptively. Bring a small cutout rectangular piece of cardboard with you on your next photo expedition and look through it from both horizontal and vertical viewpoints. It saves a lot of time and energy deciding.


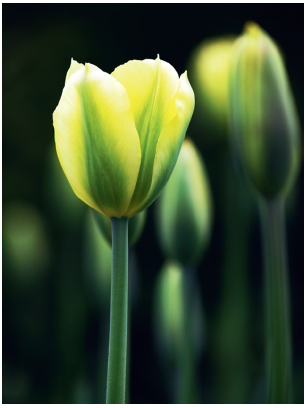
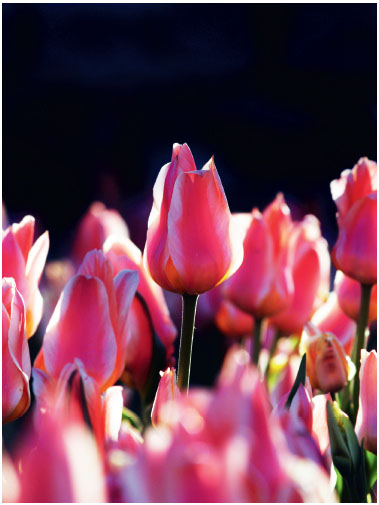
I chose a vertical format for this tulip to heighten the viewer’s awareness of the flower’s long and sinewy features. The landscape format indicates broadness and a state of collectivism, whereas a vertical shot gives the psychological effect of elegance and individualism.

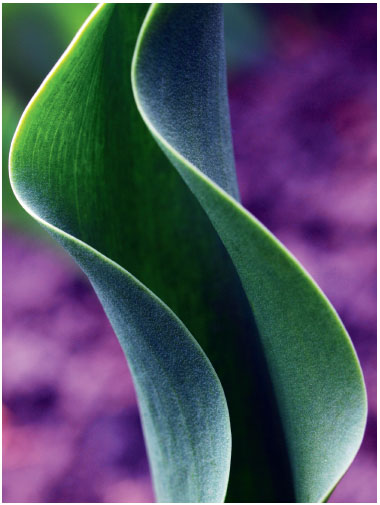
Lines, Shapes, and Patterns
One of the pleasures of taking close-ups is to recognize the elaborate floral patterns. Just as you can use strong lines to direct a viewer’s eye toward a point of interest, you can maintain a constant fluidity within the frame that gives the image a sense of vitality or sensuality. To ensure harmony to your picture, try to find a rhythm and balance through patterns and repetitive lines. Such repetitions attract our instinctive attention and can be a powerful ingredient, turning an everyday object into something quite scintillating.
One way to gravitate a viewer into your image is through the use of leading lines. These are patterns or elements that come from the edge of the frame and then lead into the image toward the main subject. The same principle can be applied to circular patterns. It is a fundamental basis of composition—lines generate a sense of movement and keep the flow of the viewer’s eye fluid. Geometric patterns can look especially dynamic in black and white. By excluding color from the picture, you can reinforce the interplay between tones and repetitive lines. Some of the best and most striking photographs of surface texture are simple black and white close-ups, which are appealing because of their graphic simplicity. Make sure that the light accentuates any pattern.


Lighting
Just walk around the flower and discover how front lighting displays the flower but loses the texture; see how the petals become delicate and transparent with back lighting or as an interesting silhouette. Side lighting reveals more of a three-dimensional feel than front lighting. And diffused lighting allows for the minimum of contrast and glare. To be able to “see” light and to comprehend how it translates into a final image is the most powerful tool at your disposal.
However, contrary to popular belief, a beautiful day doesn’t entitle one to beautiful shots. If anything, a photographer is faced with a difficult quandary: the dichotomy between deep shade and bright glare. Nevertheless, strong daylight also has some distinct advantages. It allows the photographer to use small apertures (i.e., f/8 to f/22) for a greater range of depth of field, to utilize faster shutter speeds (i.e., 1/125 or greater) to capture anything in motion, and to take pictures using lower ISO ratings to maximize image quality.
When confronted with extreme light conditions, it is not possible to expose adequately for both the bright and shadow portions of the composition because there is a difference of three or more f-stops between them. The shadows can be imaginatively utilized as part of the composition, either to create a dark background or to emphasize the structure or texture of the subject. Bright spots, glare, or haze from harsh lighting tend to draw the eye away from the focal point of the photograph. One way to minimize this distraction is to limit the depth of field. By using a wide-open aperture, such as f/1.4, f/2, or f/2.8, the bright areas will seem to fade out, losing their definition. (There is more information about lighting in Chapter 4.)
Color
What makes color so fascinating is that it can manufacture a mood or visual tension. Of course, our perceptions of color are subjective, but there is a universal generalization as to what certain colors represent. Red may be a warm color, but it can also provoke emotions of warning, anger, and rebellion. On the other hand, orange and yellow are also warm colors and emit a feeling of happiness. Blue, green, and purple are cool colors, usually associated with calmness, but they can also suggest a sense of sadness or indifference.
A red flower is the result of the red pigments in the flower absorbing blue and green wavelengths while reflecting red ones. A white flower reflects all colors equally. To punch up vivid colors, make sure the background is dark or green, then underexpose by two thirds to make the foreground pop. Alternatively, set your built-in color saturation dial to a higher number and bracket your shots for the best possible result.
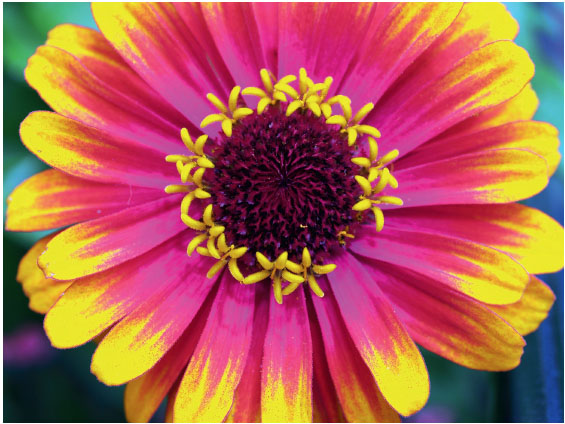
Photographing Multicolored Flowers
Very colorful flowers are better photographed in soft, diffused lighting such as on a hazy or overcast day or in open shade on a sunny day. Direct sunlight can create too many bright highlights or impenetrable shadows. Like with white flowers, you will need to underexpose your shots.
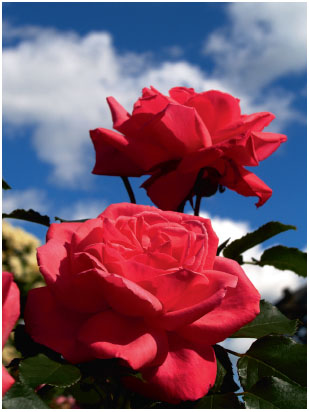
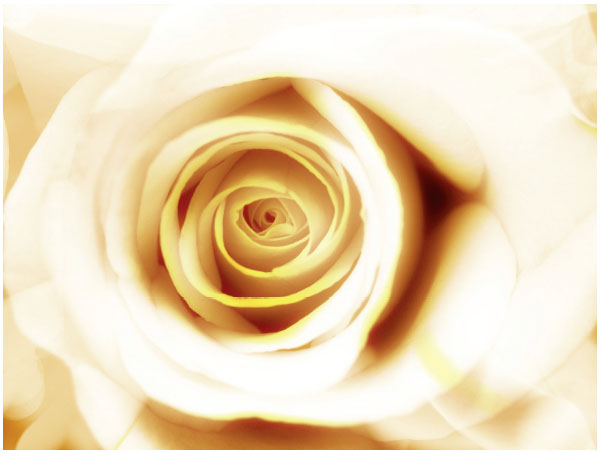
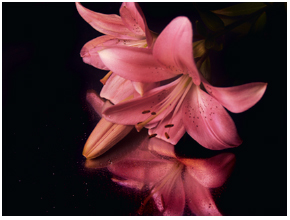
Photographing Roses
When it comes to capturing the essence of roses, keep your shots as simple and as clean as possible. Get as close as possible to highlight the intricacies and delicacies of each petal. Any angle can result in something truly beautiful, even underneath, as seen in the ground-up shot behind the shrub rose (Figure 4) , but don’t allow the background to disrupt the main focus. It is the rose that is important, so use a long lens, a small aperture, or a white board as a background, or stay with a macro lens. Although it is preferable to shoot roses on overcast days in order to obtain as much detail as possible, still use a reflector and always use a tripod.
fig.1.
Shrub Rose taken with a 35mm macro lens and a reflector.
fig.2.
Shrub Rose taken in a studio environment with a macro lens and several lights.
fig.3.
Throughout the centuries, roses are regarded as romantic flowers, so it doesn’t hurt to give them a softness to accentuate the impression of intimacy. I used a soft focus filter when shooting this bouquet.
fig.4.
unless you’re going for an aesthetic shot, try to avoid the standard approach of standing overhead and shooting into the heart of the flower. Try underneath, angled shots or from behind the flower. .
fig.5.
I shot these roses in the studio and lit them from both below and above for a direct mail piece. The circular art direction produces a nice frame for any text.

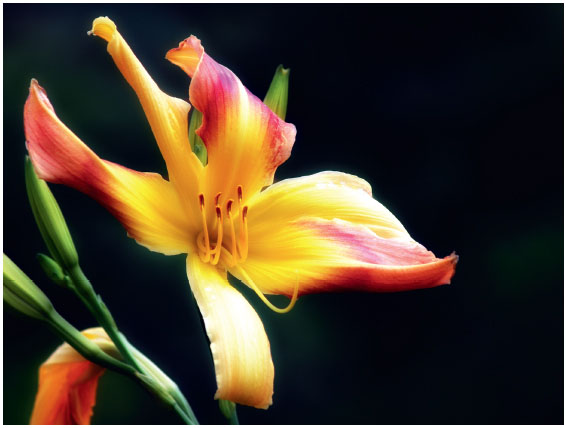
Photographing Red and Yellow Flowers
Red spells passion, power, and sex appeal, but red flowers are also some of the hardest flowers to capture because they absorb light, diffusing detail into a blur. To compensate, compose your shot, then take a meter reading of a gray card placed beside the flower. Be sure that the card fills the whole frame, then meter the light reflected off it. Use a gray card when lighting situations can perplex the camera’s light meter. If you get a similar reading with the card as without, you don’t need the gray card. Nevertheless, for reassurance, you should generally use the gray card recommendation.
Photographing Blue and Green Flowers
Blue is the color of celestial calmness. The problem with acquiring the true blue in blue flowers is their penchant to reflect red and infrared wavelengths that humans don’t see but the camera records. To offset this anomaly, wait for a cloud to cover the sun when photographing blue flowers or use a diffuser to produce a colder light. Also, photograph the flowers shortly after they have opened, as the shift to the pink or mauve part of the spectrum intensifies with the age of the flower.
Photographing White Flowers
The color white represents purity; however, white and cream flowers are among the most difficult to photograph because they are irrefutably more sensitive to light. Getting the correct exposure using a reflected in-camera reading can be tricky. In most cases, it is recommended to underexpose what you read in your meter. Bracket your shots accordingly. White flowers are also great for black-and-white photographs. The original objective, photographing the flower’s color, is usurped by the flower’s more distinct features: shape, form, and shadows.

Photographing Flowers in Black and White
Photographing flowers in black and white may seem counterproductive, but it is actually very rewarding. A good black-and- white image stands the test of time. It appears “timeless.” Black and white focuses the attention on form, shading, pattern, and simplicity. Many photographers prefer using black and white because it enforces the viewer to see the world in a way that cannot be seen by the naked eye. There is a psychological element that plays on people’s perception. Be aware that red flowers can reproduce as gray and dissolve into a green background. If you want a red flower to stand out, use a red filter. Use a green filter for a dark flower against a light background.
Lighting is a necessity for a good black-and-white photograph because it affects all of the previously discussed elements: shape, contrast, pattern, and texture. Be alert to avoid glare; it is so common to find splotches of white on petals from the sun’s harsh rays. Side lighting often produces the most dramatic black and white photos. It picks out the edges of shapes and increases contrast by adding highlights, and the shadows it creates add interest to the scene as well as enhancing textures and patterns.

Black and white is not only effective for flowers; it’s a powerful medium for still life too. Virtually anything can look dramatic in black and white from rusty nuts and bolts to cutlery and kitchenware. Strong lighting is paramount in defining shapes and emphasizing texture.
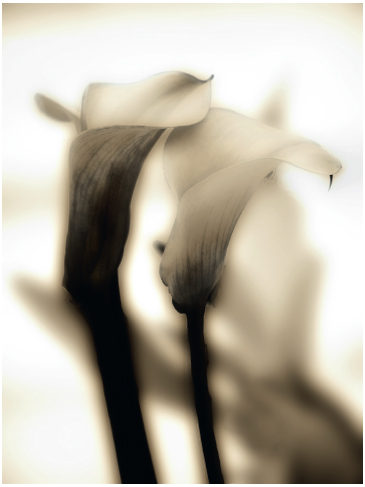
Sepia
The wonderful aspect of using sepia is how it conveys an aged but intimate appearance to your print. The result isn’t as harsh as stark black and white. Many digital cameras produce “sepiatoning,” or you can adjust the coloring in post-production. Change your grayscale image to the CMYK color mode (if you want your image professionally printed, otherwise, convert to RGB). Once in RGB, desaturate the image. Use the Levels command to make the image lighter and grayer, and then remove the blacks and whites. Add color by manipulating the Color Balance or use the Variations command to add red, yellow, or blue to produce the brown or tinted effect.
Leaves
One thing about leaves is their abundance. You can virtually walk anywhere and you will find a leaf. Never underestimate the attractiveness of the simple leaf. There are a variety of reasons for photographing leaves:
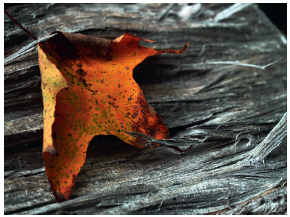
• They offer a variety of colors, particularly during autumn.
• Capture their translucence in the sun with back-lit photography.
• Use your macro lens to focus on their veins, highways of irresistible patterns. A dying, dried leaf can develop intricate and convoluted shapes. Good for close-ups as a studio shot.
• Leaves also make great black and white images.


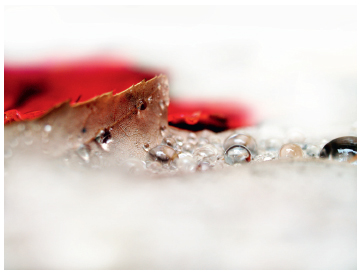
Weather
There really isn’t a bad time to photograph flowers. In winter, capture a dead leaf imprisoned by ice or frost. Often after a rainstorm the aftermath becomes one of celestial light. Or seize a raindrop clinging precariously to a leaf, petal, or pine needle. In fact, it is often recommended to photograph flowers during bright, overcast days. The thin film of cloud acts as a diffuser and softens the sunlight coming through it, allowing better detail to be captured. It also reduces shadows. This light is particularly beneficial for white or light- colored flowers because their delicate hues won’t be burned out.

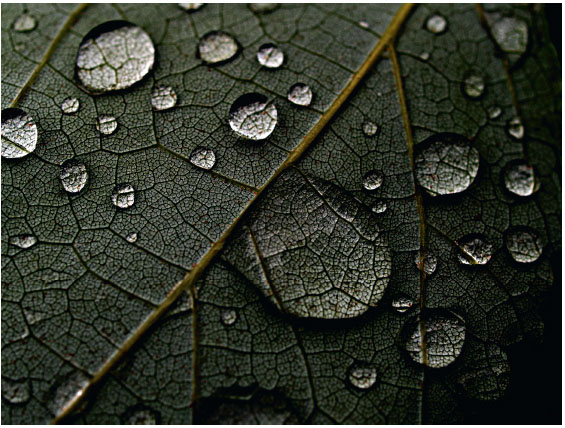
Rain
Do not despair if it rains; it is fortuitous. There is a wonderful crispness in the air after a rainstorm, and it is the perfect time to capture raindrops perched precariously on twigs, branches, flowers, and spider webs. Raindrops or dewdrops offer interesting reflections while the dramatic skies make for excellent backgrounds. Use fill-in flash to add vibrancy to the foreground, and bring a plastic bag for your camera’s protection A foggy day is even better, as it cloaks the background in a soft mist.


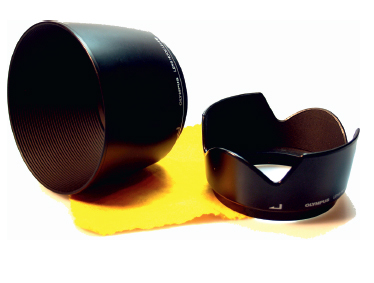
Lens Hood
More often than not, you will probably be photographing on a sunny day. Now this sounds absurdly obvious, but an essential accessory is the lens hood to avoid flare from intense light falling directly onto your camera’s lens. If you don’t have a lens hood, use the protection of your hand, a board, or a reflector to shield the sun from your lens. A lens hood also protects the lens of your camera from bumps and scrapes.
PHOTOGRAPHING INTO THE SUN
Make sure it is a close-up of the flower, otherwise:
• Photograph from under shade.
• Use a lens hood, filter, or an object to shield from the glare.
• Use fill-in flash.
• Use a reflector.
• Change your perspective.
• Play with the white balance.
• Shoot silhouettes.
Other things to consider bringing on a shoot are the following:
• A hat (maybe a pair of waterproof boots).
• Wear old clothes, like jeans, that can get dirty.
• A pad and pencil (for writing down the names of flowers for accuracy.)
• Extra batteries and memory disks.
• A towel to kneel on.
• And always check the night before that your battery isn’t low or dead.

Filters
Filters are useful for intensifying, softening, or avoiding further perils presented by the weather. There is every conceivable filter designed to project the desired effect from rainbows to artificial motion, but the most practical filter is the polarizing filter, which helps prevent flare. A polarizing filter can dramatize landscapes, garden vistas, and compositions with sky, water, or reflective greenery. The effect is to deepen and brighten colors that may be washed out by reflective highlights. Be aware, whenever using a filter, that light intensity is generally reduced by about 1/2 f-stops, so it is best to bracket your shots. A neutral density filter is ideal for outdoors to neutralize bright days with a lot of glare. The filter reduces or modifies the intensity of all colors of light equally without rendering or alternating the original hues. Here are some samples of filters I used to photograph a day lily in my studio.

The original, drab shot
2+3 sepia filter

warming filter 85A

Grad. flow M2 filter

Polar blue-yellow A173 filter
Aesthetics
Of course, sharpness is not a virtue when aesthetics is your aim. Some of the most beautiful images have limited sharpness and focus or are deliberately subdued for the effect of intimacy, delicacy, and an ethereal nuance. Photographer Sarah Moon was famous for her hushed, pastel-induced fashion photography that was, during the 1970s, a radical departure from the norm because it introduced something that was romantically nostalgic. Some floral photographers of note are Robert Maplethorpe for his seductive black-and-white floral shots, Jonathan Singer, Magda Indigo, Freeman Patterson, Dawn LeBlanc, and Brian Auer.
Photography should be about experimentation, so test your ability with filters and gels, use cheesecloth or Indian cotton, and set your subject against the afternoon sun. Try double-exposure, shaking the camera, panning, long time exposures, and, of course, Photoshop or any edition of software you like.