Chapter 4: Lighting
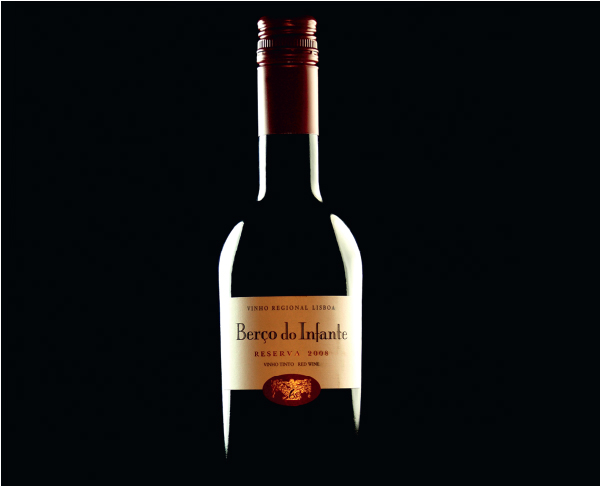
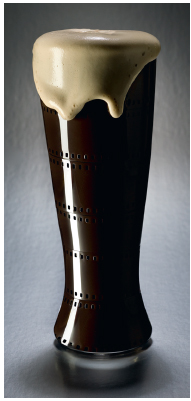
Although lighting is everything, it is the intensity of the light that is the determining factor. Light can enhance a subject from an ordinary shot to something quite extraordinary. The same subject can display a completely different aura in different lighting situations. Take the wine bottle shown in this chapter-opening photograph. Direct light would make this bottle bland and featureless, side lighting is mysterious, because half the bottle dissolves into darkness, backlighting just leaves a silhouette, but if you can arrange the lighting (more than one light), you can get the “classic” look of elegance articulating the sophistication of the brand without having to reveal too much.
Outdoor Lighting
However, contrary to popular belief and as noted earlier, a beautiful day doesn’t entitle one to beautiful shots. If anything, a photographer is faced with a difficult quandary: the dichotomy between deep shade and bright glare. Nevertheless, strong daylight also has some distinct advantages. It allows the photographer to use small apertures (i.e., f/8 to f/22) for a greater range of depth of field, to utilize faster shutter speeds (i.e., 1/125 or greater) to capture anything in motion, and to take pictures using lower ISO ratings to maximize image quality.
When confronted with extreme light conditions, it is not possible to expose adequately for both the bright and shadow portions of the composition because there is a difference of three or more f-stops between them. The shadows can be imaginatively utilized as part of the composition, either to create a dark background or to emphasize the structure or texture of the subject. Bright spots within the shadow area, or beyond it, tend to draw the eye away from the focal point of the photograph. One way to minimize this distraction is to limit the depth of field. By using a wide-open aperture, such as f/1.4, f/2, or f/2.8, the bright areas will seem to fade out, losing their definition.
Front Lighting
Be forewarned, front lighting is like light on steroids. It can cast blinding light from overhead and can overwhelm your subjects with high-contrasting light: deep shadows and glaring white highlights. This is not the lighting for portraits, and it can make floral photography difficult because it has a tendency to produce bland, unattractive, documentary-style lighting that comes across more like a mug shot than a portrait or it can pit the subject with white burnouts. It is also notorious for lighting up both the foreground and the background. On the other hand, direct lighting (usually during the midday sun), seizes color saturation, presenting colors in their bright and vibrant splendor, although texture may be sacrificed.
Here are the ways to combat direct or front lighting:
1. Reduce the high contrast with diffusers and reflectors (however, this will only lower your shadow contrast).
2. To concentrate the light on the foreground rather than the background, limit the depth of field by using a wide open aperture, such as f/2.8 to f/5.6, to fade out the background.
3. Underexpose the foreground to darken the background while retaining the foreground’s texture. This can be accomplished by changing your exposure, increasing your ISO, or adjusting your bracket shots using EV settings.
4. Use a gray card. When you need accurate exposure, place the gray card beside the subject matter (unless it is an insect) and take a reading using the camera’s meter in Manual mode. If the camera doesn’t offer this option, use the AE lock, note the exposure, and set it to Manual mode.
5. Expose the image by checking your camera’s histogram on the LCD monitor.
6. Shoot using the RAW file format, and adjust the exposure in postproduction.
7. Use a polarizing filter.
8. Because the light is behind you, make sure not to get your shadow in the frame.

Back Lighting
A flower may look uninteresting with the sunlight directly above it, but it can suddenly be engrossing once the light is behind it. To exemplify an ethereal effect by capturing the celestial translucence, position yourself in front of the flower with the sun behind it. This is a great opportunity to capture light filtering through the diaphanous skin of petals; highlight pines, dewdrops, or the iridescent glow of hairs; or emphasize the veins of a leaf. Ultimately, this effect works best on delicate flowers like poppies, buttercups, and tulips. Keep the background darker than your subject and take the meter reading from the shaded side of your subject for a more precise exposure, otherwise it will end up being a silhouette (unless that is your intention).
Be careful of light streaming into your lens, as this will cause flare. Make sure you use a lens hood or position yourself under shade and use a telephoto lens when shooting into the light. Backlight is the most difficult to measure because you are reading into direct light. Because this is the case, use a spot meter or move as close as possible to the subject. Having done that, overexpose your meter reading by 11/2 f-stops to get proper exposure, which will give you an exact reading of the sky. When framing a backlit subject, make sure you eliminate the source of the light (e.g., sun), so move around the subject until only the effect of the light on the subject is seen.

Silhouettes
For an image that lacks particular detail, silhouettes are an alluring way to convey drama, mystery, and emotion. The background sets the scene while the silhouette emits the mood. Though generally not utilized for close-up photography, there are opportunities to explore.
You can literally take a silhouette shot at any time of the day, under any circumstances (including harsh sunlight or artificial lighting), providing the background is lighter than your subject in the foreground. Many photography experts will recommend that you shoot either at dawn or at dusk for the most dramatic results, such as capturing the crimson hues of a sinking sun in the background, but I personally like shooting into the sun around noon—I can hear the experts gag. This hour is usually when the sun is at its harshest and usually inappropriate for shooting most scenes or objects, but it’s fine for taking shots of silhouettes—the contrast is more apparent.
When estimating your exposure, take a reading from the background rather than the foreground. If you take a reading of the foreground, you’ll end up with an accurate exposure of the subject and an overexposed background that contravenes the whole purpose. When focusing on the background, just press the shutter halfway down and don’t let go, then move your camera back to your subject to finish the shot. Mind you, a maximum depth of field is required, otherwise your foreground won’t be in sharp focus.
To avoid detail in your foreground subject, here are a couple of strategies. First, take the exposure reading of the background and adjust before focusing on the foreground. Second, use Aperture mode to maximize your depth of field (i.e., f/22); consequently, you should have a sharper foreground and background. This also means that you may need to use a smaller lens, such as a 50mm down to a wide-angle lens. Third, it is also advisable to bracket your shots to get a variety of rich exposures.

When searching for scenes, choose something that is clearly recognizable and is interesting enough to hold your viewer’s attention. This is where you can take an everyday scene and make it intriguing. Silhouettes do not have the advantage of color, textures, or tones, so it is imperative when focusing that the shape is distinct. Normally a silhouette with a striking colored background (sunset, fireplace, etc.) is going to have a very strong contrast; however, the same can be true about black-and-white images as long as the background remains seamless and lighter than the focused subject.
Frame your subject so that the sun (or the harshest part of the background light) is positioned completely behind the focused object. If this isn’t correct, you will end up with glare and a disappointing result. Most silhouette shots using the sun as the backlight are taken from a ground-up perspective. Don’t be too shy to get down on your knees or even your stomach for the right shot. Framing creates an important aspect in the composition of your photo and helps to escort your viewer’s eye to interpret your intention.
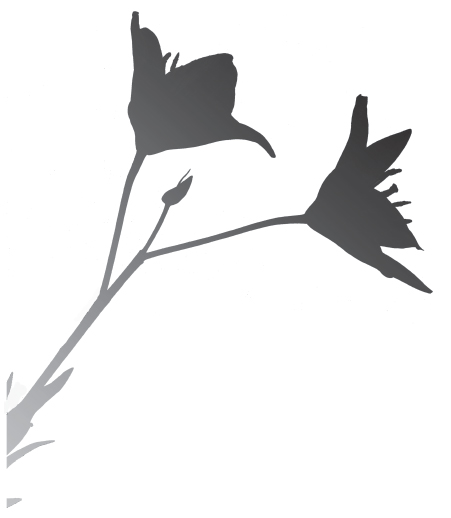
Another experiment to try is to tape white bond paper or thick tracing paper on a window. Position a flower (something delicate) in front of the paper by a few inches, or if the flower is light enough, tape it to the paper. After I photographed the silhouette of the flowers, I manipulated the original black to a gradient for more appeal as seen in the figure opposite.
Note that when composing your shot, do not overlap silhouette objects in a way that will make them merge together and confuse the viewer. Remember, they are solid black shapes and need to be defined precisely and separately.
Side Lighting
To emphasize your subject’s shape and textural detail, move so that the light hits it from a side angle. You will get more interesting, though uneven, results. Unlike backlighting or direct lighting, the light is reflected from the subject before it reaches the lens. The difficulty comes in the metering that results from the high contrast between light and shade, as you will be dealing with positive and negative (dark background) space.
This is where you need to complement the two together. If the lighting is too extreme, use a reflector on the shaded areas or meter the bright area but drop your aperture down an f-stop or two. Also, experiment with bracketing until you’re satisfied with the result. Otherwise, meter the bright highlights, then underexpose sufficiently to saturate the colors. How much you underexpose will depend on the intensity of the light and the contrast of color between the object that you are photographing and the background. The brighter the sidelight and the greater the degree of color saturation desired, the more underexposure you will need.
In this particular shot, I wanted to capture the mood of the c old war. A conspiratorial age ensconced in the politburo and a weary doctrinarian.

What is so effective about side lighting is that it can be wonderfully evocative.

This image set the mood for a diner s menu. The client wanted something more welcoming with a hint of anticipation. I tried various lighting angles, but the side lighting gave the most interesting appeal.

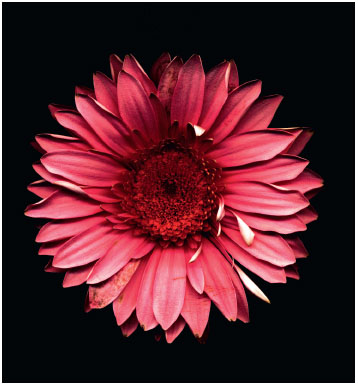
I shot this lily on a black reflective sheet. The subtle reflection resonates a distinct elegance.
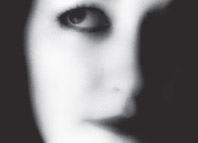
This is one of my favorite shots because it is, in my opinion, so sensual. The combination of soft side lighting and a gentle expression enveloped in black and white at 3200 ISO created a timeless moment.
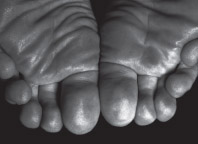
Side-lighting was ideal for this shot because it is capable of emphasizing shadows, enhancing the ripples of skin and toe prints. Had the lighting been directly overhead, it would have bleached out too many details.
Diffused Lighting
Although diffused light lacks the intensity and drama of strong daylight, it offers a softness and uniformity that is especially effective for the subtler aspects of photography, in particular for flower photography. Diffused light has the advantage of minimizing or eliminating shadows and glare. In close-up work, backgrounds blur out easily and pastels retain their integrity. Because the light is so even, pure colors are easily saturated without the need to underexpose them. Note that when you have a pale, emaciated sky, it is advisable to shoot your subjects at close range or directly, avoiding an anemic-looking sky. Also, this lighting condition isn’t the most ideal for close-up photography because it requires ample lighting. You will probably require lower shutter speeds and a higher ISO setting.
Despite a decrease in light intensity, a cloudy sky is still much brighter than the land below. Proper exposure for the land portion generally causes the sky to go white, leaving an empty, unattractively overexposed space, so if you do shoot from the ground up, try to eliminate most of the sky in your picture.

I took this shot of tulip stems after a rainstorm for its unusual perspective. Normally, I would have taken a close-up of the raindrops clinging precariously to the petals but I thought differently this time. The sun was trying to break through the clouds and the sky was about as appealing as a dirty wet towel. I believe the ground-up angle was effective because I managed to achieve an intriguing shot while avoiding any distractions, such as the weak sky.

Studio Lighting
Indoor lighting could amount to anything from a couple of tungsten lamps to an expensive studio setup with strobe lighting and overhead soft boxes, but for tabletop photography, all you need is a table (I use a Meda-light, which is a white plastic tabletop with a curved back), a backdrop (this could be a backdrop roll bought at a camera store to wallpaper or cloth), and available light. The advantages of tabletop close-ups make them hassle-free: there is no wind to contend with, you can shoot anytime of the day, and you can set your lighting to any angle you want. And with a little imagination, it is perfect for experimenting.
But say you are shooting with natural light from a window. There are two types of window light to be concerned about: direct and reflected. Direct sunlight presents the same dilemma as being outdoors in that it can compound the situation with glaring light spots, so it is best to diffuse the light coming through the window by using sheer, cheesecloth, tissue, muslin, or a sheet of plastic to cover the window. Reflected sunlight, which is indirect sunlight, usually provides soft window lighting. With such light, it may be important to use a reflector for fill-in light or shadow control. Do not use the flash embedded in your camera. It is too direct and harsh. Instead, use bounce flash or simply redirect your individual light sources. A tabletop setup can vary from natural light from a window and a reflector to three-or four-light setups. It is often best to shoot small objects with small light sources. Why? If your light source is too large or too close to the subject, the consequences are generally flat and bland. The angle of the camera is also crucial. If you are shooting for catalog work, have your camera plane either to the subject or at a 45-degree angle. For more creative work, almost anything goes including a wide-angle lens.
Incandescent Lighting or Continuous Lighting
Tungsten bulbs usually have a lower color temperature and produce a warmer (i.e., orange) glow than the bulbs made for photography. To adjust, set the correct white balance to Tungsten. In addition, shoot in RAW so that you can adjust the white balance in postprocessing. Incandescent lighting is also termed continuous lighting because it doesn’t work as a quick, burst of flash. It is an inexpensive way to set up your studio lighting for macro photography. The advantage of tungsten lighting is that you can manipulate the light’s direction, power, color, and proximity. To reduce the intensity of light, use a diffuser soft cover over your tungsten lamp heads. There are three main categories of continuous lighting: tungsten, halogen, and fluorescent.
Tungsten
This type of continuous lighting tends to be the least expensive. It uses tungsten bulbs (like the ones in your home but usually larger). They are usually inexpensive to replace but have a short life— normally around 15 to 18 hours.
Halogen
This type tends to be more expensive than tungsten but has a longer bulb life—around 200 hours.
Fluorescent
This is the newest type of continuous lighting, and it has the advantages of cooler operating temperature and long bulb life—around 8,000 hours.
WARNING
Continuous lighting can get very hot. To avoid a fire, be careful to let your lights cool down after a shoot prior to putting them away.
Strobe Lighting
Strobe lighting is a flash type lighting that is similar to the flash on your camera. All strobe lights have a flash tube that fires only when the camera transmits a signal for it to fire. The speed and intensity is calibrated in watt-seconds, which is a watt times 1 second (varying from 1/50,000 of a second to 1/1,000 of a second). If you are a beginner with strobe lights, try Novatrons
whereby you can control the light ratios at the heads, not at the pack. The difference between continuous lighting and strobe lighting is that strobe lighting is far more crisp, intense, and clean.
Monolight Strobe
This lighting is self-contained. Each strobe head has its own power pack. This type of strobe is the most common, as they are easy to transport and tend to be less expensive than the other types.
Power Pack Strobes
These lights have all the strobe heads wired to a central power pack. All the parts are interchangeable, enabling you to alter the power from a 240-watt seconds kit to a 500 by just changing the power pack.
Advantages of Strobe Lighting
• Long life (most strobe tubes last for more than a half million flashes).
• Strobes do not generate heat (they fire only when the camera tells them to).
• True color temperature (most strobes have a 5100K color temperature, which is daylight quality).
Disadvantages of Strobe Lighting
• Harder to learn to use (when using strobes, you must shoot on the manual setting and the aperture and shutter speed must be set correctly).
• A strobe must be triggered by the camera (all strobes need to have the camera tell them when to fire; many of the newer digital cameras do not have a port to plug into, but this can be overcome by using a PC adaptor that fits on the camera’s hot shoe; the other method is to use a wireless transmitter).
Advantages of Continuous Lighting
• Easier to use than strobe lights (you just turn them on, position them where needed, and shoot on the auto setting).
• No connection to a camera is required.
Disadvantages of Continuous Lighting
• Generates heat (especially tungsten and halogen tend to get quite hot; fluorescent is cooler).
• Require white balance (you will need to do a white balance on your camera to correct the color).
• Bulbs need to be replaced more often.Focus On Close-Up and Macro Photography
Fluorescent light will appear very green in color to the digital sensor. To compensate for a neutral tone, set the white balance to fluorescent and the camera uses a magenta filter. In difficult circumstances, set the white balance to Auto, shoot in RAW, and compensate the balance in your computer. When mixing strobe with incandescent lighting, use a colored filter over the strobe, such as plus green, to correct the light emitted by the fluorescent tubes. The shot above was a concept I had for the Dublin Film Festival.