
Chapter 17
Picking Apart Trace Evidence
IN THIS CHAPTER
![]() Establishing the value of trace evidence
Establishing the value of trace evidence
![]() Checking out some useful microscopic and analytical instruments
Checking out some useful microscopic and analytical instruments
![]() Understanding how trace evidence works
Understanding how trace evidence works
Criminals are clever. At least, they think they are. They know to wear masks and use the dark of night to avoid being identified by any witnesses. They’ve seen in movies the importance of wearing gloves or wiping away fingerprints. They know not to leave behind their own blood because DNA can hang you. Yet they continue to be tracked down, arrested, and convicted as the direct result of tiny bits of evidence — evidence perpetrators don’t see or realize they’re leaving behind or carrying away from the crime scene on shoes and clothing. As the saying goes, “The devil’s in the details.” So is the evidence.
Defining Trace Evidence
 From the hair that falls off your head to the carpet fibers that you track in on the soles of your shoes, trace evidence is any very small physical material that can be transferred from person to person or between a person and a crime scene. Hair, fibers, pieces of glass, chips of paint, and dirt or plant materials are examples of trace evidence found at crime scenes or on suspects.
Trace evidence creates links between suspects, places, and objects. In fact, trace evidence often is the only evidence that connects the suspect to the crime scene. So investigators must carefully document, photograph (if indicated), collect, and protect this evidence from contamination before it’s presented to the crime lab for detailed analysis.
Trace evidence is predominantly class evidence, rather than individualizing evidence (see Chapter 3): It can exclude a suspect but rarely can it absolutely implicate a suspect. For example, if a blond hair is found at a crime scene and the suspect has black hair, the suspect is exonerated, and police must develop another theory. But, if the suspect’s hair matches that found at the crime scene, that person remains a suspect.
An extremely important characteristic of most trace evidence is its transferability. It grabs and clings to clothing, hides in shoe seams, nestles into hair, settles into nooks and crannies, and typically survives for months or years.
 In the early 1900s, Edmund Locard of Lyon, France, showed that he could use traces of dust to determine whether a particular individual had been in a certain place. He recognized that everyone constantly picks up and leaves behind tiny pieces of the environment, and that recognition evolved into the Locard Exchange Principle, which is the cornerstone of forensic investigation. Find out more about Locard’s principle in Chapter 1.
Locard’s principle is the main underlying reason each crime scene is secured and access to it controlled. Everyone who enters the scene takes away and adds trace materials, and this contamination can render any evidence that investigators find useless at trial. Obviously, if the first officers on the scene don’t yet know that a crime has occurred, or if they must disarm and apprehend a suspect or assist a victim, some contamination is bound to occur. The same is true for medical and rescue personnel who must help the injured. These situations make the criminalist’s job much more difficult.
Understanding Analytical Instruments
The analysis of trace evidence requires a thorough investigation of its physical and chemical properties. Because most trace evidence is very small, investigators can’t adequately examine it with the naked eye. Nor can they easily determine its chemical properties. Fortunately, the modern crime lab has a wide array of magnification and analytical systems.
Peering through the microscope
Most types of trace evidence initially are inspected with the naked eye under good lighting. Indirect or angled light brings out details by creating depth and shadows in everything from soil and plants to paint and glass. Ultraviolet and laser lights can expose certain fibers, hair, chemicals, and other substances, but minute details of such evidence must be viewed under magnification.
 In addition to the old standard — the compound binocular microscope (the kind you probably used in your high school science classes) — trace evidence examiners use many types of microscopic equipment and techniques to search for and analyze trace evidence:
- Comparison microscope: This instrument provides a side-by-side comparison of two pieces of physical evidence. I discuss it in detail in Chapter 7.
-
Microspectrophotometry: Everyone sees light and color a little differently. One person’s red may be another’s orange. With microspectrophotometry, the exact color of an object or material and its light transmission, absorption, and reflection characteristics are accurately measured. It works with either standard white light or with infrared (IR) light and is extremely useful for examining paint chips, colored fibers, and dyed or treated hair.
When comparing two paint chips or fiber strands, an exact color match is an important first step in determining whether they share a common origin. If the colors differ, the two did not come from the same source. Microspectrophotometry allows the examiner to make this determination with extreme accuracy.
- Polarized light microscope: Polarized light causes less scatter of the reflected light, making an object appear sharper and its colors clearer. Viewing materials under polarized light can bring out details that you couldn’t see under standard light. Examiners use this microscope to examine hair, fibers, and other solid materials.
-
Scanning electron microscope (SEM): This instrument can attain magnifications up to 100,000 times the original, but rarely do examiners need magnifications above 20,000 to 25,000 times in forensics work. A standard microscope uses light for viewing an object, but an SEM uses an electron beam. This beam sweeps across the object and is viewed through electromagnetic lenses that greatly magnify the image and provide incredible clarity.
Often, examiners couple an SEM with an energy dispersive X-ray spectrometer (EDS), a device that analyzes the light and color characteristics of very small objects. The resulting SEM/EDS is capable of defining structures less than one micron (one millionth of a meter) in size and accurately defining light characteristics of the material.
This technique is useful in gunshot residue analysis because it can identify the mineral elements, creating a fingerprint of the residue.
-
Stereomicroscope: Stereovision is a result of your eyes being in different spots — you see things from two slightly different angles, and that gives your vision depth. If you look at an object and quickly close and open your eyes, one at a time, you get a good demonstration of this effect. A stereomicroscope works on the same principle. It’s a binocular scope (an eyepiece and viewing tube for each eye) in which the point of view of each eyepiece differs by an angle of 10 to 15 degrees, giving a three-dimensional appearance to the object you’re examining.
The layers of a paint chip, the texture of a fabric, the surface markings of glass, or the curliness of a hair are best seen in stereovision. For example, the examiner may use a stereomicroscope to analyze the weave, texture, fiber size, and other physical characteristics of two pieces of cloth to determine whether they match.
Testing the chemical makeup of trace materials
When they really need to get down to the nitty-gritty, examiners use more than microscopes. With the following techniques, which are the most common ones, examiners can determine the chemical properties of trace evidence, which helps to determine if the tested samples are identical and thus share a common origin:
- Infrared spectrophotometry: This technique involves exposing samples of trace evidence to infrared light. Various substances absorb infrared light at different wavelengths, and these differences distinguish one substance from another.
-
Neutron activation analysis: This procedure is cumbersome and requires a nuclear reactor. Neutrons fired at the sample collide with its components, causing each component to release radiation at its own unique energy level. Measuring the levels of those radiation emissions reveals the chemical makeup of the sample. This process is useful in the analysis of paint, soil, hair, metals, and many other substances.
As you can imagine, a nuclear reactor is bulky and expensive. Few labs have them, so this kind of testing usually is conducted by larger regional labs.
- X-ray diffraction: In this test, objects or materials are bombarded with an X-ray beam. The way that beam scatters reveals how atoms and molecules in the substance are arranged and thus results in a chemical fingerprint of the substance that is useful with materials like paint and soil.
Splitting Hairs: Linking Crime to Coiffure
Investigators frequently find hairs, both human and animal, at crime scenes. The ME must determine whether the hair came from the family dog, the victim, or perhaps the perpetrator.
Although the shaft of the hair alone can’t be matched to an individual, it has several properties that make it useful to criminalists. It’s small, easily shed, clings to clothing and other materials, and goes unnoticed by perpetrators at crime scenes. Hair is hardy and survives for a long period of time, even years after bodies decompose. Examiners can find many toxins, particularly heavy metals like arsenic, in hair (see Chapter 16). Also, if the follicle is attached to the hair, examiners can often extract DNA and use it to make an exact match (see Chapter 15).
The bulk of hair analysis deals with its structure and chemical characteristics. The value of hair as evidence depends upon how confidently an examiner can match two or more hairs. But hair varies not only from person to person but also from one area of an individual’s body to another — the hair on your head is different from the hair on your arms or other parts of your body. Investigators most often examine head or pubic hair as evidence.
Hair analysis is one of the areas of forensic science that has come under fire lately. Lack of standardization of methods and the qualifications of the examiners have led many labs to cease doing these examinations. Yet, if the hair is unique enough and if the examination is properly performed, it can still offer useful evidence. That is, if the judge will allow such testimony to enter the courtroom, and that is becoming increasingly problematic.
Dissecting hair’s anatomy
 Hair grows out of the skin from a pocket of specialized cells called a follicle. The shaft of the hair is made up of three parts (see Figure 17-1), each of which an examiner can use to match hairs. The structure of hair is similar to the yellow pencil you used in school. The lead would be the medulla, the wood the cortex, and the yellow paint the cuticle.
- Cortex: In human hair, the cortex is the largest portion of the shaft and is the component that contains hair pigment, which gives hair its color. Pigment particles show highly variable colors, shapes, and distribution patterns, all of which help examiners determine race, match known and unknown hair, and identify sources of hair. Under microscopic examination, investigators use the pattern of air pockets and structures within the cortex to seek a match.
- Cuticle: The cuticle is a layer of cells that cover the surface of the shaft and look like scales on a fish or perhaps even roofing tiles. Examiners use scale patterns to determine whether the hair is human or not and to match one hair to another. Scales overlap and always point up the shaft, away from the bulb. These scales are of the following three basic types and vary by species:
- Coronal (crownlike) scales give the hair a mosaic surface appearance. Human hair rarely has these scales, but they’re common among rodents.
- Spinous (petallike) scales tend to be somewhat triangular in shape. These scales aren’t found in humans but are typical of cats.
- Imbricate (flattened) scales are found in humans and many other animals.
- Medulla: The central core of the hair, the medulla contains a collection of cells but appears as if it’s an empty or mud-filled central canal. The width of the medulla relative to the overall width of the hair is called the medullary index. In most animals, this index is greater than 0.5, which means that the medulla is more than half the thickness of the hair. In humans, however, the medulla typically is narrow, with an index of approximately 0.3. Whether the material within the medulla appears solid and continuous, interrupted, or fragmented helps criminalists determine the hair’s species of origin. Databases of hair types from various animals help them make the match.
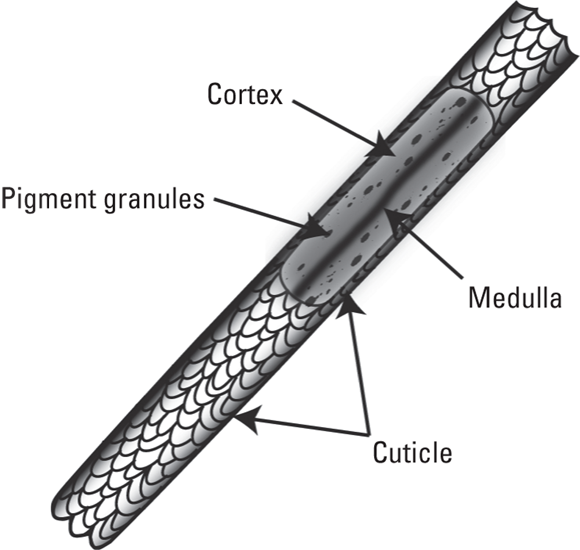
Illustration by Nan Owen
FIGURE 17-1: Hair shaft structure.
Matching criminal to curly lock
To compare hairs, an examiner must have an unknown (crime scene) hair and known hair samples from the victim and any suspects. Known hair samples are taken from various areas of the victim’s and suspect’s bodies. A typical sample includes 50 hairs removed from various parts of the head and several pubic hairs. The ME also combs the pubic region for foreign hairs and other trace materials.
To make sure that he’s comparing apples with apples, the examiner tries to determine where on the body the unknown hair came from — whether it’s a head hair, a pubic hair, or a hair from some other location. This determination is essential because the examiner wants to match crime-scene hair with hair taken from the same location on the suspect. In general, hairs taken from different areas of the body have different cross-sectional geometries. Head, eyebrow, and eyelash hairs are more likely to be round, axillary (armpit) hairs are oval, and beard hairs are triangular.
Examiners use a comparison microscope (see Chapter 7) to view known and unknown hairs side by side and work through the following checklist of comparisons:
- Color and width
- Distribution pattern of the medulla
- Color and distribution pattern of pigment in the cortex
- Cuticle pattern
 A study performed by the Royal Canadian Mounted Police shows that if a crime-scene head hair matches a suspect’s head hair in all the respects mentioned in the previous list, the probability that the crime-scene hair came from someone other than the suspect is 4,500 to 1. With pubic hairs, the probability falls to about 800 to 1.
Finding further clues
Microscopic examination of the hair may reveal tissue adhering to its root. Because yanking hair from the scalp often rips out follicular tissues, finding tissue suggests that the hair was forcibly removed instead of falling out naturally. A cut edge, of course, indicates that a sharp instrument was employed to cut the hair. In such situations, the examiner can often determine what type of instrument was used.
Determining race
Neither age nor sex can be determined by analyzing hair; however, the general nature of the hair (color, thickness, curliness) sometimes separates the source along broad racial lines. Caucasians, for example, tend to have straight or wavy hair with a round or oval cross-sectional shape and a finer and more evenly distributed cortical pigment pattern. People of African ancestry have curly hair that’s flat or oval when viewed in cross-section. In addition, the cortical pigment is denser and unevenly distributed. Unfortunately, these characteristics aren’t completely reliable, mostly due to racial admixture and individual variations.
Making it individual
You can also find many of the chemicals within your body in your hair. Techniques such as neutron activation analysis (NAA) — see the earlier section “Testing the chemical makeup of trace materials” — can detect more than a dozen different chemicals. Because two people rarely have the exact same chemicals in their hair, comparing the types and amounts of these substances may enable a forensic examiner to determine whether two hairs likely came from the same person.
In certain circumstances, hair can supply DNA, which is highly individualizing. Hair is composed of dead cellular debris that has no nuclei, so you can’t find any nuclear DNA within the hair’s shaft. The bulb, or so-called root, where hair manufacture and growth take place, is composed of live cells, so examiners can often find DNA there. If hair is pulled from the victim or the assailant, root or follicular tissue, which contains DNA, may be attached. With the newer techniques of PCR amplification and STR analysis (see Chapter 15), a single hair follicle can yield enough DNA for comparison.
This not only works for humans but also for cats, dogs, and other pets and farm animals. Matching DNA from hair obtained from a suspect’s clothing to a victim’s pet — or vice versa — has proven useful in many cases.
In the majority of cases, the examiner can extract mitochondrial DNA (mtDNA) from the hair shaft. Because the hair is built from cellular remnants, and because the cell cytoplasm houses mtDNA, you may be able to obtain a usable sample of mtDNA from cut or bulb-less shed hair. Examiners can identify the individual who shed the hair through mtDNA analysis and comparison of its pattern with the pattern of samples from the suspect’s siblings or maternal-line relatives (see Chapter 15).
Fiddling with Fibers
Right this minute, countless fibers are on and around you. Some of them originated from your home and some were passed to you when you hugged your friend or bumped into your co-worker on the way to the copy room.
Clothing, carpet, car mats, bedding, towels, and thousands of other things that you use every day are composed of various fabrics. Because they’re so common and come in such a wide variety of types, fibers from these fabrics are an important type of trace evidence. Like hair, they’re easily shed, transferred, and transported. They stick to skin and clothing and become entangled in hair. Criminalists may collect fibers from the victim’s or the suspect’s body, hair, clothing, home, or car, or from the crime scene. The crime lab can use these fibers to try to identify the manufacturer or the source of a particular fiber or match one fiber with another.
As with hair analysis, fiber analysis has been under increased scrutiny, again due to lack of standardization of the examination techniques and the examiner’s expertise.
Classifying fibers
A fiber, basically, is any threadlike element of a material — the threads in your shirt or the tiny pieces twisted together in your carpet. Fibers fall into three basic categories:
-
Natural fibers come from various animals, plants, and minerals. Examiners can often easily identify and compare these fibers by microscopic inspection alone. Animal hair that is woven into fabric or used to manufacture clothing and other household items is considered natural fiber. Other examples are wool, mohair, cashmere, and silk. Plant fibers include cotton, hemp, flax, and jute.
By far, the most commonly used natural fiber is cotton. When examined under a microscope, it has an easily recognizable twisted-ribbon pattern. Undyed white cotton is so common that it’s of little evidentiary value. Natural fibers derived from minerals include such materials as asbestos.
- Manufactured, or regenerated, fibers are fabrics like rayon, acetate, and triacetate. To make them, raw cotton or wood pulp is dissolved, and cellulose is extracted. The cellulose is then regenerated into fibers.
- Synthetic fibers come from polymers, which are substances made up of a series of monomers (single molecules) strung together to make larger molecules that can be thousands of monomers long. Nylon and polyester are synthetic fibers.
Collecting fibers
Time is critical when collecting fiber evidence because studies show that fibers clinging to the clothing of a victim or suspect are lost quickly. After four hours, 80 percent of them may have fallen away, and after 24 hours, 95 percent are likely gone. A search for trace evidence on the clothing of the victim and any suspects therefore needs to take place as soon as possible. Fibers can be lifted from clothing with tape or by vacuuming.
At the crime scene, fibers are most commonly found at the focal point of the crime (the body, a cracked safe, a ransacked desk), particularly if a physical altercation has taken place in that area. Other places that should be thoroughly searched include the points of entry and exit and the routes of approach and escape, if the investigators can identify these points.
Comparing fibers
In the lab, a fiber analyst first examines unknown fibers under a stereomicroscope, assessing their diameters, shapes, colors, shininess, and curls and crimps, and then looking for any attached debris. When matching two fibers, the analyst uses a comparison microscope so that two or more fibers can be compared side by side.
Other tools that help the investigator dig deeper into the fiber’s physical and chemical characteristics are
- Birefringence: When light passes through some synthetic fibers, it’s refracted twice and emerges as two different wavelengths of polarized light, each with its own refractive characteristics. A comparison of the birefringence of two fibers is useful for identification and comparison.
- Microspectrophotometry: This process helps the examiner determine a fiber’s true color without the problem of observer bias. See the section “Understanding Analytical Instruments” earlier in this chapter for more about microspectrophotometry.
- Polarized light: This tool estimates the reflective index (the amount and angle of light reflected by an object or substance) of the fiber and helps determine its makeup.
- Refractive index: The refractive index is measured by directing a narrow light beam at a fiber and calculating the degree to which light is bent as it passes through. This index varies from fiber to fiber.
- Scanning electron microscope: Whenever a fiber or piece of fabric is damaged, the fiber analyst can use an SEM to examine fine structural and surface details that can reveal exactly how the damage occurred.
Breaking down the fiber
Two commonly used procedures — the combination of SEM with dispersive X-ray spectrometer (SEM/EDS) and the combination of gas chromatography with mass spectrometry (GS/MS) — can yield the chemical composition of the fiber and of any pigments or treatments that have been added to it during the manufacturing process or as a later alteration. In fact, GC/MS can separate and identify each chemical found in the fiber or in the various applied treatments. For example, the presence of tin and bromide can indicate treatment with a fire retardant. Titanium oxide is found in many delustering products, substances that lessen a fiber’s luster or shine.
These chemical determinations can point to the manufacturer of the fiber or serve to more strongly match one fiber with another. After analyzing the physical and chemical properties of known and unknown fibers, the criminalist may be able to say that the two very likely came from the same source. If, on the other hand, the fibers differ in any of their characteristics, the criminalist concludes that they didn’t share a common source.
Cracking the Mysteries of Glass
Here’s good news for anyone who’s tried to sneak in a substitute after breaking Grandma’s favorite glass vase: Even a crime lab would have a hard time determining that it wasn’t the original. Glass analysis, which is a common undertaking in the crime lab, rarely supplies individualizing evidence, but it can offer class evidence that’s helpful to the examiner in determining the probability that two pieces are similar or that they came from a common source. The examiner may confidently say that the original vase and your substitute share the same class characteristics (color, shape, surface characteristics, and optical and chemical properties) and that they may have come from the same source, but he rarely can say that the two absolutely, positively share a source.
Looking into how glass becomes evidence
The glass in your windshield differs from the glass that holds your orange juice. You can easily differentiate between the two by sight, and an examiner who compares the chemical composition of the two also can tell them apart. If either of these kinds of glass breaks, it typically scatters fragments that may attach to weapons, shoes, and clothing, or settle on your skin and in your hair. Perpetrators who shatter a window, break a vase, or drop a glass object risk transferring these fragments to their clothing and thus giving investigators a piece of trace evidence that connects them to the crime.
Glass can trip up criminals in another way: It has a hard, smooth surface that is ideal for retaining fingerprints and shoeprints. For example, an intruder may accidentally touch a piece of glass while crawling through a window or step on a large piece of a broken glass that’s fallen to the floor or ground. Either of these situations can yield clear and usable impressions.
In addition, broken glass can injure the perpetrator and result in bleeding. If the point of entry or exit is a broken window or sliding glass door panel, the perpetrator easily can suffer a scrape or cut and yet be completely unaware of the injury, thus leaving behind a DNA sample for the crime lab.
Analyzing and matching glass
Glass is made by heating a mixture of sand (silica or silicon dioxide), limestone (calcium carbonate), and soda (sodium carbonate). During the process, certain other chemicals are added to alter the characteristics of the glass, and various impurities creep into the final product. An investigator can determine the chemical makeup of these additives and impurities, which can be useful in either matching or excluding an unknown sample.
Analyzing the physical, optical, and chemical properties of glass can lead criminalists to its manufacturer. A shard of glass from a car windshield or headlamp may signify the make, model, and even the year of a car used in a crime or involved in a motor-vehicle accident or hit-and-run.
- Measuring density: Comparing the densities of glass samples requires a cylindrical container filled with liquids of different densities. The liquids most often used are bromoform and bromobenzene. They are mixed together, the piece of glass is added, and then one or the other of the liquids is added until the glass is suspended, neither rising nor sinking. At that point, the glass and liquid mixture have the same density. Because the densities of the liquids are known, an investigator can easily calculate the density of the mixture, and thus of the glass. When a known piece of glass is suspended in this manner, and an unknown piece is added, if the latter remains suspended, the densities of the two are identical. If, however, the unknown fragment either sinks or floats, the two pieces of glass don’t share the same density and thus aren’t from the same source.
-
Shining light on the subject: Various glass products transmit, reflect, and refract light in different manners. Transmitted light passes through the glass like sunlight through a window. Reflected light bounces off the glass, and refracted light passes through the glass, but its pathway is bent as the glass slightly changes the direction of the light. Different types of glass differ in one or more of these optical properties. As a result, investigators can show that two pieces of glass are similar, if they share common optical properties.
For example, you can test the refractive index by submerging the piece of glass in a liquid with a refractive index that changes when the temperature of the liquid changes. Silicon oil works. Then, you slowly heat the liquid. The temperature at which the piece of glass seems to disappear reveals when refractive indexes of the glass and the oil are equal. Because the refractive index of a liquid like silicon oil is known at any given temperature, measuring the temperature of the liquid yields the refractive index of the glass.
- Getting chemical: A forensic chemist can test for additives and impurities in the glass with an eye toward matching the chemical makeup of known and unknown samples. Any differences found enable the chemist to state that the two don’t share a common source.
Breaking glass
The way glass cracks often provides clues regarding how it was broken. For example, glass that was broken by a speeding bullet has a different fracture pattern than glass that was broken by a rock crashing through it.
Certain characteristics of a break enable an examiner to determine the direction from which the impact came. Among them are stress-fracture lines that are known as conchoidal lines, or lines that radiate from the impact site (see Figure 17-2). Viewed through the thickness of the glass, these lines tend to curve out and away from the point of impact. A closer look reveals smaller lines that radiate in a direction perpendicular to the conchoidal lines. These indications are called hackle marks.
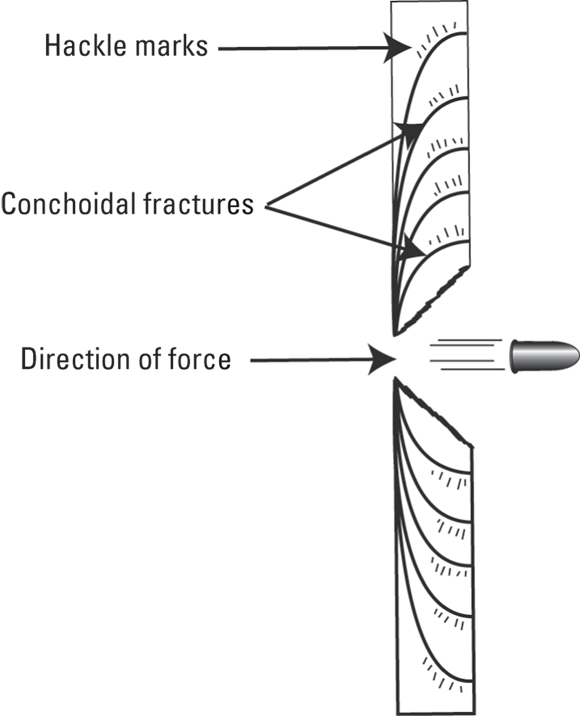
Illustration by Nan Owen
FIGURE 17-2: Characteristics of broken glass.
Cracks in windows and other flat plates of glass tend to be radial and concentric. Radial cracks spread outward from the point of impact in a spoke-like configuration. Concentric cracks are a series of progressively larger circles around the point of impact. Overall, a cracked window may look like a spider web.
If a projectile, such as a bullet, strikes a window and penetrates it but doesn’t completely shatter it, the impact may leave a hole with or without surrounding fracture lines. On the side of the impact, the hole would be rather clean, but on the side opposite the impact, a small cone-shaped plug of glass would have been knocked out. A simple visual inspection of the impact site often reveals the direction of travel of the projectile.
If multiple bullets or other objects break the glass, investigators can often determine the order in which they struck. Radial fractures caused by a second impact typically don’t cross fractures from the first impact. In other words, fractures from a second impact end when they encounter glass that’s already fractured (see Figure 17-3).
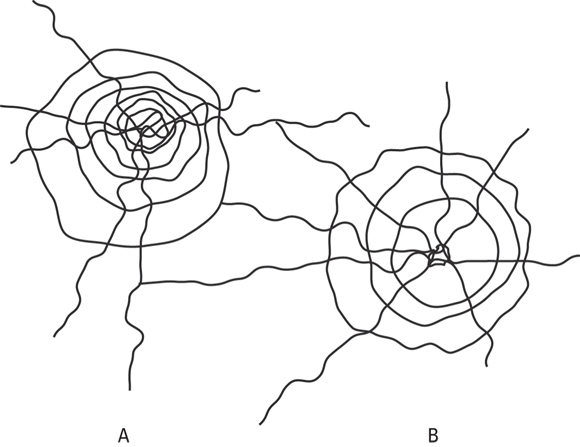
Illustration by Nan Owen
FIGURE 17-3: Impact radial fracture lines in glass end abruptly at fracture lines produced by a previous impact. In this case, Fracture B followed Fracture A.
On other occasions, the lab is asked to determine whether two pieces of glass once were part of the same object. Again, visual and microscopic examinations can be helpful. For example, the fracture line of a piece of glass found at a crime scene can be matched to a similar piece found in the possession of a suspect. Under the microscope, two edges sometimes reveal a perfect fit that indicates the two pieces once were one.
Puttering with Paints
I challenge you to find an environment in which nothing is painted. Unless you live in a cave or a tent on the beach, chances are good that you’re surrounded by paint. Your house, your car, and your office have painted surfaces. You come into contact with painted surfaces on a daily basis, and so do criminals. Such paint chips and smears often transfer from one painted surface to another or to a victim or perpetrator during the commission of a crime.
The most common paint samples that are submitted to most crime labs for evaluation come from automobiles. Paint can be transferred from one car to another or from a car to a pedestrian victim. An analysis of the paint’s physical and chemical properties often reveals the paint manufacturer and ultimately the make, model, and perhaps even the year of the automobile involved in the accident. This evidence is critical when investigating a hit-and-run accident.
Occasionally, paint or paint chips from a house or other property are submitted. Perpetrators may track through paint on a floor or somehow transfer paint from a freshly painted wall to their clothing or hands. This paint may then rub off on the perpetrator’s car, home, or belongings. An analysis of paint from these transfers can be critical to placing a suspect at the crime scene.
Determining whether two paint samples came from the same source centers around the answers to these three questions:
- Do the samples share identical physical and chemical properties?
- If multilayered, do the paint layers appear in the same sequence and thickness?
- If the sample is a chip, does its fracture edge match that of the area of paint loss?
Dissecting paint
Paint consists of these four parts, the type and proportion of which vary greatly from one paint to another:
- Binders typically are natural or synthetic resins to which pigments are added.
- Extenders add solid bulk, which increases the covering capacity of the paint.
- Modifiers change the gloss, flexibility, hardness, and durability of the paint. An example is lead oxide, which toughens paint and makes it resistant to weather.
- Pigments add color. They can be organic (most blues and greens) or inorganic (most reds, yellows, and whites) in nature.
Like most trace evidence examinations, paint analysis starts with a simple eyeball test. If samples are of similar color and luster, an examiner checks out the thickness of the layers of paint and the sequence of colors, if several were used.
If the physical qualities match, the examiner then turns to the chemical makeup of the paint or of each layer of paint. This analysis includes any binders, pigments, extenders, and modifiers and is completed using several tools.
Investigators commonly use the combination of GC/MS (see Chapter 8), with a slight twist. Because paint chips are solid, the process that’s used is called pyrolysis gas chromatography. Pyrolysis is the conversion of a solid into a gas by using high heat. In pyrolysis GC, gas from the pyrolyzed paint chip passes through the GC column and is separated into its various chemical components, which then undergo mass spectrometry. This test reveals a chemical fingerprint of the components of the paint that enables the examiner to make accurate comparisons of submitted paint samples.
Solving the puzzle
By far, the most individualizing evidence in paint analysis is physically matching the edges of a paint chip. If investigators can show that the edges of known and unknown paint chips perfectly fit the way two pieces of a jigsaw puzzle go together, this evidence is fairly conclusive that the two are from the same source. Stereomicroscopic, comparative microscopic, and SEM examinations of the chips can aid in the matching process.
Getting Down and Dirty: Soils and Plants
Remember when your mother scolded you for tracking dirt into the house? You couldn’t deny that you did it because the evidence was on your shoes. Criminals face the same situation. Soil from a crime scene, shoes, clothing, car tires, or tools like shovels frequently is submitted to the crime lab for analysis, and the results can substantiate or destroy alibis, refute or support testimony of suspects and witnesses, and place a suspect at or near the scene of the crime — the same way your mother knew it was you.
Identifying soils
Soil is not simply dirt. It’s a complex mixture of minerals, plant, and animal matter, and tiny particles of man-made products such as glass, paint, asphalt, concrete, and other materials. The contents of soil vary greatly from one region or locale to another. Soil near the beach in California is much different from the red clay of Alabama, but it also differs greatly from soil found in a downtown Los Angeles park.
Forensic soil analysis begins with visual and microscopic inspections and progresses to determinations of color, consistency, pH (a measure of soil acidity), and mineral content. The examiner also checks out any foreign substances, such as plant material or animal hair. For example, finding patches of beachfront sandy soil on the tires and floor mats of a suspect’s car can cast doubt on or even contradict the suspect’s claims of never having been near the shore. Likewise, finding horsehair and flecks of horse manure in a soil sample may indicate that the soil came from a horse farm and not from the suspect’s backyard.
Chemical analyses can determine whether two samples are chemically similar. X-ray diffraction is useful in examining and comparing minerals that are present in soil samples. GC/MS (see Chapter 8) can identify many constituents of the sample, and investigators find another technique, known as differential thermal analysis, useful. The principle behind this form of analysis is that soils absorb and release heat at different rates. In this test, a sample is heated in a specially designed furnace. The point at which the soil breaks down, melts, or boils is determined and then compared with similar thermal properties of other soils to find out whether they match.
Looking at plants and seeds
Plant materials have great forensic significance. They’re found in soil samples, on corpses, clothing, flooring, car mats, and tools, and in many other places. As is true of any type of trace evidence, plant materials can link a suspect to a crime or a crime scene. Investigators often look for leaves, stems, pine needles, bark, flower petals, seeds, and pollen because various plants are native to different areas, and materials from them can help determine the origin of a soil sample. For example, if investigators find pine needles on the floor near a homicide victim, but no pine trees grow near the residence, the killer probably brought the needles with him on his clothing or shoes. Determining the particular species of pine tree the needles came from helps narrow the search area.
Pollen, which comes from flowering plants, can be extremely useful to the forensics examiner. Pollen grains are tiny and rarely noticed, yet they’re highly distinctive. Pollen may be found on clothing, in the hair of a victim or suspect, and even in envelopes containing threatening letters or ransom notes. Microscopic identification of pollen samples may reveal that the victim or suspect had been in an area where the particular plant was in bloom. Several pollen reference databases provide help with species identification.
Additionally, DNA analysis of pollen and seeds can not only identify the plant species but also can often be linked to a particular tree. Maybe the pine tree growing near the suspect’s home.