
Chapter 7
Edge Animate and the Web
Today’s modern Web is vastly different from the Web we grew up with. In many respects, this change came about as the Web became “untethered.” The ubiquitous ethernet cable plugged into the computer processing unit or a laptop is rapidly disappearing. Surveys are showing that the monitor on your desk is no longer the primary web-viewing medium. Tablets, smartphones, “phablets”—hybrids of tablets and phones—are now the devices of choice in an increasingly mobile web universe. Even the way web pages are designed has undergone a profound change. No longer does the metaphor of a paper page apply as web pages shrink, expand, and shift their design in response to the screen real estate available on the device displaying the content.
Even content, as we know it, has undergone a profound change. As the demand for print publications diminishes, many prominent magazines and newspapers are turning out fully interactive digital versions of their print publications that can be delivered wirelessly and then viewed or “read” on smartphones and tablets.
In the midst of all of this change, the technology driving the creation and delivery of web content has changed. Plug-ins used to display content are a thing of the past. HTML 5 is establishing itself at a rather astonishing rapid pace. CSS3 is used to add special effects to CSS elements. jQuery is used to adapt content to displays. JavaScript has once again become a workhorse animation coding tool.
Within all of this change is Edge Animate, a visual editor in this HTML universe and a tool for creating consistent interactive and motion graphics experiences in the modern web universe.
Your first clue that Edge Animate is a web application is the name of the file that appears in the tab of the Stage panel. It contains the name of the file but, instead of using the .an extension, it uses the .html extension. That’s your first clue, but there is a lot going on behind the scenes that you don’t see. For example, test a composition and it opens in a browser. Add a web font and the font chosen appears in Edge Animate thanks to the Webkit browser built in to Edge Animate. Content is placed into divs or elements on the Edge Animate Stage. When you change the properties for a selection, the appropriate CSS3 or HTML 5 code is shown to you, and Responsive Design is built into the application because properties can be expressed as either pixel or percentage values.
This chapter will look not at the design aspects of using Edge Animate, but where it fits into the HTML universe. As such we will be covering:
- Preparing content for older browsers
- Adding preloaders to Edge Animate compositions
- Creating poster frames
- Examining the web publishing options available to you
- The purpose of the files created by Edge Animate
- Adding Edge Animate compositions to Dreamweaver CS6
- Adding Edge Animate compositions to Adobe Muse
- How to work with HTML and CSS inside Edge Animate
If you haven’t already downloaded the chapter files, they can be found at http://www.apress.com/9781430243502. In this chapter we will be using these files:
Mishipeshu.anFlowers.jpgPlant.jpgTags.anExternal.an
This chapter focuses on the end game of the Edge Animate process: How to get your Edge Animate file “web ready” and some of the browser issues you need to consider. With this in mind, we will be briefly touching on publishing for Adobe Digital Publishing Suite (DPS) and iBooks. We delve deeper into this subject in Chapter 9.
Edge Animate’s Web Publishing Options
Once an Edge Animate composition is finished and approved, you don’t simply save the file, merrily pop open a web editor, and go to work. Your first step in the process is to “publish” the file.
As we explained earlier, Edge Animate’s native formats are HTML, JavaScript, and CSS. There is no native file format that needs to be converted to work on the Web. Given this fact, you may wonder why there is even a publishing option at all since the code could easily be modified and integrated into a web site using standard HTML tools like Dreamweaver. Although this is certainly true, there are several viable reasons to utilize the publishing options in Animate. With publishing, your project’s code is minified, which increases the speed of JavaScript load times. Furthermore, your projects are compatible with non-HTML browsers and can be imported into DPS folios and e-publications. Let’s examine the publishing options within Edge Animate. These options are divided into targets, which can be found under the Publish Settings under the File menu.
Choosing a Target
Open the Publishing Settings tab in the File menu. Edge Animate provides three specific delivery targets, as shown in Figure 7-1, for exporting your compositions:
- Web (.html)
- Animate Deployment Package (.oam)
- iBook/OS X (.widget)

Figure 7-1. The publishing targets in Edge Animate.
In any given scenario, there is the possibility that you’ll need to publish your Edge Animate project to multiple platforms. Edge Animate’s publishing settings make this task very easy to accomplish in a few easy steps.
Web Publishing
The web publishing option allows you to export your Animate composition in a format that is compatible with the Web. There are various options that can be selected, including support for older Internet Explorer browsers, code caching and “minifying,” and search engine optimization (SEO). Follow these steps to configure the Web publishing target:
- In your
Exercisefolder, open the folder named01_Publishingand then open theMishipeshu.anfile. - Choose
File>Publishing Settingsto open thePublish Settingsdialog box. - Select the
Webtab to open theWeb/Optimized HTML. - If you leave the target directory blank, your web content will be copied inside the default
Publishfolder in the same directory as your Edge Animate file. This is acceptable, but a more efficient way of doing things is to set your target directory to your content’s final destination. For example, you can set your target directory to a content folder inside the root folder of the locally stored web site. Furthermore, under each publishing option, you can set a different target directory. In this case, let’s accept the default location. - At this point, you can set other web compatibility options such as enabling
Google Chrome Frame, which provides HTML 5 compatibility for older versions of Internet Explorer; enablingFrameworks via CDN(content delivery network), which allows your Edge Animate runtime to look for a cached version of the jQuery and Edge Animate runtimes in the browser cache first, increasing overall download speeds; or,Static HTML, which allows you to publish your web content as optimized content that search engines can read. Let’s enable all three options (Figure 7-2).
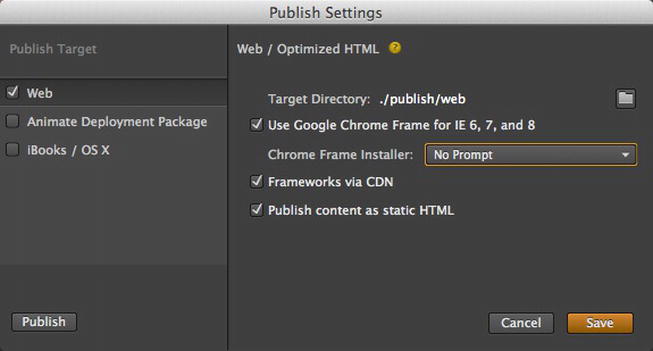
Figure 7-2. Configuring the Web/Optimized HTML publishing options.
Edge Animate Deployment Package
Similar to publishing for the Web, the Edge Animate Deployment Package essentially collects all the necessary HTML, CSS, and JavaScript files into a single OAM file that can easily be imported into Dreamweaver CS6, Muse web sites, or InDesign Folios. Follow these steps to configure an Animate Deployment Package:
- Click the
Edge Animate Deployment Packagetab. - Again, you could select a different target, but in this case, we will use the default location, which is inside the
Animate Packagefolder inside ourPublishfolder. - We can keep the published name as
Mishipeshuor a different name. In this case, we will keep the same name. - We can keep the
Poster Imagedefined earlier, or choose a new poster image from the Animate Library by clicking thedouble arrowicon. In this case, let’s keep the original image (Figure 7-3). - Click the
Savebutton.
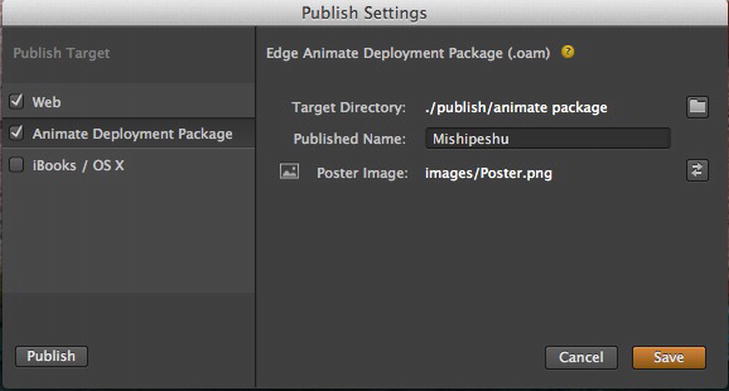
Figure 7-3. Configuring the Animate Deployment Package publishing options.
iBooks/OS X Publishing
Publishing to the iBooks/OS X format exports a single OS X dashboard widget file—with the .wdgt extension—that can be imported into iBooks documents created by Apple’s iBooks author or installed as dashboard widgets in OS X. Let’s configure the iBooks/OS X tab:
- Click on the
iBooks/OS Xtab. - We could select a different target, but in this case, we will use the default location, which is inside the
iBooksfolder inside ourPublishfolder. - We can keep the published name
Mishipeshu, or if we want, we can change it to a different name. In this case, we will keep the same name. - We can keep the
Poster Imagewe defined earlier or choose a new poster image from our library by clicking thedouble arrowicon. In this case, we will keep the original image. - Click the
Savebutton (Figure 7-4).
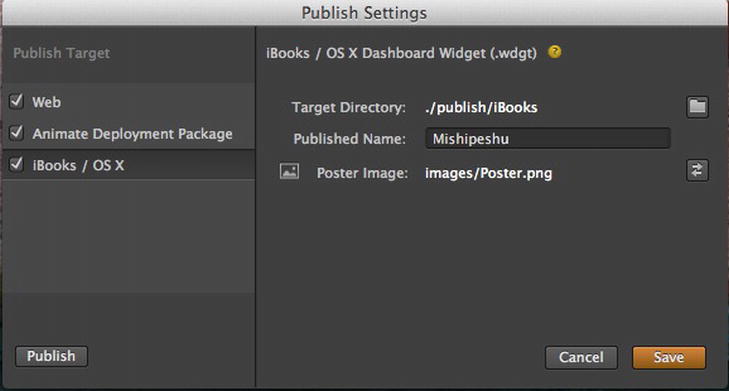
Figure 6-4. Configuring the iBooks/OS X dashboard widget publishing options.
Publishing Our Edge Animate Content
Now that we have configured our publishing options, we are ready to publish our Edge Animate composition.
- In the
Filemenu, clickPublish.Houston, we have a problem? Although Edge Animate has successfully exported our
weband .oampackage content to our designatedpublishfolder, we learn we have encountered an error publishing our iBooks content (Figure 7-5).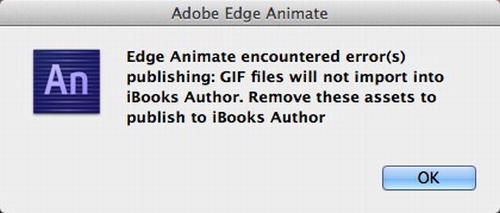
Figure 7-5. Publishing GIF files to iBooks Author is not supported.
Why the error message? Apple’s iBook format does not support GIF files, which we have utilized for animations in our down-level and preloader stages. This is a common problem and, unfortunately, fixing it is not as easy as changing a few settings. We have to remove our preloader and down-level stages, but more importantly, we need to remove any GIF files from our images library. Here’s how to do that:
- Click the
Viewmenu and select thePreloader Stage. - Choose
Edit,Select All, and delete the contents on the Stage. - Click the
Viewmenu and select theDown-level Stage. - Choose
Edit,Select All, and delete the contents on the Stage. - Now, we need to delete the GIF files from our library. Click the
MishipeshuIcon.gifandpreloader.giffiles in theLibrary panel. - Ctrl-click (Mac) or right-click and choose
Reveal in Finder. In Windows, right-click and chooseReveal in Explorer. - Remove the two GIF files from the image directory by either deleting them or dragging them to the desktop.
- When you return to Edge Animate, you will get another error indicating that files were changed or deleted outside of Edge Animate, to which you will be asked if you want to reload the lost images. Click No (Figure 7-6).
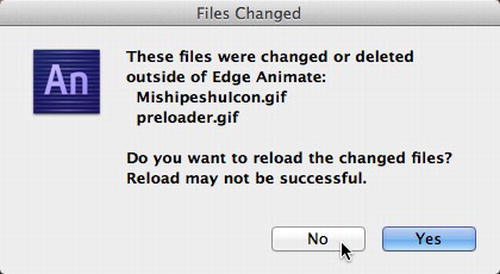
Figure 7-6. Removing files from our images folder results in this warning message.
- In the
Filemenu, choosePublishing Settings. - Make sure that
WebandAnimate Deployment Packageoptions are unchecked. - Make sure the
iBooks/OS Xoption is checked and click thePublishbutton on the bottom right.
Although we can configure multiple targets in our publishing setup, it’s important to note that when we target for digital publication like InDesign Folios or iBooks, in all likelihood we would not include a down-level or preloader stage, which often uses GIF files. As a result, the previous publishing workaround would not be required. In Chapter 9, we’ll delve into creating and exporting content for digital publications.
The Purpose of the Files Edge Animate Creates
You may have noticed early on that Edge Animate creates certain files along with its native file (.an extension) once you save your composition. The reality is, Edge Animate really doesn’t have a native file format other than HTML itself. In fact, the AN file is merely a JSON file, which simply points to the HTML file of the same name. Let’s further explore the files Edge Animate creates (Figure 7-7).
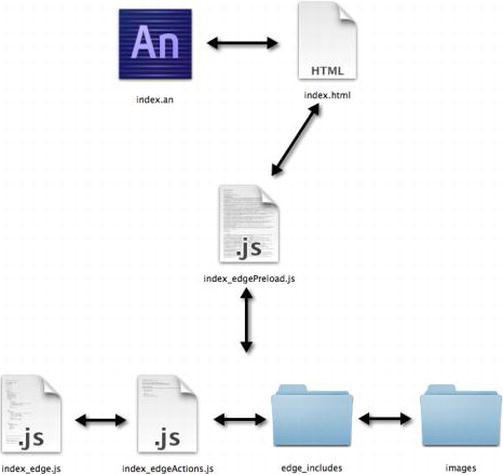
Figure 7-7. Edge Animate’s file structure.
The .an File
As we explained earlier, the AN file (Figure 7-8) is really a JSON file that points to the HTML file created by Edge Animate. As a derivative of JavaScript, JSON (JavaScript Object Notation) is a very readable language that defines simple data structures. Information about the main stage, symbols, and the preloader and the down-level stages are some examples of the data stored within the AN file. The key thing to keep in mind here is the AN file is just a pointer to the actual HTML file that Animate creates. It is also the file that, when double-clicked, opens Animate.
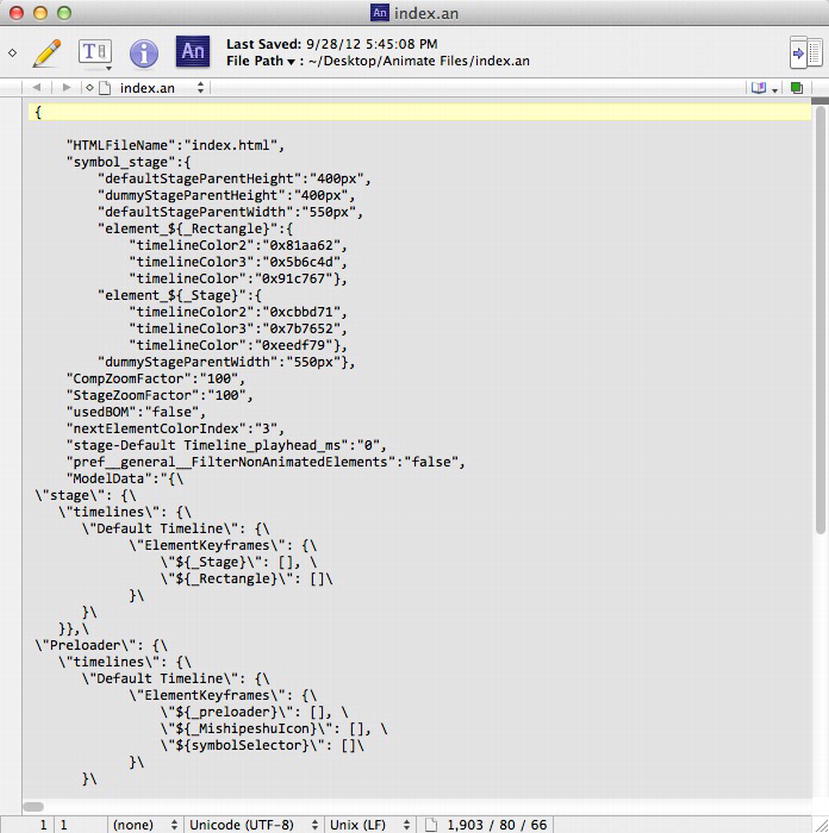
Figure 7-8. Just some of the JSON code inside the AN file.
The HTML File
The HTML file (Figure 7-9) created by Edge Animate is the starting point for your composition. As a standard web file, it is the key to what happens next regarding your Edge Animate content. Inside the HTML file is the Stage div, which is the wrapper for your presentation. The Stage div is initially hidden unless you publish your content as static, which, as we’ve mentioned earlier, creates SEO friendly code inside the stage div. Also included in the HTML file is the edgePreload.js script.
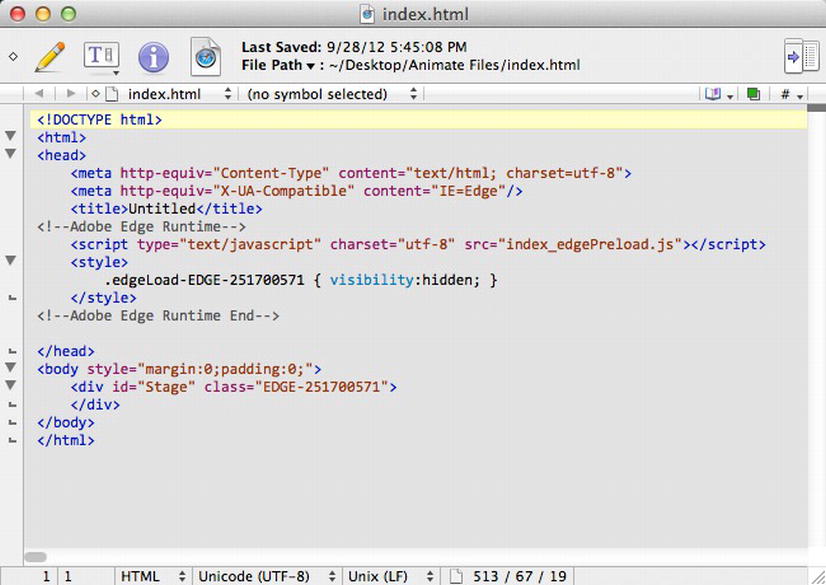
Figure 7-9. An example of the code inside the HTML file created by Edge Animate.
The .edgePreload.js File
The .edgePreload.js file (Figure 7-10) is a yepnope.js file. As explained by the yepnope project page (yepnopejs.com), yepnope is an asynchronous conditional resource loader that loads only the scripts your users need. It is similar to Modernizr but much faster. What is the purpose of a yepnope.js file? The .edgePreload.js tests for conditions that exist for your end user, such as the capability to run HTML 5 content. Depending on the testing condition’s results, the .edgePreload.js determines which resources your Edge Animate project loads. The .edgePreload.js file is created dynamically as you work within your Edge Animate project. It is extremely important that this file not be edited.
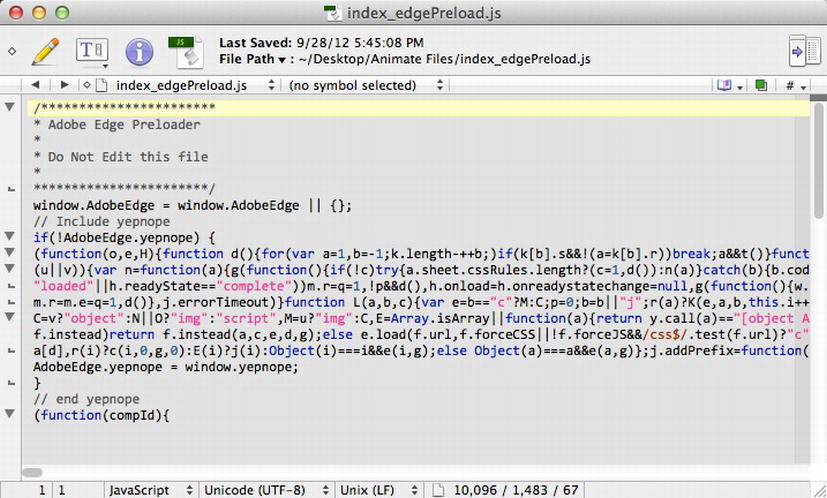
Figure 7-10. An example .edgePreload.js file created by Edge Animate.
The .edge.js File
The .edge.js file (Figure 7-11) defines the content of your Animate presentation. Content such as symbols, states, assets, and font resources are organized and detailed within this file.
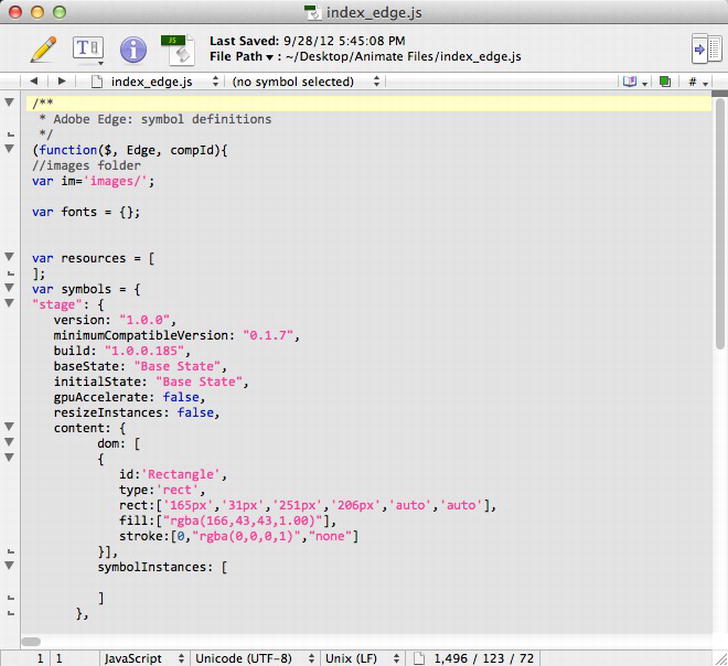
Figure 7-11. An example .edge.js file created by Animate.
The .edgeActions.js File
The .edgeActions.js file (Figure 7-12) is where all your custom JavaScript code is stored. When you create mouse or touch events or timeline triggers, for example, the code is added to the .edgeActions.js file. Although it is possible to edit the file externally, it is important that you do so with a bit of caution, making sure you keep references starting with “‘Edge” consistent so you are able to work with the actions once they are reloaded within Edge Animate.
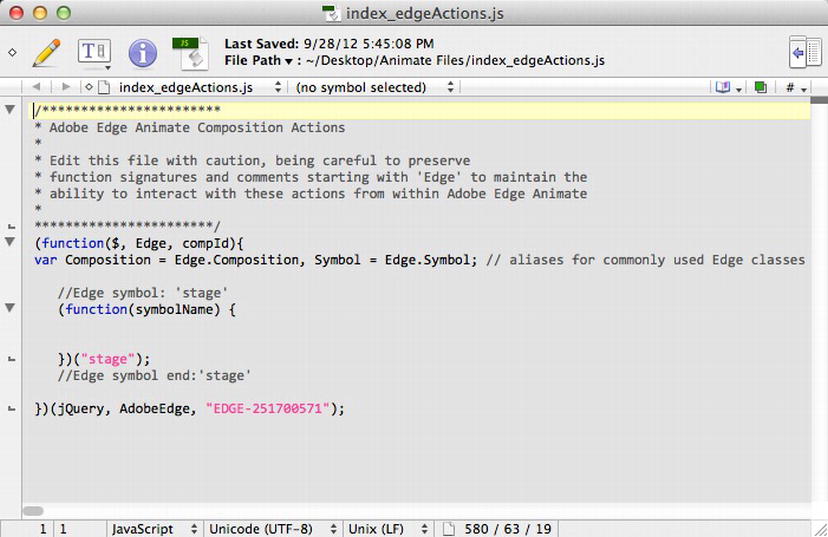
Figure 7-12. A .edgeActions.js file created by Edge Animate.
The .edge_includes Folder
The .edge_includes folder (Figure 7-13) is a repository for all required libraries. The libraries include:
edge.js: A library that defines the object and classes used in your presentation.jQuery.js: A multibrowser library that simplifies HTML scripting.jQuery.easing.js: A library that stores the easing functions within the jQuery user interface.json.js: A library that stores information on how to work with the JSON JavaScript subset language.

Figure 7-13. The .edge_includes files that Edge Animate creates.
The Images Folder
The Images folder stores all your image assets in your Edge Animate library. Anything that is added to the Images folder is added to the Edge Animate project’s library.
Edge Animate Compositions and Dreamweaver CS6
Now that you understand the nitty-gritty of how Edge Animate integrates with the Web, including the files it creates, we can turn our attention to incorporating an Edge Animate composition within Adobe Dreamweaver CS6. Of course one of the cool things about Dreamweaver CS6 Creative Cloud subscription is the built-in support for adding Edge Animate content media to an existing web page. This was included in a major Dreamweaver update released in September 2012. This new feature makes it dead simple to add Edge Animate content to your Dreamweaver projects. Here’s how:
The first thing we need to do is set up our Dreamweaver site. This creates our link structure so we can add our Edge Animate content.
- Locate and open the folder named
Dreamweaverin yourExercisefolder. - Copy the folder name
Mishipeshuto your documents folder on your hard drive. - Launch Dreamweaver and select Site: Manage Sites.
- Click the New Site button.
- In the Site Name field enter Mishipeshu.
- In the Local Site Folder field, click the folder icon and locate the
Mishipeshufolder that you copied to your documents folder. - Click the Save button.
- Click the Done button.
Inserting the Edge Animate Composition into Dreamweaver
Now that we have the site set up in Dreamweaver, we are ready to import the Edge Animate content into a Dreamweaver page. The new Insert Edge Animate feature in Dreamweaver CS6 lets you insert an Animate Deployment Package (OAM formatted file) with ease. For this next exercise, we will be using the OAM file we exported in the previous publishing exercise, which we have included in our Dreamweaver site inside the folder named animate.
- Launch Dreamweaver and open the
index.htmlfile in the Mishipeshu site defined in the previous section. - Click on the Split button to open the Code and Design view panels.
- Locate the
comment inline 83 of the Code window. - Click once in line 84 of the Code window. The Animate project is going to be inserted here.
- Select Insert > Media > Insert Edge Animate Composition. The Select Edge Animate dialog box will open.
- In the dialog box, locate the
animatefolder and insert theMishipeshu.oamfile. - You will get a dialog warning that informs you that the composition name already exists. Click OK.
- In Design view, you will see the
Anicon, which indicates you have included an Edge Animate presentation and, as shown in Figure 7-14, the code from the OAM file is added.
Figure 7-14. Dreamweaver adds the code and places an icon on the page when an OAM file is inserted into the page.
- Click the Design view button, then click the Live view button to view the page with the Animate presentation.
Inserting Edge Animate Content Using an iFrame
At this point, we are done and could publish our Dreamweaver web site to the Web. But what if we are using an older version of Dreamweaver or another web authoring application? The good news is the method is almost as easy. We could meticulously copy the header references and stage div code from our generated Edge Animate HTML file, but this starts to get ugly if we want to work with multiple Edge Animate compositions on the same page. Instead, we’ll just define and create an inline frame (iFrame) to handle our Edge Animate content. We will be using the web publishing output files we generated in the previous publishing exercise, which we have included in our Dreamweaver site inside the folder named iframe. Here’s how we do that:
- In Dreamweaver, open your Mishipeshu web site, locate the
index.htmlfile in the root folder, and open it. - Click on the Split button to bring up the code and design view.
- Locate the
animate-boxdiv in thecode viewwindow. - Select and delete the Edge Animate code between the
animate-boxdiv contents. This is the code that was automatically inserted when we imported our composition using the Insert Edge Animate feature in Dreamweaver CS6 in the previous exercise. - As shown in Figure 7-15, enter the following code:
<iframe src="/animate/mishipeshu.html" width="1000" height="300" frameborder="0"

scrolling="no"></iframe> - Click the Refresh button in the Properties panel to accept the code change.
- Save your file and click the Preview/Debug in Browse button and select a browser from the list to preview the page.
To test your results, preview the index.html file locally on your computer system or upload the contents of the Mishipeshu folder to the Web. By inserting your Edge Animate compositions with this technique, you should be able to incorporate your animations on any web platform such as WordPress, Drupal, or Joomla.

Figure 7-15. Use an iFrame for other web platforms.
Adding Edge Animate Compositions to Adobe Muse
One of the cool things evolving on the modern Web are the tools we now have at our disposal. Apart from Edge Animate, another new tool that Adobe has introduced is Muse.
Muse is targeted at designers who don’t want to learn code but still desire to create web sites. Muse is quite easy to use and operates much the same way as Adobe InDesign. Certainly we could go in depth with our explanation and discovery of Adobe Muse, but the point here is how to incorporate an Edge Animate composition in an Adobe Muse web site. Once again, Adobe has made the workflow between Edge Animate and Muse stunningly easy in their most recent version (2.0) of Muse by including the ability to place Edge Animate compositions within Muse page layouts. Here’s how easy it is to include Edge Animate content within Muse:
- In your
Exercisefolder, open the folder namedMuseand then open theMishipeshu.musefile to launch Muse. - In
Plan Mode, double-click theHomepage. - Select
File>Place. - In the
Musefolder, locate the file namedMishipeshu.oam. This is the file we created from our publishing exercise earlier, the same file we used in our Dreamweaver CS6 example. Select the file and click Open. - Your cursor will display a small preview of the Animate composition and a corner alignment guide. Click just below the top guide and right below the gray transparent header bar to place the Edge Animate content on the page.
- With the Edge Animate content placed on the page, move it until it is in position below the black header bar. In this case, we aligned it to X = 0 and Y = 0 using the Timeline tab of Transform panel shown in Figure 7-16.
- Save your file and preview in a browser.

Figure 7-16. Placing an Edge Animate composition in Adobe Muse.
Preparing Content for Older Browsers
With all the glitz and glamour of CSS effects, responsive imagery, web fonts, and animation that are integral features of the modern Web, the spotlight on older browsers has shown their inability to render HTML 5 and CSS3. The days of the desktop computer’s majority are dwindling, but the fact remains that older desktop computers with older browsers installed still represent a large group of systems incapable of viewing advanced content. Should we shut this older community out of our Edge Animate creations? Of course not! A better goal is to politely nudge them into upgrading their systems by providing viewable content that their old browsers can handle. This is the purpose of the down-level stage.
The down-level stage is a separate stage from the main Edge Animate Stage. It can be accessed from the View menu. The down-level stage is designed to house graphics and text compatible with older browsers. You won’t be animating or adding transparencies or other effects when you create a down-level stage. In fact, all of the fancy stuff is disabled in the down-level stage. And that’s exactly the point. Your job is to provide a simple screen for older browsers to deal with your advanced Edge Animate content. Let’s build a simple down-level stage:
- Navigate to the
Down-Level Stagefolder in this chapter’s exercise. Double-click theMishipeshu.anfile to launch the composition.The plan for any down-level stage is to identify a screen or point in the composition that conveys the message behind the composition. Let’s find that point:
- Move the playhead to the 1.00-second point in the timeline. The screen shown in Figure 7-17 is ideal for our needs.
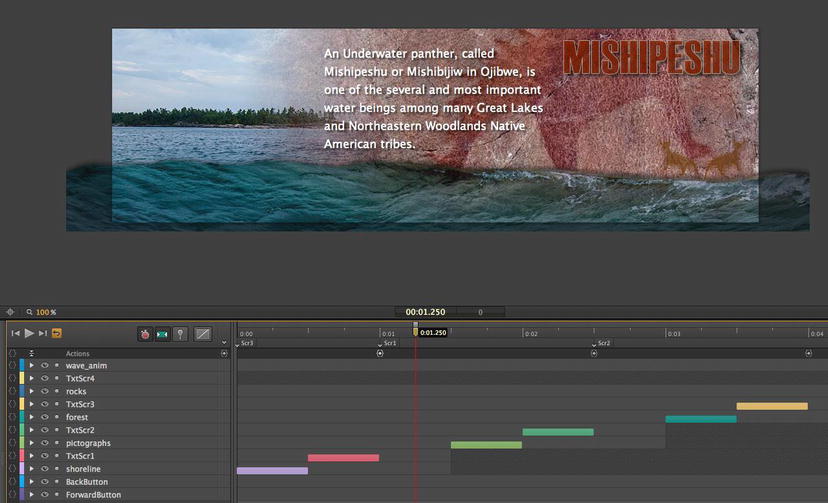
Figure 7-17. The first step is to identify a point in the composition to be used as the down-level stage.
Having identified the content to be used in the down-level stage, the next step is to create the stage. A down-level stage is nothing more than content—an image and some text—that can be rendered by older browsers.
- The image portion of a down-level stage is nothing more than a simple screen capture. This capability is built in to Edge Animate. In the
Propertiespanel underPoster, click theCameraicon to open theCapture a Poster Imagedialog box. - As you can see in Figure 7-18, you are presented with two options: Create a new poster image or, if one already exists, replace it with a new one. Click the
Capturebutton. A new image—Poster.png—will be placed in the Images folder.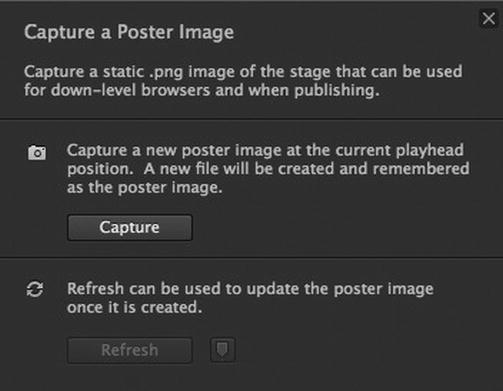
Figure 7-18. Poster Image capture options.
The Poster Image is a special image that is stored in the Edge Animate library. You can capture a Poster Image anywhere on the timeline by placing the playhead at a specific point on the timeline and selecting the Poster Image camera icon. Edge Animate keeps track of where you captured the last Poster Image (by a Pin) and allows you to update the current poster frame based on your last frame point or the new point you specify. The Poster Image can also be used when publishing to different formats, which we will cover later.
With our Poster Image stored in the library, we move next to creating our simple down-level stage. Here’s how:
- There are two ways to create a down-level stage. The first is to select Down-level Stage from the View menu. The second, as shown in Figure 7-19, is to click the
Editbutton in theDown-level Stagearea of thePropertiespanel. Regardless of the method used, they both result in a dialog box telling you there is currently no down-level stage.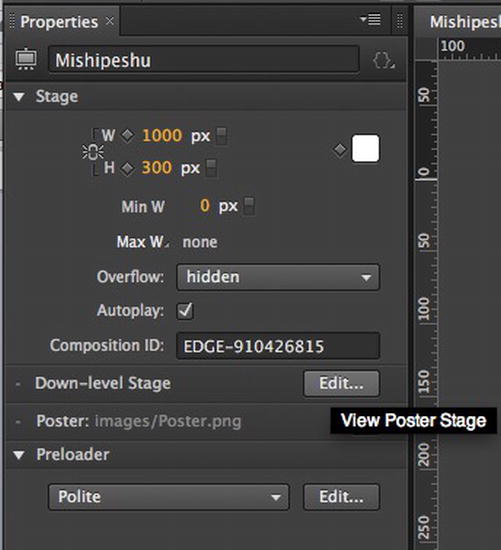
Figure 7-19. Creating a down-level stage in the Properties panel.
If you look closely at the Stage, you will notice, as shown in Figure 7-20, a breadcrumb trail, a changed
Propertiespanel, and theAlertbox. What you can gather from this is your down-level stage is really nothing more than a child of the main Stage that will only come into play when a nonmodern browser is detected.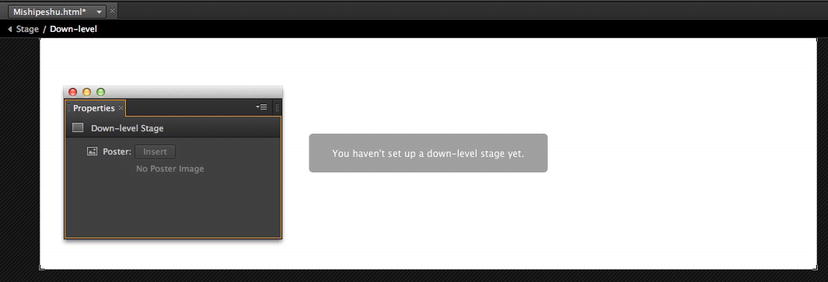
Figure 7-20. The down-level stage is ready to be created.
- In the
Propertiespanel, click Poster: Insert. This places thePoster.pngimage on the Stage. - From the library images, drag the
MishipeshuIcon.gifto the upper left corner of the Stage. - Click the Text tool and enter the following text:
'This content requires a modern browser that supports HTML5 and CSS3. Please upgrade your browser.'Drag the text block to the bottom of the screen. - In the Properties panel, format the text using these settings:
- Font: Verdana, Geneva, sans-serif
- Size: 16 pixels
- Alignment: Centered
- Color: Use these RGB values: 243,160,15 (dark orange)
- With the Text box still selected, enter the following address in the Link-URL field:
http://google.com/chrome - We can set our link target to open in the same window or a new window in the
Link Targetbox. Accept the defaultself. As shown in Figure 7-21, the down-level stage has been created.
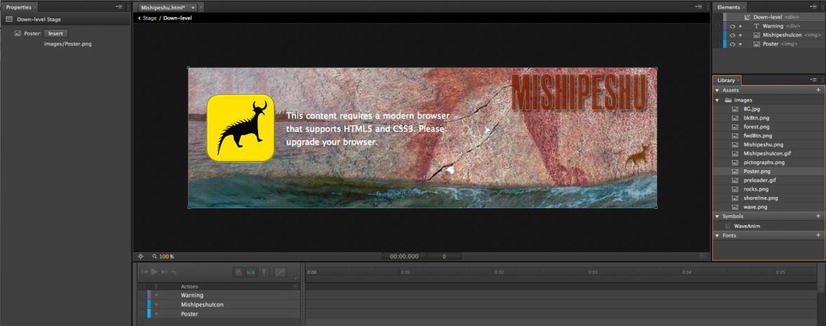
Figure 7-21. A typical down-level stage.
Testing a Down-Level Stage
Now that our down-level stage has been created, how do we know it works? One cool trick is to employ the power of Adobe Browser Lab (https://browserlab.adobe.com/en-us/index.html).
Adobe Browser Lab (Figure 7-22) is a complimentary online service that you can use if you have a free Adobe ID. When you specify a URL in the link field, Browser Lab will render it in a series of screen shots showing how it would appear in various browsers. In other words, you don’t need to keep an old copy of Internet Explorer 7 on your computer just for testing. There are several ways you can test your down-level stage:
FTP: Upload your Edge Animate file using an FTP program to a web site, then copy and paste the Absolute Link from the web site into Browser Lab.
Dreamweaver: You can open your Edge Animate file and send it to Browser Lab for testing using Dreamweaver. You will need to copy your Edge Animate files into the root folder of an existing Dreamweaver site before locally testing it in Dreamweaver.
Firebug: If you are running Firefox and have installed the Firebug plug-in, you can install the Adobe Browser Lab Firebug Plug-in (https://addons.mozilla.org/en-US/firefox/addon/adobe-browserlab-for-firebug/) and test your file locally in Browser Lab.
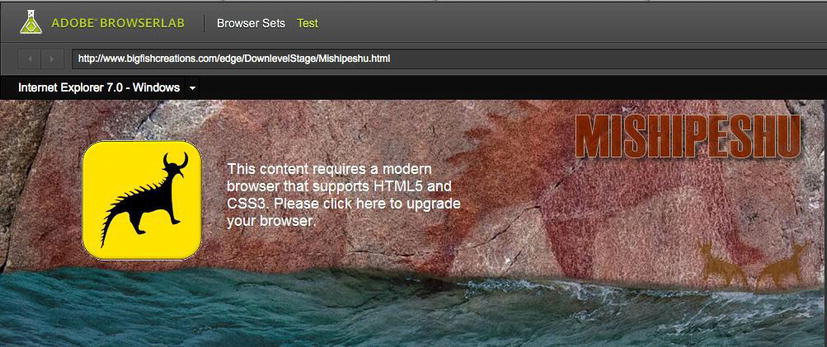
Figure 7-22. Testing our down-level stage in Adobe Browser Lab.
Adding Preloaders to Edge Animate Compositions
A practical goal in web design is to keep your file size down to a minimum while maintaining an overall decent quality. However, in situations where our Edge Animate compositions include rather large files, we want to provide a way for our users to be alerted to the fact our composition needs some time to download our assets before it displays our presentation. We accomplish this task by including a preloader stage in our Edge Animate composition. The preloader stage is a separate stage within our Edge Animate presentation where we can load small graphics and text that informs our web user that our Edge Animate file is downloading before it plays. We want our preloader stage to be small and load fast, yet provide enough visual feedback to the user as to what is going on behind the scenes. In fact, Edge Animate has a few default preloader animations built in, which makes our job in creating one a bit easier. Let’s explore this further:
- In your
Exercisefolder, open thePreloaderfolder, then open theMishipeshu Preloaderfolder, and then open theMishipeshu.anfile. - In the
Viewmenu, selectPreloader Stage. - You will see a blank stage and Edge Animate will display a message that says “You haven’t set up a preloader yet.”
- In the
Propertiespanel, click theInsert Preloader Clip-Artbutton. - Double-click a
Clip-Artoption to insert it on the Stage. In this case, we chose theLoading Bar. - In the top bar, set the
css-background colortotransparent(Figure 7-23). That completes the preloader. You won’t be able to see it when you test the file locally because it will load too quickly. To see the preloader, you will need to publish the Edge Animate file to the Web and view it there.
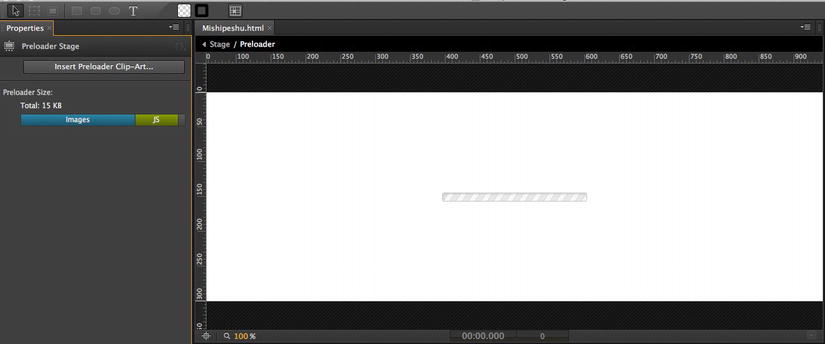
Figure 7-23. Selecting our factory preset Preloader Clip-Art loading animation.
Designing Our Own Preloader
The default preloaders within Edge Animate are quite usable out of the box. However, we may want to build our own custom preloader for our project. This is a fairly easy task to accomplish, but we want to keep in mind a few things. First, we want to keep our preloader files rather small so they load quickly while our large graphics continue to load in the background. Second, we want to provide some kind of animated feedback to our users that something is actually happening, in this case, our large graphics are downloading. We can achieve both these goals by employing the old-school power of the animated GIF. By creating an animated GIF for our preloader, we can give our user a visual signal that things are happening all within a quick, highly compressed graphic file. Adobe Fireworks is a fantastic tool to employ when we want to create a simple animated GIF file. Let’s give it a try:
- Open Fireworks and create a new document 125 pixels by 25 pixels.
- Select the Type tool and choose the font Arial Black (or similar) and set the point size to about 15 points. Type the word
LOADINGin all caps. - Rename the Firework’s layer to
text. - Right-click or (option-click Mac) and select Share Layer to States. This will share the layer to the animation states that you will be creating in the next step.
- Create a new layer and rename it
anim. - Select the
animlayer and draw a box 25 pixels by 25 pixels. - Select a dark orange fill color. In this case we chose #B25900.
- In the Properties panel, position the square at X = 0, Y = 0 on the Stage.
- Click the States panel and then right-click or (option-click Mac) and add a
new stateafter the current state. - Move the orange square to X = 25, Y = 0.
- Repeat steps 9 and 10 and move the orange square 25 pixels to the right on the X axis until you have five states.
- Select all the states and right-click (or option-click on Mac) to open the properties for the Frame Rate. Set it to 15.
- Under the Optimize panel, set the Export File Format to Animated GIF.
- Click the Preview tab in the top of the window and click the Play/Stop button in the bottom right of the Stage to preview the animation.
- Now, choose File > Image Preview to bring up the export preview window.
- Click Export and save the file as
preloader.gifin the Mishipeshu preloader images folder.In Edge Animate, the exported file should appear in the images folder in the library. Let’s complete the custom preloader:
- In the preloader stage, click on the Loader-Bar and delete it.
- In the library under images select your custom
preloder.gifimage and drag it to the center of the Stage. We centered ours at X = 424 and Y = 195. - Drag the
Mishupeshuicon.giffile on to the Stage just above your preloader. We placed ours at X = 412 and Y = 27. - Save your file.
In order to preview your preloader, you want to upload it to the Web. That way, your high-resolution files will be able to slowly download in the background while your custom preload stage displays the loading status.
Edge Animate and HTML/CSS Overflow
One of the key things to understand about Edge Animate is the fact that it utilizes HTML/CSS and JavaScript/jQuery to perform its magic. By default, elements in Edge Animate are placed inside an HTML div tag. Some Edge Animate div elements can be nested inside other elements simply by dragging them on top of the other in the Elements panel. Furthermore, every single element in Edge Animate is nested inside the Stage div element. In fact, as we mentioned in Chapter 1, Edge Animate is quite different from other Adobe design tools like Flash, Photoshop, Fireworks, and Illustrator because it uses a div as the canvas and therefore utilizes Overflow to determine how to display elements in the gray area that are not visible on the Stage. Let’s do a quick experiment.
- Open Edge Animate and create a new document with the default stage size of 550 pixels by 450 pixels.
- Select the Rectangle tool and draw a gray rectangle that stretches across the Stage, roughly 766 pixels wide.
- Draw another rectangle above the gray one and change the color to red. Make sure the rectangle is 550 pixels wide and center it on the Stage (Figure 7-24).
- Select the Stage div and, in the
Propertiespanel, click the actions button and selectcompositionReadyfrom the pop-down list. The compositionReady area is where you can insert code to run after the composition has fully loaded. In this case, we want to center our composition when we choose preview in browser. - Enter the following code:
$("#Stage").css("margin","auto")This will center our Stage when we view it in the browser.
- Preview your composition in the browser. Notice how the rectangles are the exact same width when we preview our composition in the browser, even though our rectangles were drawn in different sizes on the Stage.
- Go back to your Edge Animate file and click the
Stagediv in the Elements panel. When you look under thePropertiespanel, you’ll notice thatOverflowis set tohidden. This is the default setting for the Stage. Therefore, when you view your Edge Animate composition in a browser, the div that contains your composition, the Stage, will function like a mask and crop away everything that flows outside the boundaries. - Change the Overflow to
visiblein the pop-down menu and preview in the browser. - Notice how the bottom gray rectangle is now longer than the red rectangle.
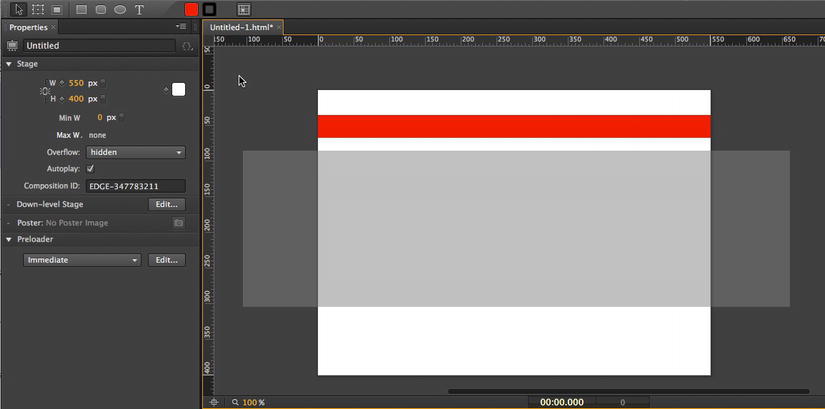
Figure 7-24. The rectangle experiment.
Edge Animate can read and open HTML documents. In fact, as we explained earlier, Edge Animate uses HTML as its default format. When you create and save a new document in Edge Animate, an .html extension is added to the document title and Edge Animate saves an AN file in the same directory. When you open the AN file, Edge Animate appends the .html extension next to the document title. The AN file is really a JSON file, which is a derivative of JavaScript. The only purpose for the AN file is that it defines the structure of the Edge Animate project, such as the symbols, preloader stage, down-level stage. The key thing to remember is Edge Animate’s native file format is HTML.
Further Exploration of Overflow
Our experiment from the previous exercise yielded some keen insights about the Edge Animate Stage. But, as we explained, Edge Animate’s content largely exists inside divs and is controlled by the CSS “Box Model” and HTML. The CSS Box Model is a method that displays elements enclosed within its defined box via criteria such as margins, padding, borders, and position. Overflow, which plays a large part in how each Edge Animate element interacts with the others on the Stage, is an important concept to grasp when designing your content. Let’s try another experiment:
- Open Edge Animate and create a new document 900 pixels by 266 pixels. Save the document and name it
overflow. - Choose File > Import and find your chapter
Exercisefolder, open theOverflowfolder and importflowers.jpgandplant.jpgto the Edge Animate Stage. Edge Animate will add the images as elements in the Elements panel. - Move the
flowerselement to the far right of the Stage. - In the Tools bar, select the
Rectangletool, then draw and center a rectangle over theplantelement about one-third the size of the image. The goal here is to cover about one-third of the plant image with a rectangle, which we will use as a mask. The top and bottom edges of the rectangle can cover the plant, while the left and right sides of the rectangle should not. It doesn’t have to be perfect, just don’t cover both sides of the plant with the rectangle. - With the rectangle still selected, click the
background-color chipin the Properties panel and set the color totransparent, which is the checkerboard icon. - In the
Elementspanel, drag theplantelement over the top of theRectangleelement you just created. This will create a parent–child relationship between theRectangle(parent) andplant(child) element. - In the
Elementspanel, click theflowerselement. - Select the
Rectangletool and draw and center another rectangle over theflowerselement, but this time make sure it is exactly the same size as theflowerselement. Set its color totransparent. - Drag the
flowerselement in theElementspanel over the top of the rectangle you just createdRectangle2to create another parent–child relationship (Figure 7.25). - Select
RectangleandRectangle2in the Elements panel and underOverflowin the Properties panel choosehidden. - In the
Elementspanel, clickplantto select the plant element on the Stage. Hold the Shift key down (to constrain the vertical position) and move theplantto the left on the Stage until it disappears off the Stage. Then, add a keyframe. - Move the playhead to the .2-second mark and, while holding the Shift key down, move the
plantto the right until it disappears on the right side. - Move the playhead to the 00 mark.
- In the Elements panel, click
flowersand underTransform, add a scale keyframe. - Move the playhead to the 2- second mark and adjust the scale to 300%.
- Test your creation in a browser.
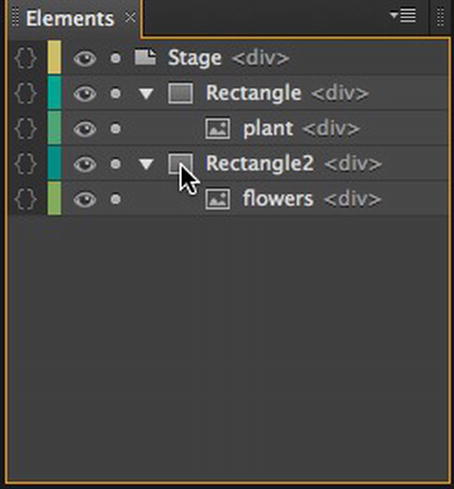
Figure 7-25. Creating our parent–child relationships by dragging one div element over the other. The indented elements indicates a child.
What you should notice that is the two rectangles you created and set to “hidden” have constrained (cropped) the elements to the box size. The plant element moves from left to right and within the Rectangle div and the flowers element scales up to 300% inside the Rectangle2 div.
Change the overflow value on the Rectangle2 Element div to Visible. Now preview your composition in a browser. The flower element scales up to 300% but is still cropped by the Stage div.
Now, click the Stage div in the Elements panel and change the Overflow to visible and preview in the browser. Notice, in Figure 7-26, how the flowers in the third example now stretch (overflow) beyond the Stage div. It is important to understand that just by changing the overflow options on our stage elements, we can create a different presentation of our elements.
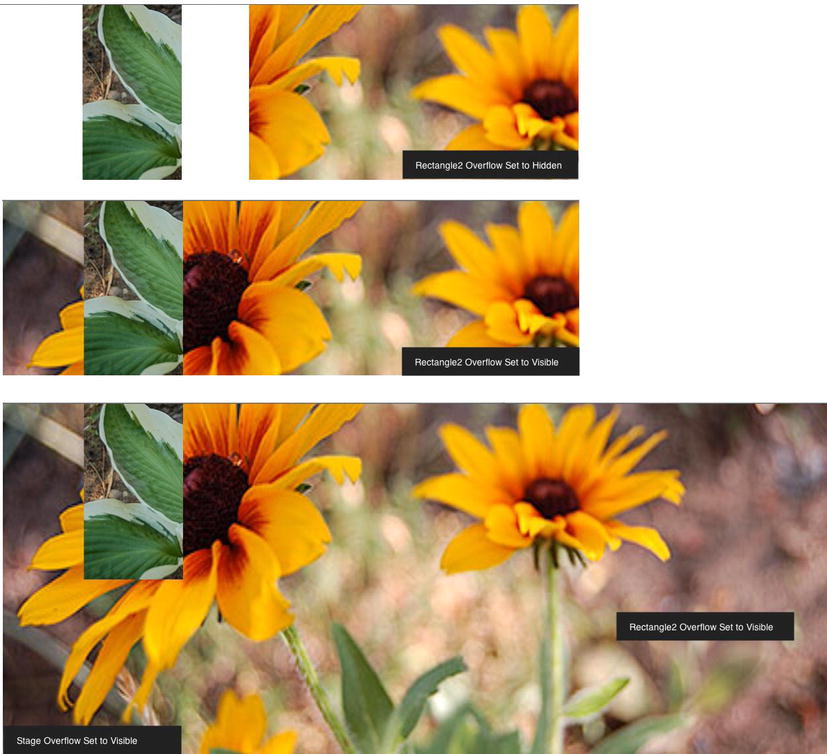
Figure 7-26. Manage the Overflow property to control stage elements.
This demonstrates that Edge Animate utilizes the CSS Box Model to organize and display elements on the screen. This is very convenient, especially when the goal is to move our Edge Animate content to the Web.
Beyond the DIV Tag
As we discussed earlier, Edge Animate’s default setting is to enclose all stage elements inside an HTML div tag. However, Edge Animate can also assign different tags to stage elements. You might be asking yourself, why would I want to do that? The answer is accessibility. Within Edge Animate, you can change the tag type of your stage elements, therefore allowing you to specify HTML tags like the paragraph tag <p> or the heading 1 tag <h1> as well as accessibility via the title tag (tooltips) and tab order. Let’s explore this further.
- In your
Exercisefolder, open thetags.anfile found inside theTagsfolder. - Click the triangle next to the Content
<div>to reveal the other elements in the document. Notice that they are all div elements (Figure 7-27).
Figure 7-27. When we open our tags.an file for the first time, we see all our elements are div elements.
- Click on the
SoupTitleelement and in the Properties panel, click the tag menu button and switch from<div>to<h1>. - Select
Ingredientsinside theIngredientBoxand switch from<div>to<h2>. - Click the
IngredientsTxtand change the tag to<p>. - Click the
Descriptionelement and change the tag to<blockquote>. - Finally, click the
logoandsoupelements and change their tags to<img>.Having changed the tags on our elements, we can add further accessibility options based on the tag we have defined. For example, if we click our
<img>tags, notice that we now have new options in the Properties panel to describe our images further, such as theAltandTitle. This further allows us to add HTML accessibility to our project, ensuring compatibility with the widest possible audience and devices. Feel free to enter an Alt description and a Title description in the fields for each of the images as follows: - For the Soup image:
Alt = Chicken Noodle Soup and Title = Soup - For the Logo image:
Alt = Food A Logo and Title = LogoWe can add
Titlesto the remainder of our non-<img>elements along with aTab indexnumber. This allows navigation via the Tab key without using a mouse. To do this, we click each element and assign an incremental number in theTab indexoption along with ourTitlein the title field. We want to do this in a logical order, for example, in a clockwise direction starting from the top left. Click each element, starting from the top left, and assign the following titles and tab numbers: - For the
SoupTitleelement: Title =Chicken Soup Tab = 1 - For the
Ingredientselement: Title =Ingredients Tab = 2 - For the
IngredientsTxtelement: Title =List of Ingredients Tab = 3 - For the
Descriptionelement: Title =Brief description of chicken noodle soup Tab = 4 - For the
Logoelement: Title =Logo Tab = 5 - For the
Soupelement: Title =Soup Tab = 6 - Test the project in a browser. Press the Tab key and tab around each section on the screen. Hover the mouse over the objects to view your Titles as tooltips.
When you publish your Edge Animate project, you can enable in the settings to publish your project as a static HTML page, which writes the tags as static tags in the HTML file rather than inside the Edge Animate JS file. By exporting your project as static HTML, it becomes more SEO friendly.
Your Turn: Loading External Content into Edge Animate
Many years ago we received an extremely wise bit of advice from a developer: “Code is code.” Whether it be HTML, CSS, JavaScript, or jQuery, the underlying concept is always code. The difficulty lies in writing it, but thanks to the extensive use of jQuery in Edge Animate, the content from many of the most popular services out there—in this section Google Maps and YouTube—is available to you through built-in APIs (application programming interfaces). Similar to how Typekit provided the embedding code for us to work with type in the previous chapter, Google’s services provide the code that can easily bring their content into Edge Animate. All you need to do is simply copy and paste it into your composition. Let’s get started:
- Open the
External.anfile located in yourExercisefolder. When it opens, you will see, as shown in Figure 7-28, that we have created a simple interface containing two buttons on the left and a background for the content on the right. You can assume from this that clicking either button loads a Google map or a YouTube video into the project.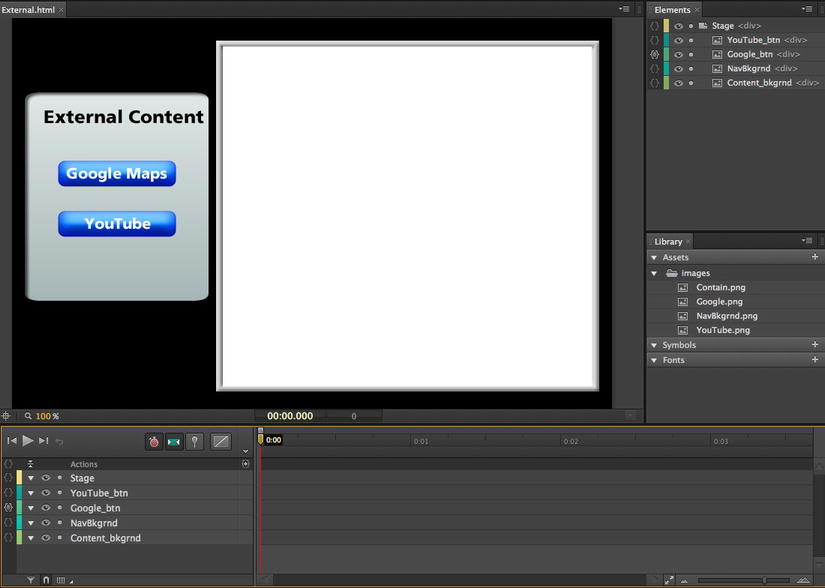
- With the playhead at the 0 point of the timeline add a
stop()action to the timeline. This will stop the playhead and give the user the opportunity to click either button. - Move the playhead to the 1-second mark of the timeline and add a label named
Googleand astop()action trigger. - Move the playhead to the 2-second mark and add a label named
YouTubeand astop()action trigger.With the main timeline set up, we can now concentrate on “wiring up” the project to display the content from Google Maps and YouTube. The first step is creating the “container” for the content.
- Select the Rectangle tool and draw out a rectangle that fills the white area of the
Content_bkgrndelement. Set the fill color to None and add a 1 or 2 pixel dashed stroke around the box. The stroke is just to give you a visual reference. It can be removed before you publish the project. - Rename this element “
container” and convert it to a symbol named “Google.” - Double-click the Google symbol to open the symbol and edit it in place. We are now ready to wire up the project.
Adding a Google Map to Edge Animate
A very common feature of web pages is a Google map showing the location of a business or local point of interest. In this case, one of the authors lives in Oakville, Ontario, and one of his favorite places is the trail alongside Lake Ontario that starts at Lakeside Park. Let’s add that location to Edge Animate.
You don’t need to use this location. Feel free to use any location that interests you. The key here is not the map. It is the code.
- Open Google Maps and enter Lakeside Park, Oakville, ON. You should see the park and harbor as shown in Figure 7-29.
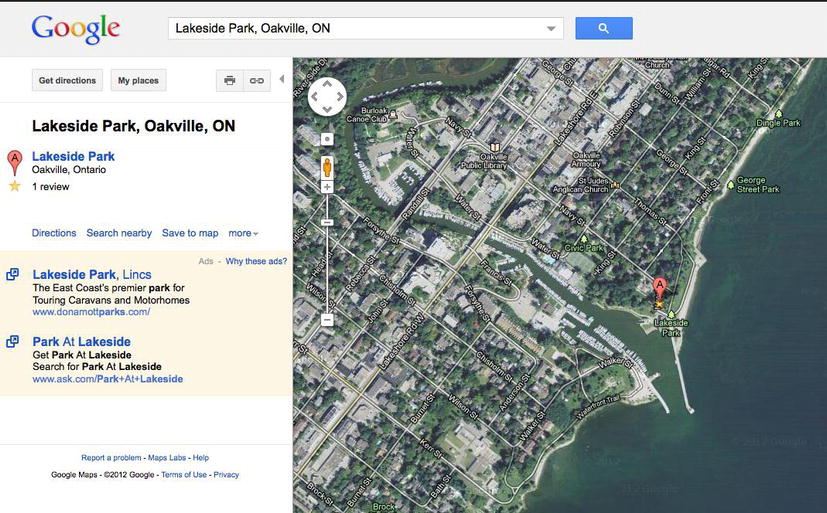
Figure 7-29. Open the location in Google Maps.
- Click the link icon at the top-right of the left-hand panel to open the Link dialog box shown in Figure 7-30. Click once in the
Paste HTMLarea to select the iFrame code. Copy it to the clipboard. Quit Google Maps to return to Edge Animate.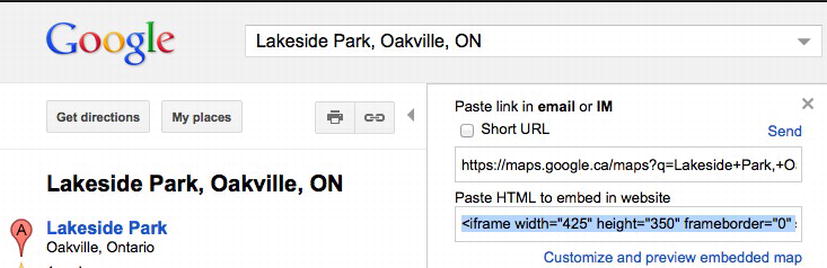
Figure 7-30. Copy the iFrame code to the clipboard.
When you click in the box below “Paste HTML to embed in website,” you automatically select all the code, although it may look like you did not. You can also click the “customize and preview embedded map” link to open up a window to further customize the code and select it and then copy it to the clipboard.
- Click once on the Stage to deselect the container. Since we are editing the symbol itself, the symbol name, which in this case is Google, should now appear in the Properties panel.
- In the Properties panel click the
Open Actionsbutton beside the symbol. When the Actions menu appears select thecreationCompleteaction (Figure 7-31). We need to do this because, according to the Edge Animate API documents: “creationCompletefires immediately after a symbol is created and initialized but before autoPlay occurs.” In short, it buys the time to load the map into the Google symbol before it appears in the browser.
Figure 7-31. Everything starts with a
creationCompleteevent attached to the symbol. - When the code editor opens, enter the following code:
var container = sym.$("container");We start by simply giving the box that we just created the variable name of
container. - Press the Return/Enter key once and enter:
var map = ' ';The plan here is to create a variable, named “map,” for our Google code that we copied from the clipboard in the previous exercise then paste that code in between our single quotes.
- Click once between the single quotes in line 2 and paste the iFrame code on the clipboard between them. You may notice the
widthandheightvalues, shown in Figure 7-32, are “hard wired” into the iFrame. Let’s change them so the values reflect the size of the box holding the map.
Figure 7-32. The width and height values should reflect those of the container element in the Edge Animate composition.
- Although you could simply note the values in Edge Animate’s Properties panel and enter them, you really should let the software handle this duty. Select the width value between the double parentheses and enter:
'+container.width ()+'This sets the width of the container to the current width of the Google symbol without you having to worry about a number. The height needs the same change. Select the value and replace it with:
'+container.height()+'Your additions should resemble those shown in Figure 7-33.

Figure 7-33. Setting the width and height values of the iFrame code to match the dimensions of any symbol.
- The last step is to add the iFrame to the target container. Click once in line 3 of the Code panel and enter:
container.html(map); - Return to the main timeline and select the
Googleelement. - In the Properties panel set the Google element’s
Displayproperty to Off. Move the playhead to the Google marker and change theDisplayproperty to On. - Save and test the movie. Click the button and (Figure 7-34) the map appears.
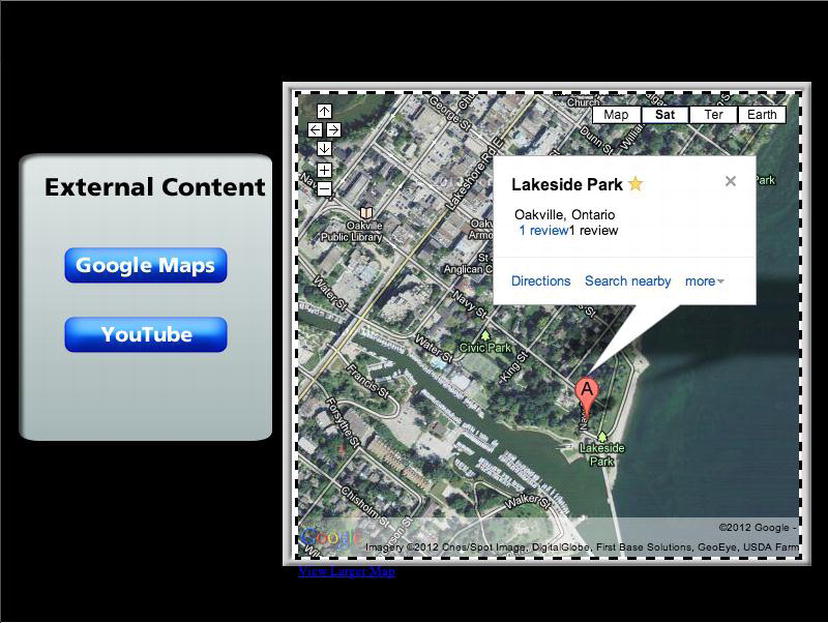
Figure 7-34. That’s exactly where we want to go.
Adding a YouTube Video
Adding a YouTube video uses the same steps as adding a Google map but there are a couple of things you should be aware of before adding YouTube content to you compositions.
If you open the Extend.an file in this chapter’s Complete folder, you will see we have added a YouTube video. If you test it in the browser and click the YouTube button you will see, as shown in Figure 7-35, a couple of children tubing through the winter snow outside the home of one of the authors.
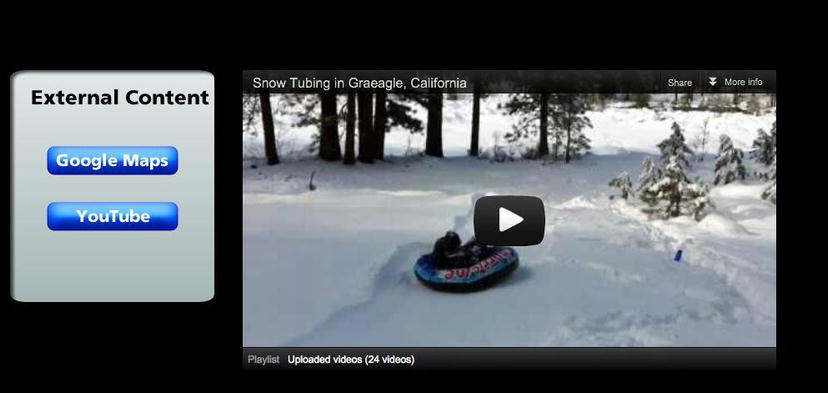
Figure 7-35. The YouTube video is in place.
If you open the code for the YouTube symbol, you will see the creationComplete code is not terribly different from the Google code other than the fact that we have used numbers for the width and height values. There is a reason for this.
If you point your browser to the video on YouTube—http://www.youtube.com/watch?v=tjXcL2mhs0M&feature=share&list=UU4Ns36PLecNVFa0oeLDLdwg—and open the Embed code, by clicking the Share button, you will see the dialog box displayed in Figure 7-36.
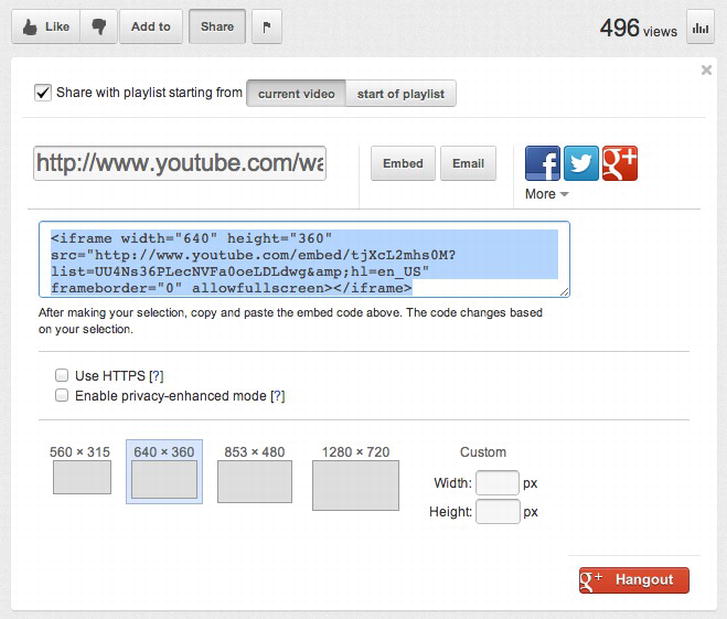
Figure 7-36. The YouTube embed options.
If you select one of the sizes, the width and height values in the code will also change. You are also given the opportunity to choose a custom width. This is where problems can arise if you pick the wrong size. The default sizes all use an HD 16:9 ratio. If your custom width and height values don’t have the same ratio, there is a pretty good chance the video will distort.
For example, a common non-HD video size is 640 pixels wide and 480 pixels high. That is an aspect ratio of 4:3, and HD video resized to those dimensions will either distort or sprout black bars at the top and bottom of the video. This technique is called letterboxing and it is how a 16:9 aspect ratio video gets shoehorned into a 4:3 aspect ratio.
If you are at all unsure as to whether the video will fit into a “container” element in Edge without distortion or letterboxing, our advice is to use one of the measurements from YouTube shown in Figure 7-36.
You Have Learned
This chapter has covered the following:
- How to publish an Edge Animate composition
- A thorough review of all of the files created by Edge Animate when a composition is published
- Dealing with iBooks and its hostile relationship with GIF images
- Adding Edge Animate compositions to Dreamweaver CS6 and Adobe Muse
- Creating a down-level stage
- Using Browser Lab to test a down-level stage
- Creating a preloader stage
- Adding accessibility to an Edge Animate composition
- How Overflow works in Edge Animate
- How to add a Google map or YouTube video to an Edge Animate composition
As we have pointed out throughout this book, Edge Animate lives in a web universe. We started by reviewing the various publishing options available to you, thoroughly reviewed the purpose of each file created when an Edge Animate project is published, created a down-level stage to adapt to older browsers, explored how to change Element tags to deal with accessibility, and finished up by adding a Google map and a YouTube video to an Edge Animate composition.
Now that you have the basics of using Edge Animate under your belt, let’s take your skills for a ride and add a little wow to your work. That’s the subject of the next chapter. We’ll see you there.