

Chapter 9
Edge Animate and Digital Publications
Information exchange prior to the 15th century was by word of mouth. That changed when Johannes Gutenberg invented movable type and revolutionized the distribution of information. With a printing press, anyone could share and distribute knowledge, wisdom, religious ideology, or literary works. The control of information was no longer in the hands of the political or religious elite as movable type printing became the first mass broadcast medium. Fast forward to the late 20th century when the personal computer was invented and later embraced in the home and office. Soon, connectivity evolved through Internet technology, later expanding via mobile and Cloud technologies. With all these modern advancements, one thing is absolute—our society is deep within the digital revolution.
One of the current driving forces behind this revolution is digital publishing. Although similar to web publishing, digital publishing differs largely in its workflow. Whereas web publishing involves programming, coding, and graphic design using web-specific tools, digital publishing uses tools and workflows already established in traditional print publishing. So, is it fair to say digital publishing is closer to traditional print publishing? Maybe. But the key differences are important to understand, namely, interactivity, distribution method, and final output. With traditional print publishing, the final output is a tangible item that is produced on printing devices and then distributed through publishing channels such as bookstores and newspaper publishers. It is a copy of the original work. With digital publishing, there is no printing process involved, and the final output is a perfect copy of the original. This digital copy is then distributed using an on-demand model through larger channels, such as the World Wide Web, or smaller channels, such as subscriber networks. With digital publishing, nothing tangible is produced other than the ones and zeros that make up the content displayed on a digital device. Furthermore, users can interact with digital published content in much the same way they interact with web content, which includes clicking buttons, tapping icons that animate or reveal pop-up information, listening to audio, viewing video or animations, or even opening a web page within the digital publication itself. This is why Edge Animate is perfect for creating content for digital publications.
This chapter will show how to integrate our Edge Animate compositions into digital publications. We will be covering the following topics:
- Understanding print vs. screen models and resolution
- Digital publishing formats
- Adding Edge Animate content with iBooks Author
- Adding Edge Animate content with Adobe InDesign
- Using Folio Builder to create a simple folio
If you haven’t already downloaded the chapter files, they can be found at http://www.apress.com/9781430243502. In this chapter we will be using these files:
Yosemite.ibaYosemite.inddYosemite.wdgtYosemite.oam
Understanding Print vs. Screen Models and Resolution
As we explained earlier, digital publishing follows a very similar workflow to traditional print publishing. However, since the output is digital and largely intended for screen presentation, traditional principles of print output and design differ. To better understand this, let’s briefly go over the different print and screen color models and compare resolutions.
CMYK Subtractive Color Model
Traditional printing utilizes color spaces referred to as CMYK, a subtractive color model. This is the process of combining inks, paints, or dyes together to produce a full range of colors in printed output. This color spectrum is based on three main colors: cyan, magenta, yellow (Figure 9-1). Black is added as an undertoning, hence the acronym CMYK. It might seem a bit confusing that this is called the subtractive color model because the colors are added together to create a full spectrum of color output. But the name does not refer to what is printed on a tangible item, such as a piece of paper. Subtractive color refers to how our eyes view the colors based on how the colors are absorbed (subtracted) or reflected on the final output target, such as the printed page.
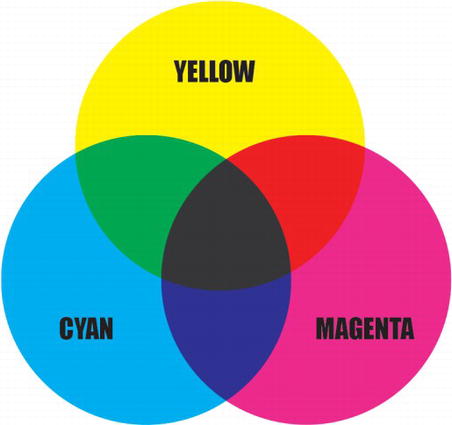
Figure 9-1. The subtractive color model.
RGB Additive Color Model
Digital or screen presentation utilizes the color space of RGB, an additive color model. In this model, light (instead of ink or paint) is added and mixed from different color sources to produce the full spectrum of color. The model is created by combining light that is projected from three main colors—red, green, and blue—hence the acronym RGB. Unlike the subtractive color model, which starts with white, the additive color model starts with black, and color is created by combinations of light projected on black (Figure 9-2). This is the color space that we work with in most web design tools, and it is the color space for Edge Animate. It is a good idea to start in this color space when designing for a digital publication.
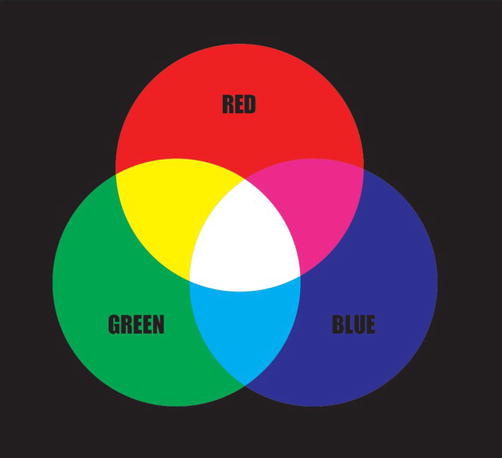
Figure 9-2. The additive color model.
Resolution
The second difference between traditional publishing and digital publishing is resolution. In simple terms, resolution is the number of pixels (dots) it takes to create a raster graphic image. Traditional printing typically uses a much larger pixel density image to reproduce accurate and sharp images on the printed page. This can be a resolution anywhere between 150 and 300 dpi (dots per inch). Digital publishing typically requires a much lower resolution, normally between 72 and 96 dpi. We talked about the image formats that Edge Animate supports in Chapter 4, most of which are raster graphic formats. Some digital publishing programs will resample higher resolution raster files and even convert vector-based files to lower resolution screen formats when they export content to a final delivery format. However, it’s a good practice to start in a screen-based resolution when designing for digital publications.
Digital Publication Formats
Anything that can be printed can be converted to a digital publication: from brochures, to executive summaries, corporate reports, school reports, publications, and books, just to name a few. In fact, you might be reading this book in a digital format. Standard digital publishing formats allow for compatibility between devices and systems to accurately display content on multiple devices. Let’s take a look at three of the main publishing formats available.
The EPUB Format
The electronic publication format, EPUB, is the most common file format used for digital publishing today, largely because it was adopted as a standard in 2007 by the International Digital Publishing Forum and thus has been widely used by publishers to produce electronic publications. The format allows for content to be reflowed and thus easily adapted to different devices and screens. In addition, EPUB supports inline raster and vector images, CSS styling, digital rights management, and metadata. Although EPUB is a common format, it does have its design limitations because the current format lacks the ability to precisely fix content on the page or include specialized formatting.
The IBOOKS Format
Apple’s IBOOKS format is a proprietary format based on the EPUB format. Files created using this format are only compatible with the iBooks Reader application. Currently, the only application that supports the export of this format is Apple’s iBook Author, which unfortunately, is only available on Mac computers running Lion or greater.
The FOLIO Format
Although the EPUB format is widely used and supported, its limitations were understood early on by Adobe, who had pioneered digital publication with their application-independent Portable Document Format (PDF) in early 1990. It is clear that from this understanding, they developed the FOLIO format, a proprietary format that Adobe InDesign utilizes, along with other tools and online-hosted services that allow for the production of rich interactive digital publications that preserve much of the original design integrity of the publication.
Edge Animate’s Formats for Digital Publishing
As you learned in Chapter 7, you can prepare your Edge Animate content for delivery in other formats, namely, formats compatible with digital publishing applications like Apple iBooks Author or Adobe InDesign. The two main formats that Edge Animate supports are iBooks / OS X Dashboard Widget format—with the .wdgt extension—which is supported by Apple’s iBooks Author, and the Animate Deployment Package—with the .oam extension—which is supported by Adobe’s InDesign. To create these formats, you first need to define your publishing output options (as we learned in Chapter 7), and then Edge Animate gathers all of your project files (such as your HTML, CSS, and JavaScript files) along with any of your assets and packages them, when you select publish, into a single WDGT or OAM file. These separate published formats can be imported into their targeted digital publishing application. Because the .wdgt and .oam extensions are the two main digital publishing formats Animate supports, we will concentrate our attention on how to incorporate our Edge Animate content in publications created with iBooks Author and InDesign.
Adding Animate Content with iBooks Author
Apple’s iBooks Author is a free program that allows you to create iBooks publications. Getting Edge Animate content into an iBooks Author document is literally drag-and-drop simple because iBooks Author does the under-the-hood work for us. The first step to get content out of Edge Animate is to publish it to Apple’s iBooks / OS X Dashboard Widget format. If you remember our Chapter 7 exercise, anything we create in Edge Animate can be exported to the WDGT format except for GIF files. Let’s take a look at the steps:
If you have an Apple desktop or laptop computer running Mac OS Lion and above, you can download the free iBooks Author application from the App Store and follow along with the next section. Unfortunately, there is no Microsoft Windows version available.
- Launch Apple iBooks Author.
- In the File menu, locate your
Exercisefolder and open theiBooks Authorfolder, then open theYosemite.ibadocument (Figure 9-3).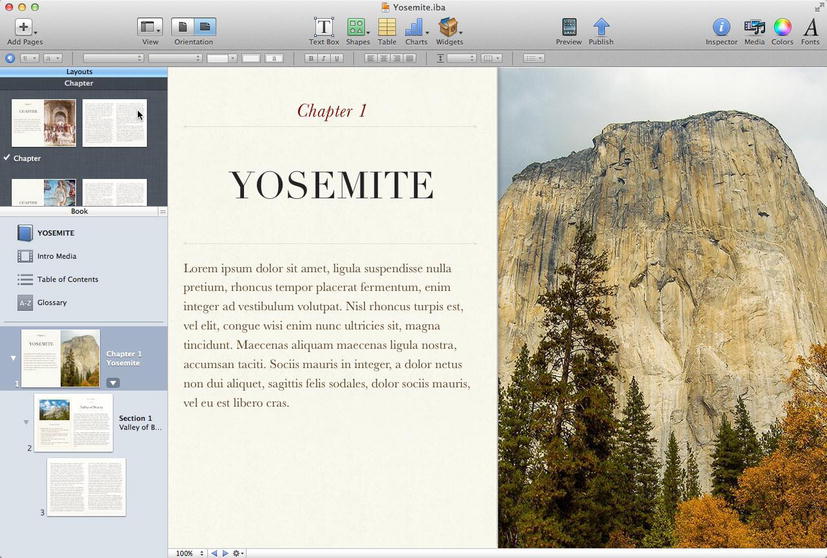
- In the
Viewmenu, make surePage Thumbnailsis selected. - Select page 3. This is where we will be dragging and dropping our Edge Animate widget.
- If you want to preview the Edge Animate content first in your web browser, click to open the
Yosemite.htmlfile inside theYosemitefolder, which is inside yourExercisefolder. We are going to import an Edge Animate composition we have prebuilt, which is located in thepublishfolder inside theYosemitefolder. - Switch to the
Finderand locate thepublishfolder in yourExercisefolder. Inside thepublishfolder you’ll see a file namedYosemite.wdgt. - Drag and drop the
Yosemite.wdgtfile on page 3 of your iBooks Author document (Figure 9-4).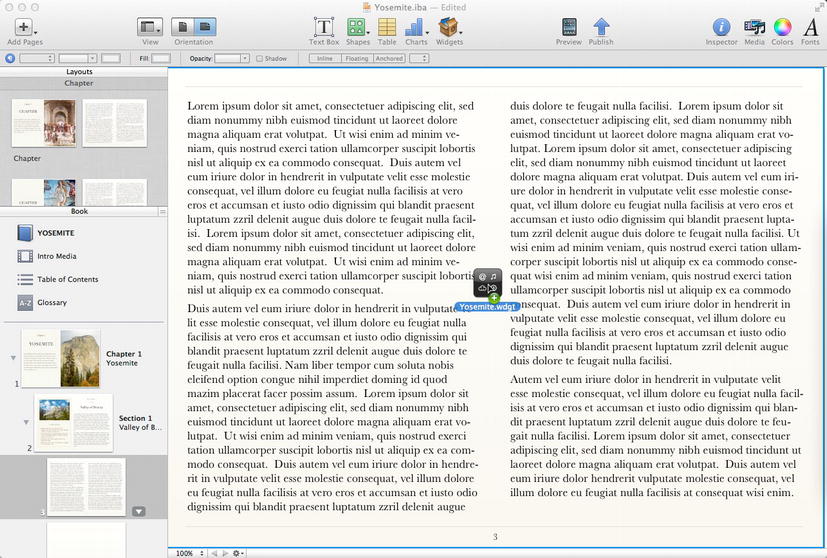
Figure 9-4. Dragging and dropping our WDGT file into iBooks Author.
- Once we have released the mouse, iBooks Author automatically creates an Interactive element on the page and embeds our WDGT file. We can reposition the WDGT file if we so choose or update the default title text as well, and that’s how easy it is to place an Animate composition into iBooks Author (Figure 9-5).
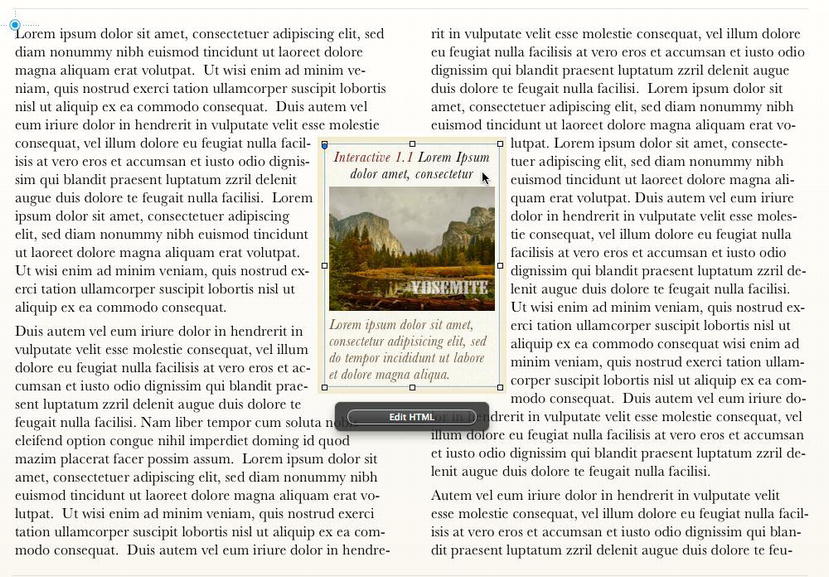
Figure 9-5. Repositioning our Animate element in iBooks Author.
Previewing Our iBooks Author Document
Now that we have added our Edge Animate content to our document, we need to preview and test our publication to make sure it behaves as expected. The only way to do that is by using an iPad. In iBooks Author, the Preview menu function automatically opens our publication in the iBooks app. In order to do that, we need to make sure our iPad is connected to our Apple desktop or laptop computer via the USB cable. Let’s test our document:
- Connect your iPad to your Apple desktop or laptop computer.
- Open the iBooks reader app on your iPad. If you don’t have it installed, you can download it for free from the App Store.
- Under the File menu in iBooks Author, select Preview.
- The iBooks app will automatically open our document.
- Navigate to page 3 and pinch or tap with your fingers on the Edge Animate content to begin testing.
- Our Edge Animate content opens in a window. Tap on the mountains to activate the interactive elements in our original Edge Animate file (Figure 9-6).
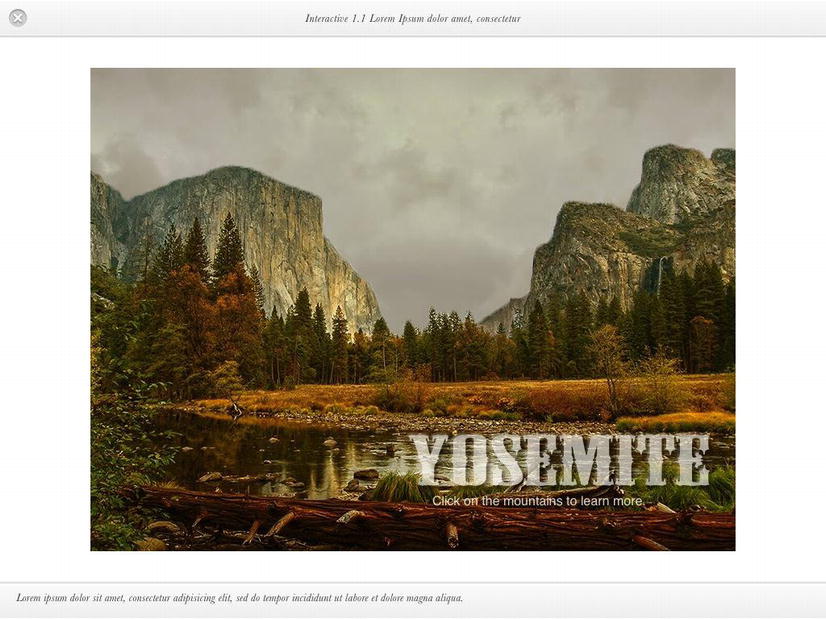
Figure 9-6. Our zoomed in Edge Animate content as it looks on our iPad screen.
This exercise demonstrates how you can easily import Edge Animate content into iBooks Author. What you want to take away here is that anything you can create in Adobe Edge Animate—animated bar graphs, interactive pie charts, games, spinning logos, and so forth—can be published to the WDGT format and imported into Apple iBooks Author. Once inside the iBooks document, the WDGT file is a self-contained media element like an image, or QuickTime movie, or an audio file that a user can interact with. The icon that represents the imported Edge Animate WDGT file is a placeholder that will autoflow with other elements inside the iBooks document, such as text and graphics, as the user changes the orientation of the device or enlarges the text display, for example. When the Edge Animate WDGT placeholder is clicked, the Edge Animate content is scaled and autoadjusted to fit the current orientation of the device screen (i.e., portrait or landscape).
Adding Edge Animate Content with Adobe InDesign
As one of Adobe’s flagship design applications, InDesign provides several ways to get Edge Animate content into publications. There are two digital publishing formats InDesign creates: EPUB and FOLIO. As we explained earlier, the EPUB format uses an open standard that allows content to reflow. In our previous exercise, you may have noticed your content flowing differently as you rotated your iPad screen. As you recall, the IBOOK format is similar to the EPUB format, but it is modified to handle advanced media integration, such as movies and audio. And this is the rub: the more common EPUB 2.1 format utilized by a large majority of EPUB readers does not support advanced media integration (i.e., Adobe Edge Animate content). Although the recently approved EPUB 3.0 format supports HTML 5, CSS3, video, and audio, there are few readers capable of handling the EPUB 3.0 format. Certainly, this will change in the future as more and more publications go digital and the format becomes readily supported.
The limitations of EPUB change when we switch to using the Adobe FOLIO format, which is an integrated digital publishing format based on Adobe’s PDF format. The FOLIO format supports advanced media integration within the Adobe InDesign environment. That means we can utilize all of InDesign’s creative toolset for our publications, and with the OAM publishing workflow built in to Edge Animate, we can place our Edge Animate content within InDesign and publish our final document to the FOLIO format for viewing on a range of tablet devices from Apple to Android.
If you don’t have a copy of InDesign CS6, you can download a trial version from Adobe’s Creative Cloud. Adobe recently added the Digital Publishing Suite Single Addition to InDesign. This edition allows you to submit an unlimited number of iPad apps to the Apple App Store as well as publish and test your FOLIO files locally and manage them online using the Adobe Digital Publishing online resources.
Let’s get started.
- Locate the
InDesign Foliofolder inside yourExercisefolder and open theYosemite.inddfile. - Under the
Windowmenu, chooseWorkspace>Digital Publishing. - Click
Pagesunder theWindowmenu to see the document overview. Notice we have two design layouts: one for iPad H (horizontal) and one for iPad V (vertical) display (Figure 9-7).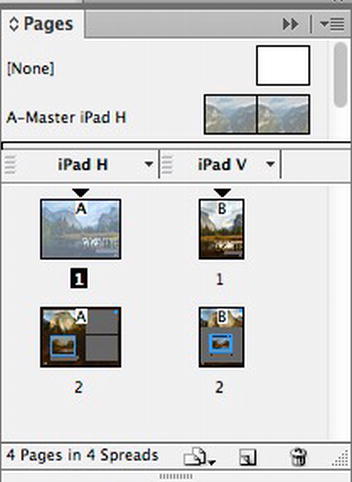
Figure 9-7. An overview of our design layouts in Adobe InDesign pages view.
- Double-click page 2 in the
iPad Hcolumn. This will zoom the display to page 2. - We want to create a button below the El Capitan image that, when clicked, opens our Edge Animate content. First, we need to place our button graphic. Click under the
Filemenu and choosePlace. - Navigate to the
Linksfolder and choose the file namedButton_Img.jpgand click Open. - The cursor will display a small preview of the image. Click just below the El Capitan image to place the
Button_Img.jpgfile in the document. - With the
Button_Img.jpgstill selected, click onWindow>Styles>Object Styles. - Select
Animate Content(Figure 9-8). You can also apply your own effects here if you so choose. - Choose
Edit>Copy. - In the
Pagespanel, double-click the page 2 ofiPad V. - Choose
Edit>Paste. - Position the
Button_Img.jpgfile in the open space between the body text.
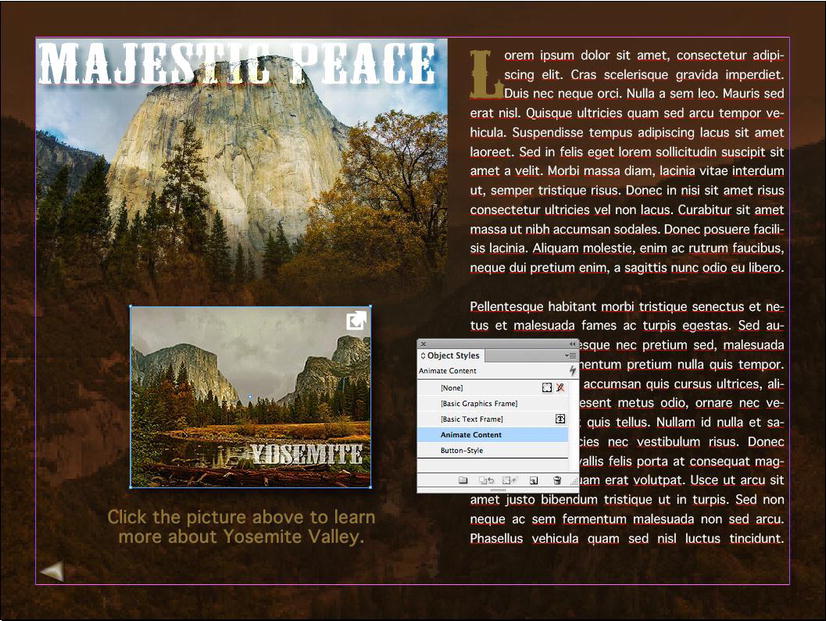
Figure 9-8. Our button image placed and styled on page 2 of our iPad H layout.
Creating Multistate Objects
Now that we have our button images placed in our document, we need to create the states necessary to add interactivity to our folio. If you have worked with programs such as Adobe Flash, Fireworks, or Muse, you may have worked with states before. Essentially, a state is like a moment in time for a particular object. In that moment, whether it is when the mouse rolls over the object or something is clicked, whatever appearance or navigation that is associated with that state is displayed and then acted upon. The plan here is to create a two-state object that when clicked or tapped displays the Edge Animate content in an overlay window above the current page. We also want to add a close button to hide that state after our user has had a chance to interact with our Edge Animate content. To insert a multistate object, follow these steps:
- Double-click page 2 on the
iPad Hlayout. - Choose
File>Placeand drop theopenBtn.pngfile on the page. - Position the
openBtn.pngfile on the top right corner of theButton_Img.jpg. - Select
openBtn.pngandButton_Img.jpgand chooseObject > Group. - Make sure the Show Guides option is enabled under
View>Grids & Guides. - In the
Toolspalette, choose the Rectangle tool (or type M on your keyboard). - Draw a rectangle to cover the contents on the page within the guidelines.
- Choose
Window>Color>Swatchesand select White (paper). - Choose
Object>Arrange>Send Backward. - With the white rectangle still selected, choose
File>Placeand clickcloseBtn.pngto place it on the inside of therectangleand on the top left corner. - Shift-click the rectangle and the
Button_img.jpgand selectWindow>Interactive>Object States. - In the
Object Statespanel, clickconvert selection to multi-state object(Figure 9-9). - In the
Object Namefield, enteriPadH_MultiStates. - Repeat steps 2 through 12 for page 2 in the
iPad Vlayout, but enter the Object NameiPadV_MultiStates.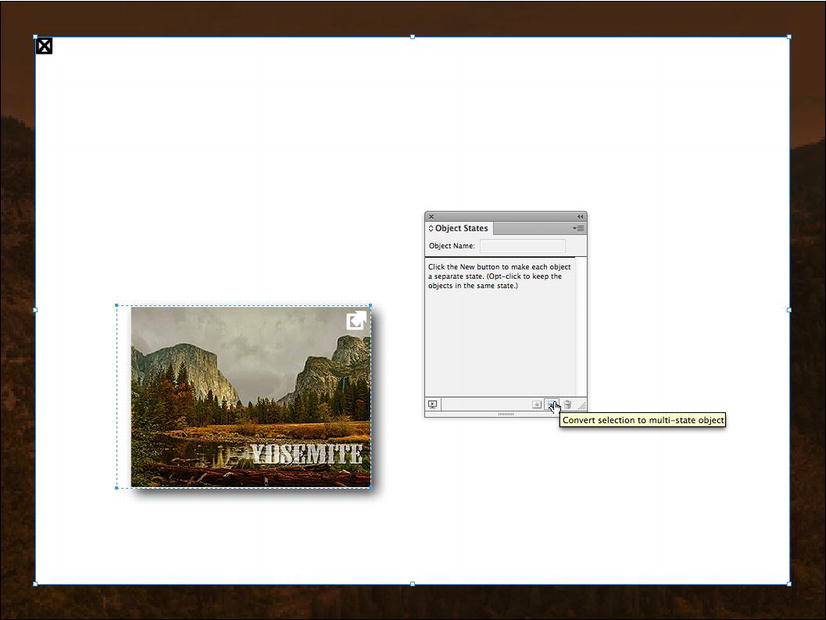
Figure 9-9. Converting our selected objects into a multistate object.
Wiring Up Our Multistate Objects
We need to add interactivity to our multistate objects. We do this by creating an invisible hotspot and then converting that hotspot into a button that switches to a different state upon a mouse click or a finger tap.
First, we wire up the button click that will switch to our State 2 rectangle where we will be placing our Edge Animate content later:
- Double-click page 2 of the
iPad Hlayout. - Select the Rectangle tool and draw a box over the
Button_img.jpg. - Choose
Window>Interactive>ButtonsandForms. - Click the
Convert to Buttonicon, which is next to the Trash can icon. - Name the button
iPadH_Btn. - Make sure the
Eventis set toOn Release or Tap. - Under
Actions, click the+icon and selectGo to State. - In the
Statedrop-down, chooseState 2.Next we wire up our close button that will switch back to State 1 when our user clicks or taps it:
- Choose
Window>Layersto open up theLayerspanel. - Click the triangle next to
Layer 1to open the sublayers within. - Click the small outlined square on the right side of the
iPadH_MultiStatessublayer to select that sublayer. It will turn blue when selected (Figure 9-10).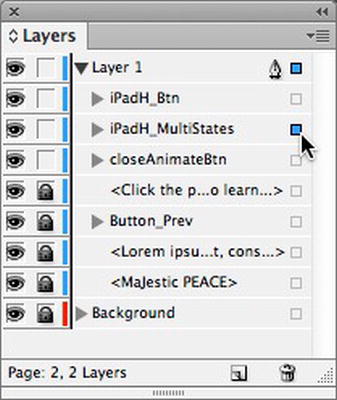
Figure 9-10. Selecting our iPadH_MultiStates sublayer.
- In the
Object Statespanel, selectState 2. - Select the Rectangle tool and draw a small rectangle over the
closeBtn.pngimage on the top left corner of the white rectangle. - In the
Buttons and Formspanel, click theConvert to Buttonicon. - Name the button
iPadH_CloseBtn. - Make sure the
Eventis set toOn Release or Tap. - Under
Actions, click the+icon and selectGo to State. - In the
Statedrop-down, chooseState 1(Figure 9-11). - Save your file.
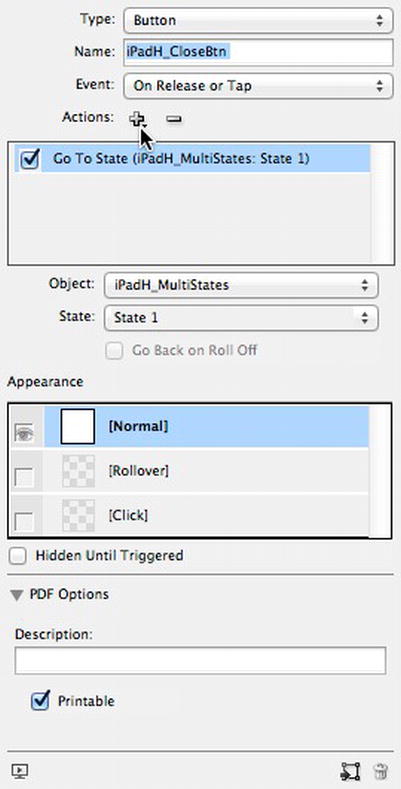
Figure 9-11. Wiring up our close button state.
We want to repeat the previous procedures and wire up our iPad V buttons, making sure we name them accordingly. You can reference the finished project in the complete folder of your chapter exercise files.
Placing an Edge Animate OAM File in InDesign
With our buttons and states set, we are now ready to place our Edge Animate content in our InDesign file. Again, as you recall from Chapter 7, we learned how to publish to an Animate Deployment Package or OAM file. This is the easiest way to import Edge Animate content into InDesign and is the method we will be using for the next exercise.
If you remember from the previous exercise, we added a second state to our buttons that contained a white rectangle. This is where we will be placing our Edge Animate OAM file. The trick here is to first place the Edge Animate content, position it, cut it from our layout, and then paste our copied file into a selected state. Why do we have to do it this way? The answer is that we really don’t have to do it this exact way. We could, for example, place all the state’s elements on the layout at the same time in layer form (one on top of the other) and then select the whole lot and convert them to a multistate object. The reason we are doing it this way is because we have to add an object to our multistate object, which in this case is our Edge Animate file, and we want the position of that object to match the position of our white rectangle, which we are using as an alignment guide. Here’s the procedure for the iPad H page:
- Open the Pages panel and double-click page 2 in the
iPad Hlayout side. - Choose
Window>Layersand make sure the sublayers are showing by clicking the triangle toggle button next toLayer 1. - Click the small outlined square on the right side of the
iPadH_MultiStatessublayer to select that sublayer. It will turn blue when selected. - If the
Object Statespanel is hidden, bring it up by choosingWindow>Interactive>Object States. - In the
Object Statespanel, make sureState 2is selected. This is the state where our white rectangle resides. - Choose
Edit>Deselect All. - Under the
Filemenu, choosePlace. - In the
Linksfolder, locate and select theYosemite.oamfile and click Open. - Click anywhere on the pasteboard (this is the white area surrounding the page).
- Our Edge Animate OAM file is now inside a frame. Drag it over the top of the white rectangle and center it.
- With the Edge Animate content still selected, click
Window>Folio Overlays. - Make sure
Allow User Interactionis checked. - Check
Auto Playand set the delay to 0.125 seconds (Figure 9-12).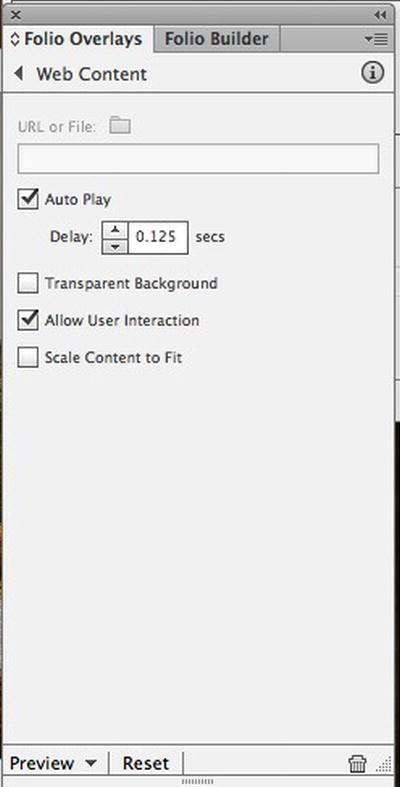
Figure 9-12. Wiring up our close button state.
- Now, choose
Edit > Cut. This removes our content and copies it to the clipboard. - In the
Object Statespanel, clickState 2. - On the bottom of the
Object Statespanel, click theStaricon to “paste copied objects into selected state” (Figure 9-13).
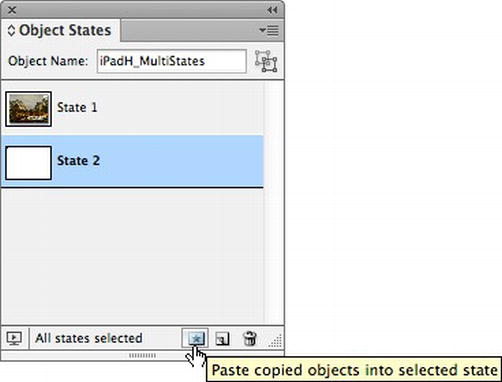
Figure 9-13. Adding additional objects to a multiobject state.
Here’s the procedure for the iPad V page:
- Open the
Pagespanel and double-click page 2 in theiPad Vlayout side. - Choose
Window>Layersand make sure the sublayers are showing by clicking the triangle toggle button next toLayer 1. - Click the small outlined square on the right side of the
iPadV_MultiStatessublayer to select that sublayer. It will turn blue when selected. - If the
Object Statespanel is hidden, bring it up by choosingWindow>Interactive > Object States. - In the
Object Statespanel, make sureState 2is selected. - Choose
Edit>Deselect All. - Under
View>Guides and Grids, make sureSmart Guidesis checked. - In the
Tools Palette, select the Rectangle Frame tool (or type F on the keyboard). - Draw a frame that is 640 pixels wide by 480 pixels high, and with the Selection tool, move and center the frame over the white rectangle.
With the new frame still selected, click
File>Place, then select theYosemite.oamfile in theLinksfolder and click Open to place it inside the new frame. - Bring up the
Folio Overlayspanel as before and make sureAllow User Interactionis checked along withAuto Playand set the delay to 0.125 seconds (Figure 9-12). - Now, choose
Edit > Cut. This removes the Edge Animate content and copies it to the clipboard. - In the
Object Statespanel, clickState 2. - On the bottom of the
Object Statespanel, click theStaricon to “paste copied objects into selected state” (Figure 9-13). - Save your file.
Previewing Our Folio with InDesign
Now that we have added our multistate objects, buttons, and Edge Animate content, we are ready to preview our folio before we convert it for viewing on the iPad. We can do that right within InDesign using the Adobe Content Viewer.
- Under the
Filemenu chooseFolio Preview(Figure 9-14). This will launch the Adobe Content Viewer installed with InDesign.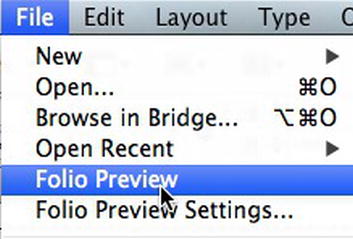
Figure 9-14. Previewing our folio in InDesign.
- Test your folio by clicking on the buttons to open the Animate content.
- Interact with the Animate content.
- When you are finished, click the Close icon to return to the button page.
- Save your InDesign file.
Using Folio Builder to Create a Simple Folio
So far you have learned how to build a basic folio file in InDesign, add Edge Animate content, and preview it in the Adobe Content Viewer. Included in the Digital Publishing Suite are several tools you can use to publish your folios so they can be viewed on digital devices such as Apple’s iPad.
A folio holds content referred to as articles. Articles can be created from pages in an existing InDesign document or created from separate InDesign documents. Rather than diving deep into the ins and outs of creating folios, which is really beyond the scope of this book, what we want to focus on is converting our existing InDesign document into a simple folio that we can share and preview on a tablet device such as the iPad.
Creating Articles
We first need to convert our pages into articles so they can be added to a folio. Here is how we would do that:
- If you closed the
InDesigndocument from the last exercise, locate it in yourExercisefolder and open it. - In the
Layerspanel, make sure theBackgroundlayer is unlocked. - In the
Pagespanel, double-click page 1 in theiPad Hlayout side. - Under the
Editmenu, chooseSelect All(Command+A [Mac] or Ctrl+A). - Under the
Windowmenu, chooseArticles. - Click the
Create New Article button(next to the Trash can icon) to create a new article (Figure 9-15). - Name the article
Cover_Hand make sureInclude When Exportingis checked. - Repeat steps 2 through 6 for page 2 in the
iPad Hlayout, and name itPage2_H. - Repeat steps 2 through 6 for page 1 in the
iPad Vlayout, and name itCover_V. - Repeat steps 2 through 6 for page 2 in the
iPad Vlayout, and name itPage2_V.

Figure 9-15. Creating a new article for our folio by selecting the entire contents from the page.
Creating a Folio and Adding Articles
Now that we have created our folio articles, we need to create the actual folios where they’ll reside. We do that with the Folio Builder inside InDesign. Although we could connect our iPad to the USB port of our computer, launch the Adobe Content Viewer App on our iPad, and then click the preview button in the bottom of the Folio Builder panel to bring up our folio preview in the iPad, the plan here is to log in to the Adobe Digital Publishing Service with our Adobe ID and then upload and share our folios for viewing on our Apple iPad (Figure 9-16). This is a more practical way to preview our folios, since it also allows us to share them with other people.
If you don’t have an Adobe ID, you can get one for free at http://www.adobe.com. With an Adobe ID, you have access to numerous FREE Adobe services, one of which is the Digital Publishing Suite Single Edition, which is included with a Creative Cloud license.
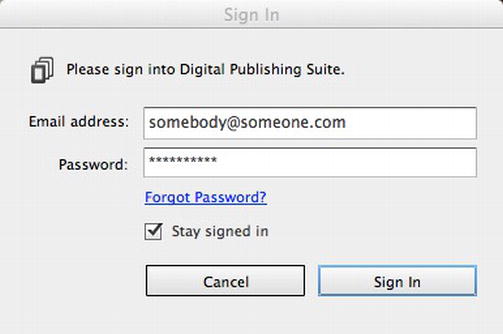
Figure 9-16. Logging into Adobe’s Digital Publishing Suite is a great way to view our folios as they will appear on a tablet device.
Let’s get started:
- Under the
Windowmenu, chooseFolio Builder. - Click
Sign Inand enter your Adobe ID (Figure 9-16). - Once you are signed in, click the
Create new foliobutton on the bottom of theFolio Builderpanel. - Name the Folio
Yosemite – Valley of Beauty. - Make sure your target is
Apple iPadand your orientation is set to bothLandscape and Portrait Folio. - Leave the
Right Edge Bindingunchecked and make sure theDefault Formatis PDF. - In the
Cover Previewbox, click the folder icon underVerticaland chooseYosemite_Cover_V_Prv.jpgin yourLinksfolder. - In the
Cover Previewbox, click the folder icon underHorizontaland chooseYosemite_Cover_H_Prv.jpgin yourLinksfolder. - If you want to edit your folio offline, check the
Create Offline Foliooption. - Click OK. Folio Builder uploads the basic structure of your folio with the parameters you just set.
- At the bottom of the
Folio Builderpanel, click theAdd Articlesicon. This will add all the open articles that we just created in theArticlespanel. Enable theHorizontal Swipe Onlyoption, which limits the swiping of pages only from left to right (Figure 9-17).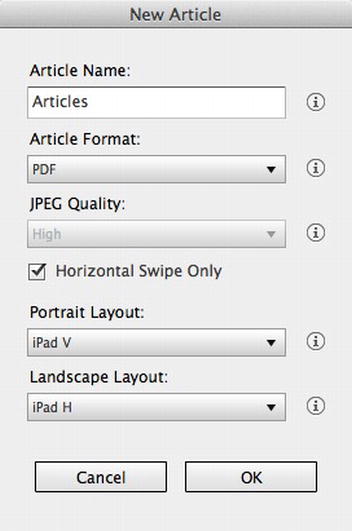
- Select
Articlesin theFolio Builderwindow and open the pop-down menu in the top right corner and chooseUpdate(Figure 9-18). This will upload an updated version of your folio to your Adobe account. - To view your folio, download the free Adobe Content Viewer App for iPad from the App Store and then log in to your Adobe Account.
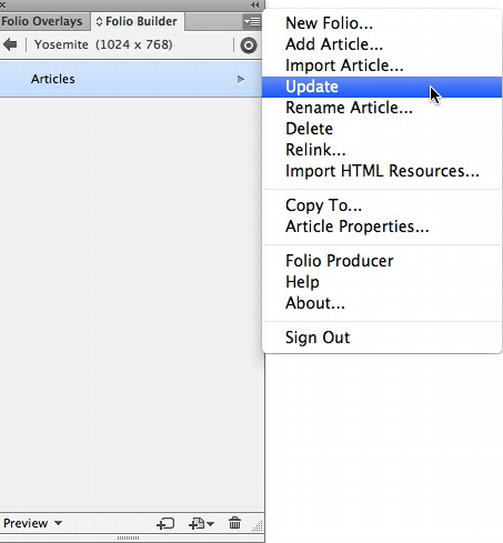
Figure 9-18. Uploading our folio to the Cloud using the Update option in the Folio Builder panel.
You Have Learned
In this chapter, we learned how to add Edge Animate content to digital publications. We learned some practical knowledge and skills including:
- Print and digital publishing workflows
- Various digital publishing formats
- Working with Animate content in iBooks Author
- Working with Animate content in Adobe InDesign
- The basics behind Folio Builder and uploading and sharing folios
The end result we gained here is the knowledge of just how easy it is to bring Edge Animate content into digital publications. And that’s the point. Dragging and dropping or placing Edge Animate content into a publication is dead simple thanks to the streamlined publishing options included in Edge Animate. Can you imagine keeping track of image assets, JavaScript files, HTML files, and the likes when working with larger iBook or InDesign folio projects? Indeed, it would certainly be a nightmare.
Now that you have a taste of just how easy it is to work with Edge Animate content in your digital publications, we hope you will explore it further. But, before you do, we’ve got one more chapter for you that will set you on the path to the future, because mobile computing is growing in leaps and bounds and overtaking desktop computing. Of course, Edge Animate is a perfect tool for the mobile world that will provide you with great flexibility and cutting-edge features for years to come. If this is something you find exciting, turn the page to learn how to take your Edge Animate compositions mobile.