
“It’s in our country’s interests to find those who would do harm to us and get them out of harm’s way.” | ||
| --George W. Bush, Washington, DC, April 28, 2005 | ||
In the previous chapter, we looked into automating file format fuzzing on the UNIX platform. We’ll now switch to uncovering file format vulnerabilities within Windows applications. Although the overall concept remains consistent, there are important differences that we’ll attempt to highlight. First off, Windows programming by nature lends itself to graphical tool design so we’ll stray from the command-line applications presented in the last chapter and build a fancy GUI for the script kiddies. We also spend time identifying appropriate file formats to target which is an important decision when working in the Windows environment, given the heavy reliance within Windows on default applications for given file types. Finally, we present a solution for the ever-present challenge of detecting exploitable conditions.
Although file format vulnerabilities can also affect servers, they are more likely to affect client-side applications. The emergence of file format vulnerabilities has marked a trend toward the importance of client-side vulnerabilities. Network administrators have over time focused resources on protecting the corporate network from network-level vulnerabilities. At the same time, software vendors have awakened to the threats posed by server vulnerabilities and these efforts have, in combination, led to a decrease in critical server-side vulnerabilities in popular applications and operating systems, which have in the past led to fast spreading worms that caused significant damage. The same cannot be said, however, for trends occurring on the client side. In the past couple of years we have seen an increase in client-side vulnerabilities that lend themselves to targeted attacks as well as phishing and identity theft.
File format vulnerabilities pose a unique risk to enterprises. Although such vulnerabilities do not lend themselves to fast spreading worms or instant network compromise, they are in many ways more difficult to protect against. The Internet, by design, promotes the sharing of information. The Web is filled with movies, images, music, and documents that make it a vast source of information and entertainment. All of that content requires that files be openly and freely shared. We have not historically considered files such as pictures or spreadsheets to be malicious as they are not themselves executable. As discussed previously, however, they can lead to exploitation when interpreted by a vulnerable application. How do we then protect against this threat? Should network administrators block all content at the firewall? The Web would be a very boring place if it was only text based. Do we really want to go back to the days of surfing the Web with a text-based browser such as Lynx? Of course not, but we do need to be aware of the threat posed by file format vulnerabilities.
The Windows platform is particularly impacted by file format vulnerabilities due to its user-friendly nature. File types are associated with applications that will handle them by default. This allows users to watch a movie or read a document simply by double-clicking on the file. It isn’t even necessary to know what applications are capable of rendering specific file types to view or listen to them. Imagine the risk posed by a file format vulnerabilities discovered in applications that run by default on the Windows operating system. Millions of end users are immediately impacted. The following sidebar lists some of the more significant file format vulnerabilities that have impacted Microsoft Windows.
FileFuzz was created to automate the process of identifying file format vulnerabilities. The goals for FileFuzz are threefold. First, the application should be intuitive and user friendly. Second, it should automate both the creation of fuzzed files and execution of the applications designed to interpret them. Third, it should incorporate debugging functionality to ensure that both handled and unhandled exceptions are identified. To satisfy those goals, we chose to design the application using the Microsoft .NET platform. This allowed us to build a graphical front end using C#, while some back-end components such as the debugger were written in C. A screenshot of the GUI can be seen in Figure 13.1.

FileFuzz is designed to identify file format vulnerabilities and does so by following a simple but effective brute force approach. In a nutshell, FileFuzz mangles properly formatted files, launches them within applications designed to interpret those files, and watches to see if any problems occur. It might not be pretty, but it works. When developing FileFuzz, we were amazed at just how easy it was to find potentially exploitable conditions within file formats.
FileFuzz goes through three distinct phases. First, it creates the files that are to be fuzzed. It does this by taking a legitimate user-supplied file and based on the directives provided, makes a calculated succession of mutations and saves the resulting files. Second, one by one, the mutated files are launched within the target application. The files are launched repeatedly and the resulting process is ultimately killed based on a user-defined timeout. Finally, built-in debugging functionality monitors the processes to identify handled and unhandled exceptions that might occur. When such events are identified, they are recorded and reported to the end user. Each of these phases is presented in further detail next.
FileFuzz takes a brute force approach to fuzzing. This means that we need the ability to read from a valid file, overwrite specific segments of that file, and save the altered file so that it can be read by the application responsible for interpreting the file. This process must be automated as it will be repeated hundreds or thousands of times.
FileFuzz allows for four separate approaches (All Bytes, Range, Depth, and Match) to file mutation that can be divided into the following categories
Binary files
Breadth
All bytes
Range
Depth
ASCII text files
Match
As can be seen, FileFuzz is capable of handling both binary and ASCII text file formats. Within binary files, we take two separate approaches, namely breadth and depth. To differentiate between breadth and depth, we’ll use the analogy of drilling for oil. If you’re searching for oil in a large geographic area you can’t simply start by drilling. You must first use various techniques to identify those locations that are most likely to contain the treasure that you’re looking for. Perhaps you study maps, analyze rock formations, or use ground-penetrating radar. Regardless of the approach, once you find those interesting locations, you can start drilling test holes to see which are the most promising.
With file format fuzzing, we take a similar approach. First we use breadth to find the interesting locations and then we use depth to determine if we’ve struck black gold. Breadth refers to covering either all bytes within the file or a specific range. Separate files are created by consecutively changing byte values within the range to a predefined value until the entire range has been covered. Once that has been completed, the files are launched one after the other to determine if the changes result in any exception.
Occasionally we get lucky and need to go no further. Sometimes at this point, exceptions result that are clearly interesting and it is obvious that the end user has control over the crash, as the value of the mutation that was introduced is clearly visible in the registers. More often than not, it’s not this easy. A crash will occur and the location might be interesting, but it’s not clear from the register values if the end user will have any means of controlling the crash. In this case, we then move onto depth. Once interesting byte locations have been identified within the file, we then focus on these locations and use depth to try all possible byte values for that location. When we look at the resulting crashes we can get a sense of the degree to which we can control that crash. If the exception location and resister values are consistent regardless of the byte values provided, we have no control over that exception. If, however, the crash occurs at different locations or the register values continually change, it is then clear that we have at least some influence over the resulting exception based on the values that we use when mutating the file.
FileFuzz also accommodates ASCII text files. It does this by allowing the end user to first select a string that identifies the location to overwrite and then requests three separate inputs to determine the input used to mutate the file. The end user must provide a string value, its length, and the number of times that it is to be multiplied. Let’s look at an example. In general, ASCII text files such as *.ini files contain name–value pairs in the following format:
name = value
Typically, we want to overwrite the value. Let’s assume that we want to overwrite the value with a succession of A characters in multiples of 10. In this case, we would first set the Find value to the = character, as this identifies the start of the value. We would then set the Replace value to A X 10 X 10. This will create 10 mutated files with overwritten values for each instance where an = character is found. The resulting 10 files will contain from 10 to 100 A characters in the value location.
Once the fuzzed files have been created, we need to launch them within the target application. For example, if we had mutated *.doc files, we would then want to launch them within Microsoft Word. File Fuzz uses the CreateProcess() function from the Windows API to do this, so we can use FileFuzz to launch the application so long as we can determine how the same application would be launched from a command prompt, including necessary flags that might be passed to the application. We provide detail on how to identify this information later in the chapter.
In file format fuzzing, we need to launch the same application over and over hundreds or perhaps thousands of times. If we were to leave all of the previously executed processes running, we would quickly run out of available memory. Therefore, the execution phase isn’t complete until the process is also killed after a predefined interval. We allow the end user to control this, by including a Milliseconds field under the Execute tab that identifies the amount of time that the process will be allowed to run before being forcibly killed if necessary.
As mentioned in previous chapters, detection is a key component to fuzzing. What good is it to run a fuzzer overnight and wake up to find that you have indeed been able to crash the application but you have no idea which of the 10,000 inputs caused the crash? You’re no closer to the answer than you were before you started. File format fuzzing provides many options for detecting exceptions but one stands out. For starters, you could go very low tech and simply watch the fuzzing process to identify error windows or perhaps an application or system crash. If you like watching paint dry, this is the approach for you. If you’d prefer to step it up a notch, you could check the log files to determine if a problem has occurred. This would include both application log files and system log files such as those maintained by the Windows Event Viewer. The problem with this approach is that the input (fuzz file) is not associated with the output (log event). The only way to tie the two together would be through the use of timestamps, which is imperfect at best.
As with most types of fuzzing, the best approach for identifying exceptions is to use a debugger. The advantage of a debugger is that it will identify both handled and unhandled exceptions. Windows has strong exception handling and can often recover from the fuzzed files that it reads. However, it is important to identify these situations, as a small change to the file at the location in question could end up creating an unrecoverable or exploitable condition.
The use of a debugger when conducting file format fuzzing is not quite as straightforward as it is for other types of fuzzing. We cannot in this case manually attach a debugger to the targeted application and let the fuzzer run. This is because the fuzzer is constantly launching and killing the target application. In doing so, it also kills the debugger. For this reason, we need to leverage a debugging API and build the debugger directly into our fuzzer. This way the fuzzer can execute the target application, attach a debugger itself, and then kill the application. In doing so, the fuzzer will monitor for exceptions each time the target application is launched.
For FileFuzz, we created crash.exe, which is actually a stand-alone debugger that is executed by the GUI application and in turn launches the target application. It is a completely stand-alone command-line application and as FileFuzz is an open source project, you are free to leverage crash.exe for your own fuzzing projects.
An audit in FileFuzz can be conducted manually by selecting the target to fuzz and identifying how the fuzzed files should be generated and stored. Alternately, a previously saved audit can be used to fill in all necessary fields to start fuzzing right away. The application comes with a number of canned audits that can be accessed from the File Types drop-down menu on the main screen. However, end users can also create their own saved audits and add them to the drop-down menu without needing to recompile the application. This is possible as the menu is dynamically generated at runtime by parsing the targets.xml file. The structure of an individual audit is shown in the following example:
<test>
   <name>jpg - iexplore.exe</name>
   <file>
   <fileName>JPG</fileName>
      <fileDescription>JPEG Image</fileDescription>
   </file>
   <source>
      <sourceFile>gradient.jpg</sourceFile>
      <sourceDir>C:WINDOWSHelpTourshtmlTour</sourceDir>
   </source>
   <app>
      <appName>iexplore.exe</appName>
      <appDescription>Internet Explorer</appDescription>
       <appAction>open</appAction>
      <appLaunch>"C:Program FilesInternet Exploreriexplore.exe"</appLaunch>
      <appFlags>{0}</appFlags>
   </app>
   <target>
      <targetDir>c:fuzzjpg</targetDir>
   </target>
</test>
The inclusion of a dynamically generated drop-down menu was an intentional design decision. Although FileFuzz is an open source application, it is assumed that most users will not have the programming experience or the interest in extending functionality through additional coding. The approach of using a dynamic menu allows the majority of end users to extend functionality in a relatively user-friendly manner. The structure of the XML file illustrates an important point: Make your applications as intuitive and user friendly as possible. Although documentation is a key component of the development process, don’t expect users to turn to documentation as a first step. Users expect intuitive applications and want to start using them out of the box.
Look at the preceding XML file. The descriptive XML tags are self-explanatory. An end user could add an audit simply by adding and customizing an additional <test> block. Although creating intuitive applications is not a legitimate excuse for ignoring documentation, it is an important design concept. Modern programming languages allow for user-friendly applications as they take care of the low-level code such as networking or graphical display. Invest the time saved in making an application that provides a better experience for the end user. Just because you’re designing a security application doesn’t mean that you should need a PhD to operate it.
Windows and UNIX file format fuzzing have the same basic fundamentals, but the importance of default applications in the Windows environment can increase the risk posed by this class of vulnerabilities. Before building our fuzzer we’ll therefore spend some time investigating this issue to better understand how to identify high risk targets.
Microsoft Windows allows users to assign default applications to specific file types. This enhances the usability of the operating system by allowing an application to automatically be launched when a file is double-clicked. This is an important point to keep in mind when identifying file formats to target. There’s minimal risk if a buffer overflow is found in an application that is unlikely to ever be used to view a particular file type, but there is significant risk when the same vulnerability is discovered in an application that opens a commonly traded file by default. Take, for example, an overflow in the JPEG image format. Like all graphic formats, there are many applications available that are capable of rendering the image, but only one that is associated with the file type by default on a given operating system. On Windows XP, the default JPEG viewer is Windows Picture and Fax Viewer. Therefore, an overflow discovered in Windows Picture and Fax Viewer carries with it much greater risk than the same overflow in a freeware picture viewer obtained from Download.com. Why? If a default Windows application is found to be vulnerable, millions of machines are immediately vulnerable.
How do we figure out which applications will render a particular file type within the Windows environment? A simple approach would be to simply double-click on the file and see which application is launched. This is fine for a quick check, but it doesn’t help us to determine the exact instructions that were executed to launch the application. These instructions are important to us when fuzzing, as we need a way to automate the continual execution of the target application. Rapid double-clicking just doesn’t cut it when you have a few thousand files to fuzz.
Windows Explorer is a quick and simple way to identify applications associated with file types and to identify the command-line arguments used to launch the application. Let’s use Explorer to prove that JPEG files are associated with Windows Picture and Fax Viewer. More important, let’s identify how we could repeatedly launch fuzzed JPEG files within FileFuzz to identify vulnerabilities.
The first step requires selecting Tools[el]Folder Options from the Windows Explorer menu. From there, we want to select the File Types tab. This displays the screen shown in Figure 13.2.
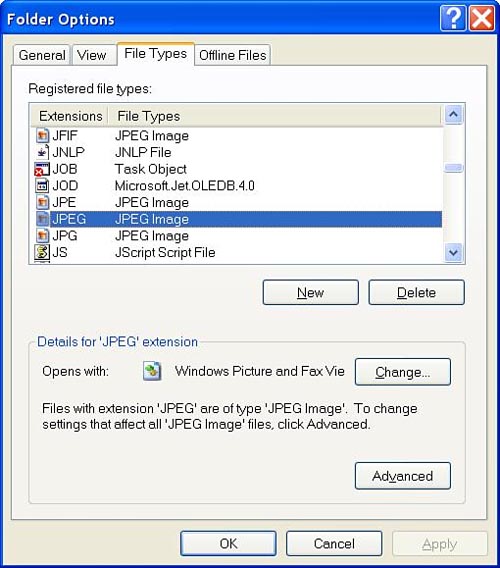
This screen alone is a wealth of information. Scrolling through the Registered file types list shows us virtually all of the file extensions that are associated with particular applications. These file types make for good fuzzing targets as vulnerabilities identified in the default applications could be exploited simply by sending a file to a victim and convincing them to double-click on the file. Although this isn’t trivial, spam e-mail has proven that end users are already trigger-happy when it comes to their mouse clicks, so it represents a reasonable exploitation scenario.
At this point, thanks to the Opens with label, we already know the application associated with the JPEG file type, but we don’t know how the operating system actually launches that application. Fortunately, we’re just a few mouse clicks away from that vital information.
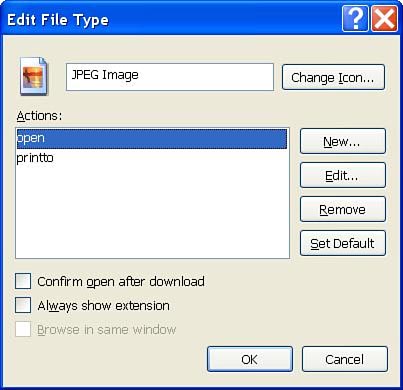
When handling file types, Windows includes the concept of actions. Actions allow for the file to be opened in a different way or with a different application, given unique command-line options. For our purposes, we want to know how Windows opens JPEG files, so we focus on the Open Action. As shown in Figure 13.3, highlighting Open and clicking the Edit button will reveal the answer.
At last! Windows reveals the secret that we’ve been searching for. In the Application used to perform action field, shown in Figure 13.4, we see that Windows Picture and Fax Viewer isn’t an executable application after all. In fact, it’s a dynamic-link library (DLL) launched using rundll32.exe. The full command-line argument for launching an image in Windows Picture and Fax Viewer is shown here.
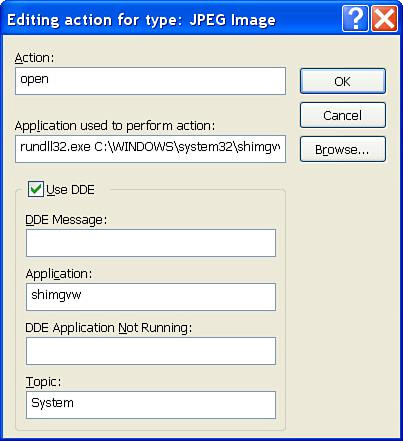
rundll32.exe C:WINDOWSsystem32shimgvw.dll,ImageView_Fullscreen %1
Not only is Windows Picture and Fax Viewer not an executable as we might have expected, but we can see that Windows also expects the ImageView_Fullscreen argument to be supplied. If you were to run this line from a command prompt and replace the %1 with the name of a legitimate JPEG file, you would see that sure enough, the file is rendered within Windows Picture and Fax Viewer as expected. This is a key concept. If we can determine the appropriate command-line arguments to render a file within a given application, we can then use FileFuzz to test for vulnerabilities. We can now take that same command line and copy it into the Application and Arguments fields under the Execute tab within FileFuzz. The only necessary change is that we must change the %1, which represents the target file, to a {0}, as this is the format that FileFuzz expects. A word of advice: Windows can be very picky when it comes to things such as spaces and quotation marks within command-line arguments. Be sure to copy the command exactly to avoid some painful debugging later on.
Although Windows Explorer can reveal the association between a particular file type and the application that it is associated with 90 percent of the time, we have encountered situations in which an association exists but it is not shown in Windows Explorer. Take, for example, the *.cbo file type. CBO files are used by the Microsoft Interactive Training application that is included by default on certain distributions of Windows XP, such as those packaged with many Dell machines. If you have a machine that includes Microsoft Interactive Training, you will notice that the CBO file type is not included in the Windows Explorer File Types list, yet within Windows Explorer a CBO file is displayed with a pencil icon and does indeed launch the Microsoft Interactive Training application when double-clicked. What gives? How do we determine the command-line arguments for launching a file type that doesn’t appear in Windows Explorer? For this, we need to turn to the Windows registry. First check the value of the default field of the HKEY_CLASSES_ROOT.xxx registry key, where xxx is the associated file extension. This value provides us with the name of the application used to launch the file type. Next, identify the HKEY_CLASSES_ROOT registry key that corresponds to that same descriptive name. Within the ...shellopencommand key, you’ll find details of command-line arguments used to launch the application associated with the mystery file extension.
Now that we have a primer on the unique aspects of file format fuzzing on the Windows platform, it’s time to build a fuzzer. We break down the thought process that we went through when designing FileFuzz and then conclude by using FileFuzz to identify the much hyped JPEG GDI+ vulnerability detailed in Microsoft Security Bulletin MS04-028.
In creating FileFuzz, we sought to develop a user-friendly, graphical application that would allow an end user to perform fuzzing without learning a series of command-line arguments. We wanted to produce a point-and-click application that was as intuitive as possible. Our goal was also to produce a tool that was specifically geared toward the nuances of file format fuzzing on the Windows platform, so cross-platform functionality was not a necessary feature.
Given the design goals, we once again chose the .Net platform for our development. This allowed us to create a GUI front end with minimal effort, freeing our time to focus on the functional aspect of the project. The GUI and all file creation functionality were done using C#. For the debugging functionality we switched to C as it allowed us to more easily and directly interact with the Windows API. The .NET platform accommodated this design decision as it allows for projects to contain multiple programming languages so long as they’re all compatible with the .NET Framework.
We’ve had enough discussion about how we would design FileFuzz. Now it’s time to walk through specific portions of the implementation. It isn’t practical to describe every section of code, but we highlight a few of the more important segments. For a complete understanding of how FileFuzz is designed, we encourage you to download the source code from www.fuzzing.org.
FileFuzz needed to be able to accommodate any Windows file format and we realized that different approaches would be required for both binary and ASCII text files. The Read.cs file contains all of the code for reading the valid files, and Write.cs handles the creation of the fuzzed files.
FileFuzz takes a brute force approach to fuzzing so we start by reading known good files. The data from the legitimate file is read and stored for subsequent mutation when creating fuzz files. Fortunately, the .NET Framework makes tasks such as reading from files relatively painless. We took separate approaches when reading and creating binary and ASCII text files. For our purposes, we leveraged the BinaryReader class for reading binary files and storing the data in a byte array. Reading ASCII text files is very similar to reading binary files but for that we leveraged the StreamReader class. Additionally, we store the result in a string variable as opposed to a byte array. The constructor for the Read class can be seen next.
private BinaryReader brSourceFile;
private StreamReader arSourceFile;
public byte [] sourceArray;
public string sourceString;
private int sourceCount;
private string sourceFile;

public Read(string fileName)
{
   sourceFile = fileName;
   sourceArray = null;
   sourceString = null;
   sourceCount = 0;
}
sourceArray will be used to hold the byte array for binary files that we read, whereas sourceString will be used to hold the contents of an ASCII text file.
Now that the files have been read, we need to mutate them and save the resulting files to launch them within the target application. As mentioned, FileFuzz divides file creation into the following four types, based on the approach used to perform file mutation:
All bytes
Range
Depth
Match
We handle all of the different approaches within a single Write class but overload the constructors to handle each of the different scenarios. For binary file types we use the BinaryWriter class to write the new byte array to a file that will be used to fuzz the target application during the execution phase. Building ASCII text files, on the other hand, takes advantage of the StreamWriter class for writing string variables to disk.
The code responsible for starting the process of executing the target application is found in the Main.cs file, as shown in the next code segment. However, when you look at it you realize that it’s relatively simple because the code is not actually responsible for launching the target application itself; rather, it is responsible for launching the built-in debugger, which in turn handles the execution of the target application. The crash.exe debugger is discussed in detail later.
We start by instantiating a new instance of the Process class. Within the executeApp() function, we then initiate a loop to launch each of the previously created fuzz files. During each pass of the loop, we set the attributes for the process to create, including the name of the process to execute, which, as mentioned, will always be crash.exe regardless of what is being fuzzed, as the command-line application crash.exe will in turn launch the target application. At this point, control is handed to crash.exe and the results are eventually returned by crash.exe through standard output and standard error and displayed in the rtbLog rich text box, which serves as the main output window for FileFuzz.
Process proc = new Process();

public Execute(int startFileInput, int finishFileInput, string targetDirectoryInput,
string fileExtensionInput, int applicationTimerInput, string executeAppNameInput,
string executeAppArgsInput)
{
   startFile = startFileInput;
   finishFile = finishFileInput;
   targetDirectory = targetDirectoryInput;
   fileExtension = fileExtensionInput;
   applicationTimer = applicationTimerInput;
   executeAppName = executeAppNameInput;
   executeAppArgs = executeAppArgsInput;
   procCount = startFile;
}

public void executeApp()
{
   bool exceptionFound = false;

   //Initialize progress bar
   if (this.pbrStart != null)
   {
      this.pbrStart(startFile, finishFile);
   }

   while (procCount <= finishFile)
   {
      proc.StartInfo.CreateNoWindow = true;
      proc.StartInfo.UseShellExecute = false;
      proc.StartInfo.RedirectStandardOutput = true;
      proc.StartInfo.RedirectStandardError = true;
      proc.StartInfo.FileName = "crash.exe";
proc.StartInfo.Arguments = executeAppName + " " + applicationTimer + " " +
String.Format(executeAppArgs,  @targetDirectory + procCount.ToString() +
fileExtension);
      proc.Start();
      //Update progress bar
      if (this.pbrUpdate != null)
      {
         this.pbrUpdate(procCount);
      }
      //Update counter
      if (this.tbxUpdate != null)
      {
         this.tbxUpdate(procCount);
      }
      proc.WaitForExit();

      //Write std output to rich text box log
      if (this.rtbLog != null && (proc.ExitCode == -1 || proc.ExitCode == 1))
      {
         this.rtbLog(proc.StandardOutput.ReadToEnd());
         this.rtbLog(proc.StandardError.ReadToEnd());
         exceptionFound = true;
      }
      procCount++;
   }
   //Clear the progress bar
   if (this.pbrStart != null)
   {
      this.pbrStart(0, 0);
   }
   //Clear the counter
   if (this.tbxUpdate != null)
   {
      this.tbxUpdate(0);
   }
   if (exceptionFound == false)
      this.rtbLog("No excpetions found

");
   exceptionFound = false;
}As mentioned, FileFuzz includes debugging functionality in the form of crash.exe, a stand-alone debugger written in C that leverages the debugging functions built into the Windows API. It also leverages libdasm, which is an open source library that helps with interpreting disassembly code. As can be seen in the next code segment, first a check is completed to ensure that crash.exe has been passed at least three arguments. For use in FileFuzz, those arguments are the name and path of the application being fuzzed, the wait time before forcibly killing the target application, and finally additional command-line arguments plus the name of the fuzzed file to interpret. Following this, the wait time value is converted from a string type to an integer and the full command-line argument is created and stored in a character array. Then, the target application is launched using the CreateProcess command, with the DEBUG_PROCESS flag set.
if (argc < 4)
{
   fprintf(stderr, "[!] Usage: crash <path to app> <milliseconds> <arg1>
     [arg2 arg3 argn]

");
   return -1;
}

// convert wait time from string to integer.
if ((wait_time = atoi(argv[2])) == 0)
{
   fprintf(stderr, "[!] Milliseconds argument unrecognized: %s

", argv[2]);
   return -1;
}

// create the command line string for the call to CreateProcess().
strcpy(command_line, argv[1]);

for (i = 3; i < argc; i++)
{
   strcat(command_line, " ");
   strcat(command_line, argv[i]);
}

//
// launch the target process.
//

ret = CreateProcess(NULL,     // target file name.
  command_line,               // command line options.
  NULL,                       // process attributes.
  NULL,                       // thread attributes.
  FALSE,                      // handles are not inherited.
  DEBUG_PROCESS,              // debug the target process and all spawned children.
  NULL,                       // use our current environment.
  NULL,                       // use our current working directory.
  &si,                        // pointer to STARTUPINFO structure.
  &pi);                       // pointer to PROCESS_INFORMATION structure.

   printf("[*] %s
", GetCommandLine());  //Print the command line
if (!ret)
{
   fprintf(stderr, "[!] CreateProcess() failed: %d

", GetLastError());
   return -1;
}
At this point, it is now possible for crash.exe to monitor for and record exceptions. In the next code segment, we see that so long as the timeout has not yet expired, we are monitoring for debug events. When one is encountered, we obtain the handle to the thread in question and determine the type of exception that has occurred. Using a case statement we look for three types of exceptions that are of interest: memory access violations, divide by zero errors, and stack overflows. We then print out pertinent debugging information that will assist the end user in determining if the exception is worthy of further analysis. Leveraging the libdasm library, we decode the location where the exception occurred, the offending opcode, and the values of the registers at the time of the crash.
while (GetTickCount() - start_time < wait_time)
{
   if (WaitForDebugEvent(&dbg, 100))
   {
      // we are only interested in debug events.
      if (dbg.dwDebugEventCode != EXCEPTION_DEBUG_EVENT)
      {
         ContinueDebugEvent(dbg.dwProcessId, dbg.dwThreadId, DBG_CONTINUE);
         continue;
      }

      // get a handle to the offending thread.
      if ((thread = OpenThread(THREAD_ALL_ACCESS, FALSE, dbg.dwThreadId)) == NULL)
      {
         fprintf(stderr, "[!] OpenThread() failed: %d

", GetLastError());
         return -1;
      }

      // get the context of the offending thread.
      context.ContextFlags = CONTEXT_FULL;

      if (GetThreadContext(thread, &context) == 0)
      {
         fprintf(stderr, "[!] GetThreadContext() failed: %d

", GetLastError());
         return -1;
      }
      // examine the exception code.
      switch (dbg.u.Exception.ExceptionRecord.ExceptionCode)
      {
         case EXCEPTION_ACCESS_VIOLATION:
            exception = TRUE;
            printf("[*] Access Violation
");
            break;
         case EXCEPTION_INT_DIVIDE_BY_ZERO:
            exception = TRUE;
            printf("[*] Divide by Zero
");
            break;
         case EXCEPTION_STACK_OVERFLOW:
            exception = TRUE;
            printf("[*] Stack Overflow
");
            break;
         default:
            ContinueDebugEvent(dbg.dwProcessId, dbg.dwThreadId, DBG_CONTINUE);
      }

      // if an exception occurred, print more information.
      if (exception)
      {
         // open a handle to the target process.
         if ((process = OpenProcess(PROCESS_ALL_ACCESS, FALSE, dbg.dwProcessId)) ==
NULL)
         {
            fprintf(stderr, "[!] OpenProcess() failed: %d

", GetLastError());
            return -1;
         }

         // grab some memory at EIP for disassembly.
         ReadProcessMemory(process, (void *)context.Eip, &inst_buf, 32, NULL);

         // decode the instruction into a string.
         get_instruction(&inst, inst_buf, MODE_32);
         get_instruction_string(&inst, FORMAT_INTEL, 0,
inst_string,sizeof(inst_string));

         // print the exception to screen.
         printf("[*] Exception caught at %08x %s
", context.Eip, inst_string);
         printf("[*] EAX:%08x EBX:%08x ECX:%08x EDX:%08x
", context.Eax, context.Ebx,
           context.Ecx, context.Edx);
         printf("[*] ESI:%08x EDI:%08x ESP:%08x EBP:%08x

", context.Esi,
context.Edi,
           context.Esp, context.Ebp);
         return 1;
      }
   }
}
The exception details identified by crash.exe are returned to the GUI and displayed for the end user. Hopefully this information will provide a quick visual queue to the end user to help in identifying important crashes. Crashes that would lend themselves to further investigation would include exceptions occurring in opcode instructions that would allow shellcode to obtain control of the flow of code execution and where registers either contain user-controlled or user-influenced input.
Now that we’ve developed a file format fuzzer, we’ll test it against a known vulnerability to validate our design. Much of our interest in file format vulnerabilities was spurred by the release of Microsoft released Security Bulletin MS04-028 – “Buffer Overrun in JPEG Processing (GDI+) Could Allow Code Execution.”[4] That bulletin garnered a great deal of attention as it shed light on just how damaging client-side vulnerabilities could be. Here was an exploitable buffer overflow in a number of popular client-side applications that were installed by default and affected a massive user base. The result was the quick emergence of public exploits that, although relying on some social engineering, lent themselves to both targeted attacks and indiscriminate phishing and identity theft.
The vulnerability itself resided in the gdiplus.dll library, which was used by a plethora of applications including Microsoft Office, Internet Explorer, and Windows Explorer. The JPEG format allows for comments to be embedded within the image itself. Comments are preceded by the 0xFFFE byte sequence, followed by a 16-bit word value indicating the total size of the comment. The size includes the two bytes used for the size and the header ends with the comment itself.
Would FileFuzz have been able to identify this vulnerability? Let’s find out. We’ll start with a legitimate image file and then add a comment either manually or using an image editor. If you choose to duplicate this example for yourself, be sure that you’re using a vulnerable version of Windows. Our results were produced using Windows XP SP1. When creating the test file, we’ll use a very simple image, in our case, a 1 x 1 white pixel. Why so simple? As mentioned, brute force fuzzing is inefficient. We want to focus on the image headers, not the image itself, so we stick to using an image that is pretty much nonexistent. As a result, we end up with a file that is only 631 bytes in size and we can therefore brute force all bytes in a reasonable time frame. After adding the comment “fuzz” when we look at the file using a hex editor, we see the byte sequence shown next.
0000009eh: FF FE 00 06 66 75 7A 7A                         ; ÿþ..fuzz

Breakdown:
FF FE                  Comment preface
00 06                  Length of comments in bytes
66 75 7A 7A            ASCII value of 'fuzz'
Before we can start fuzzing, we want to find out which Windows XP application is responsible for rendering JPEG images by default. Fortunately, we already determined earlier in the chapter that Windows Picture and Fax Viewer is responsible for this task and uses the following command-line arguments to launch the JPEG image (see Figure 13.5):
rundll32.exe C:WINDOWSsystem32shimgvw.dll,ImageView_Fullscreen %1
At this point, we can launch FileFuzz and begin the fuzzing process. FileFuzz has a built-in audit for JPEG files that can be accessed from the File Type drop-down menu, but to demonstrate the functionality of FileFuzz, we’ll start from scratch.
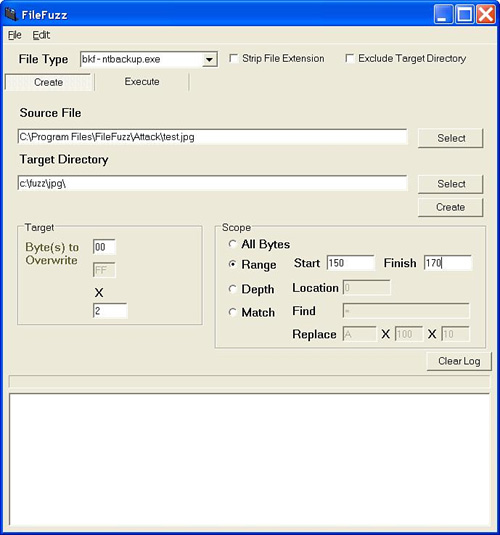
We begin in the Create tab and set the appropriate options to generate a series of altered JPEG files, based on the legitimate JPEG file with an embedded comment that we created earlier. We’ll set all options on the Create tab to the following values:
Source file. C:Program FilesFileFuzzAttack est.jpg. Legitimate JPEG file
Target directory. C:fuzzjpg. Target directory where generated fuzz files are to be stored.
Byte(s) to overwrite. 00 x 2. According details of the vulnerability,[5] the overflow will occur if we set the length value of the vulnerability to 0x00 or 0x01. It isn’t possible for the comment to be zero or one byte in length due to this fact that the two-byte size is included in the overall length. We’ll therefore fuzz the file with a word value of 0x0000 in the hopes that we’ll trigger the overflow by overwriting the comment size value.
Scope. Range = 150-170. In the test file that we created, the size value begins at byte 160. To be safe we’ll fuzz a range of bytes from 150 to 170.
The final settings can be seen in Figure 13.5.
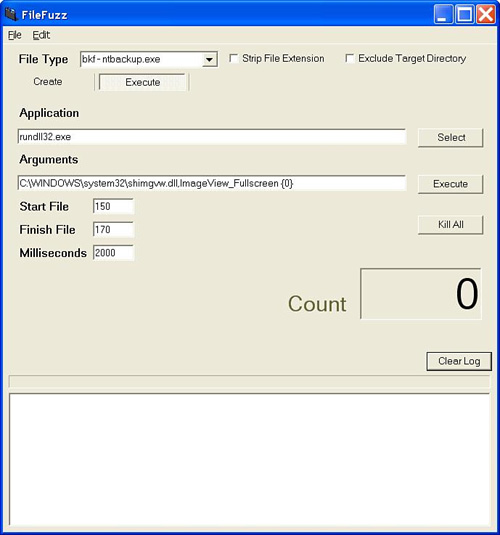
Once all of the settings are in place, we click Create to generate the files. Now it’s time to move to the Execute tab. Here we need to tell FileFuzz how to launch Windows Picture and Fax Viewer. The settings for the Execute tab values will be as follows:
Application. rundll32.exe. As Windows Picture and Fax Viewer is actually a DLL, the application that we use is run32.exe, which will be used to launch the DLL file.
Arguments. C:WINDOWSsystem32shimgvw.dll,ImageView_Fullscreen {0}. The arguments passed include the full location of Windows Picture and Fax Viewer (shimgvw,dll), the ImageView_FullScreen argument, and {0}, which is a placeholder for the name of the fuzzed file that will be opened.
Start file. 150. The first file that we created.
Finish file. 170. The last file that we created.
Milliseconds.2000. The length of time that Windows Picture and Fax Viewer will be permitted to run before it is forcibly closed.
The appropriate settings can be seen in Figure 13.6.
At this point, we’re ready to go. On clicking Execute, we see Windows Picture and Fax Viewer repeatedly launch and exit. This will happen 21 times as our 21 fuzz files are opened and interpreted. When the smoke clears we see that FileFuzz detected a few exceptions. However, the one that we’re interested in occurs when 160.jpg was launched as shown in the following sample output. This is of interest as byte 160 is the start of the JPEG comment size and file 160.jpg has overwritten the original value with 0x0000.
 [*] "crash.exe" rundll32.exe 2000
C:WINDOWSsystem32shimgvw.dll,ImageView_Fullscreen c:fuzzjpg160.jpg
[*] Access Violation
[*] Exception caught at 70e15599 rep movsd
[*] EAX:fffffffe EBX:00904560 ECX:3ffffe3c EDX:fffffffe
[*] ESI:0090b07e EDI:0090c000 ESP:00aaf428 EBP:00aaf43400
FileFuzz provides basic functionality for taking a brute force approach to fuzzing file formats. With its GUI and built-in debugging capabilities it allows for a quick and dirty audit using a known good file as a starting point. That said, there’s plenty of room for improvement.
For starters, more comprehensive audit capabilities could be developed. As it stands, only one audit can be performed at a time. For example, when taking a breadth approach with a binary file type, only a single sweep across the byte range with a single byte value (e.g., 0xFFFFFFFF) can be performed at one time. If another value is then to be run, the process must be rerun using the new value. A more comprehensive audit function could allow for multiple values to be selected or perhaps ranges of values that would all be tested. Perhaps some intelligent capabilities could be added to first take a breadth approach and then switch to a depth approach automatically once byte locations have been identified that revealed more than a specific number or type of exceptions.
FileFuzz was intentionally designed as a brute force fuzzer, as file format fuzzing lends itself to this more simplistic approach. However, that’s not to say that intelligent fuzzing capabilities couldn’t also be added. Perhaps a new Create – Intelligent tab could be added in addition to the existing Create tab, which would then become a Create – Brute Force tab. This new tab would include an entirely new set of intelligent fuzzing capabilities that would require the end user to develop a template for the structure of a particular file type rather than use an existing file as a starting point. This approach would require more up-front effort by the user but would also allow him or her to better identify specific areas of the file that are to be fuzzed and how they should be fuzzed. The template would likely be created after studying specification documents for the targeted file format but FileFuzz could also contain built-in sample templates.
Intelligent exception handling would help to weed out many of the exceptions that are unlikely to lead to exploitable conditions. By embedding rules that are applied when analyzing the crash.exe output, certain exceptions could be omitted based on factors such as the opcodes at the memory location of the crash, register values, or condition of the stack. Alternately, rather than omitting certain results, perhaps it would be better to highlight those that show more promise.
In short, there’s plenty of room for improvement. Our goal is simply to get the ball rolling. The rest is up to you.
File format vulnerabilities have plagued Microsoft during the past couple of years. Whether the vulnerabilities have appeared in media files or Office documents, they’ve appeared in bunches and are being used by attackers. That’s not to say that Microsoft is the only vendor to struggle with this class of vulnerabilities, only that they continue to be the favorite target of bug hunters. Hopefully with the recent attention drawn to file format vulnerabilities, software vendors will add fuzzing to their development lifecycle to catch these vulnerabilities prior to production.