In this section, we will discuss about the EaselJS feature to make an animation using a series of images. This feature is called Sprite Sheet. A Sprite Sheet combines a series of images or frames of an animation to produce 2D or 3D animation. For instance, if you want to animate a hero that is walking, we can combine all frames of the walking character into a single image, and then make the animation using the Sprite Sheet feature of EaselJS.
The following is a series of images (animation frames) that are combined into a single image:

In the next section, you will learn how to use the Sprite Sheet feature to develop animations.
Let's start by understanding the SpriteSheet class. This class is used to initialize the Sprite Sheet feature and encapsulate its properties and configurations. After creating the SpriteSheet class, we can use its methods to control the animation.
The basic configuration of this class has three mandatory properties:
- The image or images to use for animation frames.
- The position of each image, which can be defined using a single value for all frames or even with an individual configuration for each frame.
- The representation of the animation, which can be defined by a start and end frame or with individual values for each frame.
The following is a code snippet defines the configuration for the SpriteSheet class:
data = {
  // list of images or image URIs to use. SpriteSheet can handle preloading.
  // the order dictates their index value for frame definition.
images: [image1, "path/to/image2.png"],

  // the simple way to define frames, only requires frame size because frames are consecutive:
  // define frame width/height, and optionally the frame count and registration point x/y.
  // if count is omitted, it will be calculated automatically based on image dimensions.
frames: {width:64, height:64, count:20, regX: 32, regY:64},

// OR, the complex way that defines individual rects for frames.
  // The 5th value is the image index per the list defined in "images" (defaults to 0).
frames: [
  // x, y, width, height, imageIndex, regX, regY
  [0,0,64,64,0,32,64],
  [64,0,96,64,0]
],

  // simple animation definitions. Define a consecutive range of frames (begin to end inclusive).
  // optionally define a "next" animation to sequence to (or false to stop) and a playback "speed".
animations: {
  // start, end, next, speed
run: [0,8],
jump: [9,12,"run",2]
}

// the complex approach which specifies every frame in the animation by index.
animations: {
  run: {
  frames: [1,2,3,3,2,1]
  },
  jump: {
    frames: [1,4,5,6,1],
    next: "run",
    speed: 2
  },
stand: { frames: [7] }
  }
}
The following is a sample configuration for the SpriteSheet class:
var data = {
  images: ["sprites.jpg"],
  frames: { width:50, height:20 },
  animations: {
    run:[0,4],
    jump:[5,8,"run"]
  }
};
This is explained more in detail at: http://www.createjs.com/Docs/EaselJS/classes/SpriteSheet.html
Now, we will develop a simple walking animation using Sprite Sheets. The following is our sprite image that will be used for the animation frames:

Sprite image
The next step is to configure our SpriteSheet class. The following is the configuration:
var data = {
  "animations":
  {
    "run": [0, 15]
  },
  "images": ["running.png"],
  "frames": {
    "height": 70,
    "width": 51,
    "regX": 0,
    "regY": 0,
    "count": 16
  }
};
We have a total of 16 frames for our animation; hence, the run frameset that defines the frames of the animation, starts from 0 and extends till 15. We defined the path of the sprite image. We then defined the configuration of the frames with height 70, width 51 (this is the width of each individual image), and a count of 16 that refers to the number of frames.
The following is the complete source code for the animation:
stage = new createjs.Stage(document.getElementById("canvas"));

varss = new createjs.SpriteSheet({
  "animations":
  {
    "run": [0, 15]
  },
  "images": ["running.png"],
  "frames": {
    "height": 70,
    "width": 51,
    "regX": 0,
    "regY": 0,
    "count": 16
  }
});

var grant = new createjs.Sprite(ss, "run");

stage.addChild(grant);
createjs.Ticker.setFPS(40);
createjs.Ticker.addEventListener("tick", stage);
As seen in previous examples, first we defined the stage using the Stage class. After that, the SpriteSheet class was initiated using the configuration, and then we passed the object to the Sprite class to start the animation. The second parameter for the Sprite class defines the starting frameset for animation. Finally, we added the Sprite object to the stage with the addChild method.
It's important to add the tick event to the Ticker class and pass the Stage object to it to start the animation; otherwise, you will see a blank screen. Furthermore, using the Ticker class and setFPS method, we can control the ratio of rendering the animation.
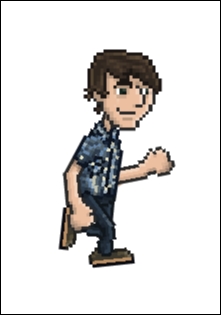
The following image shows a preview of our Sprite Sheet example: