
In this chapter, we will talk about utilizing vector masks in CreateJS and how to develop animation or drawings using vector masks. First off, we should know what a vector mask is and what it does. With vector masks, we can control which parts of the parent layer are hidden or revealed. We can even add a special effect to the vector mask to make that part of the parent layer different from the rest.
In this chapter we will cover:
- Learning about vector masks
- Adding a vector mask to an existing
DisplayObjectobject - Applying vector masks to pictures
- Animating the mask layer
Vector masking is a useful feature in EaselJS that enables developers to create awesome animations or drawings easily. There is a mask property for every DisplayObject object, with which you can apply a mask layer, or in other words; create a layer over an existing shape or picture. After applying the mask layer and updating the stage event, you will see that a new layer masks the existing layer. In other words, you can control what part of the parent layer is hidden or revealed with vector masks.
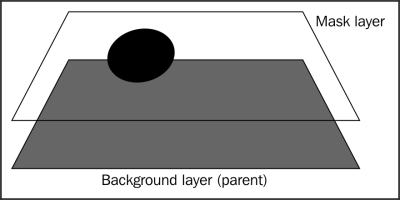
Furthermore, mask layers are also shapes, so you can change the mask layer properties continuously to create animations.
Here is an example of using a vector mask in EaselJS:
/* Declare stage in usual way */
var canvas = document.getElementById("canvas");
var stage = new createjs.Stage(canvas);
/* Create the mask */
var mask = new createjs.Shape();
mask.graphics.drawCircle(0, 0, 30);
mask.x = 100;
mask.y = 100;
var bg; /* Create a red background */
var bg = new createjs.Shape();
bg.graphics.clear().beginFill("red").rect(0, 0, 400, 200);
/* Add mask to background */
bg.mask = mask;
/* Add to stage */
stage.addChild(bg);
/* update stage in usual way */
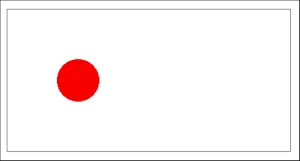
stage.update();As with other examples in this book, we first get the canvas element from the page and then create the Stage object. Then, we create a simple circle using the Shape class and the drawCircle function. For the default position, we set both x and y to 100. This circle is our vector mask layer.
Then, we create a bg variable that contains a rectangle filled with the color red. After that, we assign the first shape—that is, the circle—to the mask property of the bg variable. Finally, we add the bg variable to stage.
Here is the output of the preceding source code:
For you to understand the example better, look at the following screenshot. It is what the output will be after removing the mask layer.
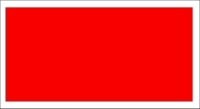
As you can see in the first example, our mask layer is seen only in the circular shape, but in the next example, the whole rectangle is seen because there is no mask layer anymore.
The following screenshot shows the mask layer independently:
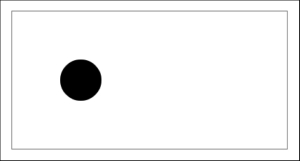
After assigning the mask layer to the parent layer (the red rectangle), the only visible part of the rectangle will be the visible part of the mask layer.
In the next section, we will look at a drag-and-drop example with mask layers.