
Let's first explore how we can use PhantomJS to run unit tests using Jasmine, JavaScript's testing framework (http://pivotal.github.io/jasmine/). There are several testing frameworks for JavaScript that are freely available to use. Some of the better known testing frameworks are Jasmine, QUnit, and Mocha. Why Jasmine? Jasmine is also one of the more popular testing frameworks.
Besides, Jasmine syntaxes are very much like the English language when used, making it easy to follow and read the content of the test, just like in a document. In this chapter, we will not discuss Jasmine in depth, but only concentrate on those parts that we will need in our code. For more information on how to use the Jasmine API, refer to the Jasmine project page at http://pivotal.github.io/jasmine/.
We will assume that you know about unit testing and are familiar with it. Let's start by creating a simple calculator in JavaScript that has the ability to perform addition, subtraction, multiplication, and division. We'll name our script as Calculator.js and save it in the src folder.
function Calculator() {
  this.currentTotal = 0;
}

Calculator.prototype.set = function(newValue) {
  this.currentTotal = newValue;
  return this.currentTotal;
};

Calculator.prototype.add = function(toAdd) {
  this.currentTotal += toAdd;
  return this.currentTotal;
};

Calculator.prototype.subtract = function(toSub) {
  this.currentTotal -= toSub;
  return this.currentTotal;
};

Calculator.prototype.divide = function(toDivide) {
  if (toDivide === 0) {
    throw "Error division by zero";
  }
  this.currentTotal /= toDivide;
  return this.currentTotal;
};
This is our simple calculator code that will handle basic calculation. Let's take a closer look at some parts of the code and start with the addition block. In the preceding code, we define the add function; it accepts a parameter that is to be added to the current total value. In the following line, we just coded an expression that performs the addition of the toAdd variable, which holds the value to be added to currentTotal. This is a very simple function and can be tested easily.
So, let's use Jasmine to create a test for our simple code, but before we do that, let's first download Jasmine. We can go to the previously mentioned URL, or use the URL https://github.com/pivotal/jasmine/downloads and download the stable, standalone version. Upon download, we will extract the files to any working directory that we can use; it is recommended that we create a jasmine folder and extract it there.
From the extracted package, there are a few important files and folders that we need to be familiar with. They are as follows:
Before we start coding Jasmine test specs, we need to be familiar with several Jasmine functions; these include describe(), it(), expect(), and matchers.
The describe() function is our test suite, and it requires two parameters to be passed onto it: the name of our test suite and the function block that holds the test specs.
describe("Calculator", function() {

});
The function block is where we will define our test specs using the it() function. The first parameter of the it() function can be any descriptive text through which we can define our test.
it("should able to add positive numbers", function() {
  calc.set(0);
  expect(calc.add(1)).toEqual(1);
  expect(calc.add(3)).toEqual(4);
});
Each block will be our test case where we can put in scripts that perform the functionalities of our application, and that may contain one or more expectations. Expectations are used in the function block with the built-in expect()function, which takes the actual value coming from the application. Each expect call is matched with matchers that perform equality comparisons against the actual value, as described in
expect(), and the value is passed as the expected value of the test. There are several matchers that are available, such as toEqual(), toBe(), toContain(), and toBeNull().
We need to read more about each matcher from the Jasmine documentation (http://pivotal.github.io/jasmine/#section-Matchers). Let us move on and create a complete test spec that we will use to test our mini-calculator application.
describe("Calculator", function() {
  var calc;

  beforeEach(function() {
    calc = new Calculator();
  });

  it("should be able to add positive numbers", function() {
    calc.set(0);
    nexpect(calc.add(1)).toEqual(1);
    expect(calc.add(3)).toEqual(4);
    expect(calc.add(2)).toEqual(6);
    expect(calc.add(4)).toEqual(10);
  });

  it("should be able to add negative numbers", function() {
    calc.set(10);
    expect(calc.add(-1)).toEqual(9);
    expect(calc.add(-4)).toEqual(5);
  });

  it("should be able to subtract positive numbers", function() {
    calc.set(10);
    expect(calc.subtract(1)).toEqual(9);
    expect(calc.subtract(3)).toEqual(6);
    expect(calc.subtract(2)).toEqual(4);
    expect(calc.subtract(4)).toEqual(0);
  });

  it("should be able to subtract negative numbers", function() {
    calc.set(10);
    expect(calc.subtract(-1)).toEqual(11);
    expect(calc.subtract(-3)).toEqual(14);
    expect(calc.subtract(-2)).toEqual(16);
    expect(calc.subtract(-4)).toEqual(20);
  });
});
The preceding code is a Jasmine test suite code that contains describe() and several it() specs with different expectations. We also have a new block in the specs, which define a beforeEach() function. This function will be called for each test before the function block of each it() block is performed. So in that line, the calculator object will be reinstantiated for each test case. Let us save our code as CalculatorSpec.js inside the test folder. We'll have to create the test folder if we don't have one.
To complete our test code, we will modify the Jasmine Spec Runner example and make it our own. Let us take a look at the SpecRunner.html example and apply our change to it later on.
<!DOCTYPE HTML PUBLIC "-//W3C//DTD HTML 4.01 Transitional//EN" "http://www.w3.org/TR/html4/loose.dtd">

<html>
  <head>
    <title>Jasmine Spec Runner</title>
    <link rel="shortcut icon" type="image/png" href="lib/jasmine-1.3.1/jasmine_favicon.png">
    <link rel="stylesheet" type="text/css" href="lib/jasmine-1.3.1/jasmine.css">
    <script type="text/javascript" src="lib/jasmine-1.3.1/jasmine.js"></script>
    <script type="text/javascript" src="lib/jasmine-1.3.1/jasmine-html.js"></script>
    <!-- include source files here... -->
    <script type="text/javascript" src="src/Player.js"></script>
    <script type="text/javascript" src="src/Song.js"></script>
    <!-- include spec files here... -->
    <script type="text/javascript" src="spec/SpecHelper.js"></script>
    <script type="text/javascript" src="spec/PlayerSpec.js"></script>
    <script type="text/javascript">
    (function() {
      var jasmineEnv = jasmine.getEnv();
      jasmineEnv.updateInterval = 1000;
      var htmlReporter = new jasmine.HtmlReporter();
      jasmineEnv.addReporter(htmlReporter);
      jasmineEnv.specFilter = function(spec) {
        return htmlReporter.specFilter(spec);
      };
      var currentWindowOnload = window.onload;
      window.onload = function() {
        if (currentWindowOnload) {
          currentWindowOnload();
        }
        execJasmine();
      };
      function execJasmine() {
        jasmineEnv.execute();
      }
    })();
    </script>
  </head>
  <body>
  </body>
</html>
The preceding code is an example from Jasmine's distribution package. This spec runner will be our template for running our own little test specs. From the preceding code, we replace the included JavaScript files with our own calculator application. We will replace the Player and Song JavaScript files with the following:
    <!-- include source files here... -->
    <script type="text/javascript" src="src/Calculator.js"></script>
The preceding code snippet will load our calculator application, and to make it complete, we will need to include our test spec in it. The example test spec is defined, and we will replace that with our CalculatorSpec.js file.
    <!-- include spec files here... -->
    <script type="text/javascript" src="test/CalculatorSpec.js"></script>
After modifying the two sections, we will leave everything else. We do not need to touch any other part of the SpecRunner.html file.
Running the test spec in our browser will produce the following screenshot:
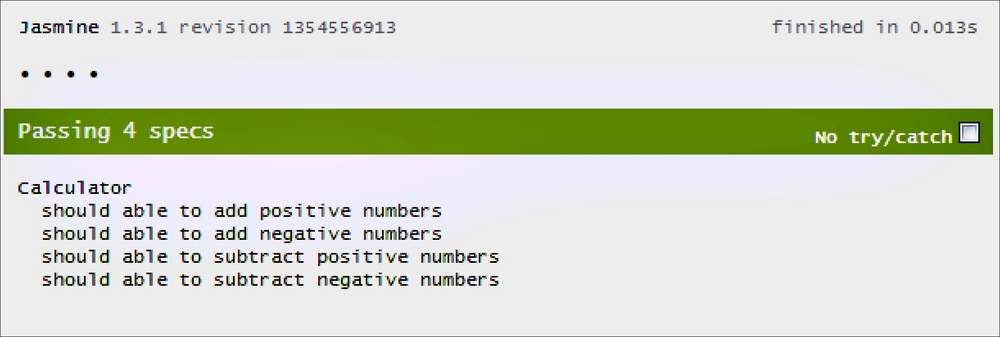
The preceding screenshot shows that our test passes for all the test cases. If there are failed test items, they will also be shown in the result page. Let's add a new test that will fail when we add a new test case for an unimplemented feature.
Our calculator does not support the multiplication of numbers yet, but we do want to add this feature. To do this, we first need to add our test specs for multiplication before implementing the multiplication code itself. So, we need to create another it() block for the multiplication test spec in our CalculatorSpec.js file as follows:
it("should be able to multiply numbers", function() {
  calc.set(10);
  expect(calc.multiply(1)).toEqual(10);
  expect(calc.multiply(2)).toEqual(20);
  expect(calc.multiply(3)).toEqual(60);
  expect(calc.multiply(4)).toEqual(240);
});
Running our spec runner should show that there are failed tests, as shown in the following screenshot:
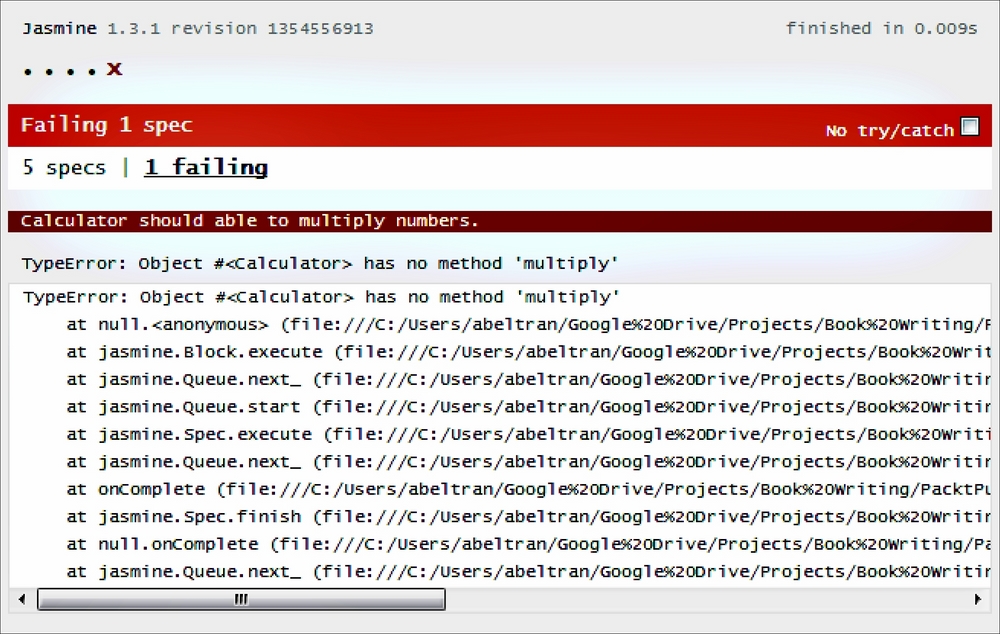
Since we don't have that function yet, our test will fail and tell us that there are no methods with multiply from our calculator object. So, let's make this test pass by implementing the multiplication feature.
Let's edit our Calculator.js script and add the following block of code:
Calculator.prototype.multiply = function(toMultiply) {
  this.currentTotal *= toMultiply;
  return this.currentTotal;
};
Without modifying anything else, running our test runner should produce an all-passed test suite.
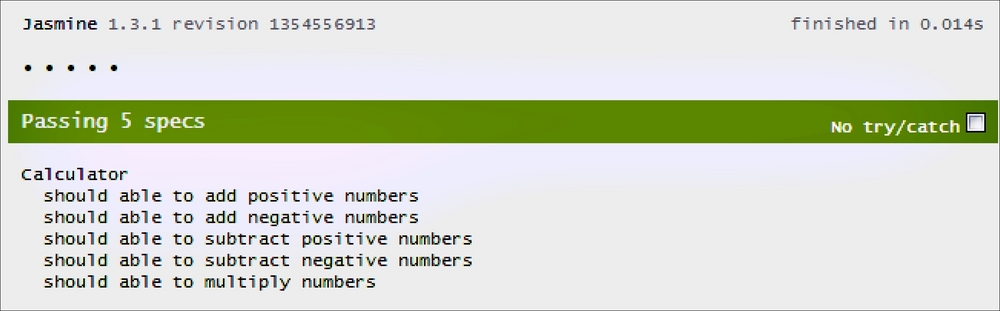
If there are problems or bugs in our implementation code, our test will produce a failed test run and Jasmine will highlight which of the test specs has the problem.
From this point on, we will move to PhantomJS and see how we are going to use it to run Jasmine test specs. What we have learned about Jasmine is enough for us to move forward and learn how to use it with PhantomJS.
There are different approaches that we can use to run or execute Jasmine test specs with PhantomJS. First, we can use any of the existing test runners for Jasmine and other testing frameworks, as documented by PhantomJS, from the following URL:
https://github.com/ariya/phantomjs/wiki/Headless-Testing
Second, we can run a Jasmine test using the PhantomJS API by loading the spec runner page using the webpage API, which we learned from the previous chapter. After opening the page, we can manipulate the Jasmine result page using DOM traversal, which we learned from the previous chapter. After that, we can redirect the content to any other channel; it can be the console screen, a logfile, or a continuous integration system.
Alternatively, we can use the PhantomJS run-jasmine.js code example that is included in the PhantomJS download package. We will use this approach rather than creating our own since we are going to review the code itself. This is almost the same as the second approach. This code can be found in the examples folder when we extract the contents of the PhantomJS package.
We are not going to change any of the code we wrote earlier; we will use the same set of JavaScript files, but instead of running the test within the browser, we will use PhantomJS. We will call phantomjs, specify that it needs to run the run-jasmine.js script from the examples folder, and pass the SpecRunner.html file that we modified earlier as the third parameter. We need to make sure we are running the script in the same folder of SpecRunner.html, or we will need to specify either the relative or absolute path along with it.
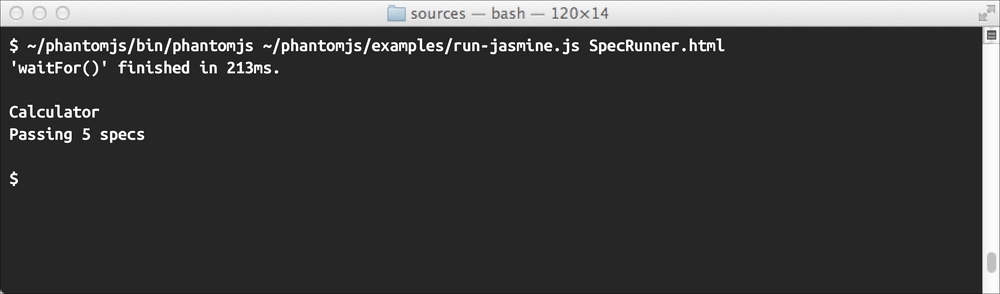
The preceding screenshot shows that our test was executed and all specs have been passed. The Jasmine result is now different from the browser since the PhantomJS Jasmine runner only displays the summary of the test. If the test fails, the output will be as shown in the following screenshot:
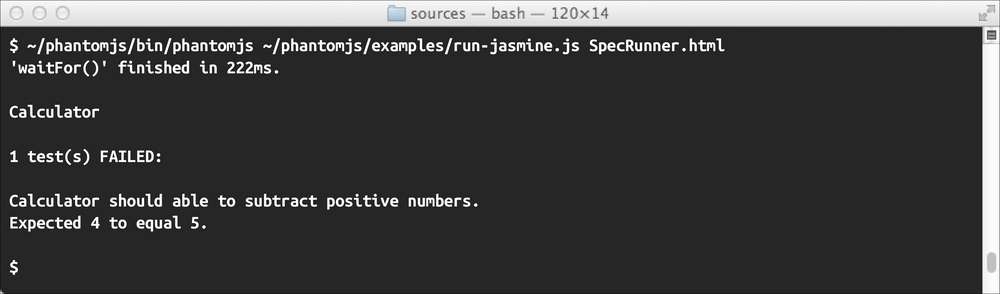
PhantomJS run-jasmine.js only displays the summary and list of failed tests. What if we want to display the list of passed test specs just like the result page in the browser? We can do this since we know how to manipulate the page content and extract certain elements. To do this, we first need to get our copy of run-jasmine.js and save it as run-jasmine2.js, which is our modified version.
Before we start upgrading the run-jasmine.js script, we need to understand how Jasmine renders the list of passed items. Using our browser and by loading our SpecRunner.html file, we can investigate and view the HTML content.
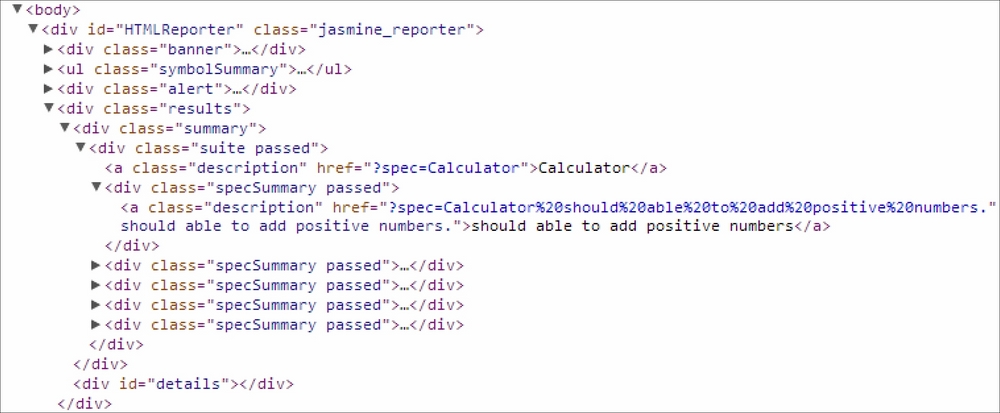
The preceding screenshot displays code that contains the content of the generated HTML from Jasmine SpecRunner.html when tests have run. It shows us that there are several layers of <div> that are added for each spec with specific functional labels based on the CSS class. The result of the test is enclosed on a <div> tag with a CSS class attribute of results. Within results, there is a summary class attribute that contains the list of suites that were passed. Each suite has description and the list of items that were passed, as denoted by the CSS class specSummary passed.
We now have some understanding of what the Jasmine result HTML document's structure is. There can be more than one test suite, so we need to get all of the test suites that were executed.
var listPasssedSuites = document.body.querySelectorAll('.results > .summary > .suite.passed'),
if (listPasssedSuites && listPasssedSuites.length > 0) {
  for (i = 0; i < listPasssedSuites.length; ++i) {
    console.log(listPasssedSuites[i].querySelector('.description').innerText);

    var items = listPasssedSuites[i].querySelectorAll('.specSummary.passed'),
    for (j = 0; j < items.length; ++j) {
      console.log("    " + items[j].querySelector('.description').innerText);
    }
  }
}
Using the querySelectorAll() function in the preceding code, we can search and retrieve all of the elements having the same selector path from the document body. This function will give an array of elements for each test suite.
And from that list of test suites, we can search for all of the test items based on each element using the selector path of '.specSummary.passed'. The query will also return a list of elements having the test items' details. We can now traverse the content of the list to output for each test item's name, as shown in the preceding code.
Our previous enhancement can be inserted in run-jasmine2.js; it falls on the else block of the original code, where the code for displaying the number of passing items is located.
    return 1;
  } else {
    console.log(document.body.querySelector('.alert > .passingAlert.bar').innerText);
    return 0;
  }
});
phantom.exit(exitCode);
After the insertion of the code, the following will be our new code:
return 1;
} else {
var listPasssedSuites = document.body.querySelectorAll('.results > .summary > .suite.passed'),
if (listPasssedSuites && listPasssedSuites.length > 0) {
for (i = 0; i < listPasssedSuites.length; ++i) {
console.log(listPasssedSuites[i].querySelector('.description').innerText);
var items = listPasssedSuites[i].querySelectorAll('.specSummary.passed'),
for (j = 0; j < items.length; ++j) {
console.log(" " + items[j].querySelector('.description').innerText);
}
}
}
console.log(document.body.querySelector('.alert > .passingAlert.bar').innerText);
return 0;
}
});
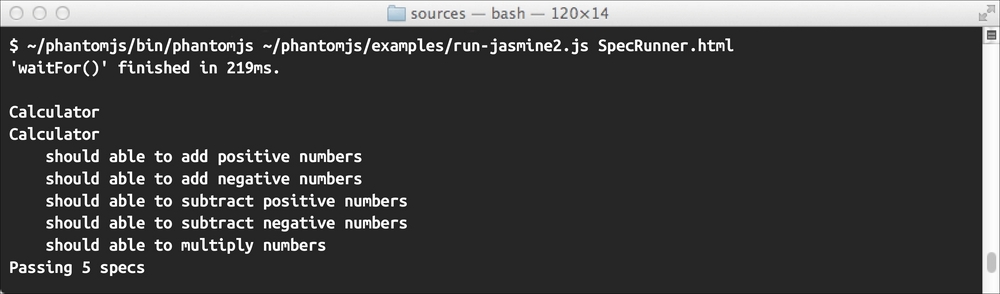
phantom.exit(exitCode);When we run our new test runner and have had our entire test passed, we should have the following screenshot as the output:
This is just an example of how we can customize our test runner to use it with Jasmine. Different development organizations have their own way and requirements for testing, and if we are engaging in doing testing for JavaScript and other web applications, this approach is very useful.