
Had some fun trying those combinations? Now is the time that we take this journey a step ahead and see what else is possible. We have all played with remote-controlled cars and I'm sure everyone will have had fun with those zippy little toys. We are going to do something similar but in a much more sophisticated way.
We all are aware of Bluetooth: this is one of the best ways to communicate with devices in close proximity. Bluetooth communication is a medium data rate, low power communication method. This is almost omnipresent in mobile devices, hence it is an ideal way to start. What we will be doing in this chapter is controlling the car via your mobile phone using Bluetooth. Now let's see how we can do it.
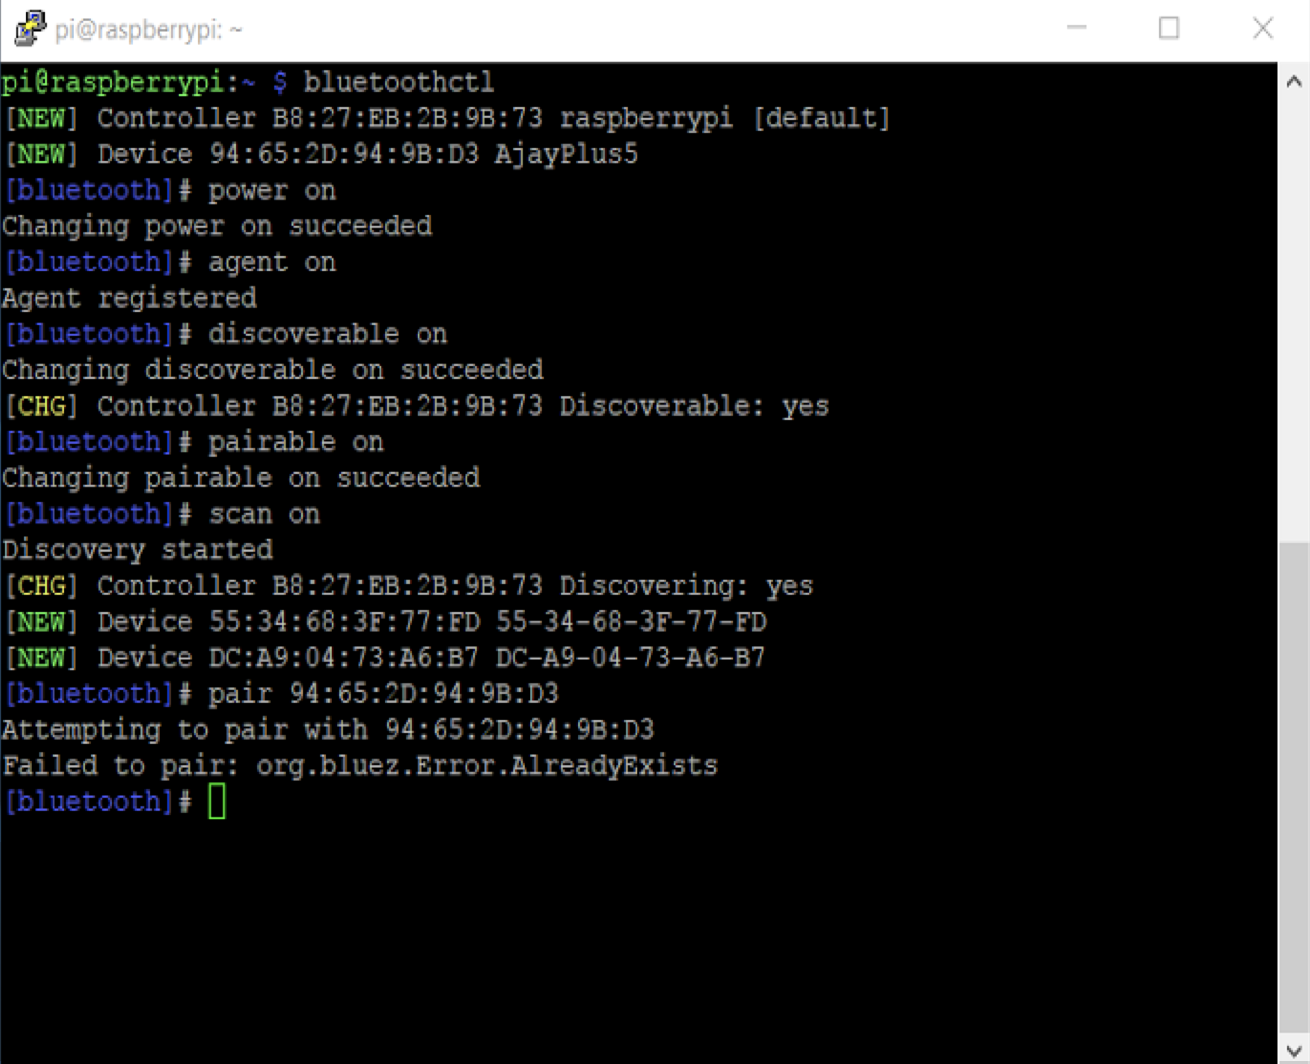
The first thing we want to do is pair up the smartphone to the robotic vehicle, and to do so we need to open the terminal on Raspberry Pi and perform the following steps:
- Type in the command ~ $ bluetoothctl; this is a Bluetooth agent which allows two Bluetooth devices to communicate. Without the Bluetooth agent, the two devices will not be able to communicate with each other in the first place.
- The [Bluetooth] # power on command simply powers up the Bluetooth on board the Raspberry.
- The [Bluetooth] # agent on command starts up the agent which can then initiate the connection for us.
- The [Bluetooth] # discoverable on command makes Raspberry Pi's Bluetooth discoverable. The Bluetooth might be on, but we must make it discoverable to make sure that the other device can find it and connect to it.
- The [Bluetooth] # pairable on command makes the device pairable. If the Bluetooth is on, this doesn't mean your device will be able to connect, hence we need to make it pairable and this command does exactly that.
- The [Bluetooth] # scan on command starts scanning for nearby Bluetooth devices. The output of this command will be a couple of MAC addresses along with the Bluetooth name. The MAC address is a physical address of the device; this is a unique address, hence it will never ever be the same for two devices.
- The [Bluetooth] # pair 94:65:2D:94:9B:D3 command helps you to pair up with the device you want. You simply need to type the mentioned command with the MAC address.
Just to be clear, this what your screen should look like:
Once you have done this process, you should be able to connect Raspberry Pi to your mobile devices. Now that you are connected, it's time to go ahead and write the code through which we will be able to control the Bluetooth car just using our mobile devices. So here is the code. Go ahead, have a look, then we will get to the explanation:
import bluetooth
import time
import RPi.GPIO as GPIO
Motor1a = 20
Motor1b = 21
Motor2a = 2
Motor2b = 3
GPIO.setmode(GPIO.BCM)
GPIO.setwarnings(False)
GPIO.setup(Motor1a,GPIO.OUT)
GPIO.setup(Motor1b,GPIO.OUT)
GPIO.setup(Motor2a,GPIO.OUT)
GPIO.setup(Motor2b,GPIO.OUT)
server_socket=bluetooth.BluetoothSocket( bluetooth.RFCOMM )
port = 1
server_socket.bind(("",port))
server_socket.listen(1)
client_socket,address = server_socket.accept()
print ("Accepted connection from "+str(address))
def stop_car():
  GPIO.output(Motor1a,0)
  GPIO.output(Motor1b,0)
  GPIO.output(Motor2a,0)
  GPIO.output(Motor2b,0)

while True:
  data = client_socket.recv(1024)
  if (data == "B" or data== "b"):
    GPIO.output(Motor1a,1)
    GPIO.output(Motor1b,0)
    GPIO.output(Motor2a,1)
    GPIO.output(Motor2b,0)
    time.sleep(1)
    stop_car()

  if (data == "F" or data == "f"):
    GPIO.output(Motor1a,0)
    GPIO.output(Motor1b,1)
    GPIO.output(Motor2a,0)
    GPIO.output(Motor2b,1)
    time.sleep(1)
    stop_car()

  if (data == "R" or data == "r"):
    GPIO.output(Motor1a,0)
    GPIO.output(Motor1b,1)
    GPIO.output(Motor2a,1)
    GPIO.output(Motor2b,0)
    time.sleep(1)
    stop_car()

  if (data == "L" or data == "l"):
    GPIO.output(Motor1a,1)
    GPIO.output(Motor1b,0)
    GPIO.output(Motor2a,0)
    GPIO.output(Motor2b,1)
    time.sleep(1)
    stop_car()

  if (data == "Q" or data =="q"):
    stop_car()

  if (data =='Z' or data == "z"):
    client_socket.close()
    server_socket.close()
Now let's see what this code is actually doing:
import bluetooth
We will be using some generic functions of Bluetooth during this program, hence we are calling the library bluetooth so that we are able to call those methods:
server_socket=bluetooth.BluetoothSocket( bluetooth.RFCOMM )
Now, whenever we connect two Bluetooth devices, we have various methods of communication; the easiest among them is radio frequency communication, herein referred to as RFCOMM. Now, in this line, we are using the BluetoothSocket method of the bluetooth library to define what communication protocol we are using in our program, which by now you know is RFCOMM. We are further storing this data in a variable called server_socket so that we don't have to repeat this step over and over again. Rather, whenever we need this data it will already be stored in the variable called server_socket:
port = 1
Now, Bluetooth has multiple ports; this is a very useful concept as through one single Bluetooth connection we can have various streams of data being transferred to various devices and programs. This avoids the clash of data and also makes sure that the data is securely communicated to exactly the right receiver. The program which we are using right now is extremely simple and we do not need multiple ports for data communication. Hence, we can use any of the 1 to 60 ports available to us for the communication. In this part of the program, you can write any port and your program will run just fine:
server_socket.bind(("",port))
Now, whenever we are connecting two devices we need to make sure that they stay connected throughout the communication. Hence, here we are writing this command: server_socket.bind. What this will do is that it will make sure that your Bluetooth connection is maintained during the entire communication.
As you can see, the first parameter inside the argument is empty. Here, we generally write the MAC address which it has to be bound with. However, as we have set this as empty it will automatically bind to the MAC address we are already paired with. The second argument we have is the port on which it has to be connected. As we know, the value of the port variable is set to be 1. Hence, it will automatically connect to port number 1:
server_socket.listen(1)
This is a very interesting line. As we know, we might not be the only person trying to connect to the Bluetooth device of Raspberry, hence what should Raspberry do when it receives another connection request?
In this line, we are defining just that: we are calling a method called listen(1). In this function, we have defined the value of argument as 1. What it means is that it will be connected to one device only. Any other device that tries to connect will not get through. If we change this argument to 2 then it will be connected to two devices, however it would stay in the queue and hence it is called queue connection:
client_socket,address = server_socket.accept()
Now that most of the things for the connection have been done, we also need to know if we are connected to the right address. What the method server_socket.accept() does is that it returns the socket number and the address it is serving to. Hence, we are storing it within two variables called client_socket and address. However, as we know, the socket will remain only as 1, hence we will not be using it any further:
print ("Accepted connection from "+str(address))
In this line we are simply telling the user that the connection has been made successfully with the sue of the function str(address) we are printing the value of the address to which it is connected to. This way we can be double sure that the connection has been made to the right device.
data = client_socket.recv(1024)
In this line, we are receiving the data from the client; also, we are defining how long that data will be. Hence, in the method client_socket.recv(1024) we have passed on a parameter in the argument as 1024 which basically denotes that the maximum length of the data packet will be 1024 bytes. Once the data is received, it is then passed on to the variable data for further use.
After this, the rest of the program is pretty simple. We simply need to compare the value received by the mobile device and make the car do whatever we want to do. Here, we have made the car go in all four directions, that is, forward, backward, right, and left. You may also add specific conditions as per your needs:
client_socket.close()
In this line, we are closing the connection of the client socket so that the client can be disconnected and the data transfer can be terminated:
server_socket.close()
In the preceding line, we are closing the connection of the server socket so that the server connection can be disconnected.