
Chapter 12: Analyzing Processor Modules
In this chapter, we will address how to incorporate new processor modules in Ghidra. This is an advanced topic that involves learning the Specification Language for Encoding and Decoding for Ghidra (SLEIGH) so that we can specify the language, disassembling the code, performing function identification via prologue and epilogue byte pattern matching, stack frame creation, and function cross-references generation.
During this chapter, you will acquire extremely useful skills for breaking down advanced reverse engineering protections. You will do this by implementing a virtual machine so that the adversary (you) will have to apply reverse engineering to the virtual machine before reverse engineering the original binary. There are several examples of malware (such as ZeusVM, KINS, and so on) and powerful software protection that's mostly based on virtualization (such as VMProtect, Denuvo, and more).
SLEIGH and SLED
SLEIGH, the Ghidra processor specification language, has its origins in the Specification Language for Encoding and Decoding (SLED), which describes abstract, binary, and assembly language representations of machine instructions. If you want to learn more about SLEIGH, which is a broad topic, check out the following link: https://ghidra.re/courses/languages/html/sleigh.html. If you want to learn more about SLED, check out the following link: https://www.cs.tufts.edu/~nr/pubs/specifying.html.
We will start by providing an overview of the extensive list of existing Ghidra processor modules and how they are used by Ghidra. Finally, we will analyze the x86 processor module from a Ghidra developer perspective. The loader under analysis is responsible for enabling Ghidra so that we can understand its x86 architecture and variants (for example, 16-bit real mode). As we did in the previous chapter, we will look at a real-world example to help us with this.
In this chapter, we're going to cover the following topics:
- Understanding the existing Ghidra processor modules
- The Ghidra processor module skeleton
- Developing Ghidra processors
Let's get started!
Technical requirements
The technical requirements for this chapter are as follows:
- Java JDK 11 for x86_64 (available here): https://adoptopenjdk.net/releases.html?variant=openjdk11&jvmVariant=hotspot
- Eclipse IDE for Java developers (any version supporting JDK 11 available here: https://www.eclipse.org/downloads/) since it is the IDE that's officially integrated and supported by Ghidra.
- This book's GitHub repository, which contains all the necessary code for this chapter (https://github.com/PacktPublishing/Ghidra-Software-Reverse-Engineering-for-Beginners/tree/master/Chapter12).
Check out the following link to see the Code in Action video: https://bit.ly/2VQjNFt
Understanding the existing Ghidra processor modules
In this section, we will provide an overview of Ghidra's processor modules from a user perspective. Ghidra provides support for a lot of processor architectures. You can find a list of supported architectures by listing the directories included in the Ghidra/Processors/ directory of both the Ghidra distribution and Ghidra's GitHub repository (https://github.com/NationalSecurityAgency/ghidra/tree/master/Ghidra/Processors), as shown in the following screenshot:

Figure 12.1 – Listing Ghidra's processor modules (partial list)
At the time of writing this book, Ghidra supports the following list of processors:6502, 68000, 6805, 8048, 8051, 8085, AARCH64, ARM, Atmel, CP1600, CR16, DATA, Dalvik, HCS08, HCS12, JVM, M8C, MCS96, MIPS, PA-RISC, PIC, PowerPC, RISCV, Sparc, SuperH, SuperH4, TI_MSP430, Toy, V850, Z80, tricore, and x86.If we compare this list with IDA Professional Edition processor support, we'll notice that IDA supports more processors, even though it doesn't provide Ghidra support. But if we compare Ghidra with IDA Home Edition, then we'll notice that Ghidra supports more architectures, including very common architectures such as Dalvik (the discontinued virtual machine used by Android) and Java Virtual Machine (JVM).
Using loading a binary for the x86 architecture as an example, you will probably remember from Chapter 11, Incorporating New Binary Formats, that, when loading a file, you can choose what language it will appear in by clicking on the ellipses button (…) next to Language, as shown in the following screenshot:
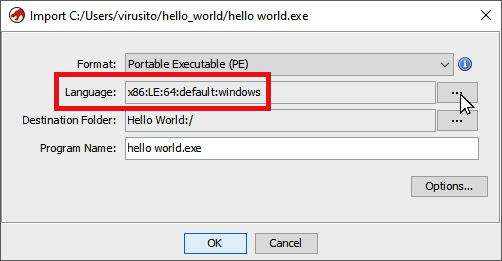
Figure 12.2 – Default language variant when importing a PE file
Once I'd done this, I unchecked Show Only Recommended Language/Compiler Specs to show all the languages and compilers that are available. By doing this, I can see that the x86 processor module implements eight variants:
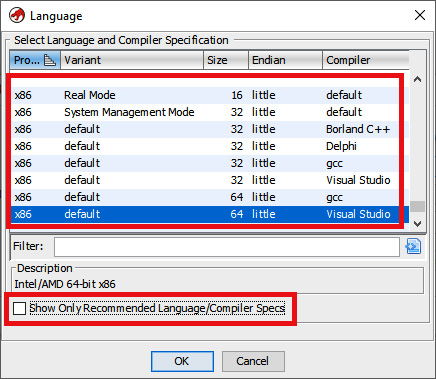
Figure 12.3 – Choosing the appropriate language variant when importing a file
Let's analyze the structure of a processor module to understand how these variants are relevant to the Language window. We can execute the tree command to provide an overview of the directory structure of the x86 processor and analyzer.
The data directory contains the x86 processor module:
C:UsersvirusitoghidraGhidraProcessorsx86>tree
├───data
│ ├───languages
│ │ └───old
│ ├───manuals
│ └───patterns
As you can see, there are three children folders implementing it:
- languages: This is responsible for implementing the x86 processor using different kinds of files, all of which will be explained later (*.sinc, *.pspec, *.gdis, *.dwarf, *.opinion, *.slaspec, *.spec, and *.ldefs).
- manuals: The processor's manual documentation is stored here using the *.idx Ghidra format. This indexes the original PDF's information, thus allowing you to query the documentation.
- patterns: Byte patterns are stored in XML files and used to determine whether the importing file was developed for the x86 architecture.
The src directory contains the x86 analyzer. You probably remember analyzer extensions from the The Ghidra Extension Module Skeleton section of Chapter 4, Using Ghidra Extensions. These kinds of extensions allow us to extend Ghidra's code analysis functionality:
└───src
├───main
│ └───java
│ └───ghidra
│ ├───app
│ │ ├───plugin
│ │ │ └───core
│ │ │ └───analysis
│ │ └───util
│ │ └───bin
│ │ └───format
│ │ ├───coff
│ │ │ └───relocation
│ │ └───elf
│ │ ├───extend
│ │ └───relocation
│ └───feature
│ └───fid
│ └───hash
└───test.processors
└───java
└───ghidra
└───test
└───processors
The main file of the analyzer extension is the X86Analyzer Java class file (full path: GhidraProcessorsx86srcmainjavaghidraappplugincoreanalysisX86Analyzer.java). This class extends from ConstantPropagationAnalyzer (full path: Ghidra/Features/Base/src/main/java/ghidra/app/plugin/core/analysis/ConstantPropagationAnalyzer.java), which itself extends from AbstractAnalyzer (the class you must directly or indirectly extend from when writing analyzer extensions).
In this section, you learned about existing processors and analyzers and how their source code is structured. In the next section, we will explore how to create a new processor module.
Overviewing the Ghidra processor module skeleton
In this section, we will look at the Ghidra processor module skeleton. This skeleton will be a little bit different because processor modules are not written in Java. Instead, the processor modules are written in SLEIGH, which is the Ghidra processor specification language.
Setting up the processor module development environment
Before you can create a new processor module, you will need to set up an environment:
- Install the Java JDK for x86_64, as explained in Chapter 3, Ghidra Debug Mode, in the Installing Java JDK section.
- Install the Eclipse IDE for Java developers, as explained in Chapter 3, Ghidra Debug Mode, in the Installing Eclipse IDE section.
- Install the GhidraDev plugin for Eclipse, as explained in Chapter 3, Ghidra Debug Mode, in the Installing GhidraDev section.
- Additionally, in the same way you installed GhidraDev, since you will need to work with SLEIGH to develop the processor's specifications, it is highly recommended that you also install GhidraSleighEditor.
The GhidraSleighEditor installation process is the same as for GhidraDev since both are Eclipse plugins. It is a ZIP file that can be installed from the Eclipse IDE, and both the straightforward installation guide (GhidraSleighEditor_README.html) and the plugin installer (GhidraSleighEditor-1.0.0.zip) are available in the ExtensionsEclipseGhidraSleighEditor directory of your Ghidra installation:

Figure 12.4 – GhidraSleighEditor plugin for the Eclipse IDE
In the next section, we will learn how to create a processor module skeleton.
Creating a processor module skeleton
As you probably remember from Chapter 4, Using Ghidra Extensions, to create a processor module, you must click on New | Ghidra Module Project… and set the name and location of the project to be created. In this case, I will name it ProcessorModuleProject, as shown in the following screenshot:

Figure 12.5 – Creating a Ghidra project
After clicking on Next >, only check the last option – Processor – Enables disassembly/decompilation of a processor/architecture – in order to create a processor module skeleton:

Figure 12.6 – Configuring the Ghidra project so that it includes the processor module skeleton
After clicking on Finish, you will see the processor skeleton in the Package Explorer section of Eclipse:
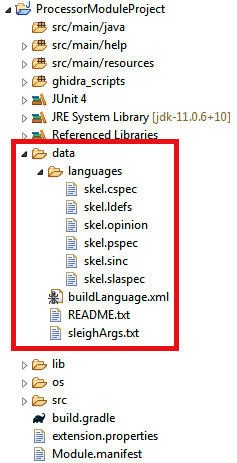
Figure 12.7 – The processor module skeleton
All the files that compose the skeleton are stored in the datalanguages directory. Since each file has its own specification goal, let's look at them in more detail:
- skel.cspec: As its name suggests, this is a compiler specification file. It allows us to encode information that is specific to the compiler that's necessary when dissembling and analyzing a binary. You can find out more by going to https://github.com/NationalSecurityAgency/ghidra/blob/master/Ghidra/Features/Decompiler/src/main/doc/cspec.xml.
- skel.ldefs: According to the extension, this is the definition of the processor language.
- skel.opinion: As you probably remember from the previous chapter, opinion files contain constraints that allow us to determine whether the file can be loaded or not by the importer. You can find out more by going to https://github.com/NationalSecurityAgency/ghidra/blob/master/Ghidra/Framework/SoftwareModeling/data/languages/Steps%20to%20creation%20of%20Format%20Opinion.txt.
- skel.pspec: As its name suggests, this file is a processor specification file.
- skel.sinc: As its name suggests, this is a SLEIGH file that specifies the language instructions of a processor (for example, the mov assembly language instruction if x86 must be defined here).
- skel.slaspec: This is the SLEIGH language specification and allows us to specify the processor (for example, registers, flags, and so on).
As we mentioned previously, SLEIGH is a broad topic, so if you want to learn more, please read the documentation available in your Ghidra distribution (docslanguageshtmlsleigh.html).
Now that you have installed the SLEIGH editor, you can edit all the aforementioned files by right-clicking the target file, choosing Open With | Other…, and then choosing Sleigh Editor:

Figure 12.8 – Opening a file in Eclipse using the Other… editor
If you want, you can also take this as an opportunity to associate the *.cspec files by checking the Use it for all '*.cspec' files option before clicking OK:

Figure 12.9 – Choosing Sleigh Editor for opening a file in Eclipse
Choose No when you're asked to convert the project into an Xtext project. Also, take this opportunity to make your computer remember this decision by checking the Remember my decision checkbox, as shown in the following screenshot:

Figure 12.10 – Converting the project into an Xtext project dialog
We started this section by providing an overview of an existing processor module (x86 processor) and analyzing it from a Ghidra user perspective. You superficially explored the code files that comprise it in order to understand the big picture of processor modules. After that, you learned how to set up a processor module development environment and a processor module skeleton so that you can start developing a new one.
In the next section, we will explore how the x86 processor we looked at in the first section of this chapter, Existing processor modules, was implemented to zoom into the details of its implementation.
Developing Ghidra processors
As you know, Ghidra processor module development involves many different files that are located in the data directory of the module. These files are listed in the manifest (https://github.com/NationalSecurityAgency/ghidra/blob/master/Ghidra/Processors/x86/certification.manifest):

Figure 12.11 – Partial dump of certification.manifest
In the next section, we will look at Ghidra's processor documentation files and their relationship to the official processor documentation.
Documenting processors
The manuals directory of the x86 processor stores the x86.idx file (https://github.com/NationalSecurityAgency/ghidra/blob/master/Ghidra/Processors/x86/data/manuals/x86.idx), which contains an indexed version of the official instruction set reference for such an architecture (https://software.intel.com/sites/default/files/managed/a4/60/325383-sdm-vol-2abcd.pdf). This indexed version allows Ghidra to access such information when retrieving instruction information from Ghidra's GUI during reversing. The following code snippet is of a few lines that can be found at the beginning of the x86.idx file. They relate to processor instructions and their documentation pages (for example, line 01 relates to the AAA processor instruction, which can be found on page 120 of the official documentation):
00 @325383-sdm-vol-2abcd.pdf [Intel 64 and IA-32 Architectures Software Developer's Manual Volume 2 (2A, 2B, 2C & 2D): Instruction Set Reference, A-Z, Oct 2019 (325383-071US)]
01 AAA, 120
02 AAD, 122
03 BLENDPS, 123
04 AAM, 124
05 AAS, 126
06 ADC, 128
07 ADCX, 131
08 ADD, 133
...................... File cut here .........................
In the next section, we will learn how to write signatures so that Ghidra can identify functions and code snippets for this architecture.
Identifying functions and code using patterns
There is also a patterns directory where patterns specified in XML language are used for function and code identification. The directory does this by taking different compilers into account. The format of a file of patterns (for example, https://github.com/NationalSecurityAgency/ghidra/blob/master/Ghidra/Processors/x86/data/patterns/x86gcc_patterns.xml) is an XML file that starts and ends with the patternlist tag:
00 <patternlist>
01 … patters here …
02 </patternlist>
You can add patterns that allow the analyzer to identify functions and code. In the following example, which has been taken from the x86 GCC patterns file (x86gcc_patterns.xml), we can see that a pattern was included using the pattern tag. The pattern itself is written as a hexadecimal byte representation. To aid in your understanding of this, a comment has been added to the right of this, indicating what those bytes mean (in this case, this is the prologue of a function).
After the data section, we have two tags: codeboundary and possiblefuncstart. The position of these tags is important because, since they are located after the data section, the meanings of codeboundary and possiblefuncstart must be understood from the pattern indicated in the data section onward. codeboundary indicates that the code starts or ends (it is a boundary), while possiblefuncstart indicates that the bytes matching the pattern may be at the start of a function:
00 <patternlist>
01 <pattern>
02 <data>0x5589e583ec</data> <!-- PUSH EBP : MOV EBP,ESP
: SUB ESP, -->
03 <codeboundary/>
04 <possiblefuncstart/>
05 </pattern>
06 </patternlist>
You can also use patternpairs to define two patterns that are usually found together, one preceding the other. These patterns are called prepatterns and postpatterns, respectively. For instance, it is quite common for the end of a function (prepattern, specified on line 03) to precede the start of another function (postpattern, specified on line 09):
00 <patternpairs totalbits="32" postbits="16">
01 <prepatterns>
02 <data>0x90</data> <!-- NOP filler -->
03 <data>0xc3</data> <!-- RET -->
04 <data>0xe9........</data> <!-- JMP big -->
05 <data>0xeb..</data> <!-- JMP small -->
06 <data>0x89f6</data> <!-- NOP (MOV ESI,ESI) -->
07 </prepatterns>
08 <postpatterns>
09 <data>0x5589e5</data> <!-- PUSH EBP : MOV EBP,ESP -->
10 <codeboundary/>
11 <possiblefuncstart/>
12 </postpatterns>
13 </patternpairs>
In the next section, we will learn how to specify the assembly language for such a processor using Debugging With Attributed Record Formats (DWARF).
Specifying the language and its variants
Inside the languages directory, we have a bunch of files with different names (every name implements a variant of the language) and different extensions (every extension if responsible for specifying the language at hand). Let's analyze the x86 files that implement the x86 variant of the processor (there are other variants as well, such as x86-64 and x86-16).
x86.dwarf
This file describes the registers of the architecture using mappings between Ghidra names and DWARF register numberings. DWARF is a standardized debugging data format. DWARF mappings are described by the Application Binary Interface (ABI) of the architecture (available here: https://www.uclibc.org/docs/psABI-i386.pdf). The Ghidra DWARF file looks as follows:
00 <dwarf>
01 <register_mappings>
02 <register_mapping dwarf="0" ghidra="EAX"/>
03 <register_mapping dwarf="1" ghidra="ECX"/>
04 <register_mapping dwarf="2" ghidra="EDX"/>
. . . . . . . . . . . . cut here . . . . . . . . . . . . . .
Of course, apart from matching the Ghidra register names with DWARF numbers, attributes are also used to specify the ESP register's purpose in the x86 architecture as a stack pointer (the stackpointer attribute):
<register_mapping dwarf="4" ghidra="ESP" stackpointer="true"/>
Attributes can also be used to abbreviate code. For instance, they can be used to declare eight registers at a time. Registers XMM0 to XMM7 are declared using a single line of code via the auto_count attribute:
<register_mapping dwarf="11" ghidra="ST0" auto_count="8"/>
This XML consists of mapping registers. In the next section, we will learn how to define the x86 processor language.
DWARF Debugging Format
If you want to learn more about DWARF, go to the official website: http://dwarfstd.org/.
x86.ldefs
This file defines the x86 processor language and its variants. All languages are specified inside language_definitions tags (lines 00 and 19). For instance, the default variant of the x86 language (line 04) that corresponds to the x86 architecture (line 01) for 32-bit machines (line 03) using little endian (line 02) and shown to the user as x86:LE:32:default (line 09) is fully specified between lines 01 and 18 (the language tags). Its specification can also include the name of the processor variant in external tools (lines 12-16).
It also references some external files: x86.sla (SLEIGH language specification file) on line 06), x86.pspec (processor specification file) on line 07, x86.idx (x86 architecture indexed manual) on line 08, and x86.dwarf (DWARF registry mapping file) on line 16:
00 <language_definitions>
01 <language processor="x86"
02 endian="little"
03 size="32"
04 variant="default"
05 version="2.9"
06 slafile="x86.sla"
07 processorspec="x86.pspec"
08 manualindexfile="../manuals/x86.idx"
09 id="x86:LE:32:default">
10 <description>Intel/AMD 32-bit x86</description>
11 <compiler name="gcc" spec="x86gcc.cspec" id="gcc"/>
12 <external_name tool="gnu" name="i386:intel"/>
13 <external_name tool="IDA-PRO" name="8086"/>
14 <external_name tool="IDA-PRO" name="80486p"/>
15 <external_name tool="IDA-PRO" name="80586p"/>
16 <external_name tool="DWARF.register.mapping.file"
17 name="x86.dwarf"/>
18 </language>
. . . . . . . more languages here . . . . . .
19 </language_definitions>
In the next section, we will learn about the processor specifications that are relevant when importing a file.
x86.opinion
This file contains constraints that allow us to determine whether the file can be loaded by the importer. For instance, the constraints for PE files (line 01) in the case of the windows compiler (line 02) are the constraints that are specified between lines 03-10. Each has its own primary value that can be queried using the opinion query service when you're loading a file:
00 <opinions>
01 <constraint loader="Portable Executable (PE)">
02 <constraint compilerSpecID="windows">
03 <constraint primary="332" processor="x86"
04 endian="little" size="32" />
05 <constraint primary="333" processor="x86"
06 endian="little" size="32" />
07 <constraint primary="334" processor="x86"
08 endian="little" size="32" />
09 <constraint primary="34404" processor="x86"
10 endian="little" size="64" />
11 </constraint>
In the next section, we will learn how to specify some necessary information about compilers targeting the architecture.
x86.pspec
The compiler specification file allows us to encode information that is specific to the compiler and is necessary when dissembling and analyzing a binary (for example, the program counter on line 08):
00 <processor_spec>
01 <properties>
02 <property
03 key="useOperandReferenceAnalyzerSwitchTables"
04 value="true"/>
05 <property key="assemblyRating:x86:LE:32:default"
06 value="PLATINUM"/>
07 </properties>
08 <programcounter register="EIP"/>
09 <incidentalcopy>
10 <register name="ST0"/>
11 <register name="ST1"/>
12 </incidentalcopy>
13 <context_data>
14 <context_set space="ram">
15 <set name="addrsize" val="1"/>
16 <set name="opsize" val="1"/>
17 </context_set>
18 <tracked_set space="ram">
19 <set name="DF" val="0"/>
20 </tracked_set>
21 </context_data>
22 <register_data>
23 <register name="DR0" group="DEBUG"/>
24 <register name="DR1" group="DEBUG"/>
25 </register_data>
26 </processor_spec>
In the next section, we will learn how to specify the processor architecture using the SLEIGH language.
x86.slaspec
The SLEIGH language specification allows us to specify the processor. In this case, the implementation is split into many files that are included in x86.slapec. In this case, we are interested in ia.sinc, which implements an x86 32-bit variant of this language:
00 @include "ia.sinc"
If you want to write your own language, then you will need to learn more about SLEIGH (https://ghidra.re/courses/languages/html/sleigh.html). The following is a snippet of ia.sinc that allows us to implement matching between the x86 32-bit swap instruction and the PCode swap operation:
00 define pcodeop swap_bytes;
:MOVBE Reg16, m16 is vexMode=0 & opsize=0 & byte=0xf; byte=0x38; byte=0xf0; Reg16 ... & m16 { Reg16 = swap_bytes( m16 ); }
:MOVBE Reg32, m32 is vexMode=0 & opsize=1 & mandover=0 & byte=0xf; byte=0x38; byte=0xf0; Reg32 ... & m32 { Reg32 = swap_bytes( m32 ); }
:MOVBE m16, Reg16 is vexMode=0 & opsize=0 & byte=0xf; byte=0x38; byte=0xf1; Reg16 ... & m16 { m16 = swap_bytes( Reg16 ); }
:MOVBE m32, Reg32 is vexMode=0 & opsize=1 & mandover=0 & byte=0xf; byte=0x38; byte=0xf1; Reg32 ... & m32 { m32 = swap_bytes( Reg32 ); }
@ifdef IA64
:MOVBE Reg64, m64 is vexMode=0 & opsize=2 & mandover=0 & byte=0xf; byte=0x38; byte=0xf0; Reg64 ... & m64 { Reg64 = swap_bytes( m64 ); }
:MOVBE m64, Reg64 is vexMode=0 & opsize=2 & mandover=0 & byte=0xf; byte=0x38; byte=0xf1; Reg64 ... & m64 { m64 = swap_bytes( Reg64 ); }
@endif
In this section, you learned how Ghidra's x86 processor module is structured and some of the details of its implementation. These can be useful if you're planning to develop your own Ghidra processor module. It is up to you if you wish to continue learning about SLEIGH, which is a broad and interesting topic.
Summary
In this chapter, you learned about the built-in Ghidra processors and their variants. You also learned what these processors look like when you're importing files using Ghidra.
You also learned about the skills you need to use for Ghidra processor module development and the SLEIGH language, which is used more for specifying than programming. By learning about this, you learned why processor modules are special. You were then introduced to processor module development by getting hands-on and analyzing the 32-bit processor variant of the x86 architecture.
Finally, you learned about the URL resources that you can use if you want to learn more about the SLEIGH specification language and write your own processor modules.
In the next chapter, we will learn how to contribute to the Ghidra project via collaborating and how to be part of the community.
Questions
- What is the difference between a processor module and an analyzer module?
- When writing patterns, is the tag's position important?
- What is the difference between language and language variants?
Further reading
Please refer to the following links to find out more about the topics that were covered in this chapter:
- SLEIGH documentation:
- Ghidra decompiler documentation:
https://github.com/NationalSecurityAgency/ghidra/tree/master/Ghidra/Features/Decompiler/src/main/doc