
Chapter 5
Google’s Part in an Information Collection Framework
Abstract
This chapter will cover automated searches, data mining and collecting useful search terms.
Keywords
automating searches
data mining
collecting search terms
Introduction
There are various reasons for hacking. When most of us hear hacker we think about computer and network security, but lawyers, salesmen, and policemen are also hackers at heart. It’s really a state of mind and a way of thinking rather than a physical attribute. Why do people hack? There are a couple of motivators, but one specific reason is to be able to know things that the ordinary man on the street doesn’t. From this many of the other motivators stem out. Knowledge is power – there’s a rush to seeing what others are doing without them knowing it. Understanding that the thirst for knowledge is central to hacking, consider Google, a massively distributed supercomputer, with access to all known information and with a deceivingly simple user interface, just waiting to answer any query within seconds. It is almost as if Google was made for hackers.
The first and second editions of this book brought to light many techniques that a hacker (or penetration tester) might use to obtain information that would help him or her in conventional security assessments (e.g., finding networks, domains, email addresses, and so on). During such a conventional security test (or pen test) the aim is almost always to breach security measures and get access to information that is restricted. However, this information can be reached simply by assembling related pieces of information together to form a bigger picture. This, of course, is not true for all information. The chances that I will find your super secret double encrypted document on Google is extremely slim, but you can bet that the way to get to it will eventually involve a lot of information gathering from public sources like Google.
If you are reading this book you are probably already interested in information mining, getting the most from search engines by using them in interesting ways. In this chapter I hope to show interesting and clever ways to do just that.
The principles of automating searches
Computers help automate tedious tasks. Clever automation can accomplish what a thousand disparate people working simultaneously cannot. But it’s impossible to automate something that cannot be done manually. If you want to write a program to perform something, you need to have done the entire process by hand, and have that process work every time. It makes little sense to automate a flawed process. Once the manual process is ironed out, an algorithm is used to translate that process into a computer program.
Let’s look at an example. A user is interested in finding out which Web sites contain the email address [email protected]. As a start, the user opens Google and types the email address in the input box. The results are shown in Figure 5.1.

Figure 5.1
The user sees that there are three different sites with that email address listed: g.bookpool.com, www.networksecurityarchive.org, and book.google.com. In the back of his or her mind is the feeling that these are not the only sites where the email address appears, and remembers that he or she has seen places where email addresses are listed as andrew at syngress dot com. When the user puts this search into Google, he or she gets different results, as shown in Figure 5.2.

Figure 5.2
Clearly the lack of quotes around the query gave incorrect results. The user adds the quotes and gets the results shown in Figure 5.3.
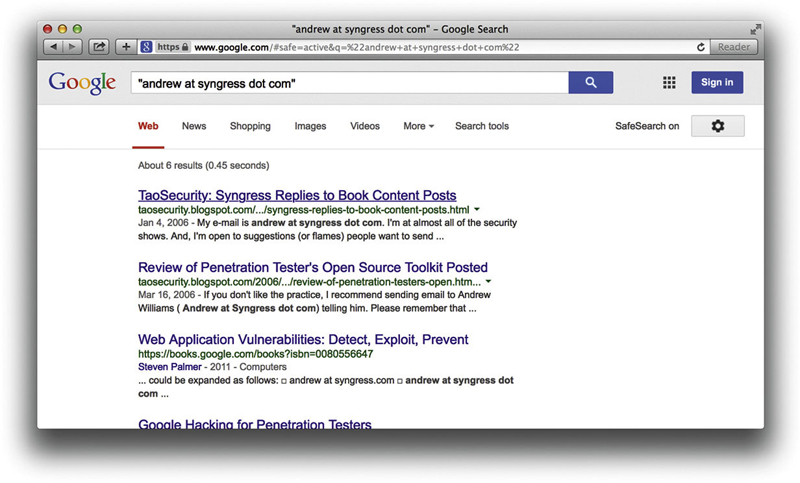
Figure 5.3
By formulating the query differently, the user now has a new result: taosecurity.blogspot.com. The manipulation of the search query worked, and the user has found another site reference.
If we break this process down into logical parts, we see that there are actually many different steps that were followed. Almost all searches follow these steps:
▪ Define an original search term
▪ Expand the search term
▪ Get data from the data source
▪ Parse the data
▪ Postprocess the data into information.
Let’s look at these in more detail.
The original search term
The goal of the previous example was to find Web pages that reference a specific email address. This seems rather straightforward, but clearly defining a goal is probably the most difficult part of any search. Brilliant searching won’t help attain an unclear goal. When automating a search, the same principles apply as when doing a manual search: garbage in, garbage out.
Computers are bad at “thinking” and good at “number crunching.” Don’t try to make a computer think for you, because you will be bitterly disappointed with the results. The principle of garbage in, garbage out simply states that if you enter bad information into a computer from the start, you will only get garbage (or bad information) out. Inexperienced search engine users often wrestle with this basic principle.
In some cases, goals may need to be broken down. This is especially true of broad goals, like trying to find email addresses of people that work in cheese factories in the Netherlands. In this case, at least one subgoal exists – you’ll need to define the cheese factories first. Be sure your goals are clearly defined, then work your way to a set of core search terms. In some cases, you’ll need to play around with the results of a single query in order to work your way towards a decent starting search term. I have often seen results of a query and thought, “Wow, I never thought that my query would return these results. If I shape the query a little differently each time with automation, I can get loads of interesting information.”
In the end the only real limit to what you can get from search engines is your own imagination, and experimentation is the best way to discover what types of queries work well.
Expanding search terms
In our example, the user quickly figured out that they could get more results by changing the original query into a set of slightly different queries. Expanding search terms is fairly natural for humans, and the real power of search automation lies in thinking about that human process and translating it into some form of algorithm. By programmatically changing the standard form of a search into many different searches, we save ourselves from manual repetition, and more importantly, from having to remember all of the expansion tricks. Let’s take a look at a few of these expansion techniques.
Email Addresses
Many sites try obscure email addresses in order to fool data-mining programs. This is done for a good reason: the majority of the data-mining programs troll sites to collect email addresses for spammers. If you want a sure fire way to receive a lot of spam, post to a mailing list that does not obscure your email address. While it’s a good thing that sites automatically obscure the email address, it also makes our lives as Web searchers difficult. Luckily, there are ways to beat this; however, these techniques are also not unknown to spammers.
When searching for an email address we can use the following expansions. The email address [email protected] could be expanded as follows:
▪ andrew at syngress.com
▪ andrew at syngress dot com
▪ andrew@syngress dot com
▪ andrew_at_syngress dot com
▪ andrew_at_syngress_dot_com
Note that the “@” sign can be written in many forms (e.g., – (at), _at_ or -at-). The same goes for the dot (“.”). You can also see that many people add “remove” or “removethis” in an email address. At the end it becomes an 80/20 thing – you will find 80% of addresses when implementing the top 20% of these expansions.
At this stage you might feel that you’ll never find every instance of the address (and you may be right). But there is a tiny light at the end of the tunnel. Google ignores certain characters in a search. A search for [email protected] and “andrew syngress com” returns the same results. The @ sign and the dot are simply ignored. So when expanding search terms, don’t include both, because you are simply wasting a search.
Verifying an Email Address
Here’s a quick hack to verify if an email address exists. While this might not work on all mail servers, it works on the majority of them – including Gmail. Have a look:
▪ Step 1. Find the mail server: $ host -t mx gmail.com
▪ Step 2. Pick one and Telnet to port 25 $ telnet gmail-smtp-in.l.google.com 25
▪ Trying 64.233.183.27
▪ Connected to gmail-smtp-in.l.google.com.
▪ Escape character is “^]”.
▪ 220 mx.google.com ESMTP d26si15626330nfh
▪ Step 3. Mimic the Simple Mail Transfer Protocol (SMTP): HELO test
▪ 250 mx.google.com at your service
▪ MAIL FROM: <[email protected]>
▪ 250 2.1.0 OK
▪ Step 4a. Positive test – RCPT TO: <[email protected]>
▪ 250 2.1.5 OK
▪ Step 4b. Negative test – RCPT TO: <[email protected]>
▪ 550 5.1.1 No such user d26si15626330nfh
▪ Step 5. Say goodbye: quit
▪ 221 2.0.0 mx.google.com closing connection d26si15626330nfh
By inspecting the responses from the mail server we have now verified that [email protected] exists, while [email protected] does not. In the same way, we can verify the existence of other email addresses.
On Windows platforms you will need to use the nslookup command to find the email servers for a domain. You can do this as follows: nslookup -qtype=mx gmail.com
Telephone Numbers
While email addresses have a set format, telephone numbers are a different kettle of fish. It appears that there is no standard way of writing down a phone number. Let’s assume you have a number that is in South Africa and the number itself is 012 555 1234. The number can appear on the Internet in many different forms:
▪ 012 555 1234 (local)
▪ 012 5551234 (local)
▪ 012555124 (local)
▪ +27 12 555 1234 (with the country code)
▪ +27 12 5551234 (with the country code)
▪ +27 (0)12 555 1234 (with the country code)
▪ 0027 (0)12 555 1234 (with the country code)
One way of catching all of the results would be to look for the most significant part of the number, “555 1234” and “5551234.” However, this has a drawback as you might find that the same number exists in a totally different country, giving you a false positive.
An interesting way to look for results that contain telephone numbers within a certain range is by using Google’s numrange operator. A shortcut for this is to specify the start number, then “..” followed by the end number. Let’s see how this works in real life. Imagine I want to see what results I can find on the area code +1 252 793. You can use the numrange operator to specify the query as shown in Figure 5.4.

Figure 5.4
We can clearly see that the results all contain numbers located in the specified range in North Carolina. We will see how this ability to restrict results to a certain area is very useful later in this chapter.
People
One of the best ways to find information about someone is to Google them. If you haven’t Googled for yourself, you are the odd one out. There are many ways to search for a person and most of them are straightforward. If you don’t get results straight away don’t worry, there are numerous options. Assuming you are looking for Andrew Williams you might search for:
▪ “Andrew Williams”
▪ “Williams Andrew”
▪ “A Williams”
▪ “Andrew W”
▪ Andrew Williams
▪ Williams Andrew
Note that the last two searches do not have quotes around them. This is to find phrases like “Andrew is part of the Williams family”.
With a name like Andrew Williams you can be sure to get a lot of false positives as there are probably many people named Andrew Williams on the Internet. As such, you need to add as many additional search terms to your search as possible. For example, you may try something like “Andrew Williams” Syngress publishing security. Another tip to reduce false positives is to restrict the site to a particular country. If Andrew stayed in England, adding the site:uk operator would help limit the results. But keep in mind that your searches are then limited to sites in the UK. If Andrew is indeed from the UK but posts on sites that end in any other top level domains (TLD), this search won’t return hits from those sites.
Getting Lots of Results
In some cases you’d be interested in getting a lot of results, not just specific results. For instance, you want to find all Web sites or email addresses within a certain TLD. Here you want to combine your searches with keywords that do two things: get past the 1000 result restriction and increase your yield per search. As an example, consider finding Web sites in the ****.gov domain, as shown in Figure 5.5.

Figure 5.5
You will get a maximum of 1000 sites from the query, because it is most likely that you will get more than one result from a single site. In other words, if 500 pages are located on one server and 500 pages are located on another server you will only get two site results.
Also, you will be getting results from sites that are not within the ****.gov domain. How do we get more results and limit our search to the ****.gov domain? By combining the query with keywords and other operators. Consider the query site:****.gov - www.****.gov. The query means find any result within sites that are located in the ****.gov domain, but that are not on their main Web site. While this query works beautifully, it will again only get a maximum of 1000 results. There are some general additional keywords we can add to each query. The idea here is that we use words that will raise sites that were below the 1000 mark surface to within the first 1000 results. Although there is no guarantee that it will lift the other sites out, you could consider adding terms like about, official, page, site, and so on. While Google says that words like the, a, or, and so on are ignored during searches, we do see that results differ when combining these words with the site: operator. Looking at these results in Figure 5.6 shows that Google is indeed honoring the “ignored” words in our query.

Figure 5.6
More Combinations
When the idea is to find lots of results, you might want to combine your search with terms that will yield better results. For example, when looking for email addresses, you can add keywords like contact, mail, email, and send. When looking for telephone numbers you might use additional keywords like phone, telephone, contact, number, and mobile.
Using “special” operators
Depending on what it is that we want to get from Google, we might have to use some of the other operators. Imagine we want to see what Microsoft Office documents are located on a Web site. We know we can use the filetype: operator to specify a certain file type, but we can only specify one type per query. As a result, we will need to automate the process of asking for each Office file type at a time. Consider asking Google these questions:
▪ filetype:ppt site:www.****.gov
▪ filetype:doc site:www.****.gov
▪ filetype:xls site:www.****.gov
▪ filetype:pdf site:www.****.gov
Keep in mind that in certain cases, these expansions can now be combined again using boolean logic. In the case of our Office document search, the search filetype:ppt or filetype:doc site www.****.gov could work just as well. Keep in mind that we can change the site: operator to be site:****.gov, which will fetch results from any Web site within the ****.gov domain. We can use the site: operator in other ways as well. Imagine a program that will see how many time the word iPhone appears on sites located in different countries. If we monitor the Netherlands, France, Germany, Belgium, and Switzerland our query would be expanded as such:
▪ iphone site:nl
▪ iphone site:fr
▪ iphone site:de
▪ iphone site:be
▪ iphone site:ch
At this stage we only need to parse the returned page from Google to get the amount of results, and monitor how the iPhone campaign is/was spreading through Western Europe over time. Doing this right now (at the time of writing this book) would probably not give you meaningful results (as the hype has already peaked), but having this monitoring system in place before the release of the actual phone could have been useful. (For a list of all country codes see http://ftp.ics.uci.edu/pub/websoft/wwwstat/country-codes.txt, or just Google for Internet country codes.)
Getting the data from the source
At the lowest level we need to make a Transmission Control Protocol (TCP) connection to our data source (which is the Google Web site) and ask for the results. Because Google is a Web application, we will connect to port 80. Ordinarily, we would use a Web browser, but if we are interested in automating the process we will need to be able to speak programmatically to Google.
Scraping it yourself: requesting and receiving responses
This is the most flexible way to get results. You are in total control of the process and can do things like set the number of results (which was never possible with the Application Programming Interface (API)). But it is also the most labor intensive. However, once you get it going, your worries are over and you can start to tweak the parameters.
Scraping is not allowed by most Web applications.
To start we need to find out how to ask a question/query to the Web site. If you normally Google for something (in this case the word test), the returned Uniform Resource Locator (URL) looks like this:
The interesting bit sits after the first slash (/) – search?hl=en&q=test&btnG= Search&meta=. This is a GET request and parameters and their values are separated with an “&” sign. In this request we have passed four parameters:
▪ hl
▪ q
▪ btnG
▪ meta
The values for these parameters are separated from the parameters with the equal sign (=). The “hl” parameter means “home language,” which is set to English. The “q” parameter means “question” or “query,” which is set to our query “test.” The other two parameters are not of importance (at least not now). Our search will return 10 results. If we set our preferences to return 100 results we get the following GET request: http://www.google.co.za/search?num=100&hl=en&q=test&btnG=Search&meta=. Note the additional parameter that is passed; “num” is set to 100. If we request the second page of results (e.g., results 101–200), the request looks as follows: http://www.google.co.za/search?q=test&num=100&hl=en&start=100&sa=N. There are a couple of things to notice here. The order in which the parameters are passed is ignored and yet the “start” parameter is added. The start parameter tells Google on which page we want to start getting results and the “num” parameter tell them how many results we want. Thus, following this logic, in order to get 301–400 results our request should look like this: http://www.google.co.za/search?q=test&num=100&hl=en&start=300&sa=N. Let’s try that and see what we get.
It seems to be working. Let’s see what happens when we search for something a little more complex. The search “testing testing 123” site:uk results in the following query: http://www.google.co.za/search?num=100&hl=en&q=%22testing+testing+123%22+site%3Auk&btnG=Search&meta=
What happened there? Let’s analyze it a bit. The num parameter is set to 100. The btnG and meta parameters can be ignored. The site: operator does not result in an extra parameter, but rather is located within the question or query. The question says %22testing + testing + 123%22 + site%3Auk. Actually, although the question seems a bit intimidating at first, there is really no magic there. The %22 is simply the hexadecimal encoded form of a quote (“). The %3A is the encoded form of a colon (:). Once we have replaced the encoded characters with their unencoded form, we have our original query back: “testing testing 123” site:uk.
So, how do you decide when to encode a character and when to use the unencoded form? This is a topic on it’s own, but as a rule of thumb you cannot go wrong to encode everything that’s not in the range A–Z, a–z, and 0–9. The encoding can be done programmatically, but if you are curious you can see all the encoded characters by typing man ascii in a UNIX terminal, by Googling for ascii hex encoding, or by visiting http://en.wikipedia.org/wiki/ASCII.
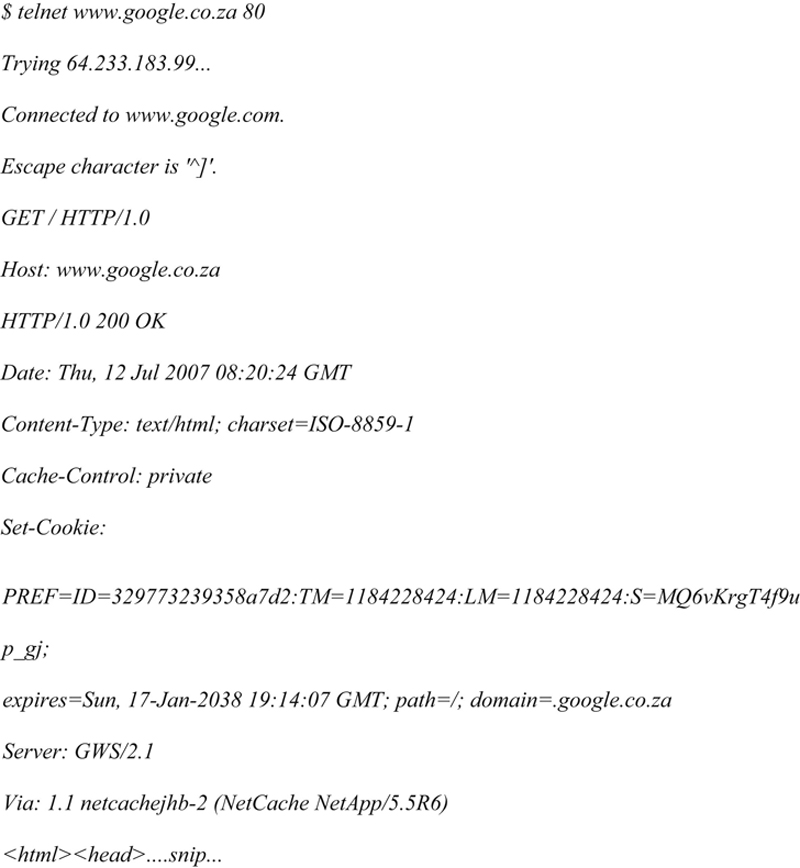
Now that we know how to formulate our request, we are ready to send it to Google and get a reply back. Note that the server will reply in Hypertext Markup Language (HTML). In it’s simplest form, we can Telnet directly to Google’s Web server and send the request by hand. Figure 5.7 shows how it is done.

Figure 5.7
The resultant HTML is truncated for brevity. In Figure 5.7, the commands that were typed out are highlighted. There are a couple of things to notice. The first is that we need to connect (Telnet) to the Web site on port 80 and wait for a connection before issuing our Hypertext Transfer Protocol (HTTP) request. The second is that our request is a GET that is followed by “HTTP/1.0” stating that we are speaking HTTP version 1.0 (you could also decide to speak 1.1). The last thing to notice is that we added the Host header, and ended our request with two carriage return line feeds (by pressing Enter two times). The server replied with a HTTP header (the part up to the two carriage return line feeds) and a body that contains the actual HTML (the bit that starts with <html>).
This seems like a lot of work, but now that we know what the request looks like, we can start building automation around it. Let’s try this with Netcat.
Netcat has been described as the Swiss Army Knife of TCP/Internet Protocol (IP). It is a tool that is used for good and evil; from catching the reverse shell from an exploit (evil) to helping network administrators dissect a protocol (good). In this case we will use it to send a request to Google’s Web servers and show the resulting HTML on the screen. You can get Netcat for UNIX as well as Microsoft Windows by Googling “netcat download.”
To describe the various switches and uses of Netcat is well beyond the scope of this chapter; therefore, we will just use Netcat to send the request to Google and catch the response. Before bringing Netcat into the equation, consider the following commands and their output:

Note that the last echo command (the blank one) adds the necessary carriage return line feed (CRLF) at the end of the HTTP request. To hook this up to Netcat and make it connect to Google’s site we do the following:

The output of the command is as follows:

The rest of the output is truncated for brevity. Note that we have parenthesis () around the echo commands, and the pipe character (|) that hooks it up to Netcat. Netcat makes the connection to www.google.com on port 80 and sends the output of the command to the left of the pipe character to the server. This particular way of hooking Netcat and echo together works on UNIX, but needs some tweaking to get it working under Windows.
There are other (easier) ways to get the same results. Consider the “wget” command (a Windows version of wget is available at http://xoomer.alice.it/hherold/). Wget in itself is a great tool, and using it only for sending requests to a Web server is a bit like contracting a rocket scientist to fix your microwave oven. To see all the other things wget can do, simply type wget -h. If we want to use wget to get the results of a query we can use it as follows:
The output looks like this:

The output of this command is the first indication that Google is not too keen on automated processes. What went wrong here? HTTP requests have a field called “User-Agent” in the header. This field is populated by applications that request Web pages (typically browsers, but also “grabbers” like wget), and is used to identify the browser or program. The HTTP header that wget generates looks like this:

You can see that the User-Agent is populated with Wget/1.10.1. And that’s the problem. Google inspects this field in the header and decides that you are using a tool that can be used for automation. Google does not like automating search queries and returns HTTP error code 403, Forbidden. Luckily this is not the end of the world. Because wget is a flexible program, you can set how it should report itself in the User Agent field. So, all we need to do is tell wget to report itself as something different than wget. This is done easily with an additional switch. Let’s see what the header looks like when we tell wget to report itself as “my_diesel_driven_browser.” We issue the command as follows:

The resultant HTTP request header looks like this:

Note the changed User-Agent. Now the output of the command looks like this:

The HTML for the query is located in the file called “output”. This example illustrates a very important concept – changing the User-Agent. Google has a large list of User-Agents that are not allowed.
Another popular program for automating Web requests is called “curl,” which is available for Windows at http://fileforum.betanews.com/detail/cURL_for_Windows/966899018/1. For Secure Sockets Layer (SSL) use, you may need to obtain the file libssl32.dll from somewhere else. Google for libssl32.dll download. Keep the EXE and the DLL in the same directory. As with wget, you will need to set the User-Agent to be able to use it. The default behavior of curl is to return the HTML from the query straight to standard output. The following is an example of using curl with an alternative User-Agent to return the HTML from a simple query. The command is as follows:

The output of the command is the raw HTML response. Note the changed User-Agent.
Google also uses the user agent of the Lynx text-based browser, which tries to render the HTML, leaving you without having to struggle through the HTML. This is useful for quick hacks like getting the amount of results for a query. Consider the following command:

Clearly, using UNIX commands like sed, grep, awk, and so on makes using Lynx with the dump parameter a logical choice in tight spots.
There are many other command line tools that can be used to make requests to Web servers. It is beyond the scope of this chapter to list all of the different tools. In most cases, you will need to change the User-Agent to be able to speak to Google. You can also use your favorite programming language to build the request yourself and connect to Google using sockets.
Scraping it yourself: the butcher shop
In the previous section, we learned how to Google a question and how to get HTML back from the server. While this is mildly interesting, it’s not really that useful if we only end up with a heap of HTML. In order to make sense of the HTML, we need to be able to get individual results. In any scraping effort, this is the messy part of the mission. The first step of parsing results is to see if there is a structure to the results coming back. If there is a structure, we can unpack the data from the structure into individual results.
The FireBug extension from FireFox (https://addons.mozilla.org/firefox/downloads/latest/1843/addon-1843-latest.xpi?src=ss) can be used to easily map HTML code to visual structures. Viewing a Google results page in FireFox and inspecting a part of the results in FireBug looks like Figure 5.8.

Figure 5.8
With FireBug, every result snippet starts with the HTML code <div class=“g”>. With this in mind, we can start with a very simple PERL script that will only extract the first of the snippets. Consider the following code:

In the third line of the script, we externally call curl to get the result of a simple request into the $result variable (the question/query is test and we get the first 10 results). In line 4, we create a scalar ($start) that contains the position of the first occurrence of the “ < div class=g > ” token. In Line 5, we look at the next occurrence of the token, the end of the snippet (which is also the beginning of the second snippet), and we assign the position to $end. In line 6, we literally cut the first snippet from the entire HTML block, and in line 7 we display it. Let’s see if this works:

It looks right when we compare it to what the browser says. The script now needs to somehow work through the entire HTML and extract all of the snippets. Consider the following PERL script:

While this script is a little more complex, it’s still really simple. In this script we’ve put the “<div class=g>” string into a token, because we are going to use it more than once. This also makes it easy to change when Google decides to call it something else. In lines 9 through 19, a loop is constructed that will continue to look for the existence of the token until it is not found anymore. If it does not find a token (line 12), then the loop simply exists. In line 18, we move the position from where we are starting our search (for the token) to the position where we ended up in our previous search.
Running this script results in the different HTML snippets being sent to standard output. But this is only so useful. What we really want is to extract the URL, the title, and the summary from the snippet. For this we need a function that will accept four parameters: a string that contains a starting token, a string that contains the ending token, a scalar that will say where to search from, and a string that contains the HTML that we want to search within. We want this function to return the section that was extracted, as well as the new position where we are within the passed string. Such a function looks like this:

Now that we have this function, we can inspect the HTML and decide how to extract the URL, the summary, and the title from each snippet. The code to do this needs to be located within the main loop and looks as follows:

Notice how the URL is the first thing we encounter in the snippet. The URL itself is a hyperlink and always start with “<a href= and ends with a quote. Next up is the heading, which is within the hyperlink and as such starts with a “>” and ends with “</a>”. Finally, it appears that the summary is always in a “<font size=–1>” and ends in a “<br>”. Putting it all together we get the following PERL script:

Now that we have this function, we can inspect the HTML and decide how to extract the URL, the summary, and the title from each snippet. The code to do this needs to be located within the main loop and looks as follows:

Notice how the URL is the first thing we encounter in the snippet. The URL itself is a hyperlink and always start with “<a href= and ends with a quote. Next up is the heading, which is within the hyperlink and as such starts with a “>” and ends with “</a>”. Finally, it appears that the summary is always in a “<font size=-1>” and ends in a “<br>”. Putting it all together we get the following PERL script:

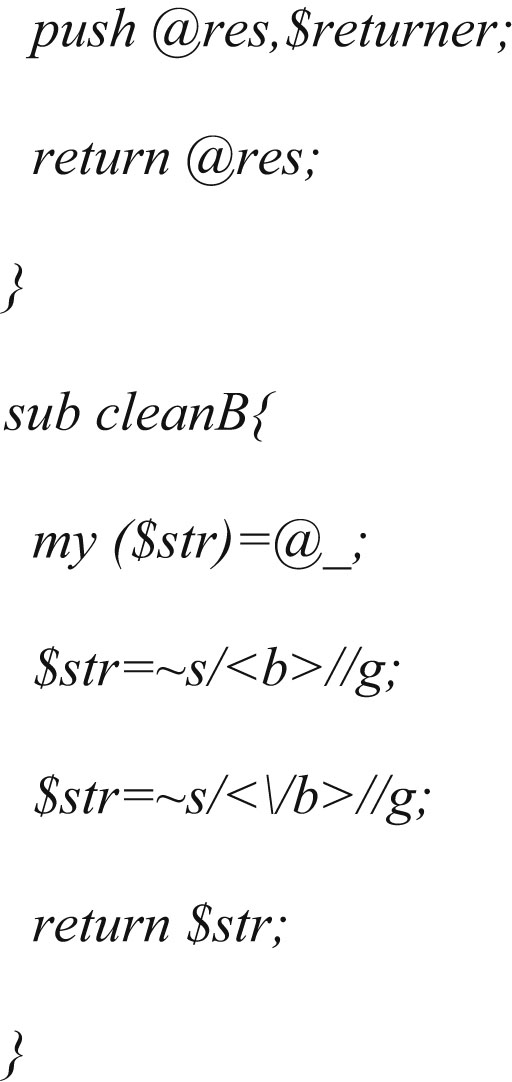
Note that Google highlights the search term in the results. We therefore take the “and” tags out of the results, which is done in the “cleanB” subroutine. Let’s see how this script works (see Figure 5.9).

Figure 5.9
It seems to be working. There could well be better ways of doing this with tweaking and optimization, but for a first pass it’s not bad.
Using other search engines
Believe it or not, there are search engines other than Google! Bing search engine still supports an API and is worth looking into. But this book is not called Bing Hacking for Penetration Testers, so figuring out how to use the Bing API is left as an exercise for the reader.
Parsing the data
Let’s assume at this stage that everything is in place to connect to our data source (Google in this case), we are asking the right questions, and we have something that will give us results in neat plain text. For now, we are not going to worry how exactly that happens. It might be with a proxy API, scraping it yourself, or getting it from some provider. This section only deals with what you can do with the returned data.
To get into the right mindset, ask yourself what you as a human would do with the results. You may scan it for email addresses, Web sites, domains, telephone numbers, places, names, and surnames. As a human you are also able to put some context into the results. The idea here is that we put some of that human logic into a program. Again, computers are good at doing things over and over, without getting tired or bored, or demanding a raise. And as soon as we have the logic sorted out, we can add other interesting things like counting how many of each result we get, determining how much confidence we have in the results from a question, and how close the returned data is to the original question. But this is discussed in detail later on. For now let’s concentrate on getting the basics right.
Parsing Email Addresses
There are many ways of parsing email addresses from plain text, and most of them rely on regular expressions. Regular expressions are like your quirky uncle that you’d rather not talk to, but the more you get to know him, the more interesting and cool he gets. If you are afraid of regular expressions you are not alone, but knowing a little bit about it can make your life a lot easier. If you are a regular expressions guru, you might be able to build a one-liner regex to effectively parse email addresses from plain text, but since I only know enough to make myself dangerous, we’ll take it easy and only use basic examples. Let’s look at how we can use it in a PERL program.

This seems to work, but in the real world there are some problems. The script cuts the text into words based on spaces between words. But what if the text was “Is your address [email protected]?” Now the script fails. If we convert the @ sign, underscores (_), and dashes (-) to letter tokens, and then remove all symbols and convert the letter tokens back to their original values, it could work. Let’s see:


It seems to work, but still there are situations where this is going to fail. What if the line reads “My email address is [email protected].”? Notice the period after the email address. The parsed address is going to retain that period. Luckily that can be fixed with a simple replacement rule; changing a dot space sequence to two spaces. In PERL:

With this in place, we now have something that will effectively parse 99% of valid email addresses (and about 5% of invalid addresses). Admittedly the script is not the most elegant, optimized, and pleasing, but it works!
Remember the expansions we did on email addresses in the previous section? We now need to do the exact opposite. In other words, if we find the text “andrew at syngress.com” we need to know that it’s actually an email address. This has the disadvantage that we will create false positives. Think about a piece of text that says “you can contact us at paterva.com.” If we convert at back to @, we’ll parse an email that reads [email protected]. But perhaps the pros outweigh the cons, and as a general rule you’ll catch more real email addresses than false ones. (This depends on the domain as well. If the domain belongs to a company that normally adds a .com to their name, for example amazon.com, chances are you’ll get false positives before you get something meaningful). We furthermore want to catch addresses that include the _remove_ or removethis tokens.
To do this in PERL is a breeze. We only need to add these translations in front of the parsing routines. Let’s look at how this would be done:

These replacements are bound to catch lots of email addresses, but could also be prone to false positives. Let’s give it a run and see how it works with some test data:

After: testing [email protected] this is normal text.for a.matrix printer.this is normal text...no really it is @work we all need to work hard [email protected] [email protected] [email protected] [email protected] i want to [email protected] i do.

For the test run, you can see that it caught four of the five test email addresses and included one false positive. Depending on the application, this rate of false positives might be acceptable because they are quickly spotted using visual inspection. Again, the 80/20 principle applies here; with 20% effort you will catch 80% of email addresses. If you are willing to do some postprocessing, you might want to check if the email addresses you’ve mined ends in any of the known TLDs (see next section). But, as a rule, if you want to catch all email addresses (in all of the obscured formats), you can be sure to either spend a lot of effort or deal with plenty of false positives.
Domains and subdomains
Luckily, domains and subdomains are easier to parse if you are willing to make some assumptions. What is the difference between a hostname and a domain name? How do you tell the two apart? Seems like a silly question. Clearly www.paterva.com is a hostname and paterva.com is a domain, because www.paterva.com has an IP address and paterva.com does not. But the domain google.com (and many others) resolve to an IP address as well. Then again, you know that google.com is a domain. What if we get a Google hit from fpd.gsfc.****.gov? Is it a hostname or a domain? Or a CNAME for something else? Instinctively you would add www. to the name and see if it resolves to an IP address. If it does then it’s a domain. But what if there is no www entry in the zone? Then what’s the answer?
A domain needs a name server entry in its zone. A hostname does not have to have a name server entry, in fact it very seldom does. If we make this assumption, we can make the distinction between a domain and a host. The rest seems easy. We simply cut our Google URL field into pieces at the dots and put it back together. Let’s take the site fpd.gsfc.****.gov as an example. The first thing we do is figure out if it’s a domain or a site by checking for a name server. It does not have a name server, so we can safely ignore the fpd part, and end up with gsfc.****.gov. From there we get the domains:
▪ gsfc.****.gov****.gov
▪ gov
There is one more thing we’d like to do. Typically we are not interested in TLDs or even sub-TLDs. If you want to you can easily filter these out. There is another interesting thing we can do when looking for domains. We can recursively call our script with any new information that we’ve found. The input for our domain hunting script is typically going to be a domain, right? If we feed the domain ****.gov to our script, we are limited to 1000 results. If our script digs up the domain gsfc.****.gov, we can now feed it back into the same script, allowing for 1000 fresh results on this subdomain (which might give us deeper subdomains). Finally, we can have our script terminate when no new subdomains are found.
Another way of obtaining domains without having to perform the host/domain check is to post process-mined email addresses. As almost all email addresses are already at a domain (and not a host), the email address can simply be cut after the @ sign and used in a similar fashion.
Telephone numbers
Telephone numbers are very hard to parse with an acceptable rate of false positives (unless you limit it to a specific country). This is because there is no standard way of writing down a telephone number. Some people add the country code, but on regional sites (or mailing lists) it’s seldom done. And even if the country code is added, it could be added by using a plus sign (e.g., +44) or using the local international dialing method (e.g., 0044). It gets worse. In most cases, if the city code starts with a zero, it is omitted if the internal dialing code is added (e.g., +27 12 555 1234 vs. 012 555 1234). And then some people put the zero in parentheses to show it’s not needed when dialing from abroad (e.g., +27 (0)12 555 1234). To make matters worse, a lot of European nations like to split the last four digits in groups of two (e.g., 012 12 555 12 34). Of course, there are those people that remember numbers in certain patterns, thereby breaking all formats and making it almost impossible to determine which part is the country code (if at all), the city, and the area within the city (e.g., +271 25 551 234).
Then as an added bonus, dates can look a lot like telephone numbers. Consider the text “From 1823-1825 1520 people couldn’t parse telephone numbers.” Better still are time frames such as “Andrew Williams: 1971-04-01 – 2007-07-07.” And, while it’s not that difficult for a human to spot a false positive when dealing with email addresses, you need to be a local to tell the telephone number of a plumber in Burundi from the ISBN number of “Stealing the network.” So, is all lost? Not quite. There are two solutions: the hard but cheap solution and the easy but costly solution. In the hard but cheap solution, we will apply all of the logic we can think of to telephone numbers and live with the false positives. In the easy (OK, it’s not even that easy) solution, we’ll buy a list of country, city, and regional codes from a provider. Let’s look at the hard solution first.
One of the most powerful principles of automation is that if you can figure out how to do something as a human being, you can code it. It is when you cannot write down what you are doing when automation fails. If we can code all the things we know about telephone numbers into an algorithm, we have a shot at getting it right. The following are some of the important rules that I have used to determine if something is a real telephone number.
▪ Convert 00 to +, but only if the number starts with it.
▪ Remove instances of (0).
▪ Length must be between 9 and 13 numbers.
▪ Has to contain at least one space (optional for low tolerance).
▪ Cannot contain two (or more) single digits (e.g., 2383 5 3 231 will be thrown out).
▪ Should not look like a date (various formats).
▪ Cannot have a plus sign if it’s not at the beginning of the number.
▪ Less than four numbers before the first space (unless it starts with a + or a 0).
▪ Should not have the string “ISBN” in near proximity.
▪ Rework the number from the last number to the first number and put it in +XX- XXX-XXX-XXXX format.
To find numbers that need to comply to these rules is not easy. I ended up not using regular expressions but rather a nested loop, which counts the number of digits and accepted symbols (pluses, dashes, and spaces) in a sequence. Once it’s reached a certain number of acceptable characters followed by a number of unacceptable symbols, the result is sent to the verifier (that use the rules listed above). If verified, it is repackaged to try to get in the right format. Of course this method does not always work. In fact, approximately one in five numbers are false positives. But the technique seldom fails to spot a real telephone number, and more importantly, it does not cost anything. There are better ways to do this. If we have a list of all country and city codes we should be able to figure out the format as well as verify if a sequence of numbers is indeed a telephone number. Such a list exists but is not in the public domain.
Because I don’t have the complete database, I don’t have code for this, but suspect that you will need to write a program that will measure the distance between the first couple of numbers from the parsed number to those in the list. You will surely end up in a situation where there is more than one possibility. This will happen because the same number might exist in multiple countries and if they are specified on the Web page without a country code it’s impossible to determine in which country they are located.
The database can be bought at www.numberingplans.com, but they are rather strict about selling the database to just anyone. They also provide a nifty lookup interface (limited to just a couple of lookups a day), which is not just for phone numbers. But that’s a story for another day.
Postprocessing
Even when we get good data back from our data source there might be the need to do some form of postprocessing on it. Perhaps you want to count how many of each result you mined in order to sort it by frequency. In the next section we look at some things that you should consider doing.
Sorting Results by Relevance
If we parse an email address when we search for “Andrew Williams,” that email address would almost certainly be more interesting than the email addresses we would get when searching for “A Williams.” Indeed, some of the expansions we’ve done in the previous section borders on desperation. Thus, what we need is a method of implementing a “confidence” to a search. This is actually not that difficult. Simply assign this confidence index to every result you parse.
There are other ways of getting the most relevant result to bubble to the top of a result list. Another way is simply to look at the frequency of a result. If you parse the email address [email protected] ten times more than any other email address, the chances are that that email address is more relevant than an email address that only appears twice.
Yet another way is to look at how the result correlates back to the original search term. The result [email protected] looks a lot like the email address for Andrew Williams. It is not difficult to write an algorithm for this type of correlation. An example of such a correlation routine looks like this:

This routine breaks the longer of the two strings into sections of three letters and compares these sections to the other (shorter) string. For every section that matches, the resultant return value is doubled. This is by no means a “standard” correlation function, but will do the trick, because basically all we need is something that will recognize parts of an email address as looking similar to the first name or the last name. Let’s give it a quick spin and see how it works. Here we will “weigh” the results of the following email addresses to an original search of “Roelof Temmingh”:

This seems to work, scoring the first address as the best, and the two addresses containing the entire last name as a distant second. What’s interesting is to see that the algorithm does not know what is the username and what is a domain. This is something that you might want to change by simply cutting the email address at the @ sign and only comparing the first part. On the other hand, it might be interesting to see domains that look like the first name or last name.
There are two more ways of weighing a result. The first is by looking at the distance between the original search term and the parsed result on the resultant page. In other words, if the email address appears right next to the term that you searched for, the chances are more likely that it’s more relevant than when the email address is 20 paragraphs away from the search term. The second is by looking at the importance (or popularity) of the site that gives the result. This means that results coming from a site that is more popular is more relevant than results coming from sites that only appear on page five of the Google results. Luckily by just looking at Google results, we can easily implement both of these requirements. A Google snippet only contains the text surrounding the term that we searched for, so we are guaranteed some proximity (unless the parsed result is separated from the parsed results by “...”). The importance or popularity of the site can be obtained by the Pagerank of the site. By assigning a value to the site based on the position in the results (e.g., if the site appears first in the results or only much later) we can get a fairly good approximation of the importance of the site.
A note of caution here. These different factors need to be carefully balanced. Things can go wrong quickly. Imagine that Andrew’s email address is [email protected], and that he always uses the alias “WhipMaster” when posting from this email address. As a start, our correlation to the original term (assuming we searched for Andrew Williams) is not going to result in a null value. And if the email address does not appear many times in different places, it will also throw the algorithm off the trail. As such, we may choose to only increase the index by 10% for every three-letter word that matches, as the code stands a 100% increase if used. But that’s the nature of automation, and the reason why these types of tools ultimately assist but do not replace humans.
Beyond Snippets
There is another type of postprocessing we can do, but it involves lots of bandwidth and loads of processing power. If we expand our mining efforts to the actual page that is returned (i.e., not just the snippet) we might get many more results and be able to do some other interesting things. The idea here is to get the URL from the Google result, download the entire page, convert it to plain text (as best as we can), and perform our mining algorithms on the text. In some cases, this expansion would be worth the effort (imagine looking for email addresses and finding a page that contains a list of employees and their email addresses. What a gold mine!). It also allows for parsing words and phrases, something that has a lot less value when only looking at snippets.
Parsing and sorting words or phrases from entire pages is best left to the experts (think the PhDs at Google), but nobody says that we can’t try our hand at some very elementary processing. As a start we will look at the frequency of words across all pages. We’ll end up with common words right at the top (e.g., the, and, and friends). We can filter these words using one of the many lists that provides the top ten words in a specific language. The resultant text will give us a general idea of what words are common across all the pages; in other words, an idea of “what this is about.” We can extend the words to phrases by simply concatenating words together. A next step would be looking at words or phrases that are not used in high frequency in a single page, but that has a high frequency when looking across many pages. In other words, what we are looking for are words that are only used once or twice in a document (or Web page), but that are used on all the different pages. The idea here is that these words or phrases will give specific information about the subject.
Presenting Results
As many of the searches will use expansion and thus result in multiple searches, with the scraping of many Google pages we’ll need to finally consolidate all of the subresults into a single result. Typically this will be a list of results and we will need to sort the results by their relevance.
Collecting search terms
Google’s ability to collect search terms is very powerful. If you doubt this, visit the Google ZeitGeist page. Google has the ability to know what’s on the mind of just about everyone that’s connected to the Internet. They can literally read the minds of the (online) human race.
If you know what people are looking for, you can provide them (i.e., sell to them) that information. In fact, you can create a crude economic model. The number of searches for a phrase is the “demand ” while the number of pages containing the phrase is the “supply.” The price of a piece of information is related to the demand divided by the supply. And while Google will probably (let’s hope) never implement such billing, it would be interesting to see them adding this as some form of index on the results page.
Let’s see what we can do to get some of that power. This section looks at ways of obtaining the search terms of other users.
Spying on Your Own
When you search for something, the query goes to Google’s computers. Every time you do a search at Google, they check to see if you are passing along a cookie. If you are not, they instruct your browser to set a cookie. The browser will be instructed to pass along that cookie for every subsequent request to any Google system (e.g., *.google.com), and to keep doing it until 2038. Thus, two searches that were done from the same laptop in two different countries, two years apart, will both still send the same cookie (given that the cookie store was never cleared), and Google will know it’s coming from the same user. The query has to travel over the network, so if I can get it as it travels to them, I can read it. This technique is called “sniffing.” In the previous sections, we’ve seen how to make a request to Google. Let’s see what a cookieless request looks like, and how Google sets the cookie:
Notice the Set-Cookie part. The ID part is interesting. The other cookies (TM and LM) contain the birth date of the cookie (in seconds from 1970), and when the preferences were last changed. The ID stays constant until you clear your cookie store in the browser. This means every subsequent request coming from your browser will contain the cookie.
If we have a way of reading the traffic to Google we can use the cookie to identify subsequent searches from the same browser. There are two ways to be able to see the requests going to Google. The first involves setting up a sniffer somewhere along the traffic, which will monitor requests going to Google. The second is a lot easier and involves infrastructure that is almost certainly already in place; using proxies. There are two ways that traffic can be proxied. The user can manually set a proxy in his or her browser, or it can be done transparently somewhere upstream. With a transparent proxy, the user is mostly unaware that the traffic is sent to a proxy, and it almost always happens without the user’s consent or knowledge. Also, the user has no way to switch the proxy on or off. By default, all traffic going to port 80 is intercepted and sent to the proxy. In many of these installations other ports are also intercepted, typically standard proxy ports like 3128, 1080, and 8080. Thus, even if you set a proxy in your browser, the traffic is intercepted before it can reach the manually configured proxy and is sent to the transparent proxy. These transparent proxies are typically used at boundaries in a network, say at your ISP’s Internet gateway or close to your company’s Internet connection.
On the one hand, we have Google that is providing a nice mechanism to keep track of your search terms, and on the other hand we have these wonderful transparent devices that collect and log all of your traffic. Seems like a perfect combination for data mining.
Let’s see how can we put something together that will do all of this for us. As a start we need to configure a proxy to log the entire request header and the GET parameters as well as accepting connections from a transparent network redirect. To do this you can use the popular Squid proxy with a mere three modifications to the stock standard configuration file. These three lines that you need are:
The first tells Squid to accept connections from the transparent redirect on port 3128:

The second tells Squid to log the entire HTTP request header:

The last line tells Squid to log the GET parameters, not just the host and path:

With this set and the Squid proxy running, the only thing left to do is to send traffic to it. This can be done in a variety of ways and it is typically done at the firewall. Assuming you are running FreeBSD with all the kernel options set to support it (and the Squid proxy is on the same box), the following one liner will direct all outgoing traffic to port 80 into the Squid box:

Similar configurations can be found for other operating systems and/or firewalls. Google for “transparent proxy network configuration” and choose the appropriate one. With this set we are ready to intercept all Web traffic that originates behind the firewall. While there is a lot of interesting information that can be captured from these types of Squid logs, we will focus on Google-related requests.
Once your transparent proxy is in place, you should see requests coming in. The following is a line from the proxy log after doing a simple search on the phrase “test phrase”:

Notice the search term appearing as the value of the “q” parameter “test + phrase.” Also notice the ID cookie that is set to “35d1cc1c7089ceba.” This value of the cookie will remain the same regardless of subsequent search terms. In the text above, the IP number that made the request is also listed (but mostly crossed out). From here on it is just a question of implementation to build a system that will extract the search term, the IP address, and the cookie and shove it into a database for further analysis. A system like this will silently collect search terms day in and day out.
How to Spot a Transparent Proxy
In some cases it is useful to know if you are sitting behind a transparent proxy. There is a quick way of finding out. Telnet to port 80 on a couple of random IP addresses that are outside of your network. If you get a connection every time, you are behind a transparent proxy. (Note: try not to use private IP address ranges when conducting this test.)
Another way is looking up the address of a Web site, then Telnetting to the IP number, issuing a GET/HTTP/1.0 (without the Host: header), and looking at the response. Some proxies use the Host: header to determine where you want to connect, and without it should give you an error.

Not only do we know we are being transparently proxied, but we can also see the type and server of the proxy that’s used. Note that the second method does not work with all proxies, especially the bigger proxies in use at many ISPs.
Referrals
Another way of finding out what people are searching for is to look at the Referer: header of requests coming to your Web site. Of course there are limitations. The idea here being that someone searches for something on Google, your site shows up on the list of results, and they click on the link that points to your site. While this might not be super exciting for those with none or low traffic sites, it works great for people with access to very popular sites. How does it actually work? Every site that you visit knows about the previous site that you visited. This is sent in the HTTP header as a referrer. When someone visits Google, their search terms appear as part of the URL (as it’s a GET request) and are passed to your site once the user arrives there. This gives you the ability to see what they searched for before they got to your site, which is very useful for marketing people.
Typically an entry in an Apache log that came from a Google search looks like this:

From this entry we can see that the user was searching for “evolution beta gui” on Google before arriving at our page, and that he or she then ended up at the “/evolution-gui.html” page. A lot of applications that deal with analyzing Web logs have the ability to automatically extract these terms for your logs, and present you with a nice list of terms and their frequency.
Is there a way to use this to mine search terms at will? Not likely. The best option (and it’s really not that practical) is to build a popular site with various types of content and see if you can attract visitors with the only reason to mine their search terms. Again, you’ll surely have better uses for these visitors than just their search terms.
Summary
In this chapter we looked at various ways that you can use Google to dig up useful information. The power of searching really comes to life when you have the ability to automate certain processes. This chapter showed how this automation might be achieved using simple scripts. Also, the fun really starts when you have the means of connecting bits of information together to form a complete picture (e.g., not just searching, but also performing additional functions with the mined information). The tools and tricks shown in the chapter is really only the top of a massive iceberg called data collection (or mining). Hopefully it will open your mind as to what can be achieved. The idea was never to completely exhaust every possible avenue in detail, but rather to get your mind going in the right direction and to stimulate creative thoughts. If the chapter has inspired you to hack together your own script to perform something amazing, it has served its purpose (and I would love to hear from you).
..................Content has been hidden....................
You can't read the all page of ebook, please click here login for view all page.