
Chapter Five
Will It Cut? Shooting for Editing
- Continuity and Performance
- Continuity and Screen Direction
- The 180 Degree Rule
- The 30 Degree Rule
- Coverage with Matching Shots
- Eye-Line Matching
It is important to remember that the planning and recording of your shots is only one part of the visual storytelling process. No matter what type of motion image project you need to create, the scripting stage is the basis for the content – the “story.” The careful filmmaker will generate shot lists and storyboards from the script – think of these as the “paper edit.” He or she will have a vision of what the final project should look like. Production yields the actual picture and sound files that can be accomplished in the reality of shooting. It is during post-production – during the edit – that the story can actually be told – as completely as possible given the production materials that were provided.
There is a certain degree of “psychic” ability required of the filmmaker to pre-think the needs of the edit team. When using the master scene technique or other means of capturing events or actions, the filmmaker must shoot the appropriate coverage of the material and deliver a variety of shots that will best show the story. This is called shooting with editing in mind. What will the editor need to cut to at this point? What would the audience like to see next? How can this information be shown at its best? What shot framing will engage and inform the viewer? Which shot is new, exciting, or cool? Etc., etc., etc.
By recording a variety of shot types (coverage of the scene, event, etc.), you provide the editor with more choices. The editor can then decide at what point the viewing audience will desire fresh information and how much or how little information to show. A scene is created when the editor stitches together all of the important and usable information found in the shots you provided. If the planning went well, and the shot lists were followed, then the editor should have enough valid material to work with and the audience should be able to understand what is going on in the “story.” To learn more about the editing process, feel free to review the contents of our companion book, Grammar of the Edit.
Production can span days, weeks, or even months, but the resulting images recorded during this time, when edited together, will need to appear as though they were all captured at the same exact time with fluid movement, matching actions, and seamless continuity.
Depending on the availability of locations and people or the quality of weather and so forth, the shooting schedule for a project can be erratic. You may shoot the wide shot of a scene on Monday, but you may not get to the close-up of a supporting actor until the following Thursday. The look of everything (camera positioning, eye-line, costuming, action, etc.) will have to match to be useful to the editor. This also holds true for coverage of exterior and interior shots for the same scene recorded on different days – or even whole scenes shot at different times that must follow one another in the movie.
The individual shots you create on set are just parts of a greater whole. They are pieces of a bigger visual puzzle. In the end, they will have to work with one another, intercut with one another, and show an entire visual story together. Based on the chronological events of the script, the shots (usually recorded out of sequential order) are assembled to make a scene, the scenes can become sequences, which cut together to make an Act, and the acts cut together to make an entire motion picture (Figure 5.1). Maintaining consistency in your visual elements is very important and we have a few ways to help you stay aware of the potential glitches.

Figure 5.1 The evolution of a motion picture’s building blocks. Shots > Scene > Act > Motion Picture.
Matching Your Shots in a Scene
When using a single camera to shoot Master Scene coverage of scripted dialogue between multiple characters, you will most likely need to run through the action several times. Start with the wide, run through one character’s shots into the close-ups, turn it around and shoot the other character through to close-ups. Recording each pass from a different angle and with a different shot type in your camera set-up will help ensure that the editor has the right material to assemble a meaningful and visually interesting scene. The performances of your actors and the framings of your shots all have to maintain some consistency throughout these repeated runs of the same dialogue and actions.
Continuity of Performance
Having the actors repeat the same actions and dialogue from shot to shot requires that you pay attention to continuity. Continuity of performance is the consistent repetition of movement, action, and dialogue by the actor from one camera set-up to the next. If you plan a wide, and a two-shot and then an MS, OTS-MCU and clean single CU for each actor, you will have eight camera set-ups for one simple dialogue scene. That becomes a lot of repetition of dialogue delivery, expressions, body actions, etc. for each actor – and then multiply that by the number of takes you have to do in order to get all of those variables the way that you want them. Yikes!
This gets tricky to follow even when you are paying attention. Recording fewer takes can save time and money and keep your talent fresh. Continuity of performance is often overruled by the quality of performance when an editor assembles the visual material from a scene. A way around some of these performance issues is to use the long-take style of filmmaking. All of the dialogue and action of a scene unfolds in one long master shot, but you shoot no coverage angles of details. There is no need for a cut because there is nothing to cut away to. This style is more like recorded live theatre. The majority of films and television programming, however, does rely on differing shot coverage to visually construct a scene – and continuity will need your attention.
Continuity is not just making sure an actor moves his hand the same way in each take of each shot. Continuity, on a cinematic language level, involves a much wider range of planning and attention to detail as well.
Continuity of Screen Direction
As we know, the camera occupies the “fourth wall,” allowing the audience a privileged view of locations and actions within the film’s “space.” It invites them to observe the actions and events that happen inside this other world. As a result, filmmakers have a responsibility to the audience to present a knowable world that conforms to some consistent, and familiar, attributes of the physical world such as up, down, left, right, near, far, and so forth. This prevents the audience from getting spatially confused while watching the motion picture. The horizon line mentioned in Chapter Three is a stabilizing device, but there are other ways that you can keep your audience grounded (Figure 5.2).
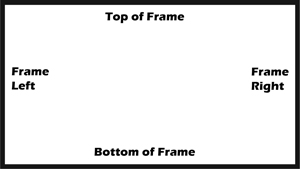
Figure 5.2 The motion picture frame has four edges and corresponding areas of interest: frame left, frame right, top of frame, and bottom of frame.
The frame itself is a useful tool. The top, bottom, left, and right edges of the frame act as references of direction for the audience. The character looks off frame left – the car exits frame right. The viewer associates the edges of the frame with the directional attention of a character or the movement of subjects in the film space. It should be clear then that screen direction – the left/right or up/down movement of a subject – must be maintained from one shot to the next. Figures 5.3 and 5.6 should help illustrate this concept of continuity of screen direction.
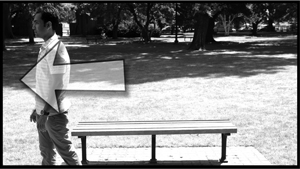
Figure 5.3 Action shows a person walking toward and exiting frame left.
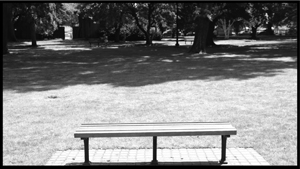
Figure 5.4 Holding on empty frame for a bit just after the person has exited.

Figure 5.5 Cut to new shot of new location, but the subject has not arrived just yet.

Figure 5.6 New shot plays and the same person continues their walk, but this time they are entering the shot from frame right. Action follows a continuity of screen direction.
The audience member viewing these recorded actions on the screen (Figures 5.3 to 5.6) assumes that there is a larger “film world” just beyond the four edges of the frame. Because this film space exists in its own version of reality, the rules of physical movement (the concept of directional space) should be followed as in reality. (Please keep in mind that cartoons, science fiction/fantasy, and even video game cinematics can take their liberties with this guideline.)
If a person moves away to the left they must keep moving away to the left until we see some change in their movement happen on screen. That is, if, during a shot, a person walks out of frame left, and we don’t see them turn towards a new direction, then we could assume a continuation of movement in that established direction – which is to the left. Logic dictates that if that character is still moving to the left when the new shot cuts onto the screen, then they should enter this new shot from frame right. The continuity of screen direction for movement within the film’s space has been maintained across the cut.
The Line – Basis for Screen Direction
Not all screen direction is based on large, physical movements. A good deal of important narrative information and spatial relationship data can be discerned by the viewing audience just through their observation of the directions of attention. This concept plays a major role in engaging the audience and keeping them actively involved in the images and in the story. Fortunately for filmmakers, humans are “programmed” to watch other humans – for all sorts of cues. One big one is to draw our attention to other things in our shared environment, such as a source of danger. Have you ever been walking down the street when someone near you, someone you don’t even know, quickly looks over at something? What do you do? If you’re like most people, you look over to see what the other person is looking at. Maybe it’s a safety mechanism or maybe it is just curiosity, but we are very good at picking up on connections between people, objects, and patterns in general.
Most often, each subject within the film space pays attention to some other subject or object within the same film space. The couple look at one another (Figure 5.7) – the pool player aligns her shot (Figure 5.8) – the hungry woman eyes the juicy apple (Figure 5.9). The audience is keen on observing these attentions (what some film folks call “the gaze”). They use these connections between people and people, people and objects, and so on to establish lines of direction, which are also called sight lines. Good filmmakers know that an audience wants to follow these lines of attention, so they use this phenomenon to compose shots, help establish narrative meaning, and reinforce spatial relationships within the film’s world.

Figure 5.7 The young couple look at one another. A line is created.

Figure 5.8 The player aligns her pool shot. A line is created.
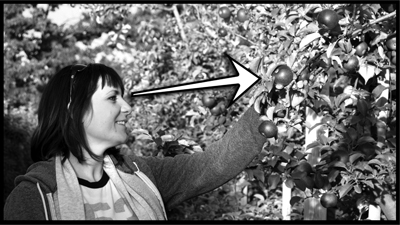
Figure 5.9 The hungry woman spies the best apple. A line is created.
The Imaginary Line – The 180 Degree Rule
The lines of attention need to be understood, established, and respected by the production team. As the audience relies upon these lines to receive and maintain spatial cues, it is very important that they remain consistent throughout the editing of a scene. To help maintain lines of attention and screen direction from shot to shot there is a popular filmmaker’s concept known by several names: 180 degree line, imaginary line, action line, or axis of action (Figure 5.10). As some of the names imply, it is an imaginary line drawn through the shooting location, roughly where all of the main action occurs, and it is established by tracing the sight line of the subject within the shot.
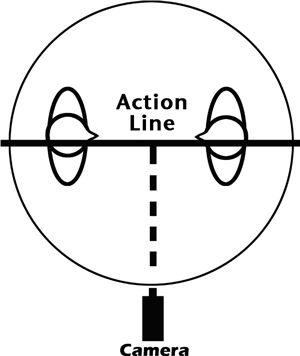
Figure 5.10 Bird’s-eye view of the action line.
This concept’s other name, the 180 degree rule, will surely help clarify how this all works the way it does and why it is considered important. Much like we discussed the horizontal camera angle circling around your stationary subject back in Chapter Two, we will once again imagine that your subjects are at the center of a large circle. For your first shot, a wide two-shot, the camera is once again positioned at the outer ring of the circle, facing in toward the center where your action is occurring. Now superimpose in your mind the action line cutting across the diameter of the circle from frame left to frame right (Figure 5.11).

Figure 5.11 Keep your camera setups within the 180 degree arc on the near side of the established action line.
Once you have established this first action line, it stays in place for as long as these characters maintain this same attention between themselves. Of course, to shoot the coverage of your subjects you will have to move the camera around the film space, but now you will have to respect this initial axis of action. The line has cut an arc out of the imaginary circle that is 180 degrees around from side to side. Your camera must now operate within that 180 degree arc when you set up for your new camera angles and coverage shots (Figure 5.11).
In our example, the first wide shot establishes frame left and frame right and also establishes the line of attention through the film space. Character A is talking with character B. A is sitting frame left and his sight line is traveling from frame left to frame right. B is sitting frame right (receiving A’s attention) and is looking back at A (sending a sight line from frame right to frame left). When you frame your shot for a CU single of A you will need to maintain screen direction and continuity. A is still frame left with his attention pointing frame right (even though B is no longer physically visible within the frame). The matching coverage of B in her CU would necessitate a similar treatment. B is framed toward the right, looking over to frame left. The series of shots and overhead diagrams in Figure 5.12 should help clarify this practice.

Figure 5.12 Respecting the imaginary line and staying within the 180 degree arc will result in correct continuity of screen direction across the coverage shots for this dialogue scene.
This happens a lot with new filmmakers, but most do not notice it until they get into the editing process. To “jump the line” or “cross the line” means that you placed the camera on the opposite side of the established action line and recorded coverage shots from the wrong side of the 180 degree arc. This effectively reverses the established directions of left and right and flops the film space on the unaware viewers when they watch the shots edited together.
In the series of shots shown in Figure 5.13, the first two are repeated from our example given earlier, but the third shot is taken, by mistake, from the far side of the arc. The result is a nice CU of character B, but the real mistake is not apparent until the three shots are edited together. B’s screen direction and line of attention are reversed and therefore the cuts make no sense. It now appears that both A and B are sitting frame left looking off frame right, rather than looking back and forth at one another which was established in the wider two-shot.
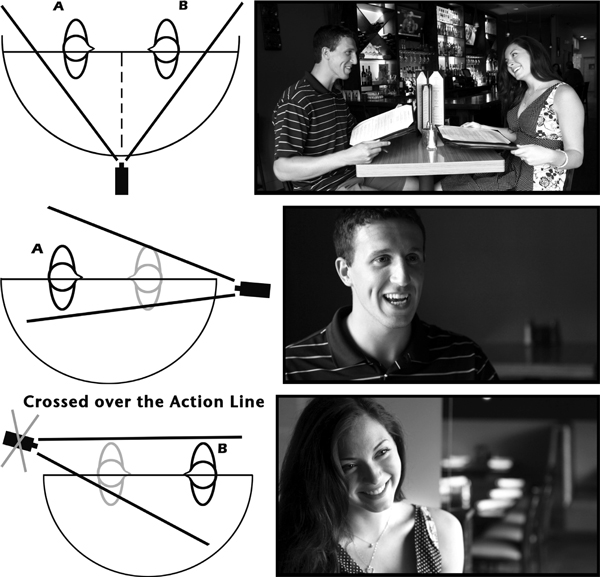
Figure 5.13 Only when edited together does one see the incorrect screen direction of character B’s attention in the close-up. The camera had jumped the axis of action.
Crossing the line is acceptable under certain circumstances that involve moving talent and camera, but these are explored in more detail in Chapter Seven. For now, just think of how you would have to cover a couple slow dancing cheek to cheek on a dance floor. You would have one face on one side of a head and the other face on the opposite side, with the axis of action cutting through each. In order to see the faces in coverage, you would have to cross the line to set up your tighter shots.
As you may have picked up by now, there are very few absolutes when it comes to the guidelines and “rules” presented in this book. If you have creative reasons to execute a certain shot or group of shots in a certain way, then do it, even if it flies in the face of convention. Just make sure that your shot choices show your story best.
The 30 Degree Rule
Grounded in the execution of the 180 degree rule is another important guideline called the 30 degree rule. Simply put, when you are seeking various angles on action for a variety of shot coverage within your 180 degree arc, you should ideally move the camera at least 30 degrees around the semicircle before you begin to frame up a new shot of the same subject. A focal length change would also be necessary (Figure 5.14).

Figure 5.14 A 180 degree arc from the action line broken down into 30 degree slices.
The angle of view or perspective on the same subjects is then considered “different enough” when the camera is moved away from the previous set-up by at least 30 degrees. Each shot or view of the action is supposed to show new information to the audience. It makes sense that you would not wish to create two separate coverage shots with very similar framing. No one expects you to have a protractor on set measuring the 30 degrees – just get a good feeling about eyeballing it (Figure 5.15).

Figure 5.15 The same subjects as seen through the camera at five 30 degree slices around the 180 degree arc. The first set has no focal length changes and may not cut that well together. The second set incorporates angle and FL changes. This maintains the action line and achieves a new framing and angle on action appropriate for the edit.
Following the 30 degree rule can help avoid what is known as a jump cut. A jump cut occurs when you edit together two shots of the same object that have very similar framing and composition. The similarity in object placement causes a visual “jump” for the viewer in either space or time (Figure 5.16).

Figure 5.16 Taken from within 30 degrees of one another, these shots (even with different object sizes), when cut together, cause a visual jump on screen due to their very similar but not exactly matching compositions.
Reciprocating Imagery
Our recent example of shots cutting from a wider two-shot to two singles in a medium close-up serves well to illustrate our next point. Whenever you shoot one type of shot to cover one character in a scene you should create a similar corresponding composition for the other character in the scene. They call this matching shots or reciprocating imagery or the answer shot (Figure 5.17).
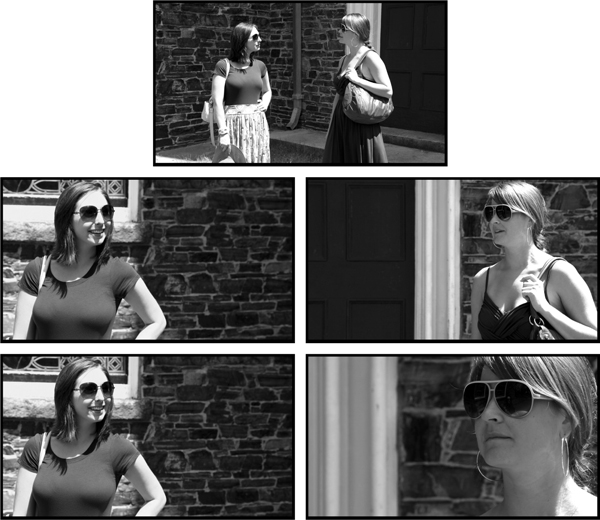
Figure 5.17 Shooting matching shots for medium close-up coverage is best. Providing an editor with an MCU of one character but only a BCU of the other may cause issues during the edit. The shot types do not match.
Tradition holds that an editor might normally show a scene from the outside in, where the shots of the action start off wider to show environment and characters and then, as the action progresses, cut together tighter and closer in order to show more intimate detail by the end. Each new camera setup with new framing should match for object size and object placement. Of course, you may have to make allowances for actual subject size, hairstyle, hat, or other accessories that may require slightly different framing. Your main goal in most cases will be to provide the editor with equal numbers of shot types and matching compositions for each character. When the time comes to edit the scene, the editor can progress through shot types as needed – from the outside in or in whatever order of shots the scene or the visual style of the project calls for.
The same can be said for the camera angle itself. Generally speaking, when you cover two separate characters with single shots from the same scene, you should take care to match the camera height, camera angle (tilted up or down or neutral), the lens focal length, and especially the quality and quantity of lighting. The overall camera angle on action is tied in with the 180 degree rule, so the associated geometry really helps keep everything organized. Of course, because you must take your storytelling needs into account, not every aspect may match exactly.
If you shoot character A from several angles around your established 180 degree arc during his cycle of coverage for the scene, then you should reset camera around your arc, tweak lighting if needed, and shoot character B from the corresponding angles for her cycle of coverage. Provided that you keep the same camera height and lens focal length, you should be able to easily generate the reciprocating images or answer shots of the second character that will match the framing of the first character’s shots (Figures 5.18 and 5.19). A camera log or notebook will help maintain all of this metadata for reference.
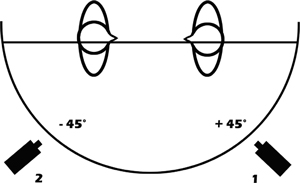
Figure 5.18 Camera setup 1 records MS of character A from 45 degrees on the arc. Camera setup 2 records MS of character B from −45 degrees on the opposite side of the same arc.

Figure 5.19 The resulting matching MS shots of characters A and B.
When two subjects appear in the same frame, the same matching shot rule applies. For example, the over-the-shoulder shot allows the audience to keep track of the physical placement of each character in the scene. Lines of attention and screen direction are still required to maintain spatial relations. When you establish a frame that favors character A’s face, you include a portion of the backside of character B’s head and shoulder. For consistency in editing purposes, the reverse shot, favoring character B’s face, must also be recorded. The audience will often expect that reverse shot to be matching in subject size, subject composition, camera height, angle on action, and so forth, unless you are providing purposefully altered framing for storytelling reasons. When cutting from one OTS to another, any differences in these image factors will be very apparent and the mismatch will cause your audience, perhaps just on a subconscious level, to have an unfavorable reaction to the scene (Figures 5.20 and 5.21).

Figure 5.20 Matching over-the-shoulder shots for characters A and B.

Figure 5.21 Mismatching over-the-shoulder shots for characters A and B. Note how the subjects framing, size, and angle are not consistent.
Another important consideration associated with shooting for editing is the concept of eye-line match. This takes the line of attention or sight line from one shot and ties it directly with an object in a new shot after a transition or cut. Eye-line match usually involves a character isolated within a frame (perhaps illustrated most easily with an MS or an MCU shot) when his/her attention is directed somewhere outside the four edges of that frame. The audience traces an imaginary line from the character’s eyes to the edge of the frame where she is looking. The audience wants to see what the character is looking at.
The filmmaker is aware of this impulse “to see,” and may choose to show the audience what the character is looking at. The next shot would then be that object of interest revealed to the audience. And it’s not just revealed in some arbitrary composition. It should be shot from a similar direction, angle, and height that closely match what the perspective would be from the vantage point of the character observing the object in the previous shot. This does not have to be a direct, subjective POV shot, but it does have to maintain and respect the eye-line established with the observing character so that the audience feels adequately informed that they, too, are seeing the same object as the character in the film.
Eye-line match is a “set up and pay off” scenario. The first shot sets up an expectation and then the second shot fulfills that expectation. The important thing is to frame the second shot from a corresponding vantage point. The illusion of connectivity to the character and the “realities” of continuity are maintained in the mind of the audience (Figure 5.22).

Figure 5.22 The first shot sets up the subject and the eye-line of interest. The second shot, presented from a correspondingly subjective viewpoint, reveals the object of interest.
- The shots you create must be edited together, so plan for that process.
- Watch for continuity of action in performance.
- Maintain continuity of screen direction from one shot to another.
- Let the line of attention connect objects for the audience.
- Use sight lines and the action line to maintain proper screen direction while shooting coverage for a scene within the 180 degree shooting arc.
- Move the camera at least 30 degrees (or more) around your shooting arc and change your focal length so that no two shots of coverage seem to come from the same angle on action.
- Match your coverage shots for framing, angle, focal length, and lighting when shooting a multi-character scene, unless you have a creative motivation to do otherwise.
- An eye-line match across a cut keeps your audience informed and grounded. Expectations are set up in one shot and paid off in the next.
Chapter Five – Exercises & Projects
- Plan and shoot coverage of a simple two-person dialogue scene. What helped you maintain screen directions? What would happen if you added a third or fourth character to this same scene?
- Create a scenario where two characters occupy one film space, but at opposite sides and with one sitting and one standing. They talk about and look at an object just off screen. Record the MCU of that object that both characters are looking at from different locations within the same environment. How are you going to address the eye-lines and angles on the object of interest?
- Record a subject entering and leaving frame at five unique locations. Did you manage to keep screen direction consistent in all five shots? If you changed the subject’s screen direction from shot to shot, how did you handle that?
- What is the “fourth wall?”
- What are “attention” and “sight lines” and how do they work into shooting coverage?
- How does “jumping the line” mess with the coverage shots when they are edited together?
- You are going to move your camera around your 180 degree shooting arc to get more coverage of a subject. How many degrees around that arc will you have to move the camera until you get a frame that looks dissimilar enough from the previous set-up so that a jump cut will not be created in the edit when these two shots are cut together?
- Why is it important to have matching “answer” shots in your two-person dialogue coverage? What shot attributes should be reciprocated in order to get the shots to match?
- What factors should you consider when you are shooting an insert shot of an object of desire? Think of this shot as the reveal of what a subject in the preceding shot is looking at.
- What is the “axis of action” and with what common film “rule” is it associated?