In Webster’s Dictionary, schedule is defined as:
1. list of details
2. a list of times of recurring events; timetable
3. a timed plan for a project
All three of these definitions apply to postproduction scheduling. This type of scheduling is an art form. Primarily, you are expected to commit to paper a plan encompassing every single step of postproduction, from dailies to delivery. Each phase is dependent on the successful completion of the previous phase. Translation: your schedule needs to be flexible and you need to be very organized and possess a lot of patience.
Once you have mapped out your postproduction schedule and committed it to paper, it is distributed to the show’s executive producers and producers, the studio, network executives, and countless others. And, at any given moment, anything can (and usually will) happen to change your schedule. These interruptions can be caused by, but not limited to, bad weather, an ill actor, or the whim of a studio or network executive. Any of these interruptions may cause a ripple effect through your entire schedule.
Creating a Postproduction Schedule
What will be your timetable? Ultimately, your airdate or release date will determine your delivery date (or the delivery date the network has established). If you don’t deliver, your show doesn’t air. It’s that simple.
The areas that the postproduction supervisor or associate producer (possibly even the producer in a videotape shoot/finish show) is responsible for scheduling are listed below. The time allotted for each phase depends, mainly on whether your show is on film or tape and whether it’s a half-hour sitcom, an hour-long episodic, a movie of the week (MOW), or a TV or theatrical “feature.”
For shows working with videotape dailies, some studios and production companies believe that the use of electronic off-line (nonlinear) editing systems (editing by computer) allows schedules to be accelerated. Others budget more time into their TV projects and call them “features,” —a word that traditionally has been reserved for theatrical releases. This is typical of the competitive cable networks. TV and theatrical features have longer schedules to allow for more automatic dialogue replacement (ADR), music, and special effects. More time is required to complete the final audio mix because more audio tracks are involved. In the end, the production executives hope they have a richer, bigger show that will guarantee better ratings than your average MOW.
When posting an MOW, one-hour episodic, half-hour (sitcom), or other special programming, many of the steps are the same and are completed in the same order. The time it takes to complete each step may vary. Some steps may not be necessary for every show.
Here is a list of the basic postproduction steps that you will go through to complete your project and the general order in which these steps will happen. At the end of the chapter are samples of various postproduction schedules.
Always keep the distributor’s delivery date foremost in your mind. It is usually tied to an airdate and therefore unchangeable.
Elements of the Postproduction Schedule
1. |
Principal photography |
2. |
Dailies |
3. |
Second unit photography |
4. |
Editor’s cut |
5. |
Director’s cut |
6. |
Producer’s cut |
7. |
Temporary on-line/temporary dub |
8. |
Network/studio view |
9. |
Picture lock |
10. |
Opticals and film titles |
11. |
Test theatrical screenings |
12. |
Negative cut |
13. |
On-line/assembly edit |
14. |
Answer print (film) |
15. |
Spotting music and sound effects |
ADR/looping |
|
17. |
Scoring |
18. |
Color correction (videotape) |
19. |
Prelay/predub |
20. |
Titling (videotape) |
21. |
The print before first trial |
22. |
Mix/dub |
23. |
Fully-formatted answer print |
24. |
Interpositive/duplicate negative |
25. |
Composite answer print |
26. |
Theatrical release prints |
27. |
Delivery duplication/air masters |
28. |
Delivery |
29. |
Air date/release date |
30. |
Overnight ratings |
The principal photography stage is when your primary footage is shot. There is a beginning date and an ending date. When scheduling postproduction for a TV project or feature, you must know the first and last days of principal photography, whether a second-unit shoot is planned, and the delivery date. Knowing the first day of principal photography and the date you must deliver your final master provides the parameters necessary to fill in the rest of the schedule.
For example, a half-hour sitcom will shoot 1 to 2 days per episode. An hour-long episodic will shoot 4 to 8 days per episode. A MOW will shoot 13 to 22 days, and a four-hour mini-series will shoot 25 to 40 days. These are rough estimates. The complexity of the show and the budget determine the exact number of shooting days per program. Situation comedies shoot more than one day when preshoots are scheduled. These are usually scenes that are shot, ahead of time and then transferred and edited together to show to the live audience on the day of principal photography. This material could be used for playback on the set (on a TV monitor) or to show the audience key story points that are shot at another location.
You must be aware of the days of the week you are shooting and whether any Friday night or weekend laboratory processing and telecine transfers are planned. There will be extra charges for weekend work, and it is necessary to alert the lab and telecine house as early as possible so they can staff accordingly. These additional charges may also affect your budget.
“Dailies” is the footage that is shot each day, when you are shooting film for either a film-finish or tape-finish show, you rush the footage to the lab each day to have it processed and printed or transferred to videotape for viewing the next day. By shooting on tape, you eliminate the laboratory and telecine processes. But the material you shoot still constitutes “dailies.”
When plotting dailies transfer time on your calendar for an episodic or MOW, remember that the actual transfer time will run at least one day behind the day the footage is shot. Film shot on Tuesday gets processed Tuesday night and transferred overnight in the early hours of Wednesday. For multicamera sitcoms, 1 to 2 days of production will take 2 to 3 days to transfer, depending on the number of cameras shooting, the amount of film shot, production values, and the number of shifts per day dedicated to the transfers.
Be sure to read the “Dailies” chapter carefully. If you are planning to transfer your film dailies to videotape, there are many details you will need to provide to your telecine house before they can begin. This is in addition to scheduling the laboratory that will be processing your film.
The entire production unit that shoots the bulk of the footage does not shoot these dailies. They are shot by a small skeleton crew called the second unit, which is made up of either fewer members of the original crew or an entirely different group. Sometimes second unit material is shot simultaneously with the principal dailies while other times it is shot after principal photography has ended. Some shows even start shooting second unit material and establishing shots at the beginning of their shooting schedule.
A second unit crew may shoot establishing shots, inserts, pickup shots, and effects back plates, among other things. Second unit shoots are often shot MOS (without sound) or with wild sound (sound not meant to be matched to picture during the dailies transfer). Once shot, second unit material is handled just like the normal dailies in terms of processing, transfer, and editing.
On print daily shows, the editor responsible for creating the “editor’s cut” is called the film editor. When cutting electronically, the first version of the project is cut together by the off-line editor. This version is the foundation for the final show assembly. Very often the editor’s cut closely resembles the final cut of a show. Shots are assembled from dailies according to the blueprint provided by the script—often with a little help from the director. Being familiar with all of the varying takes, the editor chooses the better takes of each scene. Once all the dailies are shot and delivered to the cutting room, the editor has 1 to 2 days for assembly of episodics and sitcoms, and no more than 6 days, per the Director’s Guild of America (DGA), for MOWs and TV movies or projects that have a running time of more than an hour. Always refer to your guild contracts, as these guidelines may change at any time and can vary depending on the circumstances of your program.
Once the editor’s cut is complete, the director screens the cut. All changes made by the director, become part of the director’s cut. Now the director sets the pace of the show, shortening (tightening) and lengthening scenes as the director deems necessary. This cut shows the producers how the director envisioned the movie when it was shot. The director’s cut goes to the production company and sometimes to the network executives to view.
Unless the director invites them, it is illegal (per the DGA) for anyone other than the editorial staff to be in the cutting room before the director has finished. Breaking this rule can result in costly fines to the production company. Current Guild rules governing the number of days for the creation of the director’s cut allow 1 day with an additional day for changes for 30-minute shows, 15 days for 90-minute MOWs, 20 days for 120-minute programs, and longer for features. If in doubt about the rules, call the DGA. Some directors are very strict about these rules, so exercise caution. Don’t second-guess when making the schedule. Stick to the rules.
In TV, the director’s job is officially done when shooting is completed and the director’s cut has been delivered. Because of TV’s fast pace, a new job is often waiting and the director often leaves before the picture is locked. However, the director may supervise the automatic dialogue replacement (ADR), or looping session and the second unit shoot, as well as being present at the final audio mix. The director must be informed when each step is scheduled to take place and where the sessions will be held. It is not incumbent upon the director to participate, but it is an option depending on the director’s availability.
Following the director, the producer creates a version of the program. This version may or may not incorporate part or all of the director’s cut and any other production footage. Producers usually take 2 to 5 days to screen the director’s cut and complete their version. The producer’s cut will then go to the production company executives and usually the network to be screened. Even in a half-hour sitcom, several versions (called producer’s cuts and labeled PC #1, 2, 3, etc.) may be created for executives and the network to view. We have seen seven and eight producer’s cuts go out for a single show before everyone was satisfied. In one instance, four copies of each version were sent to the production company and seven VHS copies were sent to the network executives. These costs can really add up.
Temporary music and effects may be incorporated into the producer’s cut. With film, special effects not created during production are often too expensive to make for the screening of a producer’s cut, since they might not be used in the final version. With electronic off-line editing, simple special effects can be created quite easily by your off-line or on-line editor. Simple titles can be added to help round out the effect. These extras are traditionally saved for use on MOWs, pilots, and theatrical test screenings, as are temporary on-lines and temporary dubs.
Temporary On-Line/Temporary Dub
The producers may decide to create a more completed version of the producer’s cut, rather than simply making dubs of the off-line cassette or sending out the work print as is. They spruce up the cut a bit with a temporary on-line and temporary music. These added steps are the exception to the rule and are often saved for use on pilots, MOWs, and cable shows with anticipated foreign theatrical releases. This is an added expense that may not have been included in the budget at the start of the process. The money to do this may have to come from somewhere else in your budget.
Once the producer is satisfied with the “producer’s cut” videotapes of this version are delivered (on VHS or three quarter-inch [3/4″]) and everyone waits (and waits and waits) for the network notes—usually 2 or more days later.
Once all the network notes have been addressed, your picture is considered “locked,” meaning all of the changes to the cut have been done and approved. This stage is often referred to simply as “picture lock.” At this point in a show that has been shot on film, you order the negative cut to begin. For electronic shows, you are ready for on-line. Sound and music editors will need to receive their materials as soon as possible.
Opticals/Simple Visual Effects
You will create film opticals for your cut negative at a laboratory or optical house. It can take a week or longer for the laboratory or optical house to create your optical elements. The more complicated the effect, the longer the process.
For a tape finish, simple opticals can sometimes be incorporated into the on-line session. Be aware that the postproduction facility (or postproduction house) may separate out the time spent in the bay creating opticals and visual effects and charge that time at a higher rate. Double-check the breakdown of your charges before the session begins.
When the electronic opticals are too complicated to be done during an assembly, you can build your electronic opticals or effects before or after your on-line. This optical master is now part of your on-line source material. These more complicated effects may require several sessions to complete.
Theatrical test screenings are also known as:
Test Screenings
Test Audiences
Sneak Previews
Advanced Presentations
Test screenings are held for the purpose of measuring audience reactions to a story and its characters. They are also used to gauge the target market for a film. In other words, does the audience laugh and cry where they are supposed to and which age/gender group enjoyed the movie most? The goal is to give the producers and marketing department ideas about how to best market the film, and if story changes need to be made. If changes are made, the film may be tested again to see if the changes were effective. Blockbuster high budget studio backed features test often to give their films the best possible chance.
All film-finish shows must complete a negative cut. The editor will provide the negative cutter with a completed work print. If you have done an electronic off-line, the negative cutter will ask for a cassette (called a LokBox cassette) and a paper list called a negative cut list or negative conform list. Depending on the number of edits and the amount of time it takes to create all of your opticals and cut them into your cut negative, this process can take a week for an MOW or several weeks for a feature.
As soon as the picture is locked you can go into on-line editing. In the on-line session, the picture is assembled from the master source elements. You schedule an on-line or assembly session only if you are creating a videotape master.
Simple effects and opticals can also be part of the on-line process. In the on-line or auto-assembly session your show is assembled from your dailies master tapes using the edit decision list (EDL) provided by your off-line editor. Briefly, an EDL is a list made up of all the edits and the corresponding source material that make up a show. An EDL created for a negative cut will include film edge numbers that tell the negative cutter where to cut. An EDL for an electronic on-line includes the “in” and “out” timecode numbers off the videotape master source reels. More information on EDLs is provided in the “Editorial (Film Editorial and Video Off-Line Editing)” chapter.
The ideal situation is to wait to do the on-line until the picture is locked. But, with TV schedules being what they can be, you rarely find yourself in an “ideal” situation. Assembling your show before the picture is locked is rarely an issue with sitcoms and episodics because the format is so short you don’t buy much time by rushing the on-line before the cut is completed. But MOWs and mini-series may fall prey to this piecemeal form of assembly. Often the on-line for these 2- to 4-hour shows gets rushed so that work tapes can be made for the sound and music editors, the special effects and graphics creators, and the composer. These folks can then have the maximum amount of time to create their magic.
A film-finish requires that you approve either the first trial/answer print or a proof print, depending on time and budget. A proof print, made from the color timings, is a slide show or filmstrip made up of one to three frames from each scene in the show. A Hazeltine is one machine on which the color-corrections are made. The first trial is the first full print viewed for corrections. Often the director or cinematographer attends. Whether you view a full answer print or a proof print, there will probably be adjustments to the color. If so, a second check print is struck and the process is repeated for the corrected areas until you, the client, are satisfied. What you end up with is either a scene-to-scene color-corrected print or a batch-timed print, depending on your budget and the purpose of making the print. Batch-timing is achieved by grouping many scenes together on one “light” or “color-correction” setting. The answer print is the final print.
Spotting Music and Sound Effects
During music and sound effects spotting, decisions are made regarding the placement of music cues and sound effects. The director, producer, editor, and associate producer view the picture with the composer and special effects supervisor to discuss the various music and effects cues and where they should be placed.
On film-finish shows, this is done either on the flatbed in the cutting room or on a rock-and-roll projector either in a rented room or at a studio. A rock-and-roll projector has the ability to play film backwards and forwards so you can view sections of your film over and over. On videotape projects, cassettes are created for the group to view. This is often done in someone’s office or in the off-line edit room.
The addition of sound effects is necessary for two reasons. First, sound effects are added for creative composition. Second, many sound effects, called ambient sound effects, may originally have been recorded as part of the dialogue track. If this original dialogue recording is replaced by looping or dubbing into a foreign language (rather than subtitling), any ambient sound effects recorded as part of the dialogue track will be lost. These effects will have to be recreated as part of a separate audio track called the effects track.
Your sound, music, and effects editors, along with the composer, will all require work elements as soon as possible. For film this will be black and whites and one-to-ones. When cutting electronically, call your music supervisor and effects supervisor and find out the technical requirements for their videotape copies. These will be their working copies of the show. Make sure the music supervisor and effects people know whether you are finishing on film or videotape, as their preparation and tape specifications will be determined by the format you are working with. If at all possible, have these working elements available at the time of the spotting session.
ADR (automatic dialogue replacement) is also referred to as “looping.” Here dialogue is rerecorded after shooting is complete to replace unusable original production sound. A MOW looping session will usually take 1 day for the “loop group,” 2 days for supporting actors, and 1 to 2 days for leading actors. A loop group, sometimes called a Walla group or an ADR group, is a collection of people hired to rerecord dialogue and background voices. (See the “ADR/Looping” section in the “Sound” chapter for more details on what you will need and when to start scheduling this step.) For a special or episodic, 1 day should cover all participants. Looping is not normally done for a sitcom.
The score is all the music used in your television show. Any original music is written by a composer. Some composers score using electronic instrumentation. This is known as electronic scoring. They usually work out of their homes or in small studios. The director and producers sit with the composer several times during the postproduction process to evaluate and provide direction for the scoring. If the score is not produced electronically, you will need to book a scoring stage.
Some composers hire a group of musicians and record on actual sound stages (see the “Music/Scoring” section in the “Sound” chapter). This type of scoring is seldom seen in television anymore and is reserved almost exclusively for movies (and even many movie scores are done electronically). If you are using this method for a pilot or MOW, allow 1 day to record the music. Then allow 1 day between the recording and the dubbing stage for the music editor to cut the music.
Your music supervisor will know how many sessions you will need to book. The musicians’ union governs the length of time a musician can work without a break. Your music supervisor will help you be sure you don’t incur penalties.
Color corrections are done either film-to-tape or tape-to-tape. This is the final time you alter your picture before the credits are added. In color-correction, the picture is evened out on a cut-by-cut basis so the shots flow together with a planned consistency of hue and balance.
The details of a film-to-tape color-correction session will depend on a couple of factors. A MOW being color-corrected from negative or interpositive (IP) may take 2 1/2 to 3 days. A theatrical movie can take from several days, if unsupervised, to many weeks depending on the complexity of the project and who supervises the transfer. From a low-contrast (locon) print, you should finish in 2 days. If the original negative was shot unevenly or the cinematographer is supervising the color-correction, the process may take a little longer. A tape-to-tape correction will take about as long as it takes to correct from a locon.
Color correcting a one-hour episodic from negative or IP may take 1 1/2 to 2 days. From a locon print you should finish in an 8- to 10-hour day. Again, the condition of the original negative, and the original dailies film transfer, as well as the session supervisor, will affect the actual time needed.
A half-hour sitcom should take half the time of an episodic. If you elected to color correct your sitcom dailies, a color-correction session should not be necessary. Again, all the factors listed above will affect your final session time.
If your show includes a lot of sound effects, then your sound effects supervisor may recommend a prelay/predub. This is intended to make the actual dub go more smoothly and easily by reducing the number of individual effects cues and pots the mixer has to control simultaneously. When working on an MOW, your sound effects supervisor and one mixer should be able to complete this in 1 day. More involved projects, such as a feature, will usually take longer.
In the case of film, this is the point at which you order your title opticals, or credits, and have them spliced into your cut negative. Find out who needs to sign off on the titles prior to ordering the opticals from the optical house or laboratory. Then determine who needs to approve them visually prior to having them spliced into your cut negative. Unlike video, creation of film titles requires a much longer lead time and any changes will have to be shot again by the optical department. It will take several days or longer for the creation of your credits, and changes can take just as long.
Providing credits for the titling of your program is a long, ongoing task. If you are working for a large studio, the credits will usually be provided to you. If you are working for an independent, you often are left to figure them out for yourself.
When creating electronic titles, you can sometimes deliver a computer disk formatted from the original credit list that was typed at the production office. This copy will already have been approved by all and spelling will have been checked. You can simply save your credit data file to a text file on a 3.5″ floppy disk, or CD-ROM, and deliver that to your titling facility. This can eliminate the need for the credits to be retyped at the facility, thus eliminating mistakes due to human error.
It is best to begin the process of compiling and finalizing credits as early into the project as possible. You don’t want this to hold up completion and delivery. The producer and other executives often take for themselves the fun job of picking the type style (font), color, and layout (flips, pushes, or wipes) of the credits you so painstakingly compile.
The chapter on “Completion” provides additional information and helpful hints.
This is a film print made from an original negative prior to completion of the color correction process. This print may contain slugs (placeholders) for the main and end titles and any unfinished opticals. With any luck the negative can be submitted to the laboratory early enough so the timer can make some of the color adjustment before this print is stuck. This gives the filmmaker an opportunity to see how the color correction is going. This print is run with the sound mix prior to making an optical sound track negative. This insures that your picture and track are in sync. This print is also used for test screenings.
This is one of the most time-consuming and creative events in the entire postproduction process. The producers, director, composer, music supervisor, editor, sound effects supervisor, and sound mixer go through the show scene by scene, making decisions about the placement of music and effects cues and adjusting audio levels.
When all the separate dialogue, music, and effects tracks are completed, they are mixed down onto an unused track (or tracks) of the multitrack element. These tracks become the master sound track or final mix, which is then laid back or dubbed onto the sound track of the videotape master. This master sound track is also the element used to create an optical track in the case of a film-finish project.
The sound dub for an MOW will take up to 3 days and 2 or 3 mixers. Schedule an entire day for an episodic and a half-day for a sitcom. In Canada and on some stages in the United States, dubbing involves one mixer, who mixes the sound sources one at a time. This method can take up to 5 days for a MOW. Whichever method you use, the show opening will traditionally take the longest to dub. When doing an MOW, try to complete 20 to 30 minutes of program each day. This will help keep you on schedule.
If during the session you see that you are going to go over the time allotted, quietly notify the producer. If you need more time than originally budgeted, someone will need to determine if it is more cost-effective to rack up some overtime or add another day to the dub. These additional costs are probably outside of any package deal.
If your show is going to have a laugh track, be sure to schedule the time for your laugh session as early as possible. There are only a handful of laugh guys around. They book up quickly during the TV season, and they don’t come cheap.
Fully–Formatted Dupe and Answer Print
If your film is shot with an academy aperture, you’ve exposed the whole film frame except a strip along one edge where the sound track will be placed. If your film is shot full frame, also known as Super 35, you have exposed the entire film frame leaving no room for a sound track. This aspect ratio is a creative choice giving the film a widescreen or CinemaScope size.
In order to add a sound track to this aspect ratio, there is an extra step you must go through in the film laboratory. First, an interpositive (IP) is made. Then, when the internegative (IN) is struck from the IP the original image is made slightly smaller and moved to the right. This is called formatting. Sound can then be added to the print made from this IN. The result is a check print made from a formatted dupe or a composite answer print.
This is a print of the original negative on special stock. This stock is made as an intermediate element to serve several purposes. It is a protection element, in case your original negative is damaged. It is an intermediate step to making an internegative or opticals. It can also be used as the transfer medium to master to video. Both Kodak and Fuji make IP stock.
This is a copy of your original negative, made from a positive element. In the case of release printing you may make several of these from which to print. This will help protect your original negative from damage due to over handling. If you use a scene twice in your film, you will need to make an IP of that section. From the IP you’ll strike a color corrected acetate dupe (referred to as a dupe neg) to cut into your original negative.
Be sure when making IN elements to cut into your original negative so that the IN segments are made on acetate stock. This is very important because nonacetate stock will not splice properly to your original negative stock. Also, they are different thicknesses so the splice will cause a bump and focus problems at that point. Ultimately the splice will come apart.
This is the first time you see the picture and track together on a big screen. This print is struck only when the color correction process is complete and you have delivered the optical sound track negative to the lab. This is an exciting screening.
A word of caution: Do not invite guests, i.e., actors, agents, etc. to this first screening. View this with the film lab personnel and your post crew to make sure it’s in sync and the picture looks good.
These are prints made from dupe negatives. They will be made dry (no wetgate) and will begin to show a small amount of dirt printed in it, as the negatives continue to be used. The prints will be shipped on cores, with trailers and ratings tags added to the heads and tails to theatres around the world. If this is your first film, go to the lab’s shipping department where they stack the finished prints and have your picture taken with all the reels of your film.
Delivery Duplication/Air Masters
Delivery dubs are the final tapes delivered to the network, the production company, and the distributor. Some of these tapes are closed-captioned and require special formatting. The networks always require their tapes be delivered with drop-frame timecode. International delivery requirements will vary from network requirements.
If delivery tapes are closed-captioned, you will do this in either a separate formatting session or at the time the dubs are made. See the section on “Closed Captioning” in the “Completion” chapter for more details.
Included in the delivery dubs are the air master and probably an air-protection copy. The full complement of tapes required varies widely from network to network and from production company to production company.
At this point the distributor (network, foreign, cable, etc.) actually accepts delivery of your show, meaning all of the delivery requirements have been met. Be sure you know whom you are expected to deliver to, their address, and the exact delivery date and time specified. We cannot stress enough how important it is that you know and understand your delivery requirements from the start of the project.
This is when your friends and family sit down in their living rooms and watch for your name to appear on their TV sets. This moment is why we do what we do. Well … this and the money. It’s a nerve-racking time because if something airs incorrectly, there is no way to take it back.
Regional overnight ratings (called overnights) are available the morning after your show has aired. Nationals become available a couple of days later. To get these numbers, call the network contact for your project. Knowing ratings numbers is not required, but everyone will want them.
Successful delivery of your show depends on how organized you are and the order in which the steps in your postproduction process are completed. You may very well spend more time updating, reorganizing, and agonizing over your postproduction schedule than you spend on any other part of your job. Any change in that schedule will cause a domino effect that will ripple throughout the entire process—including your budget. Good project management will help ensure that your ripple doesn’t become a tidal wave.
It is important that each change to your schedule be incorporated, and the affected steps be adjusted, and everyone involved in your postproduction process be issued an updated schedule in a timely manner. When you are distributing updated schedules, be sure that you deliver them to all your contacts at your various postproduction facilities. It is also a good idea to point out, at least to the postproduction houses, what parts of your schedule have changed. Be sure to date each version of the postproduction schedule that you distribute.
Figures 1.1 to 1.4 are excerpts from sample postproduction schedules. Feel free to pick a postproduction schedule that most closely approximates what your schedule will entail. Use it to help you organize and plan your show’s postproduction schedule. There are no extra points for reinventing the wheel.
Figure 1.1 Feature Postproduction Schedule
Last Day of Principal Photography |
Insert Date |
Re-shoots/Pick Ups |
Insert Date |
Begin Visual Effects |
Insert Date |
Editor’s Cut |
Governed by the DGA. 6 days—Begins promptly after the completion of principal photography. |
Director’s Cut |
Governed by the DGA. Feature: 10 weeks or 1 day in editorial for every 2 days in production, or whichever is longer. |
|
Low Budget Feature: 6 weeks or 1 day in editorial for every 2 days in production, or whichever is longer. |
Producer’s Cut |
Allow at least 1 week from completion of director’s cut. |
Test Audience Screening & Previews (may be several) |
The number of screenings will be dependent upon the show and its executives. A large budget studio feature, this may take several months. For an independent low budget feature this testing and re-cutting process may take a week or less, if tests are done at all. (The director must be notified at least 24 hours in advance of test screenings.) |
Recut (may be several) |
This may take 1–3 days. |
Studio View |
Insert date |
Recut |
Insert date (if applicable) |
Visual Effects Completed & Cut into Work Print |
Effects may take two weeks to two months depending upon the work required. |
Picture Lock |
Insert Date |
Begin Ordering Opticals |
Allow 2 weeks depending upon the effects |
Spotting |
2 days, 1 day for sound 1 day for music |
Negative Cut |
Allow 2 weeks depending upon when the opticals are complete. Insert date that negative cutter gets cut list. |
ADR/Looping |
Allow 1–2 weeks. |
Scoring |
Allow 1–3 days (1 day for approximately 20 minutes of music) |
Color Correction |
10 days |
Final Sound Mix |
7–10 days or more. |
Answer Print |
Allow 7 to 10 days after the final roll of complete negative has been delivered to the laboratory. |
Interpositive |
Allow 2–3 days |
Optical Track to Film Laboratory |
Processed 1 day prior to final print |
Dupe(s) |
Allow 2 to 3 days (if a formatted dupe is required, allow 5 days). |
Check Print(s) (composite) |
1 day after the dupe is completed |
Delivery/Access to Distributors |
1 day after approval of the final composite print from the dupe or original depending upon the delivery requirements |
Release Printing |
Allow 2 days for 150–500 prints depending upon the laboratory. |
Cast & Crew Screening |
Insert Date |
Premier/Film Festival |
Insert Date |
Figure 1.2 Average MOW Film-Finish Sample Schedule*
Principal Photography |
20 days |
Editor’s Cut |
2 days |
Director’s Cut |
varies (per DGA) |
Producer’s Cut |
varies |
Temp Dub |
1 to 2 days |
Network View |
1 day |
Lock Date |
3 to 4 days |
Negative Cut |
3 to 5 days |
Spotting |
1 day |
Spot Music and Effects |
1 day |
Sound Effects Cutting |
7 days |
ADR |
1 to 2 days |
Foley |
3 days |
Scoring |
2 days |
Dubbing |
3 days |
Answer Print |
1 day |
Delivery Requirements |
1 day |
Deliver to Network |
1 day |
Storage of Trims and Work Prints |
varies |
*The timetables given are approximates and may represent the maximum.
Figure 1.3 One-Hour Episodic Sample Schedule
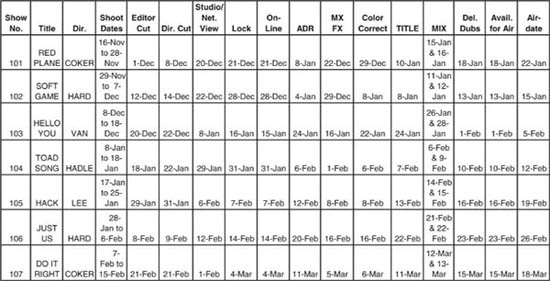
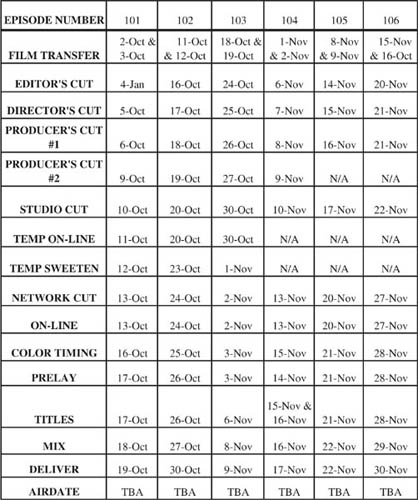
Figure 1.4 Half-Hour Sitcom Sample Schedule
Television vs. Theatrical Features
Let’s go over the differences between the delivery of TV shows and theatrical release prints and briefly touch on the differences between a TV broadcast and a theatrical release.
When making a theatrical feature, an original negative is cut and an original optical sound track is struck. Once cut, the negative is copied. This is called an interpositive (IP). An IP is a print made on special film stock. From the IP, an internegative (IN) is struck. Usually several internegatives are made and the release prints are made from these. This eliminates the need to go back and reuse the original negative again and again for printing, thus helping to preserve the condition of the original negative. An easy way to remember this process is that film goes negative to positive to negative to positive. When your 35mm still shots go in for processing, they take the exposed negative from your camera and make prints. If you want reprints and no longer have your original negatives, the lab makes a new negative from your prints and then makes additional prints from that new negative.
In the land of television, it’s increasingly rare that negative is ever cut before the final delivery for broadcast is made. The original negative is processed and the selected takes are transferred to videotape for the dailies transfer masters. These masters are used later to assemble your final videotape product. Once your show is assembled and the audio mix is completed, the mix gets laid back to the audio tracks on your videotape in the required configuration and all of your tape copies are made from this original. Well, this is all fine if you are working digitally, because you don’t lose any generations in picture quality or sound. However, it doesn’t stop here.
You deliver your hit TV show to the network on the specified format. Some networks and cable stations are still taking one-inch (1″), D2, or D3 video format, but many have gone to digital Betacam. Traditionally, the show is copied by the network’s video department, formatted (if it was not delivered by you already formatted) and satellited; this transmission is recorded and satellited at airtime in crisp, clean precision, with commercials slugged in the appropriate places.
By the time your gem is broadcast to millions of living rooms across our great land, it has had a long journey. If you are lucky, your program is only three or four generations from the original you delivered. This is one reason why some cinematographers have a love/hate relationship with color-correction. They know that no matter how much they labor over each color-correction, color may change a point or two in transmission. No matter how much work these guys put into the shows, some quality will still be lost (somehow that doesn’t stop them from racking up the hours in trying).
The same applies to sound effects and music levels. Shows that are heavy with sound effects and music will require careful attention to audio levels. Widespread digital transmission is still years away. It is amazing, however, that TV quality is as good as it is. Or maybe we should say, as good as it is—sometimes.