
Chapter 6. Available Clients
HBase comes with a variety of clients that can be used from various programming languages. This chapter will give you an overview of what is available.
Introduction to REST, Thrift, and Avro
Access to HBase is possible from virtually every popular
programming language and environment. You either use the client API
directly, or access it through some sort of proxy that translates your
request into an API call. These proxies wrap the native Java API into
other protocol APIs so that clients can be written in any language the
external API provides. Typically, the external API is implemented in a
dedicated Java-based server that can internally use the provided HTable client API. This simplifies the
implementation and maintenance of these gateway servers.
The protocol between the gateways and the clients is then driven by the available choices and requirements of the remote client. An obvious choice is Representational State Transfer (REST),[68] which is based on existing web-based technologies. The actual transport is typically HTTP—which is the standard protocol for web applications. This makes REST ideal for communicating between heterogeneous systems: the protocol layer takes care of transporting the data in an interoperable format.
REST defines the semantics so that the protocol can be used in a generic way to address remote resources. By not changing the protocol, REST is compatible with existing technologies, such as web servers, and proxies. Resources are uniquely specified as part of the request URI—which is the opposite of, for example, SOAP-based[69] services, which define a new protocol that conforms to a standard.
However, both REST and SOAP suffer from the verbosity level of the protocol. Human-readable text, be it plain or XML-based, is used to communicate between client and server. Transparent compression of the data sent over the network can mitigate this problem to a certain extent.
As a result, companies with very large server farms, extensive bandwidth usage, and many disjoint services felt the need to reduce the overhead and implemented their own RPC layers. One of them was Google, which implemented Protocol Buffers.[70] Since the implementation was initially not published, Facebook developed its own version, named Thrift.[71] The Hadoop project founders started a third project, Apache Avro,[72] providing an alternative implementation.
All of them have similar feature sets, vary in the number of languages they support, and have (arguably) slightly better or worse levels of encoding efficiencies. The key difference with Protocol Buffers when compared to Thrift and Avro is that it has no RPC stack of its own; rather, it generates the RPC definitions, which have to be used with other RPC libraries subsequently.
HBase ships with auxiliary servers for REST, Thrift, and Avro. They are implemented as standalone gateway servers, which can run on shared or dedicated machines. Since Thrift and Avro have their own RPC implementation, the gateway servers simply provide a wrapper around them. For REST, HBase has its own implementation, offering access to the stored data.
Note
The supplied RESTServer
actually supports Protocol Buffers. Instead of implementing a separate
RPC server, it leverages the Accept
header of HTTP to send and receive the data encoded in Protocol Buffers.
See REST for details.
Figure 6-1 shows how dedicated gateway servers are used to provide endpoints for various remote clients.
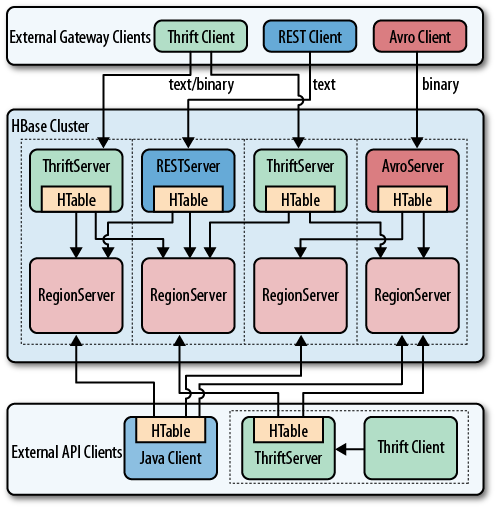
Internally, these servers use the common
HTable-based client API to access the
tables. You can see how they are started on top of the region server
processes, sharing the same physical machine. There is no one true
recommendation for how to place the gateway servers. You may want to
collocate them, or have them on dedicated machines.
Another approach is to run them directly on the client nodes. For example, when you have web servers constructing the resultant HTML pages using PHP, it is advantageous to run the gateway process on the same server. That way, the communication between the client and gateway is local, while the RPC between the gateway and HBase is using the native protocol.
Note
Check carefully how you access HBase from your client, to place the gateway servers on the appropriate physical machine. This is influenced by the load on each machine, as well as the amount of data being transferred: make sure you are not starving either process for resources, such as CPU cycles, or network bandwidth.
The advantage of using a server as opposed to creating a new connection for every request goes back to when we discussed HTablePool—you need to reuse connections to gain maximum performance. Short-lived processes would spend more time setting up the connection and preparing the metadata than in the actual operation itself. The caching of region information in the server, in particular, makes the reuse important; otherwise, every client would have to perform a full row-to-region lookup for every bit of data they want to access.
Selecting one server type over the others is a nontrivial task, as it depends on your use case. The initial argument over REST in comparison to the more efficient Thrift, or similar serialization formats, shows that for high-throughput scenarios it is advantageous to use a purely binary format. However, if you have few requests, but they are large in size, REST is interesting. A rough separation could look like this:
- REST use case
Since REST supports existing web-based infrastructure, it will fit nicely into setups with reverse proxies and other caching technologies. Plan to run many REST servers in parallel, to distribute the load across them. For example, run a server on every application server you have, building a single-app-to-server relationship.
- Thrift/Avro use case
Use the compact binary protocols when you need the best performance in terms of throughput. You can run fewer servers—for example, one per region server—with a many-apps-to-server cardinality.
Interactive Clients
The first group of clients consists of the interactive ones, those that send client API calls on demand, such as get, put, or delete, to servers. Based on your choice of protocol, you can use the supplied gateway servers to gain access from your applications.
Native Java
The native Java API was discussed in Chapters 3 and 4. There is no
need to start any gateway server, as your client using HTable is directly communicating with the
HBase servers, via the native RPC calls. Refer to the aforementioned
chapters to implement a native Java client.
REST
HBase ships with a powerful REST server, which supports the complete client and administrative API. It also provides support for different message formats, offering many choices for a client application to communicate with the server.
Operation
For REST-based clients to be able to connect to HBase, you need to start the appropriate gateway server. This is done using the supplied scripts. The following commands show you how to get the command-line help, and then start the REST server in a nondaemonized mode:
$bin/hbase restusage: bin/hbase rest start [-p <arg>] [-ro] -p,--port <arg> Port to bind to [default: 8080] -ro,--readonly Respond only to GET HTTP method requests [default: false] To run the REST server as a daemon, execute bin/hbase-daemon.sh start|stop rest [-p <port>] [-ro]$bin/hbase rest start^C
You need to press Ctrl-C to quit the process. The help stated that you need to run the server using a different script to start it as a background process:
$bin/hbase-daemon.sh start reststarting rest, logging to /var/lib/hbase/logs/hbase-larsgeorge-rest-<servername>.out
Once the server is started you can use curl[73] on the command line to verify that it is operational:
$curl http://testtable<servername>:8080/$curl http://rest 0.0.2 [JVM: Apple Inc. 1.6.0_24-19.1-b02-334] [OS: Mac OS X 10.6.7 x86_64] [Server: jetty/6.1.26] [Jersey: 1.4]<servername>:8080/version
Retrieving the root URL, that is "/" (slash), returns the list of available
tables, here testtable. Using
"/version" retrieves the REST
server version, along with details about the machine it is running
on.
Stopping the REST server, and running as a daemon, involves the
same script, just replacing start
with stop:
$bin/hbase-daemon.sh stop reststopping rest..
The REST server gives you all the operations required to work with HBase tables.
Note
The current documentation for the REST server is online at http://hbase.apache.org/apidocs/org/apache/hadoop/hbase/rest/package-summary.html. Please refer to it for all the provided operations. Also, be sure to carefully read the XML schemas documentation on that page. It explains the schemas you need to use when requesting information, as well as those returned by the server.
You can start as many REST servers as you like, and, for example, use a load balancer to route the traffic between them. Since they are stateless—any state required is carried as part of the request—you can use a round-robin (or similar) approach to distribute the load.
Finally, use the -p, or
--port, parameter to specify a
different port for the server to listen on. The default is 8080.
Supported formats
Using the HTTP Content-Type and Accept headers, you can switch between
different formats being sent or returned to the caller. As an example,
you can create a table and row in HBase using the shell like
so:
hbase(main):001:0>create 'testtable', 'colfam1'0 row(s) in 1.1790 secondshbase(main):002:0>put 'testtable', "x01x02x03", 'colfam1:col1', 'value1'0 row(s) in 0.0990 secondshbase(main):003:0>scan 'testtable'ROW COLUMN+CELL x01x02x03 column=colfam1:col1, timestamp=1306140523371, value=value1 1 row(s) in 0.0730 seconds
This inserts a row with the binary row key
0x01 0x02 0x03 (in hexadecimal
numbers), with one column, in one column family, that contains the
value value1.
Plain (text/plain)
For some operations it is permissible to have the data
returned as plain text. One example is the aforementioned /version operation:
$curl -H "Accept: text/plain" http://rest 0.0.2 [JVM: Apple Inc. 1.6.0_24-19.1-b02-334] [OS: Mac OS X 10.6.7 x86_64] [Server: jetty/6.1.26] [Jersey: 1.4]<servername>:8080/version
On the other hand, using plain text with more complex return values is not going to work as expected:
$curl -H "Accept: text/plain"http://<servername>:8080/testtable/%01%02%03/colfam1:col1<html> http://<servername>:8080/testtable/%01%02%03/colfam1:col1 <head> <meta http-equiv="Content-Type" content="text/html; charset=ISO-8859-1"/> <title>Error 406 Not Acceptable</title> </head> <body><h2>HTTP ERROR 406</h2> <p>Problem accessing /testtable/%01%02%03/colfam1:col1. Reason: <pre> Not Acceptable</pre></p><hr /><i><small>Powered by Jetty://</small></i><br/> <br/> ... </body> </html>
This is caused by the fact that the server cannot make any assumptions regarding how to format a complex result value in plain text. You need to use a format that allows you to express nested information natively.
Note
As per the example table created in the previous text,
the row key is a binary one, consisting of three bytes. You can
use REST to access those bytes by encoding the key using
URL encoding,[74] which in this case results in %01%02%03. The entire URL to retrieve a
cell is then:
http://<servername>:8080/testtable/%01%02%03/colfam1:col1See the online documentation referred to earlier for the entire syntax.
XML (text/xml)
When storing or retrieving data, XML is considered the
default format. For example, when retrieving the example row with no
particular Accept header, you
receive:
$curl http://<?xml version="1.0" encoding="UTF-8" standalone="yes"?> <CellSet> <Row key="AQID"> <Cell timestamp="1306140523371" column="Y29sZmFtMTpjb2wx">dmFsdWUx</Cell> </Row> </CellSet><servername>:8080/testtable/%01%02%03/colfam1:col1
The returned format defaults to XML. The column name and the actual value are encoded in Base64,[75] as explained in the online schema documentation. Here is the excerpt:
<complexType name="Row">
  <sequence>
    <element name="key" type="base64Binary"></element>
    <element name="cell" type="tns:Cell" maxOccurs="unbounded"
             minOccurs="1"></element>
  </sequence>
</complexType>

<element name="Cell" type="tns:Cell"></element>

<complexType name="Cell">
  <sequence>
    <element name="value" maxOccurs="1" minOccurs="1">
      <simpleType><restriction base="base64Binary">
      </simpleType>
    </element>
  </sequence>
  <attribute name="column" type="base64Binary" />
  <attribute name="timestamp" type="int" />
</complexType>
All occurrences of base64Binary are where the REST server
returns the encoded data. This is done to safely transport the
binary data that can be contained in the keys, or the value.
Note
This is also true for data that is sent to the REST server. Make sure to read the schema documentation to encode the data appropriately, including the payload, in other words, the actual data, but also the column name, row key, and so on.
A quick test on the console using the
base64 command reveals the proper content:
$echo AQID | base64 -d | hexdump0000000 01 02 03$echo Y29sZmFtMTpjb2wx | base64 -dcolfam1:col1$echo dmFsdWUx | base64 -dvalue1l
This is obviously useful only to verify the details on the command line. From within your code you can use any available Base64 implementation to decode the returned values.
JSON (application/json)
Similar to XML, requesting (or setting) the data in JSON
simply requires setting the Accept
header:
$curl -H "Accept: application/json"http://<servername>:8080/testtable/%01%02%03/colfam1:col1{ "Row": [{ "key": "AQID", "Cell": [{ "timestamp": 1306140523371, "column": "Y29sZmFtMTpjb2wx", "$": "dmFsdWUx" }] }] }
Note
The preceding JSON result was reformatted to be easier to read. Usually the result on the console is returned as a single line, for example:
{"Row":[{"key":"AQID","Cell":[{"timestamp":1306140523371,"column":
"Y29sZmFtMTpjb2wx","$":"dmFsdWUx"}]}]}
The encoding of the values is the same as for XML, that
is, Base64 is used to encode any value that potentially contains
binary data. An important distinction to XML is that JSON does not
have nameless data fields. In XML the cell data is returned between
Cell tags, but JSON
must specify key/value
pairs, so there is no immediate counterpart available. For that
reason, JSON has a special field called “$”
(the dollar sign). The value of the dollar
field is the cell data. In the preceding example, you can see it
being used:
...
"$":"dmFsdWUx"
...
You need to query the dollar field to get the Base64-encoded data.
Protocol Buffer (application/x-protobuf)
An interesting application of REST is to be able to switch encodings. Since Protocol Buffers have no native RPC stack, the HBase REST server offers support for its encoding. The schemas are documented online for your perusal.
Getting the results returned in Protocol
Buffer encoding requires the matching Accept
header:
$curl -H "Accept: application/x-protobuf"http://<servername>:8080/testtable/%01%02%03/colfam1:col1 | hexdump -C00000000 0a 24 0a 03 01 02 03 12 1d 12 0c 63 6f 6c 66 61 |.$.........colfa| 00000010 6d 31 3a 63 6f 6c 31 18 eb f6 aa e0 81 26 22 06 |m1:col1......&".| 00000020 76 61 6c 75 65 31 |value1|
The use of hexdump allows you to print out the encoded message in its binary format. You need a Protocol Buffer decoder to actually access the data in a structured way. The ASCII printout on the righthand side of the output shows the column name and cell value for the example row.
Raw binary (application/octet-stream)
Finally, you can dump the data in its raw form, while omitting structural data. In the following console command, only the data is returned, as stored in the cell.
$curl -H "Accept: application/octet-stream"http://<servername>:8080/testtable/%01%02%03/colfam1:col1 | hexdump -C00000000 76 61 6c 75 65 31 |value1|
Note
Depending on the format request, the
REST server puts structural data into a custom header. For
example, for the raw get request in the preceding paragraph, the
headers look like this (adding -D- to the curl command):
HTTP/1.1 200 OK
Content-Length: 6
X-Timestamp: 1306140523371
Content-Type: application/octet-stream
The timestamp of the cell has been moved
to the header as X-Timestamp.
Since the row and column keys are part of the request URI, they
are omitted from the response to prevent unnecessary data from
being transferred.
REST Java client
The REST server also comes with a comprehensive Java client
API. It is located in the org.apache.hadoop.hbase.rest.client package.
The central classes are RemoteHTable and RemoteAdmin. Example 6-1
shows the use of the RemoteHTable
class.
Cluster cluster = new Cluster();
cluster.add("localhost", 8080);  Client client = new Client(cluster);
  RemoteHTable table = new RemoteHTable(client, "testtable");
  Get get = new Get(Bytes.toBytes("row-30"));
  get.addColumn(Bytes.toBytes("colfam1"), Bytes.toBytes("col-3"));
Result result1 = table.get(get);
System.out.println("Get result1: " + result1);
Scan scan = new Scan();
scan.setStartRow(Bytes.toBytes("row-10"));
scan.setStopRow(Bytes.toBytes("row-15"));
scan.addColumn(Bytes.toBytes("colfam1"), Bytes.toBytes("col-5"));
ResultScanner scanner = table.getScanner(scan);
get.addColumn(Bytes.toBytes("colfam1"), Bytes.toBytes("col-3"));
Result result1 = table.get(get);
System.out.println("Get result1: " + result1);
Scan scan = new Scan();
scan.setStartRow(Bytes.toBytes("row-10"));
scan.setStopRow(Bytes.toBytes("row-15"));
scan.addColumn(Bytes.toBytes("colfam1"), Bytes.toBytes("col-5"));
ResultScanner scanner = table.getScanner(scan);  for (Result result2 : scanner) {
System.out.println("Scan row[" + Bytes.toString(result2.getRow()) +
"]: " + result2);
}
for (Result result2 : scanner) {
System.out.println("Scan row[" + Bytes.toString(result2.getRow()) +
"]: " + result2);
}Running the example requires that the REST
server has been started and is listening on the specified port. If you
are running the server on a different machine and/or port, you need to
first adjust the value added to the Cluster instance.
Here is what is printed on the console when running the example:
Adding rows to table...
Get result1: keyvalues={row-30/colfam1:col-3/1306157569144/Put/vlen=8}
Scan row[row-10]: keyvalues={row-10/colfam1:col-5/1306157568822/Put/vlen=8}
Scan row[row-100]: keyvalues={row-100/colfam1:col-5/1306157570225/Put/vlen=9}
Scan row[row-11]: keyvalues={row-11/colfam1:col-5/1306157568841/Put/vlen=8}
Scan row[row-12]: keyvalues={row-12/colfam1:col-5/1306157568857/Put/vlen=8}
Scan row[row-13]: keyvalues={row-13/colfam1:col-5/1306157568875/Put/vlen=8}
Scan row[row-14]: keyvalues={row-14/colfam1:col-5/1306157568890/Put/vlen=8}
Due to the lexicographical sorting of row keys, you will receive the preceding rows. The selected columns have been included as expected.
The RemoteHTable is a convenient way to talk to
a number of REST servers, while being able to use the normal Java
client API classes, such as Get
or Scan.
Thrift
Apache Thrift is written in C++, but provides schema compilers for many programming languages, including Java, C++, Perl, PHP, Python, Ruby, and more. Once you have compiled a schema, you can exchange messages transparently between systems implemented in one or more of those languages.
Installation
Before you can use Thrift, you need to install it, which is preferably done using a binary distribution package for your operating system. If that is not an option, you need to compile it from its sources.
Download the source tarball from the website, and unpack it into a common location:
$wget http://www.apache.org/dist/thrift/0.6.0/thrift-0.6.0.tar.gz$tar -xzvf thrift-0.6.0.tar.gz -C /opt$rm thrift-0.6.0.tar.gz
Install the dependencies, which are Automake, LibTool, Flex, Bison, and the Boost libraries:
$sudo apt-get install build-essential automake libtool flex bison libboost
Now you can build and install the Thrift binaries like so:
$cd /opt/thrift-0.6.0$./configure$make$sudo make install
You can verify that everything succeeded by calling the main thrift executable:
$thrift -versionThrift version 0.6.0
Once you have Thrift installed, you need to compile a schema into the programming language of your choice. HBase comes with a schema file for its client and administrative API. You need to use the Thrift binary to create the wrappers for your development environment.
Note
The supplied schema file exposes the majority of the API functionality, but is lacking in a few areas. It was created when HBase had a different API and that is noticeable when using it. Newer implementations of features—for example, filters—are not supported at all.
An example of the differences in API calls
is the mutateRow() call the
Thrift schema is using, while the new API has the appropriate
get() call.
Work is being done in HBASE-1744 to port the Thrift schema file to the current API, while adding all missing features. Once this is complete, it will be added as the thrift2 package so that you can maintain your existing code using the older schema, while working on porting it over to the new schema.
Before you can access HBase using Thrift,
though, you also have to start the supplied ThriftServer.
Operation
Starting the Thrift server is accomplished by using the supplied
scripts. You can get the command-line help by adding the -h switch, or omitting all options:
$bin/hbase thriftusage: Thrift [-b <arg>] [-c] [-f] [-h] [-hsha | -nonblocking | -threadpool] [-p <arg>] -b,--bind <arg> Address to bind the Thrift server to. Not supported by the Nonblocking and HsHa server [default: 0.0.0.0] -c,--compact Use the compact protocol -f,--framed Use framed transport -h,--help Print help information -hsha Use the THsHaServer. This implies the framed transport. -nonblocking Use the TNonblockingServer. This implies the framed transport. -p,--port <arg> Port to bind to [default: 9090] -threadpool Use the TThreadPoolServer. This is the default. To start the Thrift server run 'bin/hbase-daemon.sh start thrift' To shutdown the thrift server run 'bin/hbase-daemon.sh stop thrift' or send a kill signal to the thrift server pid
There are many options to choose from. The type of server, protocol, and transport used is usually enforced by the client, since not all language implementations have support for them. From the command-line help you can see that, for example, using the nonblocking server implies the framed transport.
Using the defaults, you can start the Thrift server in nondaemonized mode:
$bin/hbase thrift start^C
You need to press Ctrl-C to quit the process. The help stated that you need to run the server using a different script to start it as a background process:
$bin/hbase-daemon.sh start thriftstarting thrift, logging to /var/lib/hbase/logs/ hbase-larsgeorge-thrift-<servername>.out
Stopping the Thrift server, running as a daemon, involves the
same script, just replacing start
with stop:
$bin/hbase-daemon.sh stop thriftstopping thrift..
The Thrift server gives you all the operations required to work with HBase tables.
Note
The current documentation for the Thrift server is online at http://wiki.apache.org/hadoop/Hbase/ThriftApi. You should refer to it for all the provided operations. It is also advisable to read the provided $HBASE_HOME/src/main/resources/org/apache/hadoop/hbase/thrift/Hbase.thrift schema definition file for the full documentation of the available functionality.
You can start as many Thrift servers as you like, and, for example, use a load balancer to route the traffic between them. Since they are stateless, you can use a round-robin (or similar) approach to distribute the load.
Finally, use the -p, or
--port, parameter to specify a
different port for the server to listen on. The default is 9090.
Example: PHP
HBase not only ships with the required Thrift schema file, but also with an example client for many programming languages. Here we will enable the PHP implementation to demonstrate the required steps.
The first step is to copy the supplied schema file and compile the necessary PHP source files for it:
$cp -r $HBASE_HOME/src/main/resources/org/apache/hadoop/hbase/thrift ~/thrift_src$cd thrift_src/$thrift -gen php Hbase.thrift
The call to thrift should complete with no error or other output on the command line. Inside the thrift_src directory you will now find a directory named gen-php containing the two generated PHP files required to access HBase:
$ls -l gen-php/Hbase/total 616 -rw-r--r-- 1 larsgeorge staff 285433 May 24 10:08 Hbase.php -rw-r--r-- 1 larsgeorge staff 27426 May 24 10:08 Hbase_types.php
These generated files require the Thrift-supplied PHP harness to be available as well. They need to be copied into your web server’s document root directory, along with the generated files:
$cd /opt/thrift-0.6.0$sudo cp lib/php/src $DOCUMENT_ROOT/thrift$sudo mkdir $DOCUMENT_ROOT/thrift/packages$sudo cp -r ~/thrift_src/gen-php/Hbase $DOCUMENT_ROOT/thrift/packages/
The generated PHP files are copied into a packages subdirectory, as per the Thrift documentation, which needs to be created if it does not exist yet.
Note
The $DOCUMENT_ROOT in the preceding code could
be /var/www, for example, on a Linux system using
Apache, or /Library/WebServer/Documents/ on an Apple
Mac OS 10.6 machine. Check your web server configuration for the
appropriate location.
HBase ships with a DemoClient.php file that uses the generated files to communicate with the servers. This file is copied into the same document root directory of the web server:
$sudo cp $HBASE_HOME/src/examples/thrift/DemoClient.php $DOCUMENT_ROOT/
You need to edit the DemoClient.php file and adjust the following fields at the beginning of the file:
# Change this to match your thrift root
$GLOBALS['THRIFT_ROOT'] = 'thriftUsually, editing the first line is enough to
set the THRIFT_ROOT path. Since the
DemoClient.php file is also
located in the document root directory, it is sufficient to set the
variable to thrift, that is, the
directory copied from the Thrift sources earlier.
The last line in the preceding excerpt has a hardcoded server name and port. If you set up the example in a distributed environment, you need to adjust this line to match your environment as well.
After everything has been put into place and adjusted appropriately, you can open a browser and point it to the demo page. For example:
http://<webserver-address>/DemoClient.phpThis should load the page and output the following details (abbreviated here for the sake of brevity):
scanning tables...
  found: testtable
creating table: demo_table
column families in demo_table:
  column: entry:, maxVer: 10
  column: unused:, maxVer: 3
Starting scanner...
...
The same client is also available in C++, Java, Perl, Python, and Ruby. Follow the same steps to start the Thrift server, compile the schema definition into the necessary language, and start the client. Depending on the language, you will need to put the generated code into the appropriate location first.
HBase already ships with the generated Java classes to communicate with the Thrift server. You can always regenerate them again from the schema file, but for convenience they are already included.
Avro
Apache Avro, like Thrift, provides schema compilers for many programming languages, including Java, C++, PHP, Python, Ruby, and more. Once you have compiled a schema, you can exchange messages transparently between systems implemented in one or more of those languages.
Installation
Before you can use Avro, you need to install it, which is preferably done using a binary distribution package for your operating system. If that is not an option, you need to compile it from its sources.
Once you have Avro installed, you need to compile a schema into the programming language of your choice. HBase comes with a schema file for its client and administrative API. You need to use the Avro tools to create the wrappers for your development environment.
Before you can access HBase using Avro,
though, you also have to start the supplied AvroServer.
Operation
Starting the Avro server is accomplished by using the supplied
scripts. You can get the command-line help by adding the -h switch, or omitting all options:
$bin/hbase avroUsage: java org.apache.hadoop.hbase.avro.AvroServer --help | [--port=PORT] start Arguments: start Start Avro server stop Stop Avro server Options: port Port to listen on. Default: 9090 help Print this message and exit
You can start the Avro server in nondaemonized mode using the following command:
$bin/hbase avro start^C
You need to press Ctrl-C to quit the process. You need to run the server using a different script to start it as a background process:
$bin/hbase-daemon.sh start avrostarting avro, logging to /var/lib/hbase/logs/hbase-larsgeorge-avro-<servername>.out
Stopping the Avro server, running as a daemon, involves the same
script, just replacing start with
stop:
$bin/hbase-daemon.sh stop avrostopping avro..
The Avro server gives you all the operations required to work with HBase tables.
Note
The current documentation for the Avro server is available online at http://hbase.apache.org/apidocs/org/apache/hadoop/hbase/avro/package-summary.html. Please refer to it for all the provided operations. You are also advised to read the provided $HBASE_HOME/src/main/java/org/apache/hadoop/hbase/avro/hbase.avpr schema definition file for the full documentation of the available functionality.
You can start as many Avro servers as you like, and, for example, use a load balancer to route the traffic between them. Since they are stateless, you can use a round-robin (or similar) approach to distribute the load.
Finally, use the -p, or
--port, parameter to specify a
different port for the server to listen on. The default is 9090.
Other Clients
There are other client libraries that allow you to access an HBase cluster. They can roughly be divided into those that run directly on the Java Virtual Machine, and those that use the gateway servers to communicate with an HBase cluster. Here are some examples:
- JRuby
The HBase Shell is an example of using a JVM-based language to access the Java-based API. It comes with the full source code, so you can use it to add the same features to your own JRuby code.
- HBql
HBql adds an SQL-like syntax on top of HBase, while adding the extensions needed where HBase has unique features. See the project’s website for details.
- HBase-DSL
This project gives you dedicated classes that help when formulating queries against an HBase cluster. Using a builder-like style, you can quickly assemble all the options and parameters necessary. See its wiki online for more information.
- JPA/JPO
You can use, for example, DataNucleus to put a JPA/JPO access layer on top of HBase.
- PyHBase
The PyHBase project (https://github.com/hammer/pyhbase/) offers an HBase client through the Avro gateway server.
- AsyncHBase
AsyncHBase offers a completely asynchronous, nonblocking, and thread-safe client to access HBase clusters. It uses the native RPC protocol to talk directly to the various servers. See the project’s website for details.
Batch Clients
The opposite use case of interactive clients is batch access to data. The difference is that these clients usually run asynchronously in the background, scanning large amounts of data to build, for example, search indexes, machine-learning-based mathematical models, or statistics needed for reporting.
Access is less user-driven, and therefore, SLAs are geared more toward overall runtime, as opposed to per-request latencies. The majority of the batch frameworks reading and writing from and to HBase are MapReduce-based.
MapReduce
The Hadoop MapReduce framework is built to process petabytes of data, in a reliable, deterministic, yet easy-to-program way. There are a variety of ways to include HBase as a source and target for MapReduce jobs.
Native Java
The Java-based MapReduce API for HBase is discussed in Chapter 7.
Clojure
The HBase-Runner project (https://github.com/mudphone/hbase-runner/) offers support for HBase from the functional programming language Clojure. You can write MapReduce jobs in Clojure while accessing HBase tables.
Hive
The Apache Hive project[76] offers a data warehouse infrastructure atop Hadoop. It was initially developed at Facebook, but is now part of the open source Hadoop ecosystem.
Hive offers an SQL-like query language, called HiveQL, which allows you to query the semistructured data stored in Hadoop. The query is eventually turned into a MapReduce job, executed either locally or on a distributed MapReduce cluster. The data is parsed at job execution time and Hive employs a storage handler[77] abstraction layer that allows for data not to just reside in HDFS, but other data sources as well. A storage handler transparently makes arbitrarily stored information available to the HiveQL-based user queries.
Since version 0.6.0, Hive also comes with a handler for HBase.[78] You can define Hive tables that are backed by HBase tables, mapping columns as required. The row key can be exposed as another column when needed.
After you have installed Hive itself, you have to edit its configuration files so that it has access to the HBase JAR file, and the accompanying configuration. Modify $HIVE_HOME/conf/hive-env.sh to contain these lines:
# Set HADOOP_HOME to point to a specific hadoop install directory
HADOOP_HOME=/usr/local/hadoop
HBASE_HOME=/usr/local/hbase

# Hive Configuration Directory can be controlled by:
# export HIVE_CONF_DIR=
export HIVE_CLASSPATH=/etc/hbase/conf

# Folder containing extra libraries required for hive compilation/execution
# can be controlled by:
export HIVE_AUX_JARS_PATH=/usr/local/hbase/hbase-0.91.0-SNAPSHOT.jar
Note
You may have to copy the supplied $HIVE_HOME/conf/hive-env.sh.template file, and save it in the same directory, but without the .template extension. Once you have copied the file, you can edit it as described.
Once Hive is installed and operational, you can start using the new handler. First start the Hive command-line interface, create a native Hive table, and insert data from the supplied example files:
$build/dist/bin/hiveHive history file=/tmp/larsgeorge/hive_job_log_larsgeorge_201105251455_2009910117.txthive>CREATE TABLE pokes (foo INT, bar STRING);OK Time taken: 3.381 secondshive>LOAD DATA LOCAL INPATH '/opt/hive-0.7.0/examples/files/kv1.txt'OVERWRITE INTO TABLE pokes;Copying data from file:/opt/hive-0.7.0/examples/files/kv1.txt Copying file: file:/opt/hive-0.7.0/examples/files/kv1.txt Loading data to table default.pokes Deleted file:/user/hive/warehouse/pokes OK Time taken: 0.266 seconds
This is using the pokes table, as described in the Hive guide at http://wiki.apache.org/hadoop/Hive/GettingStarted. Next
you create an HBase-backed table like so:
hive>CREATE TABLE hbase_table_1(key int, value string)STORED BY 'org.apache.hadoop.hive.hbase.HBaseStorageHandler'WITH SERDEPROPERTIES ("hbase.columns.mapping" = ":key,cf1:val")TBLPROPERTIES ("hbase.table.name" = "hbase_table_1");OK Time taken: 0.144 seconds
This DDL statement maps the HBase table,
defined using the TBLPROPERTIES, and
SERDEPROPERTIES, using the new HBase
handler, to a Hive table named hbase_table_1. The hbase.columns.mapping has a special feature,
which is mapping the column with the name ":key" to the HBase row key. You can place
this special column to perform row key mapping anywhere in your
definition. Here it is placed as the first column, thus mapping the
values in the key column of the Hive
table to be the row key in the HBase table.
The hbase.table.name in the table properties is
optional and only needed when you want to use different names for the
tables in Hive and HBase. Here it is set to the same value, and
therefore could be omitted.
Loading the table from the previously filled
pokes Hive table is done next.
According to the mapping, this will save the pokes.foo values in the row key, and the
pokes.bar in the column cf1:val:
hive>INSERT OVERWRITE TABLE hbase_table_1 SELECT * FROM pokes;Total MapReduce jobs = 1 Launching Job 1 out of 1 Number of reduce tasks is set to 0 since there's no reduce operator Execution log at: /tmp/larsgeorge/larsgeorge_20110525152020_de5f67d1-9411- 446f-99bb-35621e1b259d.log Job running in-process (local Hadoop) 2011-05-25 15:20:31,031 null map = 100%, reduce = 0% Ended Job = job_local_0001 OK Time taken: 3.925 seconds
This starts the first MapReduce job in this example. You can see how the Hive command line prints out the values it is using. The job copies the values from the internal Hive table into the HBase-backed one.
Note
In certain setups, especially in the local, pseudodistributed mode, the Hive job may fail with an obscure error message. Before trying to figure out the details, try running the job in Hive local MapReduce mode. In the Hive CLI enter:
hive>SET mapred.job.tracker=local;
Then execute the job again. This mode was added in Hive 0.7.0, and may not be available to you. If it is, try to use it, since it avoids using the Hadoop MapReduce framework—which means you have one less part to worry about when debugging a failed Hive job.
The following counts the rows in the pokes and hbase_table_1 tables (the CLI output of the
job details are omitted for the second and all subsequent
queries):
hive>select count(*) from pokes;Total MapReduce jobs = 1 Launching Job 1 out of 1 Number of reduce tasks determined at compile time: 1 In order to change the average load for a reducer (in bytes): set hive.exec.reducers.bytes.per.reducer=<number> In order to limit the maximum number of reducers: set hive.exec.reducers.max=<number> In order to set a constant number of reducers: set mapred.reduce.tasks=<number> Execution log at: /tmp/larsgeorge/larsgeorge_20110525152323_418769e6-1716- 48ee-a0ab-dacd59e55da8.log Job running in-process (local Hadoop) 2011-05-25 15:23:07,058 null map = 100%, reduce = 100% Ended Job = job_local_0001 OK 500 Time taken: 3.627 secondshive>select count(*) from hbase_table_1;... OK 309 Time taken: 4.542 seconds
What is interesting to note is the difference
in the actual count for each table. They differ by more than 100 rows,
where the HBase-backed table is the shorter one. What could be the
reason for this? In HBase, you cannot have duplicate row keys, so every
row that was copied over, and which had the same value in the
originating pokes.foo column, is
saved as the same row. This is the same as performing a SELECT DISTINCT on the source table:
hive>select count(distinct foo) from pokes;... OK 309 Time taken: 3.525 seconds
This is now the same outcome and proves that the previous results are correct. Finally, drop both tables, which also removes the underlying HBase table:
hive>drop table pokes;OK Time taken: 0.741 secondshive>drop table hbase_table_1;OK Time taken: 3.132 secondshive>exit;
You can also map an existing HBase table into
Hive, or even map the table into multiple Hive tables. This is useful
when you have very distinct column families, and querying them is done
separately. This will improve the performance of the query
significantly, since it uses a Scan
internally, selecting only the mapped column families. If you have a
sparsely set family, this will only scan the much smaller files on disk,
as opposed to running a job that has to scan everything just to filter
out the sparse data.
Mapping an existing table requires the Hive
EXTERNAL keyword, which is also used
in other places to access data stored in unmanaged
Hive tables, that is, those that are not under Hive’s control:
hive>CREATE EXTERNAL TABLE hbase_table_2(key int, value string)STORED BY 'org.apache.hadoop.hive.hbase.HBaseStorageHandler'WITH SERDEPROPERTIES ("hbase.columns.mapping" = ":key,cf1:val")TBLPROPERTIES("hbase.table.name" = "<existing-table-name>");
External tables are not deleted when the table is dropped within Hive. This simply removes the metadata information about the table.
You have the option to map any HBase column
directly to a Hive column, or you can map an entire column family to a
Hive MAP type. This is useful when
you do not know the column qualifiers ahead of time: map the family and
iterate over the columns from within the Hive query instead.
Since storage handlers work transparently for the higher-level layers in Hive, you can also use any user-defined function (UDF) supplied with Hive—or your own custom functions.
There are a few shortcomings in the current version, though:
- No custom serialization
HBase only stores
byte[]arrays, so Hive is simply converting every column value toString, and serializes it from there. For example, anINTcolumn set to12in Hive would be stored as if usingBytes.toBytes("12").- No version support
There is currently no way to specify any version details when handling HBase tables. Hive always returns the most recent version.
Check with the Hive project site to see if these features have since been added.
Pig
The Apache Pig project[79] provides a platform to analyze large amounts of data. It has its own high-level query language, called Pig Latin, which uses an imperative programming style to formulate the steps involved in transforming the input data to the final output. This is the opposite of Hive’s declarative approach to emulate SQL.
The nature of Pig Latin, in comparison to HiveQL, appeals to everyone with a procedural programming background, but also lends itself to significant parallelization. When it is combined with the power of Hadoop and the MapReduce framework, you can process massive amounts of data in reasonable time frames.
Version 0.7.0 of Pig introduced the LoadFunc/StoreFunc classes and functionality,
which allows you to load and store data from sources other than the
usual HDFS. One of those sources is HBase, implemented in the HBaseStorage
class.
Pigs’ support for HBase includes reading and writing to existing tables. You can map table columns as Pig tuples, which optionally include the row key as the first field for read operations. For writes, the first field is always used as the row key.
The storage also supports basic filtering, working on the row level, and providing the comparison operators explained in Comparison operators.[80]
You can use the supplied tutorial code and data to experiment with Pig and HBase. You do have to create the table in the HBase Shell first to work with it from within Pig:
hbase(main):001:0>create 'excite', 'colfam1'
Starting the Pig Shell, aptly called Grunt,
requires the pig script. For local
testing add the -x local
switch:
$pig -x localgrunt>
Local mode implies that Pig is not using a
separate MapReduce installation, but uses the LocalJobRunner that comes as part of Hadoop.
It runs the resultant MapReduce jobs within the same process. This is
useful for testing and prototyping, but should not be used for larger
data sets.
You have the option to write the script
beforehand in an editor of your choice, and subsequently specify it when
you invoke the pig script. Or you can
use Grunt, the Pig Shell, to enter the Pig Latin statements
interactively. Ultimately, the statements are translated into one or
more MapReduce jobs, but not all statements trigger the execution. Instead, you first define the
steps line by line, and a call to DUMP or STORE will eventually set the job in
motion.
Note
The Pig Latin functions are case-insensitive, though commonly they are written in uppercase. Names and fields you define are case-sensitive, and so are the Pig Latin functions.
The Pig tutorial comes with a small data set that was published by Excite, and contains an anonymous user ID, a timestamp, and the search terms used on its site. The first step is to load the data into HBase using a slight transformation to generate a compound key. This is needed to enforce uniqueness for each entry:
grunt>raw = LOAD 'tutorial/data/excite-small.log'USING PigStorage(' ') AS (user, time, query);T = FOREACH raw GENERATE CONCAT(CONCAT(user, 'u0000'), time), query;grunt>STORE T INTO 'excite' USINGorg.apache.pig.backend.hadoop.hbase.HBaseStorage('colfam1:query'),... 2011-05-27 22:55:29,717 [main] INFO org.apache.pig.backend.hadoop. executionengine.mapReduceLayer.MapReduceLauncher - 100% complete 2011-05-27 22:55:29,717 [main] INFO org.apache.pig.tools.pigstats.PigStats - Detected Local mode. Stats reported below may be incomplete 2011-05-27 22:55:29,718 [main] INFO org.apache.pig.tools.pigstats.PigStats - Script Statistics: HadoopVersion PigVersion UserId StartedAt FinishedAt Features 0.20.2 0.8.1 larsgeorge 2011-05-27 22:55:22 2011-05-27 22:55:29 UNKNOWN Success! Job Stats (time in seconds): JobId Alias Feature Outputs job_local_0002 T,raw MAP_ONLY excite, Input(s): Successfully read records from: "file:///opt/pig-0.8.1/tutorial/data/excite-small.log" Output(s): Successfully stored records in: "excite" Job DAG: job_local_0002
Note
You can use the DEFINE statement to abbreviate the long Java
package reference for the HBaseStorage class. For example:
grunt>DEFINE LoadHBaseUser org.apache.pig.backend.hadoop.hbase.HBaseStorage( 'data:roles', '-loadKey'),grunt>U = LOAD 'user' USING LoadHBaseUser;grunt>DUMP U; ...
This is useful if you are going to reuse the specific load or store function.
The STORE
statement started a MapReduce job that read the data from the given
logfile and copied it into the HBase table. The statement in between is
changing the relation to generate a compound row
key—which is the first field specified in the STORE statement afterward—which is the
user and time fields, separated by a zero byte.
Accessing the data involves another LOAD statement, this time using the HBaseStorage class:
grunt>R = LOAD 'excite' USINGorg.apache.pig.backend.hadoop.hbase.HBaseStorage('colfam1:query', '-loadKey')AS (key: chararray, query: chararray);
The parameters in the brackets define the
column to field mapping, as well as the extra option to load the row key
as the first field in relation R. The
AS part explicitly defines that the
row key and the colfam1:query column
are converted to chararray, which is
Pig’s string type. By default, they are returned as bytearray, matching the way they are stored in
the HBase table. Converting the data type allows you, for example, to
subsequently split the row key.
You can test the statements entered so far by
dumping the content of R, which is
the result of the previous statement.
grunt>DUMP R;... Success! ... (002BB5A52580A8ED970916150445,margaret laurence the stone angel) (002BB5A52580A8ED970916150505,margaret laurence the stone angel) ...
The row key, placed as the first field in the tuple, is the concatenated representation created during the initial copying of the data from the file into HBase. It can now be split back into two fields so that the original layout of the text file is re-created:
grunt>S = foreach R generate FLATTEN(STRSPLIT(key, 'u0000', 2)) AS(user: chararray, time: long), query;grunt>DESCRIBE S;S: {user: chararray,time: long,query: chararray}
Using DUMP
once more, this time using relation S, shows the final result:
grunt>DUMP S;(002BB5A52580A8ED,970916150445,margaret laurence the stone angel) (002BB5A52580A8ED,970916150505,margaret laurence the stone angel) ...
With this in place, you can proceed to the
remainder of the Pig tutorial, while replacing the LOAD and STORE statements with the preceding code.
Concluding this example, type in QUIT
to finally exit the Grunt shell:
grunt>QUIT;$
Pig’s support for HBase has a few shortcomings in the current version, though:
- No version support
There is currently no way to specify any version details when handling HBase cells. Pig always returns the most recent version.
- Fixed column mapping
The row key must be the first field and cannot be placed anywhere else. This can be overcome, though, with a subsequent
FOREACH...GENERATEstatement, reordering the relation layout.
Check with the Pig project site to see if these features have since been added.
Cascading
Cascading is an alternative API to MapReduce. Under the covers, it uses MapReduce during execution, but during development, users don’t have to think in MapReduce to create solutions for execution on Hadoop.
The model used is similar to a real-world pipe assembly, where data sources are taps, and outputs are sinks. These are piped together to form the processing flow, where data passes through the pipe and is transformed in the process. Pipes can be connected to larger pipe assemblies to form more complex processing pipelines from existing pipes.
Data then streams through the pipeline and can be split, merged, grouped, or joined. The data is represented as tuples, forming a tuple stream through the assembly. This very visually oriented model makes building MapReduce jobs more like construction work, while abstracting the complexity of the actual work involved.
Cascading (as of version 1.0.1) has support for reading and writing data to and from an HBase cluster. Detailed information and access to the source code can be found on the Cascading Modules page (http://www.cascading.org/modules.html).
Example 6-2 shows how to sink data into an HBase cluster. See the GitHub repository, linked from the modules page, for more up-to-date API information.
// read data from the default filesystem
// emits two fields: "offset" and "line"
Tap source = new Hfs(new TextLine(), inputFileLhs);

// store data in an HBase cluster, accepts fields "num", "lower", and "upper"
// will automatically scope incoming fields to their proper familyname,
// "left" or "right"
Fields keyFields = new Fields("num");
String[] familyNames = {"left", "right"};
Fields[] valueFields = new Fields[] {new Fields("lower"),
  new Fields("upper") };
Tap hBaseTap = new HBaseTap("multitable", new HBaseScheme(keyFields,
  familyNames, valueFields), SinkMode.REPLACE);

// a simple pipe assembly to parse the input into fields
// a real app would likely chain multiple Pipes together for more complex
// processing
Pipe parsePipe = new Each("insert", new Fields("line"),
  new RegexSplitter(new Fields("num", "lower", "upper"), " "));

// "plan" a cluster executable Flow
// this connects the source Tap and hBaseTap (the sink Tap) to the parsePipe
Flow parseFlow = new FlowConnector(properties).connect(source, hBaseTap,
  parsePipe);

// start the flow, and block until complete
parseFlow.complete();

// open an iterator on the HBase table we stuffed data into
TupleEntryIterator iterator = parseFlow.openSink();

while(iterator.hasNext()) {
  // print out each tuple from HBase
  System.out.println( "iterator.next() = " + iterator.next() );
}

iterator.close();
Cascading to Hive and Pig offers a Java API, as opposed to the domain-specific languages (DSLs) provided by the others. There are add-on projects that provide DSLs on top of Cascading.
Shell
The HBase Shell is the command-line interface to your HBase cluster(s). You can use it to connect to local or remote servers and interact with them. The shell provides both client and administrative operations, mirroring the APIs discussed in the earlier chapters of this book.
Basics
The first step to experience the shell is to start it:
$$HBASE_HOME/bin/hbase shellHBase Shell; enter 'help<RETURN>' for list of supported commands. Type "exit<RETURN>" to leave the HBase Shell Version 0.91.0-SNAPSHOT, r1130916, Sat Jul 23 12:44:34 CEST 2011 hbase(main):001:0>
The shell is based on JRuby, the Java Virtual Machine-based implementation of Ruby.[82] More specifically, it uses the Interactive Ruby Shell (IRB), which is used to enter Ruby commands and get an immediate response. HBase ships with Ruby scripts that extend the IRB with specific commands, related to the Java-based APIs. It inherits the built-in support for command history and completion, as well as all Ruby commands.
Note
There is no need to install Ruby on your machines, as HBase ships with the required JAR files to execute the JRuby shell. You use the supplied script to start the shell on top of Java, which is already a necessary requirement.
Once started, you can type in help,
and then press Return, to get the help text (abbreviated in the
following code sample):
hbase(main):001:0> help
HBase Shell, version 0.91.0-SNAPSHOT, r1130916, Sat Jul 23 12:44:34 CEST 2011
Type 'help "COMMAND"', (e.g. 'help "get"' -- the quotes are necessary) for
help on a specific command. Commands are grouped. Type 'help "COMMAND_GROUP"',
(e.g. 'help "general"') for help on a command group.

COMMAND GROUPS:
  Group name: general
  Commands: status, version

  Group name: ddl
  Commands: alter, create, describe, disable, drop, enable, exists,
            is_disabled, is_enabled, list

...

SHELL USAGE:
Quote all names in HBase Shell such as table and column names.  Commas delimit
command parameters.  Type <RETURN> after entering a command to run it.
Dictionaries of configuration used in the creation and alteration of tables are
Ruby Hashes. They look like this:
...
As stated, you can request help for a specific command by adding the command when invoking help, or print out the help of all commands for a specific group when using the group name with the help command. The command or group name has the enclosed in quotes.
You can leave the shell by entering exit, or quit:
hbase(main):002:0>exit$
The shell also has specific command-line options, which you
can see when adding the -h, or --help, switch to the command:
$$HBASE_HOME/bin.hbase shell -hHBase Shell command-line options: format Formatter for outputting results: console | html. Default: console -d | --debug Set DEBUG log levels.
There is an option to switch the formatting being used by the
shell. As of this writing, only console is available, though.
The shell start script automatically uses the configuration
directory located in the same $HBASE_HOME directory. You can override the
location to use other settings, but most importantly to connect to
different clusters. Set up a separate directory that contains an
hbase-site.xml file, with
an hbase.zookeeper.quorum
property pointing to another cluster, and start the shell like
so:
$HBASE_CONF_DIR="/<your-other-config-dir>/" bin/hbase shell
Note that you have to specify an entire directory, not just the hbase-site.xml file.
Commands
The commands are grouped into five different categories, representing their semantic relationships. When entering commands, you have to follow a few guidelines:
- Quote names
Commands that require a table or column name expect the name to be quoted in either single or double quotes.
- Quote values
The shell supports the output and input of binary values using a hexadecimal—or octal—representation. You must use double quotes or the shell will interpret them as literals.
hbase> get 't1', "keyx00x6cx65x6fx6e" hbase> get 't1', "key�00154141165162141" hbase> put 't1', "testxefxff", 'f1:', "x01x33x70"
Note the mixture of quotes: you need to make sure you use the correct ones, or the result might not be what you had expected. Text in single quotes is treated as a literal, whereas double-quoted text is interpolated, that is, it transforms the octal, or hexadecimal, values into bytes.
- Comma delimiters for parameters
Separate command parameters using commas. For example:
hbase(main):001:0>get 'testtable', 'row-1','colfam1:qual1'- Ruby hashes for properties
For some commands, you need to hand in a map with key/value properties. This is done using Ruby hashes:
{'key1' => 'value1', 'key2' => 'value2', ...}The keys/values are wrapped in curly braces, and in turn are separated by
"=>". Usually keys are predefined constants such asNAME,VERSIONS, orCOMPRESSION, and do not need to be quoted. For example:hbase(main):001:0>create 'testtable', {NAME =>'colfam1', VERSIONS => 1,TTL => 2592000, BLOCKCACHE => true}
For any command, you can get detailed help by typing in
help '.
Here’s an example:<command>'
hbase(main):001:0>help 'status'Show cluster status. Can be 'summary', 'simple', or 'detailed'. The default is 'summary'. Examples: hbase> status hbase> status 'simple' hbase> status 'summary' hbase> status 'detailed'
The majority of commands have a direct match with a method provided by either the client or administrative API. Next is a brief overview of each command and the matching API functionality.
General
The general commands are listed in Table 6-1. They allow you to retrieve details about
the status of the cluster itself, and the version of HBase it is
running. See the ClusterStatus
class in Cluster Status Information for details.
| Command | Description |
| status | Returns various levels of information contained in the
ClusterStatus class. See
the help to get the
simple,
summary, and
detailed status information. |
| version | Returns the current version, repository revision, and
compilation date of your HBase cluster. See ClusterStatus.getHBaseVersion() in
Table 5-4. |
Data definition
The data definition commands are listed in Table 6-2. Most of them stem from the administrative API, as described in Chapter 5.
| Command | Description |
alter | Modifies an existing table schema using modifyTable(). See Schema Operations
for details. |
create | Creates a new table. See the createTable() call in Table Operations for details. |
describe | Prints the HTableDescriptor. See Tables for details. |
disable | Disables a table. See and the disableTable() method. |
drop | Drops a table. See the deleteTable() method in . |
enable | Enables a table. See the enableTable() call in for
details. |
exists | Checks if a table exists. It uses the tableExists() call; see . |
is_disabled | Checks if a table is disabled. See the isTableDisabled() method in . |
is_enabled | Checks if a table is enabled. See the isTableEnabled() method in . |
list | Returns a list of all user tables. Uses the listTables() method, described in . |
Data manipulation
The data manipulation commands are listed in Table 6-3. Most of them are provided by the client API, as described in Chapters 3 and 4.
| Command | Description |
count | Counts the rows in a table. Uses a Scan internally, as described in
Scans. |
delete | Deletes a cell. See Delete Method and the Delete class. |
deleteall | Similar to delete
but does not require a column. Deletes an entire family or
row. See and the Delete class. |
get | Retrieves a cell. See the Get class in Get Method. |
get_counter | Retrieves a counter value. Same as the get command but converts the raw
counter value into a readable number. See the Get class in . |
incr | Increments a counter. Uses the Increment class; see Counters for details. |
put | Stores a cell. Uses the Put class, as described in Put Method. |
scan | Scans a range of rows. Relies on the Scan class. See Scans for details. |
truncate | Truncates a table, which is the same as executing the
disable and drop
commands, followed by a create, using the
same schema. |
Tools
The tools commands are listed in Table 6-4. These commands are provided by the administrative API; see Cluster Operations for details.
| Command | Description |
assign | Assigns a region to a server. See Cluster Operations and the assign() method. |
balance_switch | Toggles the balancer switch. See and
the balanceSwitch() method. |
balancer | Starts the balancer. See and
the balancer()
method. |
close_region | Closes a region. Uses the closeRegion() method, as described
in . |
compact | Starts the asynchronous compaction of a region or
table. Uses compact(), as
described in . |
flush | Starts the asynchronous flush of a region or table.
Uses flush(), as described
in . |
major_compact | Starts the asynchronous major compaction of a region
or table. Uses majorCompact(), as described in
. |
move | Moves a region to a different server. See the
move() call, and for
details. |
split | Splits a region or table. See the split() call, and for
details. |
unassign | Unassigns a region. See the unassign() call, and for details. |
zk_dump | Dumps the ZooKeeper details pertaining to HBase. This is a special function offered by an internal class. The web-based UI of the HBase Master exposes the same information. |
Replication
The replication commands are listed in Table 6-5.
Scripting
Inside the shell, you can execute the provided commands interactively, getting immediate feedback. Sometimes, though, you just want to send one command, and possibly script this call from the scheduled maintenance system (e.g., cron or at). Or you want to send a command in response to a check run in Nagios, or another monitoring tool. You can do this by piping the command into the shell:
$echo "status" | bin/hbase shellHBase Shell; enter 'help<RETURN>' for list of supported commands. Type "exit<RETURN>" to leave the HBase Shell Version 0.91.0-SNAPSHOT, r1130916, Sat Jul 23 12:44:34 CEST 2011 status 1 servers, 0 dead, 44.0000 average load
Once the command is complete, the shell is closed and control is given back to the caller. Finally, you can hand in an entire script to be executed by the shell at startup:
$cat ~/hbase-shell-status.rbstatus$bin/hbase shell ~/hbase-shell-status.rb1 servers, 0 dead, 44.0000 average load HBase Shell; enter 'help<RETURN>' for list of supported commands. Type "exit<RETURN>" to leave the HBase Shell Version 0.91.0-SNAPSHOT, r1130916, Sat Jul 23 12:44:34 CEST 2011hbase(main):001:0>exit
Once the script has completed, you can continue to work in the shell or exit it as usual. There is also an option to execute a script using the raw JRuby interpreter, which involves running it directly as a Java application. Using the hbase script sets up the classpath to be able to use any Java class necessary. The following example simply retrieves the list of tables from the remote cluster:
$cat ~/hbase-shell-status-2.rbinclude Java import org.apache.hadoop.hbase.HBaseConfiguration import org.apache.hadoop.hbase.client.HBaseAdmin conf = HBaseConfiguration.new admin = HBaseAdmin.new(conf) tables = admin.listTables tables.each { |table| puts table.getNameAsString() }$bin/hbase org.jruby.Main ~/hbase-shell-status-2.rbtesttable
Since the shell is based on JRuby’s IRB, you can use its built-in features, such as command completion and history. Enabling them is a matter of creating an .irbrc in your home directory, which is read when the shell starts:
$cat ~/.irbrcrequire 'irb/ext/save-history' IRB.conf[:SAVE_HISTORY] = 100 IRB.conf[:HISTORY_FILE] = "#{ENV['HOME']}/.irb-save-history"
This enables the command history to save across shell starts. The command completion is already enabled by the HBase scripts.
Another advantage of the interactive
interpreter is that you can use the HBase classes and functions to
perform, for example, something that would otherwise require you to
write a Java application. Here is an example of binary output received
from a Bytes.toBytes() call that is
converted into an integer value:
hbase(main):001:0>org.apache.hadoop.hbase.util.Bytes.toInt("x00x01x06[".to_java_bytes)=> 67163
Note
Note how the shell encoded the first three
unprintable characters as hexadecimal values, while the fourth, the
"[", was printed as a
character.
Another example is to convert a date into a Linux epoch number, and back into a human-readable date:
hbase(main):002:0>java.text.SimpleDateFormat.new("yyyy/MM/dd HH:mm:ss").parse("2011/05/30 20:56:29").getTime()=> 1306781789000hbase(main):002:0>java.util.Date.new(1306781789000).toString()=> "Mon May 30 20:56:29 CEST 2011"
Finally, you can also add many cells in a loop—for example, to populate a table with test data:
hbase(main):003:0>for i in 'a'..'z' do for j in'a'..'z' do put 'testtable',"row-#{i}#{j}", "colfam1:#{j}", "#{j}" end end
A more elaborate loop to populate counters could look like this:
hbase(main):004:0>require 'date';import java.lang.Longimport org.apache.hadoop.hbase.util.Bytes(Date.new(2011, 01, 01)..Date.today).each { |x| put "testtable", "daily","colfam1:" + x.strftime("%Y%m%d"), Bytes.toBytes(Long.new(rand *4000).longValue).to_a.pack("CCCCCCCC") }
Obviously, this is getting very much into Ruby itself. But even with a little bit of programming skills in another language, you might be able to use the features of the IRB-based shell to your advantage. Start easy and progress from there.
Web-based UI
The HBase processes expose a web-based user interface (UI), which you can use to gain insight into the cluster’s state, as well as the tables it hosts. The majority of the functionality is read-only, but a few selected operations can be triggered through the UI.
Master UI
HBase also starts a web-based listing of vital attributes. By
default, it is deployed on the master host at port 60010, while region servers use 60030. If the master
is running on a host named master.foo.com on the default port, to see the
master’s home page, you can point your browser at http://master.foo.com:60010.
Note
The ports used by the servers can be set in the hbase-site.xml configuration file. The properties to change are:
hbase.master.info.port
hbase.regionserver.info.port
Main page
The first page you will see when opening the master’s web UI is shown in Figure 6-2. It consists of multiple sections that give you insight into the cluster status itself, the tables it serves, what the region servers are, and so on.
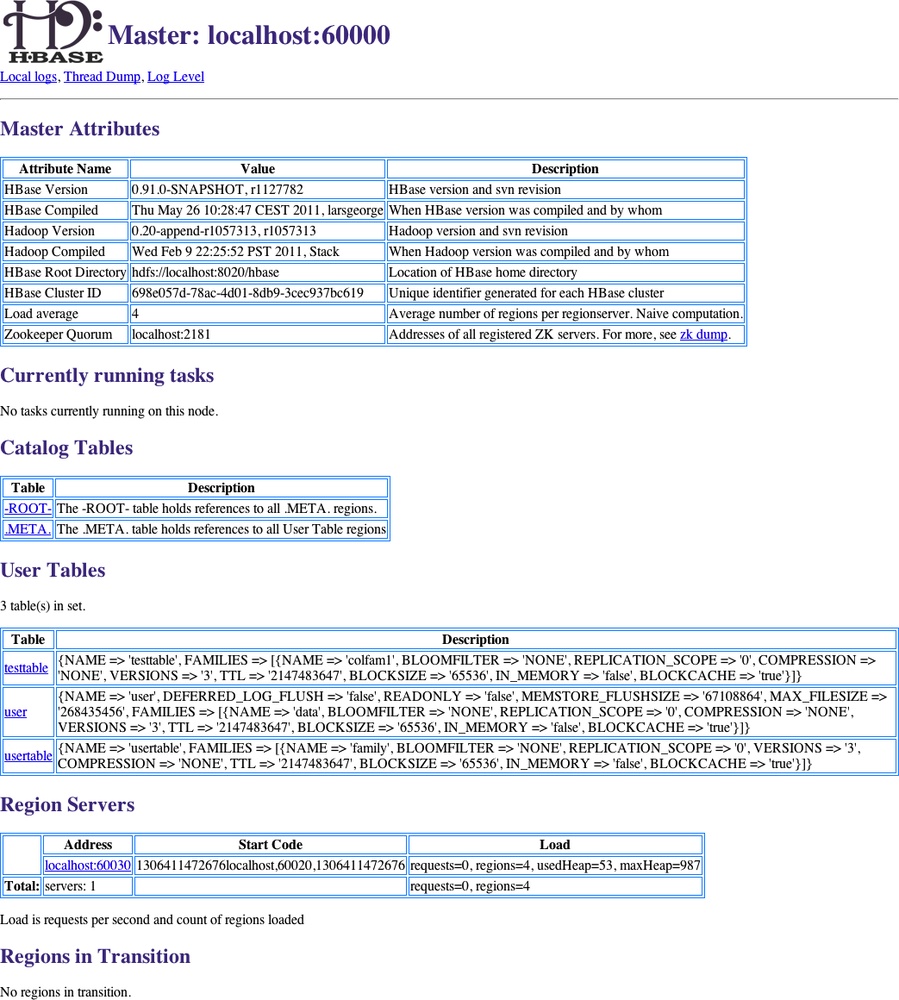
The details can be broken up into the following groups:
- Master attributes
You will find cluster-wide details in a table at the top of the page. It has information on the version of HBase and Hadoop that you are using, where the root directory is located,[83] the overall load average, and the ZooKeeper quorum used.
There is also a link in the description for the ZooKeeper quorum allowing you to see the information for your current HBase cluster stored in ZooKeeper. ZooKeeper page discusses its content.
- Running tasks
The next group of details on the master’s main page is the list of currently running tasks. Every internal operation performed by the master is listed here while it is running, and for another minute after its completion. Entries with a white background are currently running, a green background indicates successful completion of the task, and a yellow background means the task was aborted. The latter can happen when an operation failed due to an inconsistent state. Figure 6-3 shows a completed, a running, and a failed task.
- Catalog tables
This section list the two catalog tables,
.META.and-ROOT-. You can click on the name of the table to see more details on the table regions—for example, on what server they are currently hosted.- User tables
Here you will see the list of all tables known to your HBase cluster. These are the ones you—or your users—have created using the API, or the HBase Shell. The description column in the list gives you a printout of the current table descriptor, including all column descriptors; see Schema Definition for an explanation of how to read them.
The table names are links to another page with details on the selected table. See User Table page for an explanation of the contained information.
- Region servers
The next section lists the actual region servers the master knows about. The table lists the address, which you can click on to see more details. It also states the server start code, a timestamp representing an ID for each server, and finally, the load of the server. For information on the values listed refer to Cluster Status Information, and especially the
HServerLoadclass.- Regions in transition
As regions are managed by the master and region servers to, for example, balance the load across servers, they go through short phases of transition. This applies to opening, closing, and splitting a region. Before the operation is performed, the region is added to the list, and once the operation is complete, it is removed. The Region Life Cycle describes the possible states a region can be in. Figure 6-4 shows a region that is currently split.


User Table page
When you click on the name of a user table in the master’s web-based user interface, you have access to the information pertaining to the selected table. Figure 6-5 shows an abbreviated version of a User Table page (it has a shortened list of regions for the sake of space).

The following groups of information are available in the User Table page:
- Table attributes
Here you can find details about the table itself. As of this writing, this section only lists the table status (i.e., it indicates if it is enabled or not). See Table Operations, and the
disableTable()call especially.The boolean value states whether the table is enabled, so when you see a
truein the Value column, this is the case. On the other hand, a value offalsewould mean the table is currently disabled.- Table regions
This list can be rather large and shows all regions of a table. The Name column has the region name itself, and the Region Server column has a link to the server hosting the region. Clicking on the link takes you to the page explained in Region Server UI.
Sometimes you may see the words not deployed where the server name should be. This happens when a user table region is not currently served by any region server. Figure 6-6 shows an example of this situation.
The Start Key and End Key columns show the region’s start and end keys as expected. Finally, the Requests column shows the total number of requests, including all read (e.g., get or scan) and write (e.g., put or delete) operations, since the region was deployed to the server.
- Regions by region server
The last group on the User Table page lists which region server is hosting how many regions of the selected table. This number is usually distributed evenly across all available servers. If not, you can use the HBase Shell or administrative API to initiate the balancer, or use the
movecommand to manually balance the table regions (see Cluster Operations).

The User Table page also offers a form that can be used to trigger administrative operations on a specific region, or the entire table. See again for details, and Optimizing Splits and Compactions for information on when you want to use them. The available operations are:
- Compact
This triggers the
compactfunctionality, which is asynchronously running in the background. Specify the optional name of a region to run the operation more selectively. The name of the region can be taken from the table above, that is, the entries in the Name column of the Table Regions table.If you do not specify a region name, the operation is performed on all regions of the table instead.
- Split
Similar to the compact action, the split form action triggers the
splitcommand, operating on a table or region scope. Not all regions may be splittable—for example, those that contain no, or very few, cells, or one that has already been split, but which has not been compacted to complete the process.
Once you trigger one of the operations, you will receive a confirmation page; for example, for a split invocation, you will see:
Split request accepted.

Reload.
Use the Back button of your web browser to go back to the previous page, showing the user table details.
ZooKeeper page
There is also a link in the description column that lets you dump the content of all the nodes stored in ZooKeeper by HBase. This is useful when trying to solve problems with the cluster setup (see Troubleshooting).
The page shows the same information as
invoking the zk_dump command of the
HBase Shell. It shows you the root directory HBase is using inside the
configured filesystem. You also can see the currently assigned master,
which region server is hosting the -ROOT- catalog table, the list of
region servers that have registered with the master, as well as
ZooKeeper internal details. Figure 6-7 shows an
exemplary output available on the ZooKeeper page.

Region Server UI
The region servers have their own web-based UI, which you usually access through the master UI, by clicking on the server name links provided. You can access the page directly by entering
http://<region-server-address>:60030into your browser (while making sure to use
the configured port, here using the default of 60030).
Main page
The main page of the region servers has details about the server, the tasks, and regions it is hosting. Figure 6-8 shows an abbreviated example of this page (the list of tasks and regions is shortened for the sake of space).

The page can be broken up into the following groups of distinct information:
- Region server attributes
This group of information contains the version of HBase you are running, when it was compiled, a printout of the server metrics, and the ZooKeeper quorum used. The metrics are explained in Region Server Metrics.
- Running tasks
The table lists all currently running tasks, using a white background for running tasks, a yellow one for failed tasks, and a green one for completed tasks. Failed or completed tasks are removed after one minute.
- Online regions
Here you can see all the regions hosted by the currently selected region server. The table has the region name, the start and end keys, as well as the region metrics.
Shared Pages
On the top of the master, region server, and table pages there are also a few generic links that lead to subsequent pages, displaying or controlling additional details of your setup:
- Local logs
This link provides a quick way to access the logfiles without requiring access to the server itself. It firsts list the contents of the log directory where you can select the logfile you want to see. Click on a log to reveal its content. Analyzing the Logs helps you to make sense of what you may see. Figure 6-9 shows an example page.
- Thread dumps
For debugging purposes, you can use this link to dump the Java stacktraces of the running HBase processes. You can find more details in Troubleshooting. Figure 6-10 shows example output.
- Log level
This link leads you to a small form that allows you to retrieve and set the logging levels used by the HBase processes. More on this is provided in Changing Logging Levels. Figure 6-11 shows the form when it is loaded afresh.
When you enter, for example,
org.apache.hadoop.hbaseinto the first input field, and click on the Get Log Level button, you should see a result similar to that shown in Figure 6-12.

The web-based UI provided by the HBase servers is a good way to quickly gain insight into the cluster, the hosted tables, the status of regions and tables, and so on. The majority of the information can also be accessed using the HBase Shell, but that requires console access to the cluster.
You can use the UI to trigger selected administrative operations; therefore, it might not be advisable to give everyone access to it: similar to the shell, the UI should be used by the operators and administrators of the cluster.
If you want your users to create, delete, and display their own tables, you will need an additional layer on top of HBase, possibly using Thrift or REST as the gateway server, to offer this functionality to end users.


[68] See “Architectural Styles and the Design of Network-based Software Architectures” (http://www.ics.uci.edu/~fielding/pubs/dissertation/top.htm) by Roy T. Fielding, 2000.
[69] See the official SOAP specification online (http://www.w3.org/TR/soap/). SOAP—or Simple Object Access Protocol—also uses HTTP as the underlying transport protocol, but exposes a different API for every service.
[70] See the official Protocol Buffer project website.
[71] See the Thrift project website.
[72] See the Apache Avro project website.
[73] curl is a command-line tool for transferring data with URL syntax, supporting a large variety of protocols. See the project’s website for details.
[74] The basic idea is to encode any unsafe or unprintable character code as “%” + ASCII Code. Because it uses the percent sign as the prefix, it is also called percent encoding. See the Wikipedia page on percent encoding for details.
[81] The full details can be found on the Pig setup page.
[82] Visit the Ruby website (http://www.ruby-lang.org/) for details.
[83] Recall that this should better not be starting with /tmp, or you may lose your data during a machine restart. Refer to Quick-Start Guide for details.