
Chapter 7. MapReduce Integration
One of the great features of HBase is its tight integration with Hadoop’s MapReduce framework. Here you will see how this can be leveraged and how unique traits of HBase can be used advantageously in the process.
Framework
Before going into the application of HBase with MapReduce, we will first have a look at the building blocks.
MapReduce Introduction
MapReduce as a process was designed to solve the problem of processing in excess of terabytes of data in a scalable way. There should be a way to build such a system that increases in performance linearly with the number of physical machines added. That is what MapReduce strives to do. It follows a divide-and-conquer approach by splitting the data located on a distributed filesystem so that the servers (or rather CPUs, or more modern “cores”) available can access these chunks of data and process them as fast as they can. The problem with this approach is that you will have to consolidate the data at the end. Again, MapReduce has this built right into it. Figure 7-1 gives a high-level overview of the process.

This (rather simplified) figure of the
MapReduce process shows you how the data is processed. The first thing that happens is the
split, which is responsible for dividing the input
data into reasonably sized chunks that are then processed by one server
at a time. This splitting has to be done in a somewhat smart way to make
best use of available servers and the infrastructure in general. In this
example, the data may be a very large logfile that is divided into
pieces of equal size. This is good, for example, for Apache logfiles.
Input data may also be binary, though, in which case you may have to
write your own getSplits() method—but
more on that shortly.
Classes
Figure 7-1 also shows you the classes that are involved in the Hadoop implementation of MapReduce. Let us look at them and also at the specific implementations that HBase provides on top of them.
Note
Hadoop version 0.20.0 introduced a new MapReduce API. Its
classes are located in the package named mapreduce, while the existing classes for
the previous API are located in mapred. The older
API was deprecated and should have been dropped in version 0.21.0—but
that did not happen. In fact, the old API was undeprecated since the
adoption of the new one was hindered by its incompleteness.
HBase also has these two packages, which only differ slightly. The new API has more support by the community, and writing jobs against it is not impacted by the Hadoop changes. This chapter will only refer to the new API.
InputFormat
The first class to deal with is the InputFormat class (Figure 7-2). It is responsible for two things. First it
splits the input data, and then it returns a RecordReader
instance that defines the classes of the key and
value objects, and provides a next() method that is used to iterate over
each input record.

As far as HBase is concerned, there is a special
implementation called TableInputFormatBase whose
subclass is TableInputFormat. The
former implements the majority of the functionality but remains
abstract. The subclass is a lightweight concrete version of
TableInputFormat and is used by many supplied
samples and real MapReduce classes.
These classes implement the full turnkey
solution to scan an HBase table. You have to provide a Scan instance that you can prepare in any
way you want: specify start and
stop keys, add filters, specify the number of versions, and
so on. The TableInputFormat splits the table
into proper blocks for you and hands them over to the subsequent
classes in the MapReduce process. See Table Splits for details on how the table is
split.
Mapper
The Mapper class(es) is
for the next stage of the MapReduce process and one of its namesakes
(Figure 7-3). In this step, each record read
using the RecordReader is processed
using the map() method. Figure 7-1 also shows that the
Mapper reads a specific type of key/value pair, but
emits possibly another type. This is handy for converting the raw data
into something more useful for further processing.
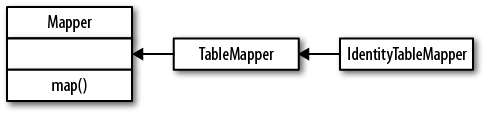
HBase provides the TableMapper class that enforces
key class 1 to be an ImmutableBytesWritable, and value
class 1 to be a Result
type—since that is what the TableRecordReader is returning.
One specific implementation of the TableMapper is the IdentityTableMapper, which is also a good
example of how to add your own functionality to the supplied classes.
The TableMapper class itself does
not implement anything but only adds the signatures of the actual
key/value pair classes. The IdentityTableMapper is simply passing on the
keys/values to the next stage of processing.
Reducer
The Reducer stage and
class hierarchy (Figure 7-4) is very similar to
the Mapper stage. This time we get the output of a
Mapper class and process it after
the data has been shuffled and
sorted.
In the implicit shuffle between the
Mapper and Reducer stages, the intermediate data is
copied from different Map servers to the Reduce servers and the sort
combines the shuffled (copied) data so that the Reducer sees the intermediate data as a
nicely sorted set where each unique key is now associated with all of
the possible values it was found with.

OutputFormat
The final stage is the OutputFormat class (Figure 7-5), and its job is to persist the data in
various locations. There are specific implementations that allow
output to files, or to HBase tables in the case of the TableOutputFormat class. It uses a TableRecordWriter to
write the data into the specific HBase output table.

It is important to note the cardinality as
well. Although many Mappers are handing records to
many Reducers, only one OutputFormat takes each output record from
its Reducer subsequently. It is the
final class that handles the key/value pairs and writes them to their
final destination, this being a file or a table.
The TableOutputCommitter
class is required for the Hadoop classes to do their job. For HBase
integration, this class is not needed. In fact, it is a dummy and does
not do anything. Other implementations of OutputFormat do require it.
The name of the output table is specified
when the job is created. Otherwise, the TableOutputFormat does not add much more
complexity. One rather significant thing it does do is to set the
table’s autoflush to false and handle the buffer flushing
implicitly. This helps a lot in terms of speeding up the import of
large data sets. Also see Client API: Best Practices for
information on how to optimize your scan performance.
Supporting Classes
The MapReduce support comes with the TableMapReduceUtil class that helps in setting
up MapReduce jobs over HBase. It has static methods that configure a job
so that you can run it with HBase as the source and/or the target.
MapReduce Locality
One of the more ambiguous things in Hadoop is block replication: it happens automatically and you should not have to worry about it. HBase relies on it to provide durability as it stores its files into the distributed filesystem. Although block replication works completely transparently, users sometimes ask how it affects performance.
This question usually arises when the user starts writing MapReduce jobs against either HBase or Hadoop directly. Especially when larger amounts of data are being stored in HBase, how does the system take care of placing the data close to where it is needed? This concept is referred to as data locality, and in the case of HBase using the Hadoop filesystem (HDFS), users may have doubts as to whether it is working.
First let us see how Hadoop handles this: the MapReduce documentation states that tasks run close to the data they process. This is achieved by breaking up large files in HDFS into smaller chunks, or blocks, with a default setting of 64 MB (128 MB and larger is very common in practice).
Each block is assigned to a map task to process the contained data. This means larger block sizes equal fewer map tasks to run as the number of mappers is driven by the number of blocks that need processing. Hadoop knows where blocks are located, and runs the map tasks directly on the node that hosts the block. Since block replication ensures that we have (by default) three copies on three different physical servers, the framework has the choice of executing the code on any of those three, which it uses to balance workloads. This is how it guarantees data locality during the MapReduce process.
Back to HBase. Once you understand that Hadoop
can process data locally, you may start to question how this may work
with HBase. As discussed in Storage, HBase transparently stores files in
HDFS. It does so for the actual data files (HFile) as well as the log
(WAL). And if you look into the code, it uses the Hadoop API call
FileSystem.create(Path path) to
create these files.
Note
If you do not co-share your cluster with Hadoop and HBase, but instead employ a separate Hadoop as well as a standalone HBase cluster, there is no data locality—there can’t be. This is the same as running a separate MapReduce cluster that would not be able to execute tasks directly on the data node. It is imperative for data locality to have the Hadoop and HBase processes running on the same cluster—end of line.
How does Hadoop figure out where data is located as HBase accesses it? The most important factor is that HBase servers are not restarted frequently and that they perform housekeeping on a regular basis. These so-called compactions rewrite files as new data is added over time. All files in HDFS, once written, are immutable (for all sorts of reasons). Because of that, data is written into new files, and as their number grows, HBase compacts them into another set of new, consolidated files.
And here is the kicker: HDFS is smart enough to put the data where it is needed! It has a block placement policy in place that enforces all blocks to be written first on a collocated server. The receiving data node compares the server name of the writer with its own, and if they match, the block is written to the local filesystem. Then a replica is sent to a server within the same rack, and another to a remote rack—assuming you are using rack awareness in HDFS. If not, the additional copies get placed on the least loaded data node in the cluster.
If you have configured a higher replication factor, more replicas are stored on distinct machines. The important factor here, though, is that you now have a local copy of the block available. For HBase, this means that if the region server stays up for long enough (which is what you want), after a major compaction on all tables—which can be invoked manually or is triggered by a configuration setting—it has the files stored locally on the same host. The data node that shares the same physical host has a copy of all data the region server requires. If you are running a scan or get or any other use case, you can be sure to get the best performance.
An issue to be aware of is region movements during load balancing, or server failures. In that case, the data is no longer local, but over time it will be once again. The master also takes this into consideration when a cluster is restarted: it assigns all regions to the original region servers. If one of them is missing, it has to fall back to the random region assignment approach.
Table Splits
When running a MapReduce job in which you read from a table,
you are typically using the TableInputFormat. It fits into the framework by
overriding the required public methods getSplits() and createRecordReader(). Before a job is
executed, the framework calls getSplit() to determine how the data is to be
separated into chunks, because it sets the number of map tasks the job
requires.
For HBase, the TableInputFormat uses the information about
the table it represents—based on the Scan instance you provided—to divide the table
at region boundaries. Since it has no direct knowledge of the effect of
the optional filter, it uses the start and stop keys to narrow down the
number of regions. The number of splits, therefore, is equal to all
regions between the start and stop keys. If you do not set the start
and/or stop key, all are included.
When the job starts, the framework is calling
createRecordReader() as many times as
it has splits. It iterates over the splits and creates a new TableRecordReader by
calling createRecordReader() with the
current split. In other words, each TableRecordReader handles exactly one region,
reading and mapping every row between the region’s start and end
keys.
The split also contains the server name hosting the region. This is what drives locality for MapReduce jobs over HBase: the framework checks the server name, and if a task tracker is running on the same machine, it will preferably run it on that server. Because the region server is also collocated with the data node on that same node, the scan of the region will be able to retrieve all data from the local disk.
Note
When running MapReduce over HBase, it is strongly advised that you turn off speculative execution mode. It will only create more load on the same region and server, and also works against locality: the speculative task is executed on a different machine, and therefore will not have the region server local, which is hosting the region. This results in all data being sent over the network, adding to the overall I/O load.
MapReduce over HBase
The following sections will introduce you to using HBase in combination with MapReduce. Before you can use HBase as a source or sink, or both, for data processing jobs, you have to first decide how you want to prepare the support by Hadoop.
Preparation
To run a MapReduce job that needs classes from libraries not shipped with Hadoop or the MapReduce framework, you’ll need to make those libraries available before the job is executed. You have two choices: static preparation of all task nodes, or supplying everything needed with the job.
Static Provisioning
For a library that is used often, it is useful to permanently install its JAR file(s) locally on the task tracker machines, that is, those machines that run the MapReduce tasks. This is done by doing the following:
Copy the JAR files into a common location on all nodes.
Add the JAR files with full location into the hadoop-env.sh configuration file, into the
HADOOP_CLASSPATHvariable:# Extra Java CLASSPATH elements. Optional. # export HADOOP_CLASSPATH="<extra_entries>:$HADOOP_CLASSPATH"
Restart all task trackers for the changes to be effective.
Obviously this technique is quite static, and every update (e.g., to add new libraries) requires a restart of the task tracker daemons. Adding HBase support requires at least the HBase and ZooKeeper JARs. Edit the hadoop-env.sh to contain the following:
export HADOOP_CLASSPATH="$HBASE_HOME/hbase-0.91.0-SNAPSHOT.jar:
$ZK_HOME/zookeeper-3.3.2.jar:$HADOOP_CLASSPATH"
This assumes you have defined the two
$ environment
variables to point to the location of where you have installed the
respective packages.[84]XYZ_HOME
Note
Note that this fixes the versions of these globally provided libraries to whatever is specified on the servers and in their configuration files.
The issue of locking into specific versions of required libraries can be circumvented with the dynamic provisioning approach, explained next.
Dynamic Provisioning
In case you need to provide different libraries to each job you want to run, or you want to update the library versions along with your job classes, then using the dynamic provisioning approach is more useful.
For this, Hadoop has a special feature: it reads all libraries from an optional /lib directory contained in the job JAR. You can use this feature to generate so-called fat JAR files, as they ship not just with the actual job code, but also with all libraries needed. This results in considerably larger job JAR files, but on the other hand, represents a complete, self-contained processing job.
Another option to dynamically provide the necessary libraries
is the libjars feature of Hadoop’s MapReduce
framework. When you create a MapReduce job using the supplied
GenericOptionsParser harness, you get support for
the libjar parameter for free. Here is the documentation of the parser
class:
GenericOptionsParser is a utility to parse command line arguments generic to
the Hadoop framework. GenericOptionsParser recognizes several standarad
command line arguments, enabling applications to easily specify a namenode,
a jobtracker, additional configuration resources etc.

Generic Options
The supported generic options are:

     -conf <configuration file>     specify a configuration file
     -D <property=value>            use value for given property
     -fs <local|namenode:port>      specify a namenode
     -jt <local|jobtracker:port>    specify a job tracker
     -files <comma separated list of files>    specify comma separated
                            files to be copied to the map reduce cluster
     -libjars <comma separated list of jars>   specify comma separated
                            jar files to include in the classpath.
     -archives <comma separated list of archives>    specify comma
             separated archives to be unarchived on the compute machines.

The general command line syntax is:

   bin/hadoop command [genericOptions] [commandOptions]
The reason to carefully read the documentation is that it not
only states the libjars parameter, but also how and
where to specify it on the command line. Failing to add the
libjars parameter properly will result in the
MapReduce job to fail. This can be seen from the job’s logfiles, for
every task attempt. The errors are also reported when starting the job
on the command line, for example:
$HADOOP_CLASSPATH=$HBASE_HOME/target/hbase-0.91.0-SNAPSHOT.jar:$ZK_HOME/zookeeper-3.3.2.jar hadoop jar target/hbase-book-ch07-1.0.jarImportFromFile -t testtable -i test-data.txt -c data:json... 11/08/08 11:13:17 INFO mapred.JobClient: Running job: job_201108081021_0003 11/08/08 11:13:18 INFO mapred.JobClient: map 0% reduce 0% 11/08/08 11:13:29 INFO mapred.JobClient: Task Id : attempt_201108081021_0003_m_000002_0, Status : FAILED java.lang.RuntimeException: java.lang.ClassNotFoundException: org.apache.hadoop.hbase.mapreduce.TableOutputFormat at org.apache.hadoop.conf.Configuration.getClass(Configuration.java:809) at org.apache.hadoop.mapreduce.JobContext.getOutputFormatClass(JobContext.java:197) at org.apache.hadoop.mapred.Task.initialize(Task.java:413) at org.apache.hadoop.mapred.MapTask.run(MapTask.java:288) at org.apache.hadoop.mapred.Child.main(Child.java:170)
The leading HADOOP_CLASSPATH assignment is
also required to be able to launch the job from the command line. The
Driver class setting up the job needs to have
access to the HBase and ZooKeeper classes. Fixing the above error
requires the libjars parameter to be added, like
so:
$HADOOP_CLASSPATH=$HBASE_HOME/target/hbase-0.91.0-SNAPSHOT.jar:$ZK_HOME/zookeeper-3.3.2.jar hadoop jar target/hbase-bk-ch07-1.0.jarImportFromFile -libjars $HBASE_HOME/target/hbase-0.91.0-SNAPSHOT.jar,$ZK_HOME/zookeeper-3.3.2.jar -t testtable -i test-data.txt -c data:json... 11/08/08 11:19:38 INFO mapred.JobClient: Running job: job_201108081021_0006 11/08/08 11:19:39 INFO mapred.JobClient: map 0% reduce 0% 11/08/08 11:19:48 INFO mapred.JobClient: map 100% reduce 0% 11/08/08 11:19:50 INFO mapred.JobClient: Job complete: job_201108081021_0006
Finally, the HBase helper class
TableMapReduceUtil comes with a method that you can
use from your own code to dynamically provision additional JAR and
configuration files with your job:
static void addDependencyJars(Job job) throws IOException;
static void addDependencyJars(Configuration conf, Class... classes)
  throws IOException;
The former uses the latter function to add all the necessary HBase, ZooKeeper, and job classes:
addDependencyJars(job.getConfiguration(),
    org.apache.zookeeper.ZooKeeper.class,
    job.getMapOutputKeyClass(),
    job.getMapOutputValueClass(),
    job.getInputFormatClass(),
    job.getOutputKeyClass(),
    job.getOutputValueClass(),
    job.getOutputFormatClass(),
    job.getPartitionerClass(),
    job.getCombinerClass());
You can see in the source code of the
ImportTsv class how this is used:
public static Job createSubmittableJob(Configuration conf, String[] args)
throws IOException, ClassNotFoundException {
  ...
  Job job = new Job(conf, NAME + "_" + tableName);
  ...
  TableMapReduceUtil.addDependencyJars(job);
  TableMapReduceUtil.addDependencyJars(job.getConfiguration(),
      com.google.common.base.Function.class /* Guava used by TsvParser */);
  return job;
}
The first call to addDependencyJars() adds
the job and its necessary classes, including the input and output
format, the various key and value types, and so on. The second call
adds the Google Guava JAR, which is needed on top
of the others already added. Note how this method does not require you
to specify the actual JAR file. It uses the Java
ClassLoader API to determine the name of the JAR
containing the class in question. This might resolve to the same JAR,
but that is irrelevant in this context. It is important that you have
access to these classes in your Java CLASSPATH;
otherwise, these calls will fail with a
ClassNotFoundException error, similar to what you
have seen already. You are still required to at least add the
HADOOP_CLASSPATH to the command line for an
unprepared Hadoop setup, or else you will not be able to run the
job.
Note
Which approach you take is your choice. The fat JAR has the advantage of containing everything that is needed for the job to run on a generic Hadoop setup. The other approaches require at least a prepared classpath.
As far as this book is concerned, we will be using the fat JAR to build and launch MapReduce jobs.
Data Sink
Subsequently, we will go through various MapReduce jobs that use HBase
to read from, or write to, as part of the process. The first use case
explained is using HBase as a data sink. This is
facilitated by the TableOutputFormat class and
demonstrated in Example 7-1.
Note
The example data used is based on the public RSS feed offered by Delicious (http://delicious.com). Arvind Narayanan used the feed to collect a sample data set, which he published on his blog.
There is no inherent need to acquire the data set, or capture the RSS feed (http://feeds.delicious.com/v2/rss/recent); if you prefer, you can use any other source, including JSON records. On the other hand, the Delicious data set provides records that can be used nicely with Hush: every entry has a link, user name, date, categories, and so on.
The test-data.txt included in the book’s repository is a small subset of the public data set. For testing, this subset is sufficient, but you can obviously execute the jobs with the full data set just as well.
The code, shown here in nearly complete form, includes some sort of standard template, and the subsequent examples will not show these boilerplate parts. This includes, for example, the command line parameter parsing.
public class ImportFromFile {
public static final String NAME = "ImportFromFile";  public enum Counters { LINES }
static class ImportMapper
extends Mapper<LongWritable, Text, ImmutableBytesWritable, Writable> {
public enum Counters { LINES }
static class ImportMapper
extends Mapper<LongWritable, Text, ImmutableBytesWritable, Writable> {  private byte[] family = null;
private byte[] qualifier = null;
@Override
protected void setup(Context context)
throws IOException, InterruptedException {
String column = context.getConfiguration().get("conf.column");
byte[][] colkey = KeyValue.parseColumn(Bytes.toBytes(column));
family = colkey[0];
if (colkey.length > 1) {
qualifier = colkey[1];
}
}
@Override
public void map(LongWritable offset, Text line, Context context)
private byte[] family = null;
private byte[] qualifier = null;
@Override
protected void setup(Context context)
throws IOException, InterruptedException {
String column = context.getConfiguration().get("conf.column");
byte[][] colkey = KeyValue.parseColumn(Bytes.toBytes(column));
family = colkey[0];
if (colkey.length > 1) {
qualifier = colkey[1];
}
}
@Override
public void map(LongWritable offset, Text line, Context context)  throws IOException {
try {
String lineString = line.toString();
byte[] rowkey = DigestUtils.md5(lineString);
throws IOException {
try {
String lineString = line.toString();
byte[] rowkey = DigestUtils.md5(lineString);  Put put = new Put(rowkey);
put.add(family, qualifier, Bytes.toBytes(lineString));
Put put = new Put(rowkey);
put.add(family, qualifier, Bytes.toBytes(lineString));  context.write(new ImmutableBytesWritable(rowkey), put);
context.getCounter(Counters.LINES).increment(1);
} catch (Exception e) {
e.printStackTrace();
}
}
}
private static CommandLine parseArgs(String[] args) throws ParseException {
context.write(new ImmutableBytesWritable(rowkey), put);
context.getCounter(Counters.LINES).increment(1);
} catch (Exception e) {
e.printStackTrace();
}
}
}
private static CommandLine parseArgs(String[] args) throws ParseException {  Options options = new Options();
Option o = new Option("t", "table", true,
"table to import into (must exist)");
o.setArgName("table-name");
o.setRequired(true);
options.addOption(o);
o = new Option("c", "column", true,
"column to store row data into (must exist)");
o.setArgName("family:qualifier");
o.setRequired(true);
options.addOption(o);
o = new Option("i", "input", true,
"the directory or file to read from");
o.setArgName("path-in-HDFS");
o.setRequired(true);
options.addOption(o);
options.addOption("d", "debug", false, "switch on DEBUG log level");
CommandLineParser parser = new PosixParser();
CommandLine cmd = null;
try {
cmd = parser.parse(options, args);
} catch (Exception e) {
System.err.println("ERROR: " + e.getMessage() + "
");
HelpFormatter formatter = new HelpFormatter();
formatter.printHelp(NAME + " ", options, true);
System.exit(-1);
}
return cmd;
}
public static void main(String[] args) throws Exception {
Configuration conf = HBaseConfiguration.create();
String[] otherArgs =
new GenericOptionsParser(conf, args).getRemainingArgs();
Options options = new Options();
Option o = new Option("t", "table", true,
"table to import into (must exist)");
o.setArgName("table-name");
o.setRequired(true);
options.addOption(o);
o = new Option("c", "column", true,
"column to store row data into (must exist)");
o.setArgName("family:qualifier");
o.setRequired(true);
options.addOption(o);
o = new Option("i", "input", true,
"the directory or file to read from");
o.setArgName("path-in-HDFS");
o.setRequired(true);
options.addOption(o);
options.addOption("d", "debug", false, "switch on DEBUG log level");
CommandLineParser parser = new PosixParser();
CommandLine cmd = null;
try {
cmd = parser.parse(options, args);
} catch (Exception e) {
System.err.println("ERROR: " + e.getMessage() + "
");
HelpFormatter formatter = new HelpFormatter();
formatter.printHelp(NAME + " ", options, true);
System.exit(-1);
}
return cmd;
}
public static void main(String[] args) throws Exception {
Configuration conf = HBaseConfiguration.create();
String[] otherArgs =
new GenericOptionsParser(conf, args).getRemainingArgs();  CommandLine cmd = parseArgs(otherArgs);
String table = cmd.getOptionValue("t");
String input = cmd.getOptionValue("i");
String column = cmd.getOptionValue("c");
conf.set("conf.column", column);
Job job = new Job(conf, "Import from file " + input + " into table " + table);
CommandLine cmd = parseArgs(otherArgs);
String table = cmd.getOptionValue("t");
String input = cmd.getOptionValue("i");
String column = cmd.getOptionValue("c");
conf.set("conf.column", column);
Job job = new Job(conf, "Import from file " + input + " into table " + table);  job.setJarByClass(ImportFromFile.class);
job.setMapperClass(ImportMapper.class);
job.setOutputFormatClass(TableOutputFormat.class);
job.getConfiguration().set(TableOutputFormat.OUTPUT_TABLE, table);
job.setOutputKeyClass(ImmutableBytesWritable.class);
job.setOutputValueClass(Writable.class);
job.setNumReduceTasks(0);
job.setJarByClass(ImportFromFile.class);
job.setMapperClass(ImportMapper.class);
job.setOutputFormatClass(TableOutputFormat.class);
job.getConfiguration().set(TableOutputFormat.OUTPUT_TABLE, table);
job.setOutputKeyClass(ImmutableBytesWritable.class);
job.setOutputValueClass(Writable.class);
job.setNumReduceTasks(0);  FileInputFormat.addInputPath(job, new Path(input));
System.exit(job.waitForCompletion(true) ? 0 : 1);
}
}
FileInputFormat.addInputPath(job, new Path(input));
System.exit(job.waitForCompletion(true) ? 0 : 1);
}
}
-
Define a job name for later use.
-
Define the mapper class, extending the provided Hadoop class.
-
The
map()function transforms the key/value provided by theInputFormatto what is needed by theOutputFormat.-
The row key is the MD5 hash of the line to generate a random key.
-
Store the original data in a column in the given table.
-
Parse the command line parameters using the Apache Commons CLI classes. These are already part of HBase and therefore are handy to process the job specific parameters.
-
Give the command line arguments to the generic parser first to handle “-Dxyz” properties.
-
Define the job with the required classes.
-
This is a map only job; therefore, tell the framework to bypass the reduce step.
The code sets up the MapReduce job in its
main() class by first parsing the command line, which
determines the target table name and column, as well as the name of the
input file. This could be hardcoded here as well, but it is good
practice to write your code in a configurable way.
The next step is setting up the job instance, assigning the
variable details from the command line, as well as all fixed parameters,
such as class names. One of those is the mapper class, set to
ImportMapper. This class is defined in the same
source code file, defining what should be done during the map phase of
the job.
The main() code also assigns the output format
class, which is the aforementioned TableOutputFormat class. It is
provided by HBase and allows the job to easily write data into a table.
The key and value types needed by this class is implicitly fixed to
ImmutableBytesWritable
for the key, and Writable for the value.
Before you can execute the job, you first have to create a target table, for example, using the HBase Shell:
hbase(main):001:0>create 'testtable', 'data'0 row(s) in 0.5330 seconds
Once the table is ready you can launch the job:
$hadoop dfs -put /projects/private/hbase-book-code/ch07/test-data.txt .$hadoop jar target/hbase-book-ch07-1.0-job.jar ImportFromFile-t testtable -i test-data.txt -c data:json... 11/08/08 12:35:01 INFO mapreduce.TableOutputFormat: Created table instance for testtable 11/08/08 12:35:01 INFO input.FileInputFormat: Total input paths to process : 1 11/08/08 12:35:02 INFO mapred.JobClient: Running job: job_201108081021_0007 11/08/08 12:35:03 INFO mapred.JobClient: map 0% reduce 0% 11/08/08 12:35:10 INFO mapred.JobClient: map 100% reduce 0% 11/08/08 12:35:12 INFO mapred.JobClient: Job complete: job_201108081021_0007
The first command, hadoop dfs -put, stores the
sample data in the user’s home directory in HDFS. The second command
launches the job itself, which completes in a short amount of time. The
data is read using the default TextInputFormat, as
provided by Hadoop and its MapReduce framework. This
input format can read text files that have newline
characters at the end of each line. For every line read, it calls the
map() function of the defined mapper class. This
triggers our ImportMapper.map() function.
As shown in Example 7-1, the
ImportMapper defines two methods, overriding the ones
with the same name from the parent Mapper
class.
The setup() method of
ImportMapper overrides the method called once when
the class is instantiated by the framework. Here it is used to parse the
given column into a column family and qualifier.
The map() of that same class is doing the
actual work. As noted, it is called for every row in the input text
file, each containing a JSON record. The code creates an HBase row key
by using an MD5 hash of the line content. It then stores the line
content as-is in the provided column, titled
data:json.
The example makes use of the implicit write buffer set up by the
TableOutputFormat class. The call to
context.write() issues an internal
table.put() with the given instance of
Put. The TableOutputFormat takes care of
calling flushCommits() when the job is
complete—saving the remaining data in the write buffer.
Note
The map() method writes
Put instances to store the input data. You can also
write Delete instances to delete data from the
target table. This is also the reason why the output key format of the
job is set to Writable, instead of the explicit
Put class.
The TableOutputFormat can (currently) only
handle Put and Delete instances.
Passing anything else will raise an IOException
with the message set to Pass a Delete or a
Put.
Finally, note how the job is just using the map phase, and no reduce is needed. This is fairly typical with MapReduce jobs in combination with HBase: since data is already stored in sorted tables, or the raw data already has unique keys, you can avoid the more costly sort, shuffle, and reduce phases in the process.
Data Source
After importing the raw data into the table, we can use the
contained data to parse the JSON records and extract information from
it. This is accomplished using the TableInputFormat class, the
counterpart to TableOutputFormat. It sets up a table
as an input to the MapReduce process. Example 7-2
makes use of the provided InputFormat class.
  static class AnalyzeMapper extends TableMapper<Text, IntWritable> {

    private JSONParser parser = new JSONParser();
    private IntWritable ONE = new IntWritable(1);

    @Override
    public void map(ImmutableBytesWritable row, Result columns, Context context)
    throws IOException {
      context.getCounter(Counters.ROWS).increment(1);
      String value = null;
      try {
        for (KeyValue kv : columns.list()) {
          context.getCounter(Counters.COLS).increment(1);
          value = Bytes.toStringBinary(kv.getValue());
          JSONObject json = (JSONObject) parser.parse(value);
          String author = (String) json.get("author");
          context.write(new Text(author), ONE);
          context.getCounter(Counters.VALID).increment(1);
        }
      } catch (Exception e) {
        e.printStackTrace();
        System.err.println("Row: " + Bytes.toStringBinary(row.get()) +
          ", JSON: " + value);
        context.getCounter(Counters.ERROR).increment(1);
      }
    }
  }

  static class AnalyzeReducer
  extends Reducer<Text, IntWritable, Text, IntWritable> {

    @Override
    protected void reduce(Text key, Iterable<IntWritable> values,
      Context context) throws IOException, InterruptedException {
      int count = 0;
      for (IntWritable one : values) count++;
      context.write(key, new IntWritable(count));
    }
  }

  public static void main(String[] args) throws Exception {
    ...
    Scan scan = new Scan();
    if (column != null) {
      byte[][] colkey = KeyValue.parseColumn(Bytes.toBytes(column));
      if (colkey.length > 1) {
        scan.addColumn(colkey[0], colkey[1]);
      } else {
        scan.addFamily(colkey[0]);
      }
    }

    Job job = new Job(conf, "Analyze data in " + table);
    job.setJarByClass(AnalyzeData.class);
    TableMapReduceUtil.initTableMapperJob(table, scan, AnalyzeMapper.class,
      Text.class, IntWritable.class, job);
    job.setReducerClass(AnalyzeReducer.class);
    job.setOutputKeyClass(Text.class);
    job.setOutputValueClass(IntWritable.class);
    job.setNumReduceTasks(1);
    FileOutputFormat.setOutputPath(job, new Path(output));

    System.exit(job.waitForCompletion(true) ? 0 : 1);
  }
-
Extend the supplied
TableMapperclass, setting your own output key and value types.-
Parse the JSON data, extract the author, and count the occurrence.
-
Extend a Hadoop
Reducerclass, assigning the proper types.-
Count the occurrences and emit a sum.
-
Create and configure a
Scaninstance.-
Set up the table mapper phase using the supplied utility.
-
Configure the reduce phase using the normal Hadoop syntax.
This job runs as a full MapReduce process, where the map phase is
reading the JSON data from the input table, and the reduce phase is
aggregating the counts for every user. This is very similar to the
WordCount example[85] that ships with Hadoop: the mapper emits counts of
ONE, while the reducer counts those up to the sum per
key (which in Example 7-2 is the
Author). Executing the job on the command line is
done like so:
$hadoop jar target/hbase-book-ch07-1.0-job.jar AnalyzeData-t testtable -c data:json -o analyze111/08/08 15:36:37 INFO mapred.JobClient: Running job: job_201108081021_0021 11/08/08 15:36:38 INFO mapred.JobClient: map 0% reduce 0% 11/08/08 15:36:45 INFO mapred.JobClient: map 100% reduce 0% 11/08/08 15:36:57 INFO mapred.JobClient: map 100% reduce 100% 11/08/08 15:36:59 INFO mapred.JobClient: Job complete: job_201108081021_0021 11/08/08 15:36:59 INFO mapred.JobClient: Counters: 19 ... 11/08/08 15:36:59 INFO mapred.JobClient: mapreduce.AnalyzeData$Counters 11/08/08 15:36:59 INFO mapred.JobClient: ROWS=993 11/08/08 15:36:59 INFO mapred.JobClient: COLS=993 11/08/08 15:36:59 INFO mapred.JobClient: VALID=993 ...
The end result is a list of counts per author, and can be accessed from the command line using, for example, the hadoop dfs -text command:
$hadoop dfs -text analyze1/part-r-0000010sr 1 13tohl 1 14bcps 1 21721725 1 2centime 1 33rpm 1 ...
The example also shows how to use the
TableMapReduceUtil class, with its static methods, to
quickly configure a job with all the required classes. Since the job
also needs a reduce phase, the main() code adds the
Reducer classes as required, once again making
implicit use of the default value when no other is specified (in this
case, the TextOutputFormat class).
Obviously, this is a simple example, and in practice you will have to perform more involved analytical processing. But even so, the template shown in the example stays the same: you read from a table, extract the required information, and eventually output the results to a specific target.
Data Source and Sink
As already shown, the source or target of a MapReduce job can be a HBase table,
but it is also possible for a job to use HBase as both input and output.
In other words, a third kind of MapReduce template uses a table for the
input and output types. This involves setting the TableInputFormat and
TableOutputFormat classes into the respective fields
of the job configuration. This also implies the various key and value
types, as shown before. Example 7-3 shows this in
context.
  static class ParseMapper
  extends TableMapper<ImmutableBytesWritable, Writable> {

    private JSONParser parser = new JSONParser();
    private byte[] columnFamily = null;

    @Override
    protected void setup(Context context)
    throws IOException, InterruptedException {
      columnFamily = Bytes.toBytes(
        context.getConfiguration().get("conf.columnfamily"));
    }

    @Override
    public void map(ImmutableBytesWritable row, Result columns, Context context)
    throws IOException {
      context.getCounter(Counters.ROWS).increment(1);
      String value = null;
      try {
        Put put = new Put(row.get());
        for (KeyValue kv : columns.list()) {
          context.getCounter(Counters.COLS).increment(1);
          value = Bytes.toStringBinary(kv.getValue());
          JSONObject json = (JSONObject) parser.parse(value);
          for (Object key : json.keySet()) {
            Object val = json.get(key);
            put.add(columnFamily, Bytes.toBytes(key.toString()),
              Bytes.toBytes(val.toString()));
          }
        }
        context.write(row, put);
        context.getCounter(Counters.VALID).increment(1);
      } catch (Exception e) {
        e.printStackTrace();
        System.err.println("Error: " + e.getMessage() + ", Row: " +
          Bytes.toStringBinary(row.get()) + ", JSON: " + value);
        context.getCounter(Counters.ERROR).increment(1);
      }
    }
  }

  public static void main(String[] args) throws Exception {
    ...
    Scan scan = new Scan();
    if (column != null) {
      byte[][] colkey = KeyValue.parseColumn(Bytes.toBytes(column));
      if (colkey.length > 1) {
        scan.addColumn(colkey[0], colkey[1]);
        conf.set("conf.columnfamily", Bytes.toStringBinary(colkey[0]));
        conf.set("conf.columnqualifier", Bytes.toStringBinary(colkey[1]));
      } else {
        scan.addFamily(colkey[0]);
        conf.set("conf.columnfamily", Bytes.toStringBinary(colkey[0]));
      }
    }

    Job job = new Job(conf, "Parse data in " + input + ", write to " + output);
    job.setJarByClass(ParseJson.class);
    TableMapReduceUtil.initTableMapperJob(input, scan, ParseMapper.class,
      ImmutableBytesWritable.class, Put.class, job);
    TableMapReduceUtil.initTableReducerJob(output,
      IdentityTableReducer.class, job);

    System.exit(job.waitForCompletion(true) ? 0 : 1);
  }
The example uses the utility methods to configure the map and
reduce phases, specifying the ParseMapper, which
extracts the details from the raw JSON, and an IdentityTableReducer to store the
data in the target table. Note that both—that is, the input and output
table—can be the same. Launching the job from the command line can be
done like this:
$hadoop jar target/hbase-book-ch07-1.0-job.jar ParseJson-i testtable -c data:json -o testtable11/08/08 17:44:33 INFO mapreduce.TableOutputFormat: Created table instance for testtable 11/08/08 17:44:33 INFO mapred.JobClient: Running job: job_201108081021_0026 11/08/08 17:44:34 INFO mapred.JobClient: map 0% reduce 0% 11/08/08 17:44:41 INFO mapred.JobClient: map 100% reduce 0% 11/08/08 17:44:50 INFO mapred.JobClient: map 100% reduce 100% 11/08/08 17:44:52 INFO mapred.JobClient: Job complete: job_201108081021_0026 ...
The percentages show that both the map and reduce phases have been
completed, and that the job overall completed subsequently. Using the
IdentityTableReducer to store the extracted data is
not necessary, and in fact the same code with one additional line turns
the job into a map-only one. Example 7-4 shows the
added line.
    ...
    Job job = new Job(conf, "Parse data in " + input + ", write to " + output +
      "(map only)");
    job.setJarByClass(ParseJson2.class);
    TableMapReduceUtil.initTableMapperJob(input, scan, ParseMapper.class,
      ImmutableBytesWritable.class, Put.class, job);
    TableMapReduceUtil.initTableReducerJob(output,
      IdentityTableReducer.class, job);
    job.setNumReduceTasks(0);
    ...
Running the job from the command line shows that the reduce phase has been skipped:
$hadoop jar target/hbase-book-ch07-1.0-job.jar ParseJson2-i testtable -c data:json -o testtable11/08/08 18:38:10 INFO mapreduce.TableOutputFormat: Created table instance for testtable 11/08/08 18:38:11 INFO mapred.JobClient: Running job: job_201108081021_0029 11/08/08 18:38:12 INFO mapred.JobClient: map 0% reduce 0% 11/08/08 18:38:20 INFO mapred.JobClient: map 100% reduce 0% 11/08/08 18:38:22 INFO mapred.JobClient: Job complete: job_201108081021_0029 ...
The reduce stays at 0%, even when the job has completed. You can also use the Hadoop MapReduce UI to confirm that no reduce task have been executed for this job. The advantage of bypassing the reduce phase is that the job will complete much faster, since no additional processing of the data by the framework is required.
Both variations of the ParseJson job performed
the same work. The result can be seen using the HBase Shell (omitting
the repetitive row key output for the sake of space):
hbase(main):001:0>scan 'testtable'... xFB!Nnx8Fx89}xD8x91+xB9o9xB3ExD0 column=data:author, timestamp=1312821497945, value=bookrdr3 column=data:comments, timestamp=1312821497945, value=http://delicious.com/url/409839abddbce807e4db07bf7d9cd7ad column=data:guidislink, timestamp=1312821497945, value=false column=data:id, timestamp=1312821497945, value=http://delicious.com/url/409839abddbce807e4db07bf7d9cd7ad#bookrdr3 column=data:link, timestamp=1312821497945, value=http://sweetsassafras.org/2008/01/27/how-to-alter-a-wool-sweater ... column=data:updated, timestamp=1312821497945, value=Mon, 07 Sep 2009 18:22:21 +0000 ... 993 row(s) in 1.7070 seconds
The import makes use of the arbitrary column names supported by HBase: the JSON keys are converted into qualifiers, and form new columns on the fly.
Custom Processing
You do not have to use any classes supplied by HBase to read
and/or write to a table. In fact, these classes are quite lightweight
and only act as helpers to make dealing with tables easier. Example 7-5 converts the previous example code to split
the parsed JSON data into two target tables. The link
key and its value is stored in a separate table, named
linktable, while all other fields are stored in the
table named infotable.
  static class ParseMapper
  extends TableMapper<ImmutableBytesWritable, Writable> {

    private HTable infoTable = null;
    private HTable linkTable = null;
    private JSONParser parser = new JSONParser();
    private byte[] columnFamily = null;

    @Override
    protected void setup(Context context)
    throws IOException, InterruptedException {
      infoTable = new HTable(context.getConfiguration(),
        context.getConfiguration().get("conf.infotable"));
      infoTable.setAutoFlush(false);
      linkTable = new HTable(context.getConfiguration(),
        context.getConfiguration().get("conf.linktable"));
      linkTable.setAutoFlush(false);
      columnFamily = Bytes.toBytes(
        context.getConfiguration().get("conf.columnfamily"));
    }

    @Override
    protected void cleanup(Context context)
    throws IOException, InterruptedException {
      infoTable.flushCommits();
      linkTable.flushCommits();
    }

    @Override
    public void map(ImmutableBytesWritable row, Result columns, Context context)
    throws IOException {
      context.getCounter(Counters.ROWS).increment(1);
      String value = null;
      try {
        Put infoPut = new Put(row.get());
        Put linkPut = new Put(row.get());
        for (KeyValue kv : columns.list()) {
          context.getCounter(Counters.COLS).increment(1);
          value = Bytes.toStringBinary(kv.getValue());
          JSONObject json = (JSONObject) parser.parse(value);
          for (Object key : json.keySet()) {
            Object val = json.get(key);
            if ("link".equals(key)) {
              linkPut.add(columnFamily, Bytes.toBytes(key.toString()),
                Bytes.toBytes(val.toString()));
            } else {
              infoPut.add(columnFamily, Bytes.toBytes(key.toString()),
                Bytes.toBytes(val.toString()));
            }
          }
        }
        infoTable.put(infoPut);
        linkTable.put(linkPut);
        context.getCounter(Counters.VALID).increment(1);
      } catch (Exception e) {
        e.printStackTrace();
        System.err.println("Error: " + e.getMessage() + ", Row: " +
          Bytes.toStringBinary(row.get()) + ", JSON: " + value);
        context.getCounter(Counters.ERROR).increment(1);
      }
    }
  }

  public static void main(String[] args) throws Exception {
    ...
    conf.set("conf.infotable", cmd.getOptionValue("o"));
    conf.set("conf.linktable", cmd.getOptionValue("l"));
    ...
    Job job = new Job(conf, "Parse data in " + input + ", into two tables");
    job.setJarByClass(ParseJsonMulti.class);
    TableMapReduceUtil.initTableMapperJob(input, scan, ParseMapper.class,
      ImmutableBytesWritable.class, Put.class, job);
    job.setOutputFormatClass(NullOutputFormat.class);
    job.setNumReduceTasks(0);

    System.exit(job.waitForCompletion(true) ? 0 : 1);
  }
Note
You need to create two more tables, using, for example, the HBase Shell:
hbase(main):001:0>create 'infotable', 'data'hbase(main):002:0>create 'linktable', 'data'
These two new tables will be used as the target tables for the current example.
Executing the job is done on the command line, and emits the following output:
$hadoop jar target/hbase-book-ch07-1.0-job.jar ParseJsonMulti-i testtable -c data:json -o infotable -l linktable11/08/08 21:13:57 INFO mapred.JobClient: Running job: job_201108081021_0033 11/08/08 21:13:58 INFO mapred.JobClient: map 0% reduce 0% 11/08/08 21:14:06 INFO mapred.JobClient: map 100% reduce 0% 11/08/08 21:14:08 INFO mapred.JobClient: Job complete: job_201108081021_0033 ...
So far, this is the same as the previous
ParseJson examples. The difference is the resulting
tables, and their content. You can use the HBase Shell and the
scan command to list the content of each table after
the job has completed. You should see that the link
table contains only the links, while the info table
contains the remaining fields of the original JSON.
Writing your own MapReduce code allows you to perform whatever is needed during the job execution. You can, for example, read lookup values from a different table while storing a combined result in yet another table. There is no limit as to where you read from, or where you write to. The supplied classes are helpers, nothing more or less, and serve well for a large number of use cases. If you find yourself limited by their functionality, simply extend them, or implement generic MapReduce code and use the API to access HBase tables in any shape or form.