24
Web Accessibility
Throughout this book, you’ve learned how to make websites. You’ve learned how to support devices of all shapes and sizes. And you’ve learned how to make your website load as quickly as it can on internet connections fast and slow. But there’s one more way you can make sure your website works for whoever wants to view it: make it accessible.
Web accessibility means designing your website in such a way that people with disabilities can use it. This can be making sure your images have alt tags for screen readers, choosing color schemes that are readable for those who are color-blind, or even adding keyboard shortcuts to help those who can’t use a mouse to navigate.
Including as Many People as Possible
An important point to make at the outset is one that’s often stated by accessibility advocates: web accessibility doesn’t just help the disabled—it makes your website more usable for everyone.
Usability is a big reason this book has focused on semantics, using the right tags, and making your website work across multiple devices, screen sizes, and connection speed. You want to reach as many people as possible with your website. Another step in that process is realizing that you’re not designing your website just for yourself.
Designing for a diverse set of users
When thinking about web accessibility, it’s important to remember that not everyone uses a computer with a keyboard and mouse.
About 12 percent of the United States population has some disability. That could range from color blindness to motor impairments, and everything in between. Here’s a short list of disabilities to think about, and how they can affect how people use your website:
Partial eyesight loss can make small text hard to read and images hard to see clearly. Users may rely on a screen reader for help.
Color blindness makes it hard to see or distinguish certain colors (FIGURE 24.1). If you’re using a color scheme that doesn’t have enough contrast, text may be completely invisible to some users (FIGURE 24.2).

Figure 24.1 The same image as viewed by people with varying degrees of color blindness, from none to completely monochrome.

Figure 24.2 Green text on a black background is readable for those without color blindness. But for those who are green-blind, the text looks dark purple and becomes unreadable.
Full or partial hearing loss means users will not be able to listen to videos or audio on your website. The best fix for this is to include transcripts and captions or subtitles for videos.
Motor impairments may cause users to have difficulty using traditional pointing devices like a mouse. A screen reader can help with input, and making your website navigable by keyboard will help as well.
Cognitive impairments like dyslexia or memory deficits can affect how people use your website. Using good, clear fonts and keeping your website clear of distractions isn’t just good UX, it can make it more accessible.
Making your website accessible, combined with tools available in browsers and other software, can make it so anyone can use your website without trouble.
What You’ve Done so Far
Luckily, a lot of what you’ve done so far goes a long way toward making your website accessible. Using the appropriate HTML elements for sections of your website clues screen readers into what kind of content you’re building.
Using heading tags (and the right heading tags) breaks up long blocks of text and makes them easier to consume and understand.
With forms, using different fields for different types of input helps users better understand the type of data they’re inserting. Similarly, labels provide meaning to those fields.
Using the alt attribute on images allows images to be described when they can’t be downloaded or viewed.
The testing you’ve learned about also helps with accessibility. By improving performance and testing on different browsers and devices, you’re ensuring your website can work anywhere and everywhere.
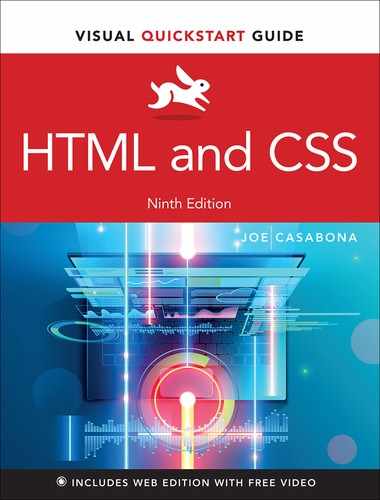
You can see how well you’ve done by turning off the styles on your website and viewing just the HTML (FIGURE 24.3). This is what both search engines and screen readers will see. In Chrome, you can do this using the Web Developer extension you downloaded in Chapter 6.

Figure 24.3 Casabona.org with all styles disabled. It’s not pretty, but it’s usable!
To turn off CSS in Chrome:
Visit your website in Chrome.
Click the Web Developer cog icon (
 ).
).Click the CSS Tab.
Click Disable All Styles.
With no styles, does your website make sense? Does the information flow the way you expect it to? Is the information that should be at the top actually at the top?
Great! Your website is well on its way to being accessible. But there is more you can do. In the rest of this chapter, you’ll learn important tests and techniques that will help you make sure your website is accessible.
Additional Tags and Attributes
Accessibility is something you should plan for from the beginning of your project. Before you start using evaluation tools, do as much as you can during development to make your website accessible.
Using well-structured HTML is the best thing you can do to support accessibility, so make sure to use the skills you’ve learned throughout the book to make a website accessible at its core.
However, sometimes in the course of building your site you do need to use HTML elements that don’t necessarily have any meaning, like div or span. You might also create an area of your site that does not have an HTML tag that would give it meaning. Luckily, that’s where ARIA tags come in.
ARIA is the shorthand way of writing WAI-ARIA, or Web Accessibility Initiative–Accessible Rich Internet Applications. Most people just refer to it as ARIA.
ARIA is a way of providing to the browser more information about an element when the proper meaning isn’t built into HTML. You can do that by using two different types of attributes:
roledefines a type of user interface component based on its function (examples includebutton,alert, andsearch). This does not change how the element is displayed; it just gives the element more meaning (FIGURE 24.4).
Figure 24.4 An
alertwith basic styles applied. It also contains the more meaningfulrole="alert"attribute.States and properties provide further information about a particular element. For example, in a date selector, the value of the month may be a number (
10, for example). The propertyaria-valuetextcan have the valueOctoberso that screen readers can give the user more meaning for that particular element.
To add role to a div:
In an HTML file, right after the opening
<body>tag, type<div class="sale-alert".Type
role="alert">.Using the ARIA
roleattribute, we’re telling browsers and screen readers that thisdivis analertand should be treated as such.Type
Now though Sunday, get 25% off!.Type
</div>.
Now your browser knows that this particular div is an alert on your site. This is particularly useful for screen readers, which can now tell users more than just “This is a container on a page.”
States and properties
States and properties can be used to provide further descriptions of elements or to connect elements in a meaningful way. One way is by connecting a password hint to the password field with aria-describedby (CODE 24.1 and FIGURE 24.5).

Figure 24.5 A password field with a hint box. Thanks to the use of the aria-describedby attribute, the browser knows the two elements are related.
However, these can sometimes be a little tricky to apply for beginning users of HTML and CSS, since many are manipulated by JavaScript.
For example, you might design a menu that is shown and hidden by JavaScript based on a click event (like in Video 24.1). You can add aria-expanded="true" to the event when the menu is open, and aria-expanded="false" when it’s closed.
Accessibility Tests and Validation
Once you’ve got your website created, there are a few ways to test and validate your work to ensure it is accessible.
The Web Content Accessibility Guidelines (WCAG) are maintained by the Web Accessibility Initiative (www.w3.org/WAI/standards-guidelines/wcag/). They are part of the World Wide Web Consortium (W3C), which develops and maintains web standards. You can test your website against WCAG to learn how to make your website more accessible.
The guidelines are currently in their second version (WCAG 2.1), and there are three levels of accessibility, ranging from Level A to Level AAA:
Level A is the lowest level of conformance. This is a great place to start to make sure your website is minimally compliant.
Level AA is the next level up, where your website meets more criteria in the guidelines. This is the goal most organizations aim for because it’s reasonably achievable without much added cost.
Level AAA is the highest level and very difficult (and costly) to achieve. For the most part, only accessibility-focused organizations aim for this rating.
Testing tools
There are three testing tools you’ll learn how to use to evaluate your website:
Our old friend Google Chrome DevTools (FIGURE 24.6).
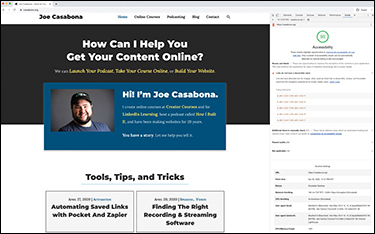
Figure 24.6 The accessibility audit built into Chrome
WAVE by WebAIM gives detailed test results and feedback. It is highly recommended by web accessibility experts (FIGURE 24.7).

Figure 24.7 WAVE by WebAIM (wave.webaim.org/) is a tool for accessibility testing.
A Chrome extension named Colorblindly tests for color blindness (FIGURE 24.8).
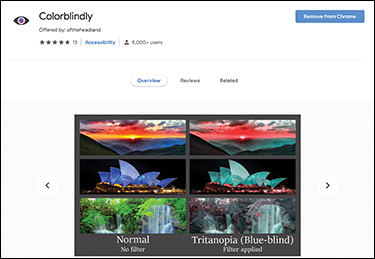
Figure 24.8 Colorblindly is a free Chrome extension that applies color filters to any website to simulate different types of color blindness.
To test accessibility with Google Chrome:
Visit your website in Chrome.
Open the DevTools by clicking the menu and choosing More Tools > Developer Tools.
Click the Audits tab.
You may need to click the double arrow (
 ) to reveal the Audits tab.
Deselect all categories except Accessibility (FIGURE 24.9).
Figure 24.9 The report settings for the Audits tool in Chrome
Under Device, select Desktop.
Click the Generate Report button.
The report gives you a score and a list of areas you can fix, as you saw in Figure 24.6.
To use WAVE for detailed testing:
Visit wave.webaim.org.
In the Web Page Address field at the top of the page, enter your website’s URL.
The test renders, and it gives you a detailed report of accessibility features, warnings, and errors (FIGURE 24.10).

Figure 24.10 The results of the WAVE test for Casabona.org
It also gives you a report on your color contrast (FIGURE 24.11).

Figure 24.11 The contrast test results in WAVE
This test is much more interactive and provides tons of detailed analysis to make sure your website is not only accessible but also web structured and free of markup errors.
To test for color blindness with Colorblindly:
In Chrome, visit the Google Chrome Web Store (chrome.google.com/webstore) and search for colorblindly.
On the Colorblindly extension page, click the Add To Chrome button to install the extension. A new icon (
 ) will appear in your browser bar.
Visit your website.
Click the Colorblindly icon.
Select the Green-Weak/Deuteranomaly option in the menu (FIGURE 24.12).
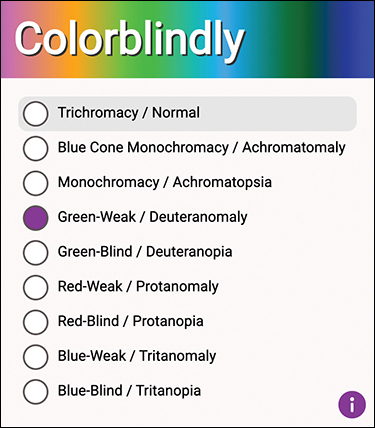
Figure 24.12 The forms of color blindness Colorblindly can simulate
This is the most common form of color blindness.
Review your website to make sure you can still read everything!
Repeat steps 5 and 6 for each form of color blindness.
Finding Your WCAG Rating
You may have noticed in all those tests that you weren’t given a specific WCAG level rating. There’s one more test you can conduct for that, using AChecker (FIGURE 24.13).
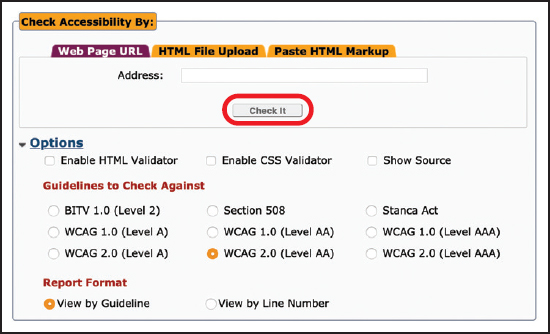
Figure 24.13 AChecker (achecker.ca/checker/) compares your website against the WCAG guidelines and shows you what you need to fix.
To check your site against WCAG level guidelines:
Visit achecker.ca/checker/.
Select the Web Page URL tab.
In the Address field, type your website’s URL.
Click Options.
Under Guidelines To Check Against, make sure the most recent WCAG Level A option is selected.
At the time of this writing, it’s WCAG 2.0 (Level A).
We’re starting simple with WCAG Level A so that you can get the baseline issues fixed.
Under Report Format, select View By Line Number.
Click the Check It button.
On the Report page, you are given a list of issues you need to fix, broken down by line number, in order to become Level A compliant (FIGURE 24.14).
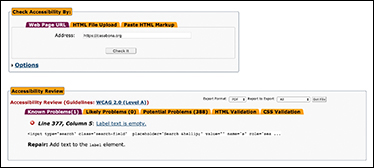
Figure 24.14 AChecker WCAG Level A results for Casabona.org
Wrapping Up
With that, you have enough tools to keep you busy! Over the last few chapters you’ve learned how to test your website, make it more performant, and make it more accessible. You’re well on your way to becoming a fantastic web developer!
But in this chapter and throughout the book, you’ve seen references to another important aspect of web development: JavaScript. While that topic is too much to cover in this book, in Chapter 25 you will get a quick introduction to it as well as to some other technologies you might want to check out.