
It's easy to deploy a single virtual machine (VM) in Azure, but as soon as you want to deploy more workloads in a single, reproducible way, you need some sort of automation.
In Azure, you can use Azure Resource Manager (ARM) to deploy VMs using template configuration files together with the Azure CLI, PowerShell, Ruby, and C#. Other third-party tools used to create images for VMs, such as Packer and Vagrant, are discussed later in this chapter.
All these deployment methods or image creation methods use images from Azure, but it's also possible to create your own custom VMs with custom images.
Before going into the configuration of all the possible options, it is important to be aware of the different deployment options and why you should or shouldn't use them. You must ask yourself several questions first:
- When are you going to deploy your application?
- Which parts of the workload should be reproducible?
- Which parts of the configuration of the workload should be done during deployment?
All these questions will be answered by the end of this chapter. These are the key takeaways from this chapter:
- We will be discussing automated deployment options in Azure.
- We will see how deployment can be automated using the Azure CLI and PowerShell.
- We will be covering Azure ARM templates for deployment and how they can be reused for redeployment.
- VM image creation tools such as Packer and Vagrant will be discussed.
- Finally, we will explain how to use custom images and bring our own VHD (Virtual Hard Disks) to Azure.
Deployment Scenarios
The three questions mentioned in the introduction are very important; these can differ per company, per application, and during the development stage. The following are examples of a few deployment scenarios:
- Applications are developed in-house, maybe even on your local computer. Once finished, applications are deployed in Azure. Updates will be applied to the running workload.
- This is the same scenario, but now the updates will be done by deploying a new VM.
- Applications are delivered by another vendor.
These three examples are very common and can affect the way that you want to deploy your workload.
What Do You Need?
Before jumping into the deployment, you should know what you need or, in other words, what resources are required to make your application work properly. Additionally, everything in Azure has a limit and a quota. Some limits are hard, and some can be increased by reaching out to Microsoft Support. To see the complete list of Azure limits and quotas, visit https://docs.microsoft.com/en-us/azure/azure-subscription-service-limits.
Prior to deployment, we need to plan and make sure that our subscription limits won't block our project. If there is a restriction or limitation, reach out to Microsoft Support and increase the quota. However, if you are on a free trial, quota requests will not be approved. You may have to move the deployment to a region where you have enough quota to fulfill the deployment. These are the key resources that we'll be deploying:
- A resource group
- A storage account (unmanaged) or a managed disk
- A network security group
- A virtual network
- A subnet for the virtual network
- A network interface attached to the VM
Regarding the VM, you need to specify and think about the following:
- VM sizing
- Storage
- VM extensions
- Operating system
- Initial configuration
- The deployment of your application
If you take a look at these lists, you might be wondering whether automated deployment or automation is necessary or required. The answer is not easy to find. Let's look at the scenarios again and try to find the answer. We could decide to do the following:
- Create a script in PowerShell or Bash to prepare the Azure environment for the workload
- Create a second script to deploy the VM based on an offer in Azure and use an Azure VM extension to configure the initial configuration
- Deploy the application with a software manager such as Yum
There is nothing wrong with deciding to do this; it could be the best solution for you! However, whether you like it or not, there are dependencies:
- You deploy your operating system based on an image. This image is made available by a publisher. What happens if the image is updated to a version that is not supported by your application?
- How much initial configuration is already done in this image? How much is needed, and who is in control of the image?
- Is this image compliant with your security policies?
- If you want to leave Azure for whatever reason, can you move your application to somewhere else?
Automated Deployment Options in Azure
After this long introduction, it's time to have a look at the feature options that make it possible to automate the deployment of your workload:
- Scripting
- Azure Resource Manager
- Ansible
- Terraform
We will be discussing Ansible and Terraform in Chapter 8, Exploring Continuous Configuration Automation.
Scripting
Automation can be done with scripts. In Azure, there are many options supported by Microsoft:
- Bash with the Azure CLI
- PowerShell with the Az module
- Python, with the complete SDK available at https://docs.microsoft.com/en-us/azure/python/python-sdk-azure-install
- Ruby, with a preview SDK available at https://azure.microsoft.com/en-us/develop/ruby
- Go, with a complete SDK available at https://github.com/Azure/azure-sdk-for-go
- And there are libraries available for Node.js
Also, you can use programming languages such as Java and C#. There are community projects as well; for instance, https://github.com/capside/azure-sdk-perl is an attempt to build a full Azure SDK for Perl.
All languages are valid options; choose a language you are already familiar with. Please be aware that the Ruby SDK was in preview at the time that this book was written. During the preview state, the syntax can change.
Scripting is especially good for preparing an Azure environment. You can also use scripting to deploy your VMs, and you can even include the initial configuration using VM extensions. The question of whether it's a good idea is dependent on your scripting abilities, the base image of the operating system, and the versions of software installed in it.
The biggest argument against using scripts is that it is time-consuming to write them. Here are some tips that can help you write scripts efficiently:
- Use as many variables as possible. This way, if you have changes to make in the script, all you have to do is change the variables' values.
- Use recognizable variable names in loops, not something like for i in.
- Especially for bigger scripts, declare functions that you can reuse.
- Sometimes, it makes sense to put variables (such as the one that provides authentication) and functions in separate files. One task per script is often a good idea.
- Include the timestamp of the modification in your code, or, even better, use a version control system such as Git.
- Include tests. For instance, only create this resource if it doesn't already exist. Use human-readable exit codes. If the script failed to deploy a resource, use something like not able to create $resource, so that whoever is running the script will understand that the script failed to create the resource.
- Include sufficient comments. If you need to debug or reuse the script after some time, you'll still know what it does. Don't forget to include a description in the header as well.
- Spend some time on the layout; use indentation to keep the code readable. Use two spaces for indentation, not tabs!
It's now time for a short example. This example will give you an idea of how to create scripts to provide the things needed in Azure before deploying a VM.
First, declare the variables. You can also add the variables to a file and make PowerShell load the variables. It is recommended to store them in the same script so that you can always go back and update them when required:
#Declare Variables
$myResourceGroup = "LinuxOnAzure"
$myLocation = "West Europe"
$myNSG = "NSG_LinuxOnAzure"
$mySubnet = "10.0.0.0/24"
$myVnet= "VNET_LinuxOnAzure"
Next, write a script to create a resource group. If the resource already exists, the script will skip the creation part. As mentioned earlier, adding comments is the best practice to make the script readable, so make use of comments marked by # so that you understand what the code block does:
# Test if the Resource Group already exists, if not: create it.
Get-AzResourceGroup -Name $myResourceGroup -ErrorVariable notPresent -ErrorAction SilentlyContinue | out-null
if ($notPresent)
{
# ResourceGroup doesn't exist, create it:
New-AzResourceGroup -Name $myResourceGroup -Location $myLocation
Write-Host "The Resource Group $myResourceGroup is created in the location $myLocation"
}
else
{
Write-Host "The Resource Group $myResourceGroup already exists in the location $myLocation"
}
Create the virtual network and configure the subnet:
#Test if the vnet name not already exists:
Get-AzVirtualNetwork -Name $myVnet -ResourceGroupName $myResourceGroup -ErrorVariable notPresent -ErrorAction SilentlyContinue | out-null
if ($notPresent)
{
# vnet doesn't exist, create the vnet
$virtualNetwork = New-AzVirtualNetwork -ResourceGroupName $myResourceGroup -Location $myLocation -Name $myVnet -AddressPrefix 10.0.0.0/16
# add subnet configuration
$subnetConfig = Add-AzVirtualNetworkSubnetConfig -Name default -AddressPrefix $mySubnet -VirtualNetwork $virtualNetwork
# Associate the subnet to the virtual network
$virtualNetwork | Set-AzVirtualNetwork
Write-Host "The virtual network $myVnet with $mySubnet configured is created in the location $myLocation"
}
else
{
Write-Host "The Resource Group $myVnet already exists in the location $myLocation"
}
Here is an example of creating a network security group:
# Create NSG
# Test if the Network Security Group does not already exist:
Get-AzNetworkSecurityGroup -ResourceGroupName $myResourceGroup -Name $myNSG -ErrorVariable notPresent -ErrorAction SilentlyContinue | out-null
if ($notPresent)
{
# create the NSG
$nsg = New-AzNetworkSecurityGroup -ResourceGroupName $myResourceGroup -Location $myLocation -Name $myNSG
# create the rules for SSH and HTTP
$nsg | Add-AzNetworkSecurityRuleConfig -Name "allow_http" -Description "Allow HTTP" -Access Allow '
-Protocol "TCP" -Direction Inbound -Priority 1002 -SourceAddressPrefix "*" -SourcePortRange * '
-DestinationAddressPrefix * -DestinationPortRange 80
$nsg | Add-AzNetworkSecurityRuleConfig -Name "allow_ssh" -Description "Allow SSH" -Access Allow '
-Protocol "TCP" -Direction Inbound -Priority 1001 -SourceAddressPrefix "*" -SourcePortRange * '
-DestinationAddressPrefix * -DestinationPortRange 22
# Update the NSG.
$nsg | Set-AzNetworkSecurityGroup
Write-Host "The NSG: $myNSG is configured is created with rules for SSH and HTTP in the resource group $myResourceGroup"
}
else
{
Write-Host "The NSG $myNSG already existed in the resource group $myResourceGroup"
}
By now, you should have a pretty good idea of how you can create a script and a virtual network. As mentioned at the beginning of this section, scripting is not the only resort to automate a deployment; there are other methods. In the next section, we'll be discussing how to use Azure Resource Manager templates to automate deployment.
Automated Deployment with Azure Resource Manager
In Chapter 2, Getting Started with the Azure Cloud, we defined Azure Resource Manager (ARM) as follows:
"Basically, the Azure Resource Manager enables you to work with resources such as storage and VMs. To do so, you have to create one or more resource groups so you can execute life cycle operations, such as deploying, updating, and deleting all the resources in the resource group in a single operation."
From the Azure portal or with scripting, you are able to do all the things stated. But that's only a small part of it. You can deploy Azure resources through ARM by using templates. There are hundreds of quick-start templates provided by Microsoft, available at https://azure.microsoft.com/en-us/resources/templates
When you create a VM via the Azure portal, you can download that VM as a template even before you create it. If you refer to the following screenshot, you can see that even before creating the VM, we have an option to download the template for automation:

Figure 7.1: Downloading VM as a template
If you click on Download a template for automation, you'll get the following screen:

Figure 7.2: VM template pane
As you can see, you can add the script to your library in Azure or you can download this file to your local computer. You will also get a Deploy option, with which you can change the parameters and deploy directly to Azure.
In the Scripts pane, Azure gives you links on how to deploy using PowerShell and the CLI.
You can easily change the parameters and deploy a new VM or redeploy exactly the same VM. It is not that different than using your own scripts, but it's less time-consuming in development terms.
This is not the only thing you can do with ARM; you can configure every aspect of Azure resources. For example, if you are deploying a Network Security Group via an ARM template, you define everything, such as the rule, port range, and the priority of the rule, in the same way as you would create from the Azure portal or via the CLI. It's not that difficult to create your own ARM template. You'll need the ARM reference guide, which can be found at https://docs.microsoft.com/en-us/azure/templates. Together with these examples, it's a great resource to get started.
Another way of getting started is by using the Visual Studio Code editor, which is available for Windows, Linux, and macOS at https://code.visualstudio.com. The Azure Resource Manager Tools extension is a must-have if you are going to start using ARM, together with some other extensions, such as Azure Account and Sign-In, Azure Resource Manager snippets, and Azure CLI Tools. You can start using existing templates, and can even upload them to Cloud Shell, execute them, and debug them.
To install the Azure Resource Manager Tools extension, follow these steps:
- Open Visual Studio Code.
- Select Extensions from the left menu. Or, from the View menu, select Extensions to open the Extensions pane.
- Search for Resource Manager.
- Select Install under Azure Resource Manager Tools.
Here is the screen where you find the Install option:

Figure 7.3: Installing Azure Resource Manager Tools
Another nice feature in Azure is the ARM Visualizer, which you can find at http://armviz.io. It's still in the early stages of development. This is a tool that can help you to get a quick insight into the purpose of the ARM template you downloaded from the Quickstart Templates website.
Instead of downloading templates, it's also possible to save them to a library:

Figure 7.4: Saving templates to the library
As stated in this pane, you can easily navigate in the Azure portal by using All resources in the left-hand navigation bar and searching for templates:

Figure 7.5: Navigating to the templates on the Azure portal
You can still edit your template here! Another nice feature is that you can share your template with other users of your tenant. This can be very useful, as you can create a user who is only allowed to use this template for deployment.
Now that we know how to deploy a template from the Azure portal, let's see how we can deploy ARM templates using PowerShell and Bash.
Deploying ARM Templates Using PowerShell
First, to validate whether the template format is right, execute the following command:
Test-AzResourceGroupDeployment -ResourceGroupName ExampleResourceGroup' -TemplateFile c:MyTemplatesazuredeploy.json '
-TemplateParameterFile c:MyTemplatesstorage.parameters.json
Then go ahead with the deployment:
New-AzResourceGroupDeployment -Name <deployment name> -ResourceGroupName <resource group name> -TemplateFile c:MyTemplatesazuredeploy.json
-TemplateParameterFile c:MyTemplatesstorage.parameters.json
Deploying ARM Templates Using Bash
You can also validate your template and parameter file prior to deployment to avoid any unexpected errors:
az group deployment validate
--resource-group ResourceGroupName
--template-file template.json
--parameters parameters.json
To deploy, execute the following command:
az group deployment create
--name DeploymentName
--resource-group ResourceGroupName
--template-file template.json
--parameters parameters.json
Now that we have deployed a new VM, we can keep the templates.json and parameters.json, which can be reused by changing the variable values.
Let's assume we have deleted the VM and you want it to be redeployed. All you need is the JSON files. As explained earlier, if you have stored the template in Azure, you can find an option to redeploy there:

Figure 7.6: Redeploying the VM using the JSON files
If you prefer to accomplish the same task via the Azure CLI or PowerShell, run the commands we used earlier and your VM will be ready with the same configuration as mentioned in the ARM template.
Initial Configuration
Following the deployment of your workload, post-deployment configuration is needed. If you want to do this as a part of your automation solution, then there are two options:
- The custom script extension, which can be used at any time after the deployment.
- cloud-init is available during boot.
Initial Configuration with the Custom Script Extension
After the deployment of the VM, it is possible to execute post-deployment scripts using the custom script extension. In the previous example, we were deploying a VM using ARM templates. What if you want to run a script after deployment? This is the role of the custom script extension. For example, let's assume you want to deploy a VM, and after deployment, you want to install Apache on it without logging in to the VM. In this case, we will write a script to install Apache and Apache will be installed after deployment using the custom script extension.
This extension will work on all Microsoft-endorsed Linux operating systems, except CoreOS and OpenSUSE LEAP. Change the apt-get command in the script to the software manager supported by your distribution if you are using a distribution other than Debian or Ubuntu.
You can use PowerShell to configure the extension:
$myResourceGroup = "<resource group name>"
$myLocation = "<location>"
$myVM = "<vm name>"
$Settings = @{ "commandToExecute" = "apt-get -y install nginx";};
Set-AzVMExtension -VMName $myVM '
-ResourceGroupName $myResourceGroup'
-Location $myLocation '
-Name "CustomscriptLinux" -ExtensionType "CustomScript" '
-Publisher "Microsoft.Azure.Extensions" '
-typeHandlerVersion "2.0" -InformationAction SilentlyContinue '
-Verbose -Settings $Settings
The PowerShell output will give you the status after the configuration, that is, whether it was OK or something went wrong. After running the script, you can verify whether the installation was successful in the logs of the VM. Since we are following this on an Ubuntu VM, you can verify the installation of nginx by checking the /var/log/apt/history.log file. The output confirms that nginx and all other dependencies have been installed:

Figure 7.7: Checking logs to verify nginx installation
Instead of a command, you can also provide a script.
Let's create a very simple script:
#!/bin/sh
apt-get install -y nginx firewalld
firewall-cmd --add-service=http
firewall-cmd --add-service=http --permanent
Now, the script must be encoded using the base64 command. You can do this on any Linux VM you have, or you can use WSL (Windows Subsystem for Linux) to create the base64 string:
cat nginx.sh| base64
Note
On some versions of base64, you have to add the -w0 parameter to disable word wrapping. Just make sure that it is one line!
The $Settings variable will be as follows:
$Settings = @{"script" = "<base64 string>";};
As we have already installed nginx using the first script, you can either remove ngnix using apt purge nginx or you can create a new VM altogether. As we did before, we can go and check the history log:

Figure 7.8: Checking the history log
The log entry clearly shows that apt install –y nginx firewalld has been executed. Since we are looking at the apt history, we will not be able to confirm whether the firewalld HTTP rule was added. To confirm that, you can run firewall-cmd –list-services:

Figure 7.9: Checking whether the firewalld HTTP rule is added
Scripts can be compressed or uploaded to a storage blob if you want.
Of course, you can use the Azure CLI to make the initial configuration. In that scenario, you have to provide a JSON file similar to this one:
{
"autoUpgradeMinorVersion": true,
"location": "<location>",
"name": "CustomscriptLinux",
"protectedSettings": {},
"provisioningState": "Failed",
"publisher": "Microsoft.Azure.Extensions",
"resourceGroup": "<resource group name>",
"settings": {
"script": "<base64 string"
},
"tags": {},
"type": "Microsoft.Compute/virtualMachines/extensions",
"typeHandlerVersion": "2.0",
"virtualMachineExtensionType": "CustomScript"
}
Then, execute the following az command:
az vm extension set --resource-group <resource group>
--vm-name <vm name>
--name customScript --publisher Microsoft.Azure.Extensions
--settings ./nginx.json
Note
The JSON file can be included in an ARM template.
If you are using PowerShell or the Azure CLI for debugging purposes, the /var/log/azure/custom-script directory contains the log of your actions.
Initial Configuration with cloud-init
A problem with the custom VM extension is that scripts can be very distribution-specific. You can already see that in the examples used. If you use different distributions, you'll need multiple scripts or you'll have to include distribution checks.
Another way to do some initial configuration after the deployment of your VM is by using cloud-init.
cloud-init is a Canonical project that was created to provide a cloud solution and a Linux-distribution-agnostic approach for customizing cloud images. In Azure, it can be used with images to prepare the operating system during the first boot, or while creating the VM.
Not every Microsoft-endorsed Linux distribution is supported; Debian and SUSE are not supported at all and it always takes some time before the latest version of a distribution can be used.
cloud-init can be used to run Linux commands and create files. There are modules available in cloud-init to configure the system, for instance, to install software or do some user and group management. If a module is available, then it's the best way to do it. It is not only easier (the hard work is done for you), but it's also distribution agnostic.
cloud-init uses YAML; please be aware that indentation is important! The purpose of the script is to install the npm, nodejs, and nginx packages, then configure nginx, and finally, display a message, Hello World from host $hostname, where $hostname is the name of the VM. To start with, let's create a YAML file with the following content, and name it cloudinit.yml:
#cloud-config
groups: users
users:
- default
- name: azureuser
- groups: users
- shell: /bin/bash
package_upgrade: true
packages:
- nginx
- nodejs
- npm
write_files:
- owner: www-data:www-data
- path: /etc/nginx/sites-available/default
content: |
server {
listen 80;
location / {
proxy_pass http://localhost:3000;
proxy_http_version 1.1;
proxy_set_header Upgrade $http_upgrade;
proxy_set_header Connection keep-alive;
proxy_set_header Host $host;
proxy_cache_bypass $http_upgrade;
}
}
- owner: azureuser:users
- path: /home/azureuser/myapp/index.js
content: |
var express = require('express')
var app = express()
var os = require('os');
app.get('/', function (req, res) {
res.send('Hello World from host ' + os.hostname() + '!')
})
app.listen(3000, function () {
console.log('Hello world app listening on port 3000!')
})
runcmd:
- systemctl restart nginx
- cd "/home/azureuser/myapp"
- npm init
- npm install express -y
- nodejs index.js
If you look at this configuration file, you can use some of the following modules in action:
- users and groups: User management
- packages and package_upgrade: Software management
- write_files: File creation
- runcmd: Run commands that are not possible with modules
You can also create a VM:
az vm create --resource-group <resource group>
--name <vm name> --image UbuntuLTS
--admin-username linuxadmin
--generate-ssh-keys --custom-data cloudinit.txt
After deployment, it will take some time before everything is done. Logging is done in the VM in the /var/log/cloud-init.log and /var/log/cloud-init-output.log files.
Change the network security group rules to permit traffic on port 80. After that, open your browser to the IP address of the VM. If everything is OK, it will show the following: Hello World from host ubuntu-web!
Note
There is no support for cloud-init in the Az cmdlets.
Vagrant
Until now, we used solutions provided by Microsoft; maybe we should call them native solutions. That's not the only way to deploy your workload in Azure. Many vendors have created solutions to automate deployments in Azure. In this section, we want to cover a solution from a company called HashiCorp (https://www.hashicorp.com). Later on in this chapter, we'll cover another product from this company: Packer. There are several reasons why we have chosen these products:
- The products are very popular and well-known.
- There is an excellent relationship between Microsoft and HashiCorp; they work very hard together to implement more and more features.
- And the most important reason: HashiCorp has different products that you can use for different implementation scenarios. This will make you think again about what method you want to choose in different use cases.
Vagrant is a tool you can use for deployment if you are a developer. It helps you to set up an environment in a standardized way that you can redeploy over and over again.
Installing and Configuring Vagrant
Vagrant is available for several Linux distributions, Windows, and macOS and can be downloaded from https://www.vagrantup.com/downloads.html:
- To install the software in Ubuntu, use the following commands:
cd /tmp
wget https://releases.hashicorp.com/vagrant/2.1.2/vagrant_2.1.2_x86_64.deb
sudo dpkg -i vagrant_2.1.2_x86_64.deb
In RHEL/CentOS, use the following command:
sudo yum install
https://releases.hashicorp.com/vagrant/2.1.2/
vagrant_2.1.2_x86_64.rpm
If you deploy it on a separate VM or workstation, make sure that you install the Azure CLI as well.
Log in to Azure:
az login
Create a service principal account that Vagrant can use to authenticate:
az ad sp create-for-rbac --name vagrant
From the output, you need the appID, also known as the Client ID, and the password, which is the same as the Client Secret.
- Execute the following command to get your tenant ID and subscription ID:
az account show
In the output of this command, you can see your tenant ID and your subscription ID.
- Create a file with the following content and save it to ~/.azure/vagrant.sh:
AZURE_TENANT_ID="<tenant id>"
AZURE_SUBSCRIPTION_ID="<account id>"
AZURE_CLIENT_ID="<app id>"
AZURE_CLIENT_SECRET="<password>"
export AZURE_TENANT_ID AZURE_SUBSCRIPTION_ID AZURE_CLIENT_ID
AZURE_CLIENT_SECRET
- These variables must be exported before you can use Vagrant. In macOS and Linux, you can do that by executing the following command:
source <file>
- An SSH key pair must be available. If this has not already been done, create a key pair with this command:
ssh-keygen
- The last step involves the installation of the Azure plugin for Vagrant:
vagrant plugin install vagrant-azure
- Verify the installation:
vagrant version

Figure 7.10: Verifying the vagrant installation
Now that we have confirmed Vagrant is up and running, let's go ahead and deploy a VM using Vagrant.
Deploying a VM with Vagrant
To deploy a VM with Vagrant, you'll need to create a new working directory where we will create the Vagrantfile:
Vagrant.configure('2') do |config|
config.vm.box = 'azure'
# use local ssh key to connect to remote vagrant box config.ssh.private_key_path = '~/.ssh/id_rsa'
config.vm.provider :azure do |azure, override|
azure.tenant_id = ENV['AZURE_TENANT_ID']
azure.client_id = ENV['AZURE_CLIENT_ID']
azure.client_secret = ENV['AZURE_CLIENT_SECRET'] azure.subscription_id = ENV['AZURE_SUBSCRIPTION_ID']
end
end
The configuration file starts with a statement that we need the Azure plugin for Vagrant that we installed earlier. After that, the configuration of the VM starts. To be able to provide a workload with Vagrant, a dummy VM is needed. It's almost an empty file: it only registers Azure as a provider. To get this dummy VM, execute the following command:
vagrant box add azure-dummy
https://github.com/azure/vagrant-azure/raw/v2.0/dummy.box
--provider azure
Normally, a lot of the options, for example, vm_image_urn, will be embedded in a box file and you just have to provide minimal options in the Vagrantfile. Since we're using a dummy box, there are no pre-configured defaults. az.vm_image_urn is the actual image offered by Azure with the following syntax:
<publisher>:<image>:<sku>:<version>
Besides using standard images, it is possible to use custom virtual hard disk (VHD) files using these directives:
- vm_vhd_uri
- vm_operating_system
- vm_vhd_storage_account_id
Later in this chapter, we will discuss these custom VHD files in more detail.
Another important value is the name of the VM; it's also used as a DNS prefix. This must be unique! Otherwise, you'll get this error: DNS record <name>.<location>.cloudapp.azure.com is already used by another public IP.
Deploy the Vagrant box, the VM:
vagrant up
Here is what the output should look like:

Figure 7.11: Deploying the vagrant box
When the machine is ready to use, you can log in using this command:
vagrant ssh
The contents of your work directory are copied to /vagrant in the VM. This can be a very nice way to have your files available in the VM.
Clean up your work with this command:
vagrant destroy
Note
It's possible to create multi-machine boxes as well.
Vagrant Provisioners
Providing an easy way to deploy a VM is not the most important feature of Vagrant. The main reason to use Vagrant is to have a complete environment up and running; after deployment, VMs need configuration. There are provisioners to do the after-work. The purpose of provisioners is to make configuration changes, automatically install packages, and more. You can use the shell provisioner, which helps to upload and execute scripts in the guest VM, and the file provisioner to run commands and copy files to the VM.
Another possibility is to use Vagrant provisioners for orchestration tools, such as Ansible and Salt. The next chapter will discuss those tools. In this chapter, together with the provisioners' documentation on the Vagrant website (https://www.vagrantup.com/docs/provisioning/), we will configure the shell provisioners and the file provisioner. Let's go ahead start configuring the provisioners by adding the following code block to the Vagrantfile.
Add this to the bottom of the Vagrantfile:
# Configure the Shell Provisioner
config.vm.provision "shell", path: "provision.sh"
end # Vagrant.config
We have referenced a file, provision.sh, in the shell provisioner. So let's create a short provision.sh script with some simple commands:
#!/bin/sh
touch /tmp/done
touch /var/lib/cloud/instance/locale-check.skip
Deploy the VM again, and you can see that Vagrant has taken the SSH key we created and has started the provisioning:

Figure 7.12: Vagrant has started provisioning
Execute this code to verify whether the /tmp/done directory has been created in the VM as we instructed in the provision.sh file:
vagrant ssh -c "ls -al /tmp/done"
Packer
It's important for a developer, especially if there are many people working on the same application, to have a standardized environment. If you are not using container technology (refer to Chapter 9, Container Virtualization in Azure, and Chapter 10, Working with Azure Kubernetes Service, to find out more about this technology), Vagrant is a great tool that helps developers with this and manages the life cycle of a VM to get things running very quickly in a reproducible way. It provisions the setup based on image offerings or a custom VHD. It's everything you need if you want to develop your application in the cloud.
But if you want more complex environments, building your own images, multi-machine deployments, cross-cloud environments, and so on, it's not completely impossible, but as soon as you try, you will see that Vagrant is not made for those scenarios.
This is where another HashiCorp product comes in handy: Packer. In this section, we're going to use Packer with a very similar configuration to the one we used before with Vagrant.
Installing and Configuring Packer
Packer is available for macOS, Windows, several Linux distributions, and FreeBSD. Packages are available to download at https://www.packer.io/downloads.html.
Download a package, unzip it, and you're ready to go. In Linux, it's a good idea to create a ~/.bin directory and unzip it there:
mkdir ~/bin
cd /tmp
wget wget https://releases.hashicorp.com/packer/1.2.5/
packer_1.2.5_linux_amd64.zip
unzip /tmp/packer*zip
cp packer ~/bin
Log out and log in again. Almost every distribution adds the ~/bin directory to the PATH variable as soon it's available, but you have to log out and log in again.
Check the PATH variable by executing $PATH. If you are not able to see the bin folder in your home directory added to the path, execute the following:
export PATH=~/bin:$PATH
Verify the installation:
packer version
If the installation was successful, the command will return the version of Packer, as you can see in this screenshot:

Figure 7.13: Verifying packer installation through Packer version
For the configuration of Packer, we'll need the same information as for Vagrant:
- Azure tenant ID (az account show)
- Azure subscription ID (az account show)
- The ID of the service principal account (if you want to use the same one as in Vagrant, use the az app list --display-name vagrant command)
- The secret key to this account (if needed, you can use the az ad sp reset-credentials command to generate a new one)
- The existing resource group in the correct location; in this example, we are using LinuxOnAzure as the resource group name and West Europe as the location (created with the az group create --location "West Europe" --name "LinuxOnAzure" command)
Create a file (for instance, /packer/ubuntu.json) with the following content:
{
"builders": [{
"type": "azure-arm",
"client_id": "<appId>",
"client_secret": "<appPassword>",
"tenant_id": "<tenantId>",
"subscription_id": "<subscriptionID>",
"managed_image_resource_group_name": "LinuxOnAzure",
"managed_image_name": "myPackerImage",
"os_type": "Linux",
"image_publisher": "Canonical",
"image_offer": "UbuntuServer",
"image_sku": "18.04-LTS",
"location": "West Europe",
"vm_size": "Standard_B1s"
}],
"provisioners": [{
"type": "shell",
"inline": [
"touch /tmp/done",
"sudo touch /var/lib/cloud/instance/locale-check.skip"
]
}]
}
Validate the syntax:
packer validate ubuntu.json
Then, build the image as follows:
packer build ubuntu.json
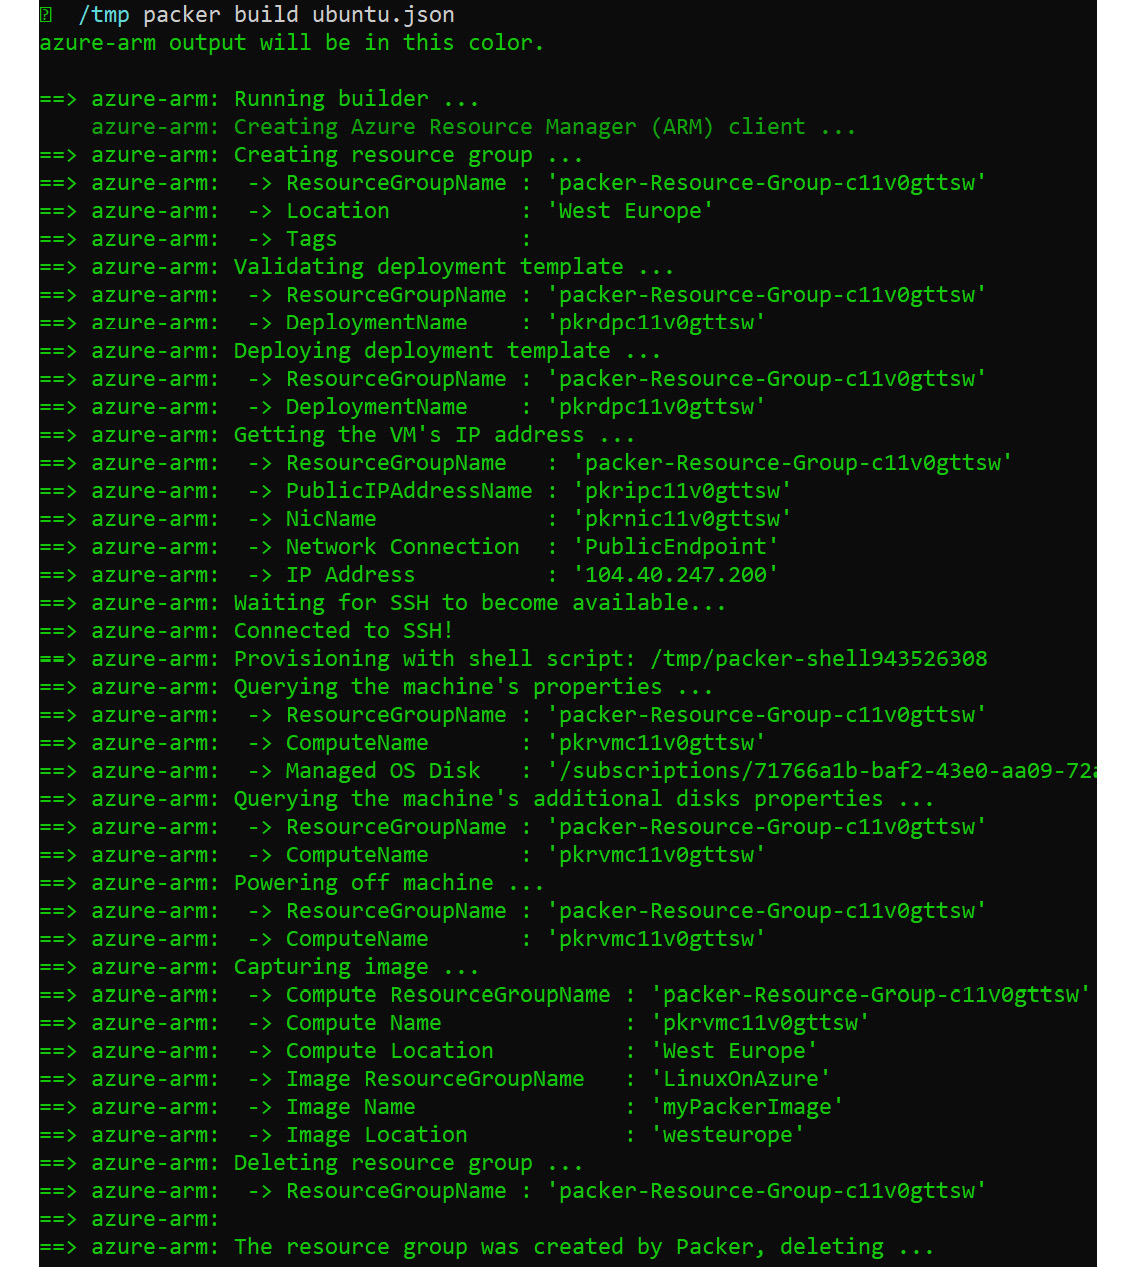
Figure 7.14: Building the image using Packer build command
It takes a few minutes for Packer to build the VM, run the provisioners, and clean up the deployment.
Once the build is complete, Packer will give you a summary of what was built, such as the resource group, where the VM was deployed, the name of the image, and the location:

Figure 7.15: Image summary
The build will create an image but not a running VM. From the image Packer created, you can deploy a machine using this command:
az vm create
--resource-group LinuxOnAzure
--name mypackerVM
--image myPackerImage
--admin-username azureuser
--generate-ssh-keys
To clean up the environment and delete the image created by Packer, execute the following command:
az resource delete --resource-group LinuxOnAzure --resource-type images
--namespace Microsoft.Compute --name myPackerImage
The JSON file that I provided earlier in this chapter is sufficient to create an image. It is very similar to what we did with Vagrant, but to make it into a deployable image, we have to generalize the VM, which means allowing it to be imaged for multiple deployments. Adding /usr/sbin/waagent -force -deprovision+user & export HISTSIZE=0 && sync to the code will generalize the VM. Don't worry about this code – you will see it again when we generalize the VM via the Azure CLI in the next section.
Locate the following code:
"provisioners": [{
"type": "shell",
"inline": [
"touch /tmp/done",
"sudo touch /var/lib/cloud/instance/locale-check.skip"
]
This needs to be replaced with the following code:
"provisioners": [{
"type": "shell",
"execute_command": "echo '{{user 'ssh_pass'}}' | {{ .Vars }} sudo -S -E sh '{{ .Path }}'",
"inline": [
"touch /tmp/done",
"touch /var/lib/cloud/instance/locale-check.skip",
"/usr/sbin/waagent -force -deprovision+user && export HISTSIZE=0 && sync"
]
}]
}
execute_command is a command used to execute the script as the correct user.
Validate the template using the packer validate command, as we did before, to avoid any errors and build the image again.
So far, we have created the image using Packer, but this can also be done using the Azure CLI and Powershell. The next section is all about this.
Custom Virtual Machines and VHDs
In the previous section, we used standard VM offerings in Azure and used two different methods to do some configuration work afterward. However, as stated before, there are reasons why a default image might not be the solution for you. Let's summarize the reasons one more time.
The native image offerings by Azure are a good starting point to deploy VMs. Some of the benefits of using native images are as follows:
- Created and supported by Linux distribution vendors or a trusted partner
- Fast to deploy, both manually and orchestrated, and, of course, you can customize them afterward
- Easy-to-extend functionality and options with Azure extensions
If you are going with the native offerings there are some disadvantages or, in other words, some drawbacks:
- If you want more hardening than the standard image, then you have to rely on hardened image versions from the Marketplace, which is expensive for some.
- The standard image is not compliant with, for example, company standards, especially when it comes to partitioning.
- The standard image is not optimized for a certain application.
- Some Linux distributions aren't supported, such as Alpine and ArchLinux.
- Questions about reproducible environments: how long is a certain image version available?
So we need custom images, with which we can customize the image and mitigate the issues or drawbacks. We are not suggesting that the native offers are not secure or can't accomplish the task, but in an enterprise environment, there are scenarios such as bring-your-own-subscription for RHEL/SLES VMs and third-party Independent Software Vendor (ISV) software packaged as images with which you have to go with the custom images. Let's go ahead and see how we can use custom images in Azure.
Creating a Managed Image
In the previous section, we investigated Packer. A VM was created, and after that, it was transformed into an image. This image can be used to deploy a new VM. This technique is also called capturing a VM image.
Let's find out whether we can do it step by step the manual way using the Azure CLI:
- Create a resource group:
myRG=capture
myLocation=westus
az group create --name $myRG --location $myLocation
- Create a VM:
myVM=ubuntudevel
AZImage=UbuntuLTS
Admin=linvirt
az vm create --resource-group $myRG --name $myVM
--image $AZImage
--admin-username linvirt --generate-ssh-keys
- Log in to the VM and deprovision it using the Azure VM Agent. It generalizes the VM by removing user-specific data:
sudo waagent -deprovision+user
Once you execute the command, the output will show warnings about the data that is going to be deleted. You can proceed by entering y, as shown here:

Figure 7.16: Deprovisioning the VM
Type exit to leave the SSH session.
- Deallocate the VM:
az vm deallocate --resource-group $myRG --name $myVM
- Mark it as being generalized. This means allowing it to be imaged for multiple deployments:
az vm generalize --resource-group $myRG --name $myVM
- Create an image from the VM in this resource group:
destIMG=customUbuntu
az image create --resource-group $myRG --name $destIMG --source $myVM
- Verify the result:
az image list -o table
The output will show the list of images in a table format:

Figure 7.17: Azure image list
- You can deploy a new VM with this image:
az vm create --resource-group <resource group>
--name <vm name>
--image $destIMG
--admin-username <username>
--generate-ssh-key
If you are in PowerShell, this is also possible. Let's go very quickly through the first step. The process is very similar; the only difference is that we are using PowerShell cmdlets:
$myRG="myNewRG"
$myLocation="westus"
$myVM="ubuntu-custom"
$AZImage="UbuntuLTS"
#Create resource group
New-AzResourceGroup -Name $myRG -Location $myLocation
#Create VM
New-AzVm '
-ResourceGroupName $myRG '
-Name $myVM '
-ImageName $AZimage '
-Location $myLocation '
-VirtualNetworkName "$myVM-Vnet" '
-SubnetName "$myVM-Subnet" '
-SecurityGroupName "$myVM-NSG" '
-PublicIpAddressName "$myVM-pip"
PowerShell may prompt you to enter credentials. Proceed with entering the credentials to access your VM. After that, we will proceed with the deallocation of the VM:
Stop-AzureRmVM -ResourceGroupName <resource group>'
-Name <vm name>
As we did before, now we have to mark the VM as generalized:
Set-AzVm -ResourceGroupName <resource group> -Name <vm name> '
-Generalized
Let's capture the VM information and save it to a variable, because we will need it to create the image's configuration:
$vm = Get-AzVM –Name <vm name> -ResourceGroupName <resource group name>
Now let's create the image's configuration:
$image = New-AzImageConfig -Location<location> -SourceVirtualMachineId $vm.Id
Since we have the configuration stored in $image, use that to create the image:
New-AzImage -Image $image -ImageName <image name> '
-ResourceGroupName <resource group name>
Verify that the image has been created:
Get-AzImage –ImageName <Image Name>
Running the preceding command will give you an output similar to the following, with the details of the image you created:
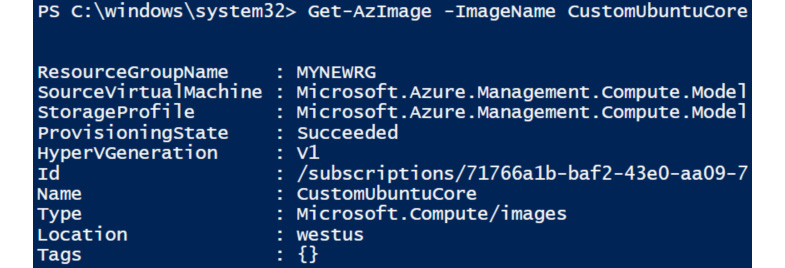
Figure 7.18: Fetching image details
If you want to create a VM using the image we just created, execute the following command:
New-AzVm '
-ResourceGroupName "<resource group name>" '
-Name "<VM Name>" '
-ImageName "<Image Name>" '
-Location "<location>" '
-VirtualNetworkName "<vnet name>" '
-SubnetName "<subnet name>" '
-SecurityGroupName "<nsg name>" '
-PublicIpAddressName "<public IP name>"
To summarize what we did, we created a VM, generalized it, and created an image that can be further used to deploy multiple VMs. There is also an alternative method to create multiple VMs from a reference image, which is using ''snaphots''. This will be covered in the next section.
An Alternative Method Using Snapshots
If you want to keep the original VM, you can create a VM image from a snapshot. A snapshot in Azure is actually a complete VM!
Using PowerShell
- Declare a variable, $vm, which will store the information about the VM we are going to take and create a snapshot:
$vm = Get-AzVm -ResourceGroupName <resource group> '
-Name $vmName
$snapshot = New-AzSnapshotConfig '
-SourceUri $vm.StorageProfile.OsDisk.ManagedDisk.Id '
-Location <location> -CreateOption copy
New-AzSnapshot '
-Snapshot $snapshot -SnapshotName <snapshot name> '
-ResourceGroupName <resource group>
- As we need the snapshot ID for a later step, we will reinitialize the snapshot variable:
$snapshot = Get-AzSnapshot –SnapshotName <Snapshot Name>
- The next step involves creating the image configuration from the snapshot.
$imageConfig = New-AzImageConfig -Location <location>
$imageConfig = Set-AzImageOsDisk -Image $imageConfig '
-OsState Generalized -OsType Linux -SnapshotId $snapshot.Id
- Finally, create the image:
New-AzImage -ImageName <image name> '
-ResourceGroupName <resource group> -Image $imageConfig
Using the Azure CLI
In the Azure CLI, things are easier; just get the ID of the snapshot and convert it to a disk:
- Using the Azure CLI, create a snapshot:
disk=$(az vm show --resource-group <resource group>
--name <vm name> --query "storageProfile.osDisk.name" -o tsv)
az snapshot create --resource-group <resource group>
--name <snapshot name> --source $disk
- Create the image:
snapshotId=$(az snapshot show --name <snapshot name>
--resource-group <resource group> --query "id" -o tsv)
az image create --resource-group <resource group> --name myImage
--source $snapshotID --os-type Linux
Don't forget to generalize the VM before you snapshot it. If you don't want to do that, create a disk from the snapshot and use that as a disk parameter with the --attach-os-disk command in the Azure CLI, or Set-AzVMOSDisk in PowerShell.
Custom VHDs
You can completely build your own image from scratch. In this scenario, you have to build your own VHD file. There are multiple ways to do this:
- Create a VM in Hyper-V or in VirtualBox, which is a free hypervisor available for Windows, Linux, and macOS. Both products support VHD natively.
- Create your VM in VMware Workstation or KVM and use it in Linux qemu-img to convert the image. For Windows, the Microsoft Virtual Machine Converter is available at https://www.microsoft.com/en-us/download/details.aspx?id=42497. This includes a PowerShell cmdlet, ConvertTo-MvmcVirtualHardDisk, to make the conversion.
Note
Azure only supports Type-1 VHD files and should have a virtual size aligned to 1 MB. At the time of writing this book, Type-2 is available in preview (https://docs.microsoft.com/en-us/azure/virtual-machines/windows/generation-2).
Azure runs on Hyper-V. Linux requires certain kernel modules to run in Azure. If the VM was created outside of Hyper-V, the Linux installers may not include the drivers for Hyper-V in the initial ramdisk (initrd or initramfs), unless the VM detects that it's running on a Hyper-V environment.
When using a different virtualization system (such as VirtualBox or KVM) to prepare your Linux image, you may need to rebuild the initrd so that at least the hv_vmbus and hv_storvsc kernel modules are available on the initial ramdisk. This known issue is for systems based on the upstream Red Hat distribution, and possibly others.
The mechanism for rebuilding the initrd or initramfs image may vary depending on the distribution. Consult your distribution's documentation or support for the proper procedure. Here is an example of rebuilding the initrd by using the mkinitrd utility:
- Back up the existing initrd image:
cd /boot
sudo cp initrd-'uname -r'.img initrd-'uname -r'.img.bak
- Rebuild the initrd with the hv_vmbus and hv_storvsc kernel modules:
sudo mkinitrd --preload=hv_storvsc --preload=hv_vmbus -v -f initrd-'uname -r'.img 'uname -r'
It's almost impossible to describe every available option for each Linux distribution and each hypervisor. In general, the things you need to do are listed here. It's very important that we follow the steps accurately, otherwise, this task cannot be accomplished. We strongly recommend following the Microsoft documentation for this (https://docs.microsoft.com/en-us/azure/virtual-machines/linux/create-upload-generic).
- Modify the kernel boot line in GRUB or GRUB2 to include the following parameters so that all console messages are sent to the first serial port. These messages can help Azure Support to debug any issues:
console=ttyS0,115200n8 earlyprintk=ttyS0,115200 rootdelay=300
- Microsoft also recommends removing the following parameters, if they exist:
rhgb quiet crashkernel=auto
- Install the Azure Linux Agent, because the agent is required for provisioning Linux images on Azure. You can install it using the rpm or deb file, or you can manually install it using the steps available in the Linux Agent Guide (https://docs.microsoft.com/en-us/azure/virtual-machines/extensions/agent-linux).
- Make sure the OpenSSH server is installed and autostarts during boot.
- Don't create swap. You can enable it later if required, as we discussed in the previous chapter.
- Deprovision the VM as in the Creating a Managed Image section.
- Shut down the VM, and your VHD is ready to be uploaded to the VM.
For simplicity, we are going to skip the preceding steps and download the official image from Ubuntu's cloud image repository, because the most important part is the uploading of the image to Azure. Download the cloud image from https://cloud-images.ubuntu.com/bionic/. This web page contains all the versions of Bionic, and you can navigate through the directories and download the tar.gz file for Azure. The filename will be similar to bionic-server-cloudimg-amd64-azure.vhd.tar.gz; however, this name may vary a little depending upon the version you are looking at.
Now we have to upload the VHD to Azure:
- To start with, it's a good idea to have a separate storage account for images, so let's create a new storage account. Here, we are going with Premium_LRS, but if you wish, you can go for Standard_LRS as well to save some costs:
az storage account create --location <location>
--resource-group <resource group> --sku Premium_LRS
--name <account name> --access-tier Cool --kind StorageV2
- Save the output for later use. List the access keys:
az storage account keys list --account-name <storage account name>
--resource-group <resource group>
- Save the output again. The next thing we need is a container to store the files:
az storage container create
--account-name <storage account>
--account-key <storage account key 1>
--name <container name>
- Now you can upload the VHD:
az storage blob upload --account-name <storage account>
--account-key <storage account key>
--container-name <container name>
--type page --file ./bionic-server-cloudimg-amd64.vhd
--name bionic.vhd
Note
You can also upload the file using the Azure portal or PowerShell. Other methods are Azure Storage Explorer (https://azure.microsoft.com/en-us/features/storage-explorer/) or the Azure VHD utils (https://github.com/Microsoft/azure-vhd-utils). The last one is amazingly fast!
- Receive the blob URL:
az storage blob url --account-name <storage account>
--account-key <storage account key>
--container-name <container name>
--name bionic.vhd
- It's now possible to create a disk from the upload:
az disk create --resource-group <resoure group>
--name bionic --source <blob url> --Location <location>
- Create a VM image with this disk:
az image create --resource-group <resource group>
--name bionic --source <blob url> --os-type linux
--location <location>
- Finally, create a VM based on this image:
az vm create --resource-group <resource group>
--name <vm name>
--image bionic
--admin-username <username>
--generate-ssh-key
--location <location>
Note
You can make your VHD images public; a nice example of this is a lesser-known Linux distribution named NixOS. On their website, https://nixos.org/nixos/download.html, they describe a way to deploy their operating system in Azure!
Let's conclude what we've done. We took two approaches here. We created and uploaded a Linux VHD from an existing VM, and then we manually downloaded an Ubuntu VHD and used it. Either way, we will be uploading it to a storage account and will create an image using it. This image is reusable, and you can deploy as many VMs you want.
The automation process and the tools available for it is vast. In the next chapter, we will continue with the automation process and we will discuss the most widely used tools, which are Ansible and Terraform.
Summary
In this chapter, we started asking why and when we should use automation in Azure. Later on, we added questions regarding using the images offered by Azure.
With these questions in mind, we explored the options for automating our deployments:
- Scripting
- ARM templates
- Vagrant
- Packer
- Building and using your own images
Vagrant and Packer are examples of third-party solutions that are very popular tools that make it possible to easily create and recreate environments as an important part of your development process.
It's important to know that all the techniques described in this chapter can be combined into a complete solution. For instance, you can use cloud-init together with ARM, but also with Vagrant.
Automation and orchestration are closely related. In this chapter, we covered automation, especially as a part of development environments, to automate the deployment of VMs. Automation is often a difficult solution to maintain your workload following development and deployment. This is where orchestration kicks in, as covered in the next chapter.
Questions
- What are the main reasons for using automated deployments in Azure?
- What is the purpose of automation in development environments?
- Can you describe the differences between scripting and automation?
- Can you name some of the automated deployment options available in Azure?
- What is the difference between Vagrant and Packer?
- Why should you use your own image instead of an image offered by Azure?
- What options are available to create your own image?
And perhaps you can find some time to finish the example script in the Scripting section, in the language of your choice.
Further Reading
Especially regarding the Azure CLI, PowerShell, and ARM, the Azure documentation contains a huge amount of valuable information, with many examples. And everything we wrote in the Further reading section of Chapter 2, Getting Started with the Azure Cloud, is important for this chapter as well.
Another resource provided by Microsoft is its blogs. If you visit https://blogs.msdn.microsoft.com/wriju/category/azure/, you'll find many interesting posts about automation, including more detailed examples.
In his blog at https://michaelcollier.wordpress.com, Michael S. Collier provides a lot of information regarding Azure. Almost every post includes scripting and automation possibilities.
There are not many recent books about Vagrant. We are sure you would really enjoy Infrastructure as Code (IAC) Cookbook, by Stephane Jourdan and Pierre Pomes, published a year ago. This book not only concerns Vagrant; it also covers other solutions, such as cloud-init and Terraform. The authors created a book that is not only a great introduction but managed to make it useable as a reference guide as well.
Can we suggest a book that has been recently published? Hands-On DevOps with Vagrant: Implement End-to-End DevOps and Infrastructure Management Using Vagrant, by Alex Braunton. His posts on YouTube regarding this topic are worth watching as well.