
In the first chapter, we covered the history of, and the ideas behind, virtualization and cloud computing. After that, you read about the Microsoft Azure cloud. This chapter will help you take your first steps into the world of Azure, get access to Azure, explore the different Linux offerings, and deploy your first Linux virtual machine.
After deployment, you will need access to your virtual machine using Secure Shell (SSH) with password authentication or using an SSH key pair.
To take the first steps on your journey into the Azure cloud, it is important to complete all the exercises and examine the outcomes. In this chapter, we will be using PowerShell as well as the Azure CLI. Feel free to follow whichever you're comfortable with; however, learning both won't hurt. The key objectives of this chapter are:
- Setting up your Azure account.
- Logging in to Azure using the Azure CLI and PowerShell.
- Interacting with Azure Resource Manager (ARM) to create network and storage resources.
- Understanding Linux distributions and Microsoft-endorsed distributions.
- Deploying your first Linux virtual machine.
Note
Everything in this chapter is tested on macOS, Windows Subsystem for Linux, and the latest versions of CentOS and openSUSE LEAP.
Technical Requirements
If you want to try all the examples in this chapter, you'll need a browser at the very least. For stability reasons, it's important to use a very recent version of a browser. Microsoft offers a list of supported browsers in the official Azure documentation:
- Microsoft Edge (latest version)
- Internet Explorer 11
- Safari (latest version, Mac only)
- Chrome (latest version)
- Firefox (latest version)
Based on personal experience, we recommend using Google Chrome or a browser based on a recent version of its engine, such as Vivaldi.
You can do all the exercises in your browser, even the exercises involving the command line. In practice, it's a good idea to use a local installation of the Azure CLI or PowerShell; it's faster, it's easier to copy and paste code, and you can save history and the output from the commands.
Getting Access to Azure
To start with Azure, the first thing you'll need is an account. Go to https://azure.microsoft.com and get yourself a free account to get started, or use the corporate account that is already in use. Another possibility is to use Azure with a Visual Studio Professional or Enterprise subscription, which will give you Microsoft Developer Network (MSDN) credits for Azure. If your organization already has an Enterprise Agreement with Microsoft, you can use your Enterprise subscription, or you can sign up for a pay-as-you-go subscription (if you have already used your free trial).
If you are using a free account, you'll get some credits to start, some of the popular services for a limited time, and some services that will stay free always, such as the container service. You can find the most recent list of free services at https://azure.microsoft.com/en-us/free. You won't be charged during the trial period, except for virtual machines that need additional licensing, but you do need a credit card to identify yourself.
Logging in Using the Azure portal
Point your browser to https://portal.azure.com and use your credentials to log in. You are ready to start using Azure, or, in other words, to start using your subscription. In Azure, a subscription permits you to create and deploy resources using the Azure portal/the Azure CLI/PowerShell with your account. It is also used for accounting and billing.
The Azure portal takes you to a dashboard that you can modify to meet your monitoring needs. You can now:
- Inspect your resources.
- Create new resources.
- Visit the Marketplace, which is an online store where you can purchase and deploy applications or services that are built for the Azure cloud.
- Get insights into your billing.
You can use the web interface, doing everything graphically, or use Azure Cloud Shell via the web interface, which provides a Bash or PowerShell interface.
Getting Command-line Access to Azure
There are several good reasons to use the command line. That's why, in this book, we'll mostly cover Azure command-line access:
- It can help you to understand the architecture of Azure. In the graphical interface, often you can do many things in one configuration window without understanding the relationships between the different fields and components.
- It is the first step in automation and orchestration.
- The web interface is still in active development; the web interface can, and will, change over time:
Some features and options are not available yet.
It is possible that Microsoft will relocate features and options in the web interface.
- The command-line interface, on the other hand, is very stable in syntax and output.
In this book, we will use both the Azure CLI in the Bash shell and PowerShell with the PowerShell Az module. Both are well-suited, platform-agnostic, and there is, besides one or two exceptions, no difference between them in terms of features. Choose your favorite because you're already familiar with it, or give both interfaces a try and choose afterward.
Note
Please note that copying and pasting commands from this book might give you some errors due to spaces and indentations. For better results, always type in commands. Also, this will help you get used to the commands.
Installing the Azure CLI
If you use the Bash interface within Azure Cloud Shell, there is a pretty complete Linux environment Azure command-line interface installing available to play with. It also provides Azure-specific commands, such as the az command.
You can also install this utility on Windows, macOS, and Linux. A Docker container is available as well. You can find detailed installation instructions for all these platforms at https://docs.microsoft.com/en-us/cli/azure.
Let's use CentOS/ Red Hat Enterprise Linux (RHEL) 7 as an example to install the Azure CLI:
- Import the Microsoft repository's GNU Privacy Guard (GPG) key:
sudo rpm --import https://packages.microsoft.com/keys/microsoft.asc
- Add the repository:
sudo yum-config-manager --add-repo=
https://packages.microsoft.com/yumrepos/azure-cli
- Install the software:
sudo yum install azure-cli
- To install the Azure CLI on an Ubuntu- or Debian-based system, use this:
curl -sL https://aka.ms/InstallAzureCLIDeb | sudo bash
On macOS, you have to install Homebrew first, a free and open-source package management system that simplifies the installation of, mostly, open-source software.
- Open a Terminal and execute the following:
ruby -e "$(curl -fsSL
https://raw.githubusercontent.com/Homebrew/install/master/install)"
- Update Homebrew and install the Azure CLI:
brew update && brew install azure-cli
- After installing the Azure CLI, you can verify the version installed using this:
az -v
Logging in with the Azure CLI
The Azure CLI is a command-line tool that's used to access or manage Azure resources, and the good thing is that it's available for macOS, Linux, and Windows platforms. Before you can use the CLI, you have to log in:
az login
This command will open a browser and requires you to log in with your Microsoft account. If you are getting an error stating that the shell was not able to open the interactive browser, use az login –use-device-code. This will generate a code, and you can use it in https://www.microsoft.com/devicelogin to complete the authentication.
If this is successful, it will give you some output in JSON format regarding your subscription, such as your username:
[
{
"cloudName": "AzureCloud",
"id": "....",
"isDefault": true,
"name": "Pay-As-You-Go",
"state": "Enabled",
"tenantId": "....",
"user": {
"name": "....",
"type": "user"
}
}
]
To get this information again, type the following:
az account list
You can always format the output in JSON, JSONC, TABLE, or TSV formats by using extra parameters.
JSON (or JSONC, the colored variant) format is easier to parse in programming and scripting languages:
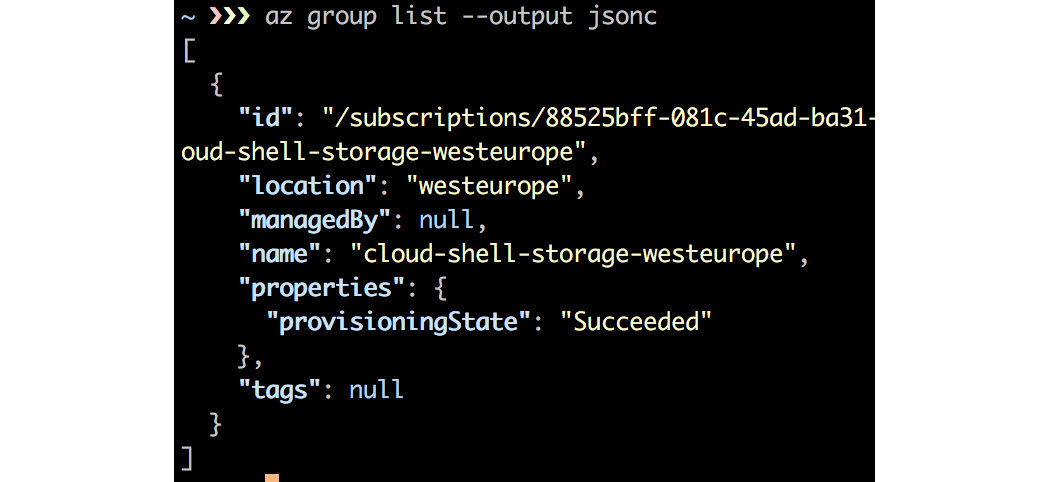
Figure 2.1: Subscription details in JSONC format
Tab-Separated Values (TSV) is a good idea if the output is a single value, if you want to use text-filtering utilities such as AWK, or if you want to export the output to a spreadsheet:

Figure 2.2: Tab-separated subscription details
The table output is very human-readable, but is more limited than the default output:

Figure 2.3: Subscription details in tabular format
To get a list of subscriptions that the logged-in account has access to in a table format, execute the following command:
az account list -o table
To make reading the JSON output easier, you can also query for specific fields:
az account list -o table --query '[].[user.name]'
If you already have a lot of resources or accounts, going through the entire list will be very hard. Luckily, there is a way to drill down the output and get just the info that you need. Chaining the command with the --query parameter will help you do this, using a powerful query language called JMESPATH (http://jmespath.org). Look at the JSON output of the az account list command again. This query is searching for the user field and the name property.
Let's go back to the login procedure. Doing this every time, again and again, may not be the most user-friendly procedure. A better way to do it is by creating a service principal, also known as an app registration, to provide a credential for a specific application:
az ad sp create-for-rbac --name <APP_NAME>
You can provide a name for your application, but certain special characters are not allowed. The reason is that APP_NAME will create a URL, so all the characters that are forbidden in URLs cannot be added to APP_NAME (for example, @ and %). The output, again in JSON format, will provide an application ID (the appID parameter):
{
"appID": "....",
"displayName": "APP_NAME",
"name": "http://APP_NAME",
"password": "....",
"tenant": "...."
}
Please note down the output on a notepad because we will be using these values for authentication. An application or service principal represents an object in the Azure tenant. A tenant refers to an organization, often denoted as <yourcompany/yourname>.onmicrosoft.com, which manages and owns an instance of Microsoft cloud services. If we look from an Azure perspective, all services deployed will be associated with a subscription, and the subscription will be mapped to a tenant. A tenant can have multiple subscriptions hosting different services. From the preceding output, we'll get the following values:
- appID: The application ID is similar to the username of the application. We will be using this ID as our username when logging in.
- displayName: A friendly name given to the application when we created the app. We set the name via the name parameter.
- name: A URL based on the name we have given.
- password: This is the password of the service principal we created. When logging in, we'll use this value in the password field.
- tenant: The tenant ID; we discussed tenants in the previous paragraph.
An application that requires access must be represented by a security principal. The security principal defines the access policy and permissions for the user/application in the tenant. This enables the authentication of the user/application during sign-in and role-based authorization during resource access. To summarize, you can use appID to sign in.
List the roles that are assigned to the newly created appID:
az role assignment list --assignee <appID> --o table
By default, the contributor role is used. This role has full permissions to read and write to your Azure account.
Now, it's a good idea to test this and log out:
az logout
Now, log in again using appID. You can use the values you copied earlier to complete the authentication:
az login --service-principal --username <appID> --tenant <tenant id>
Unfortunately, there is no way to store the username, appID, or tenant id in a configuration file. Optionally, you can add --password to the command:
az login --service-principal --username <appID> --tenant <tenant id> --password <app_password>
Instead of typing complete commands using the az command, you can also open it in interactive shell mode:
az interactive
One of the greatest features of this shell is that it splits the terminal into two windows. In the upper screen, you can type your commands; in the lower screen, you'll get help while typing commands. There is also auto-complete support for commands, parameters, and often parameter values.
PowerShell
PowerShell is a Microsoft-developed scripting language that is integrated into .NET Framework. It was designed by Jeffrey Snover, Bruce Payette, and James Truher in 2006. PowerShell is not only available for Windows, but also for Linux and macOS. You can find detailed instructions for using PowerShell with these operating systems on the GitHub repository for PowerShell: https://github.com/PowerShell.
For instance, to install it in RHEL or CentOS, follow these steps:
- Import the Microsoft repository's GPG key if you didn't do so while following the installation procedure for the Azure CLI:
sudo rpm –import https://packages.microsoft.com/keys/microsoft.asc
- Add the repository:
sudo yum-config-manager --add-repo= https://packages.microsoft.com/rhel/7/prod/
- Install the software:
sudo yum install -y powershell
- Use pwsh -v to show the installed version.
- Enter PowerShell:
pwsh
On macOS, you'll need Homebrew and Homebrew Cask. Cask extends Homebrew to install more and bigger applications:
- Install Homebrew Cask:
brew tap caskroom/cask
- Install PowerShell:
brew cask install powershell
- Use pwsh -v to show the installed version.
- To enter PowerShell:
pwsh
After the installation of PowerShell, you're ready to install the Az module. Downloading the module may take some time, depending upon your internet speed. You'll be able to see the progress of the download in the shell:
Install-Module -Name Az -AllowClobber -Scope CurrentUser -Force
PowerShell uses the PowerShellGet cmdlet to download the module and its dependencies from the PowerShell Gallery, an online repository that hosts many modules. Please note that you'll need administrator privileges in Windows and Linux to do this. The PowerShell Gallery isn't configured as a trusted repository:
Untrusted repository
You are installing the modules from an untrusted repository. If you trust this
repository, change its InstallationPolicy value by running the Set-PSRepository
cmdlet. Are you sure you want to install the modules from 'PSGallery'?
[Y] Yes [A] Yes to All [N] No [L] No to All [S] Suspend [?] Help
(default is "N"): A
Answer the question in the listing with [A] Yes to All.
It is possible now, due to the force parameter, that you have multiple versions of the Az module installed. You can verify the existence of multiple versions with the following command:
Get-InstalledModule -Name Az -AllVersions | ' select Name,Version
The latest version will be used by default, unless you use the -RequiredVersion parameter when importing the module.
Logging in with PowerShell
After the installation is complete, import the module:
Import-Module -name Az
If you don't create a PowerShell script and only execute commands within the PowerShell environment when playing with Azure, you'll need to execute this command again. But, if you want, you can automatically load the modules.
First, find out where your PowerShell profile is on your filesystem by executing the following:
$profile
Open or create this file in a text editor and add the following line:
Import-Module -name Az
Note
It may be necessary to create the directory structure before you can actually create this file.
Now you can execute all the available commands for Azure.
Log in using the following cmdlet:
Connect-AzAccount
This will open an interactive browser window, where you can use your credentials to authenticate. If the result doesn't show you a tenant ID, execute this:
Get-AzContext -ListAvailable | select Tenant
And now, log in again using the tenant ID you have found:
Connect-AzAccount -Tenant <tenantID>
If you have multiple subscriptions, you can add the -Subscription parameter and the subscription ID as well. As discussed before, it's maybe a good idea to create a service principal:
$newsp = New-AzADServicePrincipal ' -DisplayName "APP_NAME" -Role Contributor
If you don't mention DisplayName, which is the friendly name for the service principal, Azure will generate a name in the format azure-powershell-MM-dd-yyyy-HH-mm-ss. Next, you need to retrieve the application ID for the newly created service principal:
$newsp.ApplicationId
And the password can be stored to a variable, which will be encrypted, and we must decrypt it:
$BSTR = [System.Runtime.InteropServices.Marshal]::SecureStringToBSTR($newsp.Secret)
$UnsecureSecret = [System.Runtime.InteropServices.Marshal]::PtrToStringAuto($BSTR)
The $UnsecureSecret variable contains the password for your service principal.
To be able to authenticate, we need the credentials of the service principal:
$creds = Get-Credential
Provide the ApplicationID and the password, which are stored in the $newsp.ApplicationId and $UnsecureSecret variables respectively. Now we have everything we need to connect to Azure using these credentials:
Connect-AzAccount -Credential $creds '
-Tenant <tentant id> '
-ServicePrincipal
Now, save the context:
Save-AzContext -Path $HOME/.Azure/AzureContext.json
Overwrite the existing content if necessary. Exit the PowerShell environment and execute PowerShell. Make sure that you are logged into Azure and verify the context using the following command:
Get-AzContext
Azure Resource Manager
Before you can start the deployment of your first Linux virtual machine, it's important to know more about Azure Resource Manager (ARM).
Basically, ARM enables you to work with resources such as storage and virtual machines. To do so, you have to create one or more resource groups so you can execute life cycle operations, such as deploying, updating, and deleting all the resources in a resource group, in a single operation.
Note
A resource group must be created in a region, also known as a location. Please notice that there may be differences between the services offered in different regions. To find out more about these differences, please visit https://azure.microsoft.com/en-us/global-infrastructure/services/.
Azure has more than 54 regions. If a location is not available, it needs to be whitelisted for your account. For that, you can reach out to Microsoft Support. To get a list of the available locations and supported resource providers for your account, execute the following command in PowerShell:
Get-AzLocation | Select-Object Location
You can also execute the following in Bash:
az account list-locations --query '[].name'
Then, create a resource group in one of the regions:
New-AzResourceGroup -Location westus2 -Name 'MyResource1'
Now, verify the result:
Get-AzResourceGroup | Format-Table
This is the Bash version of the preceding command:
az group create --location westus2 --name MyResource2
To verify the result of Azure Resource Manager (ARM) this command, execute the following:
az group list -o table
Besides working with regions and resource groups, you have to understand the concept of storage redundancy. The available replication options are as follows:
- Standard_LRS: Locally redundant storage
Premium_LRS: Same as LRS, but it supports File Storage as well.
Standard_GRS: Geo-redundant storage
Standard_RAGRS: Read-access geo-redundant storage
- Standard_ZRS: Zone-redundant storage; ZRS doesn't support Blob storage
Note
More information is available on the Microsoft website: https://docs.microsoft.com/en-us/azure/storage/common/storage-redundancy.
Understanding this concept is important because, together with your resource group, a storage account is needed in a region. A storage account provides a unique namespace in Azure to store data (such as diagnostics) and the possibility to use services such as Azure Files. To configure redundancy for this data, you have to specify the SKU that stands for the redundancy option in this context:
New-AzStorageAccount -Location westus '
-ResourceGroupName MyResource1'
-Name "<NAME>" -SkuName Standard_LRS
Or you can do it via the Azure CLI:
az storage account create --resource-group MyResource2
--sku Standard_LRS --name <NAME>
The storage account name must be unique across Azure, be between 3 and 24 characters in length, and use numbers and lowercase letters only.
Linux and Azure
Linux is almost everywhere, on many different devices, and in many different environments. There are many different flavors, and the choice of what to use is yours. So, what do you choose? There are many questions, and many different answers are possible. But one thing's for sure: in corporate environments, support is important.
Linux distributions
As noted earlier, there are many different Linux distributions around. But there are reasons why there are so many options:
- A Linux distribution is a collection of software. Some collections are there for a specific objective. A good example of such a distribution is Kali Linux, which is an advanced penetration testing Linux distribution.
- Linux is a multi-purpose operating system. Thanks to the large number of customization options we have for Linux, if you don't want a particular package or feature on your operating system, you can remove it and add your own. This is one of the primary reasons why there are so many distributions.
- Open source is Darwinian by nature. Sometimes, a project is forked, for instance, because some other developers don't like the goal of the project or think they can do better and patches of the project are not accepted. Only the strongest projects will survive.
- It is a matter of taste. Different people have different tastes and opinions. Some people like the Debian apt package manager; other people may like SUSE's Zypper tool.
- Another big difference is that some distributions are collected and supported by vendors such as Red Hat, SUSE, and Canonical, whereas others, such as Debian, are community-driven.
In production environments, support is important. Before pushing their production workloads to a distribution, organizations will be concerned with certain factors, such as SLA, downtime, and security updates, and the following questions might arise:
- Who is responsible for the updates, and what kind of information comes with the updates?
- Who is responsible for support, and who am I going to call if there is a problem?
- Who is going to advise me if there are legal problems with the software licensing?
Microsoft-endorsed Linux Distributions
In the Azure Marketplace, there are Linux images provided by third parties, also called Microsoft partners. These are Microsoft-endorsed Linux distributions.
Microsoft works Microsoft-endorsed Linux distributions together with these partners and the Linux community to make sure that these Linux distributions work well on Azure.
It is possible to import your own image, or even your own Linux distribution, into Azure. Microsoft contributes directly to the Linux kernel, providing Linux Integration Services for Hyper-V and Azure, and because of this you can run every Linux distribution on Azure as long as support is compiled into the kernel. Also, on every Linux image in the Azure Marketplace, the Azure Linux Agent is installed, and the source code of this agent is available on GitHub as well, so you can install it in your image. Microsoft is even willing to guide you if you have issues with Linux; just buy a support plan!
For some commercial Linux distributions, there are great support options available:
- Red Hat: Microsoft Support will help you to use the Azure platform or services, and will also support issues within Red Hat, but this requires a support plan.
- Oracle Linux: Microsoft offers a support plan; additional commercial support can be bought from Oracle.
- SUSE: There are premium images supported by Microsoft; if needed, they will call SUSE for you. This SUSE premium image includes all software, updates, and patches.
- Other vendors: There are Microsoft support plans to cover other vendors; you don't have to buy a separate plan for this. Microsoft plan details are available at https://azure.microsoft.com/en-us/support/plans/.
Note
Please visit the Microsoft website for a recent list of endorsed distributions and versions, as well as details about the support that is available for a distribution:
https://docs.microsoft.com/en-us/azure/virtual-machines/linux/endorsed-distros
Deploying a Linux Virtual Machine
We've covered the Linux distributions available in Azure and the level of support you can get. In the previous section, we set up the initial environment by creating the resource group and storage; now it's time to deploy our first virtual machine.
Your First Virtual Machine
The resource group has been created, a storage account has been created in this resource group, and now you are ready to create your first Linux virtual machine in Azure.
In PowerShell, use the following command:
New-AzVM -Name "UbuntuVM" -Location westus2 '
-ResourceGroupName MyResource1 '
-ImageName UbuntuLTS -Size Standard_B1S
The cmdlet will prompt you to provide a username and password for your virtual machine:
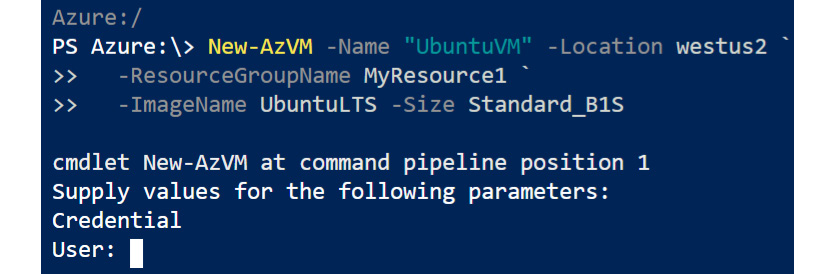
Figure 2.4: Providing user credentials for your virtual machine
In Bash, you can use the following command:
az vm create --name UbuntuVM --resource-group MyResource2
--image UbuntuLTS --authentication-type password
--admin-username student --size Standard_B1S
This was very easy, but if you create a virtual machine instance this way, the number of options you can set is very limited. This process will create multiple resources required by the virtual machine, such as the disk, NIC, and public IP, using default settings.
Let's dive a little bit further into the details and get some information about the choices made.
Images
In our example, we deployed a virtual machine with the image name UbuntuLTS. You can choose between several Linux images:
- CentOS
- Debian
- RHEL
- UbuntuLTS
- CoreOS
- openSUSE
- SUSE Linux Enterprise
But there are many more images offered by different vendors, called publishers.
Let's get a list of these publishers. In PowerShell, use this command:
Get-AzVMImagePublisher -Location <REGION>
As you can see in the following screenshot, Azure has a lot of publishers, and we'll pick one of these for the demonstration:
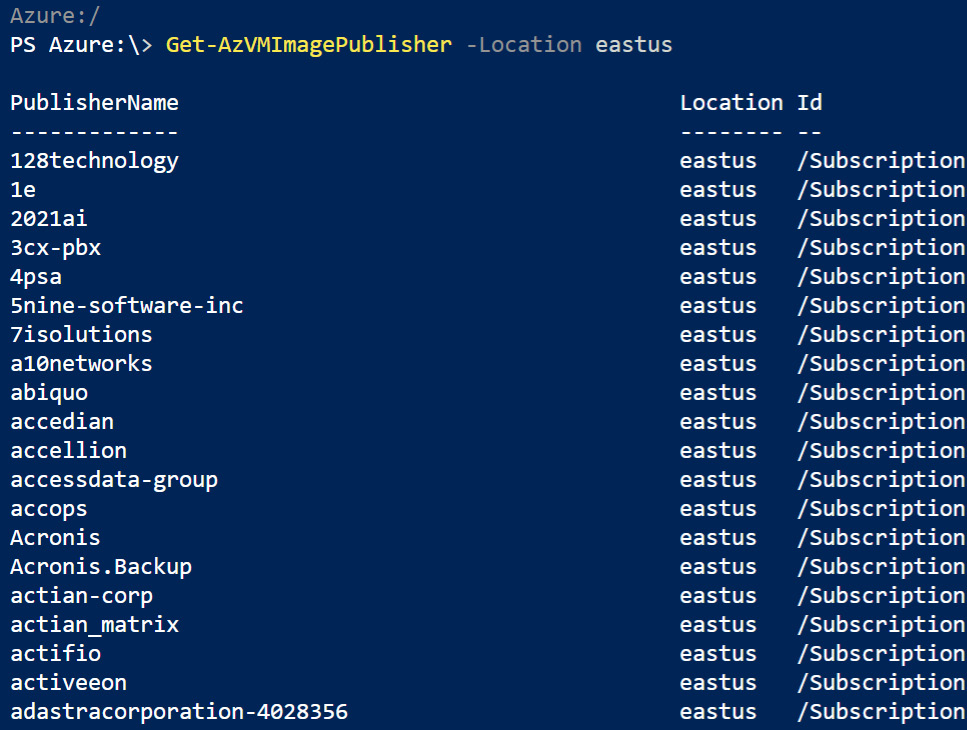
Figure 2.5: Listing image publishers in PowerShell
In Bash, you can run the following command to get the list of publishers:
az vm image list-publishers --location <REGION> --output table
The list is the same:
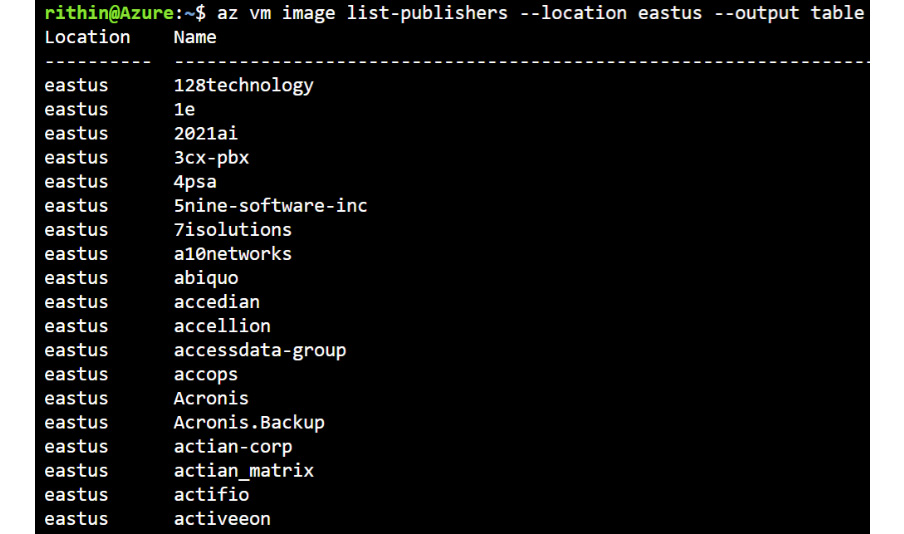
Figure 2.6: Listing image publishers in Bash
Now you know the publishers, you can get a list of images provided by a publisher using:
Get-AzVMImageOffer -Location <REGION> '
-PublisherName <PUBLISHER> | select offer
We have selected Canonical as the publisher, and now we are trying to get the list of offers available. UbuntuServer is one of the offers, and we will be using this one:
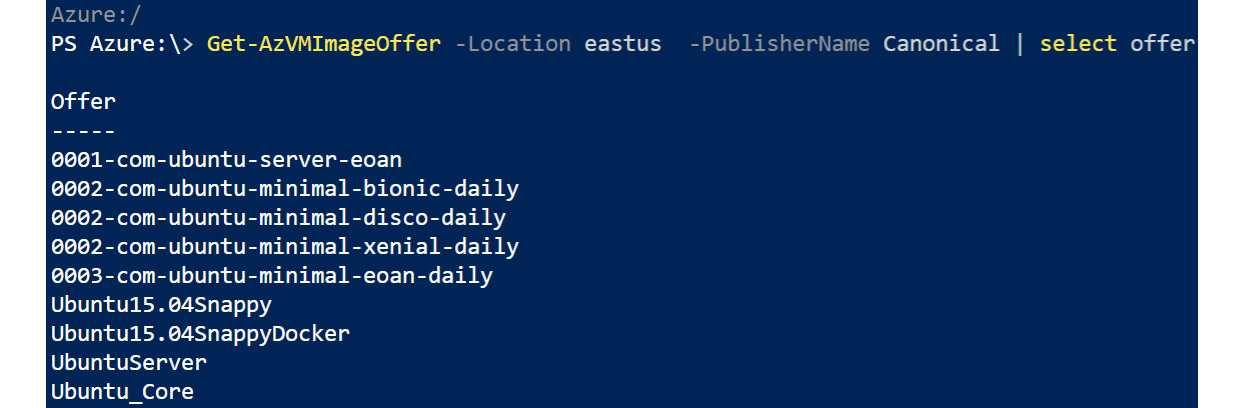
Figure 2.7: Listing offers for Canonical publisher
Alternatively, in the Azure CLI, run the following command:
az vm image list-offers --location <REGION> '
--publisher <PUBLISHER> --output table
The output is a list of so-called offers. An offer is the name of a group of related images created by a publisher.
Now we need to know what SKUs are available for the image. SKU refers to the major release of a distribution. Here is an example using Ubuntu:
Get-AzVMImageSku -PublisherName <publisher> -Offer <offer>'
-Location <location>
Now that we have the values for the publisher and offer, let's go ahead and see the major distributions (SKUs) that are available for UbuntuServer published by Canonical:
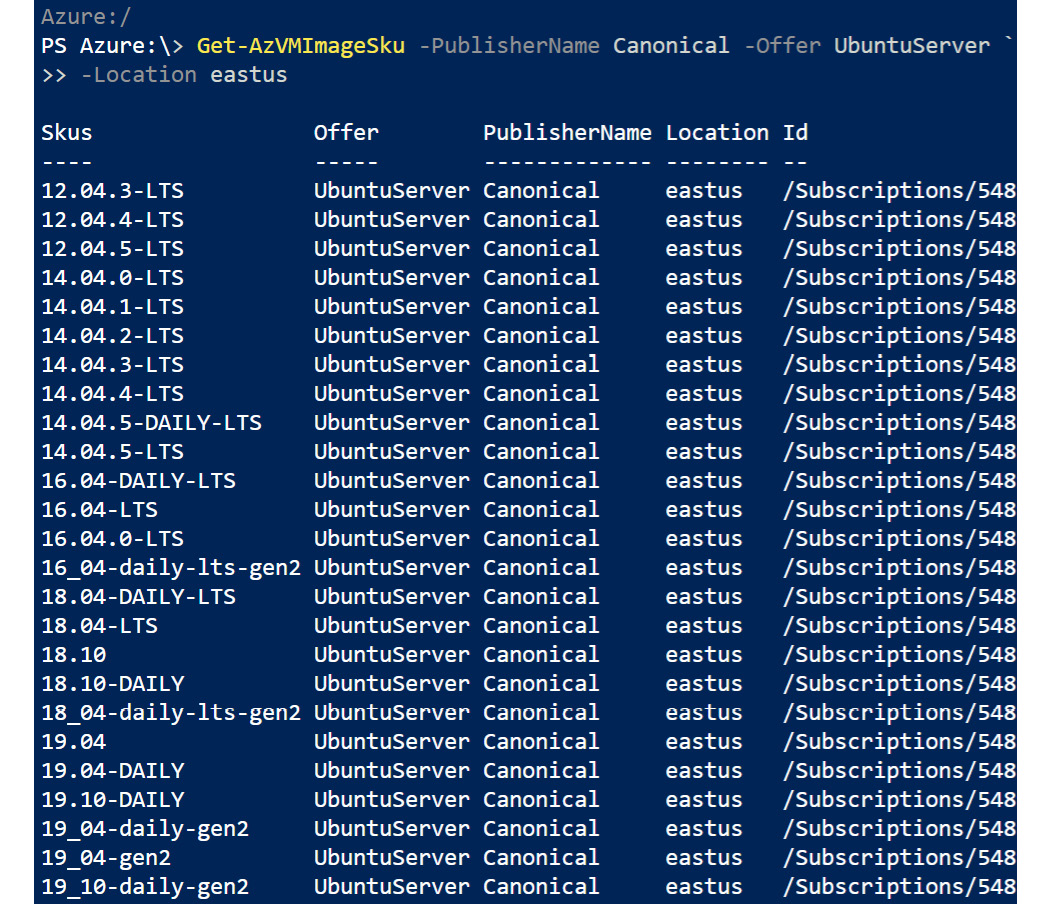
Figure 2.8: Listing SKUs for UbuntuServer published by Canonical
Alternatively, in the Azure CLI, run the following command:
az vm image list-skus --location <LOCATION>
--publisher <PUBLISHER> --offer <OFFER> -o table
Query for a specific instance within this offer:
Get-AzureVMImage -Location <REGION>'
-PublisherName <PUBLISHER> -Offer <OFFER> '
-Skus <SKU> | select Version -last 1
Let's again go through the values we have. So, using the publisher name, offer, and SKU, we're going to get the version that's available. In the following screenshot, you can see that image version 19.10.201912170 is available. Let's take this image for our virtual machine:

Figure 2.9: Selecting available image version in Azure CLI
This was the latest version available at the time of writing this chapter. If there are any new releases, you might see another version number.
Alternatively, in the Azure CLI, use the following command:
az vm image list --location <REGION> --publisher <PUBLISHER>
--offer <OFFER> --sku <SKU> --all --query '[].version'
--output tsv | tail -1
To reduce the output to the latest version, parameters were added to select the last line. The information collected contains parameters for the Set-AzVMSourceImage cmdlet; however, before using this command, we need to create a new virtual machine configuration using New-AzVMConfig:
$vm = New-AzVmConfig -VMName <name> -VMSize "Standard_A1"
Set-AzVMSourceImage -PublisherName <PUBLISHER>'
-Offer <OFFER> -Skus <SKU> -Version <VERSION>
Finally, we are creating a new virtual machine with a size of Standard_A1, and we're instructing PowerShell to use image version 19.10.201912170 of the major 19_10-daily-gen2 distribution in the UbuntuServer offer published by Canonical:

Figure 2.10: Creating a virtual machine of Standard_A1 size
In Bash, the collected information contains parameters for the az vm create command:
az vm create --name UbuntuVM2 --resource-group Packt-Testing-2 --image canonical:UbuntuServer:19_10-daily-gen2:19.10.201912170 --authentication-type password --admin-username pacman --size Standard_B1S
Note
In both Bash and PowerShell, it's possible to use the word latest instead of a specific version. The collected information is not sufficient to create the virtual machine, though. More parameters are needed.
Virtual Machine Sizing
Another thing you have to take care of is a decision regarding the virtual machine's size based on your needs and costs. More information on the available sizes and the pricing is available at https://azure.microsoft.com/en-us/pricing/details/virtual-machines/linux.
The list on this website, which includes the prices of the instances, changes often! You can get a list (without displaying the costs) on the command line:
Get-AzVMSize -Location <REGION> | Format-Table
az vm list-sizes --location <REGION> -o table
A small virtual machine is enough to execute the exercises in this book. At the time of writing, Standard_B1ls is ideal for the necessary base-level performance. But it's a good idea to recheck the virtual machine sizing/pricing list, as mentioned earlier on.
In PowerShell, the New-AzVM cmdlet can take the -size parameter, or you can use it in the New-AzVMConfig cmdlet:
New-AzVMConfig -VMName "<VM NAME>" -VMSize <SIZE>
In Bash, add the --size parameter of the az vm create command.
Virtual Machine Networking
Azure virtual networks allow communication between virtual machines, the internet, and other Azure services over a secure network. When we created the first virtual machine at the beginning of this chapter, several items regarding networking were created automatically:
- Virtual network
- Virtual subnet
- Virtual network interface attached to the virtual machine and plugged into the virtual network
- Private IP address configured on the virtual network interface
- Public IP address
The network resources will be covered in Chapter 4, Managing Azure; for now, we're just going to query the private and public IP addresses of the virtual machines. Use this command to get the list of public IP addresses:
Get-AzPublicIpAddress -ResourceGroupName <RESOURCE GROUP>'
| select Name,IpAddress
To get the list of private IP addresses of all your virtual machines, use this command:
Get-AzNetworkInterface -ResourceGroupName <resource group name> | ForEach { $interface = $_.Name; $ip = $_ | Get-AzNetworkInterfaceIpConfig | Select PrivateIPAddress; Write-Host $interface $ip.PrivateIPAddress }
The preceding command may look a little complicated, but it is a handy script for getting the list of private IPs. If you want to get the private IP address of virtual machines in a resource group, you can use this command:
Get-AzNetworkInterface -ResourceGroup <resource group name>
The output obtained will be in JSON format, and you can see the private IP address under IpConfigurations:
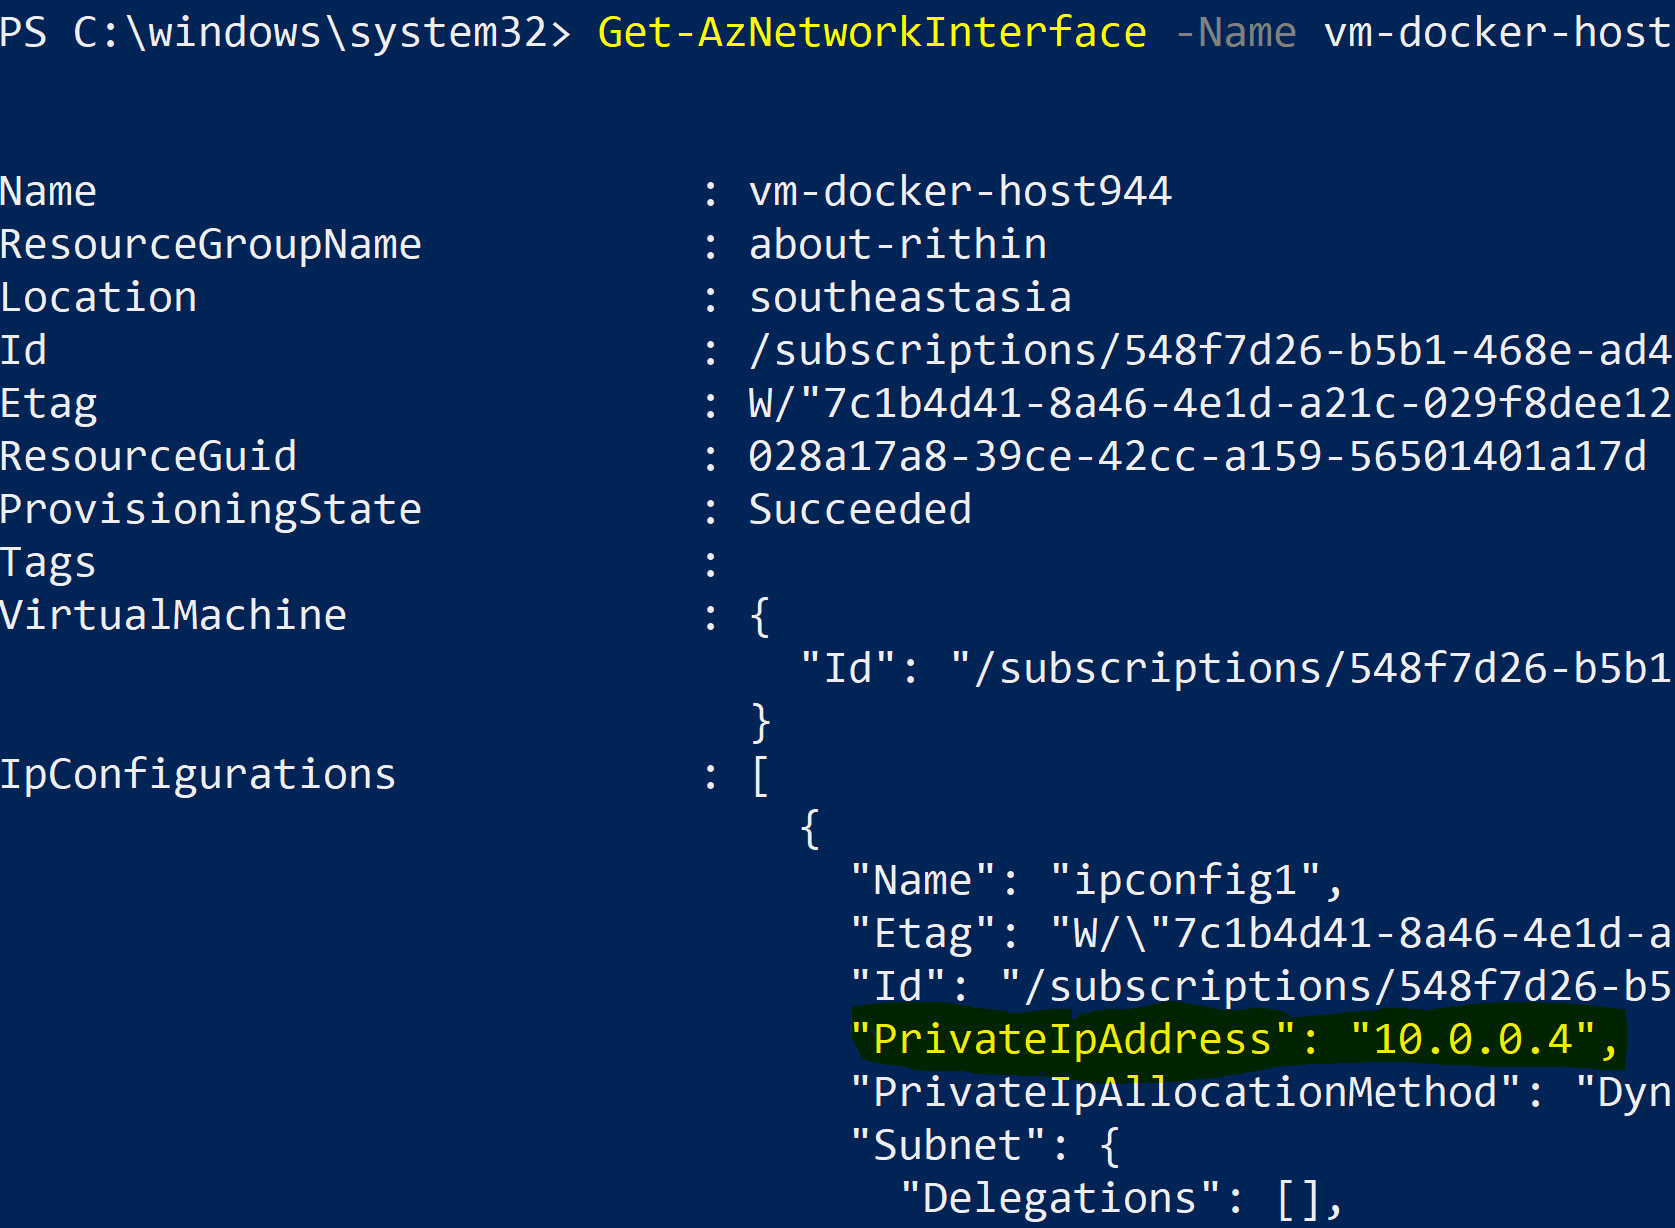
Figure 2.11: Private IP address of virtual machines in the resource group
This can be also accomplished using the Azure CLI. To get a list of the private IP addresses of virtual machines, use this:
az vm list-ip-addresses --resource <RESOURCE GROUP> --output table
The public IP address is the IP address that makes the virtual machine accessible via the internet. The incoming traffic virtual machine networking on this IP address undergoes network address translation (NAT) to the private IP address configured on the network interface of the Linux virtual machine.
Virtual Machine Information
After the deployment of the virtual machine, all the information attached to the virtual machine is available using PowerShell and Bash, such as the state. Querying the state is important; there are several states:
- Running
- Stopped
- Failed
- Deallocated
If a virtual machine is not deallocated, Microsoft will charge you for it. The Failed state means that the virtual machine is not able to boot. To query the state, execute the following command:
Get-AzVM -Name <VM NAME> -Status -ResourceGroupName <RESOURCE GROUP>
In Bash, it is possible to receive the state of the deployed virtual machines, but if we need to narrow down the output to a single instance, it's not possible without using complex queries:
az vm list --output table
To deallocate a virtual machine, first stop it:
Stop-AzVM -ResourceGroupName <RESOURCE GROUP> -Name <VM NAME>
Now you are able to deallocate it:
az vm deallocate --name <VM NAME> --resource-group <RESOURCE GROUP>
You can get much more information about the deployed virtual machines. In PowerShell, it's quite difficult to receive the properties of the virtual machine. First, create a variable:
$MYVM=Get-AzVM -Name <VM NAME> -ResourceGroupName <RESOURCE GROUP>
Now ask for the properties and methods of this MYVM object:
$MYVM | Get-Members
View the HardwareProfile property to see the size of this instance:
$MYVM.HardwareProfile
Or, to be more virtual machine information precise, use the following command:
$MYVM.HardwareProfile | Select-Object -ExpandProperty VmSize
You can also try NetworkProfile, OSProfile, and StorageProfile.ImageReference.
If you want to use the az command in Bash, the first command you may want to try is this:
az vm list –-resource-group <RESOURCE GROUP>
The only problem here is that it shows all the information about all the virtual machines at the same time; luckily, there is a show command as well, which reduces the output to a single virtual machine:
az vm show --name <VM NAME> --resource-group <RESOURCE GROUP>
And it's a good idea to limit the output by using queries. For example, if you want to see the storage profile of a particular virtual machine, you can query as follows:
az vm show --name <VM NAME> --resource-group <RESOURCE GROUP>
--query 'storageProfile'
The preceding command should give you the following output:
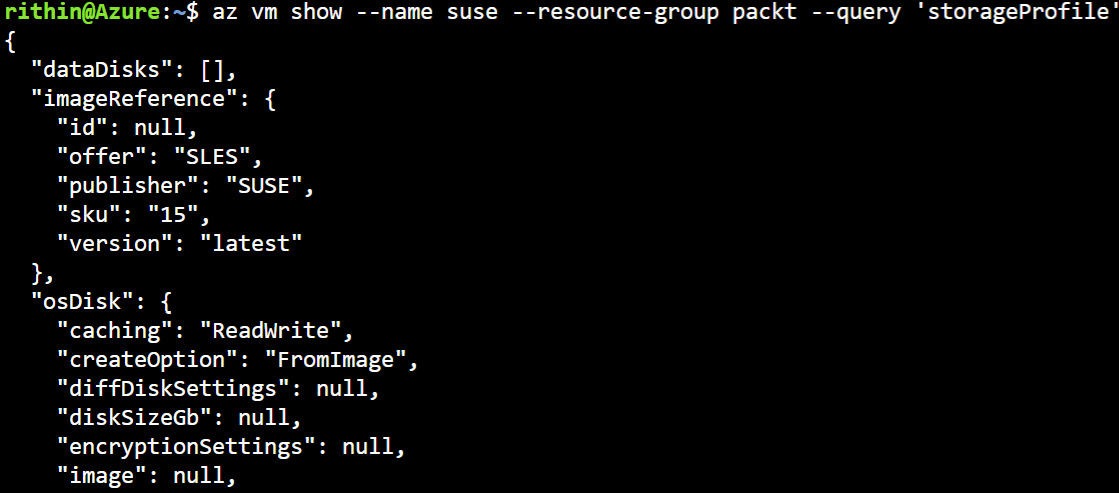
Figure 2.12: Storage profile of the SUSE virtual machine
Connecting to Linux
The virtual machine is running, ready for you to log in remotely using the credentials (username and password) you provided during the deployment of your first virtual machine. Another, more secure method to connect to your Linux virtual machine is by using SSH key pairs. SSH keys are more secure due to their complexity and length. On top of this, Linux on Azure supports sign-in using Azure Active Directory (Azure AD), where users will be able to authenticate using their AD credentials.
Logging into Your Linux virtual machine Using Password Authentication
In the Virtual Machine Networking section, the public IP address of a virtual machine was queried. We will be using this public IP to connect to the virtual machine via SSH using an SSH client installed locally.
SSH, or Secure Shell, is an encrypted network protocol used to manage and communicate with servers. Linux, macOS, Windows Subsystem for Linux (WSL), and the recent update of Windows 10 come with the command-line-based OpenSSH client, but there are more advanced clients available. Here are a few examples:
- Windows: PuTTY, MobaXterm, and Bitvise Tunnelier
- Linux: PuTTY, Remmina, and Pac Manager
- macOS: PuTTY, Termius, and RBrowser
Using the OpenSSH command-line client, connect to the virtual machine:
ssh <username>@<public ip>
Logging into your Linux Virtual Machine with an SSH private key
Using a username and password is not the best way to log into a remote machine. It is not a completely insecure operation, but you're still sending your username and password over the connection. It's also difficult to use if you want to execute scripts remotely, perform back-up operations, and so forth.
An alternative and more secure way to log into your system is by using SSH key pairs. This is a pair of two cryptographically secured keys: a private and a public key.
The private key is retained by the client and should not be copied to any other computer. It should be kept absolutely secret. And it is a good idea, during the creation of the key pair, to protect the private key with a passphrase.
The public key, on the other hand, can be copied to all the remote computers you want to administer. This public key is used to encrypt the messages that only the private key can decrypt. When you try to log in, the server verifies that the client owns the private key using this property of working with keys. No password is sent over the connection.
There are multiple ways to create an SSH key pair; for instance, PuTTY and MobaXterm both provide tooling to create them. You have to do this from every workstation that needs access to the remote machine. In this book, we are using ssh-keygen because it's available for every operating system:
ssh-keygen
The output of the preceding command should look like this:

Figure 2.13: Using ssh-keygen to create SSH key pair
Don't forget to enter a passphrase!
To understand how to use the SSH key pair to access your virtual machines, let's create a new virtual machine. If you recall, when we created the Linux machine earlier, we used the az vm create command and authentication-type as password, but in the following command, we are using a --generate-ssh-keys parameter. This will generate an SSH key pair and will be added to the .ssh directory in your home folder, which can be used to access the virtual machine:
az vm create --name UbuntuVM3 --resource-group MyResource2
--admin-username student --generate-ssh-keys --image UbuntuLTS
If you want to do it in PowerShell, use the Add-AzVMSshPublicKey cmdlet. For more information on the command, refer to https://docs.microsoft.com/en-us/powershell/module/azurerm.compute/add-azurermvmsshpublickey?view=azurermps-6.13.0.
Once the virtual machine has been created, you will be able to access it using this command:
ssh student@<IP ADDRESS>
Summary
This chapter covered the first steps into Microsoft Azure. The first step always involves creating a new account or using an existing company account. With an account, you're able to log in and start discovering the Azure cloud.
In this chapter, the discovery of the Azure cloud was done using the Azure CLI command az, or via PowerShell; example by example, you learned about the following:
- The Azure login process
- Regions
- The storage account
- Images provided by publishers
- The creation of virtual machines
- Querying information attached to a virtual machine
- What Linux is and the support available for Linux virtual machines
- Accessing your Linux virtual machine using SSH and an SSH keypair
The next chapter starts here, with a new journey: the Linux operating system.
Questions
- What are the advantages of using the command line to access Microsoft Azure?
- What is the purpose of a storage account?
- Can you think of a reason why you would get the following error message?
Code=StorageAccountAlreadyTaken
Message=The storage account named mystorage is already taken.
- What is the difference between an offer and an image?
- What is the difference between a stopped and a deallocated virtual machine?
- What is the advantage of using the private SSH key for authentication to your Linux virtual machine?
- The az vm create command has a --generate-ssh-keys parameter. Which keys are created, and where are they stored?
Further Reading
By no means is this chapter a tutorial on using PowerShell. But if you want a better understanding of the examples, or want to learn more about PowerShell, we can recommend you read Mastering Windows PowerShell Scripting – Second Edition (ISBN: 9781787126305), by Packt Publishing. We suggest that you start with the second chapter, Working with PowerShell, and continue until at least the fourth chapter, Working with Objects in PowerShell.
You can find plenty of online documentation about using SSH. A very good place to start is this wikibook: https://en.wikibooks.org/wiki/OpenSSH.
If you wish to explore more about Linux administration, Linux Administration Cookbook by Packt Publishing is a good resource, especially for system engineers.
To dive deep into security and admin tasks, this is a good read: Mastering Linux Security and Hardening, written by Donald A. Tevault and published by Packt Publishing.