
Until now, we have worked with single VMs, deploying and configuring them manually. This is nice for labs and very small environments, but if you have to manage bigger environments, this is a very time-consuming and even boring job. It's also very easy to make mistakes and forget things, such as the slight differences between VMs, not to mention the concomitant stability and security risks. For example, choosing the wrong version during deployment will result in consistency issues, and performing an upgrade later is a tedious process.
Automating deployment and configuration management is the ideal way to mitigate this boring task. However, after a while, you might notice some problems with that approach. There are so many reasons why there are problems, and some of the reasons for failure are listed here:
- The script fails because something changed, caused by, for instance, a software update.
- There is a newer version of a base image that is slightly different.
- Scripts can be hard to read and difficult to maintain.
- Scripts are dependent on other components; for instance, the OS, script language, and available internal and external commands.
- And, there is always that one colleague—the script works for you but, for some reason, it always fails when they execute it.
Of course, things have improved over time:
- Many script languages are multiplatform now, such as Bash, Python, and PowerShell. They are available on Windows, macOS, and Linux.
- In systemd, the systemctl utility with the -H parameter can execute commands remotely, and it works even if the remote host is another Linux distribution. The newer systemd version has more features.
- firewalld and systemd work with easy-to-deploy configuration files and overrides.
Automation is most likely not the answer in your quest to deploy, install, configure, and manage your workload. Luckily, there is another way: orchestration.
In musical terms, orchestration is the study of how to write music for an orchestra. You have to understand each instrument and know what sounds they can make. Then, you can start writing the music; to do this, you have to understand how the instruments sound together. Most of the time, you start with a single instrument, for instance, a piano. After that, you scale up to include the other instruments. Hopefully, the result will be a masterpiece and the members of the orchestra will be able to start playing it. It's not that important how the members start, but, in the end, the conductor makes sure that the results count.
There are many similarities to orchestration in computation. Before you can start, you have to understand how all the components work, how they fit together, and what the components do so that you can get the job done. After that, you can start writing the code to achieve the ultimate goal: a manageable environment.
One of the biggest advantages of a cloud environment is that really every component of the environment is written in software. Yes, we know, at the end of the line, there is still a datacenter with many hardware components, but as a cloud user, you don't care about that. Everything you need is written in software and has APIs to talk to. So, it's not only possible to automate the deployment of your Linux workloads, but you can automate and orchestrate the configuration of the Linux operating system and the installation and configuration of applications and keep everything up to date. You can also use orchestration tools to configure Azure resources, and it's even possible to create Linux VMs using these tools.
In orchestration, there are two different approaches:
- Imperative: Tell the orchestration tool what to do to reach this goal
- Declarative: Tell the orchestration tool what the goal you want to achieve is
Some orchestration tools can do both, but, in general, the declarative approach is the better approach in a cloud environment, where you have so many options to configure and you can declare each option and achieve the exact goal. The good news is that if it's becoming too complex for this method, for instance, when the orchestration tool is not able to understand the goal, you can always extend this method with a little bit of the imperative method using scripts.
A big part of this chapter is about Ansible, but we'll also cover PowerShell Desired State Configuration (DSC) and Terraform as examples of declarative implementations. The focus, in this chapter, is to understand orchestration and know enough to get started. And, of course, we'll discuss integration with Azure.
The key takeaways from this chapter are:
- Understanding the third-party automation tools such as Ansible and Terraform and how they can be used in Azure.
- Using Azure's native automation and PowerShell DSC to achieve the desired state of the machine.
- How to implement Azure Policy Guest Configuration and audit the settings in your Linux VMs.
- An overview of other solutions available on the market to automate deployments and configuration.
Technical Requirements
In practice, you'll need at least one VM as a control machine, or you can use your workstation running Linux or Windows Subsystem for Linux (WSL). Along with this, we need a node, which needs to be an Azure VM. However, in order to provide a better explanation, we've deployed three nodes. If you have budget constraints in your Azure subscription, feel free to proceed with one node. It doesn't matter which Linux distribution you're using. The examples in this section, to orchestrate the node, are for an Ubuntu node, but it's easy to translate them to other distributions.
In this chapter, multiple orchestration tools are explored. For every tool, you'll need a clean environment. So, when you are finished with the Ansible section in this chapter, remove the VMs and deploy new ones before going into Terraform.
Understanding Configuration Management
In the introduction of this chapter, you might have read the term configuration management. Let's understand this in more depth. Configuration management refers to how you want your VM to be configured. For example, you want an Apache webserver to host a website in a Linux VM; so, the configuration part of the VM involves:
- Installation of Apache package and dependencies
- Opening firewall ports for HTTP traffic or HTTPS traffic if you are using SSL (Secure Sockets Layer) certificates
- Enabling the service and bootstrapping it so the Apache service is started on boot
This example is for a very simple web server. Think about a complex scenario where you have a front-end web server and back-end databases, so the configuration involved is very high. So far, we've been talking about a single VM; what if you want multiple VMs with the same configuration? We are back to square one, where you have to repeat the configuration multiple times, which is a time-consuming and boring task. Here comes the role of orchestration, as we discussed in the introduction. We can make use of orchestration tools to deploy the VM with the state we want. The tools will take care of the configuration. Also, in Azure, we have Azure Policy Guest Configuration, which can be used to audit the settings. Using this policy, we can define a condition that the VM should be in. If the evaluation fails or the condition is not met, Azure will mark this machine as non-compliant.
A big part of this chapter is about Ansible, but we'll also cover PowerShell DSC and Terraform as examples of declarative implementations. The focus, in this chapter, is to understand orchestration and learn enough to get started. And, of course, we'll discuss integration with Azure.
Using Ansible
Ansible is minimal in nature, has almost no dependencies, and it doesn't deploy agents to nodes. Only OpenSSH and Python are required for Ansible. It's also highly reliable: changes can be applied multiple times without changing the result beyond the initial application and there shouldn't be any side effects on the rest of the system (unless you write really bad code). There is a strong focus on the reuse of code, which makes it even more reliable.
Ansible doesn't have a very steep learning curve. You can start with just a few lines of code and scale up afterward without breaking anything. In our opinion, if you want to try an orchestration tool, start with Ansible, and if you want to try another, the learning curve will be much less steep.
Installation of Ansible
In Azure Marketplace, a ready-to-go VM is available for Ansible. There are three versions of Ansible available in Azure Marketplace currently: Ansible Instance, Ansible Tower, and AWX, which is a Community edition of Ansible Tower. In this book, we will concentrate on the community project that is freely available; it's more than enough to learn and get started with Ansible. After that, you can go to the Ansible website to explore the differences, download the trial version of the enterprise edition of Ansible, and decide whether you need the enterprise version.
There are multiple ways to install Ansible:
- Using the repository of your distribution
- Using the latest release available at https://releases.ansible.com/ansible
- Using GitHub: https://github.com/ansible
- Using the Python installer, the preferred method, which works on every OS:
pip install ansible[azure]
Python's pip is not available for installation in the standard repositories of Red Hat and CentOS. You have to use the extra EPEL repository:
sudo yum install epel-release
sudo yum install python-pip
After installing Ansible, check the version:
ansible --version
You don't have to install Ansible if you don't want to: Ansible is preinstalled in Azure Cloud Shell. At the time of writing this book, Cloud Shell supports Ansible version 2.9.0. However, to give a walk-through of the installation, we'll go for the local installation of Ansible on the VM. For integration with Azure, you also need to install the Azure CLI to get the information you'll need to provide to Ansible.
SSH Configuration
The machine where you installed Ansible is now called the ansible-master or, in other words, it's just a VM with Ansible, the Ansible configuration file, and the instructions for orchestration. Communication with the nodes is done using communication protocols. For Linux, SSH is used as a communication protocol. To make Ansible be able to communicate in a secure way with the nodes, use key-based authentication. If this has not already been done, generate an SSH key pair and copy the key to the VM you want to orchestrate.
To generate the SSHs key, use this command:
ssh-keygen
Once you generate the key, it will be saved to the home directory of the user in the .ssh directory by default. To display the key, use this command:
cat ~/.ssh/id_rsa.pub
Once we have the key, we have to copy this value to the node server. Follow these steps to copy the key:
- Copy the contents of the id_rsa.pub file.
- SSH to your node server.
- Switch to superuser using the sudo command.
- Edit the authorized_keys file in ~/.ssh/.
- Paste the key we copied from the Ansible server.
- Save and close the file.
To verify whether the process was successful, go back to the machine where Ansible is installed (going forward, we'll call this ansible-master) and ssh to the node. It will ask for the passphrase if you used one while generating the key. Another method to automate the entire process of copying keys is to use the ssh-copy-id command.
Bare-Minimum Configuration
To configure Ansible, you'll need an ansible.cfg file. There are different locations where this configuration file can be stored, and Ansible searches in the following order:
ANSIBLE_CONFIG (environment variable if set)
ansible.cfg (in the current directory)
~/.ansible.cfg (in the home directory)
/etc/ansible/ansible.cfg
Ansible will process the preceding list and uses the first file found; all others are ignored.
Create the ansible directory in /etc if not available and add a file called ansible.cfg. This is where we are going to save our configuration:
[defaults]
inventory = /etc/ansible/hosts
Let's try the following:
ansible all -a "systemctl status sshd"
This command, called an ad hoc command, executes systemctl status sshd to all hosts defined in /etc/ansiblehosts. If you have multiple usernames for each host, you can also specify the username for these nodes in the format as shown in the following ansible hosts file:
<ip address> ansible_ssh_user='<ansible user>'
So you can add the user to the inventory file line items as shown in the following screenshot, if needed, and the file will look like this for three nodes:

Figure 8.1: Adding the user to the inventory file line items
Try again. Instead of your local username, the remote user is used. You're now able to log in and execute the command.
Inventory File
The Ansible inventory file defines the hosts and groups of hosts. Based on this, you can call out the host or group (group of hosts) and run a specific playbook or execute a command.
Here, we are going to call our group nodepool and add IPs of our nodes. Since all our VMs are in the same Azure VNet, we are using the private IP. If they are in different networks, you can add the public IP. Here, we are using three VMs to aid explanation. If you have only one node, just input that one.
Also, you can use the DNS name of the VMs, but they should be added to your /etc/hosts file for resolution:
[nodepool]
10.0.0.5
10.0.0.6
10.0.0.7
Another parameter that will be useful is ansible_ssh_user. You can use this to specify the username used to sign in to the node. This scenario comes into the picture if you are using multiple usernames across your VMs.
Instead of using all in our example, you can use a group name that is ansible-nodes. It's also possible to use generic variables that are valid for every host and override them per server; for instance:
[all:vars]
ansible_ssh_user='student'
[nodepool]
<ip address> ansible_ssh_user='other user'
Sometimes, you'll need privileges to execute a command:
ansible nodepool-a "systemctl restart sshd"
This gives the following error message:
Failed to restart sshd.service: Interactive authentication required.
See system logs and 'systemctl status sshd.service' for details.non-zero return code.
For ad hoc commands, just add the -b option as an Ansible parameter to enable privilege escalation. It will use the sudo method by default. In Azure images, you don't need to give your root password if you are using sudo. This is why the -b option works without a problem. If you configured sudo to prompt for a password, use -K.
We would suggest running other commands, such as netstat and ping, to understand how the commands are executed in these machines. Running netstat and grepping for sshd will give a similar output to this:

Figure 8.2: Running netstat and grepping for sshd
Note
You might get deprecation warnings when running the ansible all command. To suppress this, use deprecation_warnings=False in ansible.cfg.
Ansible Playbooks and Modules
Using ad hoc commands is an imperative method and is not any better than just using the SSH client to execute commands remotely.
There are two components that you need to make it into real, imperative orchestration: a playbook and a module. The playbook is the basis for the deployment, configuration, and maintenance of your system. It can orchestrate everything, even between hosts! A playbook is there to describe the state you want to reach. Playbooks are written in YAML and can be executed with the ansible-playbook command:
ansible-playbook <filename>
The second component is the module. The best way to describe a module is as follows: the task to be executed to reach the desired state. They are also known as task plugins or library plugins.
All the available modules are documented; you can find the documentation online and on your system.
To list all the available plugin documentation, execute the following command:
ansible-doc -l
This will take a while. We suggest that you redirect the result to a file. This way, it takes less time and it's easier to search for a module.
As an example, let's try to create a playbook that will create a user using the user module if the user doesn't already exist. In other words, the desired state is that a specific user exists.
Start by reading the documentation:
ansible-doc user
Create a file in the Ansible directory, for instance, playbook1.yaml, with the following content. Verify the parameters in the user documentation:
---
- hosts: all
tasks:
- name: Add user Jane Roe
become: yes
become_method: sudo
user:
state: present
name: jane
create_home: yes
comment: Jane Roe
generate_ssh_key: yes
group: users
groups:
- sudo
- adm
shell: /bin/bash
skeleton: /etc/skel
From the output, you can see that all hosts returned OK and the user was created:
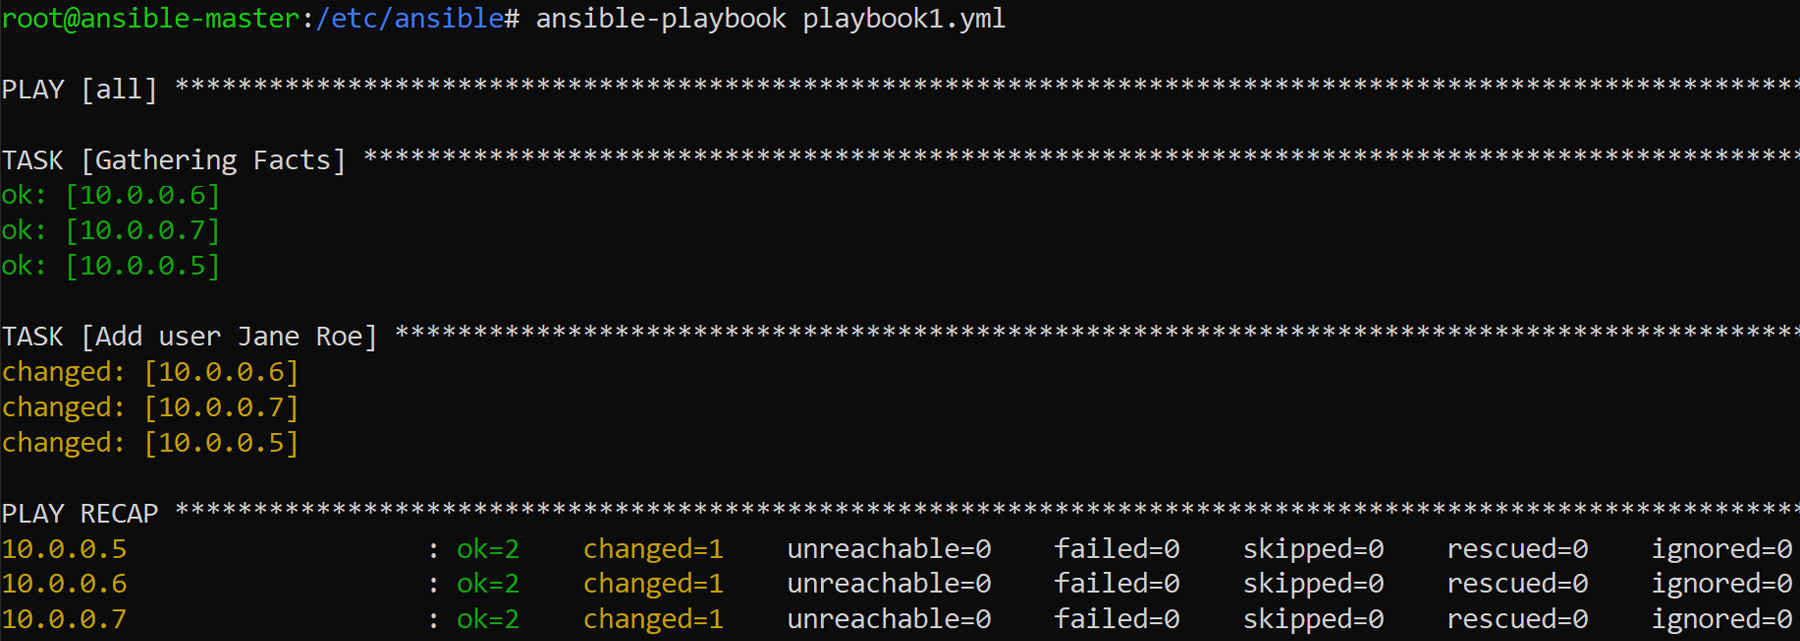
Figure 8.3: Running the Ansible playbook
Just to make sure that the user is created, we will check the /etc/passwd file in all the hosts. From the output, we can see that the user has been created:
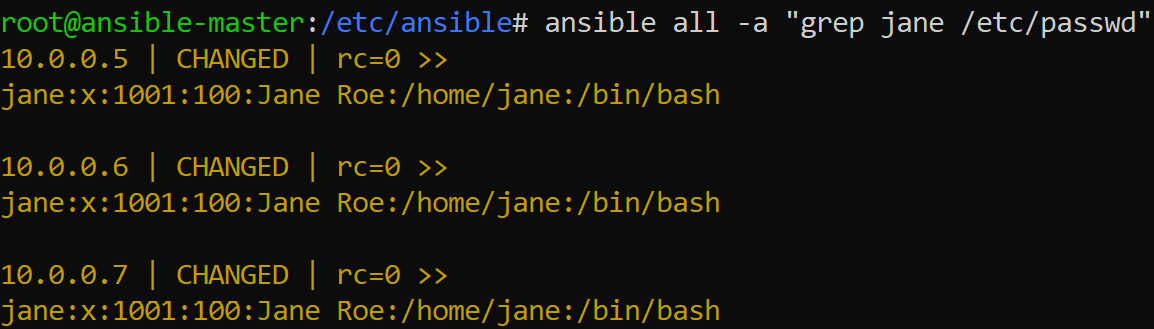
Figure 8.4: Verifying user creation using /etc/passwd
Make sure that the indentation is correct because YAML is a very strict language when it comes to indentation and white space. Using an editor such as vi, Emacs, or Visual Studio Code with YAML support really helps.
If you are required to run a command privilege escalation, become and become_method or –b can be used.
To check the Ansible syntax, use the following command:
ansible-playbook --syntax-check Ansible/example1.yaml
Let's go ahead and see how we can authenticate to Azure and start the deployment in Azure.
Authenticating to Microsoft Azure
To integrate Ansible with Microsoft Azure, you need to create a configuration file to provide the credentials for Azure to Ansible.
The credentials must be stored in your home directory in the ~/.azure/credentials file. First, we have to collect the necessary information with the Azure CLI. Authenticate to Azure as follows:
az login
If you're successfully logged in, you will get an output similar to the following:
Figure 8.5: Logging in to Azure with the az login command
This is already a part of the information you'll need. If you were already logged in, execute the following command:
az account list
Create a Service Principal:
az ad sp create-for-rbac --name <principal> --password <password>
The app ID is your client_id, and the password is your secret, which will be referenced in the credentials file we are going to create.
Create the ~/.azure/credentials file with the following content:
[default]
subscription_id=xxxxxxx-xxxx-xxxx-xxxx-xxxxxxxxxxxx
client_id=xxxxxxx-xxxx-xxxx-xxxx-xxxxxxxxxxxx
secret=xxxxxxxxxxxxxxxxx
tenant=xxxxxxx-xxxx-xxxx-xxxx-xxxxxxxxxxxx
Use ansible-doc -l | grep azure to find out which Ansible modules are available for Azure. Redirect the content to a file for reference.
Resource Group
Let's check everything works as expected. Create a new playbook named resourcegroup.yaml with the following content:
---
- hosts: localhost
tasks:
- name: Create a resource group
azure_rm_resourcegroup:
name: Ansible-Group
location: westus
Please note that the hosts directive is localhost! Execute the playbook and verify whether the resource group is created:
az group show --name Ansible-Group
The output should be very similar to the following:
{
"id": "/subscriptions/xxxx/resourceGroups/Ansible-Group",
"location": "westus",
"managedBy": null,
"name": "Ansible-Group",
"properties": {
"provisioningState": "Succeeded"
},
"tags": null
}
Virtual Machine
Let's create a VM in Azure using Ansible. To do this, create a virtualmachine.yaml file with the following content. Examine the name field of each block to understand what the code does:
- hosts: localhost
tasks:
- name: Create Storage Account
azure_rm_storageaccount:
resource_group: Ansible-Group
name: ansiblegroupsa
account_type: Standard_LRS
.
.
. - name: Create a CentOS VM
azure_rm_virtualmachine:
resource_group: Ansible-Group
name: ansible-vm
vm_size: Standard_DS1_v2
admin_username: student
admin_password:welk0mITG!
image:
offer: CentOS
publisher: OpenLogic
sku: '7.5'
version: latest
Considering the length of the code, we have just shown a few lines here. You can download the entire virtualmachine.yaml file from the chapter 8 folder in the GitHub repository of this book.
In the following screenshot, you can see that all the resources required for the VM are created by Ansible:
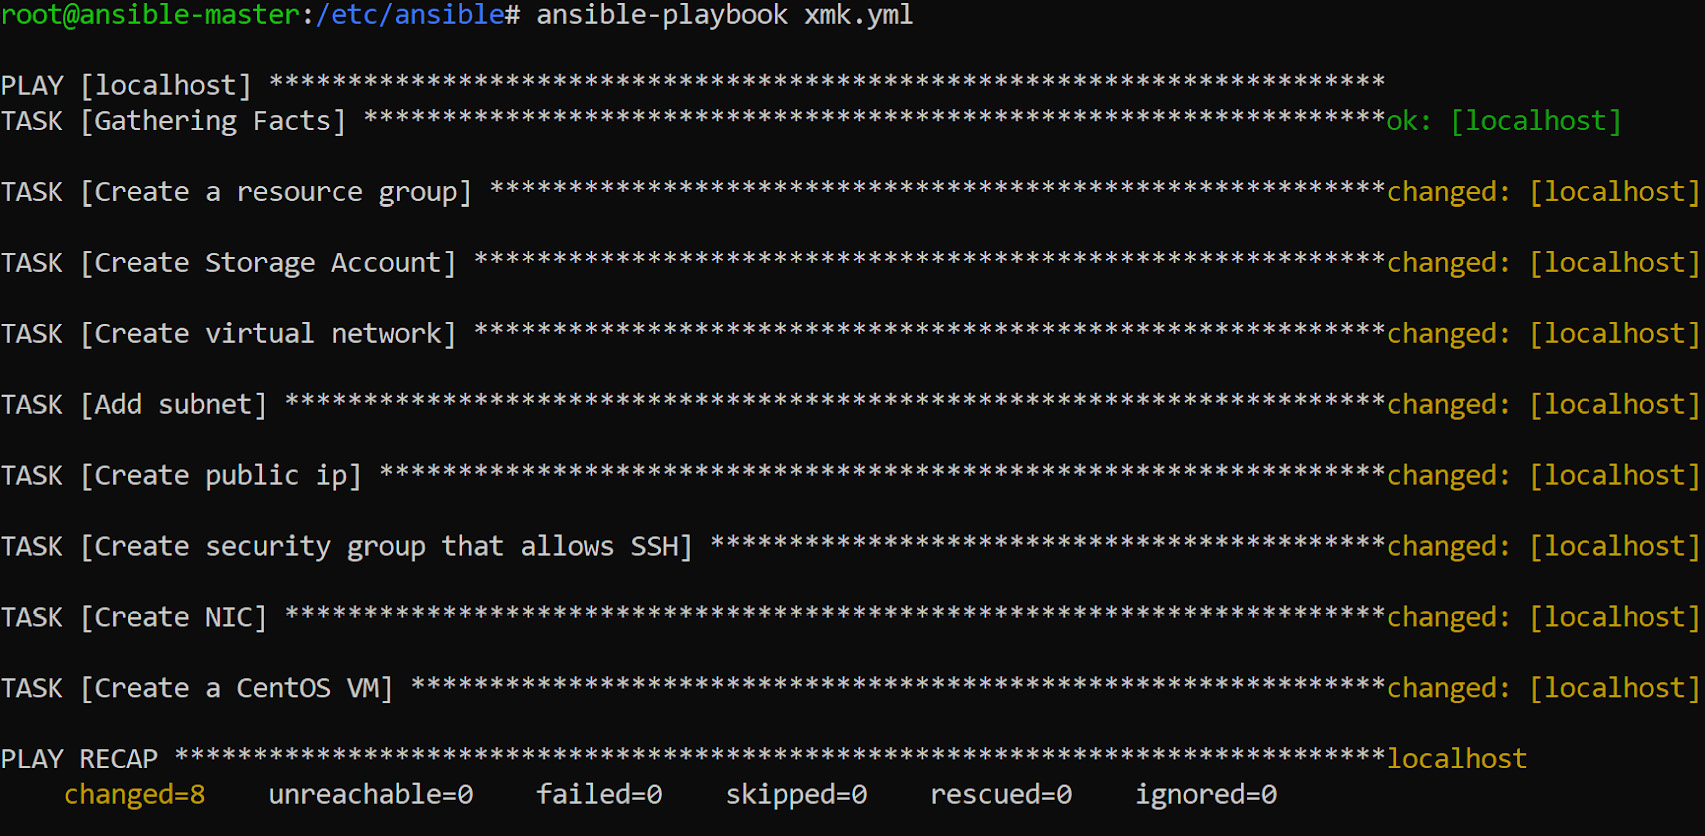
Figure 8.6: Creating all the required resources for the VM with Ansible
You can find a full example for Azure VM deployment using Ansible in Ansible's Microsoft Azure Guide (https://docs.ansible.com/ansible/latest/scenario_guides/guide_azure.html).
Azure Inventory Management in Ansible
We have learned two ways to use Ansible in Azure:
- Using Ansible in an inventory file to connect to Linux machines. In fact, it doesn't matter whether it's running in Azure or somewhere else.
- Using Ansible to manage Azure resources.
In this section, we're going one step further. Instead of using a static inventory, we will ask Azure what is running in your environment using dynamic inventory scripts.
The first step is to download the dynamic inventory script for Azure. Execute with sudo if you are not a root user:
cd /etc/ansible
wget https://raw.githubusercontent.com/ansible/ansible/devel/contrib/inventory/azure_rm.py
chmod +x /etc/ansible/azure_rm.py
Edit the /etc/ansible/ansible.cfg file and remove the inventory=/etc/ansible/hosts line.
Let's carry out the first step:
ansible -i /etc/ansible/azure_rm.py azure -m ping
It will probably fail on account of authentication problems:
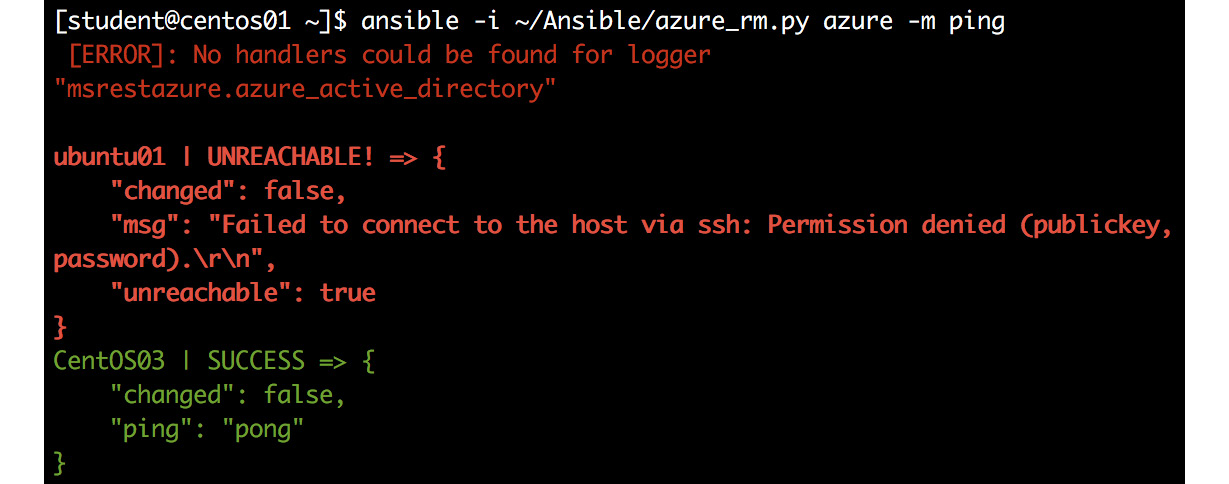
Figure 8.7: Host connection failure due to authentication issues
If you have a different login for different VMs, you can always use the user directive per task. Here, we are using azure which means all VMs. You can always query for a machine using the VM name. For example, you can ping the ansible-node3 VM using a user credential:
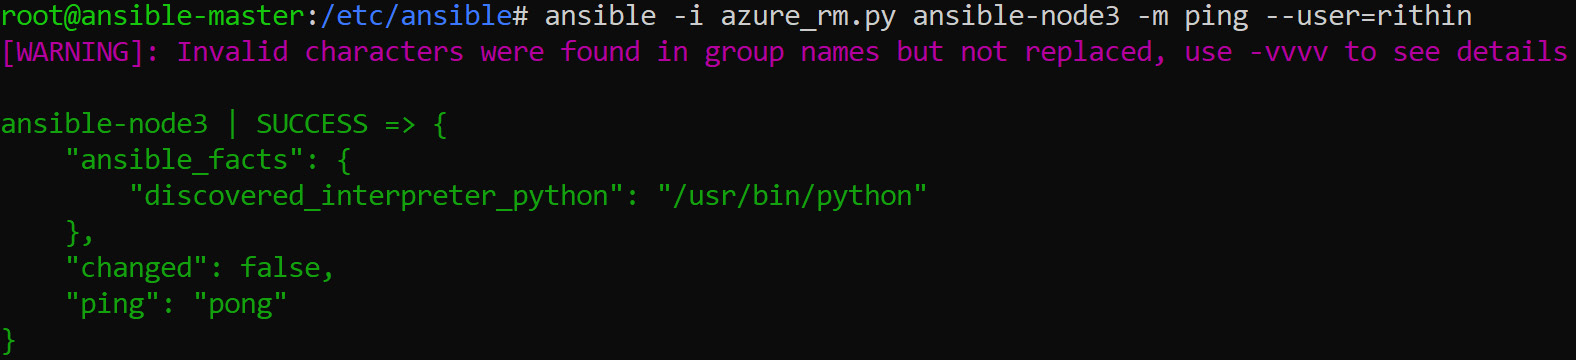
Figure 8.8: Querying for the ansible-node3 VM
Ideally, Ansible expects you to use SSH keys instead of passwords. If you would like to use a password, you can use –extra-vars and pass the password. Please note that for this you need to install an application called sshpass. To ping a VM in Azure that uses a password via Ansible, execute the following command:
ansible -i azure_rm.py ansible-vm -m ping
--extra-vars "ansible_user=<username> ansible_password=<password>"
Let's take the instance of the VM we created using Ansible in the previous example, where the username was student and the password was welk0mITG!. From the screenshot, you can see that the ping succeeds. You might see some warnings, but they can be safely ignored. However, further investigation is needed if the ping fails:

Figure 8.9: Sending a ping for the username student
By creating an azure_rm.ini file in the same directory as the azure_rm.py directory, you can modify the behavior of the inventory script. Here is an example ini file:
[azure]
include_powerstate=yes
group_by_resource_group=yes
group_by_location=yes
group_by_security_group=yes
group_by_tag=yes
It works in a very similar way to the hosts file. The [azure] section means all VMs. You can also provide sections for the following:
- Location name
- Resource group name
- Security group name
- Tag key
- Tag key value
Another method for selecting one or more VMs is to use tags. To be able to tag a VM, you'll need the ID:
az vm list --output tsv
Now, you can tag the VM:
az resource tag --resource-group <resource group>
--tags webserver --id </subscriptions/...>
You can also tag the VM in the Azure portal:
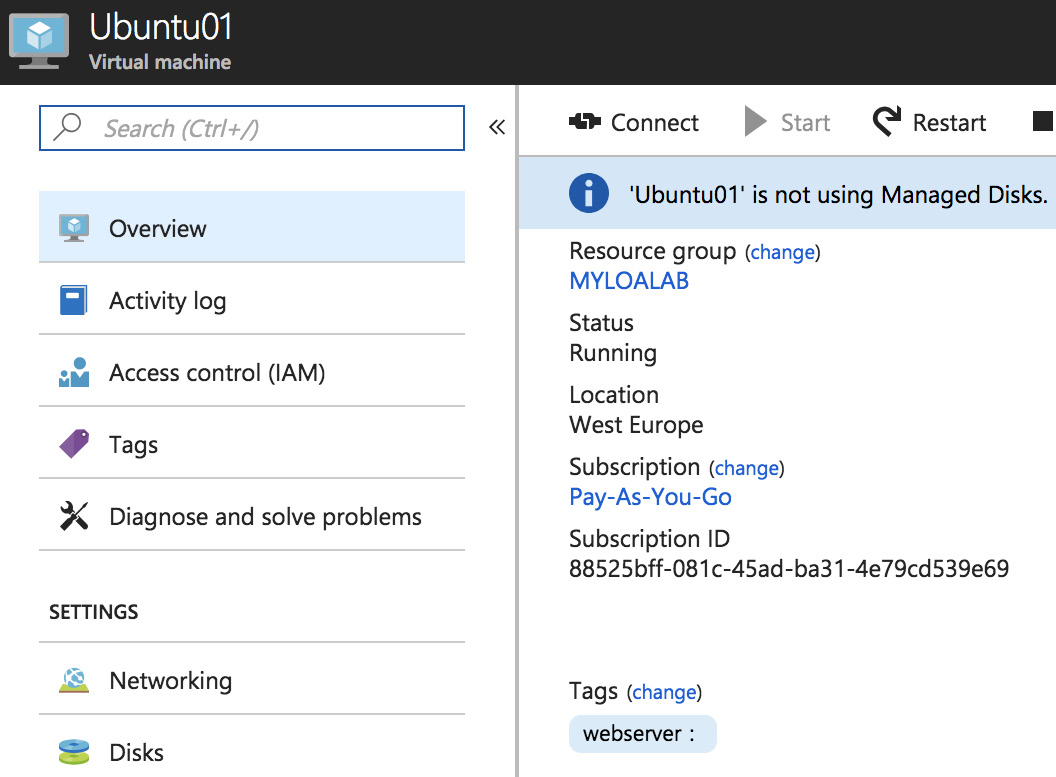
Figure 8.10: Tagging the VM in the Azure portal
Click on change and add a tag, with or without a value (you can use the value to filter the value too). To verify, use the tag name host:
ansible -i /etc/ansible/azure_rm.py webserver -m ping
Only the tagged VM is pinged. Let's create a playbook for this tagged VM, for instance, /etc/ansible/example9.yaml. The tag is, again, used in the hosts directive:
---
- hosts: webserver
tasks:
- name: Install Apache Web Server
become: yes
become_method: sudo
apt:
name: apache2
install_recommends: yes
state: present
update-cache: yes
when:
- ansible_distribution == "Ubuntu"
- ansible_distribution_version == "18.04"
Execute the playbook:
ansible-playbook -i /etc/ansible/azure_rm.py /etc/ansible/example9.yaml
Once the playbook has been run, if you check the VM, you can see that Apache is installed.
As mentioned earlier, Ansible is not the only tool. There is another popular one called Terraform. In the next section, will be discussing Terraform on Azure.
Using Terraform
Terraform is another Infrastructure as Code (IaC) tool that is developed by HashiCorp. You might wonder why it is called an IaC tool. The reason is you can define how your infrastructure needs to be using code, and Terraform will help you deploy it. Terraform uses HashiCorp Configuration Language (HCL); however, you can also use JSON. Terraform is supported in macOS, Linux, and Windows.
Terraform supports a wide range of Azure resources such as networks, subnets, storage, tags, and VMs. If you recall, we discussed the imperative and declarative ways of writing code. Terraform is declarative in nature, and it can maintain the state of the infrastructure. Once deployed, Terraform remembers the current state of the infrastructure.
As in every section, the first part of the process involves the installation of Terraform. Let's proceed with the Linux installation of Terraform.
Installation
Terraform's core executable can be downloaded from https://www.terraform.io/downloads.html and can be copied to one of the directories added to your $PATH variable. You can also use the wget command to download the core executable. To do this, first you have to find out the latest version of Terraform from the aforementioned link. At the time of writing, the latest version available is 0.12.16
Now that we have the version, we will download the executable using wget with the following command:
wget https://releases.hashicorp.com/terraform/0.12.17/terraform_0.12.17_linux_amd64.zip
The ZIP will be downloaded to the current working directory. Now we will use the unzip tool to get the executable extracted:
unzip terraform_0.12.16_linux_amd64.zip
Note
unzip might not be installed by default. If it's throwing an error, install unzip using apt or yum depending on the distribution you are using.
The extraction process will get you the Terraform executable, and you can copy this to any location in your $PATH.
To verify whether the installation was successful, you can execute:
terraform --version
Now that we have confirmed that Terraform been installed, let's go ahead and set up the authentication to Azure.
Authenticating to Azure
There are multiple ways by which you can authenticate to Azure. You can use Azure CLI, Service Principal using a Client Certificate, Service Principal and Client Secret, and many more methods. For testing purposes, Azure CLI using the az login command is the right choice. However, if we want to automate deployment, this is not an ideal method. We should go for Service Principal and Client Secret, the same as we did in Ansible.
Let's start by creating a Service Principal for Terraform. If you already have a Service Principal created for the previous section, feel free to use that. To create a new Service Principal from Azure CLI, use this command:
az ad sp create-for-rbac -n terraform
At this point, you might be already familiar with the output, which contains the appID, password, and tenant ID.
Note down the values in the output, and we will be creating variables to store this value:
export ARM_CLIENT_ID="<appID>"
export ARM_CLIENT_SECRET="<password>"
export ARM_SUBSCRIPTION_ID="<subscription ID>"
export ARM_TENANT_ID="<tenant ID>"
So, we have stored all the values to variables that will be used by Terraform for authentication. Since we have dealt with authentication, let's write code in HCL with which we can deploy resources in Azure.
Deployment to Azure
You can use any code editor for this purpose. Since we are already on a Linux machine, you can use vi or nano. If you want, you can also use Visual Studio Code, which has extensions for Terraform and Azure, which will get you IntelliSense and syntax highlighting.
Let's create a terraform directory to store all our code, and inside the terraform directory, we will create further directories based on what we are going to deploy. In our first example, we will be using Terraform to create a resource group in Azure. Later, we will discuss how to deploy a VM in this resource group.
So, to create a terraform directory and to create a resource-group subfolder within this directory, execute the following command:
mkdir terraform
cd terraform && mkdir resource-group
cd resource-group
Next, create a main.tf file with the below content:
provider "azurerm" {
version = "~>1.33"
}
resource "azurerm_resource_group" "rg" {
name = "TerraformOnAzure"
location = "eastus"
}
The code is very simple. Let's take a closer look at each of the items.
The provider directive shows that we would like to use the version 1.33 of the azurerm provider. In other words, we are indicating that we are going to use version 1.33 of the Terraform Azure Resource Manager provider, which is one of the plugins available for Terraform.
The resource directive says that we are going to deploy an Azure resource of the azurerm_resource_group type with two parameters, name and location.
rg stands for the resource configuration. Resource names must be unique per type in each module. For example, if you want to create another resource group in the same template, you cannot use rg again as you have already used it; instead, you can go for anything other than rg, such as rg2.
Before we start the deployment using the template, we first need to initialize the project directory, which is our resource-group folder. To initialize Terraform, execute the following:
terraform init
During initialization, Terraform will download the azurerm provider from its repository and will show a similar output as the following:
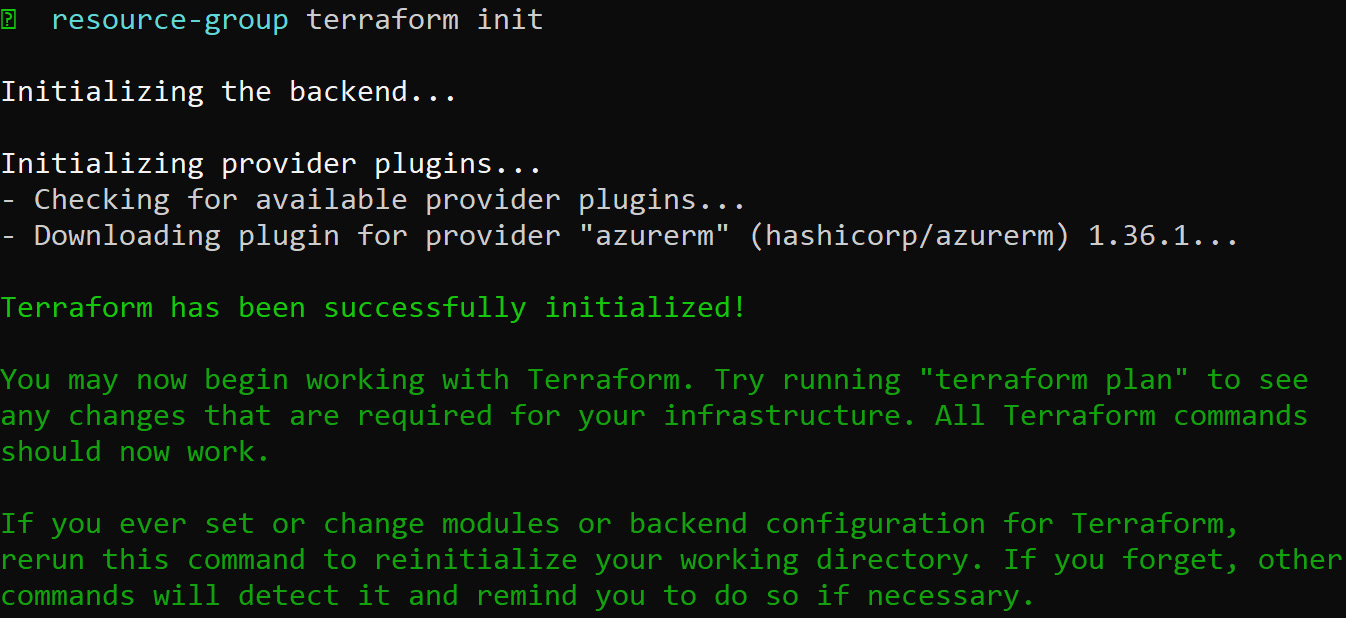
Figure 8.11: Initializing Terraform to download the azurerm provider
Since we've already exported the Service Principal details to the variables, we can deploy using this command:
terraform apply
This command will connect Terraform to your Azure subscription and check whether the resource exists. If Terraform figures out that the resource doesn't exist, it will go ahead and create an execution plan to deploy. You will get the output shown in the following screenshot. To proceed with the deployment, type yes:
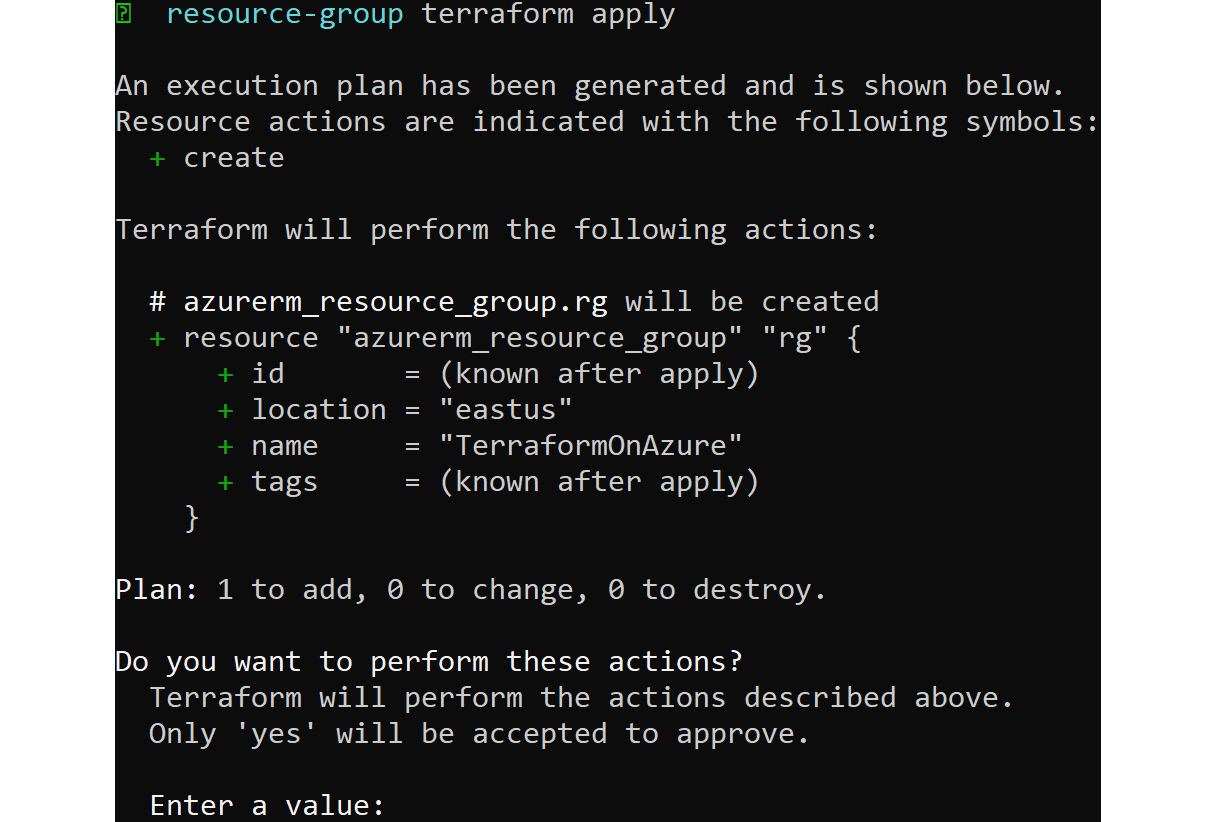
Figure 8.12: Connecting Terraform to the Azure subscription
Once you have given the input, Terraform will start the resource creation. After creation, Terraform will show you a summary of everything that was created and how many resources were added and destroyed, as shown here:

Figure 8.13: Summary of the created resources
A state file named terraform.tfstate will be generated in the project directory from where we initialized Terraform. This file will have the state information and also the list of resources we deployed to Azure.
We have successfully created the resource group; in the next section, we will discuss how to create a Linux VM using Terraform.
Deploying a Virtual Machine
In the previous example, where we created the resource group, we used azurerm_resource_group as the resource to be created. For each resource there will be a directive, for example, for a VM, it'll be azurerm_virtual_machine.
Also, we created the resource group using the terraform apply command. But Terraform also offers a way to work with an execution plan. So instead of deploying straight away, we can create a plan and see what changes will be made and then deploy.
To start with, you can go back to the terraform directory and create a new directory called vm. It's always a good idea to have separate directories for different projects:
mkdir ../vm
cd ../vm
Once you are in the directory, you can create a new main.tf file with the content shown in the following code block. Use the comments added to see the purpose of each block. Considering the length of the code, we are showing the truncated version of the code block. You can find the main.tf code file in the chapter 8 folder of the GitHub repository of this book:
provider "azurerm" {
version = "~>1.33"
}
#Create resource group
resource "azurerm_resource_group" "rg" {
name = "TFonAzure"
location = "eastus"
}
.
.
.
#Create virtual machine, combining all the components we created so far
resource "azurerm_virtual_machine" "myterraformvm" {
name = "tf-VM"
location = "eastus"
resource_group_name = azurerm_resource_group.rg.name
network_interface_ids = [azurerm_network_interface.nic.id]
vm_size = "Standard_DS1_v2"
storage_os_disk {
name = "tfOsDisk"
caching = "ReadWrite"
create_option = "FromImage"
managed_disk_type = "Standard_LRS"
}
storage_image_reference {
publisher = "Canonical"
offer = "UbuntuServer"
sku = "16.04.0-LTS"
version = "latest"
}
os_profile {
computer_name = "tfvm"
admin_username = "adminuser"
admin_password = "Pa55w0rD!@1234"
}
os_profile_linux_config {
disable_password_authentication = false
}
}
If you look at the section for azurerm_virtual_network, you can see that instead of writing down the resource name, we gave a reference in the format type.resource_configuration.parameter. In this case, instead of writing down the resource group name, the reference was given as azurerm_resource_group.rg.name. Likewise, throughout the code, we have taken references to make the deployment easy.
Before starting the deployment planning, we have to initialize the project using the following:
terraform init
As mentioned earlier, we will go with the execution plan. To create an execution plan and save it to a vm-plan.plan file, execute:
terraform plan -out vm-plan.plan
You will get a lot of warnings; they can be safely ignored. Make sure that the code doesn't show any errors. If the execution plan is successfully created, it will show the next step to be taken to execute the plan, as shown here:

Figure 8.14: Displaying the execution plan
As suggested in the output, we will execute:
terraform apply "vm-plan.plan"
Now, the deployment will start and will show what resource it's deploying, how much time has elapsed, and so on, as shown in the output:
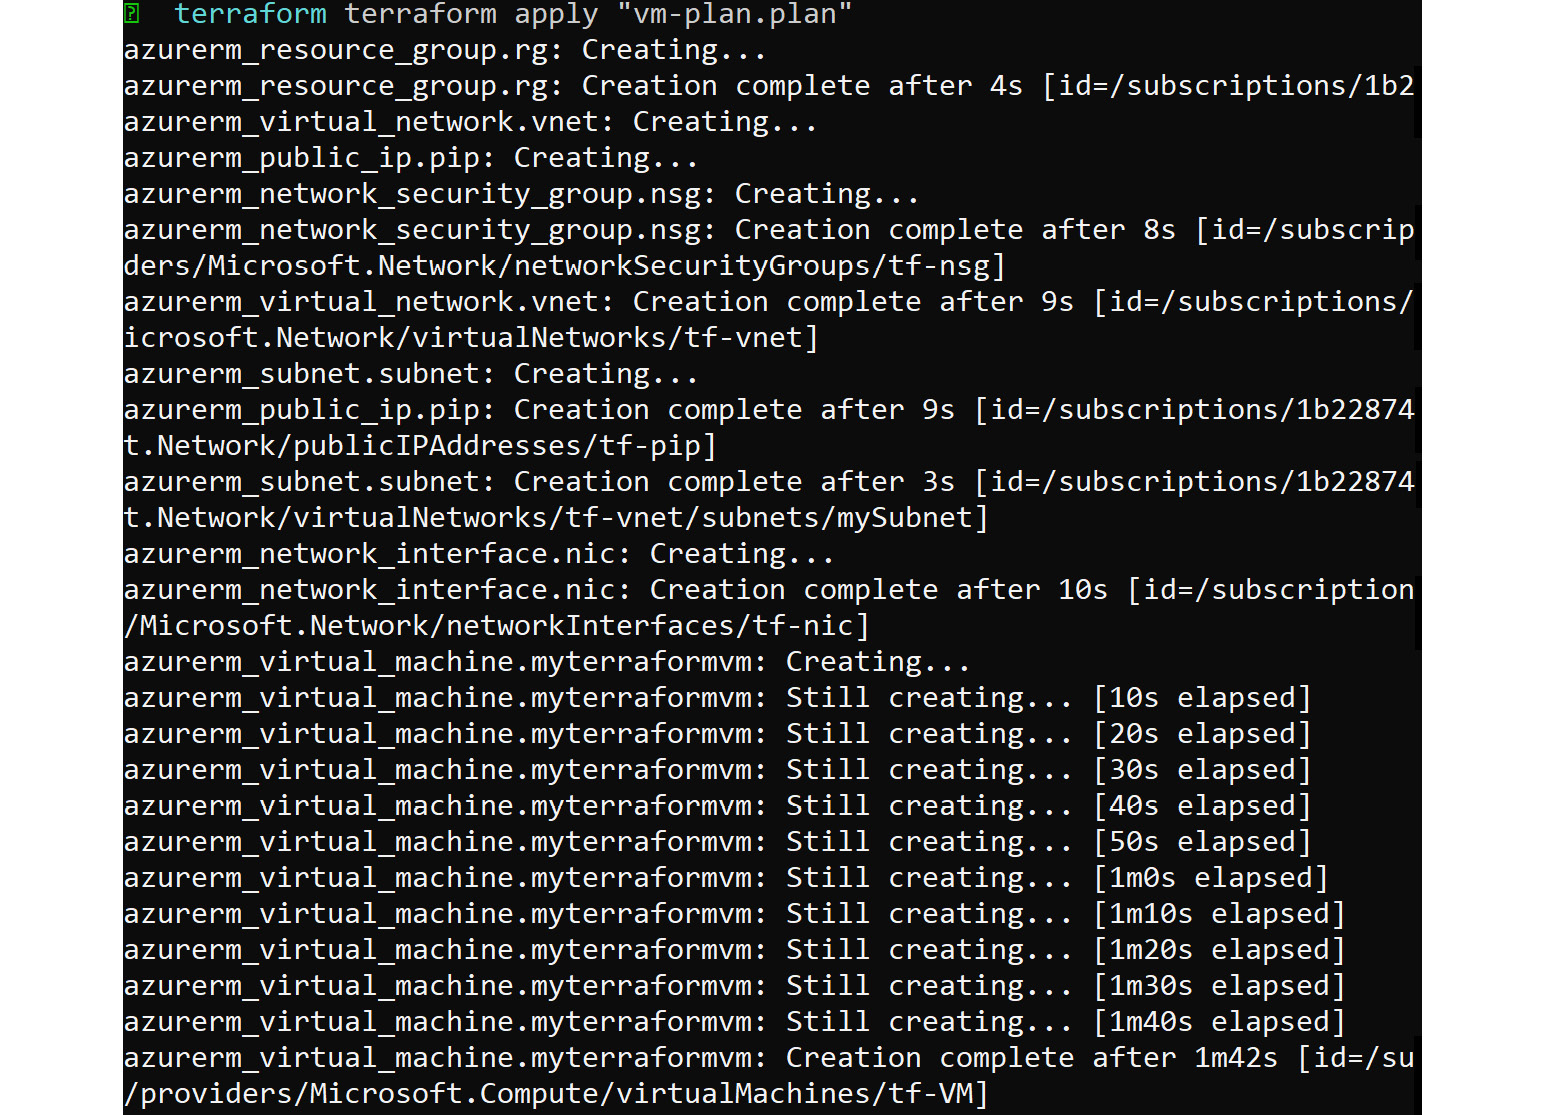
Figure 8.15: Resource deployment details
At the end, Terraform will give a summary of the number of resources deployed:

Figure 8.16: Summary of the number of resources deployed
There is also another command, which is the show command. This will show the complete state of the deployment, as can be seen in the following screenshot:
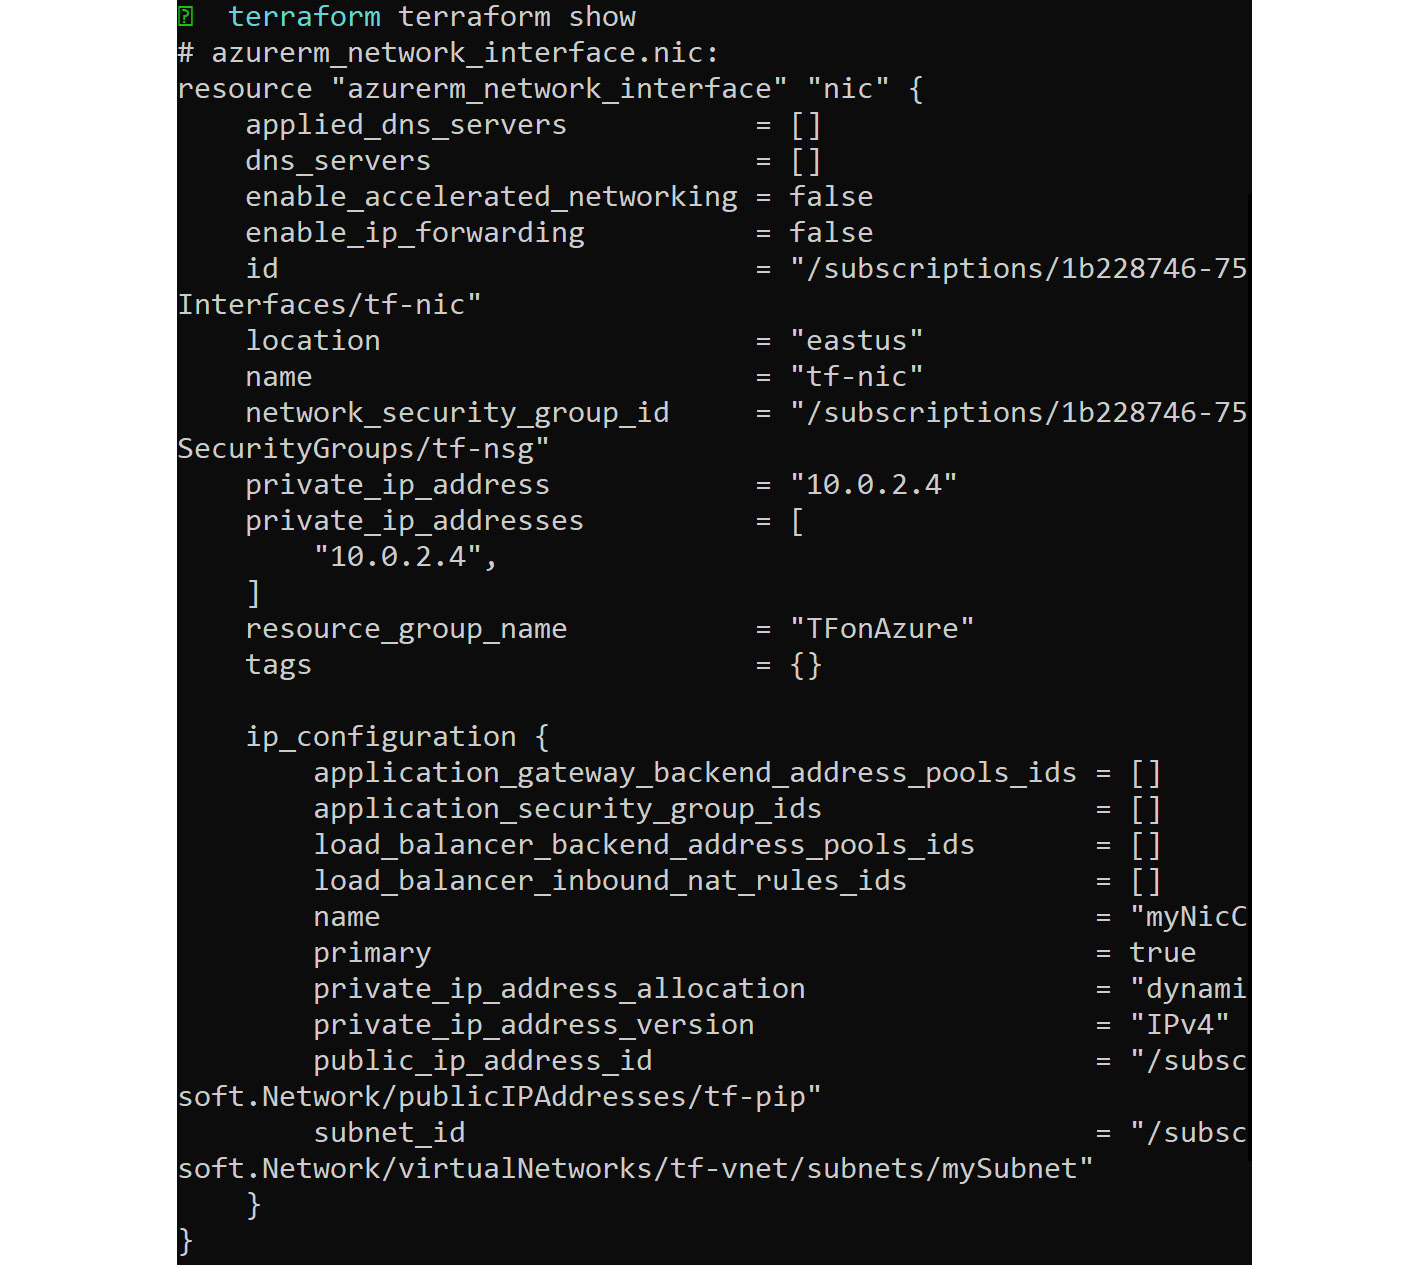
Figure 8.17: Displaying the complete state of the deployment
We have written a small piece of code that can deploy a VM in Azure. However, there are lots of arguments that can be added to the code by which advanced state configuration can be made. The complete list of arguments is available in the Terraform documentation (https://www.terraform.io/docs/providers/azurerm/r/virtual_machine.html) and the Microsoft documentation (https://docs.microsoft.com/en-us/azure/virtual-machines/linux/terraform-create-complete-vm).
As these templates are a bit advanced, they will be using variables instead of values that are repeating. Nevertheless, once you get used to this, you'll understand how powerful Terraform is.
Finally, you can destroy the entire deployment or project by executing:
terraform destroy
This will delete all the resources we mentioned in the main.tf file of the project. If you have multiple projects, you have to navigate to the project directory and execute the destroy command. On executing this command, you will be asked you to confirm the deletion; once you say yes, the resources will be deleted:
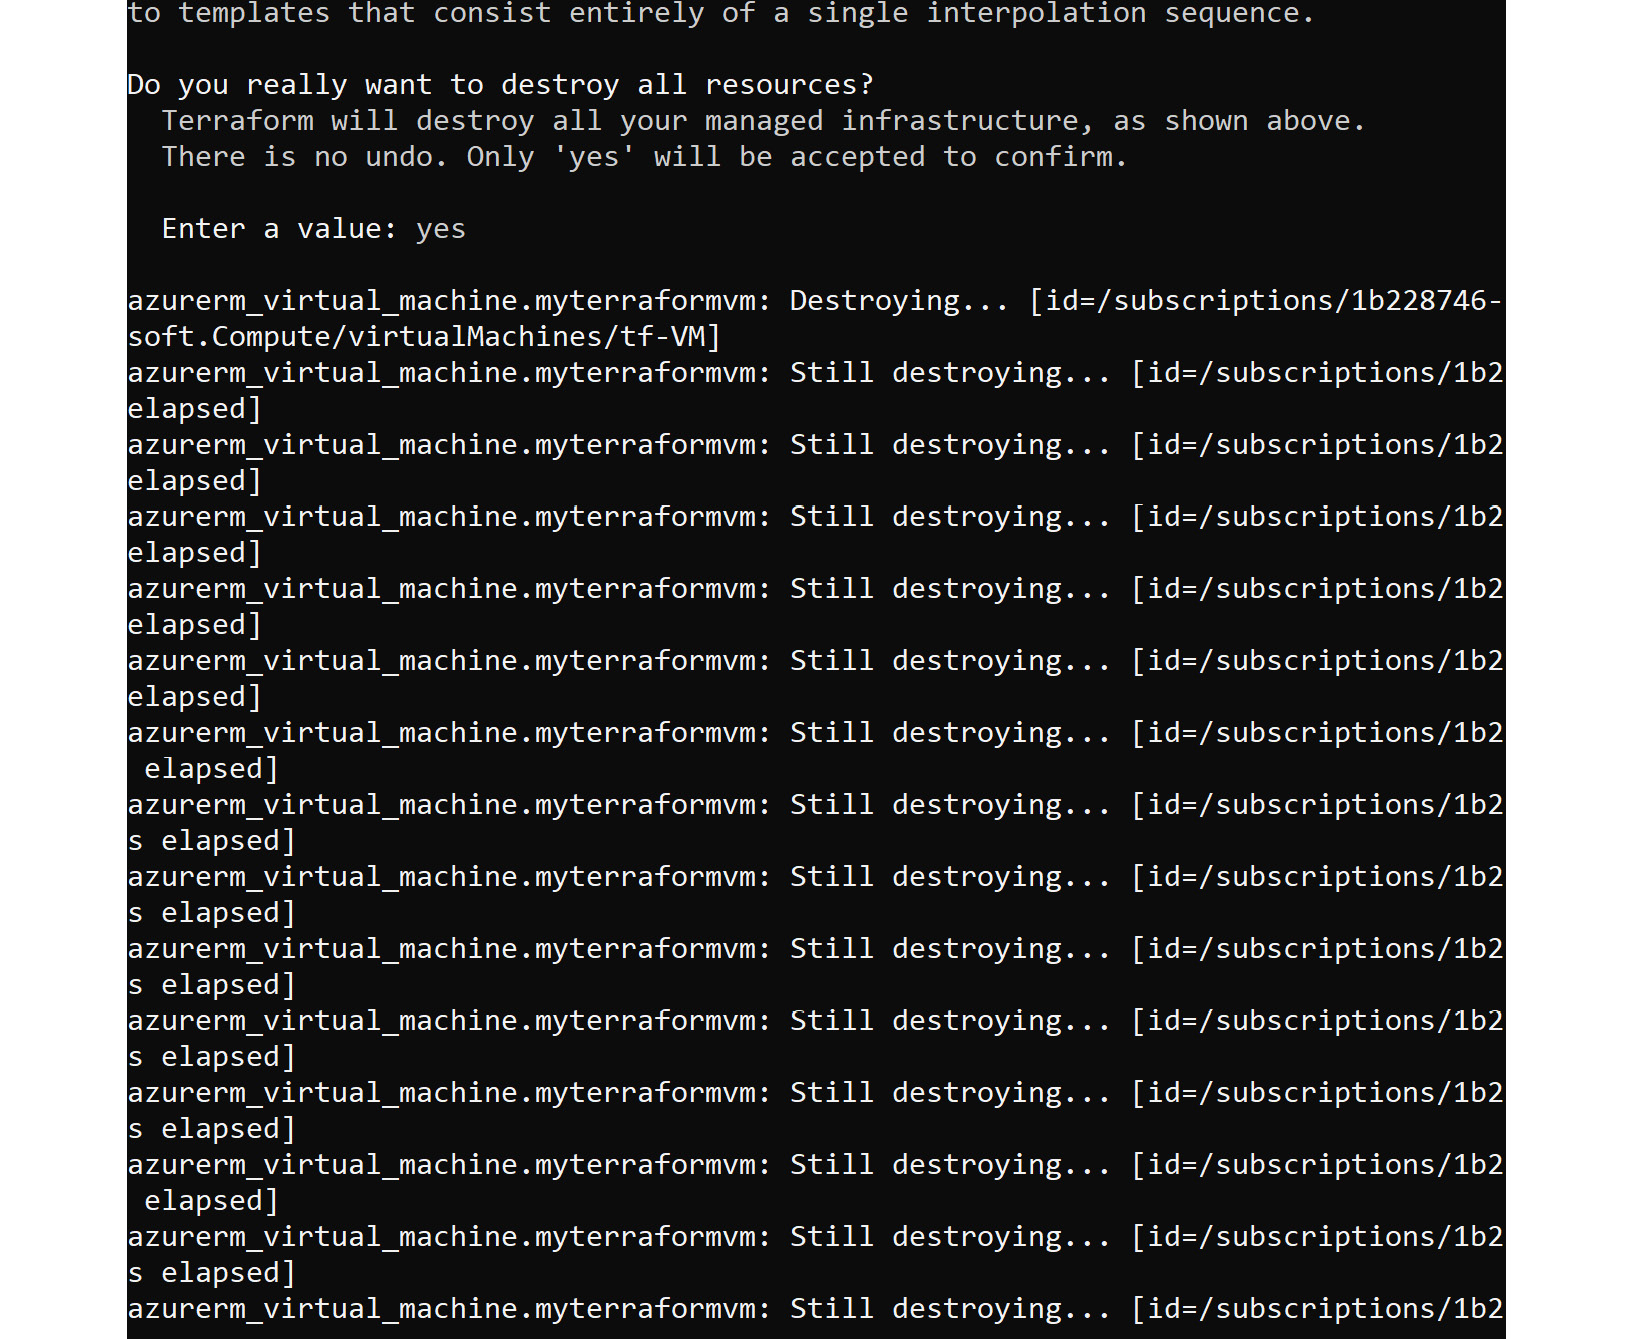
Figure 8.18: Deleting all the resources with the terraform destroy command
And finally, you will get a summary, as shown here:
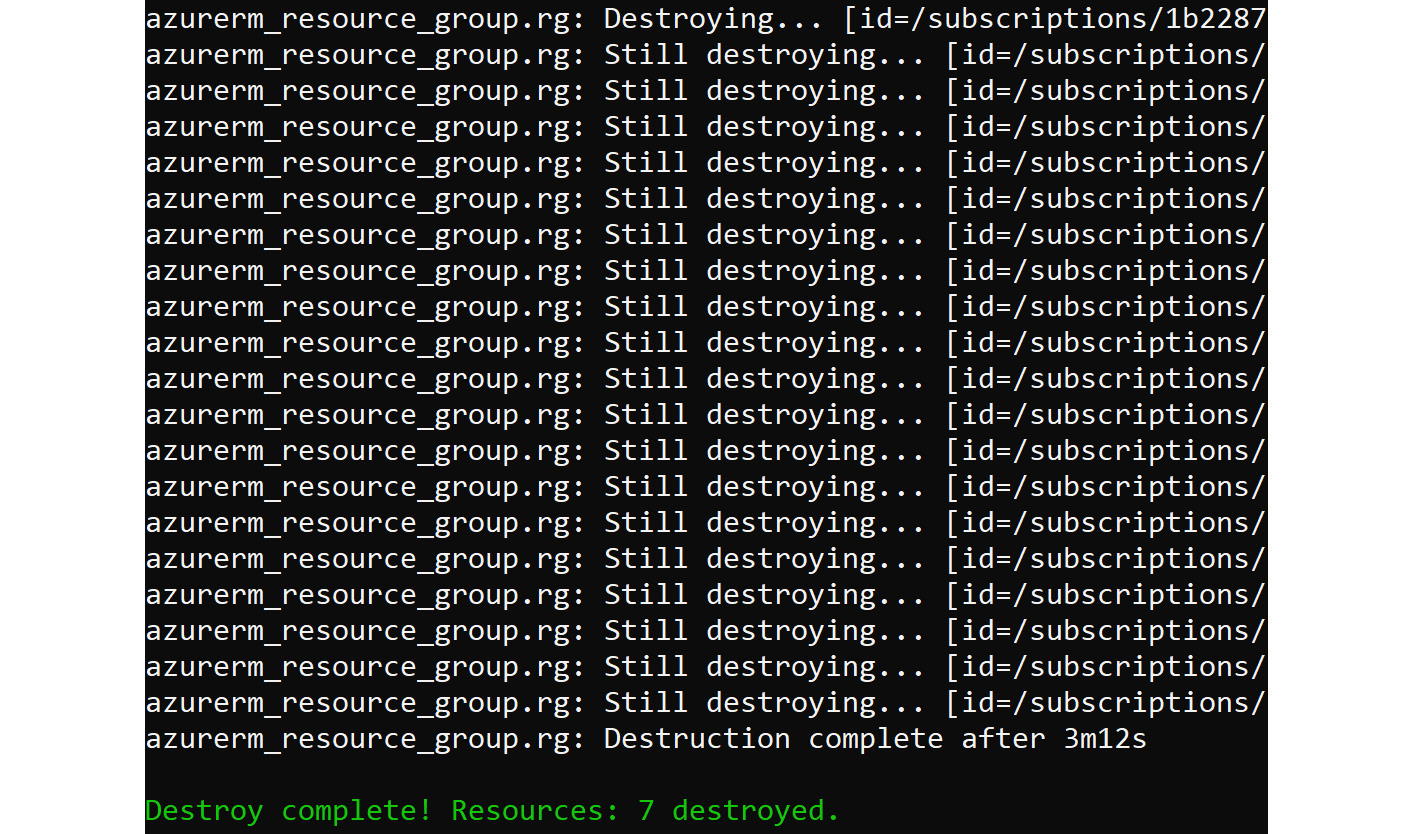
Figure 8.19: Summary of the destroyed resources
Now we are familiar with using Terraform on Azure and deploying a simple VM. Nowadays, Terraform is gaining a lot of popularity due to the usability and adoption of DevOps. Terraform has made the process of evaluating infrastructure and rebuilding it hassle-free.
Using PowerShell DSC
Like Bash, PowerShell is a shell with strong scripting possibilities. We might think that PowerShell is more of a scripting language and that can be used to carry out simple operations or to create resources as we have done so far. However, the capabilities of PowerShell are beyond that and extend all the way to automation and configuration.
DSC is an important but little-known part of PowerShell that, instead of automating scripts in the PowerShell language, provides declarative orchestration in PowerShell.
If you compare it to Ansible, support for Linux is very limited. But it is very useful for common administration tasks, and missing features can be compensated for with PowerShell scripts. Microsoft is very focused on getting it on a par with Windows Server. When that happens, it will be replaced by PowerShell DSC Core, a move very similar to what they did before with PowerShell | PowerShell Core. This will be finished by the end of 2019.
Another important note is that, for some reason, the Python scripts that come with DSC don't work—from time to time, you'll get a 401 error or even an undefined error. First, make sure that you have the latest version of the OMI server and DSC and just try again; sometimes, you have to try two or three times.
Azure Automation DSC
One way to use DSC is to use Azure Automation DSC. This way, you don't have to use a separate machine as a controller node. To be able to use Azure Automation DSC, you'll need an Azure Automation account.
Automation account
In the Azure portal, select All Services in the left-hand bar, navigate to Management + governance, and choose Automation Accounts. Create an automation account and make sure that you choose Run As Account.
Navigate again to All Services, Management Tools, and then select the just-created account:
Figure 8.20: Creating an automation account in the Azure portal
Here, you can manage your nodes, configurations, and so on.
Please note that this service is not exactly free. Process automation is priced per job execution minute, while configuration management is priced per managed node.
To be able to use this account, you'll need the registration URL and the corresponding key of your Run As Account. Both values are available under Account and Key Settings.
Or, in PowerShell, execute the following command:
Get-AzAutomationRegistrationInfo '
-ResourceGroup <resource group> '
-AutomationAccountName <automation account name>
There is a VM extension available for Linux; this way, you can deploy VMs, including their configuration, fully orchestrated.
For more information, visit https://github.com/Azure/azure-linux-extensions/tree/master/DSC and https://docs.microsoft.com/en-us/azure/virtual-machines/extensions/dsc-linux.
Because we're going to play with Linux and DSC, we'll need a DSC module called nx. This module contains DSC resources for Linux. In the settings of your automation account, select Shared Resources and Modules. In the Browse Gallery tab, search for nx and import the module.
Installing PowerShell DSC on Linux
To be able to use PowerShell DSC on Linux, you'll need the Open Management Infrastructure Service. The supported versions of Linux distributions are as follows:
- Ubuntu 12.04 LTS, 14.04 LTS, and 16.04 LTS. Ubuntu 18.04 is not supported at the moment.
- RHEL/CentOS 6.5 and higher.
- openSUSE 13.1 and higher.
- SUSE Linux Enterprise Server 11 SP3 and higher.
The software is available for download at https://github.com/Microsoft/omi.
Installation on Red Hat–based distributions is as follows:
sudo yum install
https://github.com/Microsoft/omi/releases/download/
v1.4.2-3/omi-1.4.2-3.ssl_100.ulinux.x64.rpm
For Ubuntu, you can download the deb file from the GitHub repository using wget and install it using dpkg:
dpkg –i ./omi-1.6.0-0.ssl_110.ulinux.x64.deb
Note
Make sure you download the file that matches your SSL version. Your SSL version can be checked using the openssl version command.
After installation, the service is automatically started. Check the status of the service by using the following command:
sudo systemctl status omid.service
To show product and version information, including the configuration directories used, use the following command:
/opt/omi/bin/omicli id
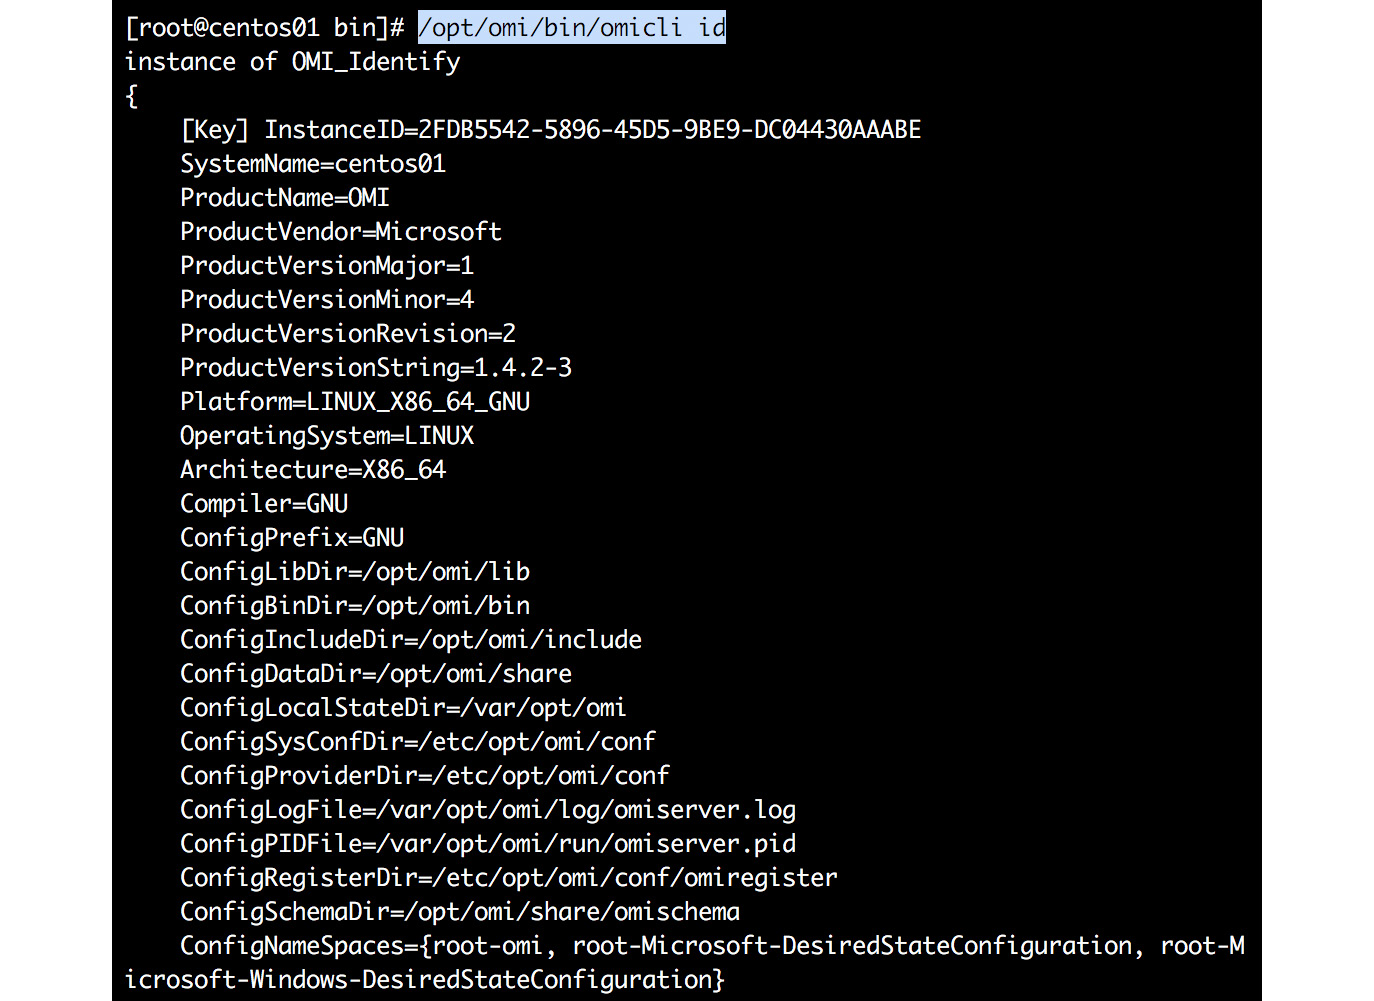
Figure 8.21: Displaying the product and version information
Creating a Desired State
PowerShell DSC is not just a script or a code with parameters, like in Ansible. To start with PowerShell DSC, you'll need a configuration file that must be compiled into a Management Object Format (MOF) file.
But, first things first. Let's create a file, example1.ps1, with the following content:
Configuration webserver {
Import-DscResource -ModuleName PSDesiredStateConfiguration,nx
Node "ubuntu01"{
nxPackage apache2
{
Name = "apache2"
Ensure = "Present"
PackageManager = "apt"
}
}
}
webserver
Let's investigate this configuration. As stated, it's very similar to a function declaration. The configuration gets a label and is executed at the end of the script. The necessary modules are imported, the hostname of the VM is declared, and the configuration starts.
PowerShell DSC Resources
In this configuration file, a resource called nxPackage is used. There are several built-in resources:
- nxArchive: Provides a mechanism to unpack archive (.tar, .zip) files at a specific path.
- nxEnvironment: Manages environment variables.
- nxFile: Manages files and directories.
- nxFileLine: Manages lines in a Linux file.
- nxGroup: Manages local Linux groups.
- nxPackage: Manages packages on Linux nodes.
- nxScript: Runs scripts. Most of the time, this is used to switch temporarily to a more imperative orchestration approach.
- nxService: Manages Linux services (daemons).
- nxUser: Manages Linux users.
You can also write your own resources in the MOF language, C#, Python, or C/C++.
You can make use of the official documentation by visiting https://docs.microsoft.com/en-us/powershell/dsc/lnxbuiltinresources.
Save the script and execute it as follows:
pwsh -file example1.ps
As a result of the script, a directory is created with the same name as the configuration name. In it, there's a localhost file in MOF format. This is the language used to describe CIM classes (CIM stands for Common Information Model). CIM is an open standard for the management of a complete environment, including hardware.
We think that this description alone is enough to understand why Microsoft chooses this model and the corresponding language file for orchestration!
You can also upload the configuration file to Azure, under DSC Configurations. Press the Compile button to generate the MOF file in Azure.
Applying the Resources in Azure
If you want, you can apply the desired state locally, using scripts in /opt/microsoft/dsc/Scripts, which is, in our opinion, not as easy as it should be. And, because this chapter is about orchestration in Azure, we'll just move straight on to Azure.
Register the VM:
sudo /opt/microsoft/dsc/Scripts/Register.py
--RegistrationKey <automation account key>
--ConfigurationMode ApplyOnly
--RefreshMode Push --ServerURL <automation account url>
Check the configuration again:
sudo /opt/microsoft/dsc/Scripts/GetDscLocalConfigurationManager.py
The node is now visible in the DSC Nodes pane under your Automation Account settings. Now, you can link the uploaded and compiled DSC configuration. The configuration is applied!
Another way is to use the Add Node option and then select the DSC configuration.
To conclude, the primary use case scenario of PowerShell DSC is to write, manage, and compile DSC configurations, as well as import and assign these configurations to the target nodes in the cloud. Before using any tool, you need to understand the use case scenarios and how they fit into your environment to achieve the goal. So far, we have been configuring VMs; the next section is all about how to audit the settings inside the Linux VM using Azure Policy Guest Configuration.
Azure Policy Guest Configuration
Policies are mainly used for the governance of resources. Azure Policy is a service in Azure by which you can create, manage, and assign policies in Azure. These policies can be used for auditing and for compliance. For example, if you are hosting a secured application in the East US location and you want to limit the deployments in East US only, Azure Policy can be used to accomplish this.
Let's say you don't want to deploy SQL servers in a subscription. In Azure Policy, you can create a policy and specify the allowed services, and only they can be deployed in that subscription. Please note, if you are assigning a policy to a subscription that already has resources, Azure Policy can only act on resources that are created post assignment. However, if any of the existing resources before assignment don't comply with the policy, they will be marked as "non-compliant" so an administrator can rectify them if necessary. Also, Azure Policy will only kick in during the validation phase of the deployment.
Some of the built-in policies are:
- Allowed locations: Using this, you can enforce geo-compliance.
- Allowed virtual machine SKUs: Defines a set of virtual machine SKUs.
- Add a tag to resources: Adds a tag to the resource. If no value is passed, it will take the default tag value.
- Enforce a tag and its value: Used to enforce a required tag and its value to the resource.
- Not allowed resource types: Prevents the deployment of selected resources.
- Allowed storage account SKUs: We discussed different SKUs that are available for storage accounts in the previous chapter, such as LRS, GRS, ZRS, and RA-GRS. You can specify the allowed SKUs, and the rest of them are denied from being deployed.
- Allowed resource type: As we mentioned in the example, you can specify which resources are allowed in the subscription. For example, if you want only VMs and networking, you can accept the Microsoft.Compute and Microsoft.Network resource providers; all other providers are denied from deployment.
So far, we have discussed how Azure Policy can be used to audit Azure resources, but it can be also used to audit settings inside a VM. Azure Policy accomplishes this task using the Guest Configuration extension and client. The extension and client work hand-in-hand to confirm the configuration of the guest OS, the presence of an application, its state, and also the environmental settings of the guest OS.
Azure Policy Guest Configuration can only help you audit the guest VM. Applying configurations is not available at the time of writing.
Guest Configuration Extension for Linux
The guest policy configuration is done by the Guest Configuration extension and agent. The Guest Configuration agent on VMs is configured by using the Guest Configuration extension for Linux. As discussed earlier, they work hand-in-hand, allowing the user to run the in-guest policy on the VMs, which, in turn, helps the user to audit the policies on the VM. Chef InSpec (https://www.inspec.io/docs/) is the In-Guest policy for Linux. Let's see how to deploy the extension to a VM and use the commands supported by the extension.
Deployment to a Virtual Machine
To do this, you need to have a Linux VM. We will be deploying the Guest Configuration extension onto the VM by executing:
az vm extension set --resource-group <resource-group>
--vm-name <vm-name>
--name ConfigurationForLinux
--publisher Microsoft.GuestConfiguration
--version 1.9.0
You will get a similar output to this:
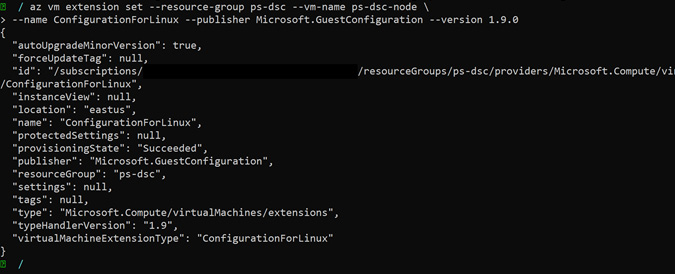
Figure 8.22: Deploying the Guest Configuration extension onto the VM
Commands
The Guest Configuration extension supports the install, uninstall, enable, disable, and update commands. To execute these commands; you need to switch the current working directory to /var/lib/waagent/Microsoft.GuestConfiguration.ConfigurationForLinux-1.9.0/bin. After that, you can chain the available commands with the guest-configuration-shim script.
Note
Check whether the execute bit is enabled for the file. If not, use chmod +x guest-configuration-shim to set the execution permission.
The general syntax for executing any command is ./guest-configuration-shim <command name>.
For example, if you want to install Guest Configuration Extension, you can use the install command. When the extension is already installed, enable will be called, which will extract the Agent package, which installs and enables the agent.
Similarly, update will update the Agent Service to the new agent, disable disables the agent, and, finally, uninstall will uninstall the agent.
The agent is downloaded to a path such as /var/lib/waagent/Microsoft.GuestConfiguration.ConfigurationForLinux-<version>/GCAgent/DSC, and the agent output is saved to the stdout and stderr files in this directory. If you encounter any issues, verify the contents of these files. Try to understand the error and then troubleshoot.
Logs are saved to /var/log/azure/Microsoft.GuestConfiguration.ConfigurationForLinux. You can use these to debug the issues.
Currently, these are the supported OS versions for Azure Policy Guest Configuration:
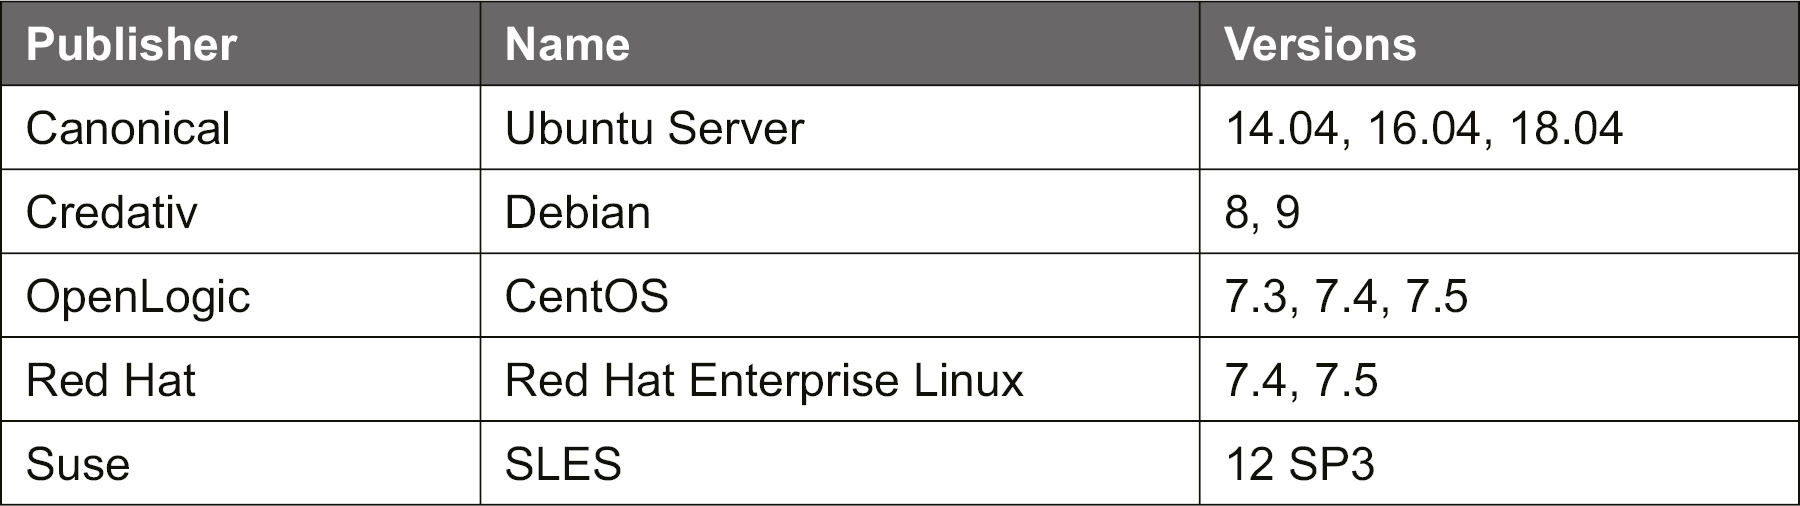
Figure 8.23: OS versions supported for Azure Policy Guest Configuration
Azure Policy is written as a JSON manifest. As writing policies is not part of this book; you can refer the sample policy shared by Microsoft (https://github.com/MicrosoftDocs/azure-docs/blob/master/articles/governance/policy/samples/guest-configuration-applications-installed-linux.md). This sample is to audit if specific applications are installed inside Linux VMs.
If you investigate the sample, you will learn what the components are and how you can use the parameters in your context.
Other Solutions
Another big player in the orchestration market is Puppet. Until very recently, the support for Azure in Puppet was very limited, but that is changing very quickly. The Puppet module, puppetlabs/azure_arm, is still somewhat in its infancy, but puppetlabs/azure provides you with everything you'll need. Both modules need the Azure CLI to work. The integration of the Azure CLI in their commercial Puppet Enterprise product is amazingly good. Azure has a VM extension that's available for VMs that will become Puppet nodes.
More information can be found at https://puppet.com/products/managed-technology/microsoft-windows-azure.
You can also go for the Chef software, which provides an automation and orchestration platform that has been around for a long time. Its development started in 2009! The user writes "recipes" that describe how Chef manages the "kitchen" using tools such as a knife. In Chef, much of its terminology comes from the kitchen. Chef integrates very well with Azure, especially if you use Chef Automate from Azure Marketplace. There is also a VM extension available. Chef is intended for big environments and has a relatively steep learning curve, but it's worth trying it at least.
More information can be found at https://www.chef.io/partners/azure/.
Summary
We started this chapter with a short introduction to orchestration, the reasons to use orchestration, and the different approaches: imperative versus declarative.
After that, we covered the Ansible, Terraform, and PowerShell DSC platforms. Many details were covered about the following:
- How to install the platforms
- Working with resources at the OS level
- Integration with Azure
Ansible is by far the most complete solution, and maybe the one with the least steep learning curve. However, all of the solutions are very powerful and there are always ways around their limitations. And for all orchestration platforms, the future is promising in terms of even more features and capabilities.
Creating Linux VMs is not the only way to create a workload in Azure; you can also use container virtualization to deploy a platform for your application. In the next chapter, we're going to cover container technologies.
Questions
For this chapter, let's skip the normal questions. Fire up some VMs and choose the orchestration platform of your choice. Configure the network security groups to allow HTTP traffic.
Try to configure the following resources with Ansible, Terraform, or PowerShell DSC:
- Create a user and make it a member of the group wheel (RH-based distributions) or sudo (Ubuntu).
- Install an Apache web server, serve content from /wwwdata, secure it with AppArmor (Ubuntu) or SELinux (RHEL-based distributions), and serve a nice index.html page on this web server.
- Restrict SSH to your IP address. HTTP ports must be open to the whole world. You can use systemd methods by providing override files or FirewallD.
- Deploy a new VM with the distribution and version of your choice.
- Create a new /etc/hosts file using variables. If you use PowerShell DSC, you'll need PowerShell as well for this task. For experts: use the hostnames and IP addresses of other machines in your resource group.
Further Reading
We really hope that you enjoyed this introduction to orchestration platforms. It was only a short introduction to make you curious to learn more. All the websites of the orchestration tools mentioned in this chapter are great resources and a pleasure to read.
Some extra resources to mention include the following:
- Learning PowerShell DSC – Second Edition by James Pogran.
- Ansible: We do think that Learn Ansible by Russ McKendrick, and other titles by the same author about Ansible, deserve a lot of credit. If you are too lazy to read the book, then you can refer to the Ansible documentation to start with. If you want some hands-on tutorials, you can use this GitHub repository: https://github.com/leucos/ansible-tuto.
- Terraform: Terraform on Microsoft Azure - Part 1: Introduction is a blog series written by Julien Corioland, who is a Senior Software Engineer at Microsoft. The blog includes a series of topics discussing Terraform on Azure. It's worth reading and trying out the tasks. The blog is available at https://blog.jcorioland.io/archives/2019/09/04/terraform-microsoft-azure-introduction.html.
- Mastering Chef by Mayank Joshi
- Learning Puppet by Jussi Heinonen