
Chapter 6: Terraform Workflows
In the previous chapter, we discussed the Terraform command-line interface (CLI) and saw some outputs from Terraform commands.
In this chapter, we will take a look at a core workflow of the Terraform tool, which involves creating a Terraform configuration file (write), previewing the changes (plan), then finally committing those changes to the target environment (apply). Once we are done with the creation of the resources, we might be required to get rid of infrastructures (destroy). In a nutshell, we are planning to cover Terraform core workflows, which mainly consist of terraform init, terraform plan, terraform apply, and terraform destroy operations, and the respective subcommands and their outputs. Understanding Terraform workflows will help you to provision and update infrastructure using Terraform infrastructure as code (IaC). We will also be explaining the integration of Terraform workflows with major cloud providers such as Azure. Moving further, we are going to discuss Terraform workflows using Azure DevOps service.
The following topics will be covered in this chapter:
- Understanding the Terraform life cycle
- Understanding Terraform workflows using Azure DevOps
Technical requirements
To follow along with this chapter, you will need to have an understanding of the Terraform CLI and of various methods of authenticating Terraform to major cloud providers such as Azure, Google Cloud Platform (GCP), and Amazon Web Services (AWS). You should also know how to install Terraform on various machines and need to have a basic understanding of writing a Terraform configuration file. Some knowledge of Azure DevOps and Git would be an added advantage. You can find all the code used in this chapter at the following GitHub link: https://github.com/PacktPublishing/HashiCorp-Infrastructure-Automation-Certification-Guide/tree/master/chapter6.
Check out the following link to see the Code in Action video:
https://bit.ly/3qVPyf8
Understanding the Terraform life cycle
As you have become familiar with how to use the Terraform CLI and run the respective Terraform commands, you must have also been wondering how Terraform creates or updates an infrastructure. Terraform follows a sequence of commands that are defined under the Terraform life cycle. Let's try to understand how the Terraform life cycle works with terraform init, terraform plan, terraform apply, and terraform destroy. A Terraform workflow starts with writing the Terraform code file, downloading all the providers and plugins, displaying in preview which actions Terraform is going to perform, and then—finally—whether you wish to deploy the resources that have been defined in the Terraform configuration code file. After creating or updating this infrastructure, let's suppose you wish to have these resources destroyed—how would you do this? All this can be clarified by following a Terraform workflow, which is depicted in the following diagram:

Figure 6.1 – Terraform life cycle workflow
Terraform init
terraform init is the first and foremost Terraform command that you generally run to initialize Terraform in the working directory. There could be several reasons to run the terraform init command, such as the following:
- When you have added a new module, provider, or provisioner
- When you have updated the required version of a module, provider, or provisioner
- When you want to change or migrate the configured backend
Terraform modules (which we will be discussing in the upcoming chapter, Chapter 7, Terraform Modules) and these downloaded files get stored in the current working directory that you have provided. The terraform init command supports many subcommands or arguments. You can get all the supported arguments by typing terraform init -h, and here we share a few of them:
- -backend=true: Configures the backend for this configuration.
- -backend-config=path: This can either be a path to a Hashicorp Configuration File (HCL) file with key/value assignments (same format as terraform.tfvars) or a key=value format. This is merged with what is in the configuration file, which can be specified multiple times. The backend type must be in the configuration itself.
- -from-module=SOURCE: Copies the contents of a given module into the target directory before initialization.
- -lock=true: Locks the state file when locking is supported.
- -no-color: If specified, the output won't contain any color.
- -plugin-dir: Directory containing plugin binaries. This overrides all default search paths for plugins and prevents the automatic installation of plugins. This flag can be used multiple times.
- -reconfigure: Reconfigures the backend, ignoring any saved configuration.
- -upgrade=false: If installing modules (-get) or plugins (-get-plugins), ignores previously downloaded objects and installs the latest version allowed within configured constraints.
- -verify-plugins=true: Verifies the authenticity and integrity of automatically downloaded plugins.
Let's try to understand what exactly happens when we run the terraform init command with some simple example code. In this example, we are taking an Azure Resource Manager (AzureRM) provider. In the following code snippet, we have placed it in the providers.tf file:
terraform {
required_version = ">= 1.0"
required_providers {
azurerm = {
source = "hashicorp/azurerm"
version = "2.55.0"
}
}
}
provider "azurerm" {
features {}
}
In terms of the actions performed when we run terraform init, if we look closely at the next code snippet, we can easily understand what terraform init has done. We can see that it has performed initialization of the backend to store the state file as well as downloading provider plugins from HashiCorp. Terraform will not be able to download third-party plugins. These can instead be manually installed in the user plugins directory, located at
~/.terraform.d/plugins on Linux/Mac operating systems and %APPDATA% erraform.dplugins on Windows. For detailed information about third-party plugins, you can refer to https://www.hashicorp.com/blog/automatic-installation-of-third-party-providers-with-terraform-0-13. You can see the code here:
$ terraform init
Initializing the backend...
Initializing provider plugins...
- Finding hashicorp/azurerm versions matching "2.55.0"...
- Installing hashicorp/azurerm v2.55.0...
- Installed hashicorp/azurerm v2.55.0 (signed by HashiCorp)
Terraform has created a lock file .terraform.lock.hcl to record the provider selections it made above. Include this file in your version control repository so that Terraform can guarantee to make the same selections by default when you run "terraform init" in the future.
Terraform has been successfully initialized!
You may now begin working with Terraform. Try running "terraform plan" to see any changes that are required for your infrastructure. All Terraform commands should now work. If you ever set or change modules or backend configuration for Terraform, rerun this command to reinitialize your working directory. If you forget, other commands will detect it and remind you to do so if necessary.
In the following code snippet, you can see that after running terraform init, this has created a .terraform folder in the current working directory, which contains azurerm provider plugins:
PS C: erraform> tree
.
├── .terraform
│ ├── environment
│ └── providers
│ ├── registry.terraform.io
│ │ └── hashicorp
│ │ └── azurerm
│ │ └── 2.55.0
│ │ └── windows_amd64
│ │ └── terraform-provider-azurerm_v2.55.0_x5.exe
├── .terraform.lock.hcl
└── providers.tf
Let's try to understand how we can perform Terraform initialization in the current local directory by providing a path of the Terraform files. In order to understand this, we have moved the providers.tf file to the provider folder and have then run terraform init -backend-config='C:provider' from the current directory. This has downloaded all the provider plugins to the present working directory. The code is illustrated in the following snippet:
$ terraform init -backend-config='C:provider'
Initializing the backend...
Initializing provider plugins...
- Finding hashicorp/azurerm versions matching "2.55.0"...
- Installing hashicorp/azurerm v2.55.0...
- Installed hashicorp/azurerm v2.55.0 (signed by HashiCorp)
Warning: Missing backend configuration
-backend-config was used without a "backend" block in the configuration.
If you intended to override the default local backend configuration, no action is required, but you may add an explicit backend block to your configuration to clear this warning:
terraform {
backend "local" {}
}
However, if you intended to override a defined backend, please verify that the backend configuration is present and valid.
Terraform has been successfully initialized!
You may now begin working with Terraform. Try running "terraform plan" to see any changes that are required for your infrastructure. All Terraform commands should now work.
If you ever set or change modules or backend configuration for Terraform, rerun this command to reinitialize your working directory. If you forget, other commands will detect it and remind you to do so if necessary.
As you can see, we are getting some sort of warning related to the backend configuration while performing terraform init. If we want to set the remote backend—for example, Azure Blob storage—then we can have the following code in the providers.tf file:
terraform {
required_version = ">= 1.0"
required_providers {
azurerm = {
source = "hashicorp/azurerm"
version = "2.55.0"
}
}
backend "azurerm" {
resource_group_name = "terraform-rg"
storage_account_name = "terraformstatestg"
container_name = "tfstate-container"
key = "tfstate"
}
}
provider "azurerm" {
features {}
}
This earlier defined code would help us in keeping the Terraform state file in the remote backend. If we don't define the remote backend, then Terraform would use the local backend as a default and store the state file in it.
We are not able to discuss all the subcommands of terraform init, which is why we have already shared a list of the subcommands/arguments and their respective descriptions at the beginning of this section so that you can get an idea of what exactly it can do for you.
Important note
The terraform init command is always safe to run multiple times. Though subsequent runs may give errors, this command will never delete your configuration or state.
Terraform validate
If you have some Terraform syntax errors in the configuration code, then you must be thinking: Does Terraform provide any way to get these errors checked? The answer to this is yes—Terraform has an built-in command, terraform validate, which will let you know if there are any syntax errors in the Terraform configuration code in the specified directory.
You can run the terraform validate command explicitly, otherwise validation of the configuration file will be done implicitly during the execution of the terraform plan or terraform apply commands, so it is not mandatory to run this command. Terraform is knowledgeable enough to run validation during other Terraform workflows such as terraform plan or terraform apply workflows.
The only thing needed before Terraform performs validation of the configuration code is the terraform init command, which downloads all plugins and providers by default. Here is a quick example, to give a walkthrough of some possible syntax validation errors:
terraform {
required_version = ">= 1.0"
required_providers {
azurerm = {
source = "hashicorp/azurerm"
version = "2.55.0"
}
}
}
provider "azurerm" {
features {}
}
resource "azurerm_resource_group" "example" {
name = "Terraform-lab-RG"
location = "eastus"
terraform_location = "eastus"
}
If we run terraform validate against this configuration, we will get the following error:
PS C:provider> terraform validate
Error: Unsupported argument
on resourcegroup.tf line 16, in resource "azurerm_resource_group" "example":
16: terraform_location = "eastus"
An argument named "terraform_location" is not expected here.
This is showing that terraform_location is not a valid argument for azurerm_resource_group.
Let's see what will happen if we remove the terraform_location argument from the configuration code and then execute terraform validate. You can see the result in the following code snippet:
PS C:provider> terraform validate
Success! The configuration is valid.
So, we can conclude that terraform validate can help us to perform a syntax check of the Terraform configuration code in the directory we are referencing.
Important note
The terraform validate command does not check Terraform configuration file formatting (for example, tabs versus spaces, newlines, comments, and so on). For formatting, you can use the terraform fmt command.
Terraform plan
After executing terraform init, you are supposed to run the terraform plan command, which would generate an execution plan. When the terraform plan command is being run, Terraform performs a refresh in the backend (unless you have explicitly disabled it), and Terraform then determines which actions it needs to perform to meet the desired state you have defined in the configuration files. If there is no change to the configuration files, then terraform plan will let you know that it is not performing any change to the infrastructure. Some of the subcommands/arguments that we can run with terraform plan are listed here—a complete list of the subcommands/arguments supported by the terraform plan phase can be seen by running the terraform plan -h command:
- -destroy: If set, a plan will be generated to destroy all resources managed by the given configuration and state.
- -input=true: Asks for input for variables if not directly set.
- -out=path: Writes a plan file to the given path. This can be used as input to the apply command.
- -state=statefile: Provides a path to a Terraform state file to use to look up Terraform-managed resources. By default, it will use the terraform.tfstate state file if it exists.
- -target=resource: Provides a resource to target. The operation will be limited to this resource and its dependencies. This flag can be used multiple times.
- -var 'foo=bar': Sets a variable in the Terraform configuration. This flag can be set multiple times.
- -var-file=foo: Sets variables in the Terraform configuration from a file. If a terraform.tfvars files or any .auto.tfvars files are present, they will be automatically loaded.
In order to understand the terraform plan command, here is a line of code that's been defined in the resourcegroup.tf file:
resource "azurerm_resource_group" "example" {
name = "Terraform-lab-RG"
location = "east us"
}
When we run the terraform plan command, we can expect the following output:
PS C: erraform> terraform plan
Acquiring state lock. This may take a few moments...
Refreshing Terraform state in-memory prior to plan...
The refreshed state will be used to calculate this plan, but will not be persisted to local or remote state storage.
------------------------------------------------------------------------
An execution plan has been generated and is shown below.
Resource actions are indicated with the following symbols:
+ create
Terraform will perform the following actions:
# azurerm_resource_group.example will be created
+ resource "azurerm_resource_group" "example" {
+ id = (known after apply)
+ location = "eastus"
+ name = "Terraform-lab-RG"
}
Plan: 1 to add, 0 to change, 0 to destroy.
------------------------------------------------------------------------
Note: You didn't specify an "-out" parameter to save this plan, so Terraform can't guarantee that exactly these actions will be performed if "terraform apply" is subsequently run.
Releasing state lock. This may take a few moments...
From the previously defined output from the terraform plan command, we got to know all the resources Terraform is going to create or update. In our example, it is showing that it is going to create a resource group with the name Terraform-lab-RG.
Let's try to understand how to store the terraform plan output into any file. In order to store the terraform plan output, we need to run the terraform plan -out <filename> command, as follows:
PS C:provider> terraform plan -out plan.txt
Acquiring state lock. This may take a few moments...
Refreshing Terraform state in-memory prior to plan...
The refreshed state will be used to calculate this plan, but will not be persisted to local or remote state storage.
------------------------------------------------------------------------
An execution plan has been generated and is shown below.
Resource actions are indicated with the following symbols:
+ create
Terraform will perform the following actions:
# azurerm_resource_group.example will be created
+ resource "azurerm_resource_group" "example" {
+ id = (known after apply)
+ location = "eastus"
+ name = "Terraform-lab-RG"
}
Plan: 1 to add, 0 to change, 0 to destroy.
------------------------------------------------------------------------
This plan was saved to: plan.txt
To perform exactly these actions, run the following command to apply:
terraform apply "plan.txt"
Releasing state lock. This may take a few moments...
The terraform plan -out plan.txt command has created a plan.txt file in the local present working directory and will have a binary file of the terraform plan output, which you can see here in the expanded directory:
PS C:provider> ls
Directory: C:provider
Mode LastWriteTime Length Name
---- ------------- ------ ----
d----- 09-12-2020 03:53 .terraform
-a---- 09-12-2020 16:41 2040 plan.txt
-a---- 09-12-2020 03:53 316 providers.tf
-a---- 09-12-2020 16:21 105 resourcegroup.tf
If we want to use this stored binary file (that is, plan.txt) during the terraform pply command, then we can run terraform apply "plan.txt".
Moving on further, let's try to understand whether we need to pass a variable value input during the Terraform runtime or if we should pass a variable value from a local file.
In resourcegroup.tf, we have defined the following code:
resource "azurerm_resource_group" "example" {
name = var.rgname
location = "eastus"
}
As we have defined name = var.rgname, we then need to declare a rgname variable that we have kept in a separate file, variables.tf, as follows:
variable "rgname"{
description = "name of the resource group"
type = string
}
After running terraform plan, we can see in the following code snippet that Terraform is looking for the rgname value that we can provide during the runtime:
PS C:provider> terraform plan
var.rgname
name of the resource group
Enter a value:
Once we provide the input, it will then proceed further and let us know which resource it is going to provision, as illustrated in the following code snippet:
PS C:provider> terraform plan
var.rgname
name of the resource group
Enter a value: terraform-lab-rg
Refreshing Terraform state in-memory prior to plan...
The refreshed state will be used to calculate this plan, but will not be persisted to local or remote state storage.
------------------------------------------------------------------------
An execution plan has been generated and is shown below.
Resource actions are indicated with the following symbols:
+ create
Terraform will perform the following actions:
# azurerm_resource_group.example will be created
+ resource "azurerm_resource_group" "example" {
+ id = (known after apply)
+ location = "eastus"
+ name = "terraform-lab-rg"
}
Plan: 1 to add, 0 to change, 0 to destroy.
------------------------------------------------------------------------
Note: You didn't specify an "-out" parameter to save this plan, so Terraform can't guarantee that exactly these actions will be performed if "terraform apply" is subsequently run.
If we want to pass the variable value as input from any file, then we can do so. First of all, Terraform will look for any file ending with .tfvars or .auto.tfvars in the present working directory. If such a file is found, then Terraform will read the variable value from that file. Suppose you had defined a variable value in the testing.txt file—in that case, during the execution of the terraform plan command, you need to provide that file's pathname in this way: terraform plan -var-file="testing.txt". We have defined a variable value in the testing.txt file —that is, rgname = "terraform-lab-rg".
You will get the following code output when you run the aforementioned command:
PS C:provider> terraform plan -var-file="testing.txt"
Refreshing Terraform state in-memory prior to plan...
The refreshed state will be used to calculate this plan, but will not be persisted to local or remote state storage.
------------------------------------------------------------------------
An execution plan has been generated and is shown below.
Resource actions are indicated with the following symbols:
+ create
Terraform will perform the following actions:
# azurerm_resource_group.example will be created
+ resource "azurerm_resource_group" "example" {
+ id = (known after apply)
+ location = "eastus"
+ name = "terraform-lab-rg"
}
Plan: 1 to add, 0 to change, 0 to destroy.
------------------------------------------------------------------------
Note: You didn't specify an "-out" parameter to save this plan, so Terraform can't guarantee that exactly these actions will be performed if "terraform apply" is subsequently run.
From this, we understand how terraform plan can take variable values in multiple ways. Terraform takes variable values in the following sequence:
Terraform CLI >> any filename/terraform.tfvars >> default value provided in the variable declaration
We have already shared a list of the subcommands/arguments supported by the terraform plan command (with their description) at the very beginning of this topic, so we will not explain all the subcommands here. To read more about terraform plan, you can go to https://www.terraform.io/docs/commands/plan.html.
Terraform apply
After executing terraform init and terraform plan, if you find things are changing as per your expectations, you can then run terraform apply to help you provision or update the infrastructure. This will update the Terraform state file and will get it stored in the local or remote backend. Here is a list of the subcommand flags you can run with terraform apply—you can see this list by running the terraform apply -h command:
- -auto-approve: Skip interactive approval of the plan before applying.
- -backup=path: Provides a path to back up the existing state file before modifying it. Defaults to the -state-out path with a .backup extension. Set to - to disable backup.
- -compact-warnings: If Terraform produces any warnings that are not accompanied by errors, show them in a more compact form that includes only summary messages.
- -input=true: Asks for input for variables if not directly set.
- -lock=true: Locks the state file when locking is supported.
- -lock-timeout=0s: Duration to retry a state lock.
- -no-color: If specified, the output won't contain any color.
- -parallelism=n: Limits the number of concurrent operations. Defaults to 10.
- -refresh=true: Updates state prior to checking for differences.
- -state=path: Provides a path to read and save state (unless state-out is specified). Defaults to terraform.tfstate.
- -state-out=path: Provides a path to write state to that is different than -state. This can be used to preserve the old state.
- -target=resource: Provides a resource to target. The operation will be limited to this resource and its dependencies. This flag can be used multiple times.
- -var 'foo=bar': Sets a variable in the Terraform configuration. This flag can be set multiple times.
- -var-file=foo: Sets variables in the Terraform configuration from a file. If a terraform.tfvars file or any .auto.tfvars files are present, these will be automatically loaded.
In continuation of the example from the terraform plan phase (that is, testing.txt is holding the Terraform variable value), let's try to understand how terraform apply will work with that example, as follows:
PS C:provider> terraform apply -var-file="testing.txt"
An execution plan has been generated and is shown below.
Resource actions are indicated with the following symbols:
+ create
Terraform will perform the following actions:
# azurerm_resource_group.example will be created
+ resource "azurerm_resource_group" "example" {
+ id = (known after apply)
+ location = "eastus"
+ name = "terraform-lab-rg"
}
Plan: 1 to add, 0 to change, 0 to destroy.
Do you want to perform these actions?
Terraform will perform the actions described above.
Only 'yes' will be accepted to approve.
Enter a value:
Now, we can enter a yes value here to continue, or we can provide any value other than yes to cancel terraform apply and come out of the execution terminal. If we want that during the terraform apply phase, it shouldn't ask for further confirmation, and we can simply put terraform apply -auto-approve. In our case, we can define terraform apply -var-file="testing.txt" -auto-approve, to result in the following output:
azurerm_resource_group.example: Creating...
azurerm_resource_group.example: Creation complete after 3s [id=/subscriptions/97c3799f-2753-40b7-a4bd-157ab464d8fe/resourceGroups/terraform-lab-rg]
Apply complete! Resources: 1 added, 0 changed, 0 destroyed.
As you can see, the preceding command didn't prompt for any confirmation and managed to create a resource group in Azure.
We saw all the subcommand flags supported by terraform apply, along with their descriptions, at the start of this section. You can read and check the output of each command on the Terraform CLI. To read more about terraform apply, you can visit https://www.terraform.io/docs/commands/apply.html.
Important note
You are not recommended to run the terraform apply -auto-approve command because many times, it is essential to check exactly what Terraform is going to perform, and we can cancel execution if we don't want to proceed with the terraform apply phase.
Terraform destroy
You might be wondering why we need to have destroy in the life cycle of the infrastructure. There could be cases where you want to get rid of the resources that you have provisioned using terraform apply, and in such cases you can run the terraform destroy command. This will delete all the resources or services you defined in the configuration file and update the state file accordingly. The terraform destroy command is a very powerful command, which is why when you execute it, it will present you with an execution plan for all resources it is going to delete and later ask for confirmation, because once the command gets executed it cannot be undone. Some of the subcommand flags or arguments supported by the terraform destroy command are listed here—you can get a full list of supported arguments by running terraform destroy -h:
- -backup=path: Provides a path to back up the existing state file before modifying it. Defaults to the -state-out path with a .backup extension. Set to - to disable backup.
- -auto-approve: Skip interactive approval before destroying.
- -lock=true: Locks the state file when locking is supported.
- -refresh=true: Update state file prior to checking for differences. This has no effect if a plan file is given to apply.
- -state=path: Provides a path to read and save state (unless state-out is specified). Defaults to terraform.tfstate.
- -state-out=path: Provides a path to write state to that is different from -state. This can be used to preserve the old state.
- -target=resource: Provides a resource to target. The operation will be limited to this resource and its dependencies. This flag can be used multiple times.
- -var 'foo=bar': Sets a variable in the Terraform configuration. This flag can be set multiple times.
- -var-file=foo: Sets variables in the Terraform configuration from a file. If a terraform.tfvars file or any .auto.tfvars files are present, they will be automatically loaded.
You may have noticed that all the subcommands supported by terraform apply are also supported by terraform destroy. terraform destroy performs exactly the opposite operations of the terraform apply command. Likewise, we have seen that the terraform apply command helps us to provision or update infrastructure; similarly, the terraform destroy command helps us to delete all infrastructure that is present in the Terraform state file.
We will not discuss terraform destroy subcommands/arguments here but you can refer to the terraform apply subcommand use cases, and accordingly, if you are planning to use terraform destroy, just replace terraform apply with terraform destroy, followed by the appropriate subcommands.
You might be wondering how we can delete an infrastructure without using the terraform destroy command, so let's see how we can perform this activity. In our terraform apply section, we created a terraform-lab-rg resource group name. Let's try to delete that resource group without using the terraform destroy command directly, as follows:
PS C:provider> terraform apply -var-file="testing.txt" -auto-approve
azurerm_resource_group.example: Creating...
azurerm_resource_group.example: Creation complete after 3s [id=/subscriptions/97c3799f-2753-40b7-a4bd-157ab464d8fe/resourceGroups/terraform-lab-rg]
Apply complete! Resources: 1 added, 0 changed, 0 destroyed.
Firstly, we will run terraform plan with a destroy flag and save the terraform plan output in delete.txt (that is, the terraform plan -destroy -out delete.txt command), and then follow this with terraform apply "delete.txt", as illustrated in the following code snippet:
PS C:provider> terraform plan -var-file="testing.txt" -destroy -out delete.txt
Refreshing Terraform state in-memory prior to plan...
The refreshed state will be used to calculate this plan, but will not be persisted to local or remote state storage.
azurerm_resource_group.example: Refreshing state... [id=/subscriptions/97c3799f-2753-40b7-a4bd-157ab464d8fe/resourceGroups/terraform-lab-rg]
------------------------------------------------------------------------
An execution plan has been generated and is shown below.
Resource actions are indicated with the following symbols:
- destroy
Terraform will perform the following actions:
# azurerm_resource_group.example will be destroyed
- resource "azurerm_resource_group" "example" {
- id = "/subscriptions/97c3799f-2753-40b7-a4bd-157ab464d8fe/resourceGroups/terraform-lab-rg" -> null
- location = "eastus" -> null
- name = "terraform-lab-rg" -> null
- tags = {} -> null
}
------------------------------------------------------------------------
This plan was saved to: delete.txt
To perform exactly these actions, run the following command to apply:
terraform apply "delete.txt"
PS C:provider> terraform apply "delete.txt"
azurerm_resource_group.example: Destroying... [id=/subscriptions/97c3799f-2753-40b7-a4bd-157ab464d8fe/resourceGroups/terraform-lab-rg]
azurerm_resource_group.example: Still destroying... [id=/subscriptions/97c3799f-2753-40b7-a4bd-...4d8fe/resourceGroups/terraform-lab-rg, 10s elapsed]
azurerm_resource_group.example: Destruction complete after 11s
Apply complete! Resources: 0 added, 0 changed, 1 destroyed.
From this, we got to know how easily we can delete resources using terraform plan and terraform apply sequentially without using terraform destroy. This is just another way of deleting resources, and you can use this in place of the terraform destroy command.
Important note
Run terraform destroy only when you want to perform a cleanup of resources because it will permanently delete the resource or services you have created during the terraform apply operation. It works in a totally opposite way to terraform apply.
By default, Terraform performs terraform refresh before executing terraform init, terraform plan, terraform apply, or terraform destroy operations.
Whenever you perform any Terraform workflow commands such as terraform init, terraform plan, terraform apply, or terraform destroy, the Terraform state file goes into a locking state to avoid anyone making changes to the state file simultaneously.
We discussed core Terraform workflows that consist of terraform init, terraform plan, terraform apply, and terraform destroy. You now have a fair understanding of how you can run a complete Terraform workflow from your local machine using the Terraform CLI. Now, we will explain Terraform workflows using an Azure DevOps Services.
Understanding Terraform workflows using Azure DevOps
It is very important to understand how we can use Terraform with any continuous integration/continuous deployment (CI/CD) tool because you know that these days, DevOps is in demand, and almost 90% of companies are using a DevOps approach. So, in order to understand Terraform with CI/CD tools, we will look at Azure DevOps tools.
Let's try to understand how we can keep our code in the Azure Repo and then use Azure Pipelines to perform the deployment of the infrastructure. In our example, we are going to use the Azure cloud platform, but you can use Azure DevOps with other major cloud providers such as GCP, AWS, and so on.
Have a look at the following diagram, which provides an overview of using Terraform with CI/CD workflows:
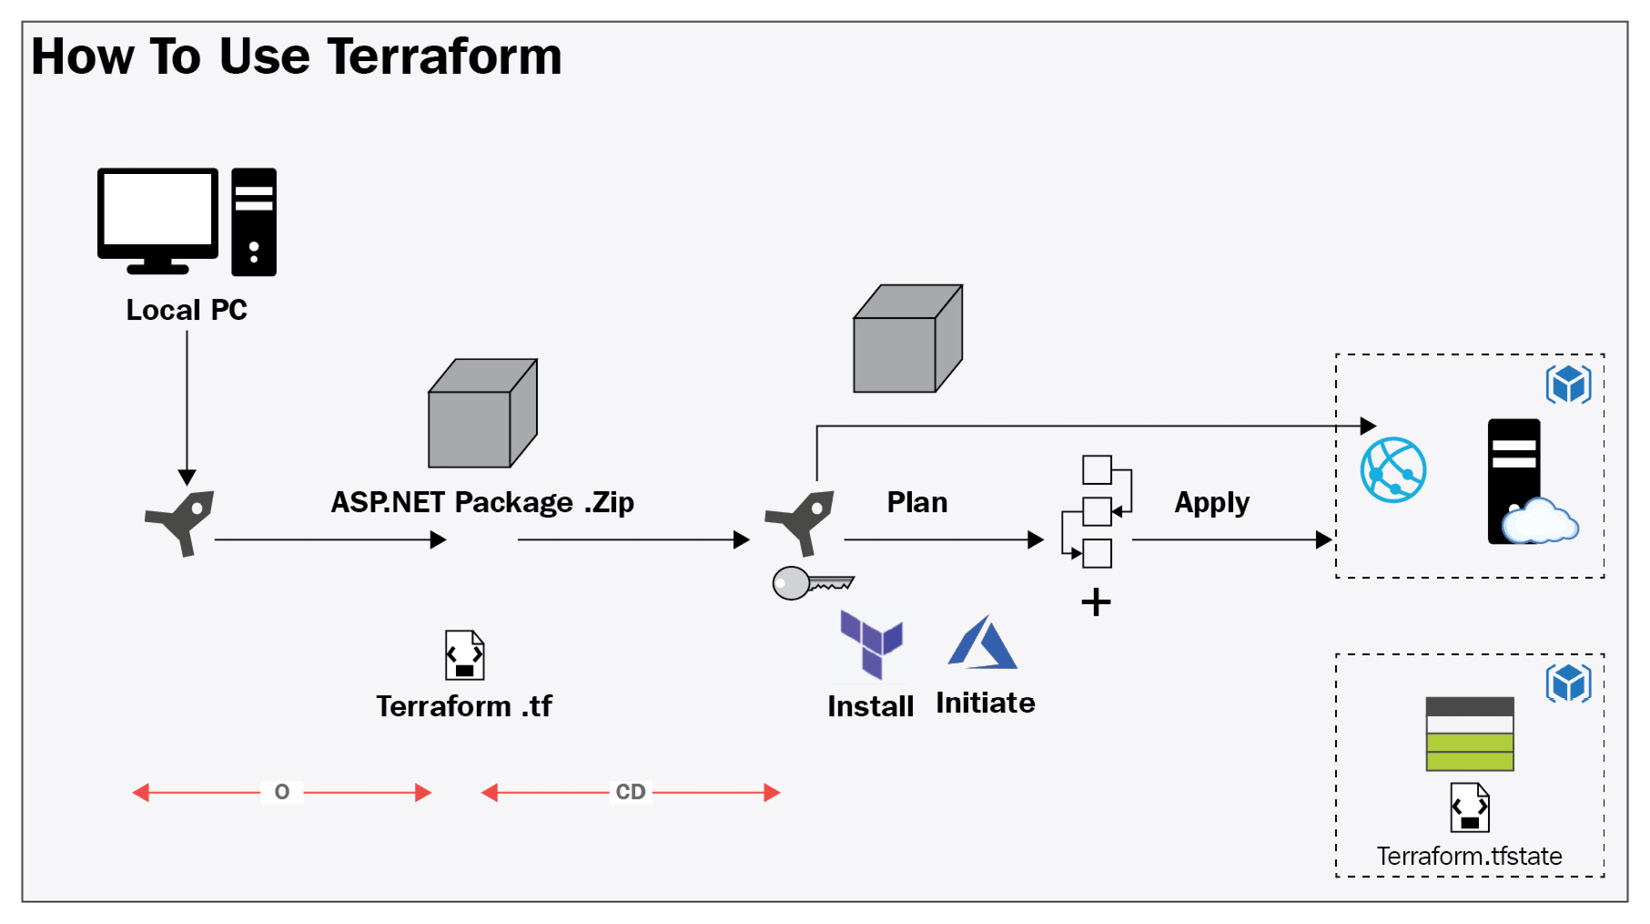
Figure 6.2 – Terraform with CI/CD workflows image
The following steps show you how to use Azure DevOps Service for infrastructure deployment in Azure using Terraform:
- To perform this demonstration, we have created a project named Terraform-lab-Project in Azure DevOps, as shown in the following screenshot:
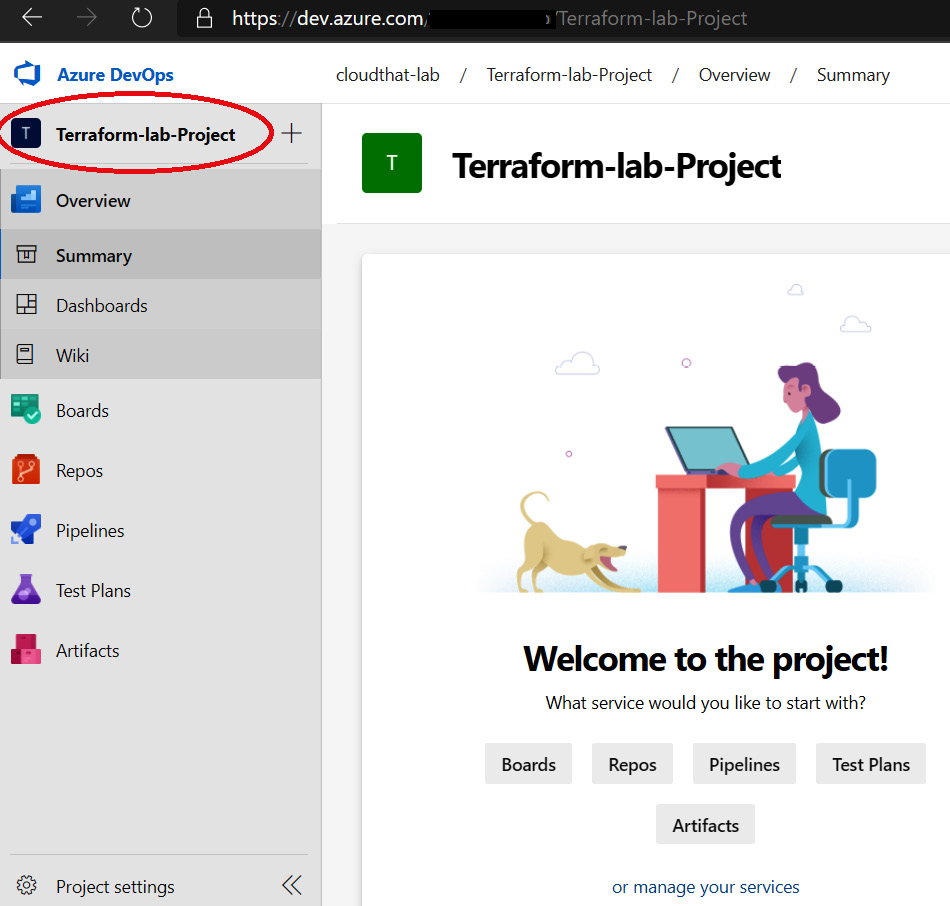
Figure 6.3 – Azure DevOps project
- The next step is to integrate our Azure DevOps project with Azure, and for that, you need to go to the Project Settings | Service connections option, where you will be able to see a list of possible connections that are supported by Azure DevOps. Here, select Azure Resource Manager, as illustrated in the following screenshot:

Figure 6.4 – Azure DevOps service connection
After selecting the Azure Resource Manager option, click on Next. We will then be able to see multiple options to build integration from Azure DevOps to the Azure portal, as shown in the following screenshot. We are going to use the first option (which is the recommended one) to automatically create a service principal in Azure and get proper access so that it can make changes to the Azure subscription:

Figure 6.5 – Azure service principal
- On the next screen, we select our Azure subscription and resource group and provide a name for the connection. We have already created a Terraform-lab-rg resource group in Azure, as well as a Terraform-lab-connection connection, as you can see in the following screenshot. You can keep the Grant access permission to all pipelines option checked so that you can use this connection with all pipelines in this project:
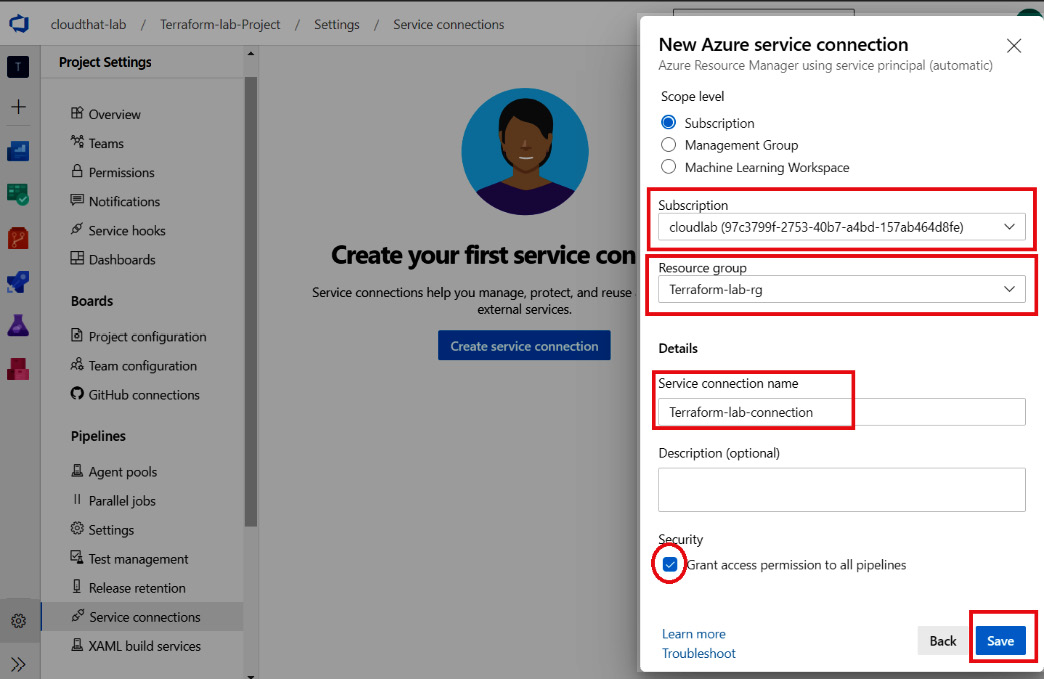
Figure 6.6 – Terraform-lab-connection
We are now all set in terms of integration of Azure DevOps with Azure, so let's make a clone of the Azure Repo and add all our Terraform configuration files to the Azure Repo. To perform this task, you should have Git Bash or any integrated development environment (IDE) such as Visual Studio Code (VS Code). For the initial Git setup, you can follow https://git-scm.com/book/en/v2/Getting-Started-First-Time-Git-Setup. We have taken an example of creating a web app in Azure using Terraform through Azure DevOps. We have kept all the required Terraform and build pipeline code in our GitHub code bundle for this chapter, which is available in the Technical requirements section. We have pushed all Terraform configuration files and CI pipeline code to the Azure Repo, as shown in the following screenshot:
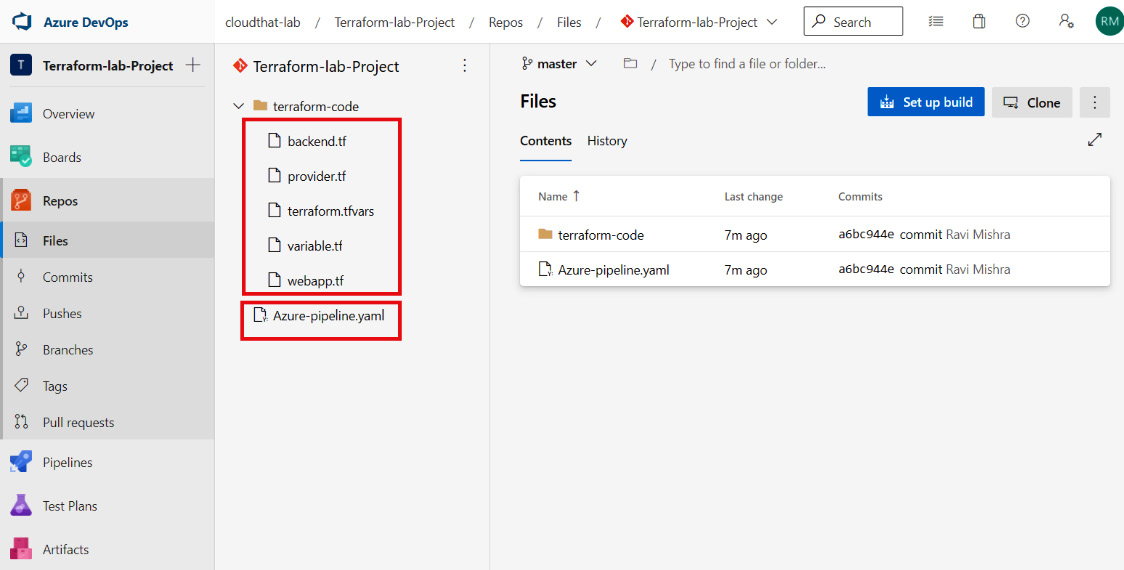
Figure 6.7 – Terraform and CI code
Now, we need to create a CI pipeline where we will be using the Azure-pipeline.yaml filename that's already been pushed to the Azure Repo. In the following screenshot, you can see that this CI pipeline has been successfully run:
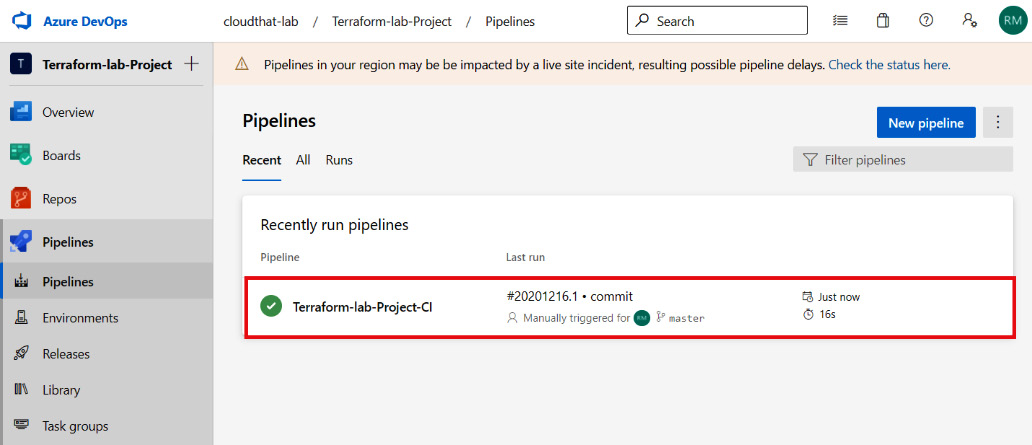
Figure 6.8 – Terraform-lab-Project-CI pipeline
What's next now that we are done with integration and our CI pipeline? Well, we now need to create a release pipeline to provision our Azure web app. So, to create the release pipeline, we need to define the Azure Artifact. Then we set the source type as Build, as shown in figure 6.9:

Figure 6.9 – Terraform-IaC-Deployment-Pipeline
In the release pipeline under the Terraform-IaC-Deployment-Pipeline stage name, we have defined all the tasks, as shown in the following screenshot:

Figure 6.10 – Release pipeline tasks
Important note
You can provision an infrastructure using a CI/build pipeline—there is no need for a release pipeline. We have included a release pipeline here to help you understand the complete CI/CD workflow.
It's great to see that our pipeline ran successfully, as demonstrated in the following screenshot:

Figure 6.11 – Azure CD pipeline status
In the following screenshot, we can see that Terraform has created an Azure web app service and App Service plan for us in the Terraform-lab-rg resource group:

Figure 6.12 – Azure services
From this section, you should now understand how CI/CD tools (that is, Azure DevOps tools) can be used with Terraform for infrastructure management (updating or provisioning) in the Azure cloud. In the same way, you should be able to use this learning for the deployment of resources in AWS and GCP.
Summary
From this complete chapter, you will have developed an understanding of Terraform workflows, including terraform init, terraform plan, terraform validate, terraform apply, and terraform destroy workflows. You should now be capable of provisioning or updating infrastructure in a major cloud provider such as AWS, Azure, or GCP. We also discussed how we can use a CI/CD pipeline (that is, an Azure DevOps pipeline) with Terraform to provision services in Azure.
In our next chapter, we are going to discuss how we can write a Terraform module for Azure, AWS, and Azure, and how this can be published and consumed.
Questions
The answers to the following questions can be found in the Assessments section at the end of this book:
- Which of the following actions are performed during a terraform init operation?
A. Initializes downloaded or installed providers
B. Downloads the declared provider
C. Provisions the declared resources
D. Initializes the backend config
- What can the terraform plan command do?
A. Provision declared resources
B. Perform initialization of the backend
C. Create an execution plan and determine which changes need to be made to achieve the desired state in the configuration file
D. Perform linting on the Terraform configuration file
- You have defined the following configuration code block:
resource "azurerm_resource_group" "example" {
name = var.rgname
location = "eastus"
}
In which possible ways can Terraform take the rgname variable value?
A. By creating a terraform.tfvars file and placing it into rgname="Terraform-lab-rg"
B. By running terraform apply -var 'rgname=Terraform-lab-rg'
C. By running terraform plan
D. By running terraform apply -var-file="example.txt"
- You are getting an error like this while executing the terraform apply command:
resource "azurerm_resource_group" "example" {
name = "Terraform-lab-RG"
location = "eastus"
terraform_location = "eastus"
}
Error: Unsupported argument
on resourcegroup.tf line 4, in resource "azurerm_resource_group" "example":
4: terraform_location = "eastus"
An argument named "terraform_location" is not expected here.
Which command could you have run to check such an error in advance?
A. terraform init
B. terraform validate
C. terraform plan
D. terraform apply
- Your team has created an AWS infrastructure using Terraform, and now they want to get rid of that infrastructure. Which command could you run to do this?
A. terraform validate
B. terraform plan
C. terraform destroy
D. terraform init
Further reading
You can check out the following links for more information about the topics that were covered in this chapter:
- terraform init: https://www.terraform.io/docs/commands/init.html
- terraform plan: https://www.terraform.io/docs/commands/plan.html
- terraform apply: https://www.terraform.io/docs/commands/apply.html
- terraform destroy: https://www.terraform.io/docs/commands/destroy.html
- Terraform DevOps lab: https://azuredevopslabs.com/labs/vstsextend/terraform/