
Chapter 3: Getting Started with Terraform
In the previous chapter, we discussed the installation of Terraform on your local machine, whether it is Windows, Linux, or macOS. Once you are done with the installation of Terraform, you should be ready to start drafting your configuration code in Terraform and running it locally from your system.
In this chapter, we are going to discuss Terraform plugins, which include providers and provisioners. Here, we will discuss Terraform providers, while in a later chapter, we will discuss Terraform provisioners. Furthermore, we will see how you can take input from users by defining Terraform variables and then, once you have provided variables and your configuration file is ready, you can validate the output using output values. We will even discuss how you can use already existing resources by calling the data block in your configuration code.
The following topics will be covered in this chapter:
- Introducing Terraform providers
- Knowing about Terraform resources
- Understanding Terraform variables
- Understanding Terraform output
- Understanding Terraform data
Technical requirements
To follow along with this chapter, you need to have an understanding of what Terraform is and how you can install Terraform on your local machine. Some basic knowledge of major cloud providers such as GCP, AWS, and Azure would add extra benefits during the chapter.
Introducing Terraform providers
In this section, we will learn what Terraform providers are. Going further, we will try to understand Terraform providers for the major clouds, such as GCP, AWS, and Azure. Once you have an understanding of Terraform providers, we will see how you can define a Terraform providers block in your configuration code and how your Terraform configuration code downloads specific providers when you execute terraform init.
Terraform providers
You may be wondering how Terraform knows where to go and create resources in, let's say, for example, a situation where you want to deploy a virtual network resource in Azure. How will Terraform understand that it needs to go and create the resources in Azure and not in other clouds? Terraform manages to identify the Terraform provider. So, let's try to understand what the definition of a Terraform provider is:
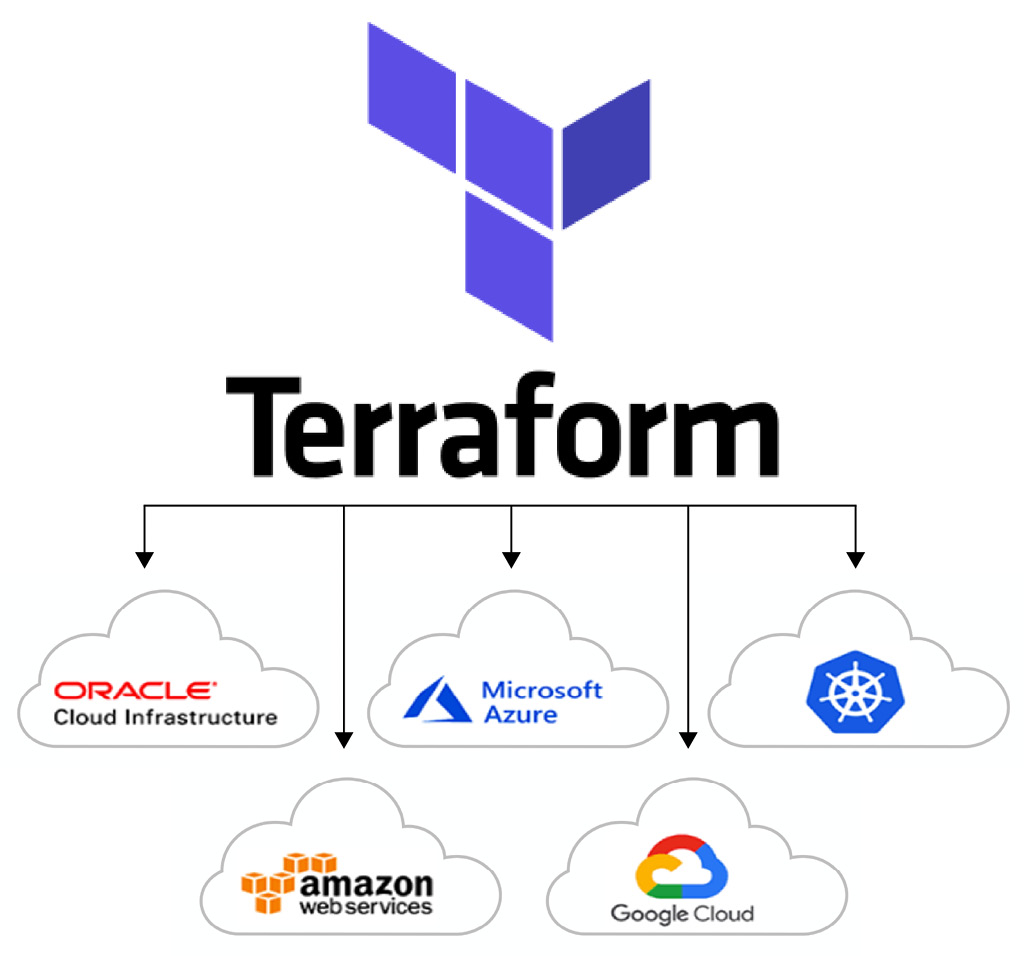
Figure 3.1 – Terraform providers
A provider is an executable plugin that is downloaded when you run the terraform init command. The Terraform provider block defines the version and passes initialization arguments to the provider, such as authentication or project details. Terraform providers are the component that makes all the calls to HTTP APIs for specific cloud services, that is, AzureRM, GCP, or AWS.
A set of resource types is offered by each provider plugin that helps in defining what arguments a resource can accept and which attributes can be exported in the output values of that resource.
Terraform Registry is the main directory of publicly available Terraform providers and hosts providers for most major infrastructure platforms. You can also write and distribute your own Terraform providers, for public or private use. For more understanding about Terraform Registry, you can follow https://registry.terraform.io/.
Providers can be defined within any file ending with .tf or .tf.json but, as per best practices, it's better to create a file with the name providers.tf or required_providers.tf, so that it would be easy for anyone to follow and, within that file, you can define your provider's code. The actual arguments in a provider block may vary depending on the provider, but all providers support the meta-arguments of version and alias.
In Terraform, there is a list of community providers that are contributed to and shared by many users and vendors. These providers are not all tested and are not officially supported by HashiCorp. You can see a list of the Terraform community providers at https://www.terraform.io/docs/providers/type/community-index.html.
If you are interested in writing Terraform providers, then you can fill in this form: https://docs.google.com/forms/d/e/1FAIpQLSeenG02tGEmz7pntIqMKlp5kY53f8AV5u88wJ_H1pJc2CmvKA/viewform#responses or visit https://registry.terraform.io/publish/provider.
We will not be discussing how you can write your own Terraform providers, but if you are interested in exploring it further, you can visit https://learn.hashicorp.com/tutorials/terraform/provider-setup and https://github.com/hashicorp/terraform-plugin-docs.
Let's try to understand what a provider block looks like for AzureRM, GCP, and AWS.
AzureRM Terraform provider
As we discussed regarding providers in Terraform, HashiCorp has introduced the AzureRM provider. Now, let's try to understand the code for the Azure provider:
# We strongly recommend using the required_providers block to set the
# Azure Provider source and version being used
terraform {
required_version = ">= 1.0"
required_providers {
azurerm = {
source = "hashicorp/azurerm"
version = "2.54.0"
}
}
}
# Configure the Microsoft Azure Provider
provider "azurerm" {
features {}
subscription_id = "...."
client_id = "...."
client_secret = "...."
tenant_id = "...."
}
In the previous AzureRM provider code block, we had considered authentication of Terraform to Azure using the service principle. Let's try to understand what are the different arguments supported:
- features (required): Some of the Azure provider resource behaviors can be customized by defining them in the features block.
- client_id (optional): The client ID can be taken from the service principle. It can source from the ARM_CLIENT_ID environment variable.
- client_secret (optional): This is the client secret that you can generate for the service principle that you have created. This can also be sourced from the ARM_CLIENT_SECRET environment variable.
- subscription_id (optional): This provides your Azure subscription ID. It can be sourced from the ARM_SUBSCRIPTION_ID environment variable.
- tenant_id (optional): This provides your Azure tenant ID. It can be sourced from the ARM_TENANT_ID environment variable.
In order to authenticate to your Azure subscription, you are required to provide values for subscription_id, client_id, client_secret, and tenant_id. Now, it is recommended that either you pass these values through an environment variable or use cached credentials from the Azure CLI. As per the recommended best practice, avoid hardcoding secret information, such as credentials, into the Terraform configuration. For more details about how to authenticate Terraform to an Azure provider, you can refer to https://www.terraform.io/docs/providers/azurerm/index.html.
Let's now try to get a detailed understanding of the version and features arguments defined in the provider code.
The version argument defined in the code block is mainly used to constrain the provider to a specific version or a range of versions. This would prevent downloading a new provider that may contain some major breaking changes. If you don't define the version argument in your provider code block, Terraform will understand that you want to download the most recent provider during terraform init. If you wish to define versions in the provider block, HashiCorp recommends that you create a special required_providers block for Terraform configuration, as follows:
terraform {
required_version = ">= 1.0"
required_providers {
azurerm = {
source = "hashicorp/azurerm"
version = "2.54.0"
}
}
}
Rather than setting the version of a provider for each instance of that provider, the required_providers block sets it for all instances of the provider, including child modules. Using the required_providers block makes it simpler to update the version on a complex configuration.
Let's see what different possible options you have when passing version values in the provider code block:
- >= 2.54.0: Greater than or equal to the version.
- = 2.54.0: Equal to the version.
- != 2.54.0: Not equal to the version.
- <= 2.54.0: Less than or equal to the version.
- ~> 2.54.0: This one is funky. It means any version in the 2.54.X range. It will always look for the rightmost version increment.
- >= 2.46, <= 2.54: Any version between 2.46 and 2.54, inclusive.
One of the most common arguments is ~>, which means you want the same major version while still allowing minor version updates. For instance, let's say there's a major change coming to the Azure provider in version 2.0. By setting the version to ~>1.0, you would allow all version 1 updates that come down while still blocking the big 2.0 release.
Let's try to understand what the features argument is doing within this Azure provider code block.
As per the latest update, you can control the behavior of some of the Azure resources using this features block. More details about what resources you can control are defined as follows.
The features block supports the following Azure resources or services:
- key_vault
- template_deployment
- virtual_machine
- virtual_machine_scale_set
- log_analytics_workspace
The key_vault block supports the following arguments:
- recover_soft_deleted_key_vaults (optional): The default value is set to true. It will try to recover a key vault that has previously been soft deleted.
- purge_soft_delete_on_destroy (optional): The default value is set to true. This will help to permanently delete the key vault resource when we run the terraform destroy command.
The template_deployment block supports the following argument:
- delete_nested_items_during_deletion (optional): The default value is set to true. This will help to delete those resources that have been provisioned using the ARM template when the ARM template got deleted.
The virtual_machine block supports the following argument:
- delete_os_disk_on_deletion (optional): The default value is set to true. This will help to delete the OS disk when the virtual machine got deleted.
The virtual_machine_scale_set block supports the following argument:
- roll_instances_when_required (optional): The default value is set to true. This will help to roll the number of the VMSS instance when you update SKU/images.
The log_analytics_workspace block supports the following arguments:
- permanently_delete_on_destroy (optional). The default value is set to true. This will help to permanently delete the log analytics when we perform terraform destroy.
The previously defined features block arguments have been taken from https://www.terraform.io/docs/providers/azurerm/index.html. For more information, you can check out that URL.
In the following example, you can see how you can define a features argument in the Azure provider code block and can control specific properties of the Azure key vault, You can use the same approach and customize all the previously defined arguments of the Azure resource or services:
provider "azurerm" {
version = "~> 2.54.0"
features {
key_vault {
recover_soft_deleted_key_vaults = false
}
}
}
Now, let's try to understand a use case where you want to deploy multiple Azure resources in different subscriptions. Terraform provides an argument called alias in your provider block. Using that alias argument, you can reference same provider multiple times with a different configuration in your configuration block.
Here is an example of the code:
terraform {
required_version = ">= 1.0"
required_providers {
azurerm = {
source = "hashicorp/azurerm"
version = "2.54.0"
}
}
}
# Configure the Microsoft Azure Provider
provider "azurerm" {
features {}
}
provider "azurerm" {
features {}
alias = "nonprod_01_subscription"
}
# To Create Resource Group in specific subscription
resource "azurerm_resource_group" "example" {
provider = azurerm.nonprod_01_subscription
name = "example-resources"
location = "West Europe"
}
Moving on, let's try to understand how you can define multiple different providers in the Terraform configuration file. Here is one of the code snippets:
terraform {
required_version = ">= 1.0"
required_providers {
azurerm = {
source = "hashicorp/azurerm"
version = "2.54.0"
}
random = {
source = "hashicorp/random"
version = "3.1.0"
}
}
}
# Configure the Microsoft Azure Provider
provider "azurerm" {
features {}
}
# Configure the Random Provider
provider "random" {}
resource "random_integer" "rand" {
min = 1
max = 50
}
resource "azurerm_resource_group" "examples" {
name = "example1-resources-${random_integer.rand.result}"
location = "West Europe"
}
As described in the previous code, we have defined two different providers: random and azurerm. The random provider will help us to generate a random integer between 1 and 50 and the result of that integer will get appended to the Azure resource group name. Using this approach, we can define multiple different providers in the same configuration file.
Let's try to understand how we can define a provider for our AWS. This will also be using the same approach as we observed with AzureRM.
AWS Terraform provider
We've already discussed the Terraform AzureRM provider. Similarly, HashiCorp has introduced an AWS provider. Let's try to understand how the AWS provider can be defined in the Terraform configuration file.
The following is a code snippet:
terraform {
required_version = ">= 1.0"
required_providers {
aws = {
source = "hashicorp/aws"
version = "~> 3.35.0"
}
}
}
provider "aws" {
region = "us-east-1"
access_key = "..."
secret_key = "..."
}
There are many arguments supported by the AWS provider code block. A few of them are described here, but for more information regarding all the arguments, you can visit https://registry.terraform.io/providers/hashicorp/aws/latest/docs:
- access_key (optional): This is the AWS access key. It must be provided, but it can also be sourced from the AWS_ACCESS_KEY_ID environment variable, or via a shared credentials file if a profile is specified.
- secret_key (optional): This is the AWS secret key. It must be provided, but it can also be sourced from the AWS_SECRET_ACCESS_KEY environment variable, or via a shared credentials file if a profile is specified.
- region (optional): This is the AWS region where you want to deploy AWS resources. This can be sourced from the AWS_DEFAULT_REGION environment variable, or via a shared credentials file if a profile is specified.
For authentication to your AWS account, you can define access_key and secret_key in the environment variable because, as you know, hardcoding of a secret in the provider code block is not recommended, so it is better to pass it during the runtime itself or define it in the environment variable. For more details about this authentication option, you can visit https://registry.terraform.io/providers/hashicorp/aws/latest/docs.
The rest of the common arguments, such as alias and version, which we discussed in the Azure provider, can be used in the AWS provider block as well, so we will skip them here.
Google Terraform provider
Like the AWS and Azure providers, HashiCorp has introduced a Google cloud provider. So far, you will have a fair understanding of the Terraform providers, so let's try to see how we can define the Terraform provider code block for Google Cloud:
terraform {
required_version = ">= 1.0"
required_providers {
google = {
source = "hashicorp/google"
version = "3.63.0"
}
}
}
provider "google" {
credentials = file("account.json")
project = "my-google-project-id"
region = "europe-west2"
zone = "europe-west2-b"
}
Like the AWS and Azure providers, the Google provider also supports many arguments. We have highlighted a few of them here:
- credentials (optional): This is a JSON file that holds login information to the Google cloud. You can provide the file path and filename.
- project (optional): This is the name of the Google project where resources are to be managed.
- region (optional): This is the region where we want to deploy our Google resources.
- zone (optional): This is a specific data center within the region that can be defined.
To have an understanding of alias and version arguments, you can go back and read the Azure provider section because the working principle in all the providers is the same; you just need to understand the concept behind it.
We have discussed the Terraform providers, specifically covering Azure, AWS, and GCP. You must have understood how to define a provider code block in your Terraform configuration file. Along with that, you should have learned how you can use multiple same providers in your configuration file by defining alias. After learning about the Terraform providers, let's try to understand how you can write a resource code block in the Terraform configuration file, which is the only code actually helping you to provision or make changes to your existing resources. We will cover resource code blocks in the major clouds: Azure, AWS, and Google.
Knowing about Terraform resources
Havig acquired a good understanding of Terraform providers, now we are going to discuss resources in Terraform. Let's try to understand how a resource code block is defined in the Terraform configuration file and why it is so important. First of all, let's see what a Terraform resource is.
Terraform resources
Resources are the most important code blocks in the Terraform language. By defining a resource code block in the configuration file, you are letting Terraform know which infrastructure objects you are planning to create, delete, or update, such as compute, virtual network, or higher-level PaaS components, such as web apps and databases. When you define a resource code block in the configuration file, it starts with the provider name at the very beginning, for example, aws_instance, azurerm_subnet, and google_app_engine_application.
Azure Terraform resource
It is very important for you to understand how you should write your Terraform resource code in the configuration file. We will take a very simple example of the Azure public IP address, which you can see in the following screenshot:

Figure 3.2 – Azure Terraform resource
As you can see in Figure 3.2, the red highlighted text is an actual resource that you are planning to update, create, or destroy. In the same way, Azure has many such resources and you can find out detailed information about it from https://www.terraform.io/docs/providers/azurerm/:
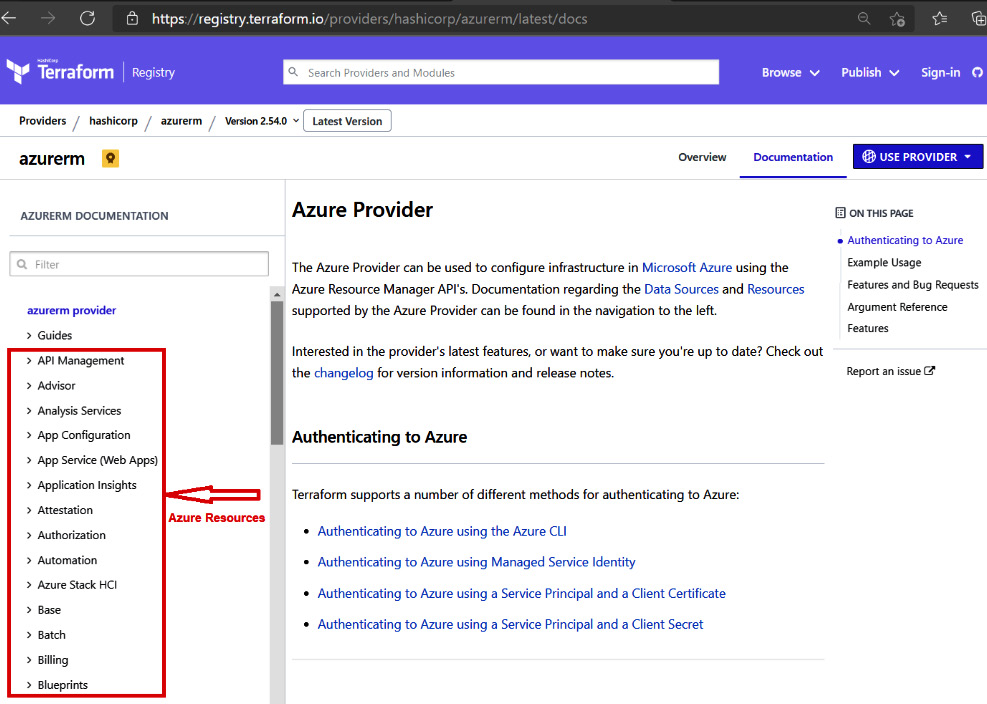
Figure 3.3 – Azure resources
There, on the left-hand side of the website given previously, you will able to see all the Azure resources as shown in Figure 3.3. You will able to write your configuration file using those Azure resources provided.
The blue highlighted text is just a local name for the Terraform to the particular resource code that we are writing. In Figure 3.2, we are creating an Azure resource group and a public IP address. So, we have defined a local name for the resource group as example and azure-pip for the Azure public IP address.
The green highlighted text in Figure 3.2 provides you with information on how you can reference certain arguments from other resource blocks. In the preceding example, we want to create an Azure public IP address. To provision the Azure public IP address, you will be required to provide the resource group name and location, which can be obtained from the earlier defined resource group code block.
With you now having an idea of how to define the Azure resource code block in the Terraform configuration file, let's see how we can do it in AWS.
AWS Terraform resource
You may be thinking that Terraform would behave separately and that there would be a change in the syntax when defining the resource code block in the Terraform configuration file for AWS, but this is not true. It follows the same approach in terms of how we can define it for the Azure resources. Let's try to discuss this using an example of AWS:
resource "aws_instance" "web" {
ami = "ami-a1b2c3d4"
instance_type = "t2.micro"
}
As you can see in the preceding code snippet, we are trying to deploy an EC2 instance in AWS. So for that, we have defined a resource block declaring a resource of a given type ("aws_instance"), which has a local name of "web". The local name is mainly used to refer to this resource in any other resource, data, or module code block. For more information about all the available AWS resources, you can visit https://registry.terraform.io/providers/hashicorp/aws/latest/docs.
So far, we have looked at resource code blocks for Azure and AWS and haven't seen any difference in the syntax. You may be thinking that it will definitely get changed in the Google Cloud. In our next section, we are going to define how you can write a Google resource code block in the Terraform configuration file.
Google Terraform resource
We have already seen how we can define a resource block code for AWS and Azure. In terms of Terraform resource syntax, there are no differences; the only thing that will be different in all the providers is the resource block arguments because every provider has its defined arguments that can be passed into the resource code block. Let's see an example of Google Cloud Terraform resource code for creating Google App Engine:
resource "google_project" "my_project" {
name = "My Project"
project_id = "your-project-id"
org_id = "1234567"
}
resource "google_app_engine_application" "app" {
project = google_project.my_project.project_id
location_id = "us-central"
}
Here, we are using the google_project resource block having a local name my_project to create a Google Cloud project and google_app_engine_application with a local name app to create a Google App Engine resource.
We have covered the Terraform resource code block and learned about how to write a resource block for cloud providers such as AWS, Azure, and GCP. We have even learned that there is no difference in the syntax of the resource code blocks; there may only be differences in terms of the argument supported by each provider. Moving forward, we are going to understand how you can take input from users, such as the name of the EC2 instance, by defining Terraform variables.
Understanding Terraform variables
In an earlier section, you learned about how you can write a resource code block in the Terraform configuration file. In that resource code block, we either hardcoded argument values or we referenced them from another resource code block. Now, we will try to understand how we can define those hardcoded values in a variable and define them in a separate file that can be used again and again.
Terraform variables
If you have basic experience of writing any scripting or programming language, you must have noticed that we can define some variables and use those defined variables again and again in the whole script. Likewise, in other programming languages, Terraform also supports variables that can be defined in the Terraform configuration code. The only difference between other programming language variables and Terraform variables is that, in Terraform variables, you are supposed to define input values when you want to execute your Terraform configuration code. We will be explaining the Terraform input variables approach for all three clouds – Azure, AWS, and GCP.
Azure Terraform input variables
Let's try to take the same Azure public IP address example that we discussed in the Knowing about Terraform resources section. We will try to define variables for most of the arguments so that we can use this resource code again and again by just providing values for the defined input variables. Here is the code snippet that will provide you with an idea of how you can define variables in the Terraform configuration code. You can simply take this code into any file ending with .tf. We generally try to put them into main.tf:
# To Create Resource Group
resource "azurerm_resource_group" "example" {
name = var.rgname
location = var.rglocation
}
# To Create Azure Public IP Address
resource "azurerm_public_ip" "azure-pip" {
name = var.public_ip_name
location = azurerm_resource_group.example.location
resource_group_name = azurerm_resource_group.example.name
allocation_method = var.allocation_method
idle_timeout_in_minutes = var.idle_timeout_in_minutes
tags = var.tags
}
In the preceding code, you may have observed how we defined the variables against all the resource arguments. The syntax is <argument name> = var.<variable name>. We have highlighted name and location in the resource group so that you get an understanding of how generally we are supposed to define Terraform input variables. After defining the Terraform input variable, don't forget to declare it. We can declare it in any file ending with .tf. Generally, we prefer to declare it in a separate file with the name variables.tf. Variables need to be defined within the variable block, in other words, variables <variable name>. Here is a code snippet for your reference:
# variables for Resource Group
variable "rgname" {
description = "(Required)Name of the Resource Group"
type = string
default = "example-rg"
}
variable "rglocation" {
description = "Resource Group location like West Europe etc."
type = string
default = "West Europe"
}
# variables for Azure Public IP Address
variable "public_ip_name" {
description = "Name of the Public IP Address"
type = string
default = "Azure-pip"
}
variable "allocation_method" {
description = "Defines the allocation method for this IP address. Possible values are `Static` or `Dynamic`"
type = string
default = "Dynamic"
}
variable "idle_timeout_in_minutes" {
description = "Provide Idle timeout in minutes"
type = number
default = 30
}
variable "tags" {
description = "A map of tags to assign to the resource. Allowed values are `key = value` pairs"
type = map(any)
default = {
environment = "Test"
Owner = "Azure-Terraform"
}
}
Only declaring Terraform variables won't be helpful. In order to complete the Terraform workflows, these variables need to get values, so there are four ways of having Terraform variable values. The first approach that we can follow is by defining variable values in the Terraform environment variables. Terraform will look for the values in the environment variable, starting with TF_VAR_, followed by the name of the declared variable, as you can see here:
$ export TF_VAR_rgname=example-rg
Secondly, we can store variable values in either a default supported file named terraform.tfvars or terraform.tfvars.json or in a file name ending with .auto.tfvars or .auto.tfvars.json.
We are showing here how you can define them in the terraform.tfvars file:
rgname = "Terraform-rg"
rglocation = "West Europe"
idle_timeout_in_minutes = 10
tags = {
environment = "Preprod"
Owner = "Azure-Terraform"
}
allocation_method = "Dynamic"
public_ip_name = "azure-example-pip"
If you are planning to define input variable values in any other file, such as testing.tfvars, then you will be required to explicitly mention the filename in the given Terraform cmdlet: terraform apply -var-file="testing.tfvars". This means that Terraform will be able to read the values from that .tfvars file.
The third way of having Terraform variable values is during runtime. If you defined the variable in main.tf or variables.tf and its input values are missing, then it will prompt you to provide respective variable values during the runtime itself, as can be seen in the following snippet:
$ terraform plan
var.rglocation
Resource Group location like West Europe etc.
Enter a value:
The fourth way could be to define a variable value directly as a default value while declaring the variables, as can be seen in the following code snippet:
variable "rgname" {
description = "(Required)Name of the Resource Group"
type = string
default = "example-rg"
}
Using all these methods, we can take the values of variables and Terraform will be able to complete its workflow.
In the previously defined variables.tf code, you can see many constraint types, including number, string, and map. We will discuss these in our upcoming Chapter 7, Terraform Modules, so for now, just understand how you can define variables and how you can define input variable values. There is one more thing you must have noticed, in our variable code, we have mentioned default values. Here, the question is which one should be preferred; if you are defining variable values in a Terraform environment variables, defining in terraform.tfvars, defining default values, or providing values during the runtime. Hence, things happen in the following sequence: Environment variable values | values during runtime | terraform.tfvars | default values.
AWS Terraform input variables
In the previous section, we learned about Azure Terraform input variables. You learned about what exactly variables are and how you can define Terraform input variables. Let's try to consider one of the examples for AWS:
# You can define this code in main.tf or in any file named like aws-ec2.tf
# To create ec2 instance in AWS
resource "aws_instance" "web" {
ami = var.ami
instance_type = var.instance_type
}
The previously defined AWS resource code block helps us to provision an EC2 instance in AWS. Let's try to define the variables.tf file for it:
# variables for Resource Group
variable "ami" {
description = "Name of the AMI"
type = string
}
variable "instance_type" {
description = "Name of the instance type"
type = string
}
We have to define the variables.tf file for the ec2 instance resource code. Next, we need to have the values of those defined variables. So, let's define the values in the terraform.tfvars file:
ami = "ami-a1b2c5d6"
instance_type = "t1.micro"
GCP Terraform input variables
We have learned about defining input variables in AWS and Azure, and there is no difference in terms of defining it for GCP as well. Let's try to take some sample Terraform configuration code for GCP and see how we can define input variables' code for it. We are going to discuss this with the same resource code as earlier that is, for App Engine in Google Cloud:
resource "google_project" "my_project" {
name = var.myproject_name
project_id = var.project_id
org_id = var.org_id
}
resource "google_app_engine_application" "app" {
project = google_project.my_project.project_id
location_id = var.location_id
}
Let's try to define our variables.tf file for the previous code, which is going to deploy Google App Engine for us:
# variables for Google Project
variable "myproject_name" {
description = "Name of the google project"
type = string
}
variable "project_id" {
description = "Name of the project ID"
type = string
}
variable "org_id" {
description = "Define org id"
type = string
}
variable "location_id" {
description = "Provide location"
type = string
}
We're done with defining all the variables in a variable.tf file. Now, let's try to pass values of them in terraform.tfvars:
myproject_name = "My Project"
project_id = "your-project-id"
org_id = "1234567"
location_id = "us-central"
We have covered Terraform variables and acquired an understanding of what the best practices of defining Terraform variables are and how we can take input from the users by passing variable values in Terraform environment variables, terraform.tfvars, default values, and runtime from the CLI. The take-away from this entire topic is how effectively you can write a Terraform configuration file with the help of Terraform variables. In the next topic, we will be discussing Terraform output. Terraform output will help you in validating what you can expect as output when you create or update any resources.
Understanding Terraform output
In this section, we are going to see how you can define the Terraform output file as well as what the best practices are for referencing the output of one resource as input for other dependent resources. We will be discussing Terraform output for AWS, GCP, and Azure.
Terraform output
Let's try to understand what this Terraform output is and ideally, what we can achieve from it, as well as why we need to define Terraform output for any of the Terraform configuration files. Output values are the return values of a Terraform resource/module/data, and they have many use cases:
- The output from one resource/module/data can be called into other resources/modules/data if there is a dependency on the first resource. For example, if you want to create an Azure subnet and you have already created an Azure virtual network, then, in order to provide the reference of your virtual network in the subnet, you can use the output of the virtual network and consume it in subnet resources.
- You can print certain output of the resources/modules/data on the CLI by running terraform apply.
- If you are using a remote state, other configurations via a terraform_remote_state data source can help you to access root module outputs.
Terraform manages all of your resource instances. Each resource instance helps you with an export output attribute, which can be used in the other configuration code blocks. Output values help you to expose some of the information that you might be looking for. Once you have provisioned a particular resource instance using Terraform, or even existing resources, output values can also be referred to using the data source's code block.
Let's try to understand how we can define Terraform output in Azure, AWS, and GCP.
Azure Terraform output
In the Terraform resource topic, we considered the Azure public IP address. Let's try to take the same resource code block and see how we can extract output from that resource:
resource "azurerm_resource_group" "example" {
name = "resourceGroup1"
location = "West US"
}
resource "azurerm_public_ip" "example" {
name = "acceptanceTestPublicIp1"
resource_group_name = azurerm_resource_group.example.name
location = azurerm_resource_group.example.location
allocation_method = "Static"
tags = {
environment = "Production"
}
}
From the azurerm_public_ip resource code block, we can export the following attributes:
- id: The public IP ID.
- name: The public IP address name.
- resource_group_name: The resource group name of the public IP address.
- ip_address: The IP address value that was allocated.
- fqdn: The fully qualified domain name (FQDN) of the DNS record associated with the public IP. domain_name_label must be specified to get the FQDN. This is the concatenation of domain_name_label and the regionalized DNS zone.
Let's see how you can define the output code block in your main.tf file, or how you can create a separate output.tf file and define everything there itself. We recommend that you define all your output code in a separate file, in other words, output.tf:
output "id" {
value = azurerm_public_ip.example.id
}
output "name" {
value = azurerm_public_ip.example.name
}
output "resource_group_name" {
value = azurerm_public_ip.example.resource_group_name
}
output "ip_address" {
value = azurerm_public_ip.example.ip_address
}
output "fqdn" {
value = azurerm_public_ip.example.fqdn
}
From the previous code, we manage to get the possible output after creating an Azure public IP address.
Important note
Dynamic public IP addresses aren't allocated until they're attached to a device (for example, a virtual machine/load balancer). Instead, you can obtain the IP address once the public IP has been assigned via the azurerm_public_ip data source.
We have discussed Terraform output and seen how we can validate it. Let's try to see how we can use a Terraform attribute reference from a resource/module/data code block while creating any new resource. For a better understanding of the Terraform attribute reference, we have taken an Azure load balancer resource:
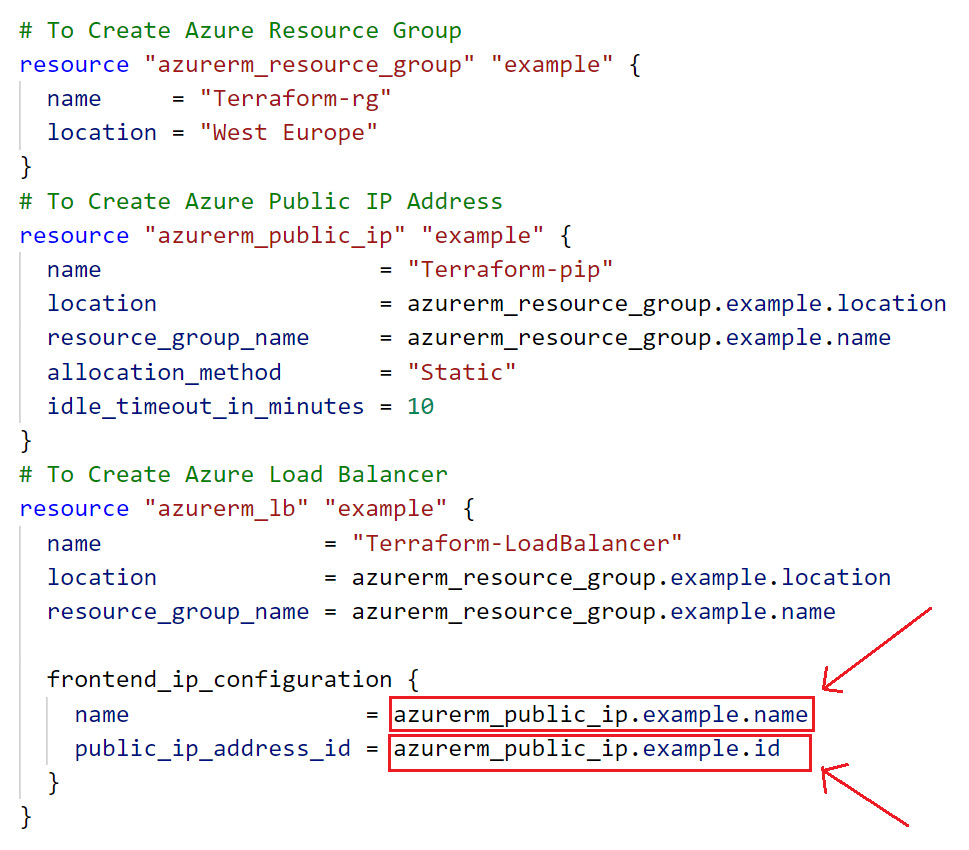
Figure 3.4 – Azure Terraform attribute reference
As shown in Figure 3.4, while creating an Azure load balancer, we are taking the reference values from Azure public IP address, in other words, the public IP address name and public IP address resource ID. Actually, this is not a Terraform output, but it is an attribute reference, meaning that one block value can be called into another.
AWS Terraform output
As we have learned how we can extract output when we are creating any Azure resource, let's now see how we can define the same in AWS. If you already understand the syntax of defining output values, this will remain the same for any Terraform providers. We are taking an example of a VPC resource to demonstrate AWS Terraform output further:
# To Create AWS VPC
resource "aws_vpc" "terraform-vpc" {
cidr_block = "10.0.0.0/16"
instance_tenancy = "default"
tags = {
Environment = "Terraform-lab"
}
}
Let's try to see what output values we can expect from the VPC resource block. Many arguments can be exported, as you can see in Figure 3.5, or visit https://registry.terraform.io/providers/hashicorp/aws/latest/docs/resources/vpc#attributes-reference. We are going to discuss a few of these, such as id and cidr_block . From there, you can get an idea of how output can be extracted for the other attributes mentioned:

Figure 3.5 – AWS VPC output attributes
The following code snippet will give you an insight as to how you can validate the respective output following creation of the AWS VPC:
output "id" {
value = aws_vpc.terraform-vpc.id
}
output "cidr_block" {
value = aws_vpc.terraform-vpc.cidr_block
}
You may be wondering whether you need to consume the output of this AWS VPC in any other resource, such as an AWS subnet, and how you can do this. Let's try to understand this, which is known as Terraform attribute referencing. Already, in the Azure Terraform output section, we explained that by using an implicit reference, you would be able to consume the one resource/module/data code block in another. Here is the code snippet to create a subnet within a specific AWS VPC:
resource "aws_subnet" "terraform-subnet" {
vpc_id = aws_vpc.terraform-vpc.id
cidr_block = "10.0.0.0/24"
tags = {
Environment = "Terraform-lab"
}
}
You can see in the previous code how we manage to perform Terraform attribute referencing from one resource code block and consume it in another resource code block. In the same way, you can do this with data sources and modules.
GCP Terraform output
In this section, we will try to understand how you can define output values for GCP resources. Let's start by understanding the output with a simple Google Cloud resource. In the following code, we have defined the resource code block for creating a Google App Engine resource:
resource "google_project" "my_project" {
name = "My Project"
project_id = "your-project-id"
org_id = "1234567"
}
resource "google_app_engine_application" "app" {
project = google_project.my_project.project_id
location_id = "us-central"
}
Here is a list of the attributes you can export as output from the Google App Engine resource:
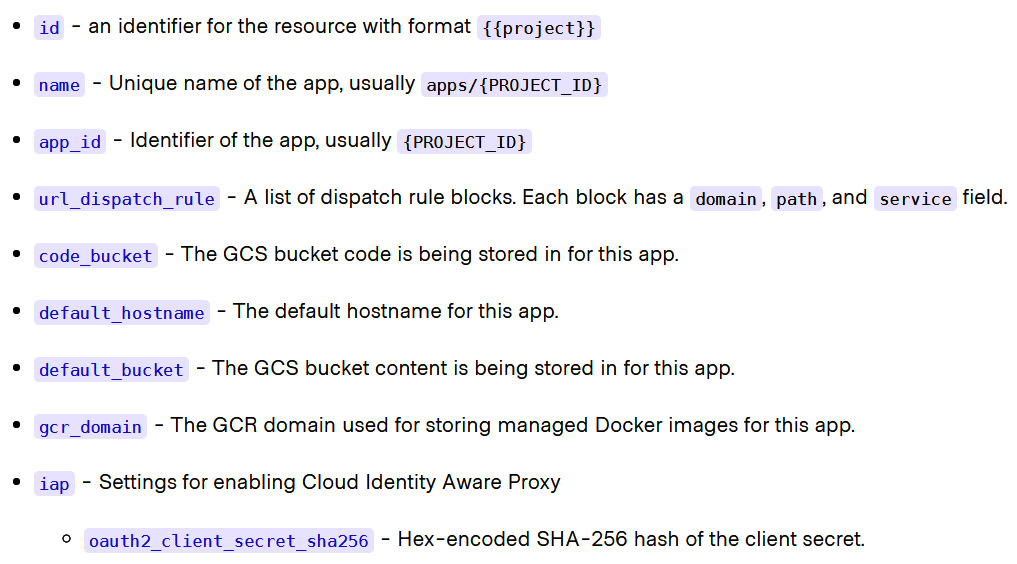
Figure 3.6 – GCP App Engine output attributes
From the list of arguments defined in Figure 3.6, we will consider id and name, which, as you can see in the following code snippet, you can define within main.tf or in a separate file such as output.tf:
output "id" {
value = google_app_engine_application.app.id
}
output "name" {
value = google_app_engine_application.app.name
}
Terraform output optional arguments
Terraform output supports some arguments such as description, sensitive, and depends_on, which are described as follows:
- description: In the output values for your reference, you can define its description so that you can understand what you are getting as an output value. You can refer to the following code snippet to get an understanding of how you can define description in the output code block:
output "instance_ip_addr" {
value = aws_instance.server.private_ip
description = "The private IP address of the main server instance."
}
- sensitive: If you want to set output values that have sensitive information, then you can define the sensitive argument. In the following code snippet, we have declared the sensitive argument in the output value code block:
output "db_password" {
value = aws_db_instance.db.password
description = "The password for logging in to the database."
sensitive = true
}
When you define output values as sensitive, this prevents Terraform from showing its values on the Terraform CLI after running terraform apply. Still, there is some chance that it may be visible in the CLI output for some other reasons, such as if the value is referenced in a resource argument. This has been taken care of in Terraform version 0.14 and above, which prevents the displaying of sensitive output in the CLI output. You can refer to the following blog post regarding it: https://www.hashicorp.com/blog/terraform-0-14-adds-the-ability-to-redact-sensitive-values-in-console-output.
Even if you have defined output values as sensitive, they will still be recorded in the state file, and they will be visible in plain text to anyone who has access to the state file.
- depends_on: Output values are just used to extract information of the resource that got provisioned or that already exists. You may be thinking, why do we need to define any kind of dependency for the output values? Just as you generally define depends_on while using the resource/module/data code level so that Terraform will understand and maintain the resource dependency graph while creating or reading the existing resources, in the same way, if you wish to define an explicit depends_on argument in your output values, then you can define it as shown in the following code snippet:
output "instance_ip_addr" {
value = aws_instance.server.private_ip
description = "The private IP address of the main server instance."
depends_on = [
# Security group rule must be created before this IP address could
# actually be used, otherwise the services will be unreachable.
aws_security_group_rule.local_access,
]
}
Important note
The depends_on argument should be used only as a last resort. When using it, always include a comment explaining why it is being used, so as to help future maintainers understand the purpose of the additional dependency.
We have discussed the Terraform output. You should now have a fair understanding of how you can use Terraform output values for the validation of the resources that you have provisioned, and you also got to know how you perform Terraform attribute referencing from one resource/module/data code block to another resource/module/data code block. In the upcoming section, we are going to discuss Terraform data. From there, you will learn how you can read already existing resources in your infrastructure. For the explanations, we will again be considering our three major cloud services: Azure, AWS, and GCP.
Understanding Terraform data
In this section, we are going to discuss how you can define Terraform data sources. You can also refer to https://www.terraform.io/docs/configuration/data-sources.html to see under which circumstances you would be able to use Terraform data sources. Just as with Terraform output, resources, providers, and variables, we will be concentrating on Terraform data sources for AWS, GCP, and Azure.
Terraform data sources
Let's try to understand Terraform data sources with the help of an example. Matt and Bob are two colleagues working for a company called Obs based out in the US. Obs is a shipping company that does business all over the world and recently, they started using multi-cloud AWS and Azure. A heated conversation is ongoing between Bob and Matt. Bob is saying that he will be doing all the IT infrastructure deployment using Azure-provided ARM templates, while Matt is saying that he would prefer to use Terraform. Now, the problem is that Bob has already provisioned some of the production infrastructures in Azure using the ARM template. Let's say, for example, he provisioned one virtual network, five subnets, and five virtual machines. Matt has been asked to create five more virtual machines in those existing virtual networks and subnets. He wants to use Terraform to perform this deployment. He has many questions in mind, such as how will he be able to read the existing infrastructure and how will he be able to write a Terraform configuration file for the new deployment? After some searching, he learns about Terraform data sources, which allow you to extract output or information from already existing resources that got provisioned by any other Terraform configuration, or manually or by any other means.
Azure Terraform data sources
In this section, we will explain how you can define Terraform data sources specific to Azure. Let's try to understand this with the help of an example. Suppose you already have an Azure virtual network created and now you are trying to create a new subnet in that existing virtual network. In this instance, how can you define your Terraform data source's code block? In the following code snippet, we demonstrate how you can get an output value from the existing virtual network:
data "azurerm_virtual_network" "example" {
name = "production-vnet"
resource_group_name = "Terraform-rg"
}
output "virtual_network_id" {
value = data.azurerm_virtual_network.example.id
}
If you want to create a subnet in the existing virtual network, then the following defined code snippet can help you out by extracting the existing resource group and virtual network, and then allowing you to provision a new subnet inside that existing virtual network:
data "azurerm_resource_group" "example" {
name = "Terraform-rg"
}
data "azurerm_virtual_network" "example" {
name = "production-vnet"
resource_group_name = data.azurerm_resource_group.example.name
}
resource "azurerm_subnet" "example" {
name = "terraform-subnet"
resource_group_name = data.azurerm_resource_group.example.name
virtual_network_name = data.azurerm_virtual_network.example.name
address_prefixes = ["10.0.1.0/24"]
}
As with Azure virtual networks, there are Terraform data sources for each Azure service. If you wish to understand the syntax of writing an Azure Terraform data source code block in your Terraform configuration file, you can refer to https://www.terraform.io/docs/providers/azurerm/.
AWS Terraform data sources
Similar to the way in which we defined our Azure Terraform data sources code block, let's try to understand how we can define Terraform data sources for AWS. We want to create a subnet in an existing AWS VPC. You can refer to the following code snippet where we have defined vpc_id as an input variable:
variable "vpc_id" {}
data "aws_vpc" "example" {
id = var.vpc_id
}
resource "aws_subnet" "example" {
vpc_id = data.aws_vpc.example.id
availability_zone = "us-west-2a"
cidr_block = cidrsubnet(data.aws_vpc.example.cidr_block, 4, 1)
}
For detailed information about each AWS service that can be defined in AWS Terraform data sources, you can refer to the AWS providers website at https://registry.terraform.io/providers/hashicorp/aws/.
GCP Terraform data sources
In this section, we are going to discuss how you can define the GCP Terraform data sources code in your configuration. To aid understanding, let's take a simple example of extracting existing GCP compute instance details. The following code snippet will give you an idea of how you can draft GCP Terraform data sources:
data "google_compute_instance" "example" {
name = "Terraform-server"
zone = "us-central1-a"
}
If you want more information, you can refer to the Terraform Google provider website at https://www.terraform.io/docs/providers/google/, where each Google service is explained along with its data sources.
We have covered data sources' code blocks in the Terraform configuration files. We have learned how we can draft our Terraform configuration file using data sources for different providers such as Azure, AWS, and GCP. Data sources help to read already existing configurations and use that output in new or updated infrastructures.
Summary
In this chapter, you gained an understanding of Terraform's core components, including providers, resources, variables, output, and data sources. In a nutshell, a provider is an API plugin that you need if you want to deploy/update services for your infrastructure. Resources are the actual services that you are planning to update/deploy for your respective providers. Variables are input from the users that makes your configuration code reusable. The output is what you are expecting when you are creating/updating your resources. Data sources help you out with extracting existing resource configurations. All of these help you to draft your Terraform configuration file.
In the next chapter, we will get into a detailed discussion regarding backend configuration, provisioners, and inbuilt functions, how to perform debugging in Terraform, and how you can perform different kinds of iteration using for and other loops in Terraform.
Questions
The answers to these questions can be found in the Assessments section at the end of this book:
- Terraform is written using the HashiCorp Configuration Language (HCL). What other syntax can Terraform be written in?
A. JSON
B. YAML
C. TypeScript
D. XML
- The following is a Terraform code snippet from your Terraform configuration file:
provider "aws" {
region = "us-east-1"
}
provider "aws" {
region = "us-east-2"
}
When validated, it results in the following error:
Error: Duplicate provider configuration
on main.tf line 5:
provider "aws" {
A default provider configuration for "aws" was already given at
main.tf:1,1-15. If multiple configurations are required, set the "______"
argument for alternative configurations.
Fill in the blank in the error message with the correct string from the following list:
A. version
B. multi
C. label
D. alias
- Referring to the following Terraform code, what is the local name for the resource that is defined?
resource "aws_instance" "example" {
ami = "ami-082b5a644766e6e6f"
instance_type = "t2.micro"
count = 2
}
A. aws_instance
B. example
C. ami-082b5a644766e0e6f
D. t2.micro
- Matt is implementing Terraform in his environment. He is looking to deploy some virtual machines with the virtual network in Azure. He has ascertained that one of his colleagues has already created a virtual network in Azure, and now he needs to create a virtual machine within that already existing virtual network. Suggest what he should use in his Terraform configuration code block:
A. Make use of Terraform variables for the virtual network.
B. Make use of a Terraform resource block for the virtual network.
C. Make use of a data source for the virtual network.
D. None of the above.
- You have been given a Terraform configuration file and have been asked to make it dynamic and reusable. What exactly will you be using to convert static parameters?
A. Output values
B. Terraform input variables
C. Data sources
D. Regular expressions
Further reading
You can check out the following links for more information about the topics that have been covered in this chapter:
- Terraform environment variables: https://www.terraform.io/docs/commands/environment-variables.html
- Terraform variables: https://upcloud.com/community/tutorials/terraform-variables/
- Terraform data sources: https://stackoverflow.com/questions/47721602/how-are-data-sources-used-in-terraform
- Terraform best practices: https://www.terraform-best-practices.com/key-concepts
- Terraform providers: https://registry.terraform.io/browse/providers
- Terraform resources: https://www.cloudreach.com/en/resources/blog/guide-terraform-resource-dev/