
Chapter 6. abstract classes and interfaces: Serious Polymorphism

A superclass inheritance hierarchy is just the beginning.
If you want to fully exploit polymorphism , you need to design using abstract classes and interfaces. In this chapter, you’ll discover how to use abstract classes to control which classes in your hierarchy can and can’t be instantiated . You’ll see how they can force concrete subclasses to provide their own implementations . You’ll find out how to use interfaces to share behavior between independent classes . And along the way, you’ll learn the ins and outs of is , as, and when .
The Animal class hierarchy revisited
In the previous chapter, you learned how to design an inheritance hierarchy by creating the class structure for a bunch of animals. We abstracted out the common properties and functions into an Animal superclass, and overrode some of the properties and functions in the Animal subclasses so that we’d have subclass-specific implementations where we thought it was appropriate.
By defining the common properties and functions in the Animal superclass, we’re establishing a common protocol for all Animals, which makes the design nice and flexible. We can write code using Animal variables and parameters so that any Animal subtype (including ones we didn’t know about at the time we wrote our code) can be used at runtime.
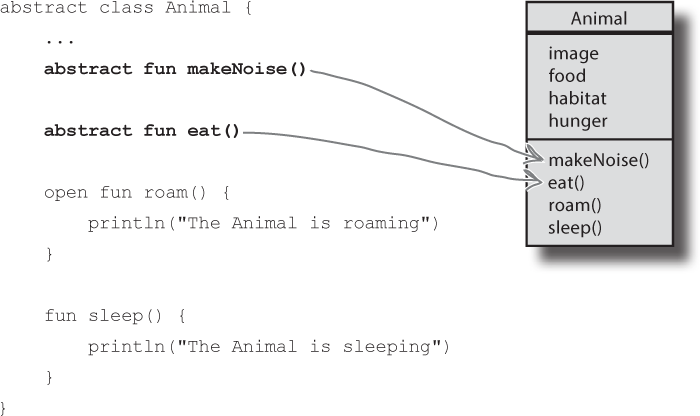
Here’s a reminder of the class structure:

Some classes shouldn’t be instantiated
The class structure, however, needs some improvement. It makes sense for us to create new Wolf, Hippo or Fox objects, but the inheritance hierarchy also allows us to create generic Animal objects. This is a Bad Thing because we can’t say what an Animal looks like, what it eats, what sort of noise it makes, and so on.

How do we deal with this? We need an Animal class for inheritance and polymorphism, but we only want to be able to instantiate the less abstract subclasses of Animal, not Animal itself. We want to be able to create Hippo, Wolf and Fox objects, but not Animal objects.
Declare a class as abstract to stop it from being instantiated
If you want to prevent a class from being instantiated, you can mark the class as abstract by prefixing it with the abstract keyword. Here’s how, for example, you turn Animal into an abstract class:

Being an abstract class means that nobody can create any objects of that type, even if you’ve defined a constructor for it. You can still use that abstract class as a declared variable type, but you don’t have to worry about somebody creating objects of that type—the compiler stops it from happening:

Think about the Animal class hierarchy. Which classes do you think should be declared abstract? In other words, which classes do you think shouldn’t be instantiated?
If a superclass is marked as abstract, you don’t need to declare that it’s open.
Abstract or concrete?
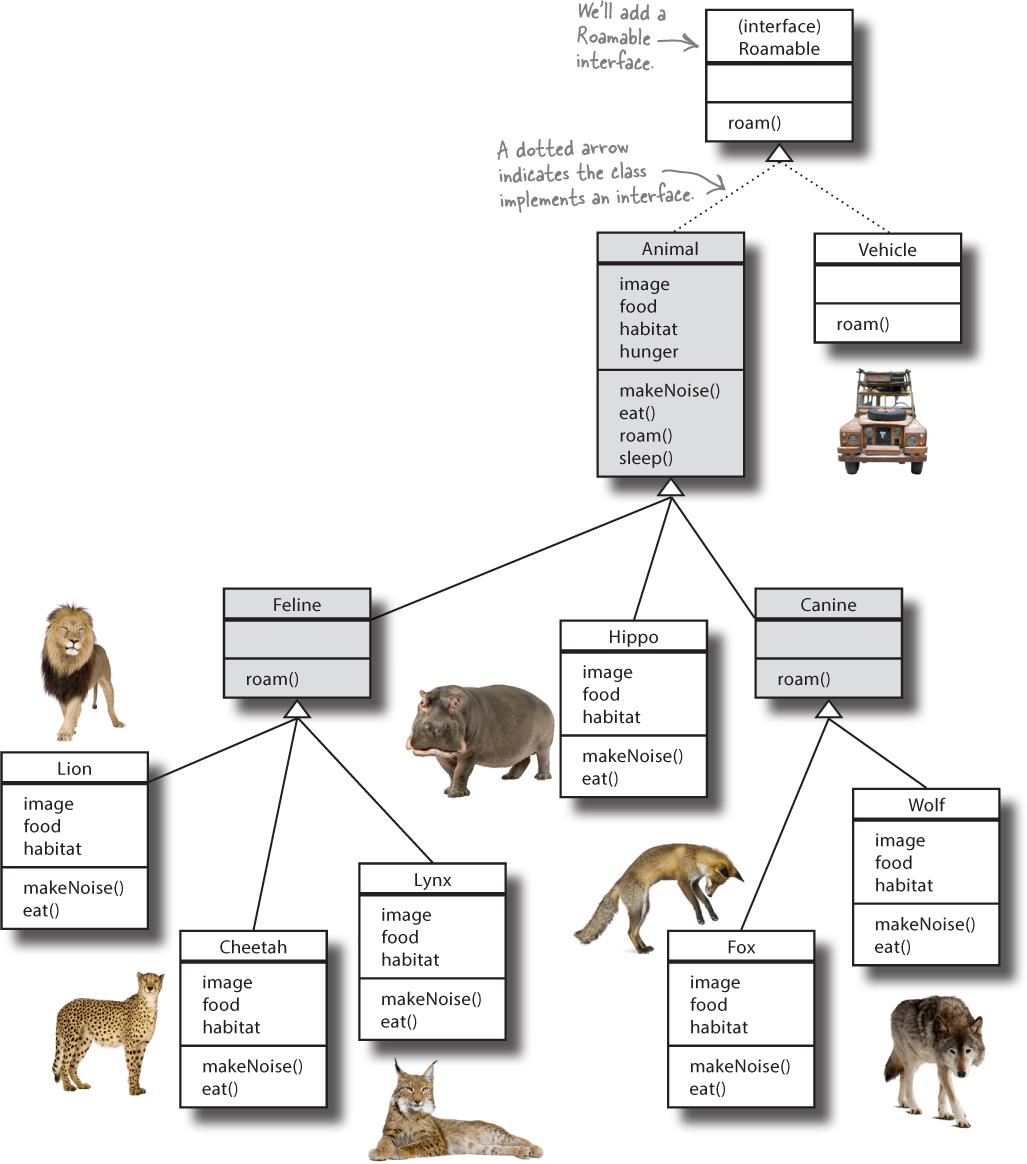
In our Animal class hierarchy, there are three classes that need to be declared abstract: Animal, Canine and Feline. While we need these classes for inheritance, we don’t want anyone to be able to create objects of these types.
A class that’s not abstract is called concrete, so that leaves Hippo, Wolf, Fox, Lion, Cheetah and Lynx as the concrete subclasses.
In general, whether a class should be abstract or concrete depends on the context of your application. A Tree class, for example, might need to be abstract in a tree nursery application where the differences between an Oak and a Maple really matter. But if you were designing a golf simulation, Tree might be a concrete class because the application doesn’t need to distinguish between different types of tree.
Note
We’re marking the Animal, Canine and Feline classes as abstract by giving each one a gray background.

An abstract class can have abstract properties and functions
In an abstract class, you can choose to mark properties and functions as abstract. This is useful if the class has behaviors that don’t make sense unless they’re implemented by a more specific subclass, and you can’t think of a generic implementation that might be useful for subclasses to inherit.
Let’s see how this works by considering what properties and functions we should mark as abstract in the Animal class.
An abstract class can contain abstract and non-abstract properties and functions. It’s possible for an abstract class to have no abstract members.
We can mark three properties as abstract
When we created the Animal class, we decided to instantiate the image, food and habitat properties with generic values and override them in the animal-specific subclasses. This was because there was no value we could assign to these properties that would have been useful to the subclasses.
Because these properties have generic values that must be overridden, we can mark each one as abstract by prefixing it with the abstract keyword. Here’s the code to do that:

Notice that in the above code, we haven’t initialized any of the abstract properties. If you try to initialize an abstract property, or define a custom getter or setter for it, the compiler will refuse to compile your code. This is because by marking a property as abstract, you’ve decided that there’s no useful initial value it can have, and no useful implementation for a custom getter or setter.
Now that we know what properties we can mark as abstract, let’s consider the functions.
Abstract properties and functions don’t need to be marked as open.
The Animal class has two abstract functions
The Animal class defines two functions—makeNoise and eat—that are overridden in every concrete subclass. As these two functions are always overridden and there’s no implementation we can provide that would help the subclasses, we can mark the makeNoise and eat functions as abstract by prefixing each one with the abstract keyword. Here’s the code to do this:
In the above code, neither of the abstract functions have function bodies. This is because when you mark a function as abstract, you’re telling the compiler that there’s no useful code you can write for the function body.
If you try to add a body to an abstract function, the compiler will get upset and refuse to compile your code. The following code, for example, won’t compile because there are curly braces after the function definition:

In order for the code to compile, you must remove the curly braces so that the code looks like this:
abstract fun makeNoise()
As the abstract function no longer has a function body, the code compiles.

Abstract properties and functions define a common protocol so that you can use polymorphism.
Inheritable function implementations (functions with actual bodies) are useful to put in a superclass when it makes sense. And in an abstract class, it often doesn’t make sense because you may not be able to come up with any generic code that the subclasses would find useful.
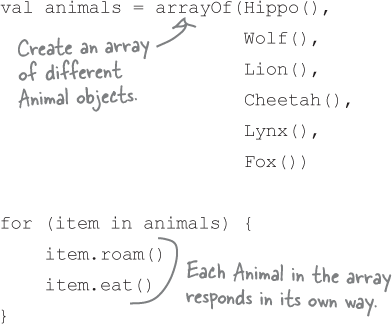
Abstract functions are useful because even though they don’t contain any actual function code, they define the protocol for a group of subclasses which you can use for polymorphism. As you learned in the previous chapter, polymorphism means that when you define a supertype for a group of classes, you can use any subclass in place of the superclass it inherits from. It gives you the ability to use a superclass type as a variable type, function argument, return type or array type, as in the following example:
This means that you can add new subtypes (such as a new Animal subclass) to your application without having to rewrite or add new functions to deal with those new types.
Now that you’ve seen how (and when) to mark classes, properties and functions as abstract, let’s see how you implement them.
How to implement an abstract class
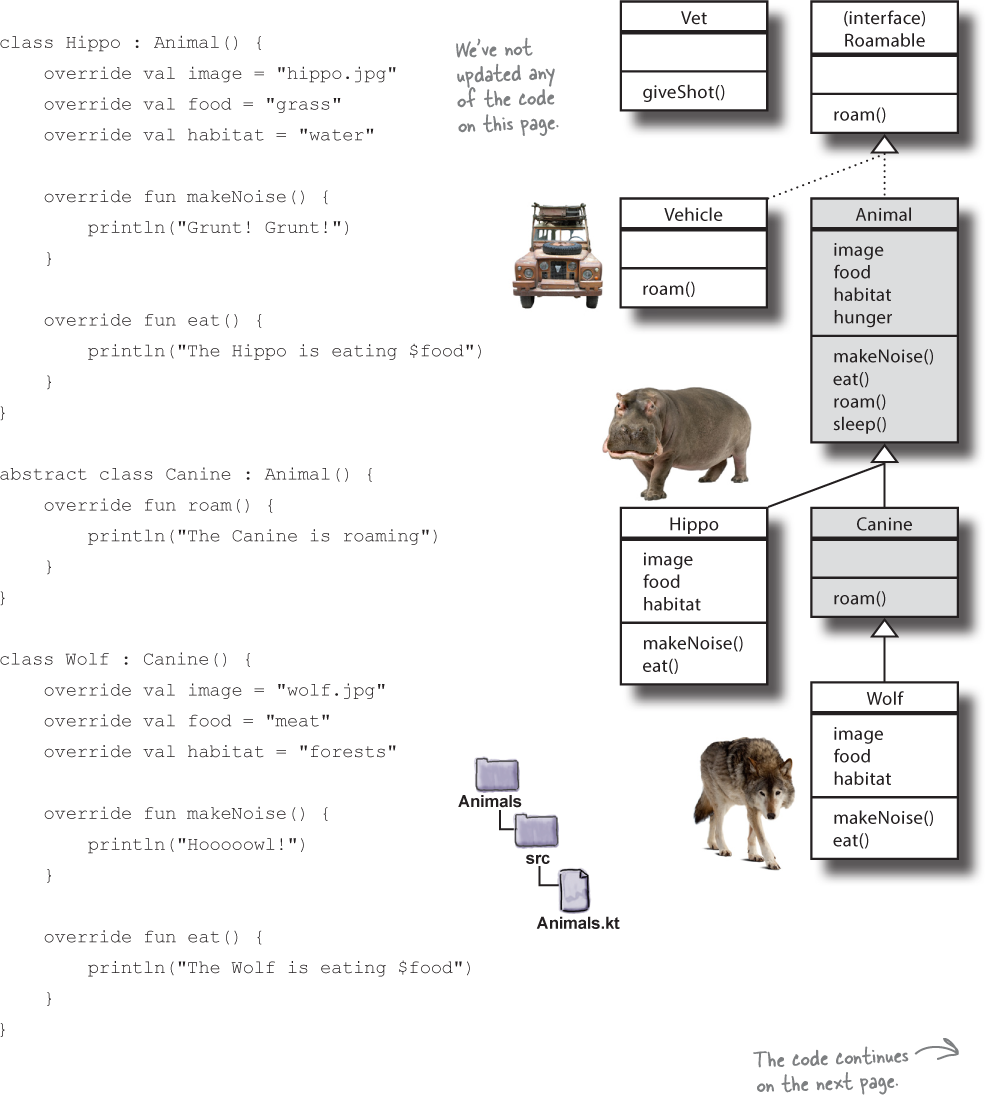
You declare that a class inherits from an abstract superclass in the same way that you say that a class inherits from a normal superclass: by adding a colon to the class header followed by the name of the abstract class. Here’s how, for example, you say that the Hippo class inherits from the abstract Animal class:

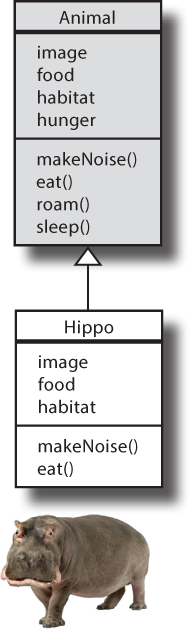
You implement abstract properties and functions by overriding each one and providing an implementation. This means that you need to initialize any abstract properties, and you need to provide a body for any abstract functions.
In our example, the Hippo class is a concrete subclass of Animal. Here’s the code for the Hippo class that implements the image, food and habitat properties, along with the makeNoise and eat functions:

When you implement abstract properties and functions, you must follow the same rules for overriding that you use for overriding normal properties and functions:
* When you implement an abstract property, it must have the same name, and its type must be compatible with the type defined in the abstract superclass. In other words, it must be the same type, or one of its subtypes.
* When you implement an abstract function, it must have the same function signature (name and arguments) as the function that’s defined in the abstract superclass. Its return type must be compatible with the declared return type.
You MUST implement all abstract properties and functions
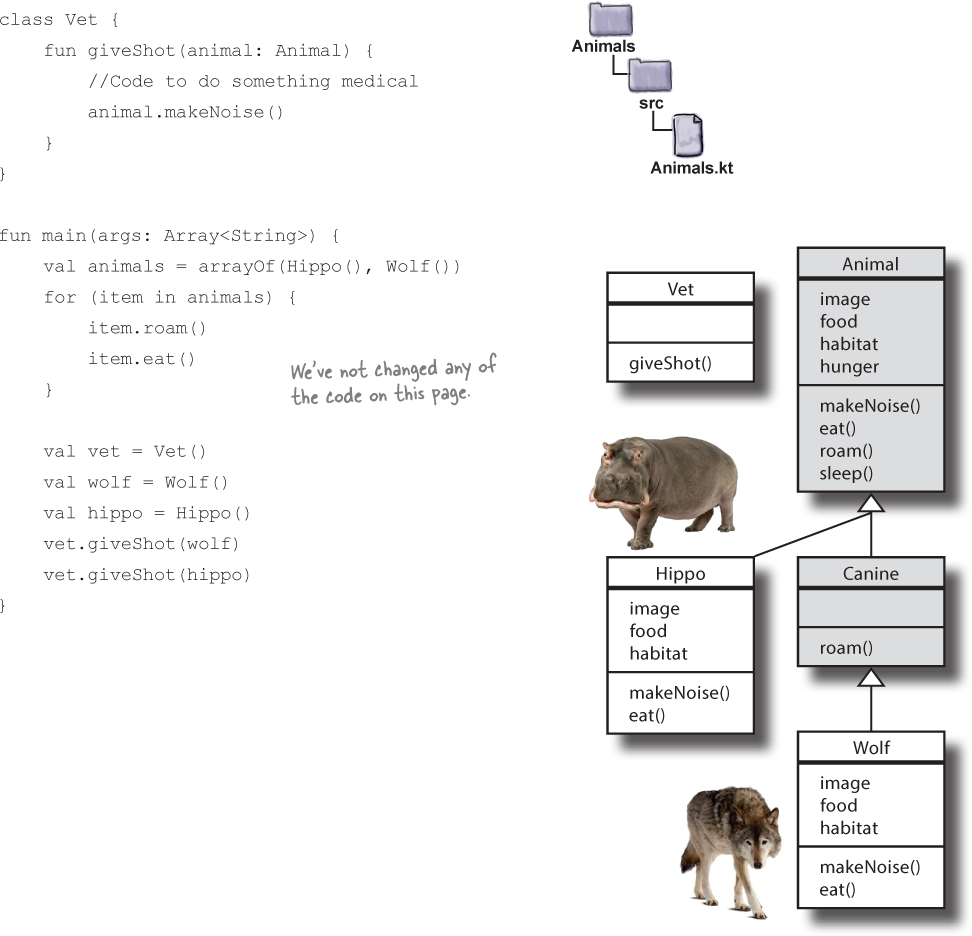
The first concrete class in the inheritance tree below the abstract superclass must implement all abstract properties and functions. In our class hierarchy, for example, the Hippo class is a direct concrete subclass of Animal, so it must implement all the abstract properties and functions defined in the Animal class in order for the code to compile.
With abstract subclasses, you have a choice: you can either implement the abstract properties and functions, or pass the buck to its subclasses. If both Animal and Canine are abstract, for example, the Canine class can either implement the abstract properties and functions from Animal, or say nothing about them and leave them for its subclasses to implement.
Any abstract properties and functions that aren’t implemented in Canine must be implemented in its concrete subclasses, like Wolf. And if the Canine class were to define any new abstract properties and functions, the Canine subclasses would have to implement these too.
Now that you’ve learned about abstract classes, properties and functions, let’s update the code in our Animal hierarchy.

When a subclass inherits from an abstract superclass, the subclass can still define its own functions and properties.
Let’s update the Animals project
In the previous chapter, we wrote the code for the Animal, Canine, Hippo, Wolf and Vet classes, and added these to the Animals project. We need to update this code so that we make the Animal and Canine classes abstract. We’ll also make the image, food and habitat properties in the Animal class abstract, along with its makeNoise and eat functions.
Open the Animals project that you created in the previous chapter, and then update your version of the code in file Animals.kt so that it matches ours below (our changes are in bold):


Let’s take the code for a test drive to see what happens.
Test drive

Run your code. The following text gets printed in the IDE’s output window as before, but now we’re using abstract classes to control which classes can be instantiated.
The Animal is roaming

The Hippo is eating grass

The Canine is roaming

The Wolf is eating meat

Hooooowl!

Grunt! Grunt!
Independent classes can have common behavior
So far, you’ve learned how to create an inheritance hierarchy using a mix of abstract superclasses and concrete subclasses. This approach helps you to avoid writing duplicate code, and it means that you can write flexible code that benefits from polymorphism. But what if you want to include classes in your application that share some of the behavior defined in the inheritance hierarchy, but not all?
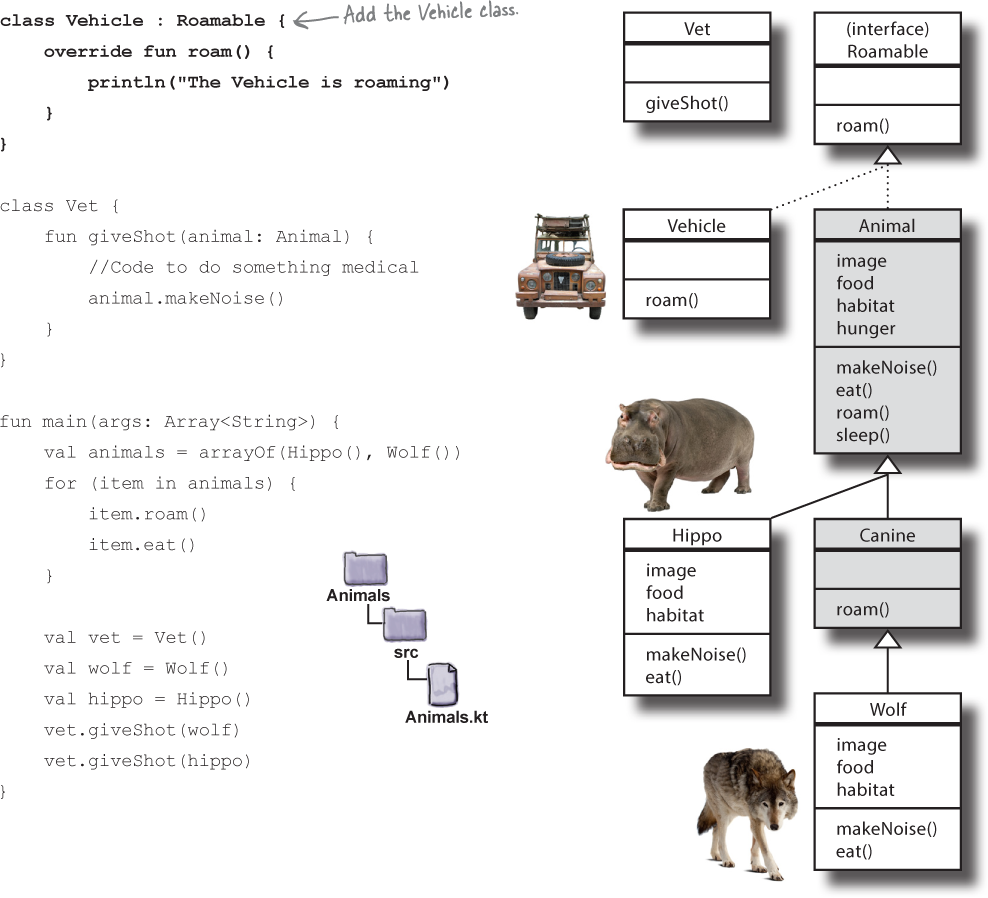
Suppose, for example, that we want to add a Vehicle class to our animal simulation application that has one function: roam. This would allow us to create Vehicle objects that can roam around the animals environment.
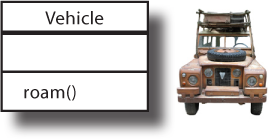
It would be useful if the Vehicle class could somehow implement the Animal’s roam function, as this would mean that we could use polymorphism to create an array of objects that can roam, and call functions on each one. But the Vehicle class doesn’t belong in the Animal superclass hierarchy as it fails the IS-A test: saying “a Vehicle IS-A Animal” makes no sense, and neither does saying “an Animal IS-A Vehicle”.
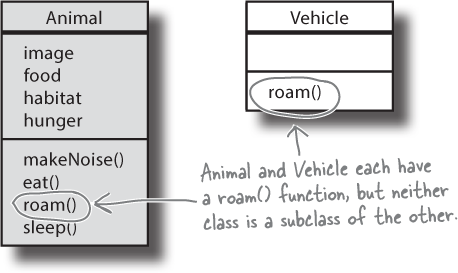
If two classes fail the IS-A test, this indicates that they probably don’t belong in the same superclass hierarchy.
When you have independent classes that exhibit common behavior, you can model this behavior using an interface. So what’s an interface?
An interface lets you define common behavior OUTSIDE a superclass hierarchy
Interfaces are used to define a protocol for common behavior so that you can benefit from polymorphism without having to rely on a strict inheritance structure. Interfaces are similar to abstract classes in that they can’t be instantiated, and they can define abstract or concrete functions and properties, but there’s one key difference: a class can implement multiple interfaces, but can only inherit from a single direct superclass. So using interfaces can provide the same benefits as using abstract classes, but with more flexibility.
Let’s see how this works by adding an interface named Roamable to our application, which we’ll use to define roaming behavior. We’ll implement this interface in the Animal and Vehicle classes.
We’ll start by defining the Roamable interface.
Let’s define the Roamable interface
We’re going to create a Roamable interface that we can use to provide a common protocol for roaming behavior. We’ll define an abstract function named roam that the Animal and Vehicle classes will need to implement (you’ll see the code for these classes later).
Here’s what our Roamable interface code looks like (we’ll add it to our Animals project a few pages ahead):

Interface functions can be abstract or concrete
You add functions to interfaces by including them in the interface body (inside the curly braces {}). In our example, we’re defining an abstract function named roam, so the code looks like this:

When you add an abstract function to an interface, there’s no need to prefix the function name with the abstract keyword, as you would if you were adding an abstract function to an abstract class. With an interface, the compiler automatically infers that a function with no body must be abstract, so you don’t have to mark it as such.
You can also add concrete functions to interfaces by providing the function with a body. The following code, for example, provides a concrete implementation for the roam function:

As you can see, you define functions in an interface in a similar way to how you define functions in an abstract class. So what about properties?
How to define interface properties
You add a property to an interface by including it in the interface body. This is the only way in which you can define an interface property, as unlike abstract classes, interfaces can’t have constructors. Here’s how, for example, you would add an abstract Int property to the Roamable interface named velocity:

Unlike properties in abstract classes, properties that are defined in an interface can’t store state, and therefore can’t be initialized. You can, however, return a value for a property by defining a custom getter using code like this:

Another restriction is that interface properties don’t have backing fields. You learned in Chapter 4 that a backing field provides a reference to the underlying value of a property, so you can’t, say, define a custom setter that updates a property’s value like this:
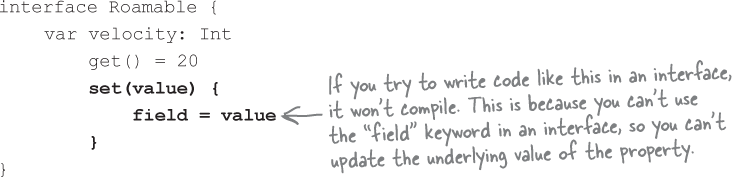
You, however, define a setter so long as it doesn’t try and reference the property’s backing field. The following code, for example, is valid:

Now that you’ve learned how to define an interface, let’s see how to implement one.
Declare that a class implements an interface...
You mark that a class implements an interface in a similar way to how you mark that a class inherits from a superclass: by adding a colon to the class header followed by the name of the interface. Here’s how, for example, you declare that the Vehicle class implements the Roamable interface:

Unlike when you declare that a class inherits from a superclass, you don’t put parentheses after the interface name. This is because the parentheses are only needed in order to call the superclass constructor, and interfaces don’t have constructors.
...then override its properties and functions
Declaring that a class implements an interface gives the class all the properties and functions that are in that interface. You can override any of these properties and functions, and you do this in exactly the same way that you would override properties and functions inherited from a superclass. The following code, for example, overrides the roam function from the Roamable interface:

Just like abstract superclasses, any concrete classes that implement the interface must have a concrete implementation for any abstract properties and functions. The Vehicle class, for example, directly implements the Roamable interface, so it must implement all the abstract properties and functions defined in this interface in order for the code to compile. If the class that implements the interface is abstract, however, the class can either implement the properties and functions itself, or pass the buck to its subclasses.
Note that a class that implements an interface can still define its own properties and functions. The Vehicle class, for example, could define its own fuelType property and still implement the Roamable interface.
Earlier in the chapter, we said that a class could implement multiple interfaces. Let’s see how.
Concrete classes can’t contain abstract properties and functions, so they must implement all of the abstract properties and functions that they inherit.
How to implement multiple interfaces
You declare that a class (or interface) implements multiple interfaces by adding each one to the class header, separating each one with a comma. Suppose, for example, that you have two interfaces named A and B. You would declare that a class named X implements both interfaces using the code:
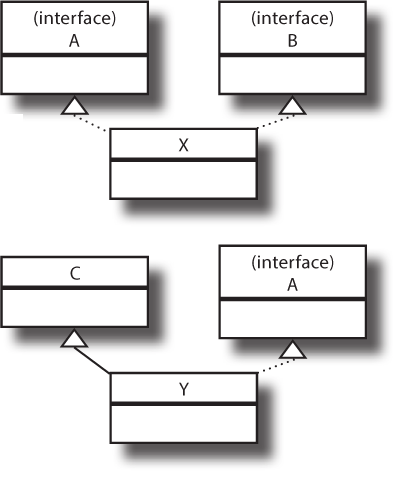

A class can also inherit from a superclass in addition to implementing one or more interfaces. Here’s how, for example, you specify that class Y implements interface A, and inherits from class C:

If a class inherits multiple implementations of the same function or property, the class must provide its own implementation, or specify which version of the function or property it should use. If, for example, the A and B interfaces both include a concrete function named myFunction, and the X class implements both interfaces, the X class must provide an implementation of myFunction so that the compiler knows how to handle a call to this function:

How do you know whether to make a class, a subclass, an abstract class, or an interface?
Unsure whether you should create a class, abstract class or interface? Then the following tips should help you out:
Note
Roses are red, Violets are blue, Inherit from one, But implement two.
A Kotlin class can have only one parent (superclass), and that parent class defines who you are. But you can implement multiple interfaces, and those interfaces define the roles that you can play.
* Make a class with no superclass when your new class doesn’t pass the IS-A test for any other type.
* Make a subclass that inherits from a superclass when you need to make a more specific version of a class and need to override or add new behaviors.
* Make an abstract class when you want to define a template for a group of subclasses. Make the class abstract when you want to guarantee that nobody can make objects of that type.
* Make an interface when you want to define common behavior, or a role that other classes can play, regardless of where these classes are in the inheritance tree.
Now that you’ve seen how to define and implement interfaces, let’s update the code for our Animals project.
Update the Animals project
We’ll add a new Roamable interface and Vehicle class to our project. The Vehicle class will implement the Roamable interface, and so will the abstract Animal class.
Update your version of the code in file Animals.kt so that it matches ours below (our changes are in bold):

Let’s see what happens when we take our code for a test drive.
Test drive
Run your code. Text gets printed in the IDE’s output window as before, but now the Animal class uses the Roamable interface for its roaming behavior.
We still need to use Vehicle objects in our main function, but first, have a go at the following exercise.
The Animal is roaming

The Hippo is eating grass

The Canine is roaming

The Wolf is eating meat

Hooooowl!

Grunt! Grunt!
Interfaces let you use polymorphism
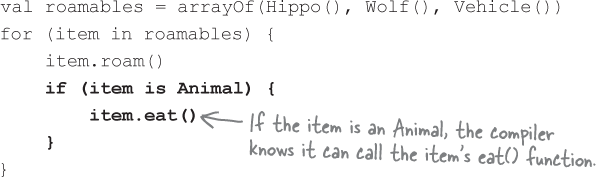
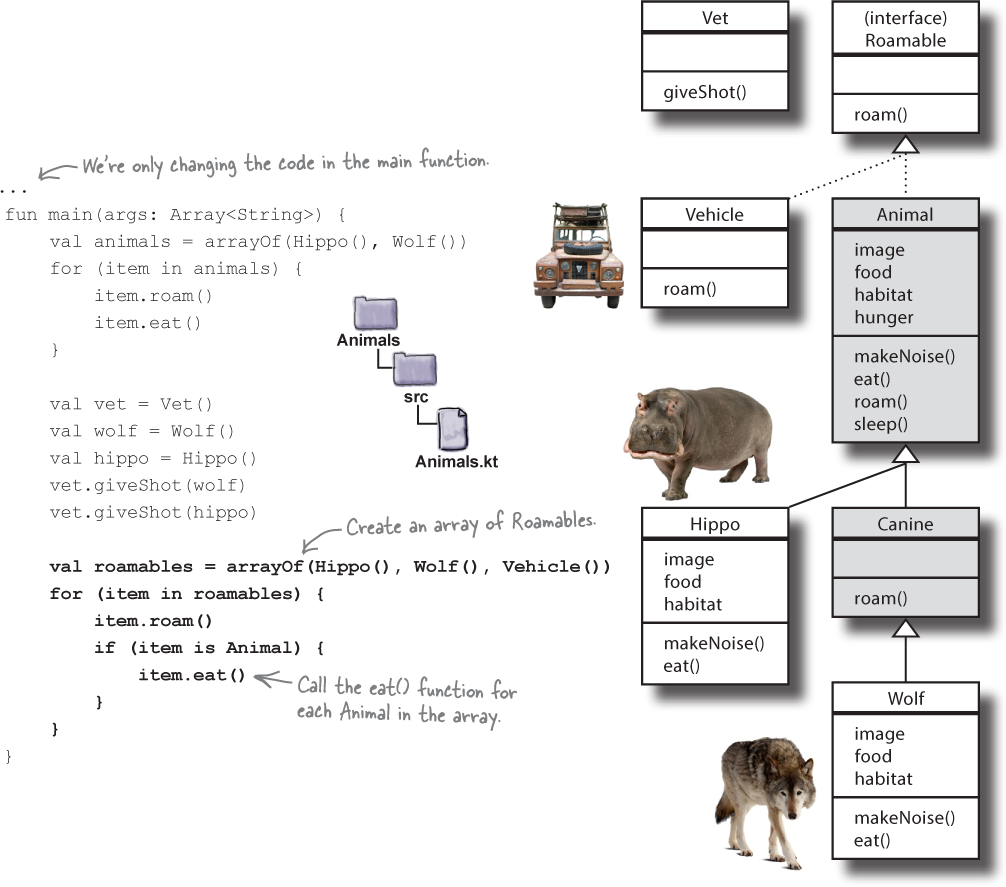
You already know that using interfaces means that your code can benefit from polymorphism. You can, for example, use polymorphism to create an array of Roamable objects, and call each object’s roam function:

But what if you don’t just want to access functions and properties defined in the Roamable interface? What if you want to call each Animal’s makeNoise function too? You can’t just use:
item.makeNoise()
because item is a variable of type Roamable, so it doesn’t recognize the makeNoise function.
Access uncommon behavior by checking an object’s type
You can access behavior that’s not defined by a variable’s type by first using the is operator to check the type of the underlying object. If the underlying object is of the appropriate type, the compiler then lets you access behavior that’s appropriate for that type. The following code, for example, checks whether the object referred to by an Animal variable is a Wolf, and if so, calls the eat function:

In the above code, the compiler knows that the underlying object is a Wolf, so it’s safe to run any code that’s Wolf-specific. This means that if we want to call the eat function for each Animal object in an array of Roamables, we can use the following:
You can use the is operator in a variety of situations. Let’s find out more.
Use the is operator to check if the underlying object is the specified type (or one of its subtypes).
Where to use the is operator
Here are some of the most common ways in which you might want to use the is operator:
As the condition for an if
As you’ve already seen, you can use the is operator as the condition for an if. The following code, for example, assigns a String of “Wolf” to variable str if the animal variable holds a reference to a Wolf object, and “not Wolf” if it doesn’t:

In conditions using && and ||
You can build up more complex conditions using && and ||. The following code, for instance, tests whether a Roamable variable holds a reference to an Animal object, and if so, it further tests if the Animal’s hunger property is less than 5:

You can also use !is to test if an object is not a particular type. The following code, for example, is like saying “if the roamable variable doesn’t hold a reference to an Animal, or if the Animal’s hunger property is greater than or equal to 5”:

In a while loop
If you want to use the is operator as the condition for a while loop, you can do so using code like this:
while (animal is Wolf) {

    //Code that runs while the Animal is a Wolf

}
In the above example, the code continues to loop while the animal variable holds a reference to a Wolf object.
You can also use the is operator with a when statement. Let’s find out what these are, and how to use them.
Use when to compare a variable against a bunch of options
A when statement is useful if you want to compare a variable against a set of different options. It’s like using a chain of if/else expressions, but more compact and readable.
Here’s an example of what a when statement looks like:

The above code takes the variable x, and checks its value against various options. It’s like saying: “when x is 0, print “x is zero”, when x is 1 or 2, print “x is 1 or 2”, otherwise print some other text”.
If you want to run different code depending on the underlying type of an object, you can use the is operator inside a when statement. The code below, for example, uses the is operator to check the type of the underlying object that’s referenced by the roamable variable. When the type is Wolf, it runs code that’s Wolf-specific, when the type is Hippo, it runs Hippo-specific code, and it runs other code if the type is some other Animal (not Wolf or Hippo):

The is operator usually performs a smart cast
In most circumstances, the is operator performs a smart cast. Casting means that the compiler treats a variable as though its type is different to the one that it’s declared as, and smart casting means that the compiler automatically performs the cast on your behalf. The code below, for example, uses the is operator to smart cast the variable named item to a Wolf, so that inside the body of the if condition, the compiler can treat the item variable as though it’s a Wolf:
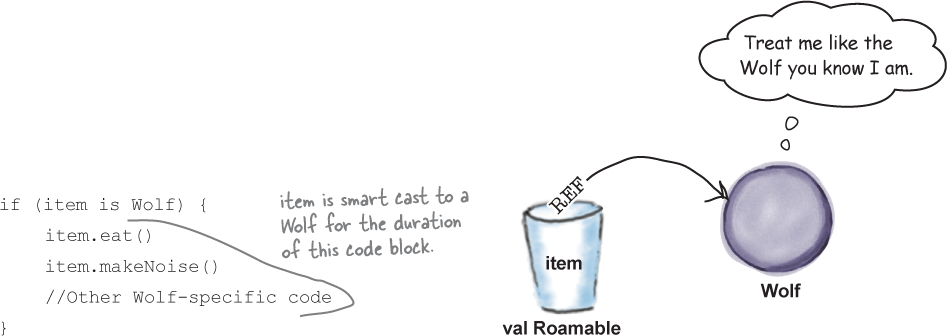
The is operator performs a smart cast whenever the compiler can guarantee that the variable can’t change between checking the object’s type and when it’s used. In the above code, for example, the compiler knows that the item variable can’t be given a reference to a different type of variable in between the call to the is operator, and the Wolf-specific function calls.
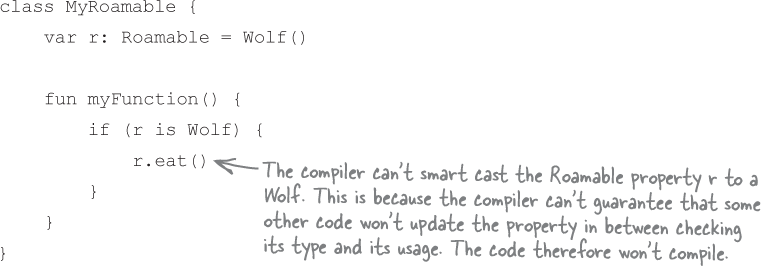
But there are some situations in which smart casting doesn’t happen. The is operator won’t smart cast a var property in a class, for example, because the compiler can’t guarantee that some other code won’t sneak in and update the property. This means that the following code won’t compile because the compiler can’t smart cast the r variable to a Wolf:
So what can you do in this sort of situation?
Use as to perform an explicit cast
If you want to access the behavior of an underlying object but the compiler can’t perform a smart cast, you can explicitly cast the object into the appropriate type.
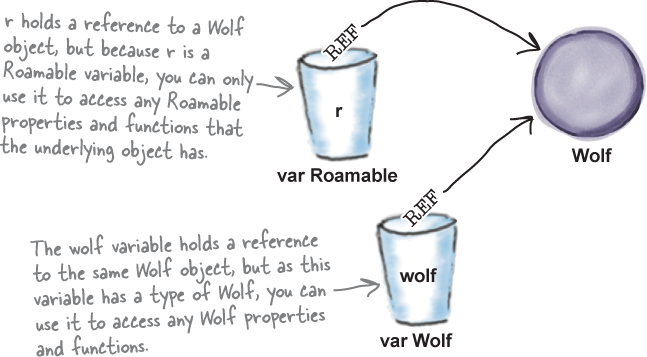
Suppose you’re sure that a Roamable variable named r holds a reference to a Wolf object, and you want to access the object’s Wolf-specific behavior. In this situation, you can use the as operator to copy the reference that’s held in the Roamable variable, and force it into a new Wolf variable. You can then use the Wolf variable to access the Wolf behavior. Here’s the code to do this:

Note that the wolf and r variables each hold a reference to the same Wolf object. But whereas the r variable only knows that the object implements the Roamable interface, the wolf variable knows that the object is actually a Wolf, so it can treat the object like the Wolf it really is:
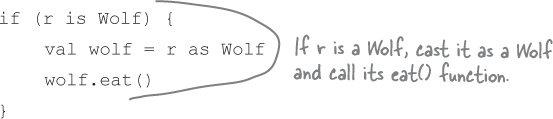
If you’re not sure that the underlying object is a Wolf, you can use the is operator to check before you do the cast using code like this:
So now that you’ve seen how casting (and smart casting) works, let’s update the code in our Animals project.
Update the Animals project
We’ve updated the code in our main function so that it includes an array of Roamable objects. Update your version of the function in file Animals.kt so that it matches ours below (our changes are in bold):
Now that you’ve updated your code, let’s take it for a test drive.
Test drive
Run your code. When the code loops through the roamables array, each item’s roam function is called, but the eat function is only called if the underlying object is an Animal.
The Animal is roaming

The Hippo is eating grass

The Canine is roaming

The Wolf is eating meat

Hooooowl!

Grunt! Grunt!

The Animal is roaming

The Hippo is eating grass

The Canine is roaming

The Wolf is eating meat

The Vehicle is roaming
Your Kotlin Toolbox

You’ve got Chapter 6 under your belt and now you’ve added abstract classes and interfaces to your toolbox.
Note
You can download the full code for the chapter from https://tinyurl.com/HFKotlin.