
Chapter 7. data classes: Dealing with Data

Nobody wants to spend their life reinventing the wheel.
Most applications include classes whose main purpose is to store data, so to make your coding life easier, the Kotlin developers came up with the concept of a data class. Here, you’ll learn how data classes enable you to write code that’s cleaner and more concise than you ever dreamed was possible. You’ll explore the data class utility functions, and discover how to destructure a data object into its component parts. Along the way, you’ll find out how default parameter values can make your code more flexible, and we’ll introduce you to Any, the mother of all superclasses.
== calls a function named equals
As you already know, you can use the == operator to check for equality. Behind the scenes, each time you use the == operator, it calls a function named equals. Every object has an equals function, and the implementation of this function determines how the == operator will behave.
By default, the equals function checks for equality by checking whether two variables hold references to the same underlying object.
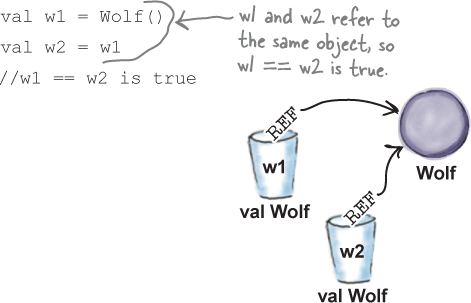
To see how this works, suppose that we have two Wolf variables named w1 and w2. If w1 and w2 hold references to the same Wolf object, comparing them with the == operator will evaluate to true:
If, however, w1 and w2 hold references to separate Wolf objects, comparing them with the == operator will evaluate to false, even if the objects hold identical property values.

As we said earlier, every object that you create automatically includes an equals function. But where does this function come from?
equals is inherited from a superclass named Any
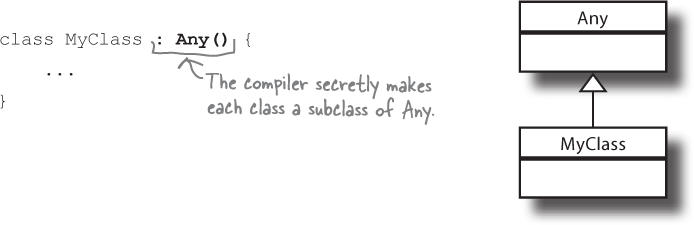
Each object has a function named equals because its class inherits the function from a class named Any. Class Any is the mother of all classes: the ultimate superclass of everything. Every class you define is a subclass of Any without you ever having to say it. So if you write the code for a class named myClass that looks like this:
class MyClass {

     ...

}
Every class is a subclass of the Any class, and inherits its behavior. Every class IS-A type of Any without you having to say so.
behind the scenes, the compiler automatically turns it into this:
The importance of being Any
Having Any as the ultimate superclass has two key benefits:
*
It ensures that every class inherits common behavior.The
Anyclass defines important behavior that the system relies on, and as every class is a subclass ofAny, this behavior is inherited by every object you create. TheAnyclass defines a function namedequals, for example, which means that every object automatically inherits this function.*
It means you can use polymorphism with any object.Every class is a subclass of
Any, so every object you create hasAnyas its ultimate supertype. This means that you can create a function withAnyparameters, or anAnyreturn type, so that it will work with all types of object. It also means that you can create polymorphic arrays to hold objects of any type using code like this:

Let’s take a closer look at the common behavior inherited from the Any class.
The common behavior defined by Any
The Any class defines several functions that are inherited by every class. Here are the ones we care about most, along with an example of its default behavior:
*
equals(any: Any): BooleanTells you if two objects are considered “equal”. By default, it returns
trueif it’s used to test the same object, andfalseif it’s used to test separate objects. Behind the scenes, theequalsfunction gets called each time you use the==operator.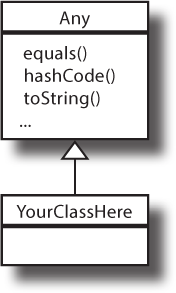

*
hashCode(): IntReturns a hash code value for the object. They’re often used by certain data structures to store and retrieve values more efficiently.

*
toString(): StringReturns a
Stringmessage that represents the object. By default, this is the name of the class and some other number that we rarely care about.val w = Wolf()
println(w.toString())
Wolf@1f32e575
The Any class provides a default implementation for each of the above functions, and these implementations are inherited by every class. They can, however, be overridden if you want to change the default behavior of any of these functions.
By default, the equals function checks whether two objects are the same underlying object.
The equals function defines the behavior of the == operator.
We might want equals to check whether two objects are equivalent
There are some situations in which you might want to change the implementation of the equals function in order to change how the == operator behaves.
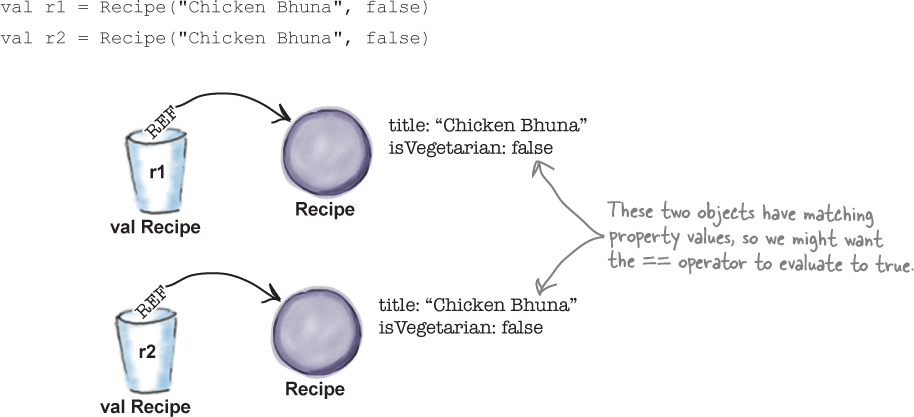
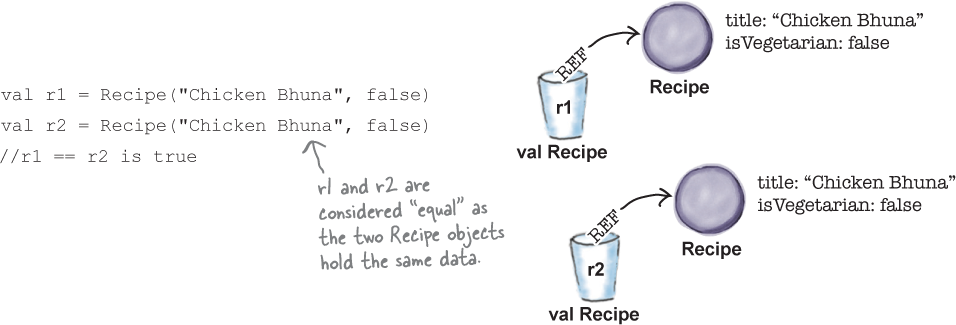
Suppose, for example, that you have a class named Recipe that lets you create objects that hold recipe data. In this situation, you might consider two Recipe objects to be equal (or equivalent) if they hold details of the same recipe. So if the Recipe class is defined as having two properties named title and isVegetarian using code like this:

you might want the == operator to evaluate to true if it’s used to compare two Recipe objects that have matching title and isVegetarian properties:
While you could change the behavior of the == operator by writing extra code to override the equals function, the Kotlin developers came up with a better approach: they came up with the concept of a data class. Let’s find out what one of these is, and how to create one.
A data class lets you create data objects
A data class is one that lets you create objects whose main purpose is to store data. It includes features that are helpful when you’re dealing with data, such as a new implementation of the equals function that checks whether two data objects hold the same property values. This is because if two objects store the same data, they can be considered equal.
You define a data class by prefixing a normal class definition with the data keyword. The following code, for example, changes the Recipe class we created earlier into a data class:

How to create objects from a data class
You create objects from a data class in the same way that you create objects from a normal class: by calling its constructor. The following code, for example, creates a new Recipe data object, and assigns it to a new variable named r1:

val r1 = Recipe("Chicken Bhuna", false)
Data classes automatically override their equals function in order to change the behavior of the == operator so that it checks for object equality based on the values of each object’s properties. If, for example, you create two Recipe objects that hold identical property values, comparing the two objects with the == operator will evaluate to true, because they hold the same data:
In addition to providing a new implementation of the equals function it inherits from the Any superclass, data classes also override the hashCode and toString functions. Let’s take a look at how these are implemented.
Data classes override their inherited behavior
A data class needs its objects to play well with data, so it automatically provides the following implementations for the equals, hashCode and toString functions it inherits from the Any superclass:
The equals function compares property values
When you define a data class, its equals function (and therefore the == operator) continues to return true if it’s used to test the same object. But it also returns true if the objects have identical values for the properties defined in its constructor:
val r1 = Recipe("Chicken Bhuna", false)

val r2 = Recipe("Chicken Bhuna", false)

println(r1.equals(r2))

    true
Data objects are considered equal if their properties hold the same values.
Equal objects return the same hashCode value
If two data objects are considered equal (in other words, they have identical property values), the hashCode function returns the same value for each object:
val r1 = Recipe("Chicken Bhuna", false)

val r2 = Recipe("Chicken Bhuna", false)

println(r1.hashCode())

println(r2.hashCode())

    241131113

    241131113
Note
You can think of a hash code as being like a label on a bucket. Objects that are considered equal are put in the same bucket, and the hash code tells the system where to look for them. Equal objects MUST have the same hash code value as the system depends on this. You’ll find out more about this in Chapter 9.
toString returns the value of each property
Finally, the toString function no longer returns the name of the class followed by a number. Instead, it returns a useful String that contains the value of each property that’s defined in the data class constructor:
val r1 = Recipe("Chicken Bhuna", false)

println(r1.toString())

     Recipe(title=Chicken Bhuna, isVegetarian=false)
In addition to overriding the functions it inherits from the Any superclass, a data class also provides extra features that help you deal with data more effectively, such as the ability to copy a data object. Let’s see how this works.
Copy data objects using the copy function
If you want to create a new copy of a data object, altering some of its properties but leaving the rest intact, you can do so using the copy function. To use, you call the function on the object you want to copy, passing in the names of any properties you wish to alter along with their new values.
Suppose that you have a Recipe object named r1 that’s defined using code like this:

The copy function lets you copy a data object, altering some of its properties. The original object remains intact.
If you wanted to create a copy of the Recipe object, altering the value of its isVegetarian property to true, you could do so using the copy function like so:

It’s like saying “take a copy of r1’s object, change the value of its isVegetarian property to true, and assign the new object to a variable named r2”. It creates a new copy of the object, and leaves the original object intact.
As well as the copy function, data classes also provide a set of functions that allow you to split a data object into its component property values in a process called destructuring. Let’s see how.
Data classes define componentN functions...
When you define a data class, the compiler automatically adds a set of functions to the class that you can use as an alternate way of accessing its object’s property values. These are known as componentN functions, where N represents the number of the property whose value you wish to retrieve (in order of declaration).
To see how componentN functions work, suppose that you have the following Recipe object:

If you wanted to retrieve the value of the object’s first property (its title property), you could do this by calling the object’s component1() function like this:


This does the same thing as the code:
val title = r.title
but it’s more generic. So why is it so useful for a data class to have generic ComponentN functions?
...that let you destructure data objects
Having generic componentN functions is useful as it provides a quick way of splitting a data object into its component property values, or destructuring it.
Suppose, for example, that you wanted to take the property values of a Recipe object, and assign each property value to a separate variable. Instead of using the code:
val title = r.title

val vegetarian = r.isVegetarian
Destructuring a data object splits it into its component parts.
to explicitly process each property in turn, you can use the following code instead:
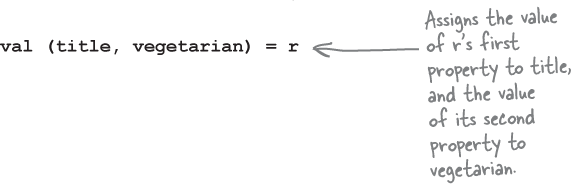

The above code is like saying “create two variables, title and vegetarian, and assign one of r’s property values to each one.” It does the same thing as the code:
val title = r.component1()

val vegetarian = r.component2()
but it’s more concise.

The === operator always lets you check whether two variables refer to the same underlying object.
If you want to check whether two variables refer to the same underlying object, irrespective of their type, you should use the === operator instead of ==. This is because the === operator always evaluates to true if (and only if) the two variables hold a reference to the same underlying object. This means that if, for example, you have two variables named x and y, and the code:
x === y
evaluates to true, then you know that the x and y variables must refer to the same underlying object:

Unlike the == operator, the === operator doesn’t rely on the equals function for its behavior. The === operator always behaves in this way irrespective of the type of class.
Now that you’ve seen how to create and use data classes, let’s create a project for the Recipe code.
== checks for object equivalence.
=== checks for object identity.
Create the Recipes project
Create a new Kotlin project that targets the JVM, and name the project “Recipes”. Then create a new Kotlin file named Recipes.kt by highlighting the src folder, clicking on the File menu and choosing New → Kotlin File/Class. When prompted, name the file “Recipes”, and choose File from the Kind option.
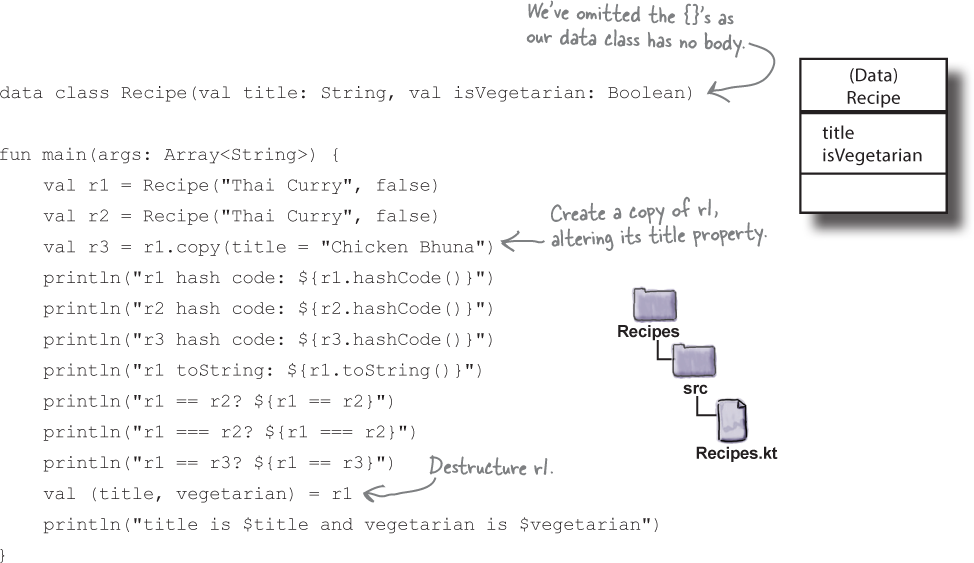
We’ll add a new data class named Recipe to the project, and create some Recipe data objects. Here’s the code—update your version of Recipes.kt to match ours:
Test drive

When you run your code, the following text gets printed in the IDE’s output window:

Generated functions only use properties defined in the constructor
So far, you’ve seen how to define a data class, and add properties to its constructor. The following code, for example, defines a data class named Recipe with properties named title and isVegetarian:
data class Recipe(val title: String, val isVegetarian: Boolean) {

}
Just like any other sort of class, you can also add properties and functions to a data class by including them in the class body. But there’s a Big Catch.
When the compiler generates implementations for data class functions, such as overriding the equals function and creating a copy function, it only includes the properties defined in the primary constructor. So if you add properties to a data class by defining them in the class body, they won’t be included in any of the generated functions.
Suppose, for example, that you add a new mainIngredient property to the Recipe data class body like this:
data class Recipe(val title: String, val isVegetarian: Boolean) {

     var mainIngredient = ""

}

As the mainIngredient property has been defined in the main body of the class instead of the constructor, it’s ignored by functions such as equals. This means that if you create two Recipe objects using code like this:
val r1 = Recipe("Thai curry", false)

r1.mainIngredient = "Chicken"

val r2 = Recipe("Thai curry", false)

r2.mainIngredient = "Duck"

println(r1 == r2) // evaluates to true
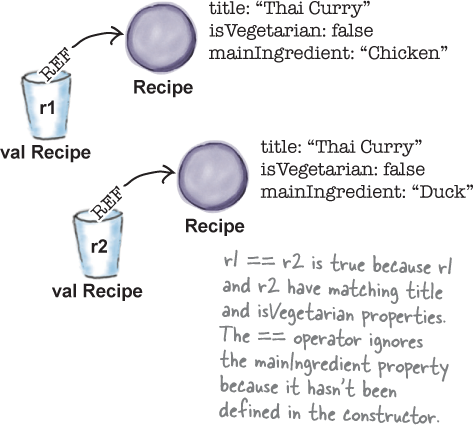
the == operator will only look at the title and isVegetarian properties to determine if the two objects are equal because only these properties have been defined in the data class constructor. If the two objects have different values for the mainIngredient property (as in the above example), the equals function won’t look at this property when considering whether two objects are equal.
But what if your data class has many properties that you want to be included in the functions generated by the data class?
Initializing many properties can lead to cumbersome code
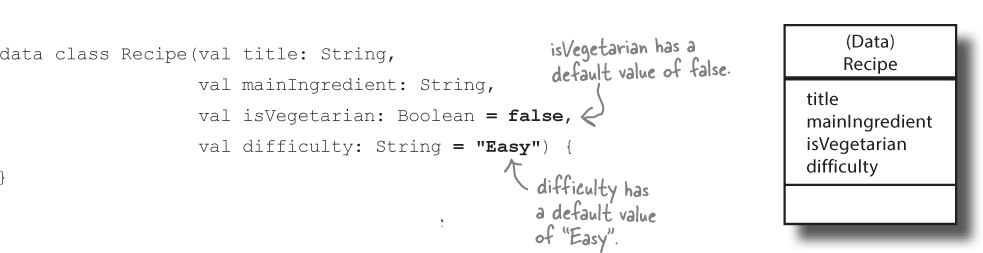
As you’ve just learned, any properties that you want to be included in the functions generated by a data class must be defined in its primary constructor. But if you have many such properties, your code can quickly become unwieldy. Each time you create a new object, you need to specify a value for each of its properties, so if you have a Recipe data class that looks like this:

your code to create a Recipe object will look like this:
val r = Recipe("Thai curry", "Chicken", false, "Easy")
This may not seem too bad if your data class has a small number of properties, but imagine if you needed to specify the values of 10, 20, or even 50 properties each time you needed to create a new object. Your code would quickly become much harder to manage.
So what can you do in this sort of situation?
Every data class must have a primary constructor, which must define at least one parameter. Each parameter must be prefixed with val or var.
Default parameter values to the rescue!
If your constructor defines many properties, you can simplify calls to it by assigning a default value or expression to one or more property definitions in the constructor. Here’s how, for example, you would assign default values to the isVegetarian and difficulty properties in the Recipe class constructor:
Let’s see what difference this makes to the way in which we create new Recipe objects.
How to use a constructor’s default values
When you have a constructor that uses default values, there are two main ways of calling it: by passing values in order of declaration, and by using named arguments. Let’s see how both approaches work.
1. Passing values in order of declaration
This approach is the same as the one you’ve already been using, except that you don’t need to provide values for any arguments that already have default values.
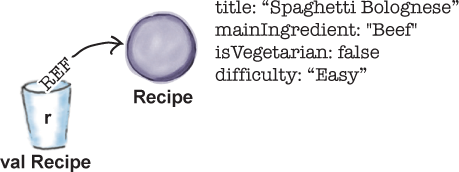
Suppose, for example, that we want to create a Spaghetti Bolognese Recipe object for a recipe that’s not vegetarian and is easy to make. We can create this object by specifying the values of the first two properties in the constructor using the following code:

The above code assigns values of “Spaghetti Bolognese” and “Beef” to the title and mainIngredient properties. It then uses the default values specified in the constructor for the remaining properties.
You can use this approach to override property values if you don’t want to use the default values. If you wanted to create a Recipe object for a vegetarian version of Spaghetti Bolognese, for example, you could use the following:

This assigns values of “Spaghetti Bolognese”, “Tofu” and true to the first three properties defined in the Recipe constructor, and uses the default value of “Easy” for the final difficulty property.
Note that in order to use this approach, you must pass values in the order in which they are declared. You can’t, say, omit the value of the isVegetarian property if you want to override the value of the difficulty property that comes after it. The following code, for example, is invalid:

Now that you’ve seen how passing values in order of declaration works, let’s look at how to use named arguments instead.
2. Using named arguments
Calling a constructor using named arguments lets you explicitly state which property should be assigned which value, without having to stick to the order in which properties are defined.
Suppose, for example, that we want to create a Spaghetti Bolognese Recipe object that specifies the values of the title and mainIngredient properties, just as we did earlier. To do this using named arguments, you would use the following code:
You must pass a value for every argument that doesn’t have a default value assigned to it or your code won’t compile.

The above code assigns values of “Spaghetti Bolognese” and “Beef” to the title and mainIngredient properties. It then uses the default values specified in the constructor for the remaining properties
Note that because we’re using named arguments, the order in which we specify the arguments doesn’t matter. The following code, for example, does the same thing as the code above, and is equally valid:

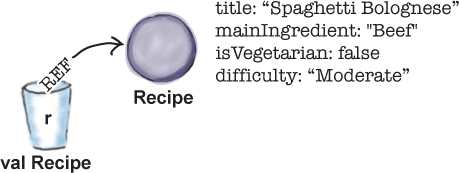
The big advantage of using named arguments is that you only need to include arguments that have no default value, or whose default value you want to override. If you wanted to override the value of the difficulty property, for example, you could do so using code like this:
val r = Recipe(title = "Spaghetti Bolognese",

               mainIngredient = "Beef",

               difficulty = "Moderate")
Using default parameter values and named arguments doesn’t just apply to data class constructors; you can also use them with normal class constructors or functions. We’ll show you how to use default values with functions after a small diversion.
Functions can use default values too
Suppose we have a function named findRecipes that searches for recipes based on a set of criteria:
fun findRecipes(title: String,

                ingredient: String,

                isVegetarian: Boolean,

                difficulty: String) : Array<Recipe> {

   //Code to find recipes

}
Each time we call the function, we must pass it values for all four parameters in order for the code to compile like this:
val recipes = findRecipes("Thai curry", "", false, "")
We can make the function more flexible by assigning each parameter a default value. Doing so means that we no longer have to pass all four values to the function in order for it to compile, only the ones that we want to override:
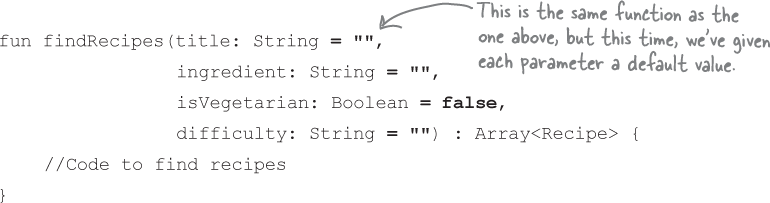
So if we wanted to pass the function a value of “Thai curry” for the title parameter and accept the default values for the rest, we could use the code:

Using default values means that you can write functions that are much more flexible. But there are times when you might want to write a new version of the function instead by overloading it.
Overloading a function
Function overloading is when you have two or more functions with the same name but with different argument lists.
Suppose you have a function named addNumbers that looks like this:
fun addNumbers(a: Int, b: Int) : Int {

    return a + b

}
The function has two Int arguments, so you can only pass Int values to it. If you wanted to use it to add together two Doubles, you would have to convert these values to Ints before passing them to the function.
You can, however, make life much easier for the caller by overloading the function with a version that takes Doubles instead, like so:

This means that if you call the addNumbers function using the code:
An overloaded function is just a different function that happens to have the same function name with different arguments. An overloaded function is NOT the same as an overridden function.
then the system will spot that the parameters 2 and 5 are Ints, and call the Int version of the function. If, however, you call the addNumbers function using:
addNumbers(1.6, 7.3)
then the system will call the Double version of the function instead, as the parameters are both Doubles.
Dos and don’ts for function overloading:
*
The return types can be different.You’re free to change the return type of an overloaded function, so long as the argument lists are different.
*
You can’t change ONLY the return type.If only the return type is different, it’s not a valid overload—the compiler will assume you’re trying to override the function. And even that won’t be legal unless the return type is a subtype of the return type declared in the superclass. To overload a function, you MUST change the argument list, although you can change the return type to anything.
Let’s update the Recipes project
Now that you’ve learned how to use default parameter values and overload functions, let’s update the code in the Recipes project.
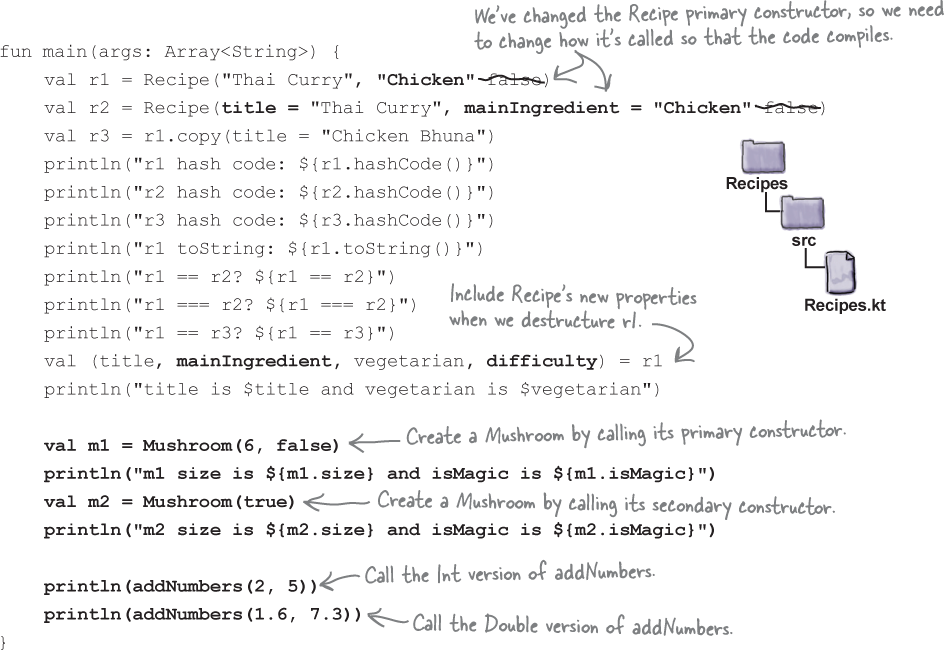
Update your version of the code in file Recipes.kt so that it matches ours below (our changes are in bold):
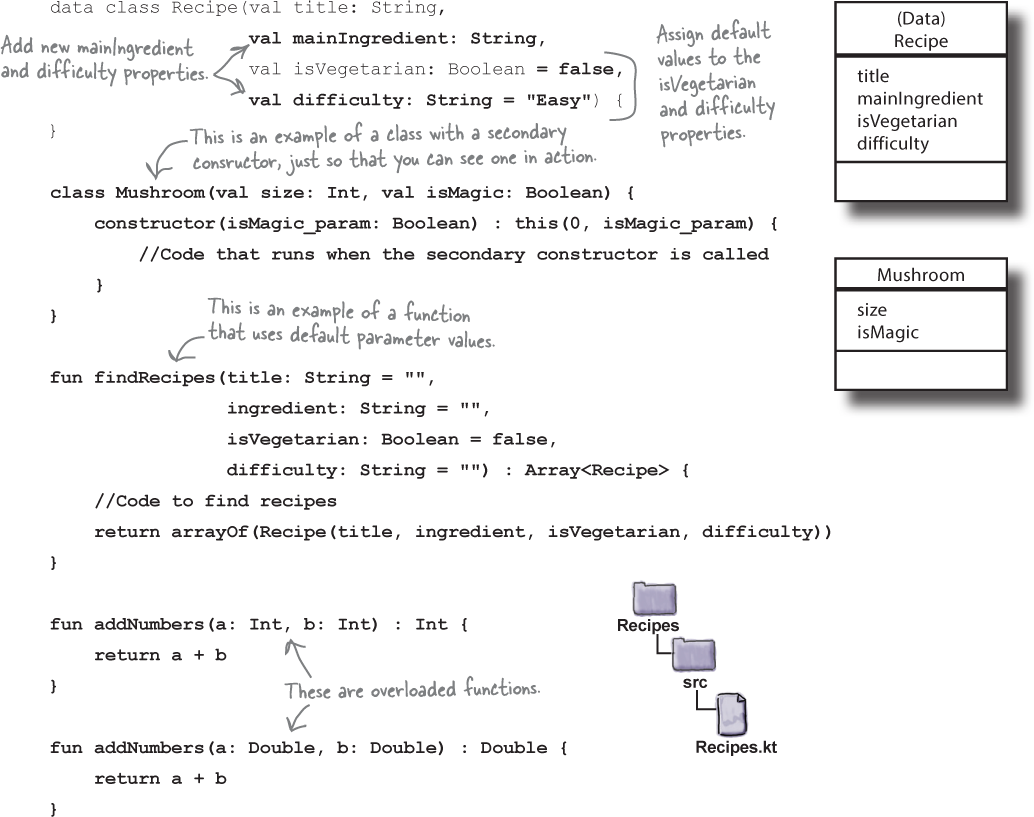
The code continued...
Test drive
When you run your code, the following text gets printed in the IDE’s output window:
r1 hash code: 295805076

r2 hash code: 295805076

r3 hash code: 1459025056

r1 toString: Recipe(title=Thai Curry, mainIngredient=Chicken, isVegetarian=false, difficulty=Easy)

r1 == r2? true

r1 === r2? false

r1 == r3? false

title is Thai Curry and vegetarian is false

m1 size is 6 and isMagic is false

m2 size is 0 and isMagic is true

7

8.9
Your Kotlin Toolbox

You’ve got Chapter 7 under your belt and now you’ve added data classes and default parameter values to your toolbox.
Note
You can download the full code for the chapter from https://tinyurl.com/HFKotlin.