
CHAPTER FIVE
FERMENTATION

At the base level of beer making, a brewer adds yeast to a sugary liquid, and the yeast eats the sugar to create alcohol, ethanol, and flavor. It’s often said that brewers just make wort, and the yeast makes the beer. In many ways, brewers are really just yeast ranchers. The job of the brewer is to create a nutrient-rich environment in which yeast can grow, eat, live, and make more yeast. In return, yeast creates ethanol and CO2 which makes an enormous range of flavors that humans find pleasant. It’s a wonderful, happy relationship.
In some ways, yeast cells are much like grazing animals. Give a few yeast cells an enormous pasture and it will take time for them to consume all the food, or they may never get to it all. There is also a risk from other “grazing” organisms. On the other hand, adding a large amount of yeast cells to a small pasture may mean the yeast cells eat all of the food too quickly—before they have time to settle in and make more yeast.
Most fermentation problems arise from not treating yeast cells well, or not fully understanding their needs and habits. Giving them a balanced environment, the right temperature, and a good, steady (but not overwhelming) food source keeps them happy, and happy yeast makes great beer.
43 | Fermentation hasn’t started |
CAUSE
Wort was too hot when yeast was pitched, wort is too cold and yeast is dormant, or yeast was dead when pitched.
SOLUTION
Yeast is a live organism and should be handled with care. While it can survive a wide array of adverse conditions, the job of the brewer is to create an environment where yeast can thrive.
Wort that has not been properly cooled can be fatal for yeast. If yeast is very cold to begin with, it can even be shocked entering a lukewarm environment. On a brew day yeast should be slowly warmed up, as close to pitching temperature as possible. Wort should be as close as possible to 60°F–70°F (16°C–21°C).
In some climates and conditions, it can be difficult to cool wort to 60°F (16°C) (see Problem 39). Yeast will survive when pitched into wort that is as hot as 90°F (32°C), but in these conditions the yeast may create fusel alcohols or grow unhealthily. It is best to make every effort to cool wort to a good pitching temperature.
If the wort is too cold, yeast may go dormant upon being added. In this case, warming the wort (with a heating pad or even just a warm room), rousing the yeast, should start fermentation.
In some unfortunate situations, through poor shipping conditions, shelf-life management, or just bad luck, the yeast may be dead. In this case, the best option is simply to pitch more yeast as soon as possible.

 Accurate temperature readings are vital in managing fermentation. Remember that the temperature on the outside of the carboy is often several degrees cooler than the liquid in the center.
44 | Fermentation ended earlier than expected |
CAUSE
The yeast that was pitched was insufficient (in quality or quantity), or wort conditions changed, or the yeast went dormant, resulting in wort that has a final gravity higher than expected for the given strain and beer.
SOLUTION
If fermentation was started with a commercial pitch of yeast (a vial or pouch), it’s possible that there was not enough viable yeast for a robust fermentation, either because the gravity of the beer was too high or because there was something wrong with the yeast pitch. Underpitching yeast can mean that the yeast in fermentation will run out of resources to grow and make more yeast before they’ve run through available sugar. Put another way, your fermentation ended early.
To be sure that you have live and viable yeast to ferment the wort you’ve created, it’s always best to start with a yeast starter (see Problem 21). If you have a fermentation that has stopped because of a low pitch rate, the easiest and simplest thing to do is to add more yeast. It can be of the same kind or a different, more attenuative yeast; just be sure that you have an active yeast culture.
If the wort has become very warm for some reason, it is likely that the yeast has died. You may restart fermentation by adding more yeast, but it is likely that off-flavors have been created by fermentation at a warm temperature or from the dead yeast.
If the wort has become too cold, the yeast may have gone dormant. Placing the fermentation in a warmer environment may spontaneously begin fermentation again. In some cases, it may be necessary to rouse the yeast by either carefully shaking or agitating your fermentation vessel.
45 | Fermentation ended quickly |
CAUSE
Though typical fermentations take 4–10 days to complete, under certain conditions the yeast may digest all the sugar available to it in a much shorter amount of time.
SOLUTION
In and of itself, quick fermentation is not a problem and, in fact, it may be a boon. However, rapid full attenuations can be indicative of other problems and should be examined so that those problems can be fully addressed.
Verify that the yeast strain has reached its final attenuation by taking a gravity reading and checking the attenuation percentage range specified by the manufacturer. This information is often listed on the yeast package, but can also be obtained on a manufacturer’s website. If the gravity did not get as low as you expected, a different problem may be present (see Problem 42).
Rapid fermentation is often due to poor temperature control. Most yeast ferments best at a cool room temperature of 68°F (20°C). However, yeast creates its own heat in fermentation and even a small 5-gallon (19 liter) batch of homebrew can rise to an additional 7°F–10°F (4°C–6°C). In an uncontrolled environment, it’s not unusual for a fermentation to reach 80°F–90°F (27°C–32°C). Particularly warm fermentations can result in high ester production (extra fruity flavor), high fusel alcohol production (nail polish, paint thinner, or others—see Problem 88), or even yeast autolysis (soy sauce flavor—see Problem 90). An over-fast fermentation may be indicative of an alcohol-tolerant bacterial infection in fermentation. In this case, the resulting beer may be sour or smell unpleasant. Fortunately, none of these conditions are harmful to the drinker, but it is unlikely the beer will taste as it was designed to.
46 | Fermentation seems to last forever |
CAUSE
Too little or unhealthy yeast was pitched, fermentation temperature is too cold, or a wild yeast infection leads to a fermentation that seems to go on for an extremely long time.
SOLUTION
Take a gravity reading on the beer whether the beer is taking a long time to ferment in general or is fermenting much longer than expected. If the gravity is still high, suggesting that fermentation is slow, check the temperature of the space where fermentation is taking place.
Yeast can create its own heat during fermentation, but if the ambient temperature of the fermentation space is too cold, the wort may cool enough for yeast to go dormant or arrest fermentation. In this case, placing the fermenter in a warm area may easily restart fermentation. You may need to rouse the yeast for this to happen.
If the gravity was still high, and the fermentation environment is a reasonable temperature, then it is likely that the yeast that was pitched was unhealthy or there was not enough of it. In this case, it is best to pitch more of the same yeast to help restart fermentation as soon as possible to avoid contamination.
Finally, if the gravity was much lower than expected but fermentation still appears to be occurring slowly, it’s possible that there is a wild yeast infection. Wild yeasts are often much more efficient fermenters than domesticated saccharomyces strains and may slowly work through all available sugar. The best way to know is to taste: If there are undesirable characteristics—usually harsh phenolics (smoky, plastic, or medicinal flavors) arising from wild yeast contamination—then you may need to consider dumping the batch.

A ring of spent krausen has remained at the end of this fermentation. If the fermentation on a brew seems to be taking forever, there could be a number of reasons for this.
47 | My fermentation smells funny |
CAUSE
Fermentations can off-gas undesirable aromas akin to rotten eggs or burnt matches. Some people find the normal yeast characteristics off-putting when concentrated in gas during fermentation.
SOLUTION
For the most part, fermentation smells a little funny no matter what. Many of the flavors that yeast produce in beer are off-gassed during fermentation due to the extraordinary amount of CO2 that yeast produces during fermentation.
Some Belgian yeasts, Hefeweissen yeasts, and lager yeasts have a strong sulfur smell when fermenting that can be alarming, but is totally normal. On the other hand, there are some aromas that can be warning signs for other problems. Watch out for fermentations that smell like garbage, sewers, or goaty earwax. These can be indicative of the presence of organic acids that are a result of some unpleasant bacterial infections.
Some homebrewers use blow-off buckets rather than airlocks. Unless blow-off buckets are cleaned on a regular basis, they can be the cause of unpleasant aromas, as well. It’s a good idea to keep a blow-off bucket filled with fresh sanitizer. If any yeast or wort blows off the fermentation and into the bucket, replace the water in the bucket. If the water in the bucket is a good place for bacteria to grow, and there is a trail of krausen up the blow-off hose to the beer, there is a small chance that bacteria may use that pathway to contaminate your beer.
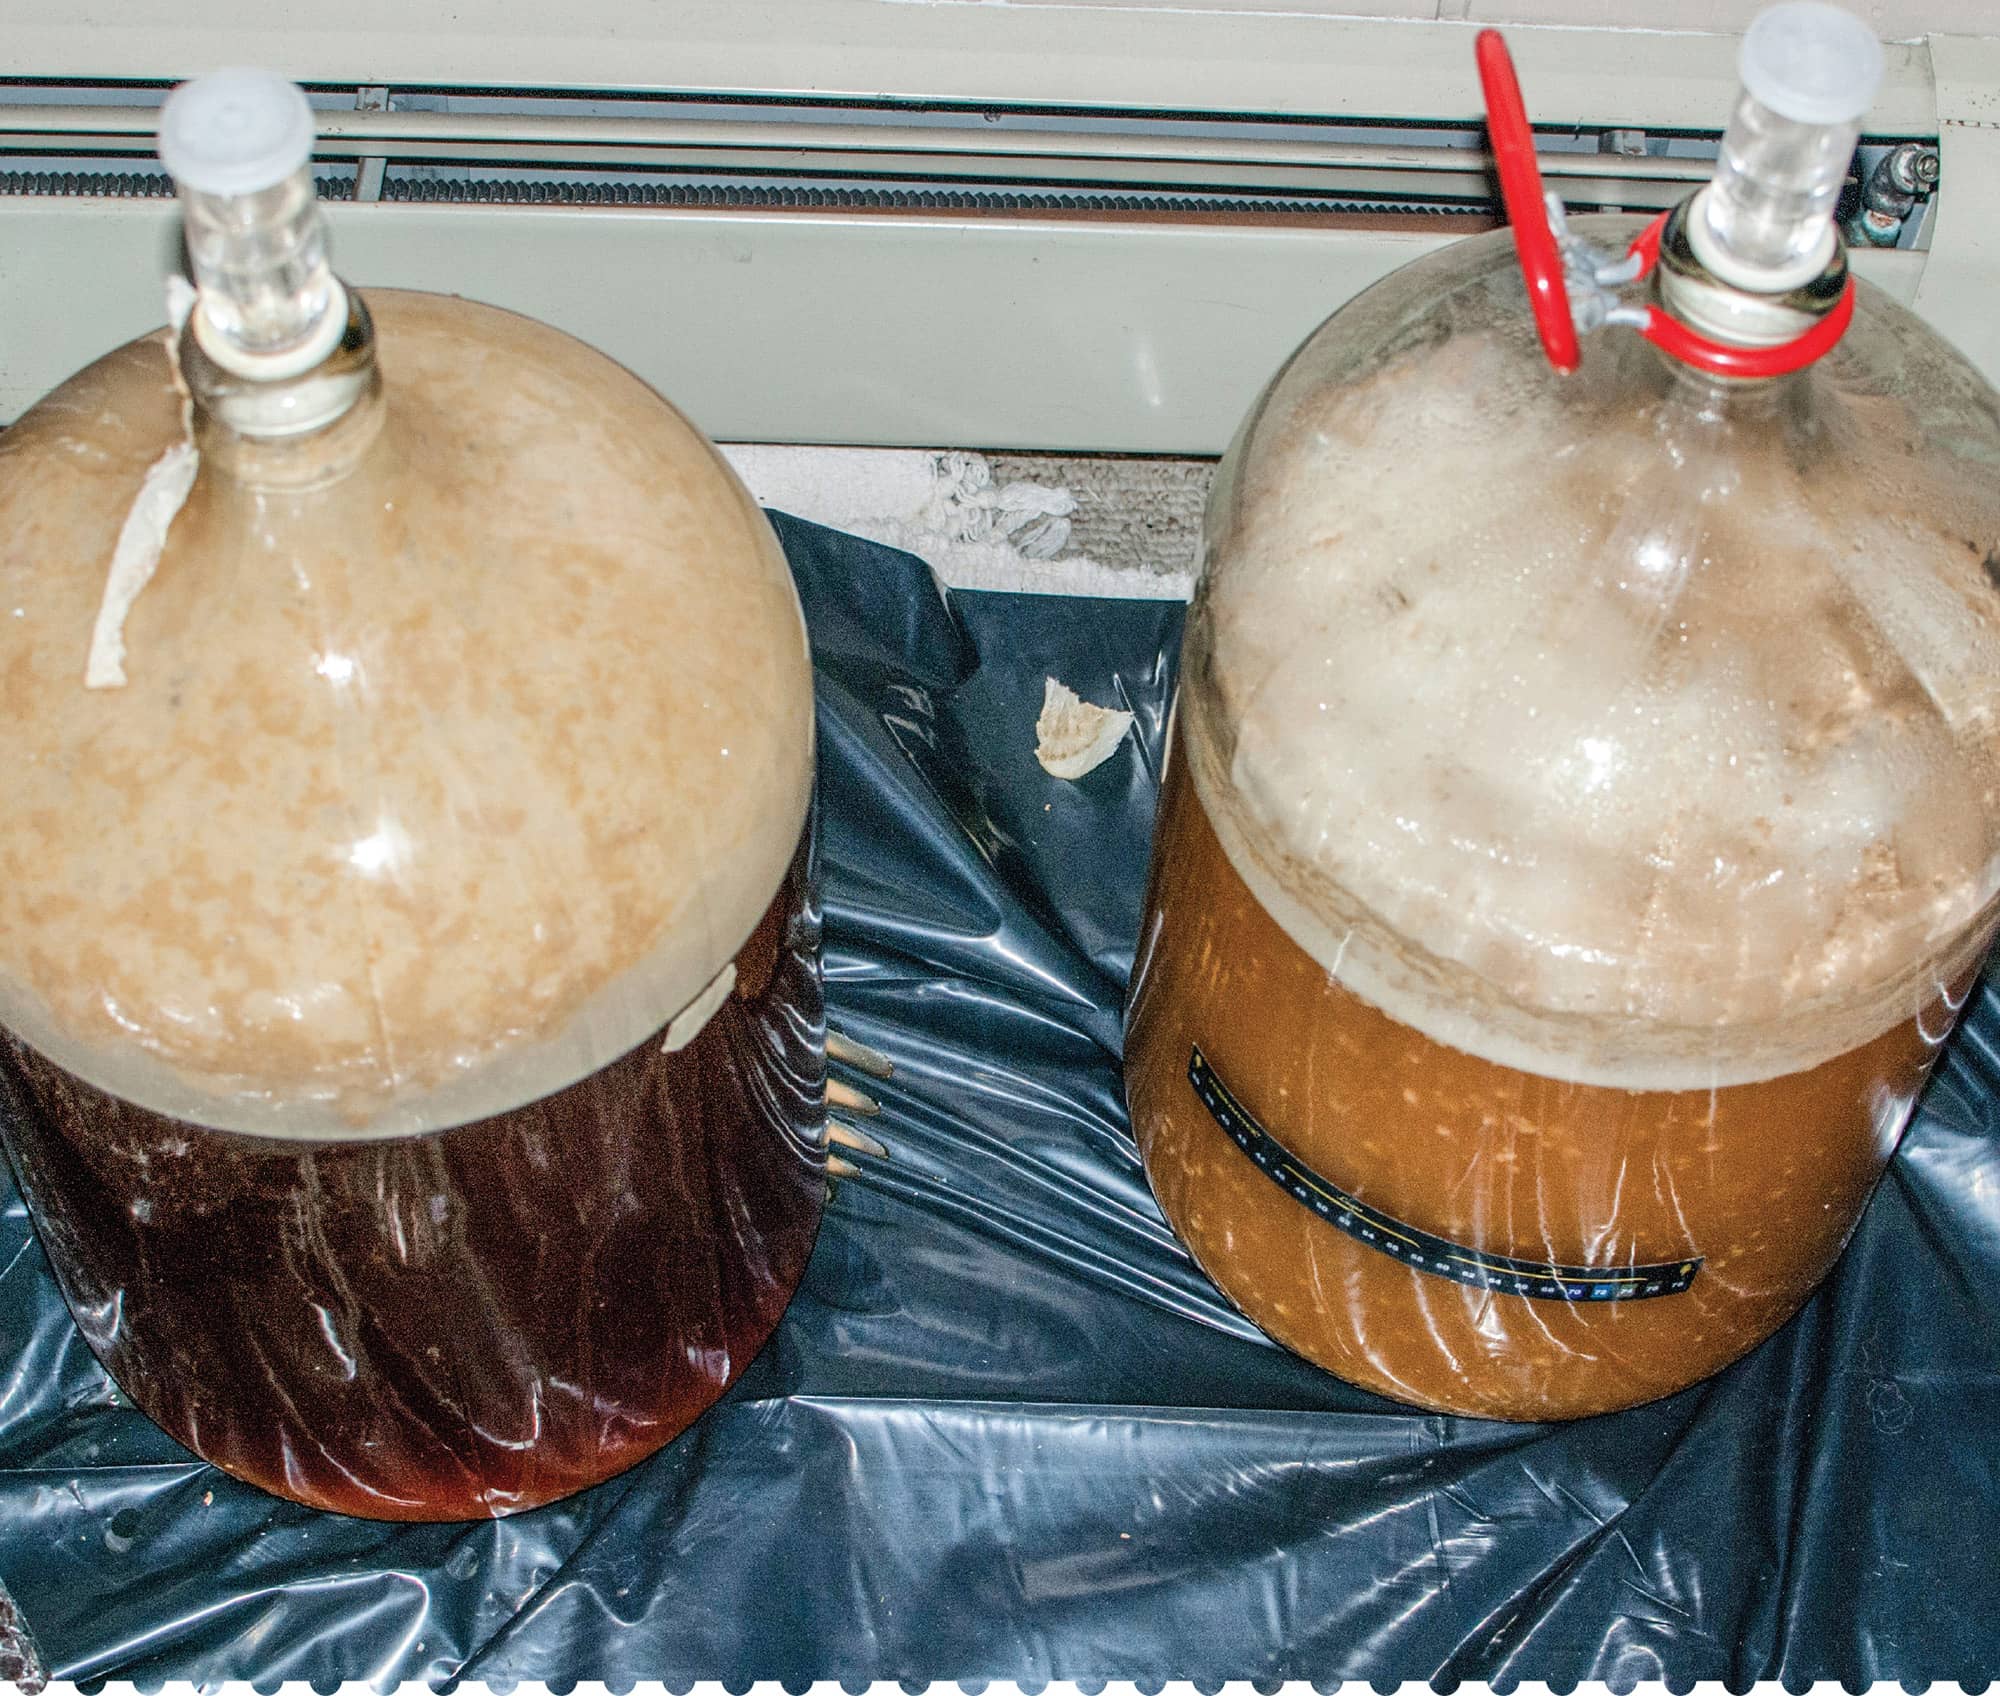
These two carboys each show healthy krausen in the middle of fermentation. The aroma emitted from the airlocks can tell the story of what’s happening inside.
48 | My fermentation has a slimy white film on top |
CAUSE
Particular strains of wild yeast or Brettanomyces may form a white film at the top of a fermentation called a pellicle. Some strains of bacteria may form a ropy slime in fermentation.
SOLUTION
You can either embrace this problem and hope that the flavor characteristics of the wild yeast or bacteria are pleasant, or throw the beer away and start over. If primary fermentation has completed using regular brewing yeast, the wild yeast or bacteria might not be harmful, but the beer may not taste good.
To avoid this issue, it is important to check your equipment for possible contamination. The most likely places for wild yeast or bacterial contamination are inside your fermenter, transfer hose, rubber stopper, airlock, or any piece of equipment that has touched the wort. Before using any of this equipment for another batch of beer, be sure that everything has been fully submersed in cleaning solutions, scrubbed, and thoroughly sanitized. If possible, replace soft plastic or rubber parts.
The other potential source of contamination is post-fermentation additions. These often come in the form of additional flavorings, ingredients, or even hops. Since brewers are often using agricultural products to flavor homebrew, there is a high possibility that these items are contaminated with wild yeast or bacteria, particularly if they are freshly picked or foraged. When using such ingredients in finished beer, it is best to sanitize the ingredients before adding them to a beer, either by pasteurizing them or by soaking them in a no-rinse sanitizing solution.
Freezing ingredients will not kill wild yeast or bacteria. They will merely go dormant until you add them into a nutrient-rich, warm environment, like beer.

The pellicle here can be good news in a purposefully wild fermentation, but could spell disaster to a clean brew.
49 | I’m not sure how to do lager fermentation |
CAUSE
Lagers differ widely from ales during fermentation, due to their temperature restrictions, and have special needs that might not be intuitive to brewers.
SOLUTION
Lager yeast, Saccharomyces Pastorianus, can be finicky and difficult to deal with. The fermentation temperature range of lagers is normally around 50°F–55°F (10°C–13°C). After boil, reduce the temperature of the wort as much as possible. Wort temperatures below 60°F (16°C) are ideal, and lagers need to be fermented in a temperature-controlled chamber to avoid rising above 55°F (13°C).
Lager fermentation can take a long time, and will not produce many of the same visual cues as ale fermentation. Lager yeast does not bind together as well as ale yeast does, so there will not be a large krausen at the top of the liquid where yeast colonies have risen to the top on CO2 bubbles.
As lager fermentation ends, it needs to be given a diacetyl rest. The purpose of this rest is to allow diacetyl to be formed in the liquid and for the yeast to subsequently digest the diacetyl (see Problem 82). A diacetyl rest is usually achieved by allowing the beer to slowly rise to room temperature (shoot for 68°F/20°C) over the course of two to three days at the end of fermentation.
Finally, lagers need to be lagered or “stored” cold. Slowly lower the temperature of the beer to as cold as possible without freezing, then hold the beer at that temperature. Lagering should last 14 days at minimum, and can continue for weeks or months with no detriment to the finished beer, if cleaning and sanitation procedures have been followed.

Most home lagers are made using fermentation chambers built from old refrigerators. With the shelves removed there is plenty of space inside.
50 | The liquid from the airlock got into my beer |
CAUSE
When lifting a plastic bucket or carboy, the sides flex causing a slight vacuum, or as wort cools air inside the fermenter contracts, sucking in the contents of the airlock, creating a contamination risk.
SOLUTION
It can be scary to finish a brew day, put wort in a fermenter, and pick the fermenter up by a handle just to watch the contents of the airlock get sucked into the wort that you painstakingly created. In this case, an ounce of prevention is worth a pound of cure.
Be sure that your airlocks are cleaned and sanitized before each use just like the rest of your brewing equipment. Before placing the airlock on the fermenter, make sure it’s filled with a sterile liquid and, preferably, one that won’t cause damage if it does happen to get sucked back into the fermenter; distilled water or food-grade sanitizers are both good options. Some homebrewers have been known to fill airlocks with cheap vodka, knowing that if it does get sucked back into the fermenter it may add a bit of ethanol but is unlikely to harbor bacteria.
If you haven’t taken these precautions and liquid has been sucked back into your fermenter, it is time to treat your homebrew with special care. Be sure you pitch yeast as quickly as possible and watch fermentation for signs of an infection. In many cases, once yeast is in robust fermentation it will outcompete most bacteria for resources and create ethanol which many bacteria cannot live in.
Be ready for signs of the worst, but hope for the best.

S-curve airlocks are inexpensive and easy to use, but be sure that the liquid inside is sterile or sanitized, just in case something goes wrong.
51 | Fermentation overflowed my fermenter |
CAUSE
Fermentation was particularly active or fermenter was exceptionally full. Krausen overflowed the fermenter and is leaking out.
SOLUTION
It’s always a mixed reaction when a fermentation overflows. On one hand, it’s nice to see strong, robust fermentation. On the other hand, there is a big mess to clean up and it often seems like there is a lot of liquid loss. An overflowed fermentation shouldn’t harm your beer, though cleaning up the mess immediately is the best way to mitigate any potential risk.
The best way to avoid an overflowed fermentation is to leave enough headspace for a robust krausen. In most cases, 25 percent headspace should be enough to do the trick. Still, some yeasts stick together a little better than others and on some high-protein or high-gravity beers there can still be an issue. If you think you may be in danger of an overflowed fermentation, consider using a blow-off tube rather than an airlock, as it is much easier to clean the inside of a blow-off bucket than the outside of a full fermenter.
Finally, your local homebrew store will likely carry anti-foaming agents. These are normally used to stop boil-overs in brewing, but can be used in fermentation as well. Take extra care with them, however. Some do not dissolve into liquid, but rather float at the top of a fermentation. If care is not used when moving beer, the anti-foaming agents may end up concentrated in package. While it is not harmful, it can taste very unpleasant in high doses.

Sometimes an airlock just isn’t enough. The end of a blow-off hose needs to be submerged in liquid so that no gases, bacteria, or mold spores can get back up the hose.
52 | I’m not sure when/how to dry hop |
CAUSE
Dry-hopping is often mentioned in brewing literature and recipes, but it can provoke some questions to homebrewers: when and how do you dry hop?
SOLUTION
If you ask five different brewers how to dry hop, you will have five different answers. There are dozens of methods, none of them totally right or wrong, but across all of them the basics remain the same.
Dry-hopping is the act of putting hops into fermenting or fermented beer to add hop aroma and flavor without increasing bitterness in the beer. The easiest possible way to approach it is just to dump hops into the fermenter after fermentation is complete and let it stand for a couple of days. Rack the beer off the hops and yeast when finished.
A few other methods to consider are:
• Adding hops before fermentation is complete. This allows the yeast to interact with the oils in the hops. Some yeasts can metabolize some hop oils and transform them into pleasant aromatic and flavor compounds.
• Adding hops into a secondary fermenter and then racking them into that fermenter after fermentation is complete.
• Some brewers add hops in stages, adding some hops during fermentation, some after, and even more after that, sometimes chilling the wort before final additions.
In all cases, take care when adding anything into your fermenter. Be sure that everything you’re using has been cleaned and sanitized, as this is an additional infection point. Also bear in mind that all of those hops will absorb some liquid. Each hop addition means a little less finished beer.
Ultimately, the best thing to do is experiment to find the dry-hopping regimen that best suits your tastes.

Whole-leaf hops are seen here floating on top of the liquid in a carboy during secondary fermentation.
53 | I didn’t transfer beer out of primary fermentation |
CAUSE
Busy brewers don’t always get to their fermentations in good time. Finished beer may sit on yeast for long periods. Under poor conditions, yeast may “lyse” (burst) releasing unpleasant flavors.
SOLUTION
First, it should be noted that secondary fermentation is not strictly necessary. It can help clarify beer and in cool conditions can help flavor maturation and shelf stability, but it is a step that can be skipped in many homebrew operations.
Some homebrew literature recommends moving finished beer from yeast as soon as possible to avoid the flavor of yeast autolysis. Autolysis can be best described as yeast death. Under poor conditions, the cell walls of dormant or old yeast can rupture, releasing the contents of the cell into solution and creating a meaty or soy sauce-like characteristic. In homebrew this is rarely a problem.
If you keep your homebrew in a relatively cool, temperature-regulated environment you should be able to leave beer in primary fermentation for weeks to months without worry. Bear in mind that the lighter, more delicate the beer, the more likely it is to develop unwanted off-flavors from sitting on the yeast cake. Keep an eye on your brew. If the yeast just looks like it’s settled out of fermentation, it’s fine. If the yeast begins to change color over time, you may be running into a problem.
If you know you’ll be unable to package or process your beer, but you know that it is finished with fermentation, do your best to keep it in as cool a location as possible (but not frozen). If possible, refrigerate the fermenter. This will help the yeast go dormant and discourage lysing.

Some hobbyists have many brews active at multiple points of fermentation so that they always have something waiting to be finished.
54 | I added fruit and it looks/smells really gross |
CAUSE
Active yeast in the beer has eaten the sugar and extracted color from the fruit naturally, or fruit contained wild yeast or bacteria that has infected the beer.
SOLUTION
When fruit has been added to fermentation, the brewer should not expect the fruit to continue to look pristine throughout the secondary fermentation process. Yeast breaks down cell walls in the fruit, digests fructose, glucose, and other compounds in the flesh of the fruit, and color from the fruit will dissolve into the beer. Fruit may take on a grayish tint, look mushy, and possibly have yeast mixed in with it. By and large, beer with fruit in it smells overwhelmingly like the fruit that was added. Sometimes fruit fermentations have wine-like characteristics.
There should never be anything that looks or smells like mold in the fermentation. If a white film appears on the top of the liquid and/or the fruit, the beer has been infected by a foreign organism that hitched a ride on the fruit into the fermented liquid.
Fruit should be sanitized before being added to finished beer, and it’s important to know that freezing does not sanitize fruit. Many wild yeasts or bacteria will merely go dormant in a freezer and will live on to infect beer. If possible, pasteurize the fruit by heating it up to 140°F (60°C) for 10 minutes, or even by boiling the fruit before putting it into the beer; but understand that heat will change the flavor characteristics of the fruit. If you’d like to add raw fruit, wash it well under water, rinse, and soak in a sanitizing solution before adding it into the fermenter.

Fruits may break down an enormous amount during fermentation as sugars and other components are broken down by yeast.
55 | I need to measure alcohol after adding fruit |
CAUSE
Fruit contains sugar. When added to a fermenter, fermentation will often start up again and while subsequent gravity readings will be accurate, it’s difficult to know what the effect of the additional sugar was on the original gravity of the beer, particularly when fruit is added late in the process.
SOLUTION
Some commercially available fruit purees will provide a measure of the sugar contained in the puree, particularly those available through homebrew suppliers. This measurement is often listed in Brix, which is an alternative measurement of density to specific gravity or plato, and used mostly in winemaking. There are many calculators and charts available to translate Brix to your gravity of choice.
When working with fresh fruit, it can be difficult to know how much sugar is being contributed to the solution. One method is to measure the gravity just before adding fruit, then measuring the gravity immediately after fruit has been mixed in to find a new starting point for that period of fermentation.
Bear in mind, however, that some of the sugar may still be locked away inside the fruit itself. Consider that fruits also contain a large amount of water. It is likely that the addition of water will offset the addition of sugar and that you will not achieve a higher alcohol content than originally planned.

Many professional brewers use a refractometer, as seen here, to measure the density of wort. Refractometers are less commonly used by homebrewers, but if used properly they can be a great tool at home as well as in a brewery.