
CHAPTER 5
What Will You Need?
A DECENT LISTENING SPACE
First, you’ll need basic acoustic treatment in your room.
Yes, most of us start out as bedroom producers and DJs, and it’s not always easy to completely control your listening environment. Most of the time in mashups we are dealing with elements that have been professionally produced, mixed and mastered. This means we have a lot more leeway than if we were performing any of these individual tasks ourselves. But it is still important to try and transform our listening space into some semblance of a professional mixing environment, because we will be dealing with the balance of different sounds.
The first problem with any given room is the problem of early reflections. Sound doesn’t simply exit the speaker cones and travel directly to our ears. When pressure waves are produced they fly off in every direction, bouncing off walls, ceiling, floor and objects in the room.
The loudest—and therefore—most distracting sound reflections come from the closest surfaces to you and the speakers; the walls or windows to the side and the ceiling. Imagine that the walls are a mirror, and that the reflection of the speakers is bouncing right off them. As a secondary reflection reaches your ear a split second after the direct sound from the speaker, it smears the sound information, confusing your sense of clarity and making it difficult to pinpoint the stereo position, tone and loudness of certain sounds (Figure 5.1).
The secondary problem is the frequency response of a room. The problem is that the box shape of most rooms creates problems in the pressure waves of sound. Due to the speed at which sound travels and the dimensions of the room you’re working in, pressure waves will bounce off each wall of the room and come back, passing through each other. For some frequencies this is particularly troublesome, because the wave bounces back to its original position just as the next cycle is leaving the speaker, causing it to encourage each successive cycle. Between each opposing wall, a ‘standing wave’ is created, resulting in a group of bands where pressure waves are pushing opposite each other, causing a cancellation (sound volume drops in this position); and bands where pressure waves coincide and combine (volume boosts in this position). These high and low pressure bands are represented by dark and light areas in Figure 5.2.
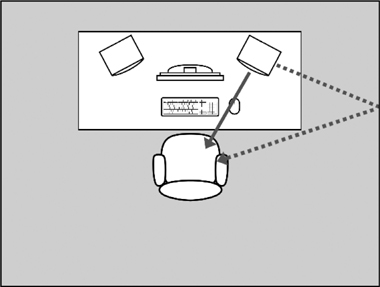
FIGURE 5.1
Direct Sound Battling with Early Reflections

FIGURE 5.2
A Standing Wave Produced by One Single Frequency
But to make this even more difficult to prevent, each frequency of sound behaves differently. Within each frequency, pressure peaks occur at different intervals, and therefore they occur at different points between the walls.
In short, there’s a whole mess of peaks and dips occurring between each parallel surface at different frequencies. Not only that, but standing waves occur between every opposing wall pair, combining with each other, as well as off corners (to a reduced degree). Figure 5.3 demonstrates this, and as you can see the listening position is right in a high-interference zone caused by two surface-pairs combining. These three-dimensional resonance- and dead-spots within the room are called nodes, and the frequency response you hear shifts and changes every time you move your ears through them. Even when your listening position is fixed, this makes balancing and mixing more difficult, because the different frequencies in each sound can be twisted by this frequency response and give you a false sense of each frequency’s volume.

FIGURE 5.3
Room Modes Produced by One Frequency
You can spend thousands and thousands of dollars trying to battle this madness, but for mashups I suggest you just do a basic job and then use headphones to help you fill the gaps. After all, sometimes you will only have access to a laptop and headphones in the hours before a gig.
First comes speaker placement. To ensure a good balance between the left and right side of the stereo field, and a strong centre image, you want to make sure the distances between you, the left speaker and the right speaker are exactly the same. Remember, your speakers don’t have to be very far away. If they’re sitting on your desk, measure the distance between them. Your head and the two speakers should make a nice equilateral triangle. If it’s not, move your listening position or move your speakers, even if they need to go off the desk—on speaker stands.
Also make sure the tweeters on the speaker cones are around ear height, and that the cones are pointing directly at you. Higher frequencies move in a much tighter cone as they project out from the speakers, whereas bass diffuses and spreads out in all directions, so you need to make sure the tweeters are pointing somewhere they will be heard.
Step two, make sure that if the speakers are sitting on anything, including your desk, they are not sending vibrations down into the object. Your speakers will turn your desk into a soundboard, like a guitar, and the desk will resonate with certain frequencies, causing some to ring out and taint your perception of the frequency response of the speakers even further. If you’re on a low budget, even the local phone book under each monitor will make some dint on the vibrations, but foam specially designed for it is better. Search for ‘monitor pads’ or ‘studio pads’.
Step three—the battle against early reflections. To set up a very basic acoustic treatment setup, look for a local DJ specialty or audio equipment store near you. If you don’t have one, look online for what you need. Grab yourself around six 24x24 inch acoustic panels (or get smaller ones but more of them, to place together in the most important spots). These foam panels absorb some of the sound, mostly medium to high frequencies, and reduce how much of it comes back at you off the wall.
Some cheaper brands include Wave Panels, Foamily, as well as many smaller non-brand stores on eBay or Amazon. If you’ve got more money to spend and are thinking about producing in the future, consider investing in better absorption from brands such as Primacoustic, Auralex and GIK Acoustics.
Have someone help you by sliding a mirror dead against the side walls until you can see a reflection of one of the speakers. Get them to mark the spot with some tape or reusable adhesive and continue looking for the reflection of the other speaker, before moving on to the next wall/ceiling. In a regular box shaped room you should end up with two on your front wall, two on the left wall, two on the right wall, and two on the ceiling. Each pair may be close together and only require one acoustic panel to cover it.
Fasten the panels to the walls however you can. A good bet if you’re renting—or even if you’re not—is to use rent-safe adhesive stickers that you can find in your local hardware store. Use them to stick the lightweight panels to your walls, and there will be no damage when you take them off later. Depending on the density of the foam, you may need to PVC glue some cardboard strips onto the back of the foam panels, let them dry overnight, and then attach the stickers to the cardboard for a better adhesive bond. Also, and I know it’s difficult … try to do the ceiling panels if you can!
Next up, the most difficult part of all—taming those bottom end frequency problems caused by the room modes. A couple of well-placed bass-traps can work magic here, but unless you are also a producer, they’re a bit expensive for the level of detail you need for mashups. I’d suggest placing some thick heavy objects toward the back of the room, leaving a gap of about a foot from the wall. Perfect objects to use include thick mattresses, a bookcase full of pillows (or even just books, they absorb remarkably well) or thick curtain. If you can, place a mattress standing up in each corner behind the speakers as well. Figure 5.4 is an example of the kind of setup you’re looking for, though obviously you’ll need to adjust depending on where your door is.
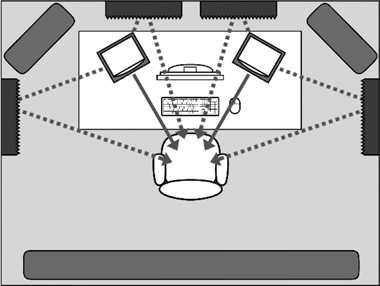
FIGURE 5.4
A Simple Acoustic Treatment Based on the Steps in This Chapter
EQUIPMENT
What equipment is required to make mashups? Here’s what you need.
• A computer
Presumably, you already use one to access your DJ collection. You don’t require huge amounts of RAM or CPU power. Most of the time Ableton will only be running a few pieces of audio at a time, with minimal effects processors working. Most laptops will be fine, so long as you have enough hard drive storage for all your music, acapellas, sessions and sample collection. Whether you use Windows or Mac is not important, Ableton Live runs on both operating systems, as do most third-party plugins you will ever need to use, and DJ playlist programs. Obviously, if possible, make your mashups on the same computer as where you keep your DJ music collection, because you will constantly need access to all of your music while creating.
• If possible, you need a decent pair of speakers
Sadly, the one area where you can’t really go extreme low-budget is your studio monitors (or speakers). The desktop speakers that come with your computer are not an option! If you don’t have a big budget, try to save up and invest in some entry-level studio monitors from brands such as KRK, M-Audio, Mackie, Behringer or Genelec. The reason they need to be at least studio monitor quality is to ensure you’re getting a somewhat reliable frequency response and a realistic idea of what your mashups will sound like in the club. You need to be able to make choices regarding volume balances and transitions with accuracy. The tell-tale sign that something is wrong in your monitoring setup is when you play something out and the balance between two elements or the volume of an effect sounds totally different to how you thought it did in your listening environment. This can also be a problem with the acoustics—remember, no matter how good your speakers are, a room that does not have at least a basic treatment will produce an uneven frequency response.
• A decent pair of headphones
Anything you’d generally use for music production is great, but even a pair of DJ headphones will do the job. Don’t use cheap headphones such as iPod earbuds because you will struggle very hard to get your volume and equalisation settings right, particularly in the bass frequencies. Try to do most of your work on speakers, primarily using headphones to listen for clicks, pops and other audio glitches you might have unknowingly created while editing audio. You can also use your headphones as a backup when problematic frequencies in your room make you doubt a volume or equalisation choice you have made.
Although I trust the sound that comes out of proper studio headphones a lot more (my favourite model is the Sennheiser HD 650), I have produced a lot of my mashups on the road with the headphones I use for DJing with very few problems. I wouldn’t mix a song using them, but I’ll happily make a mashup with them if I have no alternative. Just remember that in order to block out the outside sound, DJ and sound recordist headphones have closed cups, which makes it hard for the cone to move large distances, reducing their ability to reproduce low frequencies accurately. Try and check your low frequency decisions on speakers or open-back (studio-style) headphones.
• A decent audio interface
Though many amateur music creators stand proudly by the on-board audio that comes with their Apple MacBook, it’s worth considering investing in a decent, if modest, audio interface. Though the audio that comes built in to modern computer motherboards and laptops is, admittedly, becoming more and more high-quality, you don’t want it to be the weak link, particularly when it is easier and cheaper to improve than your acoustics or speakers.
The audio interface assists the computer in running the audio, as well as performing a better digital to analogue conversion than many computer sound-cards or motherboards. As a result, you get a cleaner signal, a more accurate recreation of the audio, and an output without a tainted frequency response. It is also better at handling the requirements of studio-quality headphones, which have a high electrical impedance, something computers are generally illequipped to handle. Unless you plan on getting into writing and producing music, a reasonably budget device should suffice. An easily accessible volume control is also very handy, if you can find a unit with one on it. I will say though, I’ve had to finish mashups on the road with no audio device available, and the on-board audio was enough to get the job done. If you plan to pretty much never be in your studio, you could skip this if you really need to. If you have put a fair bit of time into your room and have bought decent speakers, but you still notice that the frequency response between home and the club seems way off, a sub-standard digital to analogue converter may be your problem.
Jump online and have a look at what the best budget audio interfaces are in the current market. Presonus, Novation, Focusrite, M-Audio and Audient all provide reasonably good models for under $250 USD.
• Mouse
If you’re producing on a laptop, I recommend you use a mouse, even bringing it along on the road. I’ve seen some producers use their touchpads, and while they have my undying respect for being able to do so, I could never make mashup creation so awkward for myself! You need to be able to work quickly and execute decisions with accuracy, and I believe having a mouse seriously outshines a touchpad in this respect. Not only in Live, but even navigating your explorer/finder windows and skipping through music. The fewer obstacles that sit between your brain and an action being completed on your computer, the better.
• Ableton Live
This one is obvious. There are a few versions of Live available, and I will go into detail in the next chapter.