
CHAPTER 10
House-keeping
Hopefully by now you have had a go at your first mashup using the guidelines in the previous chapters! If not, it would be a great idea to go and make your first batch now, and re-read individual techniques each time you use one for the first time. As you make more mashups you will get better and faster at picking the right techniques to help you solve different problems. You’ll likely come up with your own techniques and shortcuts to getting your elements to fit together too. Now I’d like to share some ideas on how you can get even faster and more efficient as you continue to build up a collection of successful mashup ideas.
Keeping organised may seem annoying now, but trust me, when you’ve got a gig on the next day and you need to come up with some new material, being organised is going to help you create a batch of good quality mashups incredibly fast.
BECOMING FASTER AND MORE EFFICIENT
Watching my mate Andy J using a template he created in Ableton was great. He had every kind of chop up effect, EQ, compressor, etc. ready to go. Once the tracks are chosen, a good mashup should take no more than 15 minutes MAX to do.
(Ivan Gough, DJ/Producer)
Doing a lot of mashups allows you to have more in your repertoire than everyone else. It’s going to help you get more gigs. I have to play so many different styles of music, and so many different venues that I need to have a very high output.
(Phil Ross, Commercial DJ)
The whole idea behind being as organised as you can is to cut down the time it takes to come up with a group of great ideas, to ensure that you already have everything you need when you need it, and finally to make it easier for you to produce them in a very short space of time. The quicker you work, the more confident your choices of technique will be, and it will keep you from getting lost in what you are working on. It also increases your output, and therefore your musical options at gigs, making you a more flexible DJ.
QUICK RE-CAP ON ORGANISATION
Let’s pretend for now that you have just finished a batch of mashups. Here’s what you can do to stay organised and make things faster in the future.
1. Clear your Mashup Sessions folder
2. Update your Mashup Keys list
3. Clear your Current Mashup Ideas list
4. Update your Classics/Musical Hooks folder.
First, let’s go over the folder system you set up in the chapter about preparing for mashups.
Each time you finish and export a mashup, make sure Ableton Live is closed and move the session folder for that particular mashup into your ‘old’ subfolder. At first this may seem a little pointless, but once you have a collection of 20 finished mashups, it’s going to be impossible for you to remember which ones you are working on and which ones are finished. If every finished mashup is neatly hidden away in your ‘old’ folder, you won’t get confused and misplace anything.
After finishing a batch of mashups, figure out if there are any elements you want to keep track of for future mashups. You may have used a particular classic song for the first time, or a new dance track that you believe will be a big hit for a long time, and want it to appear on your Mashup Key list next time you’re looking for ideas. Go ahead and update your list. Just remember to list your vocals in the ‘Acapella’ section and the musical ideas in the ‘Riffs/Breaks’ section to make sure you are reminded about the right elements at the right time. You’ll find that if you make sure you add every relevant song into this Mashup Key list that your list will build up very quickly, and soon you’ll have so many ideas to choose from that you’ll never miss a great mashup opportunity.
Next, clear your Current Mashup Ideas list of all the ideas you have finished or no longer plan to work on. You could also think of this as your to-do list. As well as clearing the list, you clear your brain by knowing there’s nothing left waiting for you to do. This is important, as you need to be able to depend on this list to accurately keep track of your many mashup ideas, and by their very nature, too many mashup ideas are hard to hold in the imagination. Keeping this list neat and current allows you to depend on it more, keeping your mind free to focus on one project at a time.
Lastly, update your Classics/Musical Hooks folder. Add in whatever you feel will be useful in the future. As well as just keeping full copies of old classic tracks, I often export the specific part I used in a mashup and put it in the folder, because I know that’s the exact part I’m going to use next time. Sometimes I have a classic riff that I had to do a lot of careful editing or Warping on to get it to fit into a dance music tempo, and I’ll export this so that I don’t have to go through the process again next time. Put in anything that will save you time in the future.
USING YOUR OLD MASHUPS AS INSPIRATION
During the stage where you are creating your mashup ideas list by matching together songs by key, try also looking at your finished mashups for inspiration. If you are looking at your Mashup Keys list and feeling like none of the vocal ideas are special enough to use, go into your music collection and search for mashups in the right key. You’ll often find good ideas that don’t necessarily appear in your Mashup Key list. This is one of the reasons it is important to put key information in the title of your finished mashup. Sometimes this will be incredibly useful because a single mashup may have more than one element you’d like to use. This brings us to the next topic.
COMING BACK TO YOUR PREVIOUS IDEAS
At some point you are going to want to re-use a classic breakdown or a featured acapella in a new mashup idea. The above house-keeping tips create a great foundation for you here, allowing you to take your pre-edited elements and put them in new projects, meaning that making new mashups will only take a fraction of the time.
Let’s say for this example that you’ve got a previous mashup that uses a main track and a breakdown track. The element you want to re-use is the breakdown. You’ve already done all this work searching for it, importing it, editing it down into its most well-known parts, and you’ve Warped it to be compatible with dance music tempo. Rather than making a whole new mashup from scratch, the easier approach is to go into your old session and simply swap the old main track for the new one.
You can follow these steps to get started quickly.
Go into your ‘old’ session and find the old project. Move the folder out of the ‘old’ folder and back up into the main directory, to remind you that it is an active session again. Open up the session in Live.
As you look at the Arrangement area, you’ll be reminded of what you originally used in the mashup. Let’s say it looks like the one in Figure 10.1.
The first thing you should do is go to File > Save Live Set As and save it as a new project file. Do this right away so that you don’t overwrite your previous mashup. Then take a look at the session. In this example we have a main track, a breakdown track, some effects and ‘hinting’ loops.
Think about whether you want to keep your effects. Usually they are in there because some part of the breakdown track or transitions needed help being energetic and exciting, so while it’s usually a good idea to leave them in at first, you should come back later and check whether they’re still necessary. In this example we will just mute the main track (most easily done by simply muting the Audio Track rather than the individual clips).
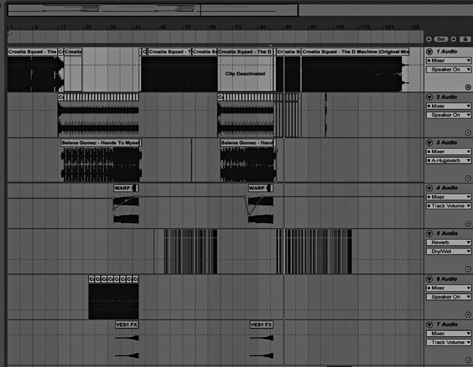
FIGURE 10.1
Returning to a Previous Mashup to Harvest an Element
Screenshot Appears Courtesy of Ableton
Now we drag an empty Audio Track up from the bottom of the session and place it just above the main track. Do this by grabbing it by the title (for example ‘11 Audio’). Drop your new main track on the empty track, but place the song right at the end of the timeline, after the mashup. This is because we need to listen to it on its own and determine how its arrangement is different from the old main track. It may have longer or shorter breakdowns, drops or transitions. You may have to make the whole mashup a little longer or shorter, possibly removing a breakdown or even repeating the same ‘drop’ section in your main track to fit the new arrangement.
So go ahead and find the new element’s starting point and set up the Warp markers as per usual. Remember that if your new main track is a different BPM, it’s better to change the BPM for the whole session to match it, rather than Warping your main track. If the new track is a semitone up or down from the old one, perform any key changes you need to, preferably to the breakdown elements.
If you need to make extensions or reductions to the space you have allowed for drops, you will need to duplicate or cut entire sections of 8 across the whole mashup to fit your new drop sections in. If so, select a section of eight bars and use Duplicate Time or Delete Time under the Edit menu.
Figure 10.2 shows a new ‘main track’ element (on the top-most Audio Track) sliced up into the desired parts and ready to replace the old element.
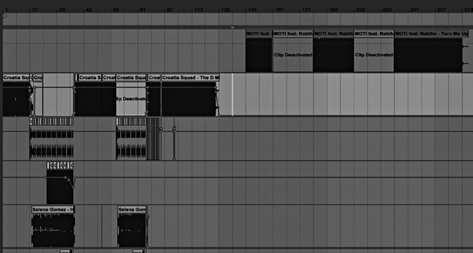
FIGURE 10.2
A New ‘Main Track’ Standing By
Screenshot Appears Courtesy of Ableton
Once you’ve decided on your arrangement and made sure the old mashup sections are the right lengths to fit it, create splits (CTRL+E Win, CMD+E Mac) in your new track and move the sections you want into the timeline of the mashup, lining them up with the old main track. Pay special attention to any volume, filter, low-shelf and Send automation used on the old track and be sure to re-make it on the new track. Remember that the new song will be sonically different and will require subtly different automation, so re-create it with the help of your ears rather than simply copying the automation across.
See the example mashup in Figure 10.3, which has a new main track inserted. Small changes needed to be made in the arrangement and the automation to make the new element fit, but most of the hard work was done in the original session.

FIGURE 10.3
The Reinvented Mashup with a New ‘Main Track’
Screenshot Appears Courtesy of Ableton
This is a very quick way to come up with the foundation for your new mashup. From here, have a careful listen through from start to finish and listen out for anything that has not translated well. Take special notice of bad transitions, too many or too few effects, and important moments that no longer work. Do what you have to do to make your new idea work, and create any new moments in the context of the new main track.
This method is incredibly efficient if you want to re-use more than one element from an old mashup. For example, if you have an old mashup with a main track, a breakdown track, an acapella and a group of effects and builds, but the only thing you want to replace is the main track, think of how much time you are saving yourself by following the above steps as opposed to re-creating the whole mashup.
INTROS AND SET-BREAKERS
Once you have mastered the art of mashup creation, you can use the techniques you have learned to create other useful DJ tools. Think of some interesting ways to kick off your DJ set; such as beginning with a classic track, a huge drum build-up with an acapella over it, attention-grabbing sound effects or mood-setting synth pads.
There are any number of exciting ways you can start things off before you get the audience in the groove of a regular dance tempo, and you don’t need to be a full-scale producer to create them. For some DJs, a set intro is about giving themselves time to address the crowd on the microphone without any vocal playing underneath. For others, it is about ‘resetting’ the dance floor vibe so that they can rebuild it in their own way. For others still, it is about directing attention to the booth as they take over the decks, or creating a memorable beginning to their set. Some begin big festival sets with an almost cinematic introduction, whilst producer/DJs often play a special introduction version of their biggest song.
You already have all the ingredients. You can use drum builds from longer, sparser tracks. You can also add your own drum builds and upsweep effects from your samples folder. You can use modern or classic tracks from your mashup folders. You can use well-known acapellas, vocal chants and loops from your acapella folders. Essentially a set intro is simply a short mashup that has a high building energy and doesn’t have an ending.
Think of a few different styles of gig you are likely to play at and come up with a few varied intros to suit them. Some can be short, some can be drawn out. Some may require you to stop the previous DJ’s final song by filtering or fading out, others can be mixed into smoothly. The great thing about having multiple set intros to choose from is that you can read the crowd before you go on and begin your set in a way that makes sense. Try to have your intros build for at least one and a half minutes so that you always have time to mix into your first track, no matter what.
Finally, don’t be afraid to use the same tool to break up your DJ set. An ‘intro-style’ track can be a great way to take your set from one energy level to another, or to bring dancers out of their own little world to refocus them on what you are doing on the decks. You can create similar tracks to the above, only with a dedicated intro so that you can mix into them. Then they can drop into effects, slow down or reset the vibe however you want.