

Data protection
Data protection is a high priority for most enterprise-class data services. It is not only critical to business continuance, but critical to the protection of corporate intellectual property and general business value to its consumers. Clearly data protection is equal to business protection and IBM Scale Out Network Attached Storage (SONAS) is not exempt from
that requirement.
that requirement.
Also, consider the fact that data protection gets more complex on a larger scale, so the bigger the data, the more expensive and complicated it is to protect efficiently. This is true with all data, large files, and small files. The more you have, the better you need to plan for its protection.
This chapter describes the following topics:
A well-planned (preferred practice) replication requires that all services and clients are ready to go from the second site when disaster strikes the primary site, and that all the backup site or secondary site resources are all sized appropriately for managing failover workloads, bandwidth, and capacity requirements.
Services, such as domain name server (DNS) and domain controllers, must be robust and reliable enough to handle all failover traffic. Network and staffing tables should be ready to take over new demands.
Finally, the more protocols you offer for data access, the more complex it becomes to protect.
The IBM Redbooks publication IBM SONAS Implementation Guide, SG24-7962 discusses the various concepts of data protection and how to install, configure, and manage this data protection service in accordance with known preferred practices. This publication describes the preferred practices considerations of these requirements, how they should and should not be implemented, and topics that you might consider obtaining expertise in to serve a preferred practice approach.
Remember, as you read this chapter, that a preferred practice for SONAS service has some form of data protection scenario locally (snapshots and backup), plus remote data replication (such as asynchronous replication) for disaster recovery (DR).
7.1 Cluster security
Cluster security is a critical point of concern for most clients who are preparing to engage in a Scale out NAS solution. This chapter introduces common topics that are related to cluster security and how you can best position your security efforts for a SONAS or IBM Storwize V7000 Unified cluster solution. For information about the preferred practice network and network port security topics that are related to SONAS, see Chapter 3, “Networking” on page 71.
These are several things to consider for protection of SONAS or Storwize V7000 Unified. This chapter explains preferred practices for these protection considerations.
7.1.1 Protection of the cluster service
This section describes several aspects of protecting the cluster service:
•Hardware security:
– The SONAS hardware can be a point of vulnerability if access to the SONAS cluster hardware is not controlled. Typically, this concern is answered by having SONAS in a controlled access facility (such as a secure data center) where conditioned, redundant power and cooling can be provided and monitored to the SONAS hardware, and power, temperature, and access is controlled.
– Guests and service agents are monitored and tracked, and ideally physical access to service hardware is strictly controlled.
•Code Security:
– Code must not be modified by the administrators unless instructed by IBM development through support escalation, and access to code level changes should only be administered by requirement if SONAS development or support agents mandate and supervise the changes. It can also be modified at the direction and guidance of a service engagement professional, where all changes are recorded in a problem management record (PMR) or Code Defect for explicit tracking.
– Administrative accounts should only be given by and to qualified administrators and all levels of service administrators should be properly trained on SONAS use of command-line interface (CLI) or graphical user interface (GUI) and be officially aware of cluster management policies in accordance with their user account privilege level.
Administrators should avoid using a general Admin account to ensure that changes are tracked by the user, and the general Admin account should be protected by a staff integrity managed process.
– When root-level access is given to an account, it is important that access is controlled (this topic is further described later in the Privileged User Access Control bullet). For example, the root password can be changed with the chrootpwd command for a specific maintenance requirement. Then it can be changed back and the password can be protected by a management-sealed process. This process ensures that privileged anonymous access is only used for a specific or planned purpose.
– Remote access should be controlled by firewall, controlling port, and Internet Protocol (IP) access to the SONAS management IP and Service IP addresses to the clusters.
•Node configuration security:
– Node configuration, logs, and events are managed and protected by configuration files and service logs. A node can be reimaged from the Trivial File Transfer Protocol (TFTP) boot server image in the management node, but the vital product data and configuration files on the node are protected by a node-backup process.
– The command cndumps (service dumps) should be run occasionally or regularly (such as monthly) to capture cluster configuration and log changes, and those cndumps should be stored off cluster to a central protected log repository.
– It is important that the management node runs a backupmanagmentnode task from cron regularly, and stores the backup information on the secondary management node, and possibly a third node for safekeeping. This task is thoroughly explained in the IBM SONAS Implementation Guide, SG24-7962 IBM Redbooks publication. As a part of preferred practice, it is important to validate that the task is active and successfully completing (note that this task is automatically run in SONAS clusters today).
– The backupmanagementnode command makes a backup from the local management node, where the command is running, and stores it on another host or server. This command should only be run manually in configurations where there is a single dedicated management node (as with SONAS v1.1.1 and SONAS V1.2). For Storwize V7000 Unified and for dual management node clusters, the backup (or sync) is automatic, and the command should never be run from the command line.
|
Note: Run the following command to ensure that the tasks are scheduled and successful:
# lstask -t CRON -s -v
Name Status Last run Runs on Type Scheduled
BackupMgmtNode OK 8/21/13 2:22 AM Management node CRON yes
|
•Privileged user access control:
– Code security at the SONAS or Storwize V7000 Unified cluster is protected by password enabled access and limited service access accounts. Customers are typically not given access to privileged users, such as root, in a SONAS environment. In some cases, for special reasons, a customer might have root-level access for special maintenance reasons. In this case, the root level access must be protected by policy and practice.
– Root-level access should not be used for day-to-day activity and should only be used when administrative-level user privilege is not sufficient to complete a task. In this case, the root password should be temporarily changed to support the required activity for the time frame of the required maintenance, and the usage of that access should be planned and collaborated to avoid mishap. A root user has enough privilege to harm the cluster, and much of what is started by the root user can be only loosely tracked from a history perspective.
7.1.2 Compliance with security policies
Many companies and government institutions require compliance with formal security policies. SONAS can configure the underlaying Linux operating system and hardware to meet many common security policy requirements.
The SONAS CLI, using the chsettings and the chpasswordpolicy commands, enables an administrator to make changes to the security policy in the following areas:
•Boot loader settings
•Secure Shell (SSH) server parameters
•Password requirements
In the next sections we’ll describe these options in more detail.
Boot loader settings
Security policies can have requirements that reduce the exposure from physical access to the hardware. SONAS 1.5 and later provide a way to meet the following requirements:
•Configure password for the Grand Unified Bootloader (GRUB) using an MD5 or stronger cryptographic hash to protect the password
•Disable Boot From Removable Media
The chsettings command is used with the following parameters:
bootLoaderPassword password Sets the new password for the GRUB for all the nodes within the cluster. Optional.
disableBootLoaderPassword Disables password for the GRUB for all the nodes within the cluster. Optional.
bootFromRemovableMedia 'yes|no' Specifies if default boot from removable media is enabled for all the nodes or not. Optional.
|
Note: Setting the value of bootFromRemovableMedia to no disables the default boot from removable media, such as CD, DVD, USB, and so on for all of the SONAS nodes. However, the system can still boot from removable media by changing the boot option in the system’s basic input/output system (BIOS) or system controller.
To protect against unauthorized access to the BIOS or system controller and completely prevent booting from removable media, the SONAS administrator needs to set a BIOS supervisor/administrator password if one has not been set and disable a user-level password if one has been set.
|
SSH server and client settings
The following list describes SSH server hardening requirements and the respective configuration file values. These requirements have already been satisfied on all SONAS systems since the 1.3 release:
•The SSH daemon must not permit tunnels:
PermitTunnel no
•The SSH daemon must do strict mode checking of home directory configuration files:
StrictModes yes
•The SSH daemon must use privilege separation:
UsePrivilegeSeparation yes
•The SSH daemon must not allow Rhosts Rivest-Shamir-Adleman algorithm (RSA) authentication:
RhostsRSAAuthentication no
The new chsettings CLI command changes the SSH configuration on all of the systems in the SONAS cluster.
The chsettings security --sshHardening yes option
The following list describes various aspects of the --sshHardening yes option.
•The SSH daemon is configured to use only Federal Information Processing Standard (FIPS) 140-2 approved ciphers by adding the following line to the SSH server configuration files on all SONAS nodes:
Ciphers aes128-ctr,aes192-ctr,aes256-ctr
•The SSH daemon is configured to not use cipher block chaining (CBC) ciphers.
•The SSH daemons are configured to only use message authentication codes (MACs) that employ FIPS 140-2 approved cryptography hash algorithms by adding the following line to all SSH server configuration files on all SONAS nodes:
MACs hmac-sha1
•The SSH client is configured to only use FIPS 140-2 approved ciphers by adding the following line to SSH client configuration file on all SONAS nodes:
Ciphers aes128-ctr,aes192-ctr,aes256-ctr
•The SSH client is configured to not use CBC-based ciphers.
•The SSH client is configured to only use message authentication codes (MACs) that employ FIPS 140-2 approved cryptographic hash algorithms by adding the following line to SSH client configuration file on all SONAS nodes:
MACs hmac-sha1
•SSH daemon does not allow compression, or must only allow compression after successful authentication by adding the following line to all SSH server configuration files on all SONAS nodes:
Compression delayed
•The SSH daemon uses a FIPS 140-2 validated cryptographic module (operating in FIPS mode). This means, use only cryptographic algorithms available in the validated Crypto++ module, which means the encryption algorithm list is limited to Advanced Encryption Standard (AES) and Triple-Data Encryption Standard (DES).
•The SSH client uses a FIPS 140-2 validated cryptographic module (operating in FIPS mode).
No additional hardening is done by default on the SONAS cluster. If you want to enable these settings, the following command can be used:
chsettings security --sshHardening yes
To reverse these settings, use the following command:
chsettings security --sshHardening no
|
Note: In SONAS 1.4 and later, async replication has the --encryption [strong|fast] option. The default strong authentication is compliant with the SSH hardening rules. However, async replication with the fast option does not work, because a weak cipher
is used. For more information, see the Configuring asynchronous replication topic in the IBM Knowledge Center:
|
Displaying the current security settings
The current security settings can be displayed with the lssettings command as shown in Example 7-1.
Example 7-1 Displaying the current security settings
$ lssettings security
SSH hardening = no
Boot from removable media = yes
Boot loader password = no
EFSSG1000I The command completed successfully.
Linux password settings
Security policies generally require certain characters be included in passwords to make the passwords stronger. The chpasswordpolicy command in SONAS 1.3 and later can set the following password requirements:
minLength Minimum length of the password. Defaults to 6 positions. Optional.
minAge Minimum age of the password in days. Defaults to zero indicating that password can be changed multiple times in a day. Minimum age should be less than the maximum age. Optional.
maxAge Maximum age of the password in days. Defaults to 90 days. Maximum age should be greater than the minimum age. Optional.
resetOnLogin Reset password on next login. Defaults to do not reset password on login if not specified. Optional. This applies to existing CLI users and not to new users.
dontResetOnLogin Do not reset password on next login. Defaults to do not reset password on login if not specified. Optional. This applies to existing CLI users and not to new users.
SONAS 1.4 added the ability to set the following password requirement:
remember The number of old passwords for each user to be remembered. Sets how frequently old passwords can be reused. The system remembers this many passwords, and the user cannot reuse any of those passwords. To disable this feature, set it to 0. The initial default value is 3. Optional.
The following options are added in SONAS 1.5.1:
minUpperChars Minimum number of uppercase characters that must be specified in the password. Optional.
minLowerChars Minimum number of lowercase characters that must be specified in the password. Optional.
minSpecialChars Minimum number of special case characters that must be specified in the password. Optional.
minDigits Minimum number of digits that must be specified in the password. Optional.
maxRepeat Maximum number of repeat characters that can be specified in the password. Optional.
minDiff Minimum number of characters that must be different in new password as compared to the old password. Optional.
rejectUserName User-name is not allowed as a part of password. Optional.
allowUserName User-name can be used as a part of password. Optional.
|
Note: These parameters are mixed-case, and must be entered as shown.
|
The lspasswordpolicy command is used to display the current password settings, as seen in Example 7-2.
Example 7-2 Output of the lspasswordpolicy command
$ lspasswordpolicy
Minimum special case characters = 0
Minimum different characters with respect to old password = 0
Minimum digits = 0
Minimum lower case characters = 0
Reset password on next login = false
Minimum password length = 6
Minimum upper case characters = 0
Maximum password age = 90
Reject user-name = false
Remember old passwords = 3
Minimum password age = 0
Maximum number of repeat characters = 0
EFSSG1000I The command completed successfully.
Session Policy settings
The session policy settings deal with bad password attempts, and how long an account will remain locked after too many bad password attempts. The chsessionpolicy command can be used with the following parameters:
maxLoginAttempts Specifies the maximum number of login attempts allowed before the user gets locked out. The default value is 0, indicating unlimited login attempts. A valid value would be 0 - 9. Optional.
timeout Specifies the time in hours for which the user gets locked out before the account is enabled. The default is 1 hour, indicating that the user gets locked out for an hour. A valid value would be 1 - 24. Optional.
loginPromptDelay Specifies the time in seconds between login prompts following a failed login attempt. The default is 4 seconds. A valid value would be 0 - 9. Optional.
The lssessionpolicy command is used to display the current settings as shown in Example 7-3.
Example 7-3 Using the lssessionpolicy command to display the current settings
$ lssessionpolicy
Locked user timeout = 1
Maximum login failures allowed = 0
Login prompt delay = 4
EFSSG1000I The command completed successfully.
If you want to implement a password policy that requires a 10-letter password with an uppercase letter, a lowercase letter, a digit, and that does not allow the user name to be in the password, you can use the chpasswordpolicy command with the options shown in Example 7-4.
Example 7-4 Implementing a password policy
$ chpasswordpolicy --minLength 10 --minUpperChars 1 --minLowerChars 1 --minDigits 1 --rejectUserName
EFSSG0465I The password policy was set successfully on the cluster 4483305904013673286
EFSSG1000I The command completed successfully.
7.1.3 Protection of the data
This section describes protecting data:
•Share access control:
– Data shares should be created with an explicit user owner definition. Access control lists (ACLs) must be immediately set by that owner for files within the file set and share before data is written to it. The ACLs exist to control the access to files and directories. Therefore, a full understanding of these ACLs, owners, and data access is necessary for the administrators of the NAS service.
•ACL management:
– ACL management is described in the IBM SONAS Implementation Guide, SG24-7962. For preferred practice understanding of ACL management and data authentication see Chapter 2, “Authentication” on page 25. Access and authorization knowledge should be a requirement for all SONAS or Storwize V7000 Unified solution administrators before administrative level privileges are assigned to administrators.
– You can and should create a new file system with a specific owner and group. Do not use the default root owner. When a file system or file set is created, if the owner is not specified, the default owner/group/permissions of the new path are root/root/771. You can change the ownership of a file system or file set by using the chowner CLI command if the file system or file set does not contain any directories or files, or during share or export creation, by setting the name of the owner of the share or export.
– If you use the root squash option for NFS users, which is the default and used for security reasons, you should set the owner of the file system or file set immediately after the file system or file set is created because you are unable to set it using the Network File System (NFS) client.
|
Note: When a share or export contains files or directories, you cannot change
the owner. |
•Snapshots, clones, and replication:
– Snapshots, file clones, wide area network (WAN) caching, and replication are ways to protect data locally and remotely by creating copies of the data within the file system space. Copies of a file should also be managed carefully. Customers can choose to enable privileges for their clients to be permitted to restore from their own snapshots. In this case, a client can restore any file that they have access to from previous snapshots. If two clients have access to any file, either one of them can restore from a previous snapshot.
This activity is not tracked or audited in the cluster, so carefully consider this possibility for use in your environment. It is important to take time to carefully consider your snapshot management practice.
– Too many snapshots are typically a waste of space, and improperly managing retention and deletion schedules or proper distribution of rules can tie up much-needed metadata performance when it is otherwise needed for routine tasks. For more information, see Chapter 4, “Storage configuration” on page 95.
•Client access security:
– Client environment protection is also a serious consideration. If a user’s client system and user account is compromised, the attacker potentially has access to controlled data in the SONAS environment. Client systems should be maintained and up-to-date for security, and virus scanning. When a customer supports heritage host platforms without mandates for up-to-date internet security and password management practices, they put corporate data protection in jeopardy.
– If a client system is infected by a virus, that virus can be spread to other clients through the data that is stored in the SONAS file system. For this reason, use an antivirus service for SONAS and Storwize V7000 Unified accessed data (whether that solution is tied to the client or the data service).
When an antivirus service is installed for the SONAS, carefully define the scopes. Scan the data on ingest (preferred practice) rather than bulk scan. Bulk scan can place a burden on the cluster and degrade client response time during the scheduled event. For detailed information about SONAS antivirus see 7.8, “Antivirus” on page 253.
– For large data repositories, random bulk file scanning can take large amounts of metadata and input/output (I/O) cycles away from the cluster. For data that is stored on tape devices such as Hierarchical Storage Manager (HSM) migrated files, data must be recalled to disk to support antivirus scan operations. For this reason, it is best to have a defined scope that only reads files on specified ingest.
– It is a preferred practice to consult with SONAS or Storwize V7000 Unified solution experts before defining antivirus sizing and scopes for antivirus protection.
|
Tip: Antivirus scanning is only supported for Common Internet File System (CIFS) shares.
|
7.1.4 Protection of the access to data
All protocols have benefits and drawbacks. SONAS supports NFS, CIFS, Hypertext Transfer Protocol (HTTP), File Transfer Protocol (FTP), and Secure Copy Protocol (SCP) protocols to satisfy client requirements. However, because these protocols are not proprietary, limitations of the underlying protocol are not necessarily mitigated by the SONAS implementation. It is the preferred practice to be mindful of the protocols you use in your SONAS environment, and that you keep up to date with client operating system (OS) patching and client protocol tuning for optimal use of NAS protocol services.
|
Note: When using FTP, the user ID and password are passed on the network in plain text. Access controls in NFSv3 are basically provided by the client, and not the server. If your client is compromised, your data could be at risk.
|
SONAS and Storwize V7000 Unified V1.4.1 include the capability to turn off unwanted or unneeded protocols. So, if you are a pure CIFS shop, you can turn off NFS. If you are a pure NFS shop, you can turn off CIFS as a cluster service.
7.2 Asynchronous replication
SONAS asynchronous replication provides for command-driven consistent remote copies of sets of files from a source SONAS system (or file tree) to a target SONAS system.
The basis of disaster recovery capabilities for a SONAS solution is built around the asynchronous replication. Asynchronous replication enables for one or more file tree structures within a SONAS file name space to be defined for replication to another
SONAS system.
SONAS system.
The asynchronous replication process looks for changed files in the source file tree since the last replication cycle completed and uses rsync to efficiently move only the changed portions (blocks) of those files from the source location to the target location. In addition to the file contents, all extended attribute information about the changed files is also replicated to the target system.
Asynchronous replication is defined in a single direction, such that a file system at one site is considered the source of the data, and the file system at the other site is the target. The replica of the file tree at the remote location is to be used Read-Only until it is needed to become usable.
Figure 7-1 shows a basic asynchronous replication process.

Figure 7-1 Basic uni-directional asynchronous replication
When using asynchronous replication, the SONAS system detects the modified files from the source system, and only moves the changed contents (changed blocks) from each modified file to the target system to create a replica. In most cases, by moving only the changed portions of each modified file, the network is used efficiently for replication.
Since SONAS V1.4.1, SONAS copies entire files when they are smaller than 1 megabyte (MB) and have changed blocks, or when the files are larger than 50 gigabyte (GB) and they have changed blocks. This process improves performance in replication because it reduces the complexity of tasks for reading the files to worklist the changed blocks in replication. In these cases, it is far more efficient to replicate the whole file instead.
The file-based movement enables the source and target file trees to be of differing sizes and configurations if the target file tree is large enough to hold the contents of the files from the source. For example, differing configurations support options like local synchronous copies of the file tree to be used at the source location but not at the target. This flexibility helps make the solution adapt to many different needs. Figure 7-2 shows a high-level asynchronous replication process flow.

Figure 7-2 High-level image of the asynchronous replication service
The asynchronous replication function is intended to be run on a periodic basis to replicate the contents of a file system from a source SONAS system to a file system on a target SONAS. When it is run, the following major steps are performed during the replication:
•A snapshot of the source file system is created.
•The source file system snapshot is scanned for created, modified, and deleted files and directories since last asynchronous replication completed.
•A full read of each changed file for finding actual changed data is done.
•Changed data contents are replicated to the target system.
•A snapshot of the target file system is created.
•The source file system snapshot is removed.
Figure 7-3 shows SONAS replication process workflow.

Figure 7-3 SONAS replication work flow diagram
The source and target snapshots can be configured to be omitted from the replication process. However, avoid this configuration. The source-side snapshot creates a point-in-time image of the source file system when the asynchronous replication process is started. The asynchronous replication process walks through this snapshot and looks for changes to build a changed file list.
This list is used as the basis for the replication to the target. The asynchronous process can use the file system for this function, but, if it does, it must scan and replicate the directory tree while it is actively being accessed and modified by the product applications.
Asynchronous replication is the only supported disaster recovery solution for SONAS or Storwize V7000 Unified. However, success depends on implementation and management practices, because it is a manual process that is initiated and managed by SONAS administrators.
It is critical that, for every file set created on the source, an equal file set must be created on the target and base file set permissions must be created on the target before data in that file set is replicated. Therefore, the preferred practice includes stopping replication to create a new file set on the source, then create the file set and set its base permissions on both source and target systems before putting data in the source. Then, restart replication on completion of the file set creation.
If data is pushed to the newly created source file set, and that data is replicated to the target file system before the target site file set is created and permissions are properly set on it, the data gets replicated to a directory in the target file system rather than a properly defined and linked target file set. This situation might not prove optimal in a disaster recovery solution.
7.2.1 Replication port requirements
The source management node and interface nodes must be able to communicate with the destination system’s management and interface nodes over the customer network.
The following Transmission Control Protocol (TCP) ports must be open between the source and destination nodes:
•TCP 22 (SSH)
•TCP 1081 (HTTP)
Open these ports in both directions.
7.2.2 Replication requirements
This section lists the requirements for SONAS replication:
•The active management node and interface nodes of the source system must be able to communicate with the active management node and interface nodes of the target system over the customer network.
•The target file system must have enough free space to support replication of the source file system with the resources required to accommodate snapshots.
•Sufficient network bandwidth is required to replicate all of the file system delta changes with a latency that is sufficient to meet recovery point objective (RPO) requirements during peak use.
•TCP port 1081 is required on the source and target systems for the configuration process to establish secure communications from the target active management node to the source active management node using SSH.
•TCP port 22 is required on the source and target systems for rsync to use SSH to transfer encrypted file changes from the management node and interface nodes to the target management node and interface nodes.
•For replication in both directions, or for potential failback after a recovery, open ports 1081 and 22 in both directions.
•Consistent authentication and ID mapping between all the sites is required:
– If you are using a version before 1.5.1, SONAS must be configured for authentication and ID mapping with Active Directory Server (ADS) with and the Services for UNIX (SFU) extension, or with a Lightweight Directory Access Protocol (LDAP) server. Authentication with Active Directory (AD) without the SFU extension is not supported. Active Directory plus SFU is the preferred practice authentication for replication.
– With version 1.5.1 and later, the auto ID mapping method is also supported.
|
Tip: Adding more participating nodes to the replication, and more threads and processes per node, improves data replication performance for both scanning and data transfer, when the networks are not the bottleneck.
|
7.2.3 Multi-directional replication
Multi-directional replication is possible with different file systems, meaning file trees only. Because each file system can have only one target for replication, different file systems in the same cluster can replicate with different targets. Figure 7-4 shows multi-directional replication.

Figure 7-4 Example of multi-directional replication
7.2.4 Asynchronous replication preferred practice considerations
Remember the following considerations when you set up asynchronous replication:
•Time should be coordinated between the source and target systems. A recovery point objective (RPO) cannot be established unless replication can be consistently completed within that specified time frame.
•The first replication needs time to complete before an ongoing RPO can be established.
•Time and date stamps are carried forward from the source files or directories to the destination SONAS.
•If the destination system is used for business continuance, a time skew at the target can cause confusion. Therefore, coordinate both systems with Network Time Protocol (NTP) time services.
•The Scan time part of the replication time scales linearly with number of inodes in the source file tree (source file system).
|
Important: Snapshot capabilities use IBM General Parallel File System (IBM GPFS) scans. This GPFS capability provides the file system with a way to do high-speed scans of the GPFS inodes. As such, it is important to understand the different elements that affect GPFS scan performance.
The multiple interface nodes equally spread the policy engine rule evaluation, file scan identification, and subsequent data movement for increased performance. If greater scan speed is required, more SONAS nodes can be allocated to the scan, and each node scans only its equal portion of the total scan. The results of the parallel scan are aggregated, and returned as the usable list of candidate files.
|
File set information is not automatically carried forward to the destination SONAS. If a file set is created on the source file system, also configure it on the target file system. Base or root folder ACLs must be configured before data replication begins from source to target.
Source file systems that contain file sets have their directory structure and files replicated to the target, but file set information is not preserved. It is similar to what a restore or cp -R command enacts across file sets.
|
Restriction: Special characters in the source and target paths that are given to the asynchronous replication CLI commands must not contain the following characters:
•Colon (:)
•Backslash ()
•Backslash + lowercase n (
)
•Backslash + lowercase r (
)
•Backslash + lowercase t ( )
•Asterisk (*)
•Question mark (?)
•Exclamation mark (!)
•Comma (,)
•Percentage sign (%)
•White space
•Open or close parenthesis
•Single or double quotation mark
|
The underlying paths in the directory tree that is being replicated are allowed to have the previously mentioned special characters.
7.2.5 Replication status
In SONAS V1.4.1 and later the lsrepl command displays the status of asynchronous replications the amount of data that is being replicated, the current rate of transfer, and estimated time of completion.
Figure 7-5 shows the lsrepl command with no parameters.
|
$ lsrepl
filesystem log Id status time
gpfs1 20100524151413 Completed 5/24/10 12:00 AM
gpfs1 20100525082852 Completed 5/25/10 12:00 AM
gpfs1 20100526144524 Completed 5/26/10 12:00 AM
gpfs1 20100601151055 started 6/1/10 12:00 AM
$ lsrepl
filesystem log Id status time
gpfs1 20100608201144 5/8 Scanning task for asynchronous replication process done 6/8/10 8:15 PM
There are 8 steps to complete Async operation
Asynchronous replication process started
Snapshot task for asynchronous replication process started
Snapshot task for asynchronous replication process done
Scanning task for asynchronous replication process started
Scanning task for asynchronous replication process done
Replication task for asynchronous replication process started
Replication task for asynchronous replication process done
Asynchronous replication process finished
|
Figure 7-5 Example of lsrepl command with no options
You can use the --progress option to display the status of active (running), available (not banned), and banned replication processes for each file module, as shown in Figure 7-6. Information about the transferred size, progress, transfer rate, elapsed time, remaining size, and remaining time for each process that is running in the asynchronous replication is displayed. The rsync progress and overall progress information are provided.
|
$ lsrepl gpfs0 --progress
Filesystem: gpfs0
Log ID: 20120429064041
Mon Apr 16 07:56:46 CEST 2012
interval 1 sec, remain loop: 26
display rsync progress information
===============================================================================
PROC #: NODE-PAIR <HEALTH STATUS>
FILE-PATH
FILE: XFER-SIZE(TOTAL) PROG(%) XFER-RATE ELAPSED REMAIN(TIME)
-------------------------------------------------------------------------------
Proc 1: int002st001->10.0.100.144 <available>
dir/file3
65,536,000(500.00MB) 12.50% 10.79MB/s 0:00:07 437.50MB(0:00:41)
- - - - - - - - - - -
Proc 2: int001st001->10.0.100.143 <available>
dir/file4
98,435,072(500.00MB) 18.77% 7.16MB/s 0:00:10 406.12MB(0:00:58)
- - - - - - - - - - -
Proc 3: int003st001->10.0.100.145 <available>
dir/file5
75,202,560(500.00MB) 14.34% 6.51MB/s 0:00:08 428.28MB(0:01:07)
- - - - - - - - - - -
Proc 4: mgmt002st001->10.0.100.141 <available>
dir/file1
43,548,672(500.00MB) 8.31% 6.74MB/s 0:00:06 458.46MB(0:01:09)
- - - - - - - - - - -
Proc 5: mgmt001st001->10.0.100.142 <available>
dir/file2
115,736,576(500.00MB) 22.07% 9.50MB/s 0:00:13 389.62MB(0:00:42)
- - - - - - - - - - -
-------------------------------------------------------------------------------
Overall Progress Information: 0 of 8 files comp
XFER-SIZE(TOTAL) PROG(%) XFER-RATE ELAPSED REMAIN(TIME)
380MB( 2.45GB) 15.09% 41.36MB/s 0:00:10 2.08GB(0:01:06)
|
Figure 7-6 Example of lsrepl command with file system details
You can only use the --process option when you are also using the --status option in the same instance of an lsrepl CLI command submission. The Health Status column displays whether the replication process is available (not banned) or not available (banned due to an error). See Figure 7-7.
|
$ lsrepl gpfs0 --status
Filesystem: gpfs0
Log ID: 20120429064041
Source Target Active Procs Available Procs Total Procs
int001st001 10.0.100.141 2 3 3
int002st001 10.0.100.143 3 3 3
$ lsrepl gpfs0 –-status -process
Filesystem: gpfs0
Log ID: 20120429064041
Index Source Target Repl Status Health Status
1 int002st001 10.0.100.143 active available
2 int002st001 10.0.100.143 active available
3 int002st001 10.0.100.143 active available
4 int001st001 10.0.100.141 inactive available
5 int001st001 10.0.100.141 active available
6 int001st001 10.0.100.141 active available
|
Figure 7-7 Example of options for the lsrepl command
The showreplresults command displays the number of files that are changed and the number of delta changes in the data between two snapshots or a snapshot and the current file system state. Figure 7-8 shows sample output from the showreplresults command.
|
$ showreplresults gpfs1 -e 20120429064041
File: async_repl.log
Replication ID: gpfs1
Node: src mgmt001st001
Log level: 1
------------------------------------
2013-06-01 15:11:59-07:00 [L0] Asynchronous replication v1.5.39 has been started at Tue Jun 1 15:11:59 MST 2013.
2013-06-01 15:11:59-07:00 [L1] Params: gpfs1 gpfs1 /ibm/gpfs1 /ibm/gpfs1/oogie_async /ibm/gpfs1 -c /etc/async_repl/arepl_table.conf -L /etc/async_repl/gpfs.filter -r --max-size=10737418240 -v 1
2013-06-01 15:12:03-07:00 [L1] Executing removal on 9.11.136.52 ...
2013-06-01 15:12:06-07:00 [L1] Feeding 3 source nodes...
2013-06-01 15:12:17-07:00 [L1] Executing hard link process on 9.11.136.52 ...
2013-06-01 15:12:17-07:00 [L1] Elapsed 19 sec (.316 min), 189059132 bytes changed under the source path
2013-06-01 15:12:17-07:00 [L1] Synced: 28, deleted: 0, hard linked: 0 number of files.
2013-06-01 15:12:17-07:00 [L1] Sync rate: 1.473 files/sec (roughly estimated: 9.489 mb/s).
2013-06-01 15:12:17-07:00 [L0] exiting with 0 at Tue Jun 1 15:12:17 MST 2010
------------------------------------
<other element of log omitted>
|
Figure 7-8 Example output of the showreplresults command
Figure 7-9 shows the SONAS GUI for managing replication tasks.
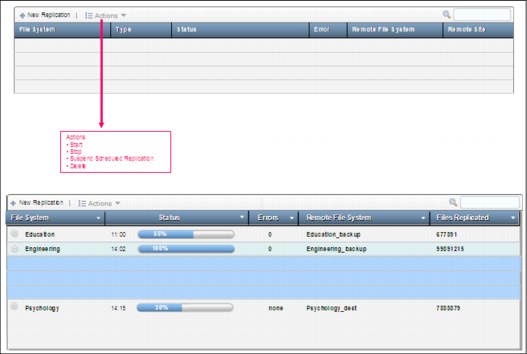
Figure 7-9 GUI for managing the replication tasks (start, stop, suspend, delete)
7.2.6 Recovery point objectives
The RPO is the amount of time between data being written at the production site and the same data being written at the DR site. If a disaster at the production site occurs during this time, any data that is written during that time frame might be lost if the production site is unrecoverable. The RPO for asynchronous replication is based on the frequency of the startrepl command, and is limited by the duration of the asynchronous replication
operation process.
operation process.
Only one asynchronous replication can be running at any time. Therefore, the minimum RPO is defined by the time of the completion from one incremental to the time of completion of the next incremental.
The first step in the asynchronous process is to create a point-in-time snapshot of the source file system that creates a data consistency point. This snapshot is used as a base to do the changed file (delta) scan and the source of the file replication.
New data that arrives to the source file system after the replication was initiated, when the point-in-time snapshot was created, is not replicated during this replication cycle. This new data is replicated as part of the next replication window.
Replication duration
The duration of the replication depends on several factors, which are described here:
•Number of files in the source file system
The number of files that are contained in the source file system affects the duration of the scan time. Asynchronous replication uses a high-speed file system scan to quickly identify the files that changed since the last successful asynchronous replication. Although the scan is optimized, the number of files that is contained in the file system adds to the time it takes to run the scan.
The scan process is distributed across the interface nodes that are configured to participate in the asynchronous process. Also, the files with changed data must be read to understand the data that changed. Therefore, what needs to be sent to the target system, the data size, and the number of files that are changed all affect replication performance.
•Amount of changed data that requires replication
The time that it takes to transfer the contents from the source SONAS to the target is a direct result of the amount of data that was modified since the last asynchronous operation. The asynchronous operation moves only the changed contents of files between the source and target to minimize the amount of data that needs to be sent over the network.
•Bandwidth and capabilities of the network between SONAS systems
The network capabilities play a large factor in the time that it takes the replication process to complete. Enough network bandwidth must be available to handle all of the updates that occurred since the start of the last increment before the start of the next scheduled increment. Otherwise, the next startrepl command fails, which effectively doubles the RPO for this time.
•Number of source and target nodes that are participating in asynchronous replication
The number of interface nodes and the network capabilities between the systems is also a factor in the time that it takes to replicate the amount of changed data. The interface nodes work in parallel to transfer the changed content to the target.
•Other workloads that are running concurrently with replication
•Type and number of disks that form the source and target file systems
The disk type of the file systems at the source and target help determine the I/O capabilities of the nodes that are participating in the replication process. Serial-attached SCSI (SAS) drives have a higher degree of I/O capacity than Serial Advanced Technology Attachment (SATA) drives, which enables them to move data faster, especially if they are doing replication alongside production workload.
•Using HSM managed file systems at source or target file systems
HSM managed file systems can negatively affect the time that it takes for asynchronous replication to complete if the changed files in the source file system must be recalled from secondary media before asynchronous replication replicates the files to the target.
•Number of replication processes per node
This configuration parameter enables for more internal rsync processes to be used on each node to replicate data to the other side. This increase provides more parallelism, and increases the potential replication bandwidth and rate.
•Encryption cipher
The data that is transferred between SONAS systems is encrypted using SSH as part of the replication. The default cipher is strong, but limits the maximum per-process network transfer rate to approximately 35 - 40 megabytes per second (MBps). The fast cipher is not as strong, but increases the per-replication process network transfer rate to approximately 95 MBps. Consider requirements for security versus speed when you make the choice.
•Software compression
This compresses the data to be transferred over the network before being encrypted. The compression is done with the processor of the node that is transferring the data.
For data that is compressible, this compression can provide a means of reducing the bytes being sent over the network to increase the effective bandwidth. When large data transfers are expected, and overall cluster use shows that it can handle the extra processor workload on the interface nodes, compression is preferred. If the interface nodes are at high usage levels, and the size of the changes is small, compression might not be advantageous.
7.2.7 Replication validation
The lsrepl command displays the list of currently running and previous historical asynchronous operations from this SONAS cluster. This command can be run from the source SONAS management node.
This command displays all of the currently running asynchronous operations, what step of the replication process they are on, and the history of previous asynchronous operations. Asynchronous history is kept until it is cleared with the cleanuprepl CLI command. The point here is that it is important to put review of replication task success in your daily task list.
Each replication keeps an archive of the logs that are generated by the processes on both the source and target SONAS systems. These archives are preserved until they are removed using the cleanuprepl command that is described later in this section.
The contents of the logs are helpful for determining specifics of each replication cycle. The logs include detailed error information when a replication fails. This information in these logs is available using the showreplresults CLI command.
Cleaning up old asynchronous replication information is useful for freeing the space that is used to keep the information. Therefore, it is a good idea to add cleaning up the replication log once a week as a matter of routine weekly tasks for the cluster admin (when replication proves successful). For more information, see the documentation in the SONAS section of the IBM Knowledge Center:
For workloads that create larger files, there can be an issue with being able to replicate a large file within an 8-hour window, depending on the capabilities of the system (disk types, number of disks, network bandwidth, encryption cipher, and so on). The option of disabling the timer to allow these files to complete replication is required in these cases. Contact IBM support for assistance in temporarily disabling the timer.
Figure 7-10 shows some of the file sizes that can be replicated within the 8-hour window against the encryption cipher and varying average network throughputs.

Figure 7-10 Cypher encryption replication modeling table
7.2.8 Asynchronous replication logs
There are several logs that are related to asynchronous replication:
•Current logs. Active logs that are being used by asynchronous replication in each of the participating source and destination nodes.
•Collected logs. Logs that were collected for the last asynchronous replication from all the nodes to one dedicated location.
•Archived logs. Historical logs from previous asynchronous replications.
Replication logs are segmented in two locations
Small files are kept under the node’s local file system on the source management node (/var/log/cnlog/async_repl/archive).
Large files are in the GPFS file system that is participating in the asynchronous relationship (for example, /ibm/gpfs0/.async_repl, where gpfs0 is the file system that is defined in this asynchronous relationship).
7.2.9 Issues and expectations
This section describes issues that are related to asynchronous replication:
•Source or target interface node failures during an asynchronous replication are automatically recovered by the asynchronous process:
– Files that are replicated through these nodes are reassigned to surviving nodes.
– Source interface node failures move another source interface node to the configured target interface node.
– Target interface node failures cause the source node to resume the replication to the destination IP address of the failed node, which has been reassigned to another destination node.
•Source management node failures cause the currently running async operation to fail:
– If the asynchronous process is still in the scan phase, the current async process fails without transferring any files.
– If the asynchronous process is in the file transfer phase, the interface nodes continue to transfer their current file lists, but the overall asynchronous process fails.
•Network failures between a subset of nodes cause work to be distributed to a source interface node that can still reach the destination.
•Network failures that cause all communication to be lost fail the overall asynchronous operation.
Effects of an overall failure during asynchronous replication
An overall failure to the asynchronous process has the following effects:
•The current replication halts until the next replication is initiated, either manually or when the next scheduled starts.
•The source-side snapshot is retained at the point in time that the failed asynchronous operation created it.
•The next asynchronous operation continues to attempt the failed replication attempt.
•An asynchronous operation must complete successfully before another asynchronous operation can take place at a new RPO point in time.
•Upon successful completion of the replication, the recovery point is the one established at the start of the first failed replication.
•Depending on the type of failure condition, an asynchronous lock file is left to suspend future asynchronous operations from starting until corrective action is taken.
•The startrepl command has a parameter to clear the lock file, which tells the asynchronous replication service to attempt to do asynchronous operation again (presumably after corrective action is taken to clear the condition).
For information about asynchronous cluster replication, see the IBM SONAS Implementation Guide, SG24-7962 IBM Redbooks publication.
7.3 Backup and restore solutions
Backup and restore solutions are a common requirement for file data protection. SONAS currently supports two solutions for backup and restore. The first solution is full integration with IBM Tivoli Storage Manager. Alternatively, a Network Data Management Protocol (NDMP) backup and restore solution can be used.
Backup and restore solutions add value to most NAS solutions with little added complexity. As you approach the higher scale of NAS (such as multi-petabyte (PB) solutions), SONAS, like other Scale Out NAS solutions, begins to lose its value with backup and restore tape-based solutions. It soon becomes too much data to back up, track, and manage.
The cost, complexity, and data scan times soon become too much of a burden, and large-scale data restore from tape takes longer than is tolerable. When the scale reaches these boundaries, it becomes important to back up only data that requires backup, and consider replication as the better option for protecting large-scale data.
Replication is the fastest way to recover access to replicated data. A well-planned disaster recovery strategy for even a multi-petabyte SONAS solution can typically be recovered in less than 30 minutes by a disaster recovery team that is familiar with SONAS. For this reason, replication is the best-supported vehicle for disaster recovery for SONAS.
7.3.1 Tivoli Storage Manager
This section describes Tivoli Storage Manager and how it works with SONAS.
Key backup and archive concepts
The key concepts for consideration with any backup system are the amount of new, changed, or deleted file-based data that might be lost because it is not yet backed up, and the time it takes to recover an entire system if the production system suffers a failure or disaster.
Consider the following terminology for Tivoli Storage Manager backup:
Tivoli Storage Manager Server
This is the Tivoli Storage Manager Server that holds Tivoli Storage Manager license keys, and the backup database that is used for Tivoli Storage Manager backups of SONAS. The preferred practice is to size and tune it appropriately for the size of the SONAS environment that you want to back up.
Tivoli Storage Manager Clients
These clients are the SONAS interface nodes that participate in the workload that is associated with SONAS data backup and restore.
Tivoli Storage Manager Storage Class
This is a device class that represents a device type (such as disk or tape) that Tivoli Storage Manager can use to determine which types of devices and volumes are available to store client-node data in primary storage pools, copy storage pools, and active-data pools. Device classes are also important for storing database backups and for exporting and importing data.
Sequential-access device types include tape, optical, and sequential-access disk.
For random access storage, Tivoli Storage Manager supports only the DISK device class, which is defined by Tivoli Storage Manager.
Figure 7-11 shows a basic Tivoli Storage Manager backup solution for SONAS.

Figure 7-11 Basics in a Tivoli Storage Manager backup solution for SONAS
SONAS and Tivoli Storage Manager considerations
Although Tivoli Storage Manager is tightly integrated with SONAS and Storwize V7000 Unified, it is important to remember that the Tivoli Storage Manager Server side of that relationship is independently managed. It is out of the general scope of SONAS configuration and preferred practice.
However, this section provides a few preferred practices for the Tivoli Storage Manager Server and supporting SONAS side preferred practice considerations.
Configuration
Before configuring SONAS backups on a Tivoli Storage Manager server, complete the following tasks:
•Work with Tivoli Storage Manager subject matter experts (SMEs) to ensure that the server is configured optimally for reliability, sizing, and performance. IBM offers fee-based Tivoli Storage Manager Server sizing and installation services:
– Networking bandwidth and redundancy
– Processor and memory
– Kernel and protocol tuning
– Database, logs, and file system sizing and performance
– Software updates and system patching
•Run annual or semi-annual Tivoli Storage Manager Server health checks to ensure that the server and all associated hardware, software, tuning parameters, licenses, and support are correctly sized, configured, and maintained for use in protecting SONAS or Storwize V7000 Unified data.
Recovery point objective, recovery time objective, and versioning
The industry terms for these concepts are recovery point objective (RPO) and recovery time objective (RTO). Another concept that is important for backup is versioning. Versioning is the ability to retain older versions of files for restoration in the case of some operational or accidental corruption.
Recovery point objective
The RPO is expressed as the amount of time for which data can be lost in a disaster. Specifically, it is the amount of time that it takes between the write of data to a storage device and the time it takes to back it up and move it to a location that will not participate in the same disaster that befalls the production site.
Usually, continuous copy replication methods have low RPOs, ranging from zero RPO for synchronous replication to tens of seconds for some of the asynchronous replication methodologies. Traditional backup to tape, such as Tivoli Storage Manager backup, can have daily or even weekly RPOs.
If you are using tape to make a backup copy, it is not just the time between backups and the time it takes for the backup to complete. The tape data must be in a location that is secure from a disaster before the RPO is met. This time includes boxing the tapes and transporting them to a safe facility, or running the backups from a remote location from the primary data. The use of “hot” sites and electronic vaulting are used to reduce and sometimes eliminate this aspect of the RPO that is associated with tape backups.
Recovery time objective
The recovery time objective is also expressed as the time that it takes to recover and get back into production after a disaster. This time includes the time that it takes to activate the recovery site and recover all of the data that is necessary to start production, including starting the applications on the servers to resume production.
There might be different RTOs for different applications or lines of business. Critical operations might have much smaller RTOs than non-critical applications. For example, a customer order system might be considered a critical system to protect order status and cash flow. Studies that have been done on RTO suggest that most business-critical applications must have an RTO of 48 hours or less.
This might or might not reflect the requirements of your company. However, the availability of tapes, tape drives, drive restore speeds, and bandwidth from the backup server and recovery network are extremely important to consider in the RTO objectives for extremely large NAS services. Petabytes from tape might take weeks to recover, where DNS updates for replication sites might be adequately updated within a few minutes, or at worst hours, with even 5 - 10 PB in shared data repositories.
Versioning
Versioning is the ability to retain multiple versions of changed files for later recovery. It is important if the detection of the corruption has not been identified before a file is saved, or if a history of updates to a file is needed. When a file is detected as being changed during the backup process, a customer might retain several versions even after the latest version of the file is deleted. This retention policy is applicable to the number of versions that are maintained and the duration of time that they are retained before the version is deleted.
GPFS scans
The Scan time part of the replication time scales linearly with the number of inodes in the source file tree (source file system).
|
Important: Snapshot capabilities use GPFS scans. This GPFS capability provides the file system with a way to do a high-speed scan of the GPFS inodes. As such, it is important to understand the different elements that affect GPFS scan performance.
The multiple interface nodes equally spread the policy engine rule evaluation, file scan identification, and subsequent data movement for increased performance. If greater scan speed is required, more SONAS nodes can be allocated to the scan, and each node scans only its equal portion of the total scan. The results of the parallel scan are aggregated, and returned as the usable list of candidate files.
|
The SONAS software high-performance scan engine is designed to use the multiple interface nodes of the SONAS in parallel to scan the internal file system metadata called inodes. SONAS asynchronous replication, the startbackup SONAS backup CLI command, and SONAS snapshot capabilities all use GPFS scans.
Given this description, it is easy to understand that scans use a large amount of I/O and processing resources. This adds to the overall stress of the system. Therefore, minimize scans and only run them when there are sufficient resources both in the interface nodes and storage controller that contain the GPFS metadata. This availability is generally not a problem because the backup window normally is done during a slack production period.
Scan factors
The time that it takes to complete a scan is influenced by several factors:
•System load. In particular if other scans are running at the same time.
•The number and type of system disks that hold the inodes (metadata).
•How the disk pools are set up. If the system disks are dedicated to inodes or are shared with user data.
•The number of interface nodes.
•The number of files and directories that are contained in the file system or independent file set that is being scanned.
•The complexity and depth of the directory structure that is being scanned.
•The size of the files.
Metadata scans
There are several processes that use metadata scans:
• The SONAS startbackup command
•SONAS asynchronous replication
• Policy scan to determine new, changed, and deleted files, or their base file placement
• Snapshot deletions, even as part of the asynchronous replication consistency mechanism
•Snapshot deletes that are initiated by the customer for customer-created scans, and snapshots that are initiated by asynchronous replications on both the source and target machines
•Antivirus scans
Policy scans
The GPFS scan has two phases:
1. A directory traversal to collect the full path to each file.
2. A sequential scan over each file’s inode to collect the remaining file attributes. This second scan also does the policy rule evaluation, which selects the files that match the policy rules.
Startbackup LAN-based backup through Tivoli Storage Manager
The SONAS startbackup command uses Tivoli Storage Manager backup processing to backup files to an external Tivoli Storage Manager server by using the embedded Tivoli Storage Manager backup client. This client runs the GPFS mmbackup command with special parameters and backs up file by file system.
This command is unaware of the nature of file sets. It backs up files by path association and directory, whether file sets are linked or not. For this reason, it is important to make sure that file sets are not unlinked during replication or backup processes.
Advantages of using Tivoli Storage Manager
The advantages to using Tivoli Storage Manager are described in this section.
GPFS scan
As the number of files continues to grow in a single file system, the time that is required for this scan using the traditional “walk the directory tree” method becomes a major obstacle to completing the backup within the backup window.
At the mid-end or high-end scale of SONAS, it becomes infeasible to use the traditional backup method of walk the directory tree to identify new changed and deleted files for backup processing. To make the process of identifying files that need to be processed by Tivoli Storage Manager backup, the SONAS startbackup command is specifically designed to use a high-performance, high-speed GPFS scan engine that is available through the GPFS mmbackup command.
The GPFS mmbackup command is an integrated part of the GPFS file system and serves as an interface to the embedded RPO and RTO client to assist the backup process. As a part of mmbackup, there is an internal database of file system metadata that is called the shadow file. This database is designed for the integrated scan engine. The goal of mmbackup is to replace the walk the directory tree method with a higher-performance GPFS scan.
HSM
The SONAS startbackup support is the only solution that enables for the mix of data protection and tape-based storage tiering using the IBM HSM components of the Tivoli Storage Manager product.
GUI and CLI
Setup, monitoring, and administering backup is supported through the SONAS CLI and GUI.
Additional considerations
It is important to understand the functions of the SONAS startbackup command, which uses the GPFS mmbackup command and an internal Tivoli Storage Manager client to an external Tivoli Storage Manager server for backup. Backup of a cluster, file system, and file set configuration data is not captured with file system backups. For this, it relies on secondary management nodes, site cluster replication, and internal tasks that replicate critical cluster management data between the management nodes.
Tivoli Storage Manager database object count considerations
There are limitations on how many objects the Tivoli Storage Manager IBM DB2® database has been tested with, and, therefore are officially supported. With Tivoli Storage Manager 6.3, the statement of support was a maximum of 4 billion objects per server. However, this number is unlikely to be achievable in reality due to operational inefficiencies or limitations in the usual disk, network, processor, or memory in the SONAS or Tivoli Storage Manager infrastructure.
An object is used for each version of a file. If the file is being managed by HSM, it uses an additional object (for a stub and migrated file). For example, if there are 200 million files (all backed up) and each file has three inactive versions retained, and the files are being HSM managed, there are about 1 billion objects that are used in the Tivoli Storage Manager DB2 database. Tivoli Storage Manager data deduplication also affects capacity. You can see how a single file becomes multiple objects in the Tivoli Storage Manager database.
Check the current statement of support for the version of Tivoli Storage Manager server that is being used to determine the maximum number of files that can be backed up and managed by a single Tivoli Storage Manager server. With extremely large clusters, the value of replication exceeds that of backup for some parts data protection. However, replication will not necessarily provide file versioning or a way to recover from data loss or corruption. Large data structures might require multiple file systems for improved backup (or data protection) strategies.
|
Tip: When planning for backup, if you have a file system backup that will approach 1 billion objects, you should consider creating additional file systems. Contact IBM support for more guidance and assistance.
|
Single Tivoli Storage Manager server for a single GPFS file system
There is an mmbackup restriction that a GPFS file system can be backed up only by a single Tivoli Storage Manager server. The design of mmbackup does not support the coordination of backups across multiple Tivoli Storage Manager servers. It is possible to back up multiple file systems to a single Tivoli Storage Manager server. This restriction, combined with the Tivoli Storage Manager DB2 restriction mentioned previously, limits the number of files that can be backed up and managed in a single Tivoli Storage Manager server database.
GPFS scan times
The mmbackup command uses GPFS scans to significantly decrease the time when compared to the traditional walking the directory tree scans to determine new, changed, and deleted files for backup processing. Although faster, the GPFS scan does take time to complete. Generally, GPFS scans take about 40 minutes for each 100 million files. So, the preferred practice is to set RPOs that are appropriate to these expectations and adjust them based on performance.
Sequential mark for expiration
The mmbackup command manages deleted files with a step that is called mark for expiration or expiration processing. This expiration processing must be completed before the start of the process that copies new and changed files for backup. Generally, expiration processing can process about 5 million files per hour. If many files are deleted between backups, a significant amount of time in the backup window can be taken by expiration processing. Consider this time when you are setting RPO time expectations.
Shadow file rebuilds
The mmbackup process uses an internal file to track information that is needed to determine if a file is new, modified, or deleted. This file is stored in GPFS and is a shadow of the Tivoli Storage Manager DB2 database. This file is rebuilt if the mmbackup command detects a problem with the shadow files or if the mmbackup process did not complete successfully.
The shadow file is rebuilt using an interface with Tivoli Storage Manager and might take time, depending on the number of files that Tivoli Storage Manager is tracking (Tivoli Storage Manager DB2 objects). Extremely high numbers of objects affect the RPO expectations.
Considerations on file sets
The mmbackup command and Tivoli Storage Manager are unaware of the existence of file sets. When you are restoring a file system that was backed up by Tivoli Storage Manager, the files are restored to their original path names, regardless of which file sets they were part of. Tivoli Storage Manager has no mechanism to create or link file sets during restore.
Therefore, if a file system is migrated to Tivoli Storage Manager and file sets are unlinked or deleted, or linked files are restored to a different location, restore or recall of the file system does not restore the file sets. During a full restore from backup, all file set information is lost and all files are restored into the root file set. This is a limitation that affects all backup products, but it is important to understand.
Backups on entire file systems only
Tivoli Storage Manager backups can be taken only for a file system, but not for a specific file, or for a path (no selectable backup). The first backup is of the entire file system, then incremental are captured from there. Restore can be done on file or path level. However, individual files or directories can be restored.
Application-consistent backups are not supported
The startbackup command does not support an application-consistent backup. It uses the active file system view to back up data, and therefore changes from file to file occur as the backup proceeds.
Special Tivoli Storage Manager tuning considerations
RESOURCEUTILIZATION in the SONAS Tivoli Storage Manager (backup-archive client tuning parameters) is set to 10. This might cause issues, for example, when Tivoli Storage Manager has no disk storage pool and the tape library does not have enough tape drives attached to manage the work. This limitation can result in frequent errors, such as This node has exceeded its maximum number of mount points or something similar. To resolve the issue, reduce the number to improve work distribution to a specified number of targets.
This value regulates the number of concurrent sessions during processing.
Sessions
Each interface node can open up to eight sessions on the Tivoli Storage Manager server. Therefore, the Tivoli Storage Manager server should set its maximum connections to accommodate this limit. A typical value for this is 100 sessions. Resource utilization in SONAS is set to 10, which means that a node that is configured as a Tivoli Storage Manager client can use up to seven tape drives per IBM SONAS configured Tivoli Storage Manager node.
|
Note: Although you can run backups from several or many interface nodes, restores come from a single node. Avoid restoring large numbers of files with the Tivoli Storage Manager restore operation. Restoring a large number of files might require a lot of time.
|
Table 7-1 shows the maximum number of mount points that are used, by type of operation, per IBM SONAS-configured Tivoli Storage Manager node.
Table 7-1 Mount restrictions for resource utilization settings
|
Type of operation
|
Maximum number of mount points
|
|
Backup
|
Six per interface node, when RESOURCEUTILIZATION is set to 10
|
|
Restore
|
Six, when RESOURCEUTILIZATION is set to 10
|
|
Migration
|
Three per interface node
|
|
Recall
|
20 (This value is the default setting for a Tivoli Storage Manager server)
|
|
Reconcile
|
0
|
Use the RESOURCEUTILIZATION client option to regulate the number of concurrent sessions that are handled by Tivoli Storage Manager server and client operations, such as multiple backup, restore, archive, or retrieve operations. Tivoli Storage Manager Hierarchical Storage Management operations, such as migrate or recall, that are initiated by the IBM SONAS interface nodes that are configured for Tivoli Storage Manager Hierarchical Storage Management, require one or more sessions to the Tivoli Storage Manager server.
Multiple concurrent sessions might be required to perform one operation, depending upon the volume of the operation and the value that is set for the RESOURCEUTILIZATION option. The number specifies the level of resources the Tivoli Storage Manager server and client can use during processing. The range of values that you can specify is 1 - 10.
When set at the default value 10, up to 7 tape drives can be used per SONAS node. When there is no disk storage pool that is defined for Tivoli Storage Manager and HSM, reduce this number to match the number of drives. For example, if your tape library has 4 LTO5 drives, reduce this number to 4.
Tracking backup status and monitoring failures
It is important to consider daily status and failures in the cycle of daily backups. Review the status of backups daily. Complete the following tasks:
•Validate error codes and the status of files that failed in backups.
•Search for trends and common behavior in order to catch when the result is different from normal.
•Track scratch tape quantities regularly, and determine how quickly scratch tapes are normally used.
•Watch both SONAS file system capacities and Tivoli Storage Manager server file system capacities.
For more information about these tasks, see Chapter 8, “Monitoring” on page 261 and Chapter 9, “Troubleshooting and support” on page 279.
For more information and methods to monitor your SONAS, see the Scale Out Network Attached Storage Monitoring, SG24-8207 IBM Redbooks publication:
Additional Information
Additional limitations and planning items are described in the SONAS section of the IBM Knowledge Center:
http://www.ibm.com/support/knowledgecenter/STAV45/com.ibm.sonas.doc/adm_tsm_limitations.html?lang=en
7.3.2 IBM HSM
HSM is Hierarchical Storage Manager or Hierarchical Space Manager. It is a separate set of licensed binary files in the Tivoli Storage Manager product that require Tivoli Storage Manager backup licenses. It enables you to extend your file system to tape through a managed archive.
The HSM solution enables you to define criteria for which, when met, files are migrated from their disk locations to a location on tape devices. A simple file stub (or small subset of a file and the metadata) is used for a client to access the file.
For example, a client navigates a directory that has some HSM migrated files. What they see is an icon in Windows Explorer that indicates that the file is a stub file. When the client opens the file, it calls for the HSM manager to read the whole file from tape.
If supported by the application, the client can read the subset that is stored in the stub while the file is recalled back to a disk location. In the background, Tivoli Storage Manager calls for the data, tracks it to the tape or tapes that it is stored on, and restores that data to disk locations on the file server, where it is completely readable by the client.
Recall storm
The previously mentioned process is known as a file recall. This process is slower than reading files from disk locations. In some cases, it can be much slower (taking many minutes to recall), and, if there is tape drive contention for other tasks (such as backup or network issues), it can take hours.
For this reason, users of data in space-managed data should be educated on the possibility of recall delays, and how to avoid a recall storm. A recall storm is a process where a client recalls an exceptional amount of data, such as a recall of a large directory of files. This can tie up file system management resources, tape drive resources, and network bandwidth.
One example of a recall-storm-inducing task is to force an antivirus scan of millions of files in a large SONAS-migrated file set. This data can include millions of files that have not been read for a long time, and have been archived to tape because of a space management policy. These files are later scanned for antivirus signatures. In this scenario, all the files that are scanned would be recalled from tape and placed back on file system disk pool resources sequentially.
It is the preferred practice to ensure that files are scanned before being placed into space managed pools, and that you avoid any action that tries to read a massive number of files from space managed capacity, unless that is the wanted result and enough time and resources are known to be available to support the task. It is the preferred practice to use HSM migration policies as a tool for true archiving, and to manage capacity that might be accessed or read on a cheaper tier of storage.
As Tivoli Storage Manager and HSM can require much knowledge, take time to read about these externally managed services in the product brand materials, IBM Knowledge Centers, and Tivoli Storage Manager Administrator Guides, along with reading the sections for Tivoli Storage Manager in the IBM SONAS Implementation Guide, SG24-7962.
7.3.3 Network Data Management Protocol (NDMP)
The IBM SONAS system supports NDMP, which is an open standard protocol for network-attached storage (NAS) backup and restore functions. NDMP Version 4, provided by compatible Data Management Applications (DMAs) such as Symantec’s Veritas NetBackup, is supported.
|
NDMP backups with Tivoli Storage Manager: This section describes NDMP backup by programs other than Tivoli Storage Manager. Although it might be technically possible to use Tivoli Storage Manager and back up with NDMP, Tivoli Storage Manager backup should be done with the SONAS Tivoli Storage Manager client.
|
Planning for Network Data Management Protocol
Full and incremental backup and restore of file system or independent file set data is provided by capturing data and metadata using file system snapshots. An NDMP backup session provides backup of a specific directory, a set of directories in a file system, or all of the files and subdirectories that are contained within a file system.
The maximum length of the names of files and directories that are backed up or restored using NDMP is 255 characters. Multiple directories within the same file system, and multiple file systems, can be backed up or restored concurrently.
All extended attributes, including access control list (ACL) information, are also stored for every file and directory in a backup. File set information is not backed up or restored. An NDMP restore session restores all of the files and directories in the backed up structure along with their extended attributes, including ACL information.
A snapshot is used to provide a point-in-time copy for a backup; it is the snapshot of the directory structure that is backed up. The use of a snapshot accounts for files that might be open or in use during the backup.
A single file in the NDMP backup data stream can be restored by using the NDMP Direct Access Restore (DAR) feature if DAR is supported by the Data Management Application (DMA). All metadata, including ACL information, is restored along with the file contents.
The NDMP function is configured and managed on the IBM SONAS system by using the IBM SONAS command-line interface (CLI) from the active Management Node. NDMP alerts are written to the alert log on the IBM SONAS active management node. Viewing an alert log NDMP entry is the only IBM SONAS system NDMP feature that is accessible from the IBM SONAS graphical user interface (GUI). It should be a part of the daily routine when NDMP backup is deployed.
Full or differential backups
Full and differential backup and restore of file system data is provided by capturing all data and all metadata using file system snapshots. An NDMP backup session provides backup of a specific directory, a set of directories in a file system, or all of the files and subdirectories that are contained within a file system. Multiple directories within the same file system, and multiple file systems, can be backed up or restored concurrently. All extended attributes, including access control list (ACL) information, are also stored for every file and directory in a backup. File set information is not backed up or restored.
NDMP-based differential backup triggers an internal parallel scan of all changed files and then makes them available to the NDMP server. NDMP-based backups are done over TCP/IP, and the backup server is responsible for streaming the returned data to tape.
Currently, NDMP for full or differential backups can be done at the directory or file system level, including snapshots.
After a full backup image is created, subsequent backups can be differential images. A differential image consists of all the files that have changed since the previous full image backup. The restore of a differential image automatically restores the differential image after the appropriate full image has been restored.
Advantages of NDMP
The advantages to using the NDMP methodology are discussed here.
Selectable backups
A subset of a file system can be backed up by specifying what is to be backed up at the file set level. This process enables specific directories to be removed from backup consideration if the versions of files that are held in those directories are already backed up, or a backup copy is not necessary.
GPFS scan
As the number of files continues to grow in a single file system, the time that is required for this scan with the traditional “walk the directory tree” method becomes a major obstacle to completing the backup within the backup window. To make the process of identifying files that need to be processed by NDMP-based backup, the GPFS scan is used.
Data consistent backups
The SONAS NDMP support uses the GPFS snapshot to provide a file consistent backup.
HSM
HSM functionality depends on Tivoli Storage Manager agents. If you are using NDMP backups with a non-Tivoli Storage Manager service, you cannot use a Tivoli Storage Manager service to provide HSM storage tiering.
Cumulative differential backups
For most agents, differential backups are cumulative. This means that each differential backup contains all changes that are accumulated since the last full backup. Each successive differential backup contains all the changes from the previous differential backup. This means that each subsequent differential backup takes longer to complete. At some time, a new full backup must be done to reset the differential backup. Periodically doing a complete backup affects the start of the next backup and affects the RPO.
No versioning
Tivoli Storage Manager like version retention of multiple versions of a file is not available through NDMP. There is no way to specify the number of versions for an individual file because retention is managed at the image level. Using the NDMP backup utility, it might be possible to manage versions of files can at the image level.
Single File recovery
Single file recovery is not available through NDMP.
Backup and Recovery metrics
This section describes the backup and recovery metrics as related to NDMP.
RPO
The RPO of backups that are created by the NDMP command depend on the scheduling of the backup and the time it takes to get the backup version to a secure site. Another factor is the time that it takes to complete the backup because the previous backup must complete before starting the next backup. This time becomes a problem when the differential backups must be reset with a full backup. This process is impractical for backing up large file systems.
The real advantage is the ability to maintain a single file system (name space) while removing a set of directories from backup consideration. By doing this process, an acceptable RPO can be accomplished.
RTO
For large-scale systems, this process becomes an issue because recovering petabytes of data can take a long time (high RTO times). This time is even more of a problem with NDMP, especially if there are several differential backups since the last full backup. This is because the full backup must be restored first, followed by the cumulative differential backup, which can contain changes for several days.
The management of files that are included in a backup by excluding files or by not causing a backup of the directories that the files are stored in is one way to lower the attainable RTO. This is achieved by designating specific directories to be backed up leaving the files in other directories without backup copies. This methodology enables both the removal of files for backup consideration and the recovery of critical files (stored in specific directories) to be restored to speed the resumption for production.
If there is accidental deletion and operational corruption, it is possible to restore a file system or file set. However, restore is at the file system or file set granularity, so recovery of a particular file is not possible. Files are restored at the image level, so all files in the image are restored. However, the entire image must be restored. Care must be taken to avoid overwriting files that are not part of the set of times that are needed for restoration with earlier versions.
Recovery through NDMP
The last full backup is recovered first. It is followed by the last incremental backup to complete the recovery.
Guidelines
The following list describes the major challenges for the backup from an NDMP share backup methodology at scale:
•During incremental NDMP backups, file system metadata is scanned to determine which files to back up. If the directory being backed up is very large, there might be a delay before data starts transferring.
•The time that it takes to restore the entire file system for disaster recovery.
Both of these challenges can be overcome by managing files in separate directories, and being selective about what needs to be backed up and recovered.
If it is possible to identify the files that are critical to recover first, it might be advantageous to place those files into a file system that will be recovered first for disaster recovery. This step might significantly lower the RTO.
For some applications that do not modify files, such as imaging, a directory by time period (year, quarter, month, and so on) can help, because the files for the previous period do not need to be “walked”. Backup of the current period is all that needs to be done.
7.4 Snapshots
This section describes GPFS snapshots for data versioning.
7.4.1 Managing snapshots
A snapshot of an entire file system, or of an independent file set, can be created to preserve the contents of the file system or the independent file set at a single point in time. You cannot create a snapshot of a dependent file set alone. However, running snapshots of a file system’s root file set captures snapshots of its dependent file sets, and enables you to manage the snapshots of independent file sets, independently.
The storage that is needed for maintaining a snapshot is due to the required retention of a copy of all of the data blocks that have been changed or deleted after the time of the snapshot, and is charged against the file system or independent file set quota. Therefore, SONAS snapshots are space-efficient because they only store data of blocks that have changed.
It is not advised to run scheduled snapshots of the file systems and all their independent file sets, because this process is redundant in the case of independent file sets.
Also, when there are many independent file sets in your file system, it is not advised that all file sets apply the same sets of rules. Instead, it is the preferred practice to break up the timing of the activity of snapshots and associated snapshot deletions so that different times can be used to achieve that feature enablement. (More information is provided later in this section.)
Snapshots are read-only. Changes can be made only to the normal, active files and directories, not to the snapshot.
The snapshot function enables a backup or mirror program to run concurrently with user updates, and still obtain a consistent copy of the data as of the time that the snapshot was created. Snapshots also provide an online backup capability that enables easy recovery from common problems such as accidental deletion of a file and comparison with older versions of a file.
Snapshots are managed by an automated background process that self-initiates once a minute. The snapshot management service creates and deletes snapshots based on the system time at process initiation and the attributes of snapshots rules that are created and then associated with file systems, or independent file sets, or both, by the system administrator.
There are two steps to configure snapshot management for a file system or independent file set. First, create the rule or rules. Then associate the rule or rules with the file system or independent file set.
A user must have the Snapshot Administrator role to do snapshot management functions.
Snapshot rule
A snapshot rule indicates the frequency and timing of the creation and deletion of snapshots, and also indicates the retention of the snapshots that are created by the rule. The retention attributes indicate how many snapshots are retained for the current day and for the previous days, weeks, and months. One snapshot can be retained for each previous day, week, or month that is identified, and is the last snapshot that is taken in that day, week, or month.
7.4.2 Traditional backup versions compared to snapshot versions
A snapshot of an entire GPFS file system or independent file set can be created to preserve the file system’s or file set’s contents at a single point in time. A snapshot contains a pointer to the file data as it existed at the time of the snapshot creation, while enabling the normal files to continue to be updated. Files that are preserved in a snapshot are read-only. Therefore, snapshot is a way to preserve versions of files as they existed at some time in the past.
The snapshot function can be used to preserve one or more versions of all files in a file system or file set at a particular point in time. These snapshot versions can be used to recover a previous version of one or more files if a file is accidentally deleted or corrupted by an application, much like a file or files are recovered from a traditional backup.
There are some differences worth noting between the traditional backup versions and snapshot versions. The snapshot copy of the file cannot be moved to an off-site location. Note however, that a copy of a snapshot copy can be moved off site.
Another important difference is that the backup version is made when a file has been changed. The snapshot version is taken across the file system or file set at a particular time even if no files (or all files) have been changed.
If a file has not changed, there is still a version of that file that is saved in the snapshot. This means that a file that is not changed is recoverable from any snapshot that was taken even though the file did not change.
The snapshot version is recoverable if the snapshot has not been deleted. Snapshots take up space in the GPFS file system only when changes are made to the files, where the traditional backup version is stored outside of the SONAS.
|
Note: Do not rely only on snapshots for important backups. A snapshot might not survive file system corruption or a catastrophic hardware failure, possibly due to an external event.
|
Example of versioning with snapshots
A customer wants to have a daily backup. Each day’s version of the file is kept for seven days. A weekly backup version is kept for eight weeks. After eight weeks, no backup versions are available.
To implement this scenario, you need to create some backup rules and associate the rules with an automatic snapshot policy. Figure 7-12 shows how to use the GUI to create a
new rule.
new rule.

Figure 7-12 Snapshot Rule Creation Launch from GUI
This scenario requires one snapshot rule to keep daily snapshots for seven days (see Figure 7-13). You can call this rule a Daily_w_1WeekRetention rule.

Figure 7-13 Daily snapshot with one-week retention from the GUI
It also requires a second snapshot rule to capture weekly snapshots with two months of retention (see Figure 7-14). This rule can be called Weekly_w_2MonthRetention. You can then create two automated snapshots, one with each rule associated, for each file system you want to have these snapshots.

Figure 7-14 Weekly snap with two-month retention from GUI
When the snapshot is saved, the CLI command structure that is used to create the rule is displayed (see Figure 7-15).

Figure 7-15 CLI for creating a snapshot rule that is associated to scheduled snapshots
When the rule is created, the snapshot can be scheduled and associated with that rule for any file system or independent file set as shown in Figure 7-16.

Figure 7-16 Snapshot with Auto Retention cleanup creation GUI
7.4.3 Snapshot rule preferred practices
Snapshot creation is instantaneous, but snapshot deletion requires a GPFS scan of the entire file system. Because snapshot rules instruct when the snapshot is to be created, tying too many automated snapshots to a single rule can create a GPFS burden at that time in the schedule if too many file systems and file sets use the same rule. There are a few preferred practices to consider.
Effect on capacity
For preferred practice, consider the effect on capacity for snapshots and the effect on performance during snapshot deletions.
SONAS uses space efficient snapshots and only writes physical copies on changed files, but these snapshots apply to all file system or file set data. So the effect can be a tremendous use of capacity if frequent changes are stored long term. At some point, having too many snapshots makes it more difficult to manage what versions had what changes, and its practical value diminishes greatly.
For that reason, it is the preferred practice to keep snapshots only on an as-necessary basis. This is probably a value of less than 50 or 60 snapshots per file set or file system.
Stagger snapshot creation times
It is also preferred practice to stagger your snapshot creation times. If you have 400 file sets, it is not practical or advisable to associate a single Daily snapshot rule to all file sets. This configuration not only creates the automatic snapshots to launch at the exact same time for all file sets, but also creates a retention cleanup operation that happens at the same time for each file set.
Remember that a snapshot delete requires a GFPS file system or file set scan, and each file set snapshot does this process independently. You might create a large effect by scanning 400 file sets all at the same time, or with the same time frame. Therefore, keep as many snapshots as necessary but as few as possible, and coordinate the time of snapshot creation to stagger the burden of snapshot deletion schedules.
Stagger replication timing
Another preferred practice is to stagger the replication timing from the snapshot schedules and peak client activity hours in heavy workload environments. Because every replication includes an initial snapshot creation, a metadata scan, and incremental data transfer, it is important to monitor performance workloads during these events to understand their effect.
If normal workflow performance is degraded during this process, you might consider adjusting the start times or expanding the RPO objectives to reduce the effect to production data workflow until you can add resources to the cluster where they are needed.
7.4.4 Snapshot configuration example
Here is an example of how to configure a client’s snapshot schedules for preferred practices:
•No snapshots are scheduled for the file system itself.
•All independent file sets (including the file system root file set) are on an automatic snapshot schedule for semi-daily snapshots, weekly snapshots, and monthly snapshots.
|
Note: The file system root file set snapshot captures all file system and dependent file set data, but not the underlying independent file sets.
|
•The snapshot rule that is applied to each file set is assigned alphabetically to ensure that not all file sets have applied snapshots or snapshot deletions at the same time. An example is shown in Figure 7-17 on page 250.
This configuration enables the schedules to stagger and distribute the heavy metadata scan requirements that are associated with snapshots at varying times in the daily schedule.
•A file set, whose name begins with the letters A - E, is assigned a semi-daily, weekly, or monthly snapshot rule that ends in A - E, and so on.
•The semi-daily snapshot takes a snapshot at roughly 5 or 6 am and 5 or 6 pm daily, and these snapshots are naturally and automatically deleted after one week of age.
•The weekly snapshot takes a snapshot at roughly 9 pm on a weekend, and these snapshots are naturally and automatically deleted after five weeks of age.
•The monthly snapshot takes a snapshot at roughly 1 am on a weekend and these snapshots are naturally and automatically deleted after six months of age.
This configuration ensures adequate protection of file set data (restorable by clients), and yet limits the number of active snapshots to roughly 25 for any file set, while mixing up the activation time and distributing the metadata scan burden of deletion schedules.
Figure 7-17 shows snapshot rules assigned alphabetically.

Figure 7-17 Snapshot rules with alphabetical separation
7.5 File clones
Clones are writable, point-in-time, space-efficient copies of individual files. Here are two related use cases.
One use case is for provisioning virtual machines by creating a file for each system by cloning a common base image.
The second use case is for cloning the virtual disk image of an individual system as part of creating a snapshot of the system state. You can clone a file, not a directory, file set, or file system. However, you can snapshot independent file sets and file systems. This feature is a special purpose feature.
7.5.1 Managing clone files
Use the mkclone CLI command to create a clone, to create multiple clones of the same file with no additional space required, and to create clones of clones. A clone parent file is a read-only copy of the source file that is being cloned and shares disk space for the data that is common with the original source file. The owning user of the original source file can modify the original file without affecting the clones.
As blocks are written to either file, pointers to the new data blocks are created. With cloning, two files that are 90% identical require 55% of the space that is required if the source file is instead copied to a non-clone file.
A parent file for the clone must be designated or created when the clone is created. This clone parent file is permanently immutable, and can either be designated to be the source file, or it can be a unique new file.
|
Restriction: When a file, even if it is a source file, is designated as the parent file, the source file becomes an immutable parent file, and can never be modified from that point forward. An attempt to modify a clone parent results in an access denied return code. When a clone parent becomes immutable, it cannot be reverted to being modifiable. It can only be deleted, and then only if it has no clone child.
|
Creating a clone file
To create a clone file, a CLI user that has the SecurityAdmin or DataAccess role authorization can use the mkclone CLI command and specify the source file and target file with the -s or --source and -t or --target options. You can optionally use the -p or --cloneParentFile option to specify a clone parent file that is separate from the source file; if these options are omitted, the source file becomes immutable due to its default designation as the clone parent.
Creating a clone example
The following example creates a separate parent file named someFileParent:
$ mkclone -s someFile -t someFileClone -p someFileParent
See the man page for more information:
The someFileParent file is created as an immutable clone parent file and cannot be modified. The file content of someFile and someFileClone are stored in the someFileParent file. The someFile and someFileClone files can be modified. However, the someFileParent file is immutable.
A file can have only one immutable parent. You cannot have two immutable clone parents of the same file clone, so the preferred practice is to check the status and clone parent information before creating your clone.
Before running the mkclone command, you must run lsclone <file-name> first to determine whether the source <file-name> is already a clone.
If a file does not have a parent file, the depth value is 0. The clones for this file have a depth value of 1. A clone of a clone has a depth value of 2, and so on.
7.6 Management node configuration backup tasks
This section describes backing up the active management node.
The active management node can be backed up by using the backupmanagementnode CLI command. The active management node backup enables the replacement of the management node if there is a failure of that node.
To back up the active management node manually, use the backupmanagementnode CLI command. This command does not create a scheduled backup task. For more information, including task parameters and default values, see the backupmanagementnode information in the SONAS section of the IBM Knowledge Center:
The command creates an archive that includes all the components. To specify components to back up, you must use the --component option.
Only the active management node is backed up with the backupmanagementnode CLI command.
|
Important: The backupmanagementnode CLI command does not back up file systems, file system settings, exports, file system pools, file sets, snapshots, or quotas.
|
A subsequent restore operation restores the active management node from the same system on which the management node archive was created. If a storage node or an interface node is reinstalled after an archive is created, the archive is no longer valid for use by a restore operation.
To back up the active management node to the /persist/mgmtbackup path on the strg001st001 storage node, enter the command that is shown in Figure 7-18.
|
# backupmanagementnode --targethost strg001st001 --targetpath /persist/mgmtbackup
|
Figure 7-18 Backupmanagementnode command example
To back up to a USB flash drive, enter the command that is shown in Figure 7-19.
|
# backupmanagementnode --mount /media/usb
|
Figure 7-19 Example of using the backupmanagementnode command to back up to a USB flash drive
|
Tip: The backupmanagementnode command makes a backup from the local management node, where the command is running, and stores it on another host or server. This command should be used only in configurations where there is a single dedicated management node. For Storwize V7000 Unified and for dual management nodes the backup is automatic, and the command should never be run from the command line.
|
7.7 External log service
This section shows how to create a system log server definition with the CLI.
You can use the mksyslogserver CLI command to create a new system log server configuration for an IBM SONAS system. You can configure at most six external servers that can receive system log (syslog) messages from an IBM SONAS clustered system, using the BSD syslog protocol as defined by Internet Engineering Task Force (IETF) Request for Comments (RFC) 3164.
7.7.1 Log server overview
The mksyslogserver CLI command creates a new system log server definition for an IBM SONAS system.
The command syntax is simple and self-explanatory, and log traffic can be secured by firewall rules to isolate an IP and port number. External logging is considered a preferred practice for SONAS and Storwize V7000 Unified.
The syntax in Figure 7-20 is used for the mksyslogserver command.
|
mksyslogserver syslogServerName [--ip ipAddress] [--port portNumber] [-c {system ID | system name}]
|
Figure 7-20 CLI for initiating external logging
7.7.2 Retrieving system log server information by using the CLI
You can use the lssyslogserver CLI command to display information about the system log servers of an IBM SONAS system.
Overview
The lssyslogserver CLI command retrieves information about the system log servers of an IBM SONAS system from the database and can optionally display the information in colon-delimited format.
The command syntax is simple, and it is good practice to validate that the external log server is collecting logs in your daily system status check.
The command in Figure 7-21 can be submitted without any option to list the system log servers of the SONAS system.
|
lssyslogserver [syslogServerName] [-c {system ID | system name}] [-Y]
|
Figure 7-21 Listing log server information
7.8 Antivirus
With today’s continuing explosive growth in data comes the need for storing the data without compromising data integrity from potential threats that might exist in an enterprise network environment. SONAS is qualified for interoperability with two leading antivirus scan engines: Symantec AntiVirus (SAV) for NAS and McAfee VirusScan Enterprise.
The data that is created or accessed with Network File System (NFS) or Common Internet File System (CIFS) is vulnerable to the potential threats of viruses, worms, Trojan horses, and other forms of malware. Computer viruses mostly target Microsoft operating systems. However, computers that are running other operating systems can be directly or indirectly affected by viruses.
The antivirus connector is a part of the SONAS management software, which communicates with vendor scan engines by using Internet Content Adaptation Protocol (ICAP). There are two main approaches for virus scanning:
•On-access scan. It scans all of the specified files on SONAS when accessed or created. This method has the benefit of ensuring that the files are scanned with the latest virus signature before they are accessed. This approach is more effective at detecting viruses before they are able to compromise data, and this method does not generate heavy network traffic between SONAS and SAV scan engines. This approach is ideal for customers who are using Windows clients and CIFS file I/O.
•Bulk scan. This method enables scanning of all of the specified files on a file system, or a part of file system. This scan is typically performed on the schedule that is defined on the SONAS system.
The disadvantage in using this method is that the files that are recently updated might not be scanned before being used. Bulk scans can generate heavy network traffic between SONAS and scan engines, and can generate heavy load on a storage system. Also, bulk scans can take significant time to complete, depending on the number of files to be scanned. Storage administrators are likely to use the bulk scans for non-CIFS files (for example, NFS) protection, which are less prone to virus attacks.
When users access a file from SONAS over the network, SONAS initiates the scan of a file in real time, opens a connection with the scan engine, and then passes the file to the scan engine for scanning. The scan engine indicates the scanning results to SONAS after the file is scanned. If the file is infected, the scan engine tries to repair the file, and sends the repaired file to SONAS.
If the file is infected and can be cleaned, a stored version of the infected file is replaced on SONAS with the repaired file that is received from the scan engine. Only the repaired file is passed to the requesting user. If a virus is detected and repair of the file is not possible, SONAS can be configured to quarantine or delete the non-repairable file, and notify the user with an error message that indicates permission is denied.
7.8.1 Integration considerations
The following factors need to be carefully considered before you integrate IBM SONAS with Symantec AntiVirus.
Numbers of Symantec scan engines
Antivirus scanning on SONAS requires a minimum of one scan engine that is configured with Symantec AntiVirus for NAS. However, to take full benefit of load balancing and the high availability feature of SONAS, use a minimum of two scan engines.
SONAS antivirus connector automatically performs load balancing to make sure that the workload is evenly distributed across the scan engines. When a scan engine becomes unavailable, the workload is directed to the remaining operational scan engines. The considerations that are listed here affect the number of scan engines that might be required:
•Total number of files that are stored on the SONAS requiring scanning
Large numbers of files can be scanned by multiple scan engines using the SONAS antivirus connector load balancing feature.
•Host processor speed and memory configuration
Fewer scan engines might be needed if processor speeds are faster and more memory is present on each scan engine.
•Network speed
Faster network speeds support reduced time in transferring larger files to the scan engine for scanning.
Figure 7-22 shows the workflow for antivirus software that is running on SONAS.

Figure 7-22 Workflow for antivirus software
7.8.2 Defining files to be scanned
In SONAS, the administrator can define which files or file types are to be scanned. The administrator can control and decide whether to scan files by exclusion list or inclusion list, or whether to scan all the files regardless of extensions.
The inclusion/exclusion list defines the following behavior:
•If the include list is empty or not defined, the default is that all extensions are included in the scan.
An excluded list is created to exclude files with specific file extensions from scanning by the Symantec scan engine.
•If an extension is in the include list, only files with that extension are scanned.
•If an extension is in the include and exclude lists, files with that extension are not scanned.
Careful planning is required to create the include and exclude list, because they play an important role in improving performance of the scan process. Not all file extensions need to be scanned due to the nature of the files and file types, which are unlikely to have viruses.
It is important to plan for the action that needs to be taken in case an unrecoverable virus file is identified. IBM SONAS provides the option to quarantine or delete the infected, unrecoverable file.
7.8.3 Defining scan engine pool
At least one scan engine must be registered to provide virus scanning for each SONAS. However, configure a minimum two scan engines in a scan engine pool to use the load-balancing facility that is provided by SONAS to distribute the scan load. Also, it provides the high-availability feature in case one scan engine is not available. SONAS tries to contact the failed scan engine periodically and reinstate it for scanning after it becomes available.
Every time a new antivirus definition file is downloaded by the scan engine, all files that are defined within all scopes must be rescanned before access. The bulk scan feature is a method to proactively scan all of those files during a window when access to the SONAS is at a minimum, reducing the load on the system and network during peak usage times.
7.8.4 Antivirus preferred practices
Antivirus scanning, particularly bulk scanning of large files, can add significant load to several SONAS system resources, and can cause performance bottlenecks. The following guidelines can help you minimize performance effect to the system:
•If on-access or bulk scan produces timeout errors, consider increasing the timeout value of scans by using the --timeout option of the cfgav command. Do not increase the timeout parameter beyond the CIFS client timeout value, which can cause files to become inaccessible to the user.
•Avoid scanning “expensive” items (such as scanning inside the HSM archived files or other containers) to avoid timeout issues.
•Avoid scanning files that are managed on tape (HSM) pools.
•Depending on the scanning performance requirements, the number of interface nodes on which bulk scans are run can be configured by using the --nodes option of the ctlavbulk command. If higher scanning performance is wanted, consider running scans on more interface nodes. To reduce effect to other SONAS resources, consider limiting the number of interface nodes on which bulk scans are run.
•Carefully select file types for scanning. Certain classes of large files are less likely to be prone to virus attacks. By unconfiguring certain types of files by using the --add-include|--rem-include|--set-include|--set-exclude options of the cfgav command, overall antivirus scanning performance can be greatly improved.
•Give similar consideration to selecting scopes for scanning, because some scopes might contain files that will not be accessed, and they are not likely to be prone to the virus attacks.
•Ensure that the storage system has adequate capacity for the client and scan traffic. On-access scans are less likely to add significant load to the storage backend because it is typically scanning data that has either just been written or is just about to be read by the client and therefore can take advantage of caching. Bulk scans can add significant load to the storage back-end.
•After updating the antivirus signature, scan all protected files during off-peak hours to minimize the effect of scanning during peak usage.
•Ensure that the network infrastructure, such as routers, switches, and network cards on both SONAS and scan engines, has adequate capacity. In a typical configuration, use 10-Gigabit Ethernet.
•Use a minimum of two scan engines to use high-availability and load-balancing features for the scanning.
•Ensure that scan nodes have adequate processor and disk performance.
•Run bulk scan after a migration either by Hierarchical Storage Management (HSM) recall or data restoration from the backup server.
•When using multiple scan engines to support scanning of IBM SONAS, consider the following factors:
– Configure the setting on each scan engine to be identical.
– Schedule an automatic update of all SAV scan engines to occur at the same time to ensure that virus definitions are identical.
– Configure virus scan functionality for each identical SONAS system that uses a particular scan engine to avoid inconsistency.
7.8.5 AntiVirus Summary
The ability to effectively protect shared file data against viruses, file loss, and other malicious threats is an important challenge for storage and security administrators who require a trusted and reliable antivirus solution. Not only must the integrity of the data be constantly maintained, the solution must also be scalable to match the continually expanding size and volume of data that is retained on an NAS system.
For specific details about how to configure and manage antivirus services and management details, read about both SONAS supported antivirus solutions in the IBM Knowledge Center:
7.9 Failover, failback, and disaster recovery
This section describes business continuance if a primary SONAS site is destroyed.
7.9.1 Disaster recovery
Disaster recovery (DR) is only supported for file systems that are correctly configured in asynchronous replication today. This section describes a process for DR with SONAS. It requires correct authentication of the primary and secondary site to the same directory service, and that those services have the correct authentication extensions for replication.
The target file systems must have adequate spindle and interface node configurations to support the capacity and performance that are required of the user base and all associated data.
The target site also needs adequate networking, access to active directory or LDAP services, NTP, and DNS services to serve the user community at large.
Asynchronous replication disaster recovery
Recovering a file system by using asynchronous replication requires that a replication relationship from the original target site to the original source site is configured and started.
After the source (Site A) site fails, you must set the target site (Site B) as the new source site, replicating back to Site A.
Where the previous replication relationship was Site A replicating to Site B, configure the asynchronous replication and reverse the source and target site information so that Site B now replicates to Site A.
Start the replication by using the startrepl CLI command, specifying the --fullsync option.
If the amount of data to be replicated back to the Site A is large, multiple replications from Site B to Site A might be required until modifications to Site B can be suspended to perform a final replication to catch up Site A. These incremental replications should not use the --fullsync option.
When data is verified as being replicated accurately to Site A, Site A can be reconfigured as the primary site. Remove any replication tasks that are going from Site B to Site A by using the rmtask CLI command.
7.9.2 Disaster recovery testing and high-level process overview
In most cases, do failover testing with sample data before going into production to allow the client to accurately document and test failover capturing all the specific edits and details to Shares, DNS, and so on, as it applies to them.
The following is a summary of the tasks that are typically required to test failover. Prepare for failover before applying the configuration to production. If the cluster is already in production, a small test file system can be assembled to test this configuration for a non-production file system before applying the failover script to a production file system.
Failover plan overview
A high-level plan includes the following tasks:
•Verify that replication is working and that the last replication was successful.
•Stop the automatic replication job, which runs every ½ hour (or as assigned).
•Initiate replication (primary to DR) manually and monitor progress.
•Inform users and application owners as soon as replication is completed.
Sample Message: Planned Service Outage: There will be a minor disruption in access. The NAS System is failing over to the disaster recovery site. It will be available in a few minutes. Stand by for an update.
•Update or change exports and shares to read-only (RO) mode at the primary site, then initiate another replication (Primary to DR) manually and monitor progress.
•Run the chexports command as needed to make them RO at the primary site.
•Run the lsexports command to verify exports that are on this file system are RO and get a name list.
•To the extent possible, stop all file access:
– If you have root access, use the smbstatus command to get process IDs (PIDs) of users that are actively connected to the previously mentioned export name list for this file system and stop processes that are associated with those PIDs on interface nodes.
– Use equivalent commands like showmount to stop NFS and HTTP access.
•Run the rmrepltarget command on the secondary site to ensure that the target is not over written if the primary comes back online.
•Change the Domain Name Server (DNS) entry for the application with the collaboration of the network engineering team:
– Rename the CName/alias from PrimarySONAS to SecondarySONAS.
– Rename the CName/alias from SecondarySONAS to PrimarySONAS.
•Verify that replication is completed. Change exports and shares to read/write (RW) mode at the DR site.
•Inform users and app owners as soon as exports and shares are updated to RW mode.
•If a problem is discovered, open an incident ticket and follow the troubleshooting steps.
•When service is validated, Start automatic replication from the DR to the primary system. Schedule the replication job to start automatic replication.
Figure 7-23 is a diagram of a disaster recovery operation with SONAS replication.

Figure 7-23 Flow diagram of a disaster recovery operation with SONAS replication
..................Content has been hidden....................
You can't read the all page of ebook, please click here login for view all page.