

Data protection
Data protection means backing up data and being able to recover it. You protect the data by making copies of it so that it is available for restoration even if the original is no longer available.
Businesses need data backup and protection for the following reasons:
•To protect data from accidentally deleted files, application crashes, data corruption,
and viruses
and viruses
•To archive data for future use
•To recover from a disaster
Data ONTAP provides a variety of tools that you can use to build a comprehensive strategy to protect your company's data:
•Snapshot copies: Enable you to manually or automatically create, schedule, and maintain multiple backups
•SnapRestore: Enables you to perform fast, space-efficient, on-request Snapshot recovery from Snapshot copies on an entire volume.
•SnapVault backups: Provide storage-efficient and long-term retention of backups.
•Volume copy: Enables you to perform fast block-copy of data from one volume to another.
The following topics are covered:
14.1 Snapshot
Snapshot copies are the first line of defense for data protection. Data ONTAP maintains a configurable Snapshot schedule that creates and deletes Snapshot copies automatically for each FlexVol volume and Infinite Volume. You can also create and delete Snapshot copies, and manage Snapshot schedules based on your requirements.
14.2 Snapshot introduction
A Snapshot is a point-in-time copy of a FlexVol volume representing the volume's contents at a particular point in time. You can view the contents of the Snapshot copy and use the Snapshot copy to restore data that you lost recently.
A Snapshot copy of a volume is located on the parent volume but has read-only access. It represents the contents of the original volume at a particular point in time. A parent volume and a Snapshot copy of it share disk space for all blocks that have not been modified between the creation of the volume and the time the Snapshot copy is made, thereby making Snapshot copies lightweight.
Similarly, two Snapshot copies share disk space for those blocks that were not modified between the times that the two Snapshot copies were created. You can create a chain of Snapshot copies to represent the state of a volume at a number of points in time. Users can access Snapshot copies online, enabling users to retrieve their own data from past copies, rather than asking a system administrator to restore data from tape. Administrators can restore the contents of a volume from a Snapshot copy.
Snapshot features are shown in Figure 14-1.

Figure 14-1 Snapshot features
14.2.1 Key features of Snapshot software
Here we provide a brief overview of the Snapshot features:
•Stability:
A Snapshot copy is a read-only, static, and immutable copy. It enables organizations to perform consistent backups from an N series storage system while applications run.
•Performance:
Storing a Snapshot copy on an N series system has no performance impact. In addition, creating and deleting a Snapshot copy have little performance impact on a properly configured system. Even if you use a competing primary storage system, N series storage can be used for replication, backup, and archival.
•Scalability:
N series storage volumes support up to 255 Snapshot copies. The ability to store a large number of low-impact, frequently created Snapshot copies increases the likelihood that the desired version of data can be successfully recovered.
•User visibility and file recoverability:
Snapshot high performance, scalability, and stability provides an ideal online backup for user-driven recovery. Additional solutions allow you to copy backups to offline disk or to tape and archive them in provably immutable form for compliance or e-discovery.
•Efficient storage utilization:
Two Snapshot copies taken in sequence differ only by the blocks added or changed in the time interval between the two. This block-incremental behavior limits associated storage capacity consumption. Some alternative implementations can consume storage volumes rivaling that of the active file system, raising storage capacity requirements.
14.2.2 User access to Snapshot copies
Each volume has a .snapshot directory that is accessible to NFS users by using the ls command and to CIFS users by double-clicking the ~snapshot folder. This access to Snapshot copies can be turned off.
Snapshot files carry the same read permissions as the original file. A user who has permission to read a file in the volume can read that file in a Snapshot copy. A user without read permission to the volume cannot read that file in a Snapshot copy. Snapshot copies do not have write permissions.
Example 14-1 shows the contents of the .snapshot directory within an NFS share. It is a set of subdirectories, labeled by type, date, and time.
Example 14-1 Listing .snapshot folder on NFS share
$ ls .snapshot
hourly.2013-05-15_1006/
hourly.2013-05-15_1106/
hourly.2013-05-15_1206/
hourly.2013-05-15_1306/
hourly.2013-05-15_1406/
hourly.2013-05-15_1506/
daily.2013-05-14_0013/
daily.2013-05-15_0012/
weekly.2013-05-13_0019/
Each subdirectory of the .snapshot directory includes a list of the parent volume's files and directories. If users accidentally delete or overwrite a file, they can locate it in the most recent Snapshot directory and restore it to their main read-write volume simply by copying it back to the main directory. Example 14-2 shows how an NFS user can locate and retrieve a file named my.txt from the .snapshot directory.
Example 14-2 Recovering my.txt file from latest snapshot
$ ls my.txt
ls: my.txt: No such file or directory
$ ls .snapshot
hourly.2013-05-15_1006/
hourly.2013-05-15_1106/
hourly.2013-05-15_1206/
hourly.2013-05-15_1306/
hourly.2013-05-15_1406/
hourly.2013-05-15_1506/
daily.2013-05-14_0013/
daily.2013-05-15_0012/
weekly.2013-05-13_0019/
$ ls .snapshot/hourly.2013-05-15_1506/my.txt
my.txt
$ cp .snapshot/hourly.2013-05-15_1506/my.txt .
$ ls my.txt
my.txt
|
Note: The .snapshot directory is always visible to NFSv2 and NFSv3 clients and available from within the volume, and not visible but still available from any other volume. For NFSv4 clients, the .snapshot directory is not visible, but accessible in all paths of a volume.
|
Some Snapshot copies in the .snapshot directory are used only to support internal system processes for the volume, such as data protection of the namespace constituent for an Infinite Volume, and you cannot access these Snapshot copies. You can access any of the Snapshot copies for a volume that are displayed when you use the volume snapshot show command. The command hides the types of Snapshot copies that you cannot access.
14.2.3 Maximum number of Snapshot copies
You should know what the maximum number of Snapshot copies you can accumulate is to minimize the possibility that you do not have Snapshot copies available when you need them.
•You can accumulate a maximum of 255 Snapshot copies of a FlexVol volume.
•If the FlexVol volume is in a data protection mirror relationship, the maximum number of Snapshot copies is 254 because one Snapshot copy is reserved for use by the relationship during recovery operations.
•If the FlexVol volume is in a disk to disk backup relationship, the maximum number of Snapshot copies is 251.
•If the Infinite Volume is in a data protection mirror relationship, the maximum number of Snapshot copies is reduced by two for each namespace mirror constituent and another 2 if you have a SnapMirror relationship between Infinite Volumes
Over time, automatically generated hourly, weekly, and monthly Snapshot copies accrue. Having a number of Snapshot copies available gives you a greater degree of accuracy if you have to restore a file.
The number of Snapshot copies can approach the maximum if you do not remove older Snapshot copies. You can configure Data ONTAP to automatically delete older Snapshot copies of volumes as the number of Snapshot copies approaches the maximum.
The following data protection mirror copies affect the maximum number of Snapshot copies available to a volume:
•A FlexVol volume in a data protection mirror relationship
•A FlexVol volume with a load-sharing mirror copy
•An Infinite Volume with one or more namespace mirror constituents
Each namespace mirror constituent uses two Snapshot copies. By default, a read/write Infinite Volume contains one namespace mirror constituent. If you enable SnapDiff on an Infinite Volume, each additional namespace mirror uses two Snapshot copies.
An Infinite Volume also uses up to four Snapshot copies when technical support runs some commands that require diagnostic privilege. You must keep the number of Snapshot copies far enough below the limit to ensure that technical support can run commands.
14.3 Creation of Snapshot copy schedules
Data ONTAP provides a default Snapshot copy schedule for each FlexVol volume and Infinite Volume. You can create schedules to fit your needs if the default Snapshot copy schedule is not adequate.
For FlexVol volumes, the default Snapshot copy schedule automatically creates one daily Snapshot copy Monday through Saturday at midnight, an hourly Snapshot copy five minutes past the hour, every hour, and a weekly Snapshot copy. Data ONTAP retains the two most recent nightly Snapshot copies and the six most recent hourly Snapshot copies, and deletes the oldest nightly and hourly Snapshot copies when new Snapshot copies are created.
14.3.1 Types of user-specified Snapshot copy schedules
Data ONTAP contains weekly, daily, and hourly Snapshot copy schedules that you can use to create Snapshot copy policies that retain the number and type of Snapshot copies you want.
Table 14-1 describes the available types of Snapshot copy schedules.
Table 14-1 Snapshot copy schedules
|
Type
|
Description
|
|
Weekly
|
Data ONTAP creates these Snapshot copies every Sunday at 15 minutes after midnight.
Weekly Snapshot copies are named weekly.n, where n is the date in year-month-day format followed by an underscore (_) and the time. For example, a weekly Snapshot copy created on 25 November 2012 is named weekly.2012-11-25_0015.
|
|
Daily
|
Data ONTAP creates these Snapshot copies every night at 10 minutes after midnight.
Daily Snapshot copies are named daily.n, where n is the date in year-month-day format followed by an underscore (_) and the time. For example, a daily Snapshot copy created on 4 December 2012 is named daily.2012-12-04_0010.
|
|
Hourly
|
Data ONTAP creates these Snapshot copies five minutes after the hour.
Hourly Snapshot copies are named hourly.n, where n is the date in year-month-day format followed by an underscore (_) and the time. For example, an hourly Snapshot copy created on 4 December 2012 at 1:00 (1300) is named hourly.2012-12-04_1305.
|
14.3.2 Creating a Snapshot copy schedule
If the default Snapshot copy schedule does not meet your needs, you can create a schedule that does by using the job schedule cron create command or the job schedule interval create command.
Depending on how you want to implement the schedule, run one of the following commands:
•The job schedule cron create command creates a cron schedule. A cron schedule, like a UNIX cron job, runs at a specified time. You can also specify months, days of the month, or days of the week on which the schedule will run.
If you specify values for both days of the month and days of the week, they are considered independently. For example, a cron schedule with the day specification Friday, 13 runs every Friday and on the 13th day of each month, not just on every Friday the 13th.
Example 14-3 creates a cron schedule named weekendcron that runs on weekend days (Saturday and Sunday) at 3:00 a.m.
Example 14-3 Cron schedule example
cluster1::> job schedule cron create -name weekendcron -dayofweek "Saturday, Sunday" -hour 3 -minute 0
•The job schedule interval create creates an interval schedule. An interval schedule runs jobs at specified intervals after the previous job finishes.
For example, if a job uses an interval schedule of 12 hours and takes 30 minutes to complete, the job runs at the following times:
– Day one at 8:00 a.m. (the job's initial run)
– Day one at 8:30 p.m.
– Day two at 9:00 a.m.
– Day two at 9:30 p.m.
Example 14-4 creates an interval schedule named rollingdaily that runs six hours after the completion of the previous occurrence of the job.
Example 14-4 Interval schedule example
cluster1::> job schedule interval create -name rollingdaily -hours 6
See the man page for each command to determine the command that meets your needs.
14.3.3 Deleting Snapshot copies automatically
You can automatically delete Snapshot copies from read-write volumes and FlexClone LUNs from read-write parent volumes. You cannot set up automatic deletion of Snapshot copies from Infinite Volumes or from read-only volumes, for example, SnapMirror destination volumes.
You define and enable a policy for automatically deleting Snapshot copies by using the volume snapshot autodelete modify command.
Example 14-5 enables the automatic deletion of Snapshot copies and sets the trigger to snap_reserve for the vol3 volume, which is part of the vs0 storage virtual machine (SVM).
Example 14-5 Enabling automatic deletion of Snapshot copies
cluster1::> volume snapshot autodelete modify -vserver vs0 -volume vol3 -enabled true -trigger snap_reserve
Example 14-6 enables the automatic deletion of Snapshot copies and of FlexClone LUNs for the vol3 volume, which is part of the vs0 SVM.
Example 14-6 Enabling the automatic deletion of Snapshot copies and of FlexClone LUNs
cluster1::> volume snapshot autodelete modify -vserver vs0 -volume vol3 -enabled true -trigger volume -commitment try -delete-order oldest_first -destroy-list lun_clone,file_clone
See the volume snapshot autodelete modify man page for information about the parameters that you can use with this command to define a policy that meets your needs.
|
Notes:
•You can view the settings for the automatic deletion of Snapshot copies to help you when you are deciding if the settings are meeting your needs.
•View the settings for the automatic deletion of Snapshot copies by using the volume snapshot autodelete show command.
|
14.4 Snapshot for Infinite Volume
Snapshot copies are managed at the Infinite Volume level, not at the individual data constituent level or the storage class level. Similarly to the way he uses a FlexVol volume, an administrator can create, delete, and restore data files by using Snapshot on the Infinite Volume along with the similar (hourly, nightly, weekly) Snapshot schedule management.
The Snapshot copy of Infinite Volume differs from that of a FlexVol volume in terms of performance, because all the constituents have to be fenced, Snapshot copies created, and unfenced together. The latency that this incurs for file operations increases linearly with the number of data constituents.
|
Note: Infinite Volume-level Snapshot copies are crash-consistent Snapshot copies. The Snapshot process coordinates with each individual data constituent on each node to start the Snapshot creation process by fencing all I/Os while performing the Snapshot creation.
|
•A Snapshot copy can incur latency of up to 30 seconds if the number of data constituents is <=50.
•It can incur latency up to 2 minutes if the number of data constituents is 200.
The .snapshot directory for a FlexVol volume shows the files in the Snapshot copies only for that specific FlexVol volume, not for the entire namespace that is using numerous junctions in that hierarchy. A Snapshot copy of an Infinite Volume shows the files for the entire namespace at the Infinite Volume level.
14.4.1 Snapshot for FlexVol volume versus Infinite Volume
Table 14-2 compares the Snapshot functionality for the FlexVol volumes with that for the Infinite Volume.
Table 14-2 Snapshot for FlexVol volume versus Infinite Volume
|
Snapshot functionality
|
FlexVol volume
|
Infinite Volume
|
|
Create / Delete / Restore
|
Yes
|
Yes
|
|
Single File SnapRestore
|
Yes
|
No
|
|
Compute space reclaimable
|
Yes
|
No
|
|
Rename
|
Yes
|
No
|
|
Show
|
Yes
|
Yes
|
|
Latencies less than 2 minutes for commands
|
Yes
|
No
|
|
Snapshot policy (includes any of the defined policies in volume snapshot policy)
|
Yes
|
Yes
|
|
Subvolume Snapshot copies (partial behavior)
|
N/A
|
No
|
|
Auto Snapshot delete
|
Yes
|
No
|
|
Manage ONTAP (ZAPI) support
|
Yes
|
Yes
|
14.4.2 Snapshot copies for Infinite Volume states
Snapshot copies of an Infinite Volume are restorable and fully accessible to clients only when the Snapshot copies are in a valid state.
The availability of a Snapshot copy of an Infinite Volume is indicated by its state, as explained in Table 14-3.
Table 14-3 Snapshot copies for Infinite Volume states
|
State
|
Description
|
Client access to the Snapshot copy
|
Impact on restore
|
|
Valid
|
The copy is complete.
|
Fully accessible to clients
|
Can be restored
|
|
Partial
|
Data is missing or incomplete.
|
Partially accessible to clients
|
Cannot be restored without assistance from technical support
|
|
Invalid
|
Namespace information is missing or incomplete.
|
Inaccessible to clients
|
Cannot be restored
|
The validity of a Snapshot copy is not tied directly to the state of the Infinite Volume. A valid Snapshot copy can exist for an Infinite Volume with an offline state, depending on when the Snapshot copy was created compared to when the Infinite Volume went offline. For example, a valid Snapshot copy exists before a new constituent is created. The new constituent is offline, which puts the Infinite Volume in an offline state. However the Snapshot copy remains valid because it references its needed pre-existing constituents. The Snapshot copy does not reference the new, offline constituent.
To view the state of Snapshot copies, you can use the volume snapshot show command.
14.4.3 Guidelines for working with Snapshot copies of Infinite Volumes
You can create, manage, and restore Snapshot copies of Infinite Volumes. However, you should be aware of the factors affecting the Snapshot creation process and the requirements for managing and restoring the copies.
Guidelines for creating Snapshot copies of Infinite Volumes
Observe the following guidelines:
•The volume must be online.
You cannot create a Snapshot copy of an Infinite Volume if the Infinite Volume is in a Mixed state because a constituent is offline.
•The Snapshot copy schedule should not be less than hourly.
It takes longer to create a Snapshot copy of an Infinite Volume than of a FlexVol volume. If you schedule Snapshot copies of Infinite Volumes for less than hourly, Data ONTAP tries but might not meet the schedule. Scheduled Snapshot copies are missed when the previous Snapshot copy is still being created.
•Time should be synchronized across all the nodes that the Infinite Volume spans.
Synchronized time helps schedules for Snapshot copies run smoothly and restoration of Snapshot copies function properly.
•The Snapshot copy creation job can run in the background.
Creating a Snapshot copy of an Infinite Volume is a cluster-scoped job (unlike the same operation on a FlexVol volume). The operation spans multiple nodes in the cluster. You can force the job to run in the background by setting the -foreground parameter of the volume snapshot create command to false.
•After you create Snapshot copies of an Infinite Volume, you cannot rename the copy or modify the comment or SnapMirror label for the copy.
Guidelines for managing Snapshot copy disk consumption
Observe the following guidelines:
•You cannot calculate the amount of disk space that can be reclaimed if Snapshot copies of an Infinite Volume are deleted.
•The size of a Snapshot copy for an Infinite Volume excludes the size of namespace mirror constituents.
•If you use the df command to monitor Snapshot copy disk consumption, it displays information about consumption of the individual data constituents in an Infinite Volume, not for the Infinite Volume as a whole.
•To reclaim disk space used by Snapshot copies of Infinite Volumes, you must manually delete the copies.
You cannot use a Snapshot policy to automatically delete Snapshot copies of Infinite Volumes. However, you can manually delete Snapshot copies of Infinite Volumes, and you can run the delete operation in the background.
Guidelines for restoring Snapshot copies of Infinite Volumes
Observe the following guidelines:
•You must restore the entire Snapshot copy of the Infinite Volume.
You cannot restore single files or parts of files. You also cannot restore a Snapshot copy of a single constituent.
•The Snapshot copy must be in a valid state.
You cannot use admin privilege to restore a Snapshot copy of an Infinite Volume if the copy is in a partial or invalid state because the commands require diagnostic privilege. However, you can contact technical support to run the commands for you.
14.5 Snapshot process: Basic operation
The basic operation of the Snapshot process proceeds as follows:
1. Snapshots are performed from active data on the file system (Figure 14-2).

Figure 14-2 Identify active data to be snapped
2. When an initial Snapshot is done, no initial data is copied. Instead, pointers are created to the original blocks for recording a point-in-time state of these blocks (Figure 14-3). These pointers are contained within metadata.

Figure 14-3 Pointers are created
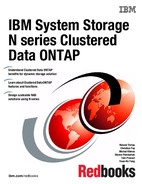
3. When a request to block C occurs, the original block C1 is frozen to maintain a point-in-time copy, and the modified block C2 is written to another location on disk and becomes the active block (Figure 14-4).

Figure 14-4 Modified block written to a location on disk becomes the active block
4. The final result is that the Snapshot now consumes 4 K + C1 of space. Active points for the point-in-time Snapshot are unmodified blocks A, B, and point-in-time copy C1 (Figure 14-5).
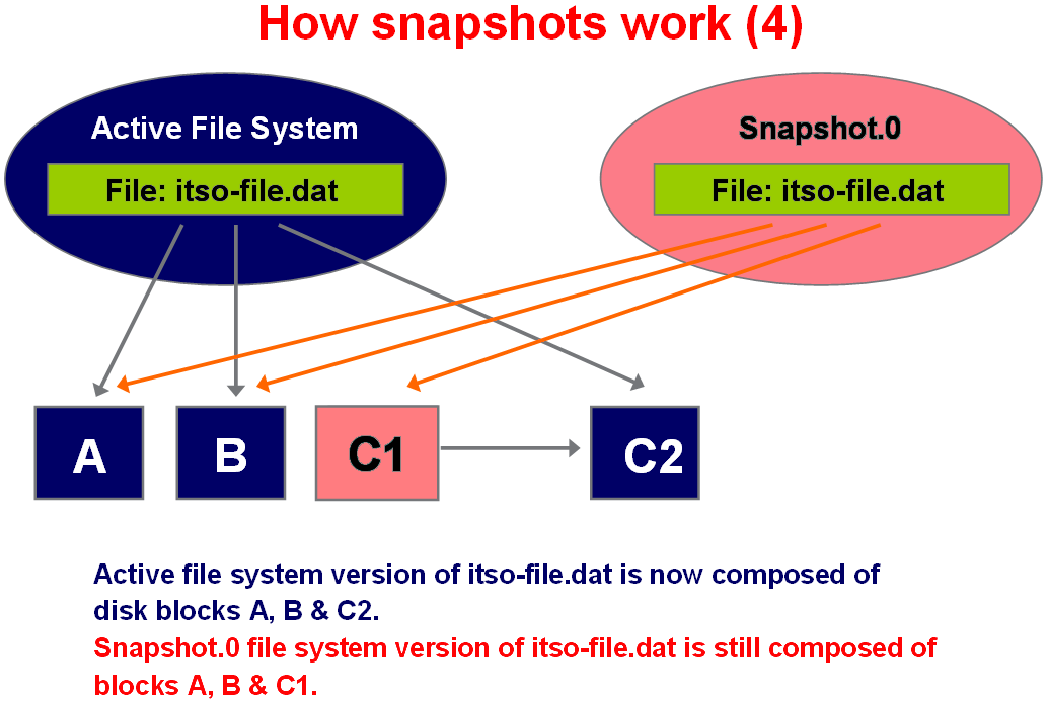
Figure 14-5 Final result showing active points
14.6 Understanding Snapshots in detail
A small percentage of the drive's available space is used to store file-system-related data and can be considered as impacting the system. A file system splits the remaining space into small, consistently sized segments. In the UNIX world, these segments are known as inodes.
Understanding that the WAFL file system is a tree of blocks rooted by the root inode is the key to understanding Snapshots. To create a virtual copy of this tree of blocks, WAFL simply duplicates the root inode. Figure 14-6 illustrates how this works.

Figure 14-6 WAFL creates a Snapshot by duplicating the root inode
Column A in Figure 14-6 represents the basic situation before the Snapshot.
Column B in Figure 14-6 shows how WAFL creates a new Snapshot by making a duplicate copy of the root inode. This duplicate inode becomes the root of a tree of blocks representing the Snapshot, just as the root inode represents the active file system. When the Snapshot inode is created, it points to exactly the same disk blocks as the root inode. Thus, a brand-new Snapshot consumes no disk space except for the Snapshot inode itself.
Column C in Figure 14-6 shows what happens when a user modifies data block D. WAFL writes the new data to block D on disk and changes the active file system to point to the new block. The Snapshot still references the original block D, which is unmodified on disk.
Over time, as files in the active file system are modified or deleted, the Snapshot references more and more blocks that are no longer used in the active file system. The rate at which files change determines how long Snapshots can be kept online before they consume an unacceptable amount of disk space.
WAFL Snapshots duplicate the root inode instead of copying the entire inode file. It reduces considerable disk I/O and saves a lot of disk space. By duplicating only the root inode, WAFL creates Snapshots quickly and with little disk I/O. Snapshot performance is important because WAFL creates a Snapshot every few seconds to allow quick recovery after unclean system shutdowns.
The transition from column B in Figure 14-6 on page 221 to column C is illustrated in more detail here in Figure 14-7. When a disk block is modified and its contents written to a new location, the block's parent must be modified to reflect the new location. The parent's parent, in turn, must also be written to a new location, and so on up to the root of the tree.

Figure 14-7 Block updates
WAFL might be inefficient if it wrote this many blocks for each Network File System (NFS) write request. Instead, WAFL gathers up many hundreds of NFS requests before scheduling a write episode. During a write episode, WAFL allocates disk space for all the unclean data in the cache and schedules the required disk I/O. As a result, commonly modified blocks (such as indirect blocks and blocks in the inode file) are written only once per write episode instead of once per NFS request.
14.6.1 How Snapshot copies consume disk space
Snapshot copies minimize disk consumption by preserving individual blocks rather than whole files. Snapshot copies begin to consume extra space only when files in the active file system are changed or deleted. When it happens, the original file blocks are still preserved as part of one or more Snapshot copies.
In the active file system, the changed blocks are rewritten to different locations on the disk or removed as active file blocks entirely. As a result, in addition to the disk space used by blocks in the modified active file system, disk space used by the original blocks is still reserved to reflect the status of the active file system before the change.
Figure 14-8 shows disk space usage for a Snapshot copy.

Figure 14-8 How Snapshot copies consume disk space
14.6.2 How changing file content consumes disk space
A given file can be part of a Snapshot copy. The changes to such a file are written to new blocks. Therefore, the blocks within the Snapshot copy and the new (changed or added) blocks both use space within the volume.
Changing the contents of the myfile.txt file creates a situation where the new data written to myfile.txt cannot be stored in the same disk blocks as the current contents because the Snapshot copy is using those disk blocks to store the old version of myfile.txt. Instead, the new data is written to new disk blocks. As the following illustration shows, there are now two separate copies of myfile.txt on disk a new copy in the active file system and an old one in the Snapshot copy.
Figure 14-9 shows how changing file content consumes disk space.

Figure 14-9 How changing file content consumes disk space
14.6.3 What the Snapshot copy reserve is
The Snapshot copy reserve sets a specific percentage of the disk space for Snapshot copies. For FlexVol volumes, the default Snapshot copy reserve is set to 5% of the disk space. By default, the Snapshot copy reserve is 5% of the disk space for a FlexVol volume and 0% for aggregates.
The active file system cannot consume the Snapshot copy reserve space, but the Snapshot copy reserve, if exhausted, can use space in the active file system.
|
Tip: Although the active file system cannot consume disk space reserved for Snapshot copies, Snapshot copies can exceed the Snapshot copy reserve and consume disk space normally available to the active file system.
|
Managing the Snapshot copy reserve involves the following tasks:
•Ensuring that enough disk space is set aside for Snapshot copies so that they do not consume active file system space
•Keeping disk space consumed by Snapshot copies below the Snapshot copy reserve
•Ensuring that the Snapshot copy reserve is not so large that it wastes space that can be used by the active file system
Use of deleted active file disk space
When enough disk space is available for Snapshot copies in the Snapshot copy reserve, deleting files in the active file system frees disk space for new files, while the Snapshot copies that reference those files consume only the space in the Snapshot copy reserve.
If Data ONTAP created a Snapshot copy when the disks were full, then deleting files from the active file system does not create any free space because everything in the active file system is also referenced by the newly created Snapshot copy. Data ONTAP has to delete the Snapshot copy before it can create any new files.
The following topics describe how disk space being freed by deleting files in the active file system ends up in the Snapshot copy. If Data ONTAP creates a Snapshot copy when the active file system is full and there is still space remaining in the Snapshot reserve, the output from the df command (Example 14-7) displays statistics about the amount of disk space on a volume.
Example 14-7 Command output - space freed by deleting files in active file system ends up in the Snapshot copy
itsonas1*> df /vol/LUN1
Filesystem kbytes used avail capacity
/vol/LUN1/ 3000000 300000 0 100%
/vol/LUN1/.snapshot 1000000 1000000 500000 50%
itsonas1*>
If you delete 100,000 KB (0.1 GB) of files, the disk space used by these files is no longer part of the active file system, so the space is reassigned to the Snapshot copies instead.
Data ONTAP reassigns 100,000 KB (0.1 GB) of space from the active file system to the Snapshot reserve. Because there was reserve space for Snapshot copies, deleting files from the active file system freed space for new files. If you enter the command again, the output df command is displayed (Example 14-8).
Example 14-8 Command output - reassigned 01.GB space from active file system to Snapshot reserve
itsonas1*> df /vol/LUN1
Filesystem kbytes used avail capacity
/vol/LUN1/ 3000000 2900000 100000 97%
/vol/LUN1/.snapshot 1000000 600000 400000 60%
itsonas1*>
Snapshot copies can exceed reserve
There is no way to prevent Snapshot copies from consuming disk space greater than the amount reserved for them. Therefore, it is important to reserve enough disk space for Snapshot copies so that the active file system always has space available to create new files or modify existing ones.
Consider what happens if all files in the active file system are deleted. Before the deletion, the df command output is listed in Example 14-9.
Example 14-9 Command output before deletion of all files in the active file system
itsonas1*> df /vol/LUN1
Filesystem kbytes used avail capacity
/vol/LUN1/ 3000000 300000 0 100%
/vol/LUN1/.snapshot 1000000 1000000 500000 50%
itsonas1*>
After the deletion of all files in an active file systems, the entire 3,000,000 KB (3 GB) in the active file system is still being used by Snapshot copies, along with the 500,000 KB (0.5 GB) that was being used by Snapshot copies before, making a total of 3,500,000 KB (3.5 GB) of Snapshot copy data. It is 2,500,000 KB (2.5 GB) more than the space reserved for Snapshot copies; therefore, 2.5 GB of space that might be available to the active file system is now unavailable to it. The post-deletion output of the df command (Example 14-10) lists this unavailable space as used even though no files are stored in the active file system.
Example 14-10 Command output after deletion of all files in the active file system
itsonas1*> df /vol/LUN1
Filesystem kbytes used avail capacity
/vol/LUN1/ 3000000 2500000 500000 83%
/vol/LUN1/.snapshot 1000000 3500000 0 350%
itsonas1*>
Recovery of disk space for file system use
Whenever Snapshot copies consume more than 100% of the Snapshot reserve, the system is in danger of becoming full. In this case, you can create files only after you delete enough Snapshot copies.
If 500,000 KB (0.5 GB) of data is added to the active file system, a df command generates the output in Example 14-11.
Example 14-11 Command output after 500,000 KB of data is added to the active file system
itsonas1*> df /vol/LUN1
Filesystem kbytes used avail capacity
/vol/LUN1/ 3000000 2500000 0 100%
/vol/LUN1/.snapshot 1000000 3500000 0 350%
itsonas1*>
As soon as Data ONTAP creates a new Snapshot copy, every disk block in the file system is referenced by some Snapshot copy. Therefore, no matter how many files you delete from the active file system, there is still no room to add any more. The only way to recover from this situation is to delete enough Snapshot copies to free more disk space.
14.7 Snapshot data structures and algorithms
Most file systems keep track of free blocks by using a bit map with one bit per disk block.
If the bit is set, then the block is in use. However, this technique does not work for WAFL because many Snapshots can reference a block at the same time.
If the bit is set, then the block is in use. However, this technique does not work for WAFL because many Snapshots can reference a block at the same time.
Figure 14-10 shows the lifecycle of a typical block-map entry. At time T1, the block-map entry is completely clear, indicating that the block is available. At time T2, WAFL allocates the block and stores file data in it.

Figure 14-10 Lifecycle of a block-map file entry
When Snapshots are created, at times t3 and t4, WAFL copies the active file system bit into the bit indicating membership in the Snapshot. The block is deleted from the active file system at time t5. It can occur either because the file containing the block is removed or because the contents of the block are updated and the new contents are written to a new location on disk.
The block cannot be reused, however, until no Snapshot references it. In Figure 14-10, it occurs at time t8, after both Snapshots that reference the block have been removed.
14.7.1 Creating a Snapshot
The challenge in writing a Snapshot to disk is to avoid locking out incoming NFS requests. The problem is that new NFS requests might need to change cached data that is part of the Snapshot and that must remain unchanged until it reaches disk.
An easy way to create a Snapshot is to suspend NFS processing, write the Snapshot, and then resume NFS processing. However, writing a Snapshot can take more than a second, which is too long for an NFS server to stop responding. (Remember that WAFL creates a consistency point Snapshot at least every 10 seconds, so performance is critical.)
The WAFL technique for keeping Snapshot data self-consistent is to mark all the unclean data in the cache as IN_Snapshot. The rule during Snapshot creation is that data marked IN_Snapshot must not be modified, and data not marked IN_Snapshot must not be flushed to disk. NFS requests can read all file system data and can modify data that is not IN_Snapshot, but processing for requests that must modify IN_Snapshot data must be deferred.
To avoid locking out NFS requests, WAFL must flush IN_Snapshot data as quickly as possible. To do this, WAFL performs the following tasks:
1. Allocates disk space for all files with IN_Snapshot blocks.
WAFL caches inode data in two places:
– In a special cache of in-core inodes
– In disk buffers belonging to the inode file
When it finishes write allocating a file, WAFL copies the newly updated inode information from the inode cache into the appropriate inode file disk buffer and clears the IN_Snapshot bit on the in-core inode.
When this step is complete, no inodes for regular files are marked IN_Snapshot, and most NFS operations can continue without blocking. Fortunately, this step can be done quickly because it requires no disk I/O.
2. Updates the block-map file.
For each block-map entry, WAFL copies the bit for the active file system to the bit for the new Snapshot.
3. Writes all IN_Snapshot disk buffers in cache to their newly allocated locations on disk.
As soon as a particular buffer is flushed, WAFL restarts any NFS requests waiting to modify it.
4. Duplicates the root inode to create an inode that represents the new Snapshot and turns the root inode's IN_Snapshot bit off.
The new Snapshot inode must not reach the disk until after all other blocks in the Snapshot have been written. If this rule were not followed, an unexpected system shutdown can leave the Snapshot in an inconsistent state.
After the new inode has been written, no more IN_Snapshot data exists in cache, and any NFS requests that are still suspended can be processed. Under normal loads, WAFL performs these four steps in less than a second. Step 1 can generally be done in just a few hundredths of a second, and after WAFL completes it, few NFS operations need to be delayed.
To create the Snapshot on an SVM vs1, volume vol1, named snap1 manually, enter the command shown in Example 14-12.
Example 14-12 Creating the snapshot
cluster1::> volume snapshot create -vserver vs1 -volume vol1 -snapshot snap1
|
Notes:
•Due to the fact that you can run deduplication only on the active file system, Snapshot copies created before you run deduplication, locks the data in Snapshot, resulting in reduced space savings.
•To avoid conflicts between deduplication and Snapshot copies, run deduplication before creating new Snapshot copies or remove unnecessary Snapshot copies stored in deduplicated volumes.
|
14.7.2 Deleting a Snapshot
Deleting a Snapshot is a simple task. WAFL simply zeros the root inode representing the Snapshot and clears the bit representing the Snapshot in each block-map entry.
When creating Snapshots from LUNs, the task can be accomplished by using SnapDrive software from the host and running the snap delete command from the Data ONTAP command-line interface (CLI), or using System Manager.
Example 14-13 Manual deletion of snapshot
cluster1::> volume snapshot delete -vserver vs1 -volume vol1 -snapshot snap1
The various parts of this expression have the following meanings:
•The volume_name is the name of the volume that contains the Snapshot to delete.
•The snapshot_name is the specific Snapshot to delete.
14.8 SnapVault
SnapVault is a separately licensed feature in Cluster Data ONTAP that provides disk-based space-efficient data protection for storage systems. It performs asynchronous replication using snapshot copies of a primary volume.
A SnapVault backup is a collection of Snapshot copies on a FlexVol volume that you can restore data from if the primary data is not usable. Snapshot copies are created based on a Snapshot policy. The SnapVault backup backs up Snapshot copies based on its schedule and SnapVault policy rules.
You can convert SnapMirror to SnapVault relationship if needed. The major operational difference is that SnapVault allows you to have different retention schedules for Snapshot copies on the primary and secondary volume. You can keep up to 251 Snapshot copies per volume.
14.9 SnapVault basics
SnapVault, as shown in Figure 14-11, protects data on IBM N series storage systems by maintaining a number of read-only versions of that data on a SnapVault secondary system and the SnapVault primary system.
|
Note: SnapVault relationships are not supported on Infinite Volumes.
|
SnapVault is a disk-based storage backup feature of Cluster Data ONTAP. SnapVault enables data stored on multiple systems to be backed up to a central, secondary system quickly and efficiently as read-only Snapshot copies.

Figure 14-11 SnapVault technology overview
In the event of data loss or corruption on a system, backed-up data can be restored from the SnapVault secondary system with less downtime and uncertainty than is associated with conventional tape backup and restore operations.
|
Note: Notice that SnapVault has a read-only destination. This is different from 7-Mode, where the destination could be converted to RW using SnapMirror, this is not possible in Clustered Data ONTAP. You can create a FlexClone copy of a SnapVault backup.
|
14.9.1 SnapVault terms
The following terms are used to describe the SnapVault feature:
•Primary system:
A system whose data is to be backed up.
•Primary volume:
A volume that contains data that is to be backed up. In cascade or fan-out backup deployments, the primary volume is the volume that is backed up to a SnapVault backup, regardless of where in the chain the SnapVault source is. In a cascade chain configuration in which A has a mirror relationship to B and B has a SnapVault relationship to C, B serves as the source for the SnapVault backup even though it is a secondary destination in the chain.
•Secondary system:
A system to which data is backed up.
•Secondary volume:
A volume to which data is backed up from a primary volume. Such a volume can be a secondary or tertiary (and onward) destination in a cascade or fan-out backup configuration. The SnapVault secondary system maintains Snapshot copies for long-term storage and possible restore operations.
•SnapMirror label:
An attribute that identifies Snapshot copies for the purpose of selection and retention in SnapVault backups. Each SnapVault policy configures the rules for selecting Snapshot copies on the primary volume and transferring the Snapshot copies that match a given SnapMirror label.
•SnapVault relationship:
The backup relationship between a FlexVol on a primary system and its corresponding secondary system FlexVol.
•Snapshot copy:
The backup images on the source volume that are created manually or automatically as scheduled by an assigned policy. Baseline Snapshot copies contain a copy of the entire source data being protected; subsequent Snapshot copies contain differential copies of the source data. Snapshot copies can be stored on the source volume or on a different destination volume in a different SVM or cluster.
Snapshot copies capture the state of volume data on each source system. For SnapVault and mirror relationships, this data is transferred to destination volumes.
•SnapVault Snapshot basename:
As incremental Snapshot copies for a set are taken and stored on both the primary and secondary systems, the system appends a number (0, 1, 2, 3, and so on) to the basenames to track the most recent and earlier Snapshot updates.
•SnapVault baseline transfer:
An initial complete backup of a primary storage FlexVol to a corresponding FlexVol on the secondary system.
•SnapVault incremental transfer:
A follow-up backup to the secondary system that contains only the changes to the primary storage data between the current and last transfer actions.
14.9.2 Which data gets backed up and restored from a SnapVault backup
You create SnapVault relationships to back up and restore volumes. You can select the Snapshot copies that the SnapVault relationship uses to backup and restore volumes.
The SnapVault operation backs up a specified volume on the primary system to the associated volume on the SnapVault secondary system. If necessary, data is restored from the SnapVault secondary volume back to the associated primary volume or to a different volume.
The Snapshot policy assigned to the source volume specifies when Snapshot copies are performed. The SnapVault policy assigned to the SnapVault relationship specifies which of the source volume Snapshot copies are replicated to the SnapVault backup.
14.9.3 Which data does not get backed up to a SnapVault backup
If you back up an entire SVM to a SnapVault backup by establishing a SnapVault relationship for each volume in the SVM, namespace and root information is not backed up. To protect namespace and root information for an SVM, you must manually create the namespace and root on the SnapVault secondary volume. When backing up LUNs to a SnapVault secondary volume, not all LUN information is replicated.
In SAN environments, the following LUN attributes are not replicated to the secondary volume:
•Path:
The LUN in the SnapVault secondary volume can be in a different SVM or volume from the source LUN. Path-related metadata, such as persistent reservations, are not replicated to the SnapVault primary volume.
•Serial number
•Device ID
•UUID
•Mapped status
•Read Only state:
The Read Only state is always set to true on the destination LUN.
•NVFAIL attribute:
The NVFAIL attribute is always set to false on the destination LUN.
You can set persistent reservations for LUNs on the SnapVault secondary volume.
14.9.4 Clustered Data ONTAP SnapVault highlights
SnapVault allows you to have asymmetric snapshot retention on your primary and secondary volumes. The typical use case for SnapVault is that you want to keep backups for a short period of time (maybe only a week) on your primary system, but you want to keep backups on your secondary for a long period of time (possibly several years):
•Replication based on Snapshot
•One baseline, forever incremental backups
•Multiple recovery points (each incremental copy = recovery point)
•Supported over any distance
•In case of data loss, recovery is fast and simple
•Storage efficiency preserved over the wire
•Take advantage of high-density storage (SATA)
•Reduce reliance on tape
•End user browse and restore - ability to use NFS and CIFS to allow end users restores
•Simple management
14.10 7-Mode versus Clustered Data ONTAP SnapVault
It is not possible to transition 7-Mode SnapVault relationships to Clustered Data ONTAP without needing a rebaseline. New SnapVault relationships must be created in Clustered Data ONTAP. This requires a baseline transfer.
Table 14-4 compares the 7-Mode and Clustered Data ONTAP SnapVault. Most of the points are the same from 7-Mode SnapVault except for storage efficiency preserved over the wire, which is new for Clustered Data ONTAP.
Table 14-4 7-Mode versus Clustered Data ONTAP SnapVault
|
Feature
|
7-Mode
|
Clustered Data ONTAP
|
|
Replication Granularity
|
qtree
|
Flex Volume
|
|
Baseline and Incremental Backup
|
Yes
|
Yes
|
|
Baseline and Incremental Restore
|
Yes
|
Yes
|
|
Single File/LUN Restore (Using NDMP Copy)
|
Yes
|
Yes
|
|
Data ONTAP Version Interoperability
|
Yes
|
Yes
|
|
Schedule-Driven Update
|
Yes
|
Yes, policy driven
|
|
Secondary Snapshot Management
|
Yes
|
Yes
|
|
Usable Replica (read access)
|
Yes
|
Yes
|
|
Tape Integration
|
Yes
|
Yes, using NDMP or SMTape
|
|
Primary/Secondary Deduplication or Compression
|
Yes, but savings lost over wire
|
Yes, savings preserved over wire
|
|
Auto Grow Secondary
|
No
|
Yes
|
|
SnapMirror to SnapVault Conversion
|
No
|
Yes, but SnapVault to SnapMirror not possible
|
|
Notes:
•SnapVault relationships between a 7-Mode and Clustered Data ONTAP system are not possible. Also, OSSV is not supported in Clustered Data ONTAP 8.2.
•Clustered Data ONTAP SnapVault supports 64-bit aggregates only.
|
Even when creating a SnapVault relationship and not a SnapMirror relationship the commands for both is snapmirror. When using the snapmirror commands, you will have to specify the type of relationship you are creating (-type DP or -type XDP). A SnapVault relationship is type XDP.
14.11 How a SnapVault backup works
Backing up volumes to a SnapVault backup involves starting the baseline transfers, making scheduled incremental transfers, and restoring data upon request.
14.11.1 Baseline transfers
A baseline transfer occurs when you initialize the SnapVault relationship. When you do this, Data ONTAP creates a new Snapshot copy. Data ONTAP transfers the Snapshot copy from the primary volume to the secondary volume. This Snapshot copy is the baseline of the volume at the time of the transfer and is a complete transfer, not an incremental transfer. As a result, none of the other Snapshot copies on the primary volume are transferred as part of the initial SnapVault transfer, regardless of whether they match rules specified in the SnapVault policy.
14.11.2 Incremental transfers
The source system creates incremental Snapshot copies of the source volume as specified by the Snapshot policy that is assigned to the primary volume. Each Snapshot copy for a specific volume contains a label that is used to identify it.
The SnapVault secondary system selects and retrieves specifically labeled incremental Snapshot copies, according to the rules that are configured for the SnapVault policy that is assigned to the SnapVault relationship. The Snapshot label is retained to identify the backup Snapshot copies.
Snapshot copies are retained in the SnapVault backup for as long as is needed to meet your data protection requirements. The SnapVault relationship does not configure a retention schedule, but the SnapVault policy does specify number of Snapshot copies to retain.
14.11.3 SnapVault backup updates
At the end of each Snapshot copy transfer session, which can include transferring multiple Snapshot copies, the most recent incremental Snapshot copy in the SnapVault backup is used to establish a new common base between the primary and secondary volumes and is exported as the active file system.
14.11.4 Data restore
If data needs to be restored to the primary volume or to a new volume, the SnapVault secondary transfers the specified data from the SnapVault backup.
14.11.5 SnapVault backups with data compression
SnapVault relationships preserve storage efficiency when replicating data from the source to the SnapVault secondary volume except when additional data compression is enabled.
If additional compression is enabled on the SnapVault secondary volume, storage efficiency is affected as follows:
•Storage efficiency is not preserved for data transfers between the primary and secondary volumes.
•You do not have the option of returning to replicating data while preserving storage efficiency.
14.11.6 Data protection of SVM namespace and root information
Backups to secondary volumes in SnapVault relationships between FlexVol volumes replicate only volume data, not the SVM namespace or root information.
SnapVault relationships replicate only volume data. If you want to back up an entire SVM to a SnapVault secondary volume, you must first create SnapVault relationships for every volume in the SVM.
To provide data protection of the SVM namespace information, you must manually create the namespace on the SnapVault secondary immediately after the first data transfer is completed for all of the volumes in the SVM and while the source SVM volumes are still active. When subsequent changes are made to the namespace on the source SVM, you must manually update the namespace on the destination SVM.
You cannot create the namespace for an SVM on a SnapVault secondary volume if only a subset of the SVM volumes are in a SnapVault relationship, or if only a subset of the SVM volumes have completed the first data transfer.
14.12 Supported data protection deployment configurations
A simple data protection deployment consists of a FlexVol volume or Infinite Volume in a single mirror relationship or a FlexVol volume in a SnapVault relationship. More complex deployment configurations that provide additional data protection consist of a cascade chain of relationships between FlexVol volumes or a set of fan-out relationships for a FlexVol volume or Infinite Volume.
Although a single volume-to-volume relationship does provide data protection, your data protection needs might require the additional protection that is provided by more complex cascade and fan-out configurations.
An example of a cascade chain is an A to B to C configuration. In this example, A is the source that is replicated to B as a data protection mirror, and B is the primary that is backed up to C as a SnapVault backup. Cascade chains can be more complex than A to B to C, but the more relationships that are involved in the chain, the greater the number of temporary locks on volumes while replication or update operations are in progress.
The three types of cascade chain relationships that you can configure are as follows:
•Mirror-mirror cascade (for FlexVol volumes only)
•Mirror-SnapVault cascade (for FlexVol volumes only)
•SnapVault-mirror cascade (for FlexVol volumes only)
An example of a fan-out is an A to B and A to C backup or mirror replication configuration. In this example, A is the primary source that is replicated to both B (either in a mirror or SnapVault relationship) and C.
In a fan-out relationship structure, the source is replicated to multiple destinations, which can be mirror or SnapVault destinations. Only one SnapVault relationship is allowed in a fan-out.
•Mirror-SnapVault fan-out (for FlexVol volumes only)
•Multiple-mirrors fan-out (for FlexVol volumes and Infinite Volumes)
|
Note: Only one SnapVault relationship is supported in a cascade chain configuration, but many SnapVault relationships are supported in a fan-out configuration; multiple mirror relationships are supported.
|
14.12.1 Basic data protection configuration
A basic data protection deployment (Figure 14-12) consists of two volumes, either FlexVol volumes or Infinite Volumes, in a one-to-one, source-to-destination relationship. This deployment backs up data to one location, which provides a minimal level of data protection.
In a data protection configuration, source volumes are the data objects that need to be replicated. Typically, users can access and write to source volumes.
Destination volumes are data objects to which the source volumes are replicated. Destination volumes are read-only. Destination FlexVol volumes are usually placed on a different SVM from the source SVM. Destination Infinite Volumes must be placed on a different SVM from the source SVM. Destination volumes can be accessed by users in case the source becomes unavailable. The administrator can use SnapMirror commands to make the replicated data at the destination accessible and writable.
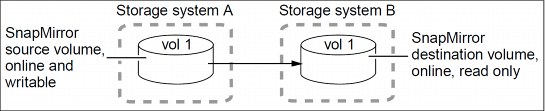
Figure 14-12 Basic data protection deployment
14.12.2 Source to destination to tape backup
A common variation of the basic data protection backup deployment adds a tape backup of a destination FlexVol volume as shown in Figure 14-13. By backing up to tape from the destination volume, you do not subject the heavily accessed source volume to the performance degradation and complexity of a direct tape backup.
Figure 14-13 Data protection chain deployment with a tape backup
NDMP is required for this configuration, and Infinite Volumes do not support NDMP.
14.12.3 Mirror to mirror cascade
A mirror-mirror cascade (Figure 14-14) deployment is supported on FlexVol volumes and consists of a chain of mirror relationships in which a volume is replicated to a secondary volume and the secondary is replicated to a tertiary volume. This deployment adds one or more additional backup destinations without degrading performance on the source volume.
By replicating source A (as shown in this illustration) to two different volumes (B and C) in a series of mirror relationships in a cascade chain, you create an additional backup. The base for the B-to-C relationship is always locked on A to ensure that the backup data in B and C always stay synchronized with the source data in A.
If the base Snapshot copy for the B-to-C relationship is deleted from A, the next update operation from A to B fails and an error message is generated that instructs you to force an update from B to C. The forced update establishes a new base Snapshot copy and releases the lock, which enables subsequent updates from A to B to finish successfully.
If the volume on B becomes unavailable, you can synchronize the relationship between C and A to continue protection of A without performing a new baseline transfer. After the resynchronize operation finishes, A is in a direct mirror relationship with C, bypassing B.
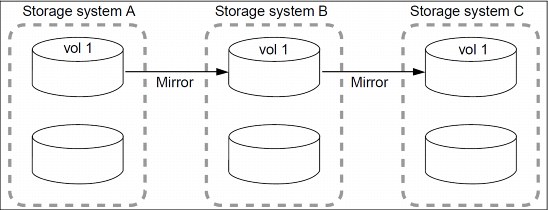
Figure 14-14 Mirror to mirror cascade chain
14.12.4 Mirror to SnapVault cascade
A mirror-SnapVault cascade (Figure 14-15) deployment is supported on FlexVol volumes and consists of a chain of relationships in which a volume is replicated to a destination volume and then the destination volume becomes the primary for a SnapVault backup on a tertiary volume. This deployment adds a SnapVault backup, which fulfills more strict protection requirements.
In a typical mirror-SnapVault cascade, only the exported Snapshot copies from the mirror destination are transferred to the SnapVault secondary when the SnapVault update occurs. These exported Snapshot copies are created by Data ONTAP and have a prefix of snapmirror and a hidden snapmirror-label called sm_created. The SnapVault backup, using a SnapVault policy and applying a rule that identifies Snapshot copies with the sm_created snapmirror-label, backs up the exported Snapshot copies. Only in the case of mirror-SnapVault cascades is the snapmirror-label sm_created used.
|
Note: A cascade chain can contain multiple mirror relationships but only one SnapVault relationship. The SnapVault relationship can occur anywhere in the chain, depending on your data protection requirements.
|
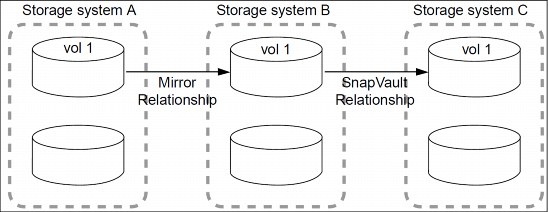
Figure 14-15 Mirror to SnapVault cascade chain
14.12.5 SnapVault to mirror cascade
A SnapVault-mirror cascade (Figure 14-16) consists of a chain of relationships in which a volume has a SnapVault backup on a secondary volume, and then that secondary volume data is replicated to a tertiary volume. In effect, this deployment provides two SnapVault backups.
A SnapVault-mirror cascade deployment is only supported on FlexVol volumes if the first leg in the cascade is a SnapVault backup. In cascade chains that include a SnapVault relationship, updates to the SnapVault backup always include the Snapshot copy base of the SnapVault relationship in addition to the Snapshot copies that are selected in conformance with the SnapVault policy that is assigned to the relationship. This ensures that the common Snapshot copy for B is always available on A (as shown in the following illustration), which enables you to establish a direct relationship for A to C, if necessary. The extra base Snapshot copy is replaced with a newer common Snapshot copy at every subsequent SnapVault update.

Figure 14-16 SnapVault to mirror cascade chain
14.12.6 Fan-in and fan-out deployments
Since replication is now done at the volume level, you cannot have multiple source volumes backing up to the same destination volume similar to the way you could have multiple source qtrees backing up to one volume with 7-Mode SnapVault. You can have volumes from different SVMs backing up to volumes on the same SVM. Note that in 8.2 the number of cluster peers is limited to 8. This means that volumes from a maximum of 7 different clusters can back up to a single destination cluster.
The fan-out limit of 1:4 applies to the combined number of SnapMirror and SnapVault relationships. One volume can have a maximum of 4 relationships of any combination of SnapMirror and SnapVault.
A mirror-SnapVault fan-out deployment is supported on FlexVol volumes and consists of a source volume that has a direct mirror relationship to a secondary volume and also a direct SnapVault relationship to a different secondary volume.
A multiple-mirrors fan-out deployment is supported on FlexVol volumes and Infinite Volumes, and consists of a source volume that has a direct mirror relationship to multiple secondary volumes.
|
Note: A fan-out deployment might not provide as much data protection as a cascade chain.
|
Fan-in and fan-out limitations are shown in Figure 14-17.

Figure 14-17 Fan-in and fan-out limitations
14.13 Protecting data on FlexVol volumes by using SnapVault
You can create a SnapVault relationship between FlexVol volumes and assign a SnapVault policy to it to create a SnapVault backup. A SnapVault backup contains a set of read-only backup copies, located on a secondary volume.
A SnapVault backup differs from a set of Snapshot copies or a set of mirror copies on a destination volume. In a SnapVault backup, the data in the secondary volume is periodically updated to keep the data in the secondary volume up to date with changes made in the primary data.
14.13.1 Creating SnapVault backups on FlexVol volumes
You configure a SnapVault relationship and assign a SnapVault policy to the relationship to establish a SnapVault backup.
General guidelines for creating a SnapVault relationship
The following guidelines apply to all SnapVault relationships:
•A volume can be in multiple relationships, either as the secondary or the primary.
A volume can be the primary for multiple secondaries and also the secondary for another primary.
•A volume can be the secondary for only one SnapVault relationship.
•You cannot configure SnapVault relationships from multiple primary volumes to a single SnapVault secondary volume.
For example, if you want to back up an entire SVM to a SnapVault backup, then you must create a separate secondary volume for each volume in the SVM, and create a separate SnapVault relationship for each primary volume.
•You can configure SnapVault relationships to be used simultaneously with data protection mirror relationships.
•Primary or secondary volumes cannot be 32-bit volumes.
•The primary of a SnapVault backup should not be a FlexClone volume.
The relationship will work, but the efficiency provided by FlexClone volumes is not preserved.
•A SnapVault secondary volume cannot be the primary volume of FlexCache volumes.
•Primary and secondary volumes must have the same vol lang settings.
•After you establish a SnapVault relationship, you cannot change the language assigned to the secondary volume.
•A SnapVault relationship can be only one leg of a cascade chain.
•After you establish a SnapVault relationship, you can rename primary or secondary volumes.
If you rename a primary volume, it can take a few minutes for the relationship to recover from the name change.
Guidelines for a SnapVault relationship to a prepopulated secondary
Typically, you create a prepopulated secondary volume when you copy a primary volume to a secondary volume using tape. This process is known as tape seeding.
If the SnapVault secondary volume already contains data, you can create a SnapVault relationship by using the snapmirror resync command with the -type XDP option.
Before creating a SnapVault relationship to a prepopulated secondary, observe the following guidelines:
•The primary and secondary volumes must have a common Snapshot copy.
•Snapshot copies on the secondary volume that are newer than the common Snapshot copy are deleted.
When a SnapVault relationship is created, all Snapshot copies on the secondary volume that are more recent than the common Snapshot copy and that are not present on the primary volume are deleted. Newer Snapshot copies on the primary volume that match the configured SnapVault policy are transferred to the secondary volume according to the SnapVault policy.
You can use the -preserve option to keep any Snapshot copies that are more recent than the common Snapshot copy on the SnapVault secondary volume and that are not present on the primary volume.
When you use the -preserve option, data on the secondary volume is logically made the same as the common Snapshot copy. All newer Snapshot copies on the primary volume that match the SnapVault policy are transferred to the secondary volume.
This option is useful when the latest common Snapshot copy is deleted from the primary volume but another, older common Snapshot copy between the primary and secondary volumes still exists.
|
Notes:
•If the aggregate that contains the secondary volume of the SnapVault backup is out of space, SnapVault updates fail, even if the secondary volume has space.
•Ensure that there is free space in the aggregate and the volume for transfers to succeed.
|
Prepopulated SnapVault secondary scenarios
There are several ways in which a secondary FlexVol volume for a SnapVault relationship might be prepopulated with data.
In the following scenarios, a SnapVault secondary might be populated before a SnapVault relationship is created:
•You used tape backups to provide a baseline transfer to a secondary volume.
•A SnapVault primary volume in a cascade becomes unavailable.
You have a data protection mirror relationship between a source and a destination volume (a mirror relationship from A to B) and a SnapVault relationship between the secondary destination volume and a tertiary destination volume (a SnapVault relationship from B to C). The backup cascade chain is A mirror to B and B SnapVault backup to C. If the volume on B becomes unavailable, you can configure a SnapVault relationship directly from A to C. The cascade chain is now A SnapVault backup to C, where C was prepopulated with data.
•You created a SnapVault relationship between two flexible clones.
You create a SnapVault relationship between two flexible clones for which their respective parent volumes are already in a SnapVault relationship.
•You extended the SnapVault backup protection beyond 251 Snapshot copies.
To extend the SnapVault backup protection beyond the volume limit of 251 Snapshot copies, you can clone the secondary volume. The original SnapVault secondary volume is the parent volume for the new flexible clone.
•You restored data from a SnapVault secondary to a new primary volume.
You have a SnapVault relationship from A to B. A becomes inaccessible, so the SnapVault secondary volume (B) is used for a baseline restore operation to a new SnapVault secondary volume (C).
After the restore operation finishes, you establish a new SnapVault relationship from the new secondary volume (C), which now becomes the primary volume, and the original SnapVault secondary volume (in other words, C to B). The disk to disk backup relationship is now C to B, where B was prepopulated with data.
•You deleted the base Snapshot copy from the primary volume.
You deleted the base Snapshot copy from the primary volume that was used for a SnapVault transfer, but another, older Snapshot copy exists that is common between the primary and secondary volumes.
14.13.2 Creating a SnapVault backup in an empty FlexVol volume
You can protect data that has long-term storage requirements on a FlexVol volume by replicating selected Snapshot copies to a SnapVault backup on another SVM or cluster.
Before you begin
Observe these prerequisites:
•You must have cluster administrator privileges to perform this task for a cluster, and SVM administrator privileges to perform this task for an SVM.
•If the primary and secondary volumes are in different SVMs, the SVMs must be in a peer relationship.
If the primary and secondary volumes are in different clusters, the clusters must be in a peer relationship.
•A SnapVault policy must exist.
You must either create one or accept the default SnapVault policy (named XDPDefault) that is automatically assigned.
Only Snapshot copies with the labels configured in the SnapVault policy rules are replicated in SnapVault operations.
•The Snapshot policy assigned to the primary volume must include the snapmirror-label attribute.
You can create a new Snapshot policy by using the volume snapshot policy add-schedule command, or you can modify an existing policy by using the volume snapshot policy modify-schedule command to set the snapmirror-label attribute for the set of Snapshot copies that you want backed up to the SnapVault secondary volume. Other Snapshot copies on the primary volume are ignored by the SnapVault relationship.
•Your work environment must be able to accommodate the time it might take to transfer a baseline Snapshot copy with a large amount of data.
|
Note: Even when creating a SnapVault relationship and not a SnapMirror relationship, the command for both is snapmirror. When using the snapmirror commands, you will have to specify the type of relationship you are creating (-type DP or -type XDP). A SnapVault relationship is type XDP.
|
Steps
Follow these steps:
1. On the destination SVM, create a SnapVault secondary volume with a volume type DP.
2. Create a schedule that Data ONTAP uses to update the SnapVault relationship by using the job schedule cron create command.
Example 14-14 creates a schedule that runs on the weekend at 3 a.m.
Example 14-14 Creating a schedule
vserverB::> job schedule cron create -name weekendcron -dayofweek "Saturday, Sunday" -hour 3 -minute 0
3. On the source SVM, create a Snapshot copy policy that contains the schedule of when Snapshot copies with snapmirror-label attributes occur by using the volume snapshot policy create command with the snapmirror-label parameter, or use the default Snapshot copy policy called default.
Example 14-15 creates a Snapshot copy policy called keep-more-snapshot.
Example 14-15 Creating snapshot policy
vserverB::> snapshot policy create -vserver vs1 -policy keep-more-snapshot -enabled true -schedule1 weekly -count1 2 -prefix1 weekly -schedule2 daily -count2 6 -prefix2 daily -schedule3 hourly -count3 8 -prefix3 hourly
The name specified in the snapmirror-label attribute for the new Snapshot policy must match the snapmirror-label attribute that is specified in the SnapVault policy. This ensures that all subsequent Snapshot copies created on the primary volume have labels that are recognized by the SnapVault policy.
The default Snapshot copy policy has two snapmirror-label attributes associated with it, daily and weekly.
4. Create a SnapVault policy by using the snapmirror policy create command, or use the default SnapVault policy called -XDPDefault.
Example 14-16 creates a SnapVault policy called vserverB-vault-policy.
Example 14-16 Creating a SnapVault policy
vserverB::> snapmirror policy create -vserver vserverB -policy vserverB-vault-policy
5. Add the snapmirror-label attribute to the SnapVault policy you created by using the snapmirror policy add-rule command.
If you used the XDPDefault SnapMirror policy, you do not need to perform this step. The XDPDefault SnapVault policy uses the daily and weekly snapmirror-label attributes specified by the default Snapshot copy policy.
Example 14-17 adds a rule to the vserverB-vault-policy to transfer Snapshot copies with the weekly snapmirror-label attribute and to keep 40 Snapshot copies.
Example 14-17 Adding rules to SnapVault policy
vserverB::> snapmirror policy add-rule -vserver vserverB -policy vserverB-vault-policy -snapmirror-label weekly -keep 40
6. On the destination SVM, create a SnapVault relationship and assign a SnapVault policy by using the snapmirror create command with the -type XDP parameter and the -policy parameter.
In the path specification, a single name is interpreted as a volume name in the SVM from which the command is executed. To specify a volume in a different SVM or in a different cluster, you must specify the full path name.
Example 14-18 creates a SnapVault relationship between the primary volume srcvolA on SVM vserverA and the empty secondary volume dstvolB on SVM vserverB. It assigns the SnapVault policy named vserverB-vault-policy and uses the weekendcron schedule.
Example 14-18 Creating a SnapVault relationship and assigning a SnapVault policy
vserverB::> snapmirror create -source-path vserverA:srcvolA -destination-path vserverB:dstvolB -type XDP -policy vserverB-vault-policy -schedule weekendcron
7. On the destination SVM, initialize the SnapVault relationship by using the snapmirror initialize command to start a baseline transfer.
The command creates a new Snapshot copy that is transferred to the secondary volume and used as a baseline for subsequent incremental Snapshot copies. The command does not use any Snapshot copies that currently exist on the primary volume.
Example 14-19 begins the relationship initialization by creating and transferring a baseline Snapshot copy to the destination volume dstvolB on SVM vserverB.
Example 14-19 Beginning the relationship initialization
vserverB::> snapmirror initialize -destination-path vserverB:dstvolB
|
Note: Creating a baseline for a large amount of data might take a while.
|
14.13.3 Creating the SnapVault relationship of a mirror-SnapVault cascade
The SnapVault relationship of a mirror-SnapVault cascade requires a different configuration from a SnapVault relationship that is not a part of a mirror-SnapVault cascade.
Before you begin
Observe these prerequisites:
•You must have cluster administrator privileges to perform this task for a cluster, and SVM administrator privileges to perform this task for an SVM.
•If the primary and secondary volumes are in different SVMs, the SVMs must be in a peer relationship.
If the primary and secondary volumes are in different clusters, the clusters must be in a peer relationship.
About this task
The Snapshot copies that are exported to the mirror destination are ones that are created by Data ONTAP. These Snapshot copies have a snapmirror-label called sm_created associated with them. Only these Snapshot copies are replicated from the mirror to the SnapVault backup. To configure the SnapVault relationship of the mirror-SnapVault cascade, the SnapVault policy associated with the SnapVault relationship must have the sm_created snapmirror-label in a rule to restrict the number of Snapshot copies retained on the SnapVault backup.
Steps
Follow these steps:
1. On the destination SVM, create a SnapVault secondary volume with a volume type DP.
2. Create a SnapVault policy by using the snapmirror policy create command, or use the default SnapVault policy called XDPDefault.
3. Add the sm_created snapmirror-label to the SnapVault policy by using the snapmirror policy add-rule command.
Only the sm_created rule will be observed. Any other rules associated with the SnapVault policy, like the daily or weekly rule, will be disregarded.
Example 14-20 adds a rule to the XDPDefault policy to transfer Snapshot copies with the sm_created snapmirror-label and to keep 40 Snapshot copies.
Example 14-20 Adding rule to policy
vserverB::> snapmirror policy add-rule -vserver vserverC -policy XDPDefault -snapmirror-label sm_created -keep 40
4. On the destination SVM, create a SnapVault relationship and assign a SnapVault policy by using the snapmirror create command with the -type XDP parameter and the -policy parameter.
The Example 14-21 creates a SnapVault relationship between the primary volume srcvolB on SVM vserverB and the empty secondary volume dstvolC on SVM vserverC. It assigns the SnapVault policy named XDPDefault.
Example 14-21 Creating a SnapVault relationship
vserverC::> snapmirror create -source-path vserverB:srcvolB -destination-path vserverC:dstvolC -type XDP -policy XDPDefault
5. On the destination SVM, initialize the SnapVault relationship by using the snapmirror initialize command to start a baseline transfer.
The Example 14-22 begins the relationship initialization by creating and transferring a baseline Snapshot copy to the secondary volume dstvolC on SVM vserverC.
Example 14-22 Initializing the SnapVault relationship
vserverC::> snapmirror initialize -destination-path vserverC:dstvolC
|
Note: Creating a baseline for a large amount of data might take a while.
|
14.13.4 Preserving a Snapshot copy on the primary source volume
In a mirror-SnapVault cascade, you must preserve a Snapshot copy on the primary source volume until it transfers to the secondary volume of the SnapVault backup. For example, you want to ensure that application-consistent Snapshot copies are backed up.
Before you begin
You must have created the mirror-SnapVault cascade.
Steps
Follow these steps:
1. Ensure that the Snapshot copy you want to preserve has a snapmirror-label by using the volume snapshot show command.
2. If the Snapshot copy does not have a snapmirror-label associated with it, add one by using the volume snapshot modify command.
Example 14-23 Adding snapmirror-label to Snapshot copy
clust1::> volume snapshot modify -volume vol1 -snapshot snapappa -snapmirror-label exp1
3. Preserve the Snapshot copy on the source volume by using the snapmirror snapshot-owner create command to add an owner name to the Snapshot copy.
Example 14-24 adds ApplicationA as the owner name to the snapappa Snapshot copy in the vol1 volume on the vs1 SVM.
Example 14-24 Adding owner name to Snapshot copy
clust1::> snapmirror snapshot-owner create -vserver vs1 -volume vol1 -snapshot snapappa -owner ApplicationA
4. Update the destination volume of the data protection mirror relationship by using the snapmirror update command.
Alternatively, you can wait for the scheduled update of the data protection mirror relationship to occur.
5. Update the secondary volume of the SnapVault relationship to transfer the specific Snapshot copy from the SnapMirror destination volume to the SnapVault secondary volume by using the snapmirror update command with the -source-snapshot parameter.
6. Remove the owner name from the primary source volume by using the snapmirror snapshot-owner delete command.
Example 14-25 removes ApplicationA as the owner name to the snapappa Snapshot copy in the vol1 volume on the vs1 SVM.
Example 14-25 Removing owner name
clust1::> snapmirror snapshot-owner delete -vserver vs1 -volume vol1 -snapshot snapappa -owner ApplicationA
14.13.5 Creating a SnapVault backup in a prepopulated FlexVol volume
You can protect data that has long-term storage requirements on a FlexVol Volume by replicating selected Snapshot copies to a SnapVault backup on another SVM or cluster. The SnapVault secondary volume might contain data that already exists from a previous data protection mirror or SnapVault relationship or has been loaded from a tape backup.
Before you begin
Observe these prerequisites:
•You must have cluster administrator privileges to perform this task for a cluster, and you must have SVM administrator privileges to perform this task for an SVM.
•If the primary and secondary volumes are in different SVMs, the SVMs must be in a peer relationship.
If the primary and secondary volumes are in different clusters, the clusters must be in a peer relationship.
•The secondary volume must be prepopulated with data.
•A SnapVault policy must exist.
You must either create one or accept the default SnapVault policy (named XDPDefault) that is automatically assigned.
The SnapVault policy configuration includes the snapmirror-label attribute that is used to select Snapshot copies on the primary volume and match Snapshot copies between the primary and secondary volumes. Only Snapshot copies with the labels configured in the SnapVault policy rules are replicated in SnapVault operations.
•The Snapshot policy assigned to the primary volume must include the snapmirror-label attribute.
The name specified in the snapmirror-label attribute for the new Snapshot policy must match the snapmirror-label attribute that is specified in the SnapVault policy. This ensures that all subsequent Snapshot copies created on the primary volume have labels that are recognized by the SnapVault policy.
You can create a new Snapshot policy by using the volume snapshot policy add-schedule, or you can modify an existing Snapshot policy by using the volume snapshot policy modify-schedule command to set the snapmirror-label attribute for the set of Snapshot copies that you want replicated to the SnapVault secondary volume. Other Snapshot copies on the primary volume are ignored by the SnapVault relationship.
•Your work environment must be able to accommodate the time it might take to transfer a baseline Snapshot copy with a large amount of data.
Step
On the destination SVM, establish the relationship by using the snapmirror resync command and the -type XDP parameter.
If the most recent common Snapshot copy between the primary and the secondary is deleted from the primary but there exists another, older common Snapshot copy, you can also use the -preserve option. This option performs a logical local rollback to make the data in the primary and the secondary the same, and then it replicates all newer Snapshot copies from the source that match the SnapVault policy.
Example 14-26 creates a SnapVault relationship between the primary volume srcvolA on SVM vserverA and the prepopulated secondary volume dstvolB on SVM vserverB.
Example 14-26 Creating a SnapVault relationship between primary volume and prepopulated secondary volume
vserverB::> snapmirror resync -source-path vserverA:srcvolA -destination-path vserverB:dstvolB -type XDP
14.13.6 Creating a destination baseline using a tape backup
You can perform a baseline transfer from local tape copies to a SnapVault secondary volume to manage your bandwidth or timing constraints over a network.
Before you begin
Observe these prerequisites:
•You must have cluster administrator privileges to perform this task for a cluster.
•You must have SVM administrator privileges to perform this task for an SVM.
•The destination volume must not contain data.
About this task
This operation physically copies data from tape to one or more secondary volumes. When the operation finishes, the secondary volume contains all the Snapshot copies that existed on the primary volume at the time the tape copy was created.
Steps
Follow these steps:
1. Create a copy of the primary volume on the tape by using the system smtape backup command.
2. Restore the data to the empty secondary volume from the tape copy.
3. Initialize the SnapVault relationship by using the snapmirror resync command with the
-typeXDP parameter on the secondary volume, and enable incremental updates.
-typeXDP parameter on the secondary volume, and enable incremental updates.
14.13.7 Converting a data protection destination to a SnapVault secondary
You convert a data protection destination volume to a SnapVault secondary volume after a tape seeding operation or after you lose a SnapVault secondary volume in a backup to disaster protection mirror cascade.
Before you begin
Observe these prerequisites:
•You must have cluster administrator privileges to perform this task for a cluster.
•You must have SVM administrator privileges to perform this task for an SVM.
About this task
In the case of tape seeding, after you transfer the data from the tape to the volume, the volume is a data protection destination volume.
In the case of a SnapVault secondary volume to disaster protection volume cascade, if the SnapVault secondary volume is lost, you can resume SnapVault protection by creating a direct relationship between the SnapVault primary volume and the disaster protection destination volume. You must make the disaster protection destination volume a SnapVault secondary volume to do this.
Steps
Follow these steps:
1. Break the data protection mirror relationship by using the snapmirror break command.
The relationship is broken and the disaster protection volume becomes a read-write volume.
2. Delete the existing data protection mirror relationship, if one exists, by using the snapmirror delete command.
3. Remove the relationship information from the source SVM by using the snapmirror release command.
This also deletes the Data ONTAP created Snapshot copies from the source volume.
4. Create a SnapVault relationship between the primary volume and the read-write volume by using the snapmirror create command with the -type XDP parameter.
5. Convert the destination volume from a read-write volume to a SnapVault volume and establish the SnapVault relationship by using the snapmirror resync command.
14.14 Managing backup operations for SnapVault backups
You configure SnapVault relationships on FlexVol volumes to establish SnapVault backups. You manage SnapVault relationships to optimize the performance of the relationships.
14.14.1 How an out-of-order Snapshot copy transfer works
The transfer of a Snapshot copy that does not conform to the usual sequence scheduled by a SnapVault policy is an out-of-order Snapshot copy transfer.
In SnapVault relationships, Snapshot copies are selected and transferred from the primary volume to the secondary volume, according to the configured SnapVault policy. Only Snapshot copies that are newer than the common Snapshot copy between the primary and secondary volume are transferred.
However, you can use the snapmirror update command to initiate the transfer of a Snapshot copy that was not originally selected and transferred.
When you initiate an out-of-order transfer, an older Snapshot copy is used to establish the base. To avoid subsequent transfers of Snapshot copies that already exist on the SnapVault secondary volume, the list of Snapshot copies that are selected for transfer in this update cycle are reconciled against the Snapshot copies that are already present on the secondary volume. Snapshot copies that are already present on the secondary volume are discarded from the transfer list.
Establishing new base from an out-of-order Snapshot copy transfer
In this example, the SnapVault policy has a schedule in which only the even-numbered Snapshot copies on the primary volume are transferred to the secondary volume. Before the out-of-order transfer begins, the primary volume contains Snapshot copies 2 through 6; the secondary volume contains only the even-numbered Snapshot copies (noted as “SC” in the figures). Snapshot copy 4 is the common Snapshot copy that is used to establish the base, as shown in Figure 14-18.

Figure 14-18 Common Snapshot copy used to establish the base
After Snapshot copy 3 is transferred to the secondary volume, out of order, it becomes the new common Snapshot copy that is used to establish the base, as shown in Figure 14-19.

Figure 14-19 New common Snapshot copy after Snapshot copy 3 is transferred
|
Note: Although Snapshot copy 3 is now the base, the exported Snapshot copy is still Snapshot copy 4.
|
When Snapshot copies are selected for subsequent updates according to the SnapVault policy, the policy selects Snapshot copy 4 and Snapshot copy 6 for transfer to the secondary volume.
When the transfer list is reconciled, Snapshot copy 4 is removed from the transfer list because it already exists on the secondary volume. Only Snapshot copy 6 is transferred, which becomes the new common Snapshot copy that is used to establish the base, as shown in Figure 14-20.

Figure 14-20 Snapshot copy 6 is transferred and becomes the new common Snapshot copy
14.14.2 Backing up from a Snapshot copy that is older than base Snapshot copy
You might want to replicate a special, manually initiated Snapshot copy to the SnapVault backup. The Snapshot copy is one that is not in the sequence scheduled by the SnapVault policy assigned to the SnapVault relationship.
Before you begin
Observe these prerequisites:
•You must have cluster administrator privileges to perform this task for a cluster.
•You must have SVM administrator privileges to perform this task for an SVM.
Step
Begin the backup transfer of the older Snapshot copy by using the snapmirror update command.
Example 14-27 starts an out-of-order transfer of Snapshot copy SC3 from the source volume srcvolA on SVM vserverA and the secondary volume dstvolB on SVM vserverB.
Example 14-27 Backup transfer of the older Snapshot copy
vserverA::> snapmirror update -source-path vserverA:srcvolA -destination-path vserverB:dstvolB -snapshot SC3
Result
After the backup finishes, the transferred Snapshot copy becomes the base.
14.14.3 Backing up FlexVol volumes with the maximum limit of Snapshot copies
To work around the limit of 251 Snapshot copies per volume, you can create a new destination volume clone, then establish a SnapVault relationship with the new clone.
Before you begin
You must have cluster administrator privileges to perform this task for a cluster. You must have SVM administrator privileges to perform this task for an SVM.
About this task
Creating a new SnapVault relationship to a new volume clone enables you to continue SnapVault protection with minimum disruption on the clone volume and without starting a new baseline transfer. Because the source clone and the volume clone share the latest common Snapshot copy, subsequent updates are performed as usual, according to the policy assigned to the SnapVault relationship.
Steps
Follow these steps:
1. Quiesce the SnapVault relationship between the primary volume and the secondary volume by using the snapmirror quiesce command.
This step prevents updates from starting until after the task is complete.
2. Verify that there are no active transfers on the relationship by using the snapmirror show command.
The Relationships field should be Idle.
3. Create a volume clone based on the most recent common Snapshot copy between the SnapVault primary volume and the SnapVault secondary volume by using the volume clone create command with the -type DP parameter.
4. Establish the SnapVault relationship between the primary volume and the newly created secondary volume clone by using the snapmirror resync command and the -type XDP parameter.
5. Delete the SnapVault relationship between the primary volume and the original SnapVault secondary volume by using the snapmirror delete command.
14.15 Managing restore operations for SnapVault backups
The restore operation from a SnapVault backup copies a single, specified Snapshot copy from a SnapVault secondary volume to a specified volume. Restoring a volume from a SnapVault secondary volume changes the view of the active file system but preserves all earlier Snapshot copies in the SnapVault backup.
|
Note: You cannot make the SnapVault destination volume readable and writable. If you need disaster recovery capabilities, use volume SnapMirror. However, it is possible to create a FlexClone volume of the Snapshot copies on the SnapVault destination to gain read and write access to the data.
|
14.15.1 Guidelines for restoring the active file system
Before restoring a volume, you must shut down any application that accesses data in a volume to which a restore is writing data. Therefore, you must dismount the file system, shut down any database, and deactivate and quiesce the Logical Volume Manager (LVM) if you are using an LVM.
The restore operation is disruptive. When the restore operation finishes, the cluster administrator or SVM administrator must remount the volume and restart all applications that use the volume.
The restore destination volume must not be the destination of another mirror or the secondary of another SnapVault relationship.
You can restore to the following volumes:
•Original source volume
You can restore from a SnapVault secondary volume back to the original SnapVault primary volume.
•New, empty secondary volume
You can restore from a SnapVault secondary volume to a new, empty secondary volume. You must first create the volume as a data protection (DP) volume.
•New secondary that already contains data
You can restore from a SnapVault secondary volume to a volume that is prepopulated with data.
The volume must have a Snapshot copy in common with the restore primary volume and must not be a DP volume.
14.15.2 Guidelines for restoring LUNs in SAN environments
The restore operation from a SnapVault backup copies a single, specified LUN from a SnapVault secondary volume to a specified volume. Restoring a LUN from a SnapVault secondary volume changes the view of the active system on the volume to which data is being restored, preserving all earlier Snapshot copies.
The following guidelines apply only to SAN environments:
•You can restore a single file or single LUN from a SnapVault secondary volume by using the IBM OnCommand management software online management tools.
•When LUNs are restored to existing LUNs, new access controls do not need to be configured. You must configure new access controls for the restored LUNs only when restoring LUNs as newly created LUNs on the volume.
•If LUNs on the SnapVault secondary volume are online and mapped before the restore operation begins, they remain so for the duration of the restore operation and after the operation finishes.
•The host system can discover the LUNs and issue non-media access commands for the LUNs, such as inquiries or commands to set persistent reservations, while the restore operation is in progress.
•You cannot create new LUNs in a volume during a restore operation with the lun create command.
•Restore operations from tape and from a SnapVault backup are identical.
•You cannot restore a single LUN from a SnapVault secondary volume that is located on a system that is running in 7-Mode.
14.15.3 How restore operations work from a SnapVault backup
A restore operation from a SnapVault backup consists of a series of actions performed on a temporary restore relationship and on the secondary volume.
During a restore operation, the following actions occur:
1. A new temporary relationship is created from the restore source (which is the original SnapVault relationship secondary volume) to the restore destination.
The temporary relationship is a restore type (RST). The snapmirror show command displays the RST type while the restore operation is in progress.
The restore destination might be the original SnapVault primary or might be a new SnapVault secondary.
2. During the restore process, the restore destination volume is changed to read-only.
3. When the restore operation finishes, the temporary relationship is removed and the restore destination volume is changed to read-write.
14.15.4 Restoring a volume from a SnapVault backup
If the data on a volume becomes unavailable, you can restore the volume to a specific time by copying a Snapshot copy in the SnapVault backup. You can restore data to the same primary volume or to a new location. This is a disruptive operation.
Before you begin
Observe these prerequisites:
•You must have cluster administrator privileges to perform this task for a cluster.
•You must have SVM administrator privileges to perform this task for an SVM.
•CIFS traffic must not be running on the SnapVault primary volume when a restore operation is running.
About this task
Example 14-28 shows how to restore a whole volume from a SnapVault backup. To restore a single file or LUN, you can restore the whole volume to a different, non-primary volume, and then select the file or LUN, or you can use the IBM OnCommand management software online management tools.
Steps
Follow these steps:
1. If the volume to which you are restoring has compression enabled and the secondary volume from which you are restoring does not have compression enabled, disable compression.
You disable compression to retain storage efficiency during the restore.
Example 14-28 Restoring a volume from a SnapVault backup
vs1::> snapmirror restore -destination-path vs1:vol1 -source-path vs2:vol1_dp_mirror2 -source-snapshot snap3
Warning: All data newer than Snapshot copy snap6 on volume vs1:vol1 will be deleted.
Do you want to continue? {y|n}: y
[Job 34] Job is queued: snapmirror restore from source vs2:vol1_dp_mirror2 for the snapshot snap3.
3. Remount the restored volume and restart all applications that use the volume.
4. If you previously disabled compression, reenable compression on the volume.
14.15.5 Managing the SnapVault-mirror cascade when the SnapVault backup is unavailable
You can manipulate relationships in a SnapVault-mirror cascade to maintain data backup relationships if the secondary of the SnapVault relationship becomes unavailable.
Before you begin
You must have a SnapVault-mirror cascade already configured.
About this task
The destination of the SnapVault relationship is the middle of the SnapVault-mirror cascade. If it becomes unavailable, you might have the following issues:
•You cannot update the SnapVault backup.
•You cannot update the mirror copy of the SnapVault secondary.
To manage this issue, you can temporarily remove the SnapVault secondary volume from the cascade and establish a SnapVault relationship to the mirror copy of the SnapVault secondary volume. When the unavailable secondary volume becomes available, you can reestablish the original cascade configuration.
In the following steps, the primary volume of the cascade is called “A”, the secondary volume of the SnapVault relationship is called “B”, and the destination volume of the data protection mirror relationship is called “C”.
Steps
Follow these steps:
1. Identify the current exported Snapshot copy on C by using the volume snapshot show command with the -fields busy parameter.
The busy field is set to true for the exported Snapshot copy:
volume snapshot show C -fields busy
2. Break the data protection mirror relationship by snapmirror break command on C:
snapmirror break C
3. Create a dummy snapmirror-label on the exported Snapshot copy you previously identified by using the volume snapshot modify command with the -snapmirror-label parameter.
If a snapmirror-label already exists for the exported Snapshot copy, you do not need to perform this step:
volume snapshot modify -volume C -snapshot name -snapmirror-label exp1
4. Create a Snapshot owner on the exported Snapshot copy of C by using the snapmirror snapshot-owner create command.
This prevents Clustered Data ONTAP from deleting the Snapshot copy:
snapmirror snapshot-owner create -volume C -snapshot exported -owner admin1
5. Delete the data protection mirror relationship between B and C by using the snapmirror delete command:
snapmirror delete C
6. Create the SnapVault relationship between A and C by using the snapmirror resync command and the -type XDP parameter:
snapmirror resync -source-path A -destination-path C -type XDP
You can maintain this SnapVault relationship until you recover the original SnapVault secondary volume. At that time, you can reestablish the original cascade relationship by using the steps that follow this step.
7. Delete the data protection mirror relationship between A and B by using the snapmirror delete command.
8. Perform a disaster recovery resynchronization from C to B by using the snapmirror resync command:
snapmirror resync –source-path C –destination-path B
This step copies from C to B, all of the Snapshot copies made after B became unavailable.
9. Identify the current exported Snapshot copy on B by using the volume snapshot show command with the -fields busy parameter:
volume snapshot show B -fields busy
The busy field is set to true for the exported Snapshot copy.
10. Break the data protection mirror by using the snapmirror break command on B:
snapmirror break B
11. Create a dummy snapmirror-label on the exported Snapshot copy you previously identified by using the volume snapshot modify command with the -snapmirror-label parameter:
volume snapshot modify -volume B -snapshot name -snapmirror-label exp2
If a snapmirror-label already exists for the exported Snapshot copy, you do not need to perform this step.
12. Create a Snapshot owner on the exported Snapshot copy of B by using the snapmirror snapshot-owner create command.
This prevents Clustered Data ONTAP from deleting the Snapshot copy:
snapmirror snapshot-owner create -volume B -snapshot exported -owner admin1
13. Delete the data protection mirror relationship between C and B by using the snapmirror delete command.
14. Perform a SnapVault resynchronization from A to B by using the snapmirror resync command and the -type XDP parameter:
snapmirror resync –source-path A –destination-path B –type XDP
New Snapshot copies that meet the Snapshot policy of the SnapVault relationship are transferred from A to B.
15. Delete the data protection mirror relationship between A and C by using the snapmirror delete command.
16. Perform a disaster recovery resynchronization from B to C by using the snapmirror resync command.
This step copies from B to C, all of the Snapshot copies made after reestablishing the A to B relationship without deleting any Snapshot copies on C:
snapmirror resync –source-path B –destination-path C
17. Remove the Snapshot copy owner from volumes B and C by using the snapmirror snapshot-owner delete command:
snapmirror snapshot-owner delete -volume B -snapshot exported_snap
18. Remove SnapMirror labels that you created from volumes B and C by using the snapshot modify command:
snapshot modify -volume B -snapshot exported_snap -snapmirror-label text
snapshot modify -volume C -snapshot exported_snap -snapmirror-label text
14.16 Managing storage efficiency for SnapVault secondaries
SnapVault relationships preserve storage efficiency when backing up data from the primary volume to the secondary volume, with one exception: If post-process and optionally inline compression are enabled on the secondary volume, storage efficiency is not preserved for data transfers between the primary and secondary volumes.
14.16.1 Guidelines for managing storage efficiency for SnapVault backups
If both the primary and secondary volumes in a SnapVault relationship have storage efficiency enabled, then data transfers to the SnapVault secondary volume preserve storage efficiency. If the primary volume does not have storage efficiency enabled, you might want to enable storage efficiency only on the secondary volume.
Because SnapVault secondary volumes typically contain a large amount of data, storage efficiency on SnapVault secondary volumes can be very important.
|
Notes:
•If the primary volume in a SnapVault relationship is enabled for storage efficiency, all data backup operations preserve the storage efficiency.
•If the primary volume in a SnapVault relationship does not have storage efficiency enabled, you might want to enable storage efficiency for the secondary volume because it is likely to contain a large amount of data over time.
|
You can use the volume efficiency command to start a scan on the volume if there is already data on the volume from transfers. If this is a new relationship with no transfers, then there is no need to run the scan manually.
Changes to the volume's efficiency schedule do not take effect for a SnapVault secondary volume. Instead, when storage efficiency is enabled, the SnapVault relationship manages the schedule. When a data transfer begins, the storage efficiency process automatically pauses until the transfer is finished, and then automatically begins again after the data transfer is complete. Because data transfers to a SnapVault secondary volume might include more than one Snapshot copy, the storage efficiency process is paused for the entire duration of the update operation. After the transfer is finished and the post-transfer storage efficiency process is complete, the last Snapshot copy created in the secondary volume is replaced by a new, storage-efficient Snapshot copy.
If the last Snapshot copy that is created in the secondary volume is locked before it can be replaced by a new, storage-efficient Snapshot copy, then a new, storage-efficient Snapshot copy is still created, but the locked Snapshot copy is not deleted. That Snapshot copy is deleted later during the storage-efficient cleanup process after a subsequent update to the SnapVault secondary volume and after the lock is released. A Snapshot copy in a SnapVault secondary volume might be locked because the volume is the source in another relationship, such as a data protection mirror relationship.
|
Note: If the secondary volume has additional compression enabled, storage efficiency is not preserved.
|
Storage efficiency on all data transfers in SnapVault relationships is not preserved when the secondary volume has additional compression enabled. Because of the loss of storage efficiency, a warning message is displayed when you enable compression on a SnapVault secondary volume. After you enable compression on the secondary volume, you can never have storage-efficient transfers.
14.16.2 Enabling storage efficiency on a SnapVault secondary volume
If the primary volume does not have storage efficiency enabled, you can enable storage efficiency on a SnapVault secondary volume by enabling storage efficiency on the volume.
Before you begin
Observe these prerequisites:
•You must have cluster administrator privileges to perform this task for a cluster.
•You must have SVM administrator privileges to perform this task for an SVM.
Steps
Follow these steps:
1. Use the volume efficiency command with the -on parameter to enable storage efficiency.
2. If the volume already has data which you want to make storage efficient, use the volume efficiency command with the -start and -scan-old-data parameters to start a scan of the volume.
..................Content has been hidden....................
You can't read the all page of ebook, please click here login for view all page.