


SnapRestore
This chapter introduces the snap family of commands, which provides a means to create and manage Snapshot copies in each volume or aggregate.Introducing Snapshots.
The following topics are covered:
12.1 SnapRestore at a glance
This chapter introduces the IBM System Storage N series SnapRestore as shown in Figure 12-1.
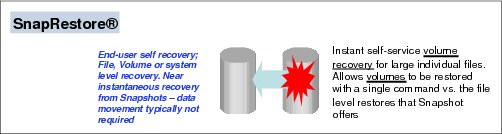
Figure 12-1 SnapRestore
You can use the SnapRestore feature to recover data that is no longer available, or if you are testing a volume or file and want to restore that volume or file to pre-test conditions.
SnapRestore enables you to quickly revert a local volume or file to the state it was in when a particular Snapshot copy was taken. In most cases, reverting a file or volume is much faster than restoring files from tape or copying files from a Snapshot copy to the active file system.
After you select a Snapshot copy for reversion, the Data ONTAP reverts the specified file or the volume to the data and timestamps that it contained when the selected Snapshot copy was taken. Data that was written after the selected Snapshot copy was taken is lost.
|
Tip: If the volume you select to revert is a root volume, the system reboots.
|
SnapRestore reverts only the file contents. It does not revert attributes of a volume. For example, the Snapshot copy schedule, volume option settings, RAID group size, and maximum number of files per volume remain unchanged after the reversion.
You use SnapRestore to recover from data corruption. If a primary system application corrupts data files in a volume, you can revert the volume or specified files in the volume to a Snapshot copy taken before the data corruption.
SnapRestore performs Snapshot copy restoration more quickly, using less disk space, than an administrator can achieve by manually copying volumes, qtrees, directories, or large files to be restored from the Snapshot copy.
You must purchase and install the license code before you can use SnapRestore.
On the server, enter the following command:
license add xxxxxxx
xxxxxxx is the license code you purchased. This setting persists across reboots.
12.2 Introduction to SnapRestore
SnapRestore software makes recovering your data fast and easy. Without SnapRestore, you have to restore files from tape, use a third-party software application, or copy files from a Snapshot to the active file system.
Using these methods takes longer than reverting a volume, and can take longer than reverting a single file (Figure 12-2). It is because with SnapRestore, no data is copied; instead, the file system is restored to an earlier state.

Figure 12-2 Restore time
12.2.1 Cost and storage efficiency
Snapshot technology makes extremely efficient use of storage by storing only block-level changes between each successive Snapshot. Because the Snapshot process is automatic and virtually instantaneous, backups are significantly faster and simpler. SnapRestore software uses Snapshot technology to perform near-instantaneous data restoration. In contrast, alternative storage solutions copy all of the data and require much more time and disk storage for the backup-and-restore operations.
SnapRestore reduces the burden on staffing resources. Whether your business employs a small group of users or an enterprise-scale user community and IT support team, SnapRestore's easy single-command restoration eliminates complexity and reduces errors. Using SnapRestore requires no special training or expertise.
12.2.2 Data restoration
With SnapRestore, data can be restored from any one of the Snapshots stored on the file system. It allows an application development team, for example, to revert to Snapshots from various stages of their design, or test engineers to quickly and easily return data to a baseline state. Restoring to the base environment takes only seconds, and the restored environment is identical to the point at which the Snapshot was created.
12.2.3 A possible SnapRestore use
As an example of a possible SnapRestore use, let us assume that Snapshots are taken every night at midnight. On Friday, you discover that an upgrade that you performed on your application on Thursday accidentally caused some serious corruption to some data stored on that volume. You want to revert your environment to the Snapshot that was taken on Wednesday night.
To accomplish this task, you can invoke the snap restore command and specify the Wednesday night Snapshot. This action restores the entire volume in seconds and reverts the active file system to the state that it was in on Wednesday night.
Upon further examination, you will notice that the Wednesday Snapshot is still in the Snapshot list, but the Thursday Snapshot is now missing.
You can also accomplish this task by specifying a single file or LUN. However, to make it happen quickly, the file or LUN must be removed first from the active file system. If it is not removed, the blocks for that file or LUN are already defined, so the storage system turns the request into a copy operation instead of an instantaneous revert. So single file SnapRestore (SFSR) becomes the same operation as copying the data from the Snapshot into the active file system.
12.2.4 Flexible restore
SnapRestore allows a customer to quickly restore an entire volume, a single file, or a LUN by simply having any of the available Snapshot images overwrite the existing data in the active file system. Using SnapRestore, you can roll back data to the instant a Snapshot was taken.
|
Attention: Rolling back in time, by restoring from a Snapshot, has the effect of wiping out any changes made to the volume after the Snapshot.
|
12.2.5 Additional benefits
SnapRestore includes these additional benefits:
•Simple, single-command operation: There is no special expertise required, so the chance of operator error is greatly reduced.
•File or full volume restore: You can choose to restore only specific files or the entire volume.
•Multiple recovery points: You can restore the most recent clean copy from any Snapshot.
•Unsurpassed reliability: SnapRestore is far more dependable than traditional data restoration methods.
•Fast restoration of databases: This function is especially useful when the recovery time of databases is critical.
•Reduced dependency on operator or administrator to make a file restore: The file owner can restore the file.
•There is quick recovery from virus attacks.
•SnapRestore is based on Snapshot technology.
•There is a possible reduction in dependency upon tape.
•There can be data recovery after a user error or application error.
12.3 SnapRestore operation
After you select a Snapshot for reversion, the IBM System Storage N series storage system restores the volume or file that contain the same data and time stamps as they did when the Snapshot was taken. As mentioned, all data that existed before the reversion is overwritten.
|
Important: You cannot undo a SnapRestore reversion to change the volume back to the state that it was in prior to the reversion.
|
12.3.1 What SnapRestore reverts
SnapRestore only reverts file contents. It does not revert attributes of a volume, such as the Snapshot schedule, volume option settings, RAID group size, and maximum number of files per volume.
However, option settings applicable to the entire storage system might be reverted, because the option settings are stored in a registry in the /etc directory on the root volume. If you revert the root volume, the registry is reverted to the version that was in use at Snapshot creation time.
You can revert a volume to a Snapshot taken when the storage system was running a different Data ONTAP version as well. Note, however, that doing so can cause problems because of version incompatibilities.
|
Important:
•You cannot revert a volume to recover a deleted Snapshot.
•After you revert a volume to a specific Snapshot, you will lose Snapshots that are more recent than the Snapshot used for the volume reversion.
|
12.3.2 Applying SnapRestore
SnapRestore is a data recovery facility available for IBM N series.
SnapRestore scenarios
SnapRestore can be used in the following scenarios:
•Disaster recovery
•Database corruption recovery
•Application testing, such as a development environment using large data files
If a client application corrupts data files in a volume, you can revert the volume to a Snapshot taken before the data corruption.
Prerequisites for using SnapRestore
The prerequisites for using SnapRestore are as follows:
•SnapRestore must be licensed on the system.
•There must be at least one Snapshot on the system that you select to revert.
•The volume to be reverted must be online and must not be a mirror that is used for data replication.
•The LUN must be unmounted before using SnapRestore to revert the volume containing the LUN or to revert a single file. SnapRestore of the LUN. For a single file SnapRestore, the LUN must also be offline.
|
Licensing:
•SnapRestore is a licensed feature and requires a license code. A SnapRestore license must be purchased and installed before Snapshots can be restored.
•Snapshots can be accessed as read only without buying the optional SnapRestore license. Then single files from within the Snapshot can be restored.
|
12.4 SnapRestore: Details of operation
In this section, we go into more detail about SnapRestore operation.
As shown in Figure 12-3, at time state 0, the first Snapshot is taken and it points to the 4 K blocks that are equivalent to those in the active file system. No additional space is used at this time by Snapshot 1 because modifications to the active file system blocks have not occurred.
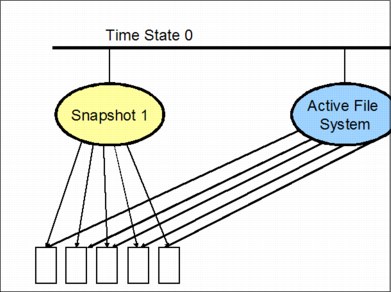
Figure 12-3 Snapshot 1
Some time goes by and new files are added with new blocks and modifications to files and their existing blocks are made, as shown in Figure 12-4. Snapshot 1 now points to blocks and the file system as it appeared in time state 0. Notice that one of the blocks, A1, has not been modified and is still part of the active file system.

Figure 12-4 Snapshot 2
Snapshot 2 reflects a Snapshot of file modifications and adds since time state 0. Notice that it still points to active file system blocks A1 and A2.
More time goes by and more files are added with new blocks, and modifications to files and their existing blocks are done, as shown in Figure 12-5. Snapshot 1 now points to blocks and the file system as it appeared in time state 0. Snapshot 2 reflects a Snapshot of file modifications and adds since time state 0. Snapshot 3 reflects modifications and adds since time state 1 and Snapshot 2. Note that Snapshot 1 no longer points to any Active file system blocks.

Figure 12-5 Snapshot 3
Snapshot 4, as shown in Figure 12-6, brings us to time state 3. It reflects adds or modifications of 4 K blocks. Notice that the first two Snapshots no longer reflect any of the active file system blocks.

Figure 12-6 Subsequent Snapshots
As shown in Figure 12-7, the customer has discovered that it has file system corruption due to a virus and must revert to the point-in-time Snapshot of time state 2 and Snapshot 3. The active file system becomes Snapshot 3. Blocks that were previously pointed to only by Snapshot 4 or the active file system are freed up for writes again. In addition, blocks that were pointed to only by Snapshot 4 and the previous active file system are also freed up again.

Figure 12-7 Reversion to Snapshot 3
In Figure 12-8, we compare time state 4 and the reversion to Snapshot 3 and time state 1, which reflects the active file system before Snapshot 3. As you can see, they are the same.
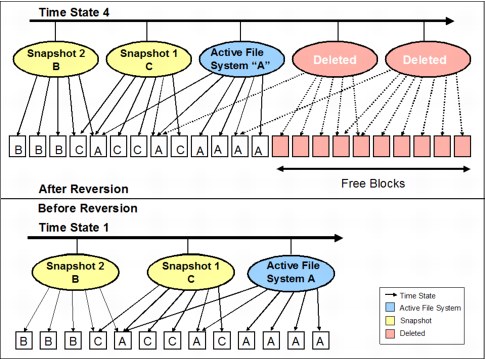
Figure 12-8 Comparison of reversion to Snapshot 3 time state 4 and active file system at time state 1
12.5 Examples
In this section, we cover common examples of using SnapRestore. IBM N series FilerView does not support restore of Snapshots, so we use the Data ONTAP Command Line Interface (CLI).
12.5.1 SnapRestore command syntax
The snap restore command’s syntax is as follows:
snap restore [ -f ] [ -t vol | file ] [ -s snap_shot_name ]
[ -r restore_as_new_path ] vol_name restore_from_path
This command reverts a volume to a specified Snapshot, or reverts a single file to a revision from a specified Snapshot.
The snap restore command is only available if your storage system has the SnapRestore license. If you do not specify a Snapshot, the IBM System Storage N series storage system prompts you for the Snapshot.
Before reverting the volume or file, the user must confirm the operation. The -f option suppresses this confirmation step.
If the -t option is specified, it must be followed by vol or file to indicate which type of SnapRestore is to performed.
A volume cannot have both a volume SnapRestore and a single file SnapRestore executing simultaneously. Multiple single file SnapRestores can be in progress simultaneously.
|
Considerations:
•Network File System (NFS) users need to unmount the files and directories in the volume before a reversion. If they do not unmount the files and directories, they might get a stale file handle error message after the volume reversion.
•For additional information about the snap restore command and its parameters, see the Data ONTAP 8.0 7-Mode Data Protection Online Backup and Recovery Guide, available at this website:
http://www.ibm.com/storage/support/nas
|
12.5.2 Considerations before performing SnapRestore
Consider the following items before performing SnapRestore:
•When the restore_as_path parameter is specified within the command syntax, the path must be a full path to a file name and must be in the same volume as the volume used for the restore.
•The volume used for restoring the file must be online and must not be a mirror.
•When the restore_as_path parameter is specified within the command syntax, the path must be a full path to a file name and must be in the same volume as the volume used for the restore.
•Files other than normal files and LUNs are not restored. This includes directories (and their contents), and files with NT streams.
•If there is not enough space in the volume, the single file SnapRestore will not start.
•If the file already exists (in the active file system), it will be overwritten with the version in the Snapshot.
•It can take up to several minutes for snap command output. During this time client exclusive oplocks are revoked and hard exclusive locks like the DOS compatibility lock are invalidated.
•After the snap command returns, the file restore will proceed in the background. During this time, any operation that tries to change the file will be suspended until the restore is done. Also, other single file SnapRestores can be executed.
•It is possible for the single file SnapRestore to be aborted if we run out of disk space during the operation. When it happens, the time stamp of the file being restored is updated. Thus, it will not be the same as the time stamp of the file in the Snapshot.
•An in-progress restore can be aborted by removing the file. For NFS users, the last link to the file must be removed.
•The Snapshot used for the restore cannot be deleted. New Snapshots cannot be created while a single file SnapRestore is in progress. Scheduled Snapshots on the volume will be suspended for the duration of the restore.
•Tree, user, and group quota limits are not enforced for the owner, group, and tree in which the file is being restored. Thus, if the user, group, or tree quotas are exceeded, /etc/quotas must be altered after the single file SnapRestore operation has completed. Then quota resize must be run.
•When the restore completes, the file’s attributes (size, permissions, ownership, and so on) must be identical to those in the Snapshot.
•If the system is halted or crashes while a single file SnapRestore is in progress, then the operation is restarted upon reboot.
12.5.3 The process for restoring data
There is no FilerView wizard to restore files. The volume used for restoring the file must be online and must not be a mirror.
Restoring data from the command line
We cover three methods of restoring data from the command line:
•Single file restore using SnapRestore
•Volume restore using SnapRestore
•FCP LUN restore using SnapRestore
•Mounting the .snapshot directory using UNIX and Windows clients
Listing Snapshots from the Data ONTAP CLI
Consider a situation where a CIFS-share, NFS-share, file, or LUN is recognized as being damaged and a SnapRestore from an existing Snapshot is being considered. Then we need to know which Snapshots exist, so that we can pick the right one to restore from.
Use the snap list command to check existing Snapshots for a given volume (Example 12-1).
Example 12-1 Snapshot listing
itsotuc1> snap list cifs_vol3
Volume cifs_vol3
working...
%/used %/total date name
---------- ---------- ------------ --------
0% ( 0%) 0% ( 0%) Mar 31 12:00 hourly.0
0% ( 0%) 0% ( 0%) Mar 31 08:00 hourly.1
0% ( 0%) 0% ( 0%) Mar 31 00:00 nightly.0
0% ( 0%) 0% ( 0%) Mar 30 12:00 hourly.2
0% ( 0%) 0% ( 0%) Mar 30 08:00 hourly.3
itsotuc1>
The Snapshot schedule is determined at creation of the volume. The default Snapshot schedule saves six hourly and two nightly Snapshots.
12.5.4 SnapRestore volume restore
The SnapRestore process for restoring an entire volume is as follows:
1. Open a command line interface on your IBM System Storage N series storage system.
2. Check which Snapshots exist for a given volume with the command: snap list <vol_name>
3. Restore the Snapshot to an online volume with the command: snap restore -t vol -s <snapshot_name> <vol_name>
Where:
-t vol specifies the volume name to revert.
-s <snapshot_name> specifies the name of the Snapshot copy from which to revert
<vol_name> is the name of the damaged volume to be reverted.
4. Verify the status of the restored volume with the command vol status <vol_name>.
5. After restoring the Snapshot, you might want to check the remaining Snapshots available for the volume using the snap list <vol_name>. All Snapshots more recent than the one to which we reverted do not exist any more.
SnapRestore volume restore considerations
|
Important: The volume must be online and must not be a mirror. If you are reverting the root volume, the IBM System Storage N series storage system will be rebooted.
Non-root volumes do not require a reboot. When reverting a non-root volume, all ongoing access to the volume must be terminated, just as it is done when a volume is brought offline. See the man page for the vol offline command for a description of circumstances that will prevent access to the volume from being terminated and thus prevent the volume from being reverted.
After the reversion, the volume is in the same state as it was when the Snapshot was taken.
|
|
Tip: When a volume containing LUNs is restored, the LUNs must be taken offline or be unmapped prior to recovery. Using SnapRestore on a volume that contains LUNs without stopping all host access to those LUNs can cause data corruption and system errors.
|
SnapRestore volume restore example
We use the following SnapRestore command to restore our damaged volume from a Snapshot:
snap restore -t vol -s hourly.2 cifs_vol3
Where:
-t vol specifies that we are restoring an entire volume.
-s hourly.2 specifies the Snapshot we are restoring from.
cifs_vol3 specifies the damaged volume we are restoring to.
-s hourly.2 specifies the Snapshot we are restoring from.
cifs_vol3 specifies the damaged volume we are restoring to.
In Example 12-2, we show the result the SnapRestore volume restore process where we revert our active volume from the hourly.2 Snapshot.
Example 12-2 SnapRestore process for restoring a volume
itsotuc1> date
Wed Mar 30 20:58:04 GMT 2011
itsotuc1> snap list cifs_vol3
Volume cifs_vol3
working...
%/used %/total date name
---------- ---------- ------------ --------
0% ( 0%) 0% ( 0%) Mar 30 20:00 hourly.0
20% (20%) 15% (15%) Mar 30 16:00 hourly.1
20% ( 0%) 15% ( 0%) Mar 30 12:00 hourly.2
20% ( 0%) 15% ( 0%) Mar 30 08:00 hourly.3
itsotuc1> snap restore -t vol -s hourly.2 cifs_vol3
WARNING! This will revert the volume to a previous Snapshot.
All modifications to the volume after the Snapshot will be
irrevocably lost.
Volume cifs_vol3 will be made restricted briefly before coming back online.
Are you sure you want to do this? y
You have selected volume cifs_vol3, Snapshot hourly.2
Proceed with revert? y
Share cifs_vol1_clone5 disabled while volume cifs_vol3 is offline.
Wed Mar 30 20:59:19 GMT [wafl.snaprestore.revert:notice]: Reverting volume cifs_vol3 to a previous Snapshot.
Share cifs_vol1_clone5 activated.
Wed Mar 30 20:59:19 GMT [cifs.shares.activated:info]: Activated 1 CIFS share on the volume cifs_vol3.
Volume cifs_vol3: revert successful.
itsotuc1> vol status cifs_vol3
Volume State Status Options
cifs_vol3 online raid_dp, flex create_ucode=on,
sis convert_ucode=on
Volume UUID: eb289e50-5c00-11e0-b9d8-00a098098a07
Containing aggregate: 'aggr1'
itsotuc1> snap list cifs_vol3
Volume cifs_vol3
working...
%/used %/total date name
---------- ---------- ------------ --------
0% ( 0%) 0% ( 0%) Mar 30 12:00 hourly.0
0% ( 0%) 0% ( 0%) Mar 30 08:00 hourly.1
itsotuc1>
|
Tip: After you revert the volume to the hourly.2 Snapshot, you no longer have access to more recent Snapshots, such as the hourly.0 and hourly.1 Snapshots. It is because, at the creation time of the hourly.2 Snapshot, the hourly.0 and hourly.1 Snapshots did not exist. Naming of the remaining Snapshots AFTER SnapRestore is also reverted.
|
12.5.5 SnapRestore single file restore
The SnapRestore process for restoring a lost or damaged file is as follows:
1. Open a command line interface on your IBM System Storage N series storage system.
2. Check which Snapshots exist for a given volume with the command:
snap list <vol_name>
3. Restore the Snapshot to an online volume with the command:
snap restore -t file -s <snapshot_name> -r <restore_as_new_path> <path_and_file_name>
Where:
-t file specifies that we are restoring a single file.
-s <snapshot_name> specifies the name of the Snapshot copy from which to revert.
-r <restore_as_new_path> is an optional new path to restore the file to.
<path_and_file_name> specifies the path and file we are restoring.
4. Verify the status of the restored file from the NFS-share.
SnapRestore single file restore example
In the situation described next, we need to restore a single file from a Snapshot. We choose not to mount the .snapshot directory of the volume, but to use SnapRestore for this purpose.
The file that we accidently lost is in use on an NFS-share where it has accidently been deleted. The file is called 13_SnapRestore_lab.doc and is located in the directory /mnt/archive /data1/Redbooks of our UNIX server. We know that the file exists in the Snapshot nfs_vol1_snap2 of our volume, which is called nfs_vol1.
We use the following SnapRestore command to restore our lost file volume from a Snapshot:
snap restore -t file -s nfs_vol1_snap2 /vol/nfs_vol1/data1/Redbooks/13_SnapRestore_lab.doc
Where:
-t file specifies that we are restoring a single file.
-s nfs_vol1_snap2 specifies the Snapshot that we are restoring from.
/vol/nfs_vol1/data1/Redbooks/13_SnapRestore_lab.doc specifies the file that we are restoring.
Example 12-3 shows how the NFS-share is missing the file 13_SnapRestore_lab.doc, which was accidently deleted. Before doing so, we mount the NFS-share.
Example 12-3 Mounting and checking the NFS-share where we lost a file (mount output modified for clarity)
[root@localhost ~]# mount -t nfs 9.11.218.114:/vol/nfs_vol1 /mnt/archive
[root@localhost Redbooks]# mount
9.11.218.114:/vol/nfs_vol1 on /mnt/archive type nfs (rw,addr=9.11.218.114)
[root@localhost Redbooks]# pwd
/mnt/archive/data1/Redbooks
[root@localhost Redbooks]# ls -l
total 8
-rw-r--r-- 1 root root 1112 Mar 31 10:50 11_FlexScale.doc
-rw-r--r-- 1 root root 293 Mar 31 10:50 12_FlexVol.doc
[root@localhost Redbooks#
Now we move to the N series Data ONTAP CLI where we perform SnapRestore.
Example 12-4 shows how we perform a SnapRestore command to retrieve the lost file from a Snapshot.
Example 12-4 SnapRestore is performed to retrieve the lost file
itsotuc1> snap list nfs_vol1
Volume nfs_vol1
working...
%/used %/total date name
---------- ---------- ------------ --------
7% ( 7%) 0% ( 0%) Mar 31 18:36 nfs_vol1_snap2
20% (15%) 0% ( 0%) Mar 31 17:57 nfs_vol1_snap1
47% (38%) 0% ( 0%) Mar 31 16:00 hourly.0
49% ( 7%) 0% ( 0%) Mar 31 12:00 hourly.1
51% ( 7%) 0% ( 0%) Mar 31 08:00 hourly.2
52% ( 7%) 0% ( 0%) Mar 31 00:00 nightly.0
itsotuc1> snap restore -t file -s nfs_vol1_snap2 /vol/nfs_vol1/data1/Redbooks/13_SnapRestore_lab.doc
WARNING! This will restore a file from a Snapshot into the active
filesystem. If the file already exists in the active filesystem,
it will be overwritten with the contents from the Snapshot.
Are you sure you want to do this? y
You have selected file /vol/nfs_vol1/data1/Redbooks/13_SnapRestore_lab.doc, Snapshot nfs_vol1_snap2
Proceed with restore? y
itsotuc1>
Example 12-5 shows how the lost file is now retrieved after Snaprestore on the lost file has been submitted.
Example 12-5 The lost file is now retrieved on our NFS share
[root@localhost Redbooks]# pwd
/mnt/archive/data1/Redbooks
[root@localhost Redbooks]s# ls -l
total 24
-rw-r--r-- 1 root root 1112 Mar 31 10:50 11_FlexScale.doc
-rw-r--r-- 1 root root 293 Mar 31 10:50 12_FlexVol.doc
-rw-r--r-- 1 root root 14100 Mar 31 10:50 13_SnapRestore_lab.doc
[root@localhost Redbooks#
We successfully retrieved our lost file using IBM N series SnapRestore technology.
|
Considerations:
•While SnapRestore is able to restore single files from a previously taken Snapshot, you cannot use SnapRestore for single file reversion on files with NT streams, or on directories.
•It means, for a Windows server with a CIFS-share, that ONLY single files in the root directory of the volume can be restored.
•For a UNIX-server with an NFS share, it means that single files can be restored from the root directory and subdirectories of the Snapshot, but not whole directories.
•Therefore it is more likely that server administrators will mount the .snapshot directory of a volume and retrieve the lost or damaged files from there.
•It is, however, not a SnapRestore function, but an integrated part of the Data ONTAP Snapshot technology.
•One case where SnapRestore single file restore does make up a very good tool, is when restoring LUNs, which, in terms of Data ONTAP, are single files and can be restored as single files.
|
Restoring a LUN with SnapRestore
Restoring an FCP-LUN is basically also just a SnapRestore single file restore. The resulting restore that takes place, is however, not just a single file, but an entire LUN with all its data and files in it. The filename we provide for LUNs being reverted with SnapRestore is the LUN-name, such as /vol/lun1/lun1.
Next, in Example 12-6, we show how to restore a LUN. The LUN must be offline before the SnapRestore action can take place, and the LUN must be manually taken online after the restore is finished.
Example 12-6 Reverting a LUN from a Snapshot
itsotuc1> snap restore -t file -s lun1-snap1 /vol/lun1/lun1
WARNING! This will restore a file from a snapshot into the active
filesystem. If the file already exists in the active filesystem,
it will be overwritten with the contents from the snapshot.
Are you sure you want to do this? y
You have selected file /vol/lun1/lun1, snapshot lun1-snap1
Proceed with restore? y
Thu Mar 31 22:20:55 GMT [lun.snaprestore.notice:notice]: [/vol/lun1/lun1, 43928771, 96, 18539483] SnapRestore: started
itsotuc1> Thu Mar 31 22:20:55 GMT [lun.snaprestore.notice:notice]: [/vol/lun1/lun1, 43928771, 96, 18539483] SnapRestore: completed
itsotuc1> lun online /vol/lun1/lun1
itsotuc1> lun show
/vol/lun1/lun1 1.0g (1077511680) (r/w, online, mapped)
itsotuc1>
12.5.6 Mounting the Snapshot directly from a server
In the event that a single file or a directory is lost and cannot be retrieved from a filesystem, Data ONTAP offers Snapshots from which data can be retrieved.
Mounting a Snapshot from a UNIX server with a NFS-share
In the following example, we demonstrate how to mount an existing Snapshot from a UNIX server with a NFS-share already mounted.
Example 12-7 shows the available Snapshots on our N series filer for the volume nfs_vol1.
Example 12-7 The available Snapshots
itsotuc1> snap list nfs_vol1
Volume nfs_vol1
working...
%/used %/total date name
---------- ---------- ------------ --------
7% ( 7%) 0% ( 0%) Mar 31 20:00 hourly.0
16% (11%) 0% ( 0%) Mar 31 18:36 nfs_vol1_snap2
27% (15%) 0% ( 0%) Mar 31 17:57 nfs_vol1_snap1
50% (38%) 0% ( 0%) Mar 31 16:00 hourly.1
52% ( 7%) 0% ( 0%) Mar 31 12:00 hourly.2
53% ( 7%) 0% ( 0%) Mar 31 08:00 hourly.3
55% ( 7%) 0% ( 0%) Mar 31 00:00 nightly.0
itsotuc1>
Example 12-8 shows a UNIX server where the mount command without parameters lists all mounted filesystems. We have an NFS-share to an N series NAS device mounted on /mnt/archive.
Example 12-8 Existing mounted filesystems on the server
[root@localhost ~]# mount
/dev/mapper/VolGroup00-LogVol00 on / type ext3 (rw)
proc on /proc type proc (rw)
sysfs on /sys type sysfs (rw)
devpts on /dev/pts type devpts (rw,gid=5,mode=620)
/dev/sda1 on /boot type ext3 (rw)
tmpfs on /dev/shm type tmpfs (rw)
none on /proc/sys/fs/binfmt_misc type binfmt_misc (rw)
sunrpc on /var/lib/nfs/rpc_pipefs type rpc_pipefs (rw)
9.11.218.114:/vol/nfs_vol1 on /mnt/archive type nfs (rw,addr=9.11.218.114)
[root@localhost ~]#
Example 12-9 shows how we mount the N series Snapshot to the filer and list files in the .snapshot directory.
Example 12-9 mounting the .snapshot and listing files (mount output modified for clarity)
[root@localhost ~]# mount -t nfs 9.11.218.114:/vol/nfs_vol1/.snapshot /mnt/archive/snapshot
[root@localhost ~]# mount
9.11.218.114:/vol/nfs_vol1 on /mnt/archive type nfs (rw,addr=9.11.218.114)
9.11.218.114:/vol/nfs_vol1/.snapshot on /mnt/archive/snapshot type nfs (rw,addr=9.11.218.114)
[root@localhost Redbooks]# cd /mnt/archive/.snapshot
[root@localhost .snapshot]# ls -l
total 28
drwxr-xr-x 5 root root 4096 Mar 31 11:09 hourly.0
drwxr-xr-x 4 root root 4096 Mar 29 09:29 hourly.1
drwxr-xr-x 4 root root 4096 Mar 29 09:29 hourly.2
drwxr-xr-x 4 root root 4096 Mar 29 09:29 hourly.3
drwxr-xr-x 4 root root 4096 Mar 31 10:50 nfs_vol1_snap1
drwxr-xr-x 5 root root 4096 Mar 31 11:09 nfs_vol1_snap2
drwxr-xr-x 4 root root 4096 Mar 29 09:29 nightly.0
[root@localhost .snapshot]#
From this point, we can change directory down into all available Snapshots, and copy files or directories out of the Snapshots.
Mounting a Snapshot from a Windows server with a CIFS-share
In the following example, we demonstrate how to mount an existing Snapshot from a Windows server with a CIFS-share already mounted.
Figure 12-9 shows how a system currently connected to the CIFS-share \9.11.218.114cifs_vol3 now also connects to the .snapshot directory of the cifs_vol3 volume. From the server, click Start → Run and type \9.11.218.114cifs_vol3.snapshot then press Enter.

Figure 12-9 mounting to the .snapshot directory
Figure 12-10 shows how Windows Explorer opens the .snapshot directory on the cifs_vol3 volume on the N series filer.

Figure 12-10 Windows Explorer opens the .snapshot directory
From here, all Snapshots and datafiles, or whole directories within them, can be copied out of the Snapshot.
12.6 SnapRestore for databases
SnapRestore for databases provides a unique solution to database recovery, rather than restoring large amounts of data from backup tape,
12.6.1 SnapRestore for databases overview
SnapRestore for databases uses this easy procedure:
1. It reverts the entire volume back in time to its state when the Snapshot was taken.
2. It allows the playing of change logs forward to complete the recovery.
This procedure effectively protects data without expensive mirroring or replication. Use SnapRestore where the time to copy data from either a Snapshot or tape into the active file system is prohibitive.
12.6.2 SnapRestore for databases scenario
In this scenario, an Oracle database is damaged and SnapRestore is used to restore it, as described here:
•There is a 550 GB Oracle database that requires recovery.
•An Ultrium tape drive can reach up to 140 MBps with 6 Gbps SAS interface connectivity.
•A normal recovery takes about 1.5 hours plus the log replay time.
•SnapRestore reverts the volume to the same state as when backup was taken, which takes 3 minutes.
•Total recovery using SnapRestore takes 3 minutes plus the log replay time.
|
Tip: A single use of SnapRestore can pay for the storage system in terms of cost of downtime for the enterprise.
|
Figure 12-11 shows a typical software testing scenario without using SnapRestore.
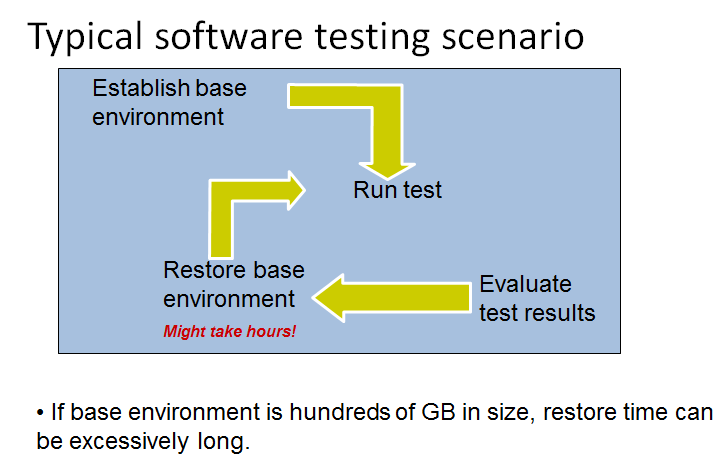
Figure 12-11 Software testing scenario
Figure 12-12 shows a testing scenario using SnapRestore.

Figure 12-12 Testing using SnapRestore
..................Content has been hidden....................
You can't read the all page of ebook, please click here login for view all page.